Minolta Dimage Scan Multi PRO
A Review by Peter Wolff

Minoltahas updated their multi-format scanner again, this time to theMinolta Dimage Scan Multi Pro. This scanner is competing with theNikon 8000 EDand thePolaroid 120and, of course, theImaconscanners, although they are still in a different league. I’ve been reading many reviews and comments on these scanners in order to decide which one to buy. I finally settled for the Minolta for a number of reasons, including price and image quality.
Technical Data
The Multi Pro is a multi-format scanner (as the name implies). It can scan 35mm and medium format up to 6×9. Other formats like 16mm film and APS can be scanned using optional film-holders. The resolution is 4800 DPI optical for 35mm and 3200 DPI optical for medium format. A good combination of very high resolution on the small format and a bit less resolution on the bigger format. It’s a true 16 bit scanner, which means that it can deliver 16 bits for each color as output. Other scanners can do this also, but the Minolta is scanning with 16 bits internally also, whereas the competitors (Nikon, Polaroid and Imacon) are scanning with 14 bits. This should give a better DMax. The advertising material says a DMax of 4.8 (which simply is Log10(2^16), see www.scantips.comfor more details on this subject), while the manual says 4.2 tested value. This scanner includes theICE 3technologies from Applied Science Fictionand it offers support for dust removing, grain removing and color restoration.
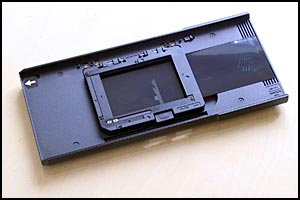
The Hardware
The Multi Pro is a rather small scanner, at least compared to Nikon and Polaroid. The scanner is seen here next to a Nikon F90x.
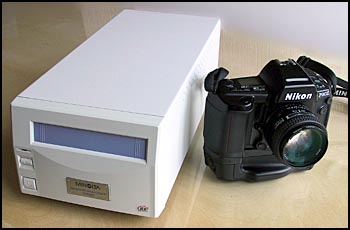
As it can be seen it will easily fit on almost any desk. There are only two buttons on the front; a power button and an eject button. On the back you’ll find connections forSCSIas well asFirewire. The film holders are very easy to use and they have a rather rugged design using hard plastic. You don’t get the feeling that you can break these holders easily. Film holders for 35mm strips, 35mm mounted slides and 120 film (max. 6×9) are part of the standard package.
The Film Holders:
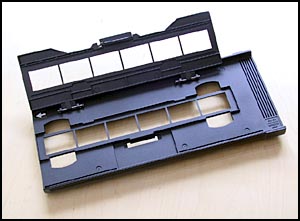
The 35mm strip and slide holders.
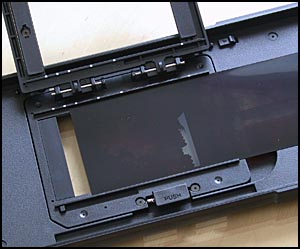
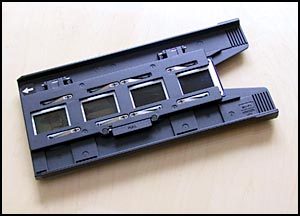
The 120 film strip holder.
As it can be seen, the 120 film holder can easily hold 3 frames of 6×6 without any clipping needed. The holder shown above is the glassless holder, but for curled film there is a glass holder with anti-Newton ring glass.
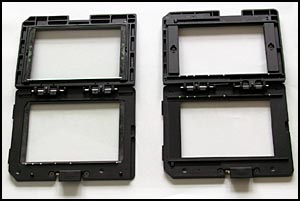
The 120 film glass holder on the left and the glassless holder on the right. These are inserts that fit into the larger holder seen above. I try to keep my slides very flat and I haven’t needed the glass holder yet.
All in all the hardware seems to be of good build-quality.
Installation
I’m usingWindows 98 SEand therefore I have to use the SCSI connection, since Minolta does not provide drivers for theFirewireconnection onWindows98. No SCSI or Firewire card was provided, so I had to buy a SCSI controller card. The Minolta web site suggests someAdapteccards that can be used, but I took a chance and bought a very inexpensive card calledACARD AEC-6710Sfor about $30. The installation of the card went without any problems and so did installation of the scanner software. The scanner was found first time from the TWAIN software used viaPhotoShop, and I made my first scan within minutes from starting out. I’m running Windows98 SE on a Pentium III 866MHz with 512Mb RAM.
The Software
Before going into details regarding the software I must say that it has never crashed or "misbehaved" in any way yet, so it seems as stable as the hardware. However, having said that I must say that the software seems a bit simpler that you would expect. But for scanning slides is works well and you will get correct colors. The software is build around a few main sections called "Index", "Prescan" and"Image Correction". TheIndexsection will scan all 35mm films that are in the holder, be it the strip holder or the slide holder.
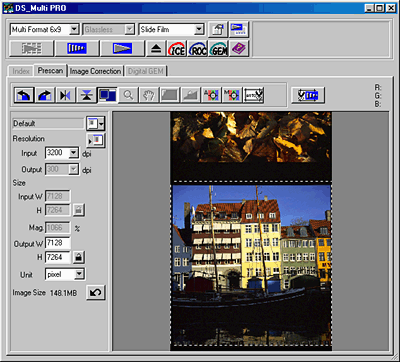
In thePrescansection you can scan one of the frames or the entire frame if its 120 film. You can then crop and re-focus the pre-scan if needed. Focus can be set manually or to automatic. The auto-focus is very good, however it will always focus at one given (by the user) place on the frame, and if the film is just a bit curled you might like to focus manually on one spot.
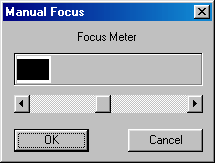
The manual focus on the preview scan is made very easy‚ you simply have to align two bars (white and black) to the maximum size you can get.
TheImage Correctionsection is where you can alter levels, brightness and contrast and you can make variations in colors, etc. I will not go into this section, simply because I don’t use it‚ I prefer to alter these things in Photoshop.
So far I have used theICEdust-removal function for 35mm film only, but it can also be used for medium format and the results are pretty amazing. After using ICE you only have to spot the image for larger dust areas which ICE can not handle.
You can select many color spaces as output for the scans.
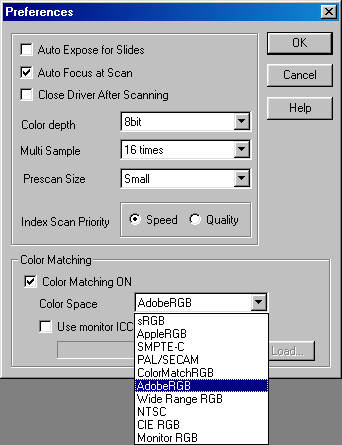
You simply set the desired color space in the preferences dialog.
The Scans
Until recently I used theEpson 1640SU Photoflatbed scanner for scanning medium format slides. Needless to say, the Minolta is a great step foreward, and these two scanners are difficult to compare. But from what I’ve seen on the Internet, the Minolta performs very well compared to the other scanners in the same league.
Below you will find my own tests. Since I only have the Epson scans to compare with, I will make the test in a rather unconventional way. I can compare the scans to those from the Epson and I can show grain, which you can compare to scans you might have. This section might therefore be more a comparison of a flatbed scanner versus a film scanner than a real test of the Minolta. The software reproduces colors correctly on slides, but unfortunately not on (all) negatives.
Medium Format Slides
Scanning grain on Velvia is no problem. Below you’ll see the Minolta compared to the Epson 1640SU Photo, which does a pretty good job considering its low price. However the Epson scan is of course noisy and has a much lower "real" resolution. The examples here are from medium format slides scanned at 3200dpi.
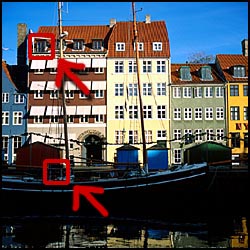
The enlarged areas below are from this full-frame 6×6Fuji Velviatransparency.


Minolta Dimage Scan Multi Pro at 3200dpi Epson 1640SU Photo at 3200dpi


Minolta Dimage Scan Multi Pro at 3200dpi Epson 1640SU Photo at 3200dpi
Both images have been brightened to reveal shadow details. Noise and banding is visible in the Minolta scan, but the Epson scan is rather useless. It might seem that this scanner is very noisy, but please remember that this is a very dark Velvia slide and noise can always be reduced using multi-sampling which this scanner also offers. This can be set in software to OFF, 2, 4, 8 or 16 samples. Below you’ll see the same image with 16x multisampling.
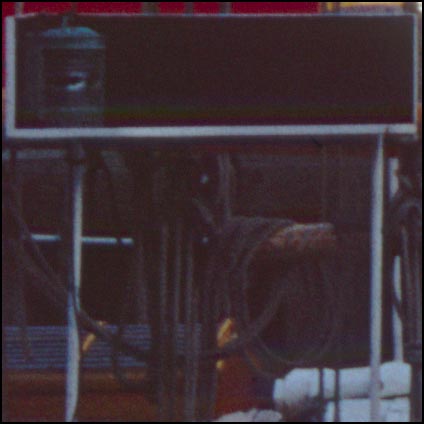
Now noise is almost gone and more shadow details are visible. A bit of banding can still be seen though (the image is still heavily brightened.
Another example below is grain in aProvia 100Fsky.

35mm Slides
When scanning 35mm you get 4800dpi optical resolution‚ quite a lot (90MB in 8bit!), and I think you can see from the example below that just about all the detail available on the film been has extracted from. Anyway, grain is very visible.
Fuji Superia

These frames are Actual Pixel size, No enhancements or changes are made after the scan, other than changing the color space from Adobe RGB to sRGB.
Negatives
Scanning negatives is not recommended with this software. Unfortunately the Minolta software can not really reproduce correct colors from (some) negatives. I have only testedFuji RealaandKodak Goldfilms. The Fuji films where acceptable, but the colors on the Kodak negatives where way off. However, it seems that the rather inexpensiveVueScansoftware can be used for scanning negatives. I will post a separate review of this problem and how to solve it.
What Else?
The real resolution of the interpolated 4800 DPI on medium format has been discussed a bit on the net. Minolta says that interpolation is done in the "main scanning direction"‚ this sounds as though it might be a bit better than actual interpolation. I will look at this in a later test. How about B&W negatives? I’ve heard about problems, so I’ll test this later also.
Conclusion
Minolta has created a scanner that delivers very high resolution scans and of apparently professional quality. The price of this device is low enough for enthusiastic amateurs to buy it. It’s lighter and smaller than the obvious competitors (Nikon 8000ED, Polaroid 120), and‚ at least in Europe‚ a bit cheaper as well. Some even claims that the scans are better than the competitors (some even think the scans are better than Imacon, but I doubt it), but there are also some that says it’s a bit inferior to the others. Bottom line is that all of the scanners in this league are probably good, and this scanner is definitely a revolution for enthusiastic amateur medium-format photographers.
Links
To get a more complete view of what this scanner is capable of‚ and to get a second opinion‚ you should follow some of the links below. You can also read my article about medium format scannershere.
ï Imaging Resource
ï Ken Rockwell
ï SAPhoto (Minolta Dimage Scan Multi Pro, Imacon Flextight Precision II, LeafScan 45)
ï SAPhoto (Scanning negatives)
You could also simply go out and buy it. Here are some European sources.
ï CyberPhoto (SE)
ï Digital4U (DK)
ï DigitalFirst (UK)
![]()
Peter has publishedan addendumto his review in which he compares medium format scans at both 3200 and 4800 dpi. This article is located on Peter’s own site.
Copyright‚© 2002Peter Wolff.
All rights reserved.
About Peter Wolff
Until recently I earned my living as a computer programmer, but have had a passion for photography for many years.When I saw how the digital world of computers were mixing with photography, I decided to devote more time on this passion. My primary interests are medium format, high quality scans and of course inkjet printers.
Peter Wolff
Copenhagen, Denmark
[email protected]
http://www.photographical.net
![]() TheHS-P1multi-format film holder for theMinolta Dimage Multiis reviewed byDavid Mantripp
TheHS-P1multi-format film holder for theMinolta Dimage Multiis reviewed byDavid Mantripp
A discussion regarding this review and issues pertaining to
its software can be foundhere.
If you enjoyed this article, as well as the hundreds of other tutorials, features,
reviews and essays on this site, you can support its continued growth
and discover an exciting new photographic resource by …


Elevate Your Vision


Read this story and all the best stories on The Luminous Landscape
The author has made this story available to Luminous Landscape members only. Upgrade to get instant access to this story and other benefits available only to members.
Why choose us?
Luminous-Landscape is a membership site. Our website contains over 5300 articles on almost every topic, camera, lens and printer you can imagine. Our membership model is simple, just $2 a month ($24.00 USD a year). This $24 gains you access to a wealth of information including all our past and future video tutorials on such topics as Lightroom, Capture One, Printing, file management and dozens of interviews and travel videos.
- New Articles every few days
- All original content found nowhere else on the web
- No Pop Up Google Sense ads – Our advertisers are photo related
- Download/stream video to any device
- NEW videos monthly
- Top well-known photographer contributors
- Posts from industry leaders
- Speciality Photography Workshops
- Mobile device scalable
- Exclusive video interviews
- Special vendor offers for members
- Hands On Product reviews
- FREE – User Forum. One of the most read user forums on the internet
- Access to our community Buy and Sell pages; for members only.
You may also like