Customize (= Processing)
Let’s dive in with some processing, step-by-step. Upon opening a file in Customize (as easy as double clicking the thumbnail in Photo Library), PL9 automatically does whatever it’s told to do by the Preset selected by the user under Settings > General. I prefer to start with something as neutral as possible, which appears to be “DxO Optical Corrections only”. DxO knows their lens corrections, so I don’t mind leaving that up to them.
From a processing perspective, I treat each raw file as a digital negative, a processing blank slate. Choosing any of the other Presets in the drop down list will apply differing amounts of a variety of edits. I would rather build the processing myself to match the vision I had for the scene or subject, but the option is there for whatever users prefer.
Once the photo is open in Customize, it is easy enough for users to change the preset by selecting the Presets button in the top right.
Note 1: Selecting a new Preset wipes out any edits done up to that point and applies the values in the Preset.
Note 2: If (when) you become mired in edits and feel you’re going around in circles, there is a Reset button up beside the Presets button. I’ve made good use of it over the past few weeks of learning the app. Another alternative is to make a Virtual Copy (Yes! PL9 has VCs!!) before starting over.
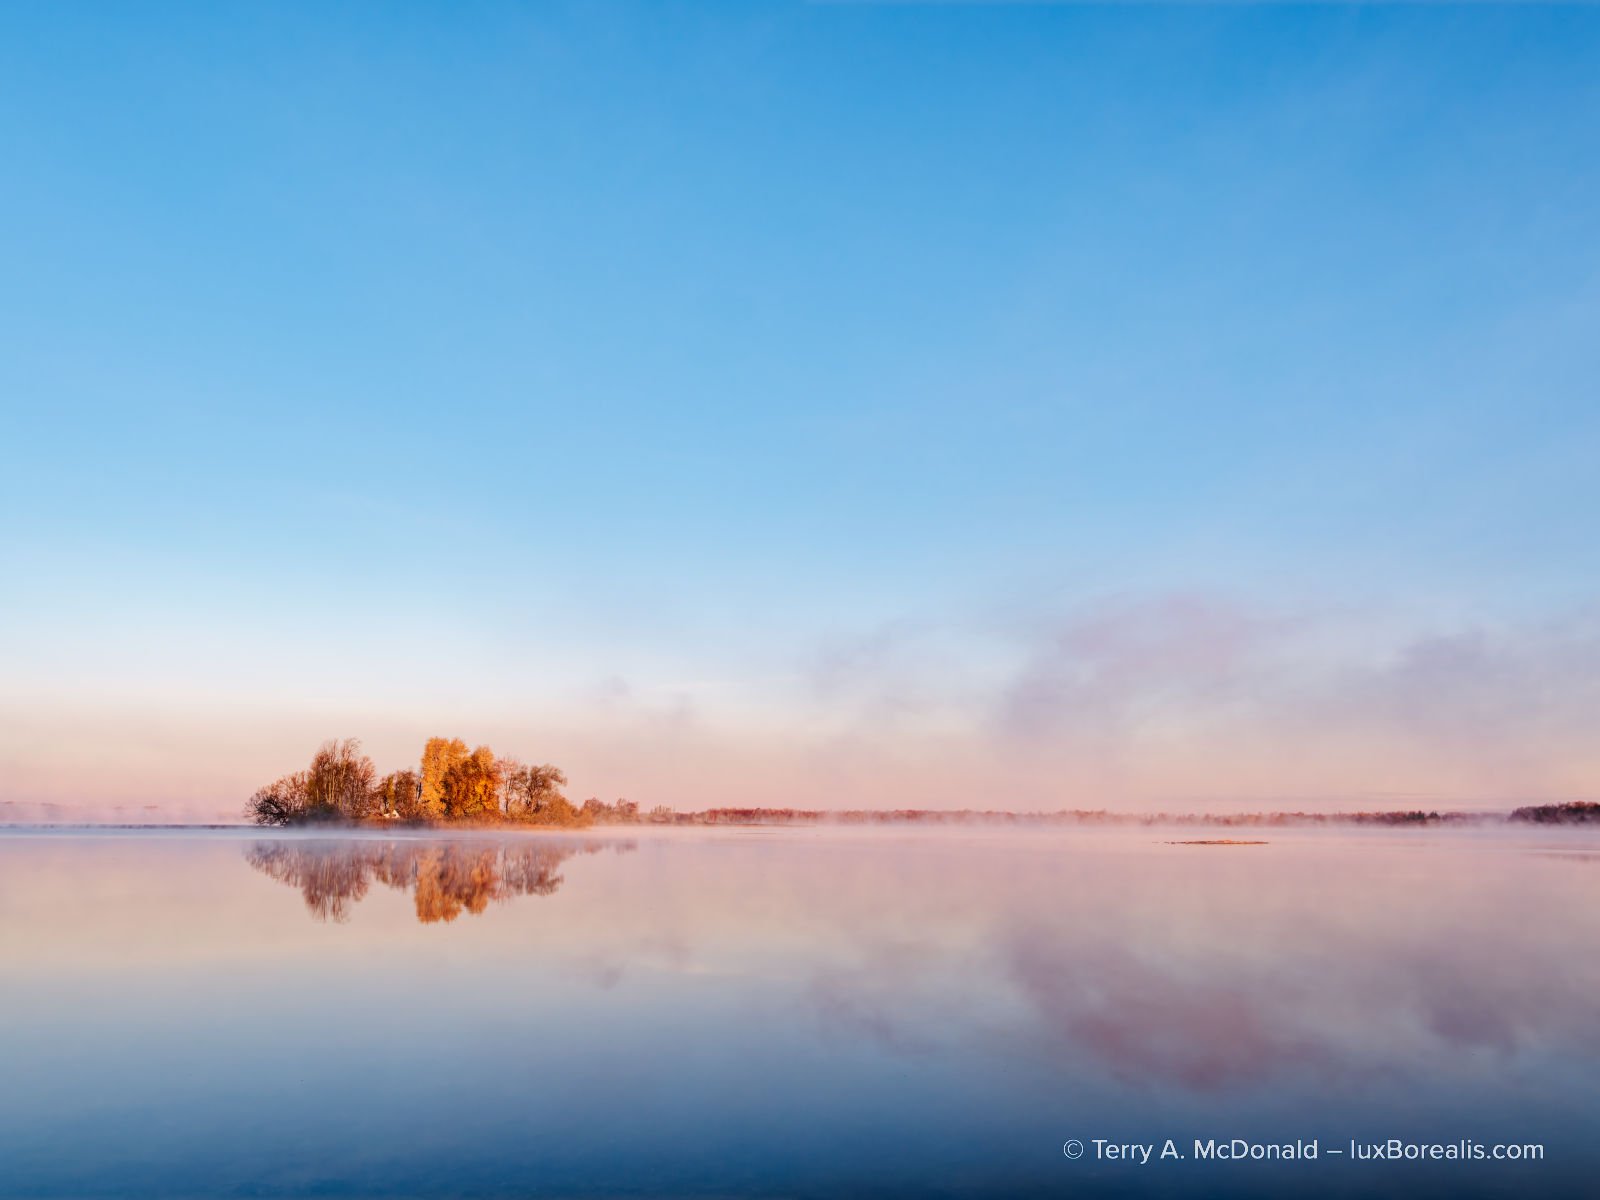
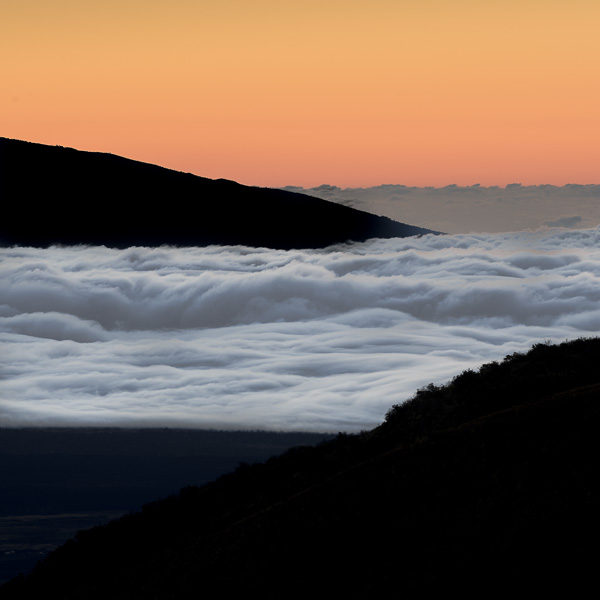
OM-1 | 15mm (30mm efov) | ƒ5.6 @ 1/800 | ISO 800 | HHHR | PhotoLab 9 Once again I was able to successfully match the image to the editing achieved in Lr.
OoO
There appears to be an on-going debate regarding the order of operations (OoO) for processing images: there IS an optimal order versus there IS NOT an optimal order. This is perhaps the biggest divide between Adobe and DxO. I’ll begin with some history . . .
Years ago, Lr was re-designed with a specific order in mind, as indicated by the order of operations as they appeared in the Basic palette of the Develop module: Exposure-Contrast-Highlights-Shadows-Whites-Blacks, each being pegged to a specific section of the tonal scale, as represented by the histogram. Adobe also recommended moving from top to bottom in LrC Develop panel. In fact, this order cannot be changed.
With the number of recent new functions within Lr, as of 2025 Adobe has published this list for Lightroom Desktop and Adobe Camera Raw stating:
“The best order of Develop operations to avoid unexpected results and achieve the best output is as follows:
- Denoise, Raw Details, Super Resolution
- Reflections Removal
- Distracting People Removal
- Generative Expand (Currently available only in Adobe Camera Raw as Tech Preview)
- Generative Remove, Content-Aware Remove, Heal, and Clone
- Lens Blur
- Lens Profile
- Crop and Transform
- Adaptive Profiles
- Global Adjustments
- Masking”
Adobe then offers this ‘Tip’:
“Note: The recommended workflow is to avoid applying Clarity, Highlights, Shadows, Dehaze, Whites, and Blacks, until after healing. Other tools that can be used initially, if desired (before healing) without adverse effects are Exposure, Contrast, Parametric, and point curves.”
What they are saying is that there is an optimal OoO: do the heavy-lifting first, the denoise, healing, and blurring, all the AI intensive edits. This is interesting for two reasons: (1) it shows there is also some latitude in the process order; and (2) the recommended order is opposite to PhotoLab9.
PL9 leans towards leaving the resource-intense operations to later in the workflow. At least, that’s the suggestion, based on button arrangement from left to right at the top of the Customize panel, with the less intense processes to the left. As I began processing, the reasons for this order became apparent: with lower-resource-intensity edits first (Light and Colour), there is less lag before the high-intensity processes of denoising and masks.
Given the ability to drag-and-drop palettes in any order, it seems DxO supports the idea of complete freedom for a user to adopt any order of operations. But is this the case? So far, despite scouring the Help Centre, searching ’best order of processing’ and ’processing order of operations’ plus checking various forums, I’ve not found anything official from DxO about OoO. The general consensus is the same as what I found and is supported by a couple of blog posts from 2022 by BeforeAfterAndOtheStuff.com and ChrisWright.photography, who place Local Adjustments (masks) towards the end (though they differ on Detail).
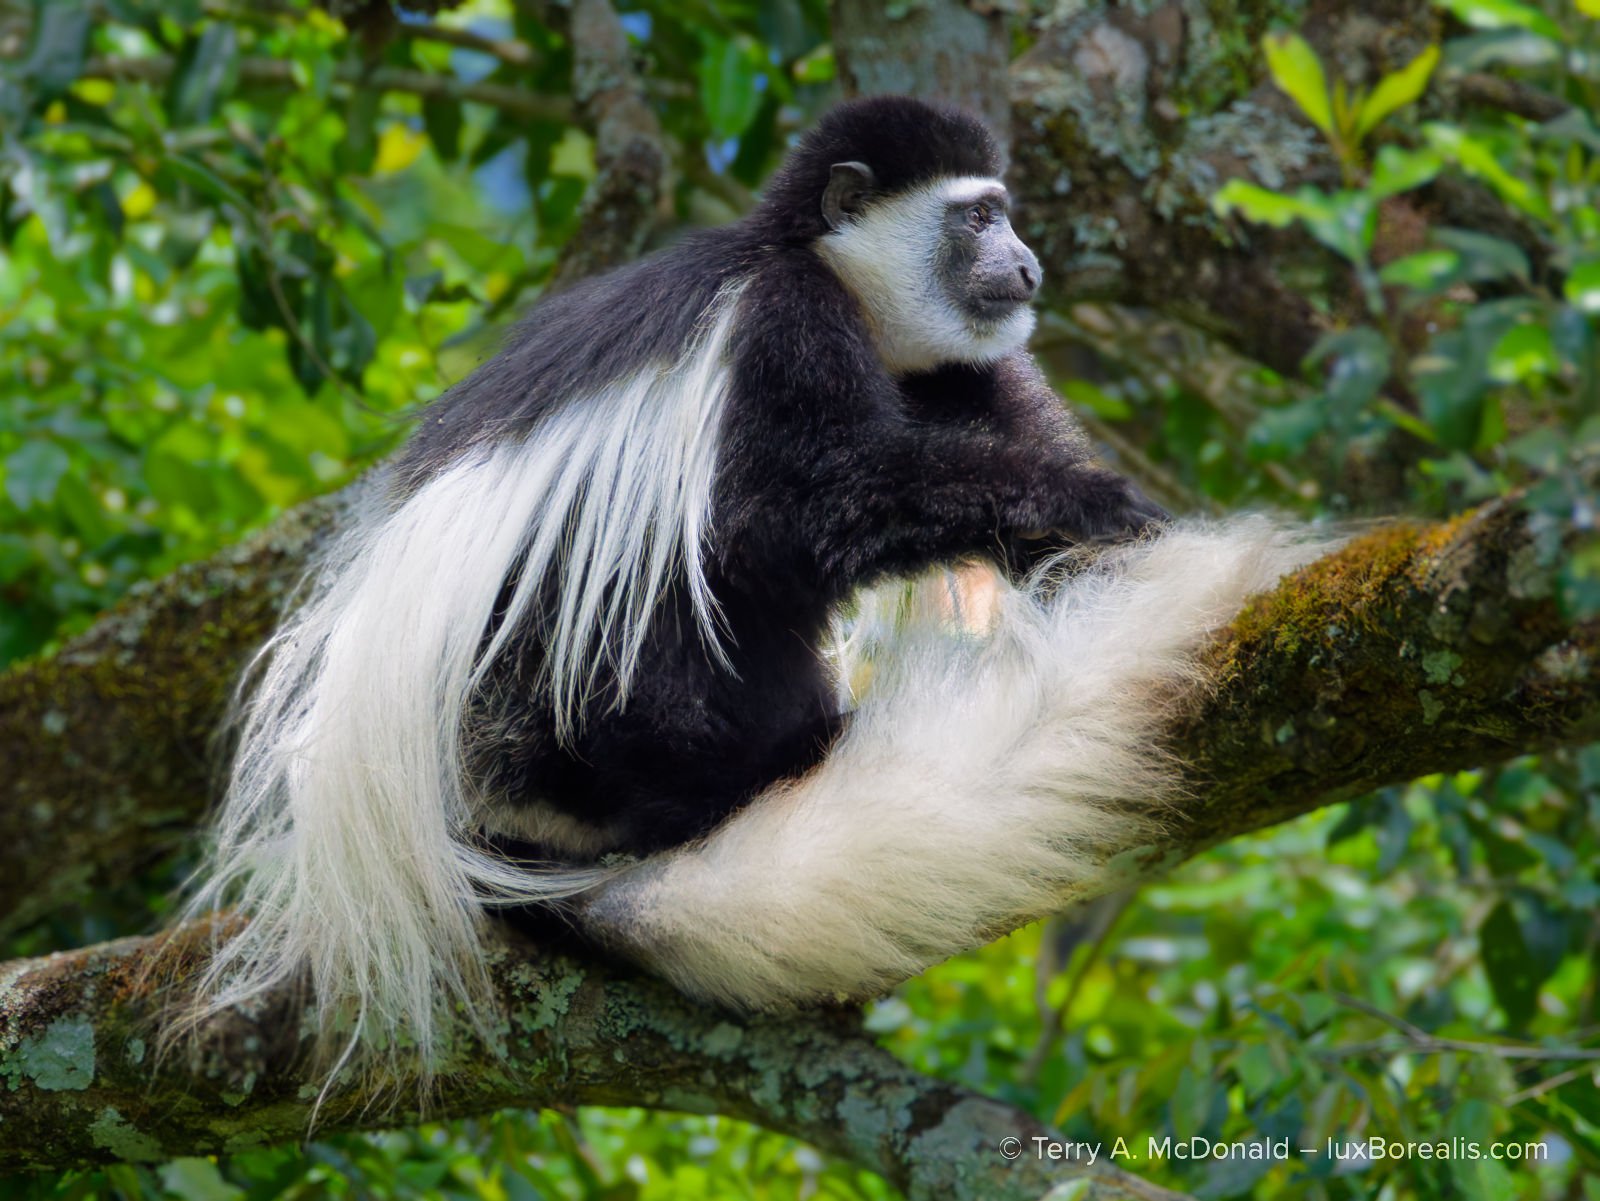
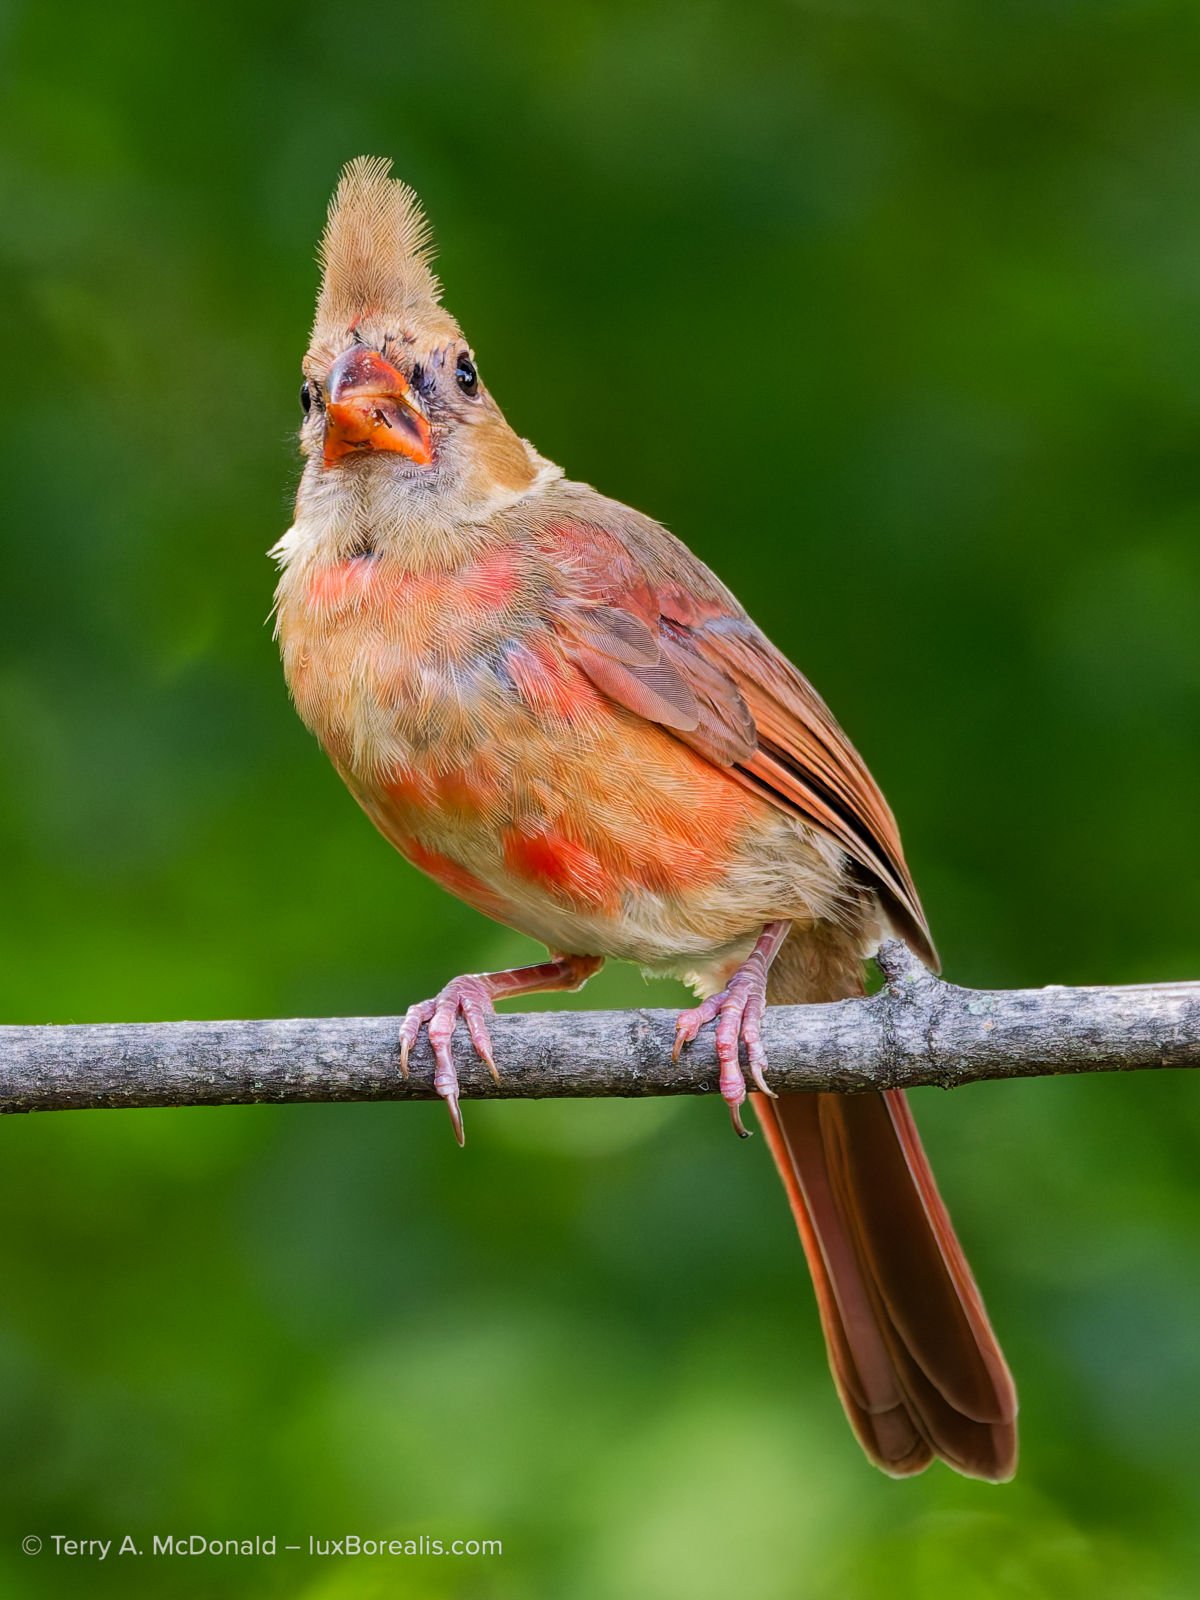
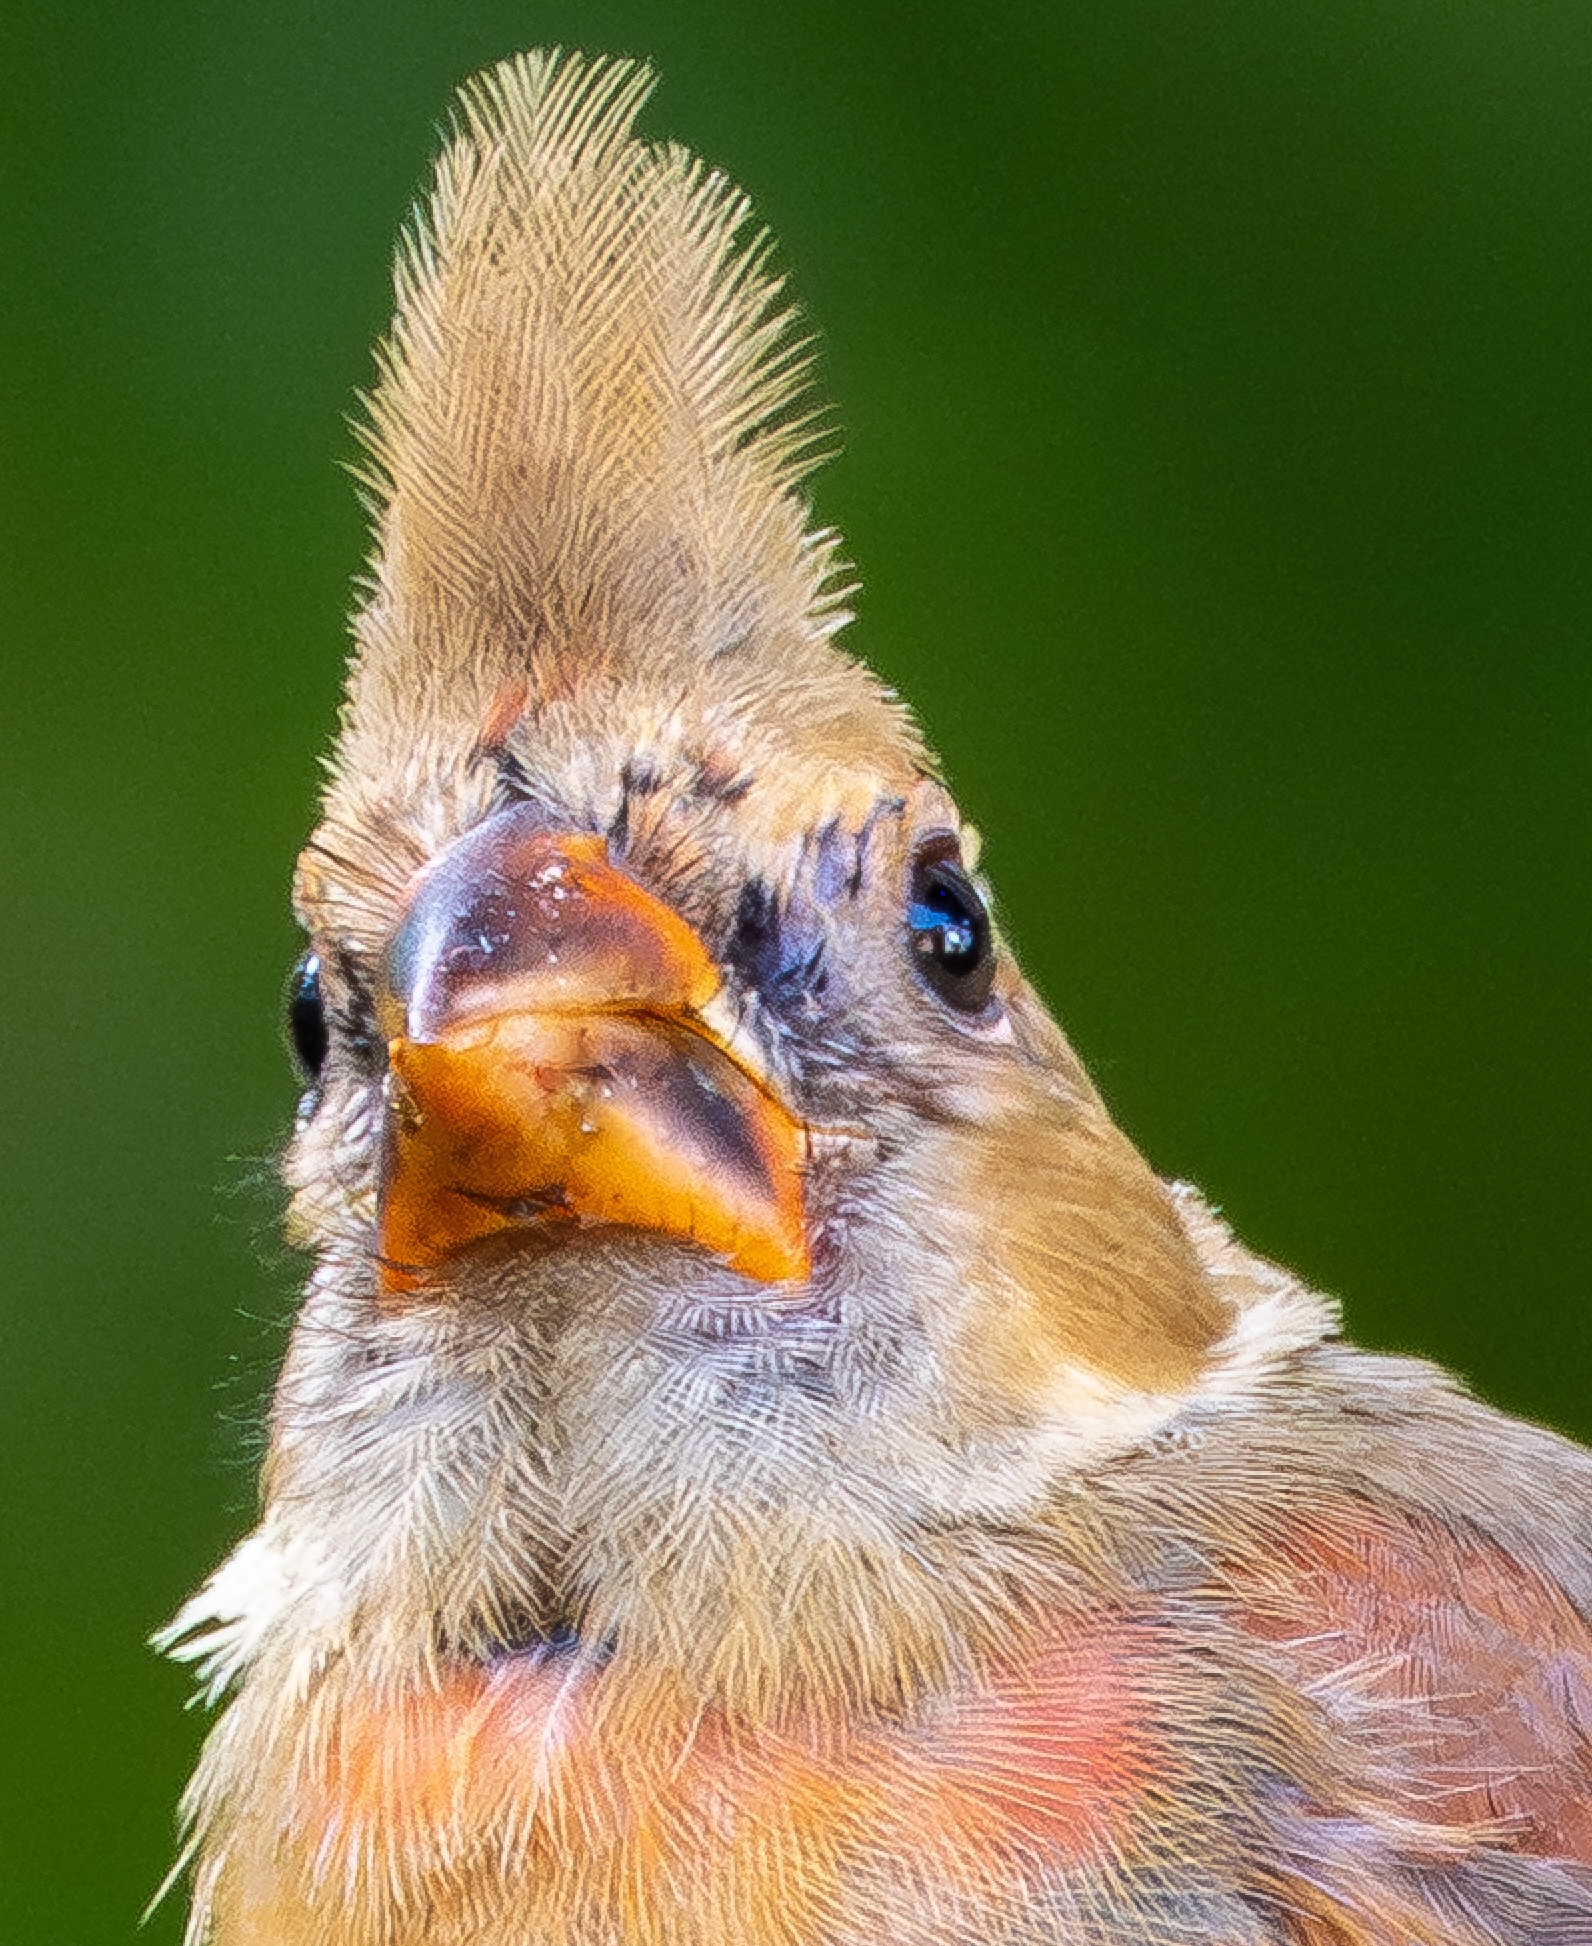
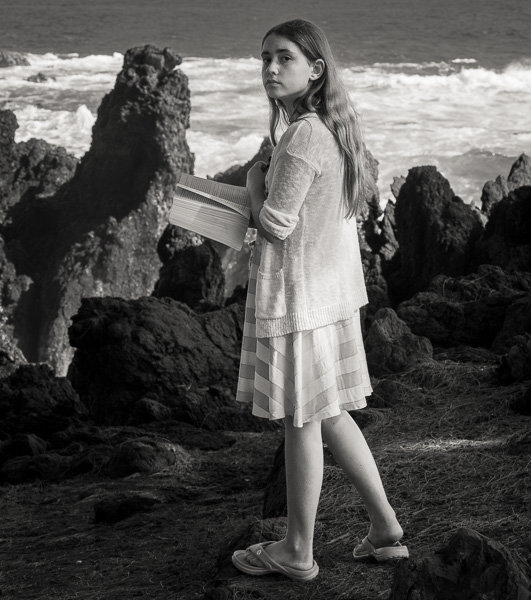
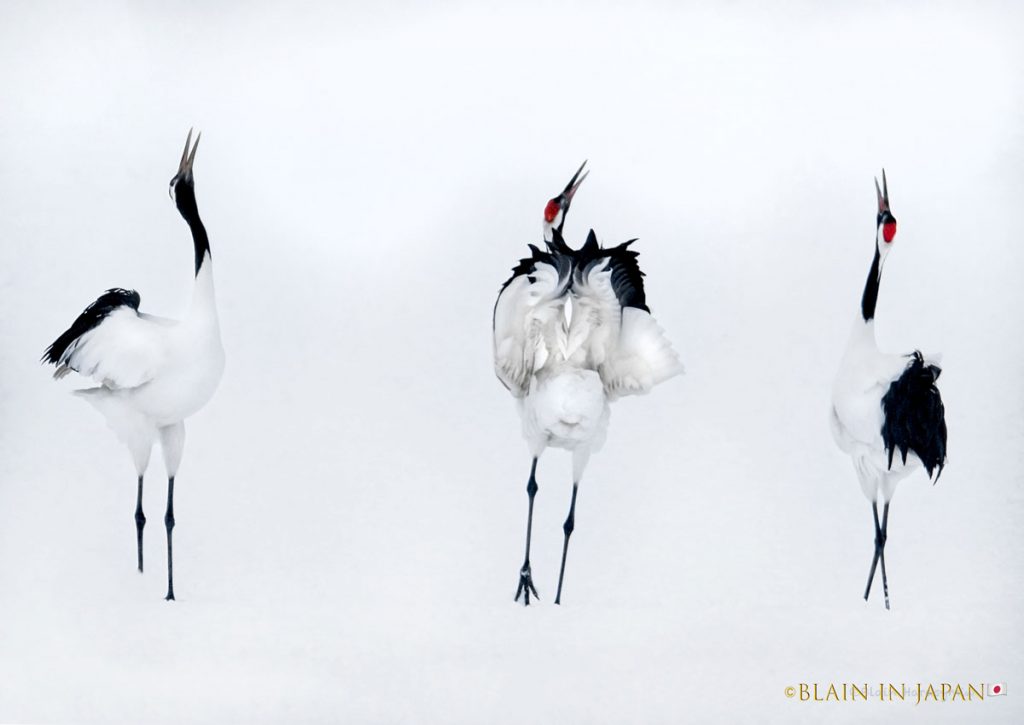
OM-1 | 381mm (762mm efov) | ƒ11 @ 1/250 | ISO1600 | PhotoLab 9
The precision of the Subject AI mask amazed me. It accurately picked up every stray hair and was almost perfect at ignoring any twigs. Furthermore, the blur tool for part of the background is very natural-looking. The only additional mask I would have used is the Radial Gradient mask, which is not available in PL9.
Lag Time
Unfortunately, I didn’t pay attention to the PL9 left-to-right OoO and followed my Lightroom instincts by diving right into Detail, using DeepPRIME-XD/XDs. I was greeted with a ’Correction Preview’ lag of a couple of seconds. From that point on, every time I changed a value and hit return, I needed to wait for rendering. It was like waiting for test strips to develop in a darkroom; I thought we were past that!
No need to tell you how alarming this was, as there was no lag with either version of Lightroom when performing the same edits under identical conditions on laptop or iPad.
Am I just nitpicking here, belly-aching because I can’t have things my way? No. Should I just pony up for a new laptop and stop complaining? No. With both versions of Lr, all changes, small and large, are live as I make them. Intuitive, seamless editing without waiting to view results is not too much to ask for in 2025. And according to the DxO Forums, I’m not the only one. There is significant chatter about the lagginess, especially when denoise and AI masks are used. Funny how this does not come up in any of the many promotional reviews circulating around the web.
So I got looking and researching. Under Detail, I changed Denoise back to Standard hoping things might speed up. They did. Slightly. There was still a Correction Preview lag before the changes were live again. As suggested online, one way of decreasing lag is to open Settings and toggle off both ”Enable high quality previews” and ”Enable DeepPRIME rendering”. The lag was cut to only a second or so, but there is still a lag and now I’m looking at a rough image, not a finished one.
For processing, I’m using a 16” M1 MacBookPro with 16 GB of RAM. I have no issues with LrD or LrC keeping up with me. Even LrM on the iPad has no lag. Every change I make is immediate and, as I adjust sliders, I can watch the changes in real time. They are live, happening right in front of me. This is how digital editing should be, but it was not the case with PL9. I also experienced delays when switching zoom levels,.
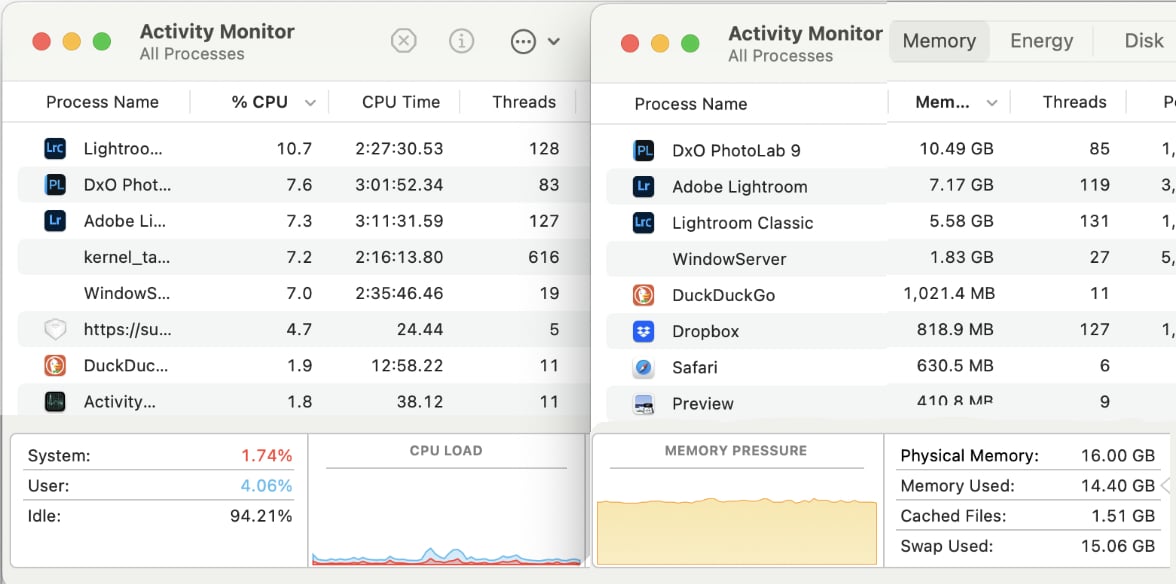
An M1 MBP is no slouch and before you suggest my MBP is ’underpowered’ or I’m ’only’ using 16 GB of RAM, it’s important to note that I am running LrC, LrD, PL9, two web browsers, Notes, Preview and mirroring my phone—all at the same time—and lag times are only an issue with PL9, not with either version of Lr. I’m not sure if the sluggishness is due to a lack of resources or if it is the way the app was designed. According to Activity Monitor, DxO PL9 does not appear to be a resource hog. Either way, it is an impediment to smooth and intuitive editing.
Lag Solutions
PL9 lag times have been reduced (but not eliminated) by: (1) restarting my computer; (2) keeping PL9 ‘fresh’ by closing it periodically and re-opening it; and (3) minimizing other open apps. I could push the cache limit up past 1000MB, but even it isn’t maxed out. Despite the refreshing and minimizing, there is still a “Correction Preview” lag of a few seconds when opening a photo processed previously. It seems PL9 needs time to apply the various adjustments I made. This does not happen with Lr. The photo is live the moment it is opened, even after Denoising. I’m guessing, but the extra speed may come from Lr creating and using screen-sized Previews, rather than opening the original file every time and applying the processing steps from the XMP sidecar file. I can’t be certain, but perhaps this is another advantage of employing a closed database versus an open file browser.
In the end, users will adopt a specific workflow based on what works for them, whether they use PL or Lr. It’s not wrong to dive into Denoise first, but be aware that you may encounter increased issues of lag time.
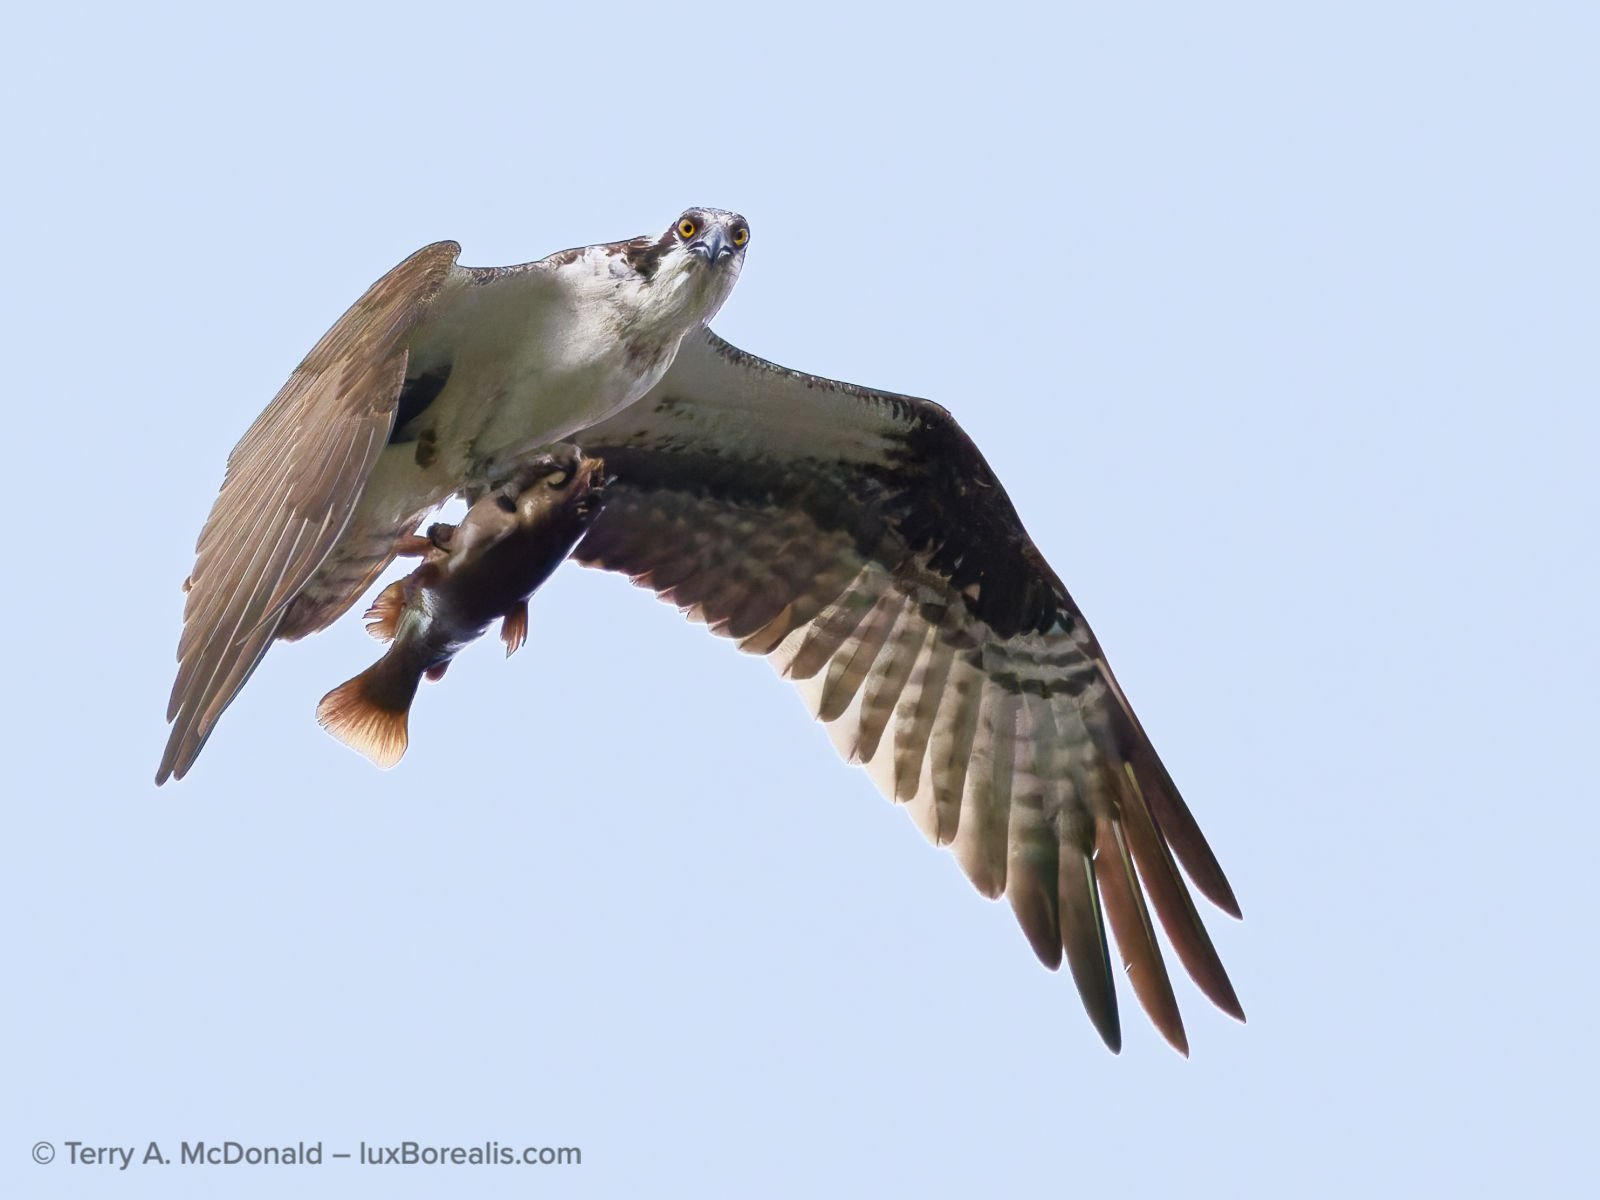
OM-1 | 400mm (800mm efov) | ƒ8 @ 1/20000 | ISO3200 | PhotoLab 9
PhotoLab 9 handled this difficult shot superbly, though not without significant lag with every change—even when re-naming masks! It was a difficult grab shot with the osprey heavily under-exposed against a very bright morning sky. I treated it as two photos, masking the osprey and the sky separately, the performing edits for tone and colour on each.
Light: Exposure and Tone Control
Exposure and Selective Tone controls are the heart of creating lively tones in an image. With Lr, each of Exposure, Highlights, Shadows, Whites and Blacks operate somewhat independently on different parts of the histogram/tonal range. A change in Shadows will alter the mid-tones and blacks, but only slightly, with the bulk of the changes happening between the two and virtually no change happening in the highlights. I remember when this was introduced in Lightroom years ago—it revolutionized how we balanced tones. The Shadows adjustment, for example, allowed us to pull out details that were otherwise muddy, leaving the Black Point untouched.
I am also seeing this with PL9, though perhaps not to the same extent. There appears to be more overlap of the tones each slider is changing. Also, without a dedicated Whites adjustment, as there is in Lr, I’m finding it more difficult to control highlights. There doesn’t appear to be the same nuanced ability to create more highlight separation, without having to resort to masks.
Furthermore, PL9 does not have the Auto White Point and Auto Black Point feature found in Lr. When working with full-tone images (those that include everything from pure white through to pure black), it is helpful to have the app automatically find the brightest pixel(s) and make it pure white, then do the same for the darkest pixel(s), making ittiitt pure black. This sets each end of the tonal spectrum and allows me to work with the tones between those two points, taking the guess-work out of a fairly routine requirement when editing full-tone images, landscape photos in particular. I’m sorry to see this is not available in PL9.
SmartLighting and ClearView Plus

DxO’s proprietary SmartLighting and ClearView Plus adjustments are an interesting addition. They seem to act similarly to Clarity and DeHaze and can be quite effective in separating the muddy mid-tones and shadows. SmartLighting can be further enhanced by using the Spot-Weighted tool. I know Tom Stirr over at SmallSensorPhotography.com swears by SmartLighting, in particular the Spot-Weighted feature.
Colour
The first difference I noticed is that I could not select ProPhotoRGB as my colour space for processing. PL9 uses DxO Wide Gamut for colour space—one I wasn’t familiar with until I did a bit of research. Though different from what Adobe users are familiar with, it turns out to be a thoughtful choice. DxO knows what they are doing and say it’s ”An intelligent compromise”. DxO Wide Gamut is wider than AdobeRGB, covers the visual spectrum of what we see, but is not as large as ProPhotoRGB. Thanks to ChrisWhite.photography for shedding some light on this.
Denoise-Demosaic-Sharpen
OM-1 | 400mm (800mm efov) | ƒ8 @ 1/320 | ISO 6400 | PhotoLab 9 This is a 2400×3212 vertical crop of the original ORF, and it is absolutely clean and absolutely sharp. There is no indication this was made by a M43 camera, a testament to the excellence of DxO’s demosaic, denoise and sharpening algorithms.
This is where PL9 should shine. And it does—once the user figures out that ”DeepPRIME rendering” must be toggled ON in the Settings. Silly me, until I did this, I couldn’t figure out why the rendering looked like crap. There was even a “Correction Preview” lag, so I thought it was rendering. Nope. Newbie mistake. But in my defence, DxO PureRAW, which I’ve used for a year now, does not have the same requirement. Rendering is live from the moment you open the app. Oh well; lesson learned. But remember, live rendering = lag time.
It’s an interesting model and, for comparison sake, it’s one that is the opposite of Lightroom. Lr does the rendering when Denoise is selected, taking about the same time as PL9, but once it’s done, it’s done. No further lags due to rendering. Adjustments can then be made with the slider and, of course, with Detail Sharpening, but when scrolling around the photo, to check out different parts of it, there is no lag in Lr as there is, at times, with PL9. If DxO could sort out this lag, then they would truly have a winner with PL9.
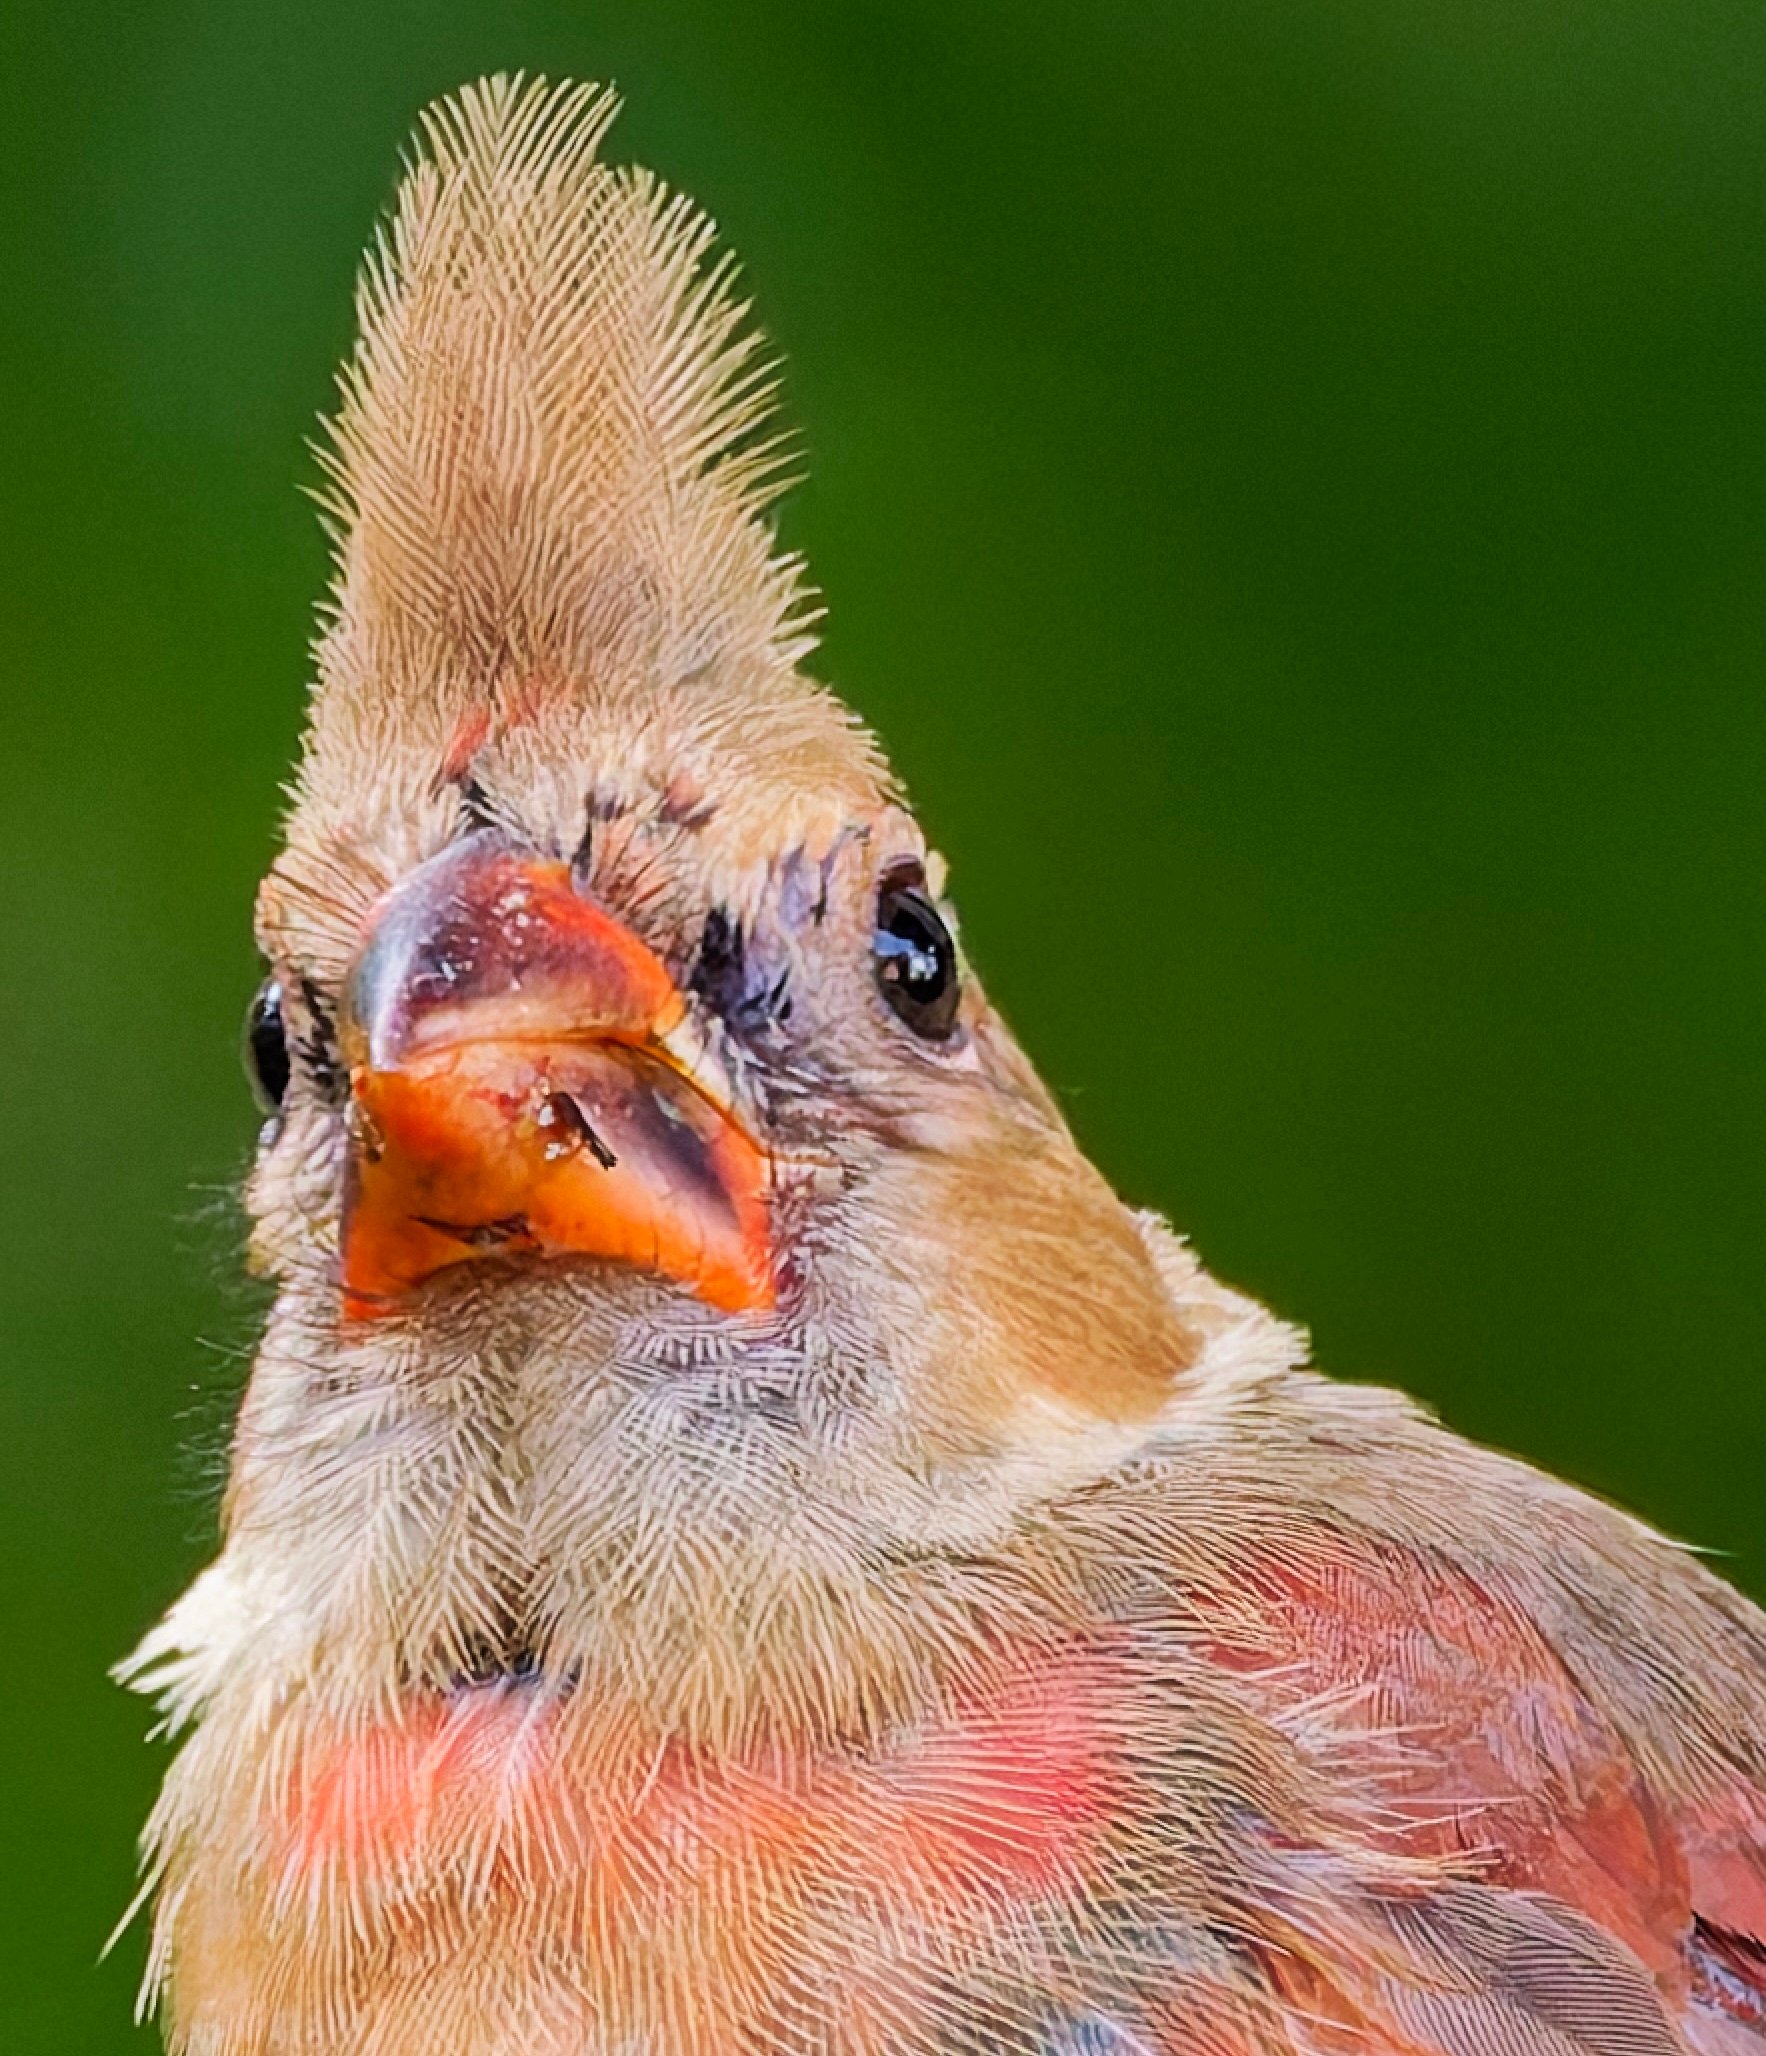
Left: PL9 – At 200%, every barb of every feather is distinct and the background is smooth.
Right: The Lightroom version of the same ISO 6400 image shows equally good detail and smoothness, but without the artefact on the beak.
PL9 has accounted for this with their Loupe tool (S on the keyboard). First, turn off denoise in Settings. Then, in the Detail palette, select the type of denoise you want. The Loupe tool can then be used to provide a 100% view of what the denoising will do when the file is exported without adding lag time with every adjustment.
With that behind me, I could begin my comparisons. As I said above, this is where PhotoLab really shines. DxO has superb rendering engines and algorithms producing smooth where smooth should be and detail where detail should be. The default rendering is excellent. Tweaking the balance of smoothness and detail is done with the Luminance and Force Details adjustments; higher Luminance = smoother tones; more Force Details—well, you get the picture. Further sharpening is applied via the Lens Correction tool.
Interestingly, and something that demands pointing out, is the artefact that was introduced on ‘Junior’s’ bill. It looks like an insect or a seed husk, and it is clearly not there in the original. It’s easy enough to retouch out, but it seems like an odd thing to be added, especially when denoise is supposed to use internal generative AI, using only pixels from the actual image, not third-party pixels. Where did the artifact originate?
ReTouch Tool (N) (Detail palette)
PL9’s ReTouch tool is very straightforward to use and very accurate. It chooses appropriate source areas and is just the click of a button away (or tap the N key). As well, with the stroke selected, it can be switched between Repair and Clone. Even better, it will ‘borrow’ from pixels outside the cropped area; something Lr does not do. Perhaps its best feature, and another not found in Lr, is the ability to Transform the source area by changing its shape and rotation–very helpful, especially for difficult-to-retouch areas.
A nice addition would be seeing live views of how ReTouch changes as the user drags the source area to a new location. It would mean not having to wait for the render to occur only to discover it needs to nudge further. Lr provides this live view of the source area and how it affects the destination.
Changing the size of the brush (Cmd+Touchpad Up/Down) and the feathering using Shift+Touchpad Up or Down is also very helpful, a feature PL9 shares with Lr, though with Lr, it is a matter of pinching the touchpad to make the brush larger or smaller; i.e. no keys are involved.
Despite the excellent options available in PL9, I note two options missing compared to Lr:
- The PL9 ReTouch brush has only two options: Repair and Clone. There is no Healing brush equivalent. Healing is helpful for softening edges, particularly around areas that have been cloned when there is no perfect source to draw from.
- With Lr, users can Cmd/Ctrl-click-and-hold to choose the source area for cloning. This is a significant time-saver from having to wait for PL9 to make its choice then changing it to a more appropriate set of pixels, and the associated lag time for both.
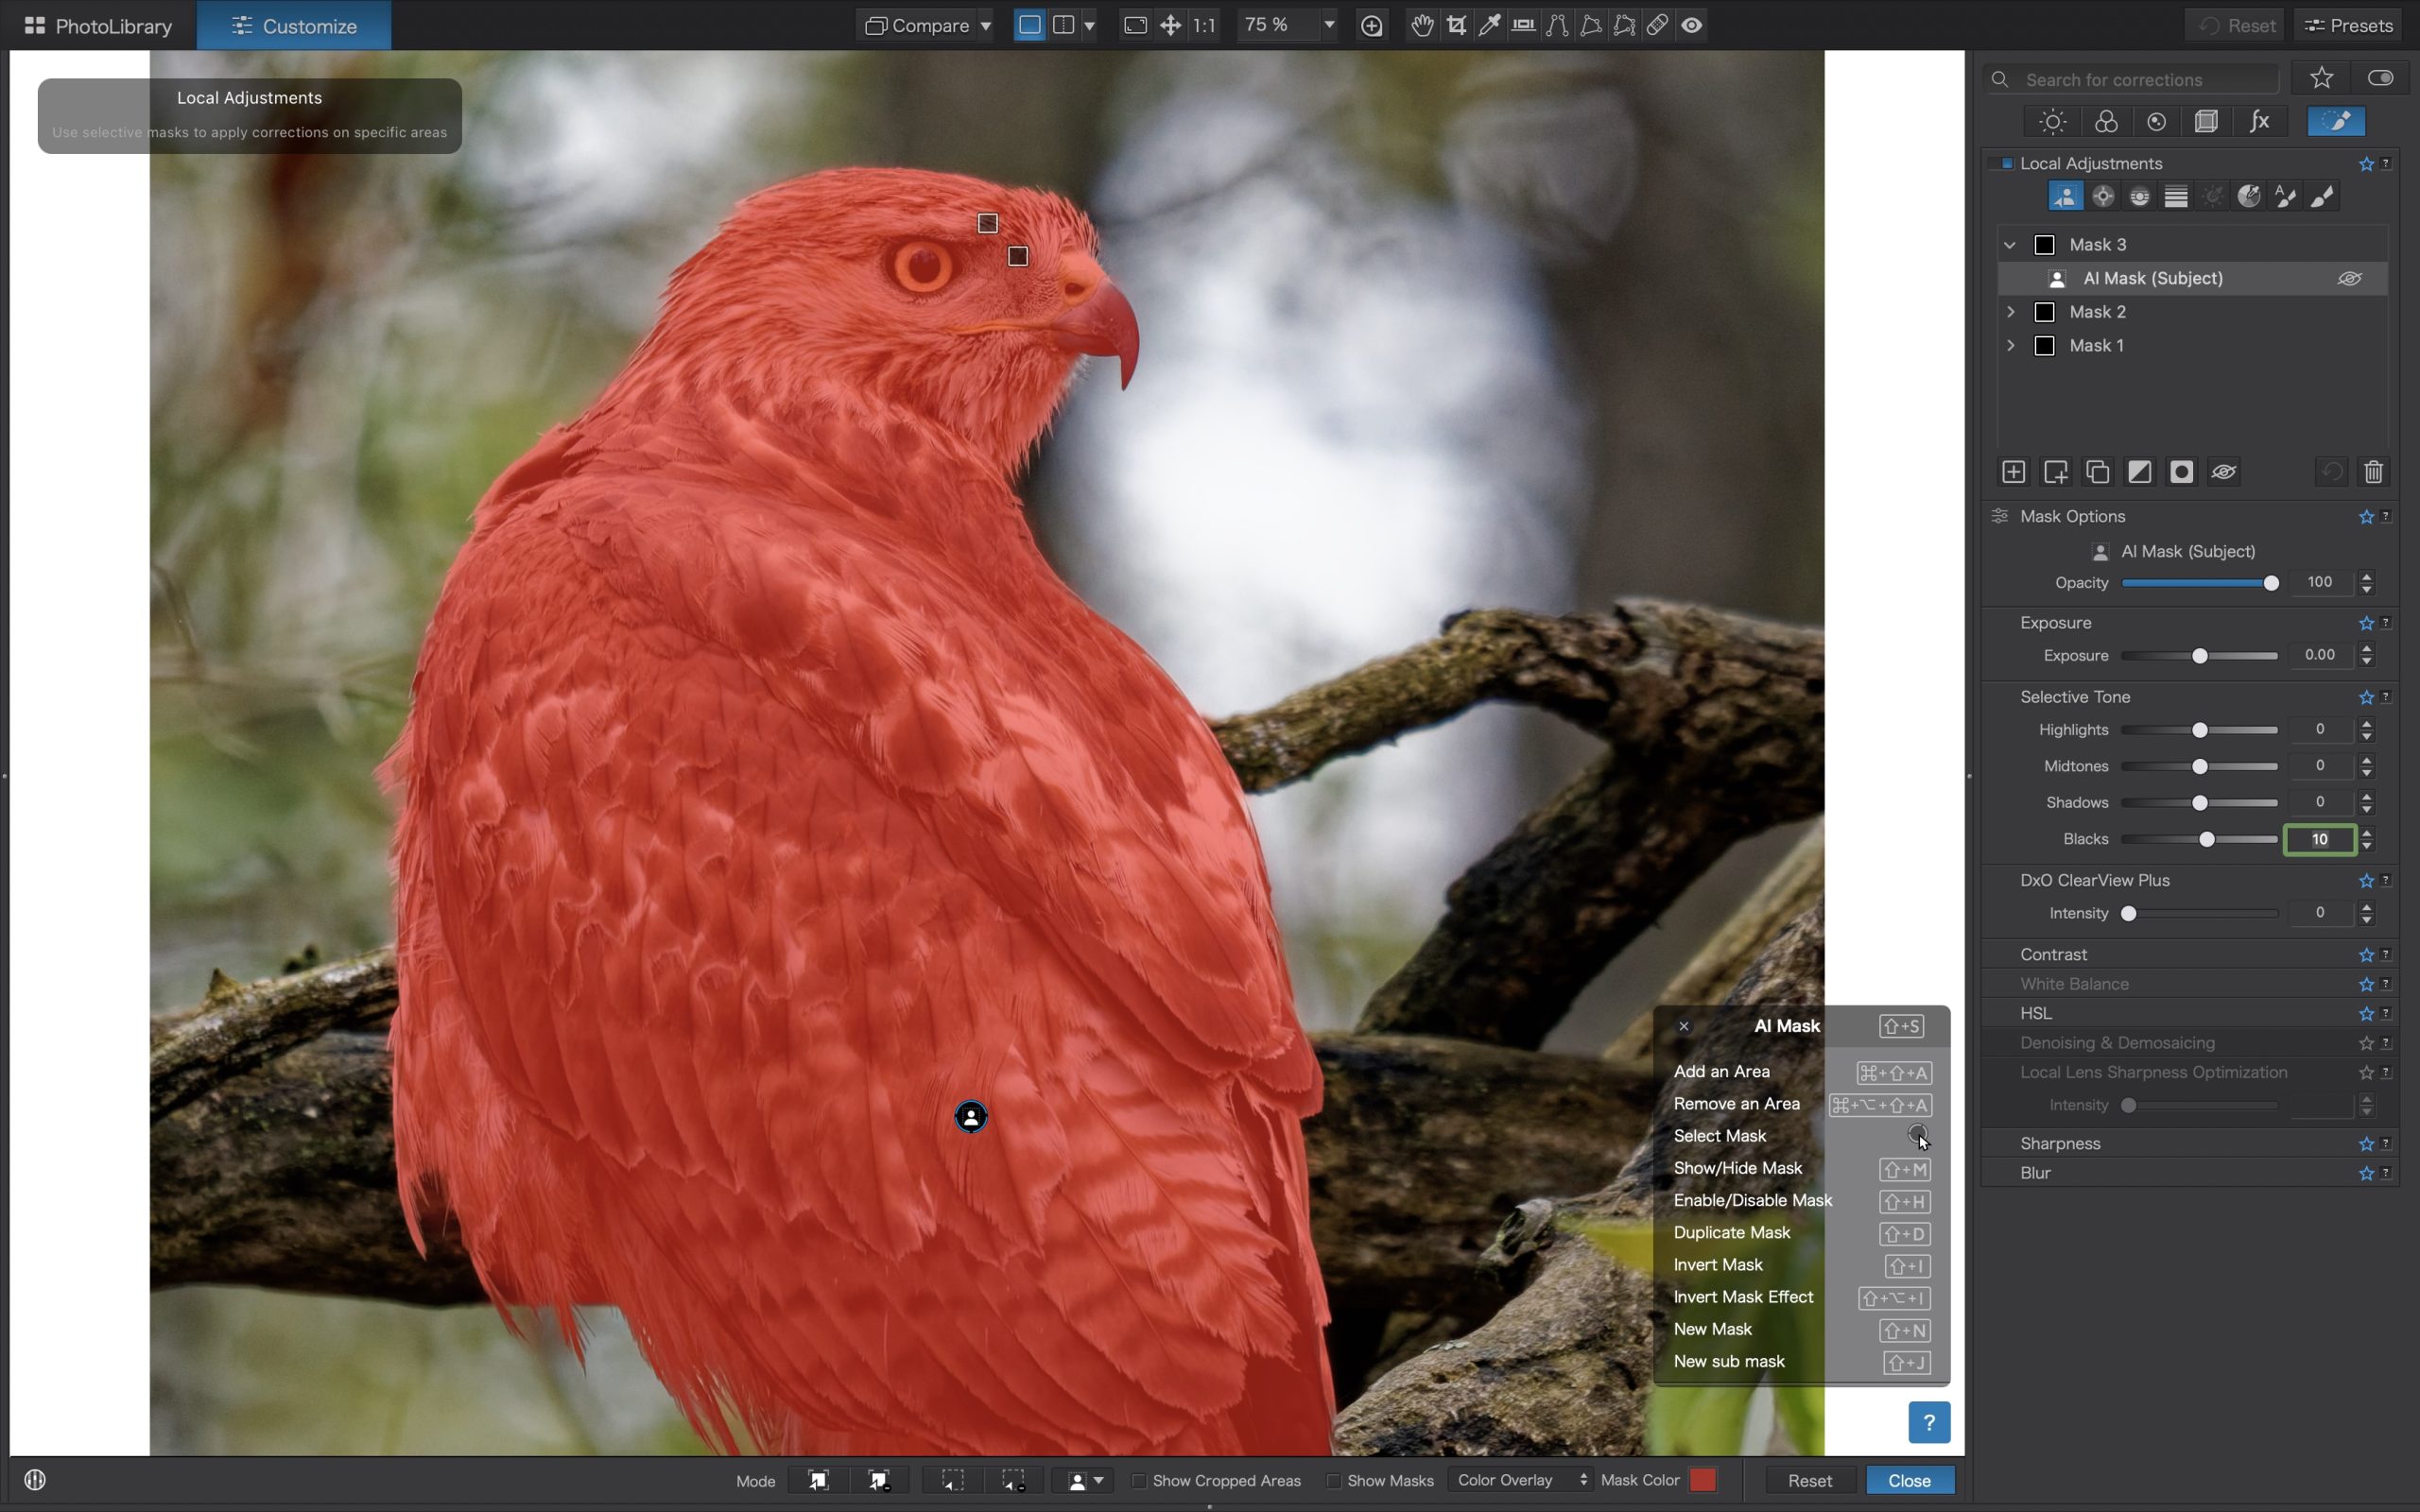
Local Adjustments: Masks
I live by masks. They are essential tools for balancing and shaping the light in any image. So, masks need to be intuitive. Masking in PhotoLab 9 is excellent, and is almost on par with Lightroom. PL9’s AI Masks are accurate at picking out well-defined objects with edges. No surprise there. I also like the semi-transparent menu that pops up in the bottom right corner of the image viewer, which provides keyboard shortcuts. Note: If the palette’s in the way, it can be closed and easily opened again.
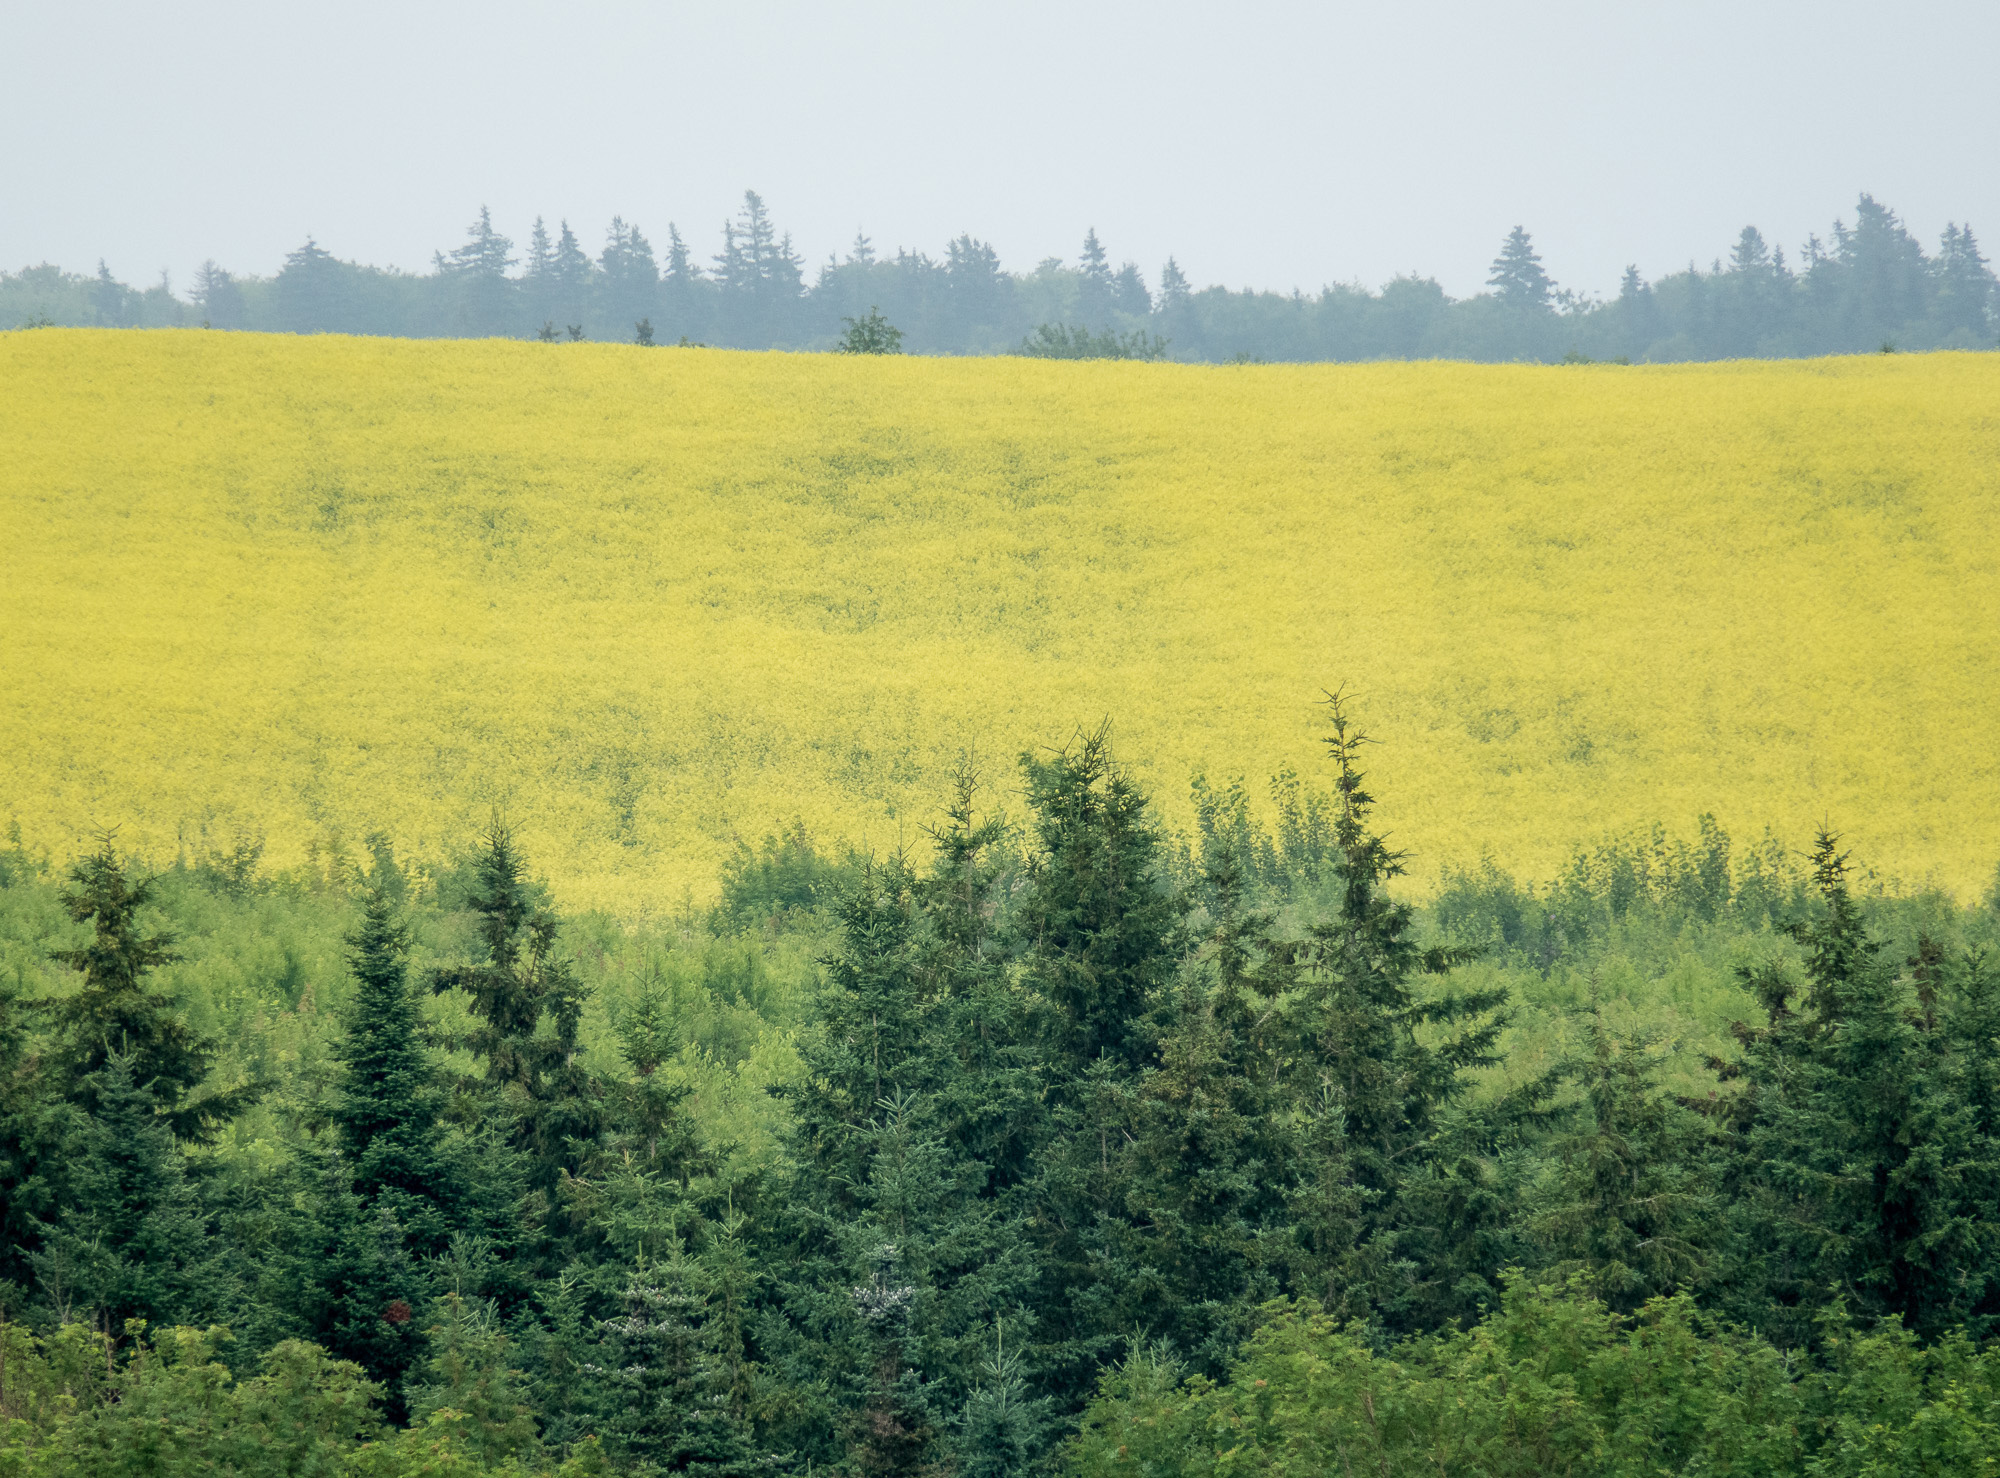
One thing I noticed when working on a landscape image is that the AI Sky mask has some trouble with tree branches, choosing to ignore them and go around them rather than recognising the similar hue within the branches. Perhaps it’s looking for contiguous pixels. I tried using the Auto Brush tool to fill in the sky pixels between the branches, but as the size of the brush is increased, so too is the size of the inner circle, which causes too many of the wrong pixels to be included.
Determined to make this work, I made a virtual copy in PL9 and experimented with different masking techniques. The workaround I found was to use a Grad ND filter that covered down past the tree line then subtracted out the trees (and branches) using the ’Remove a selection’ tool. The result was a much more realistic-looking sky-treelike separation. To many, this might be of little consequence. But, for someone who does a lot of landscape photography and is frequently masking the sky, it is additional work.
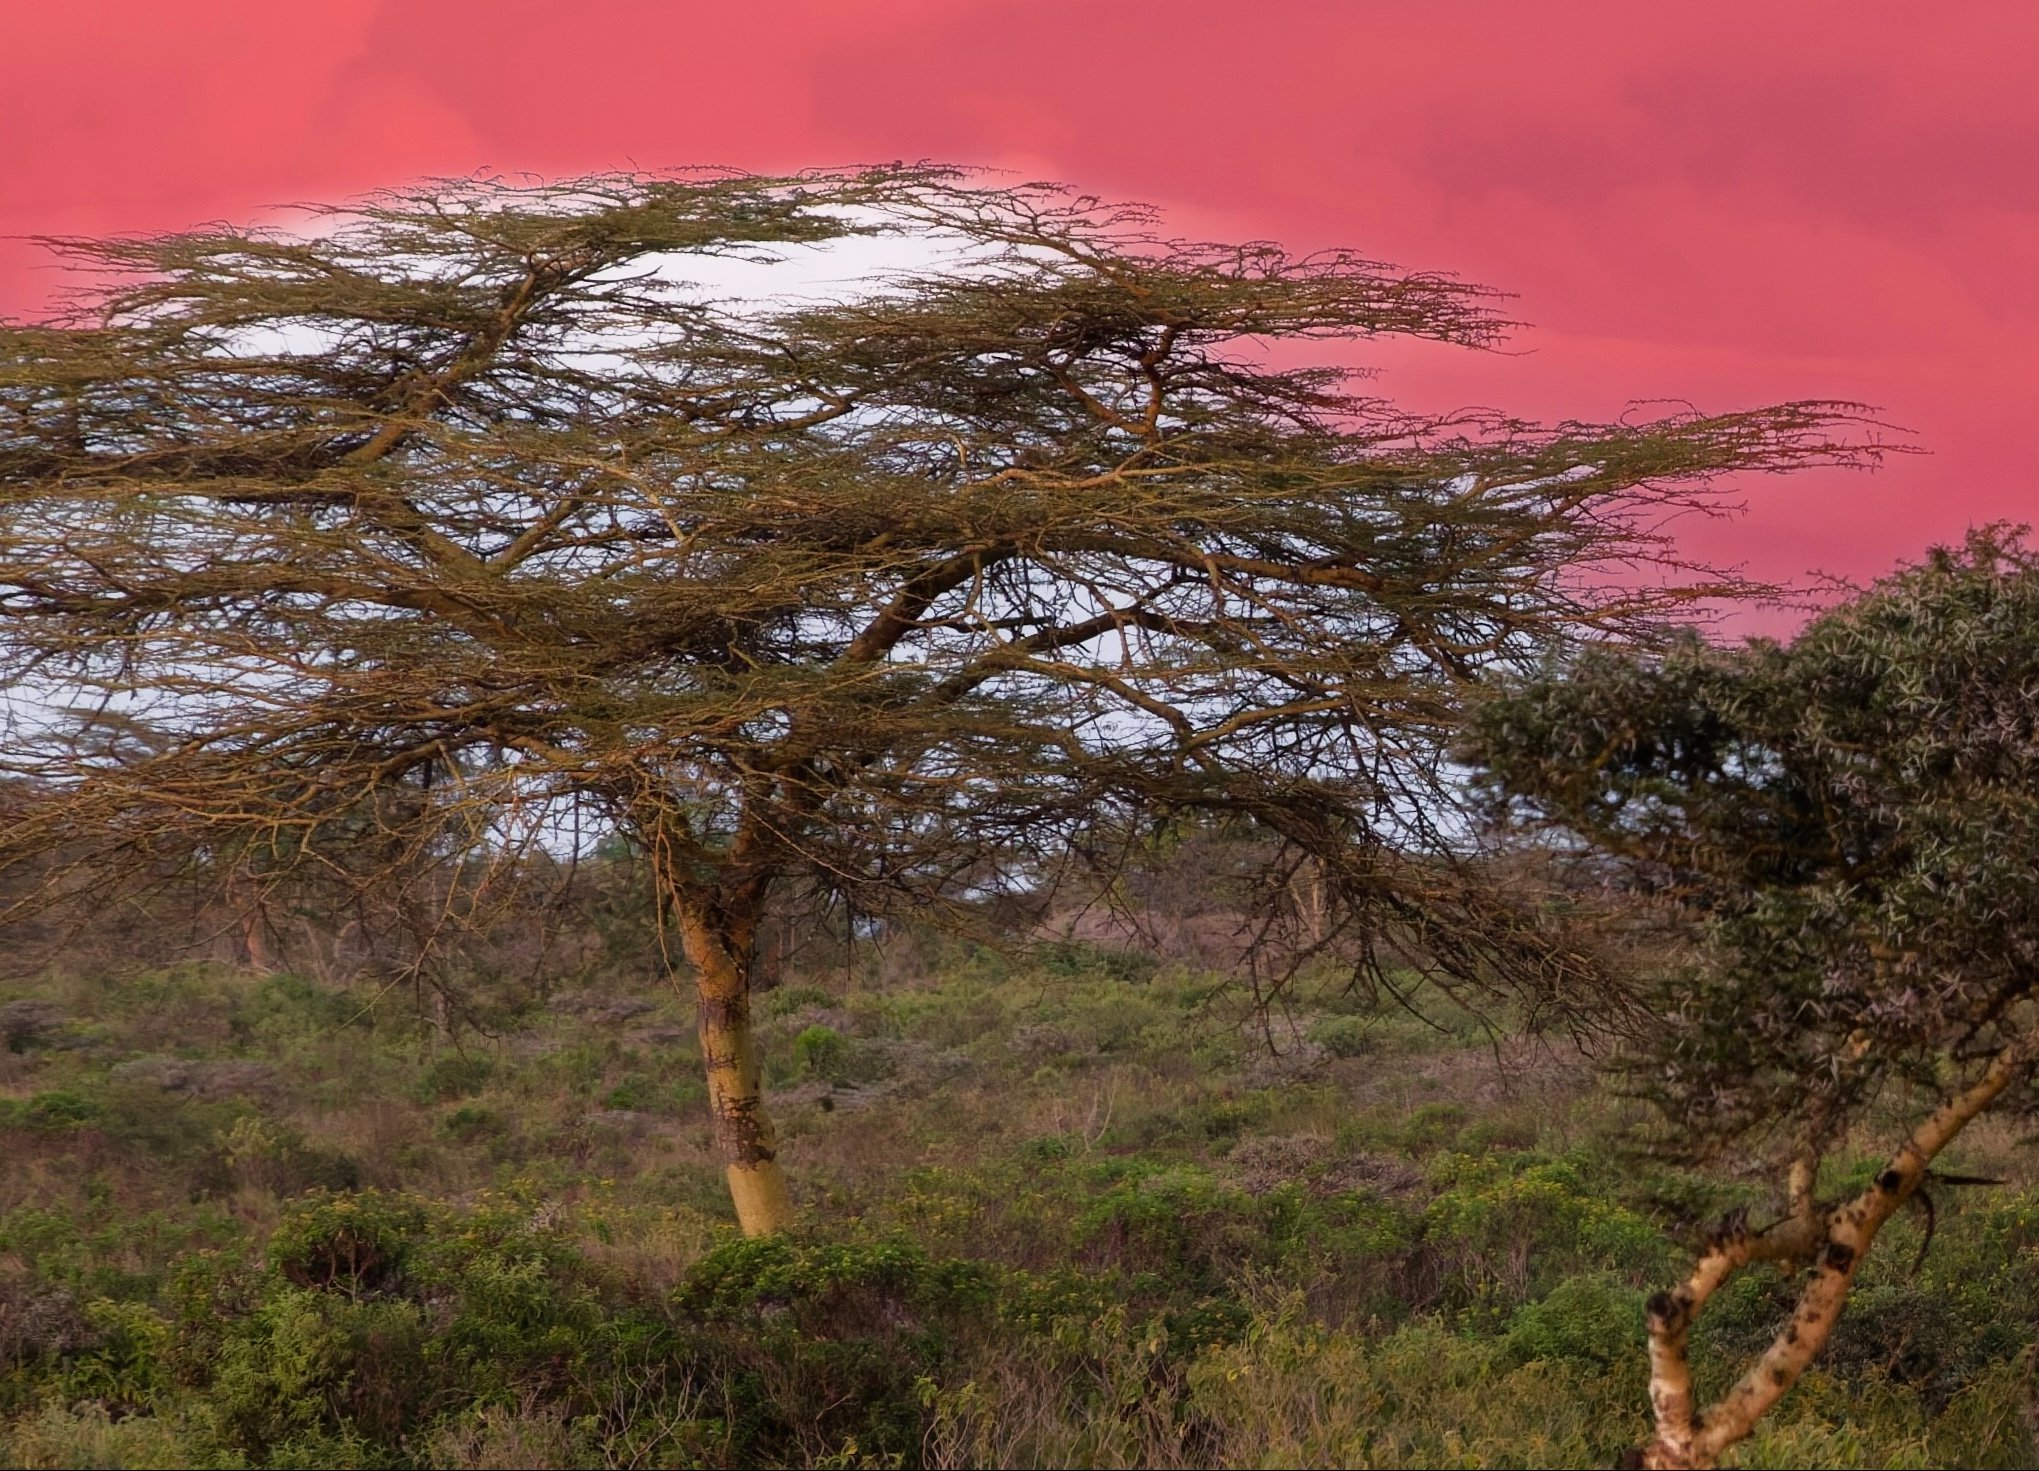
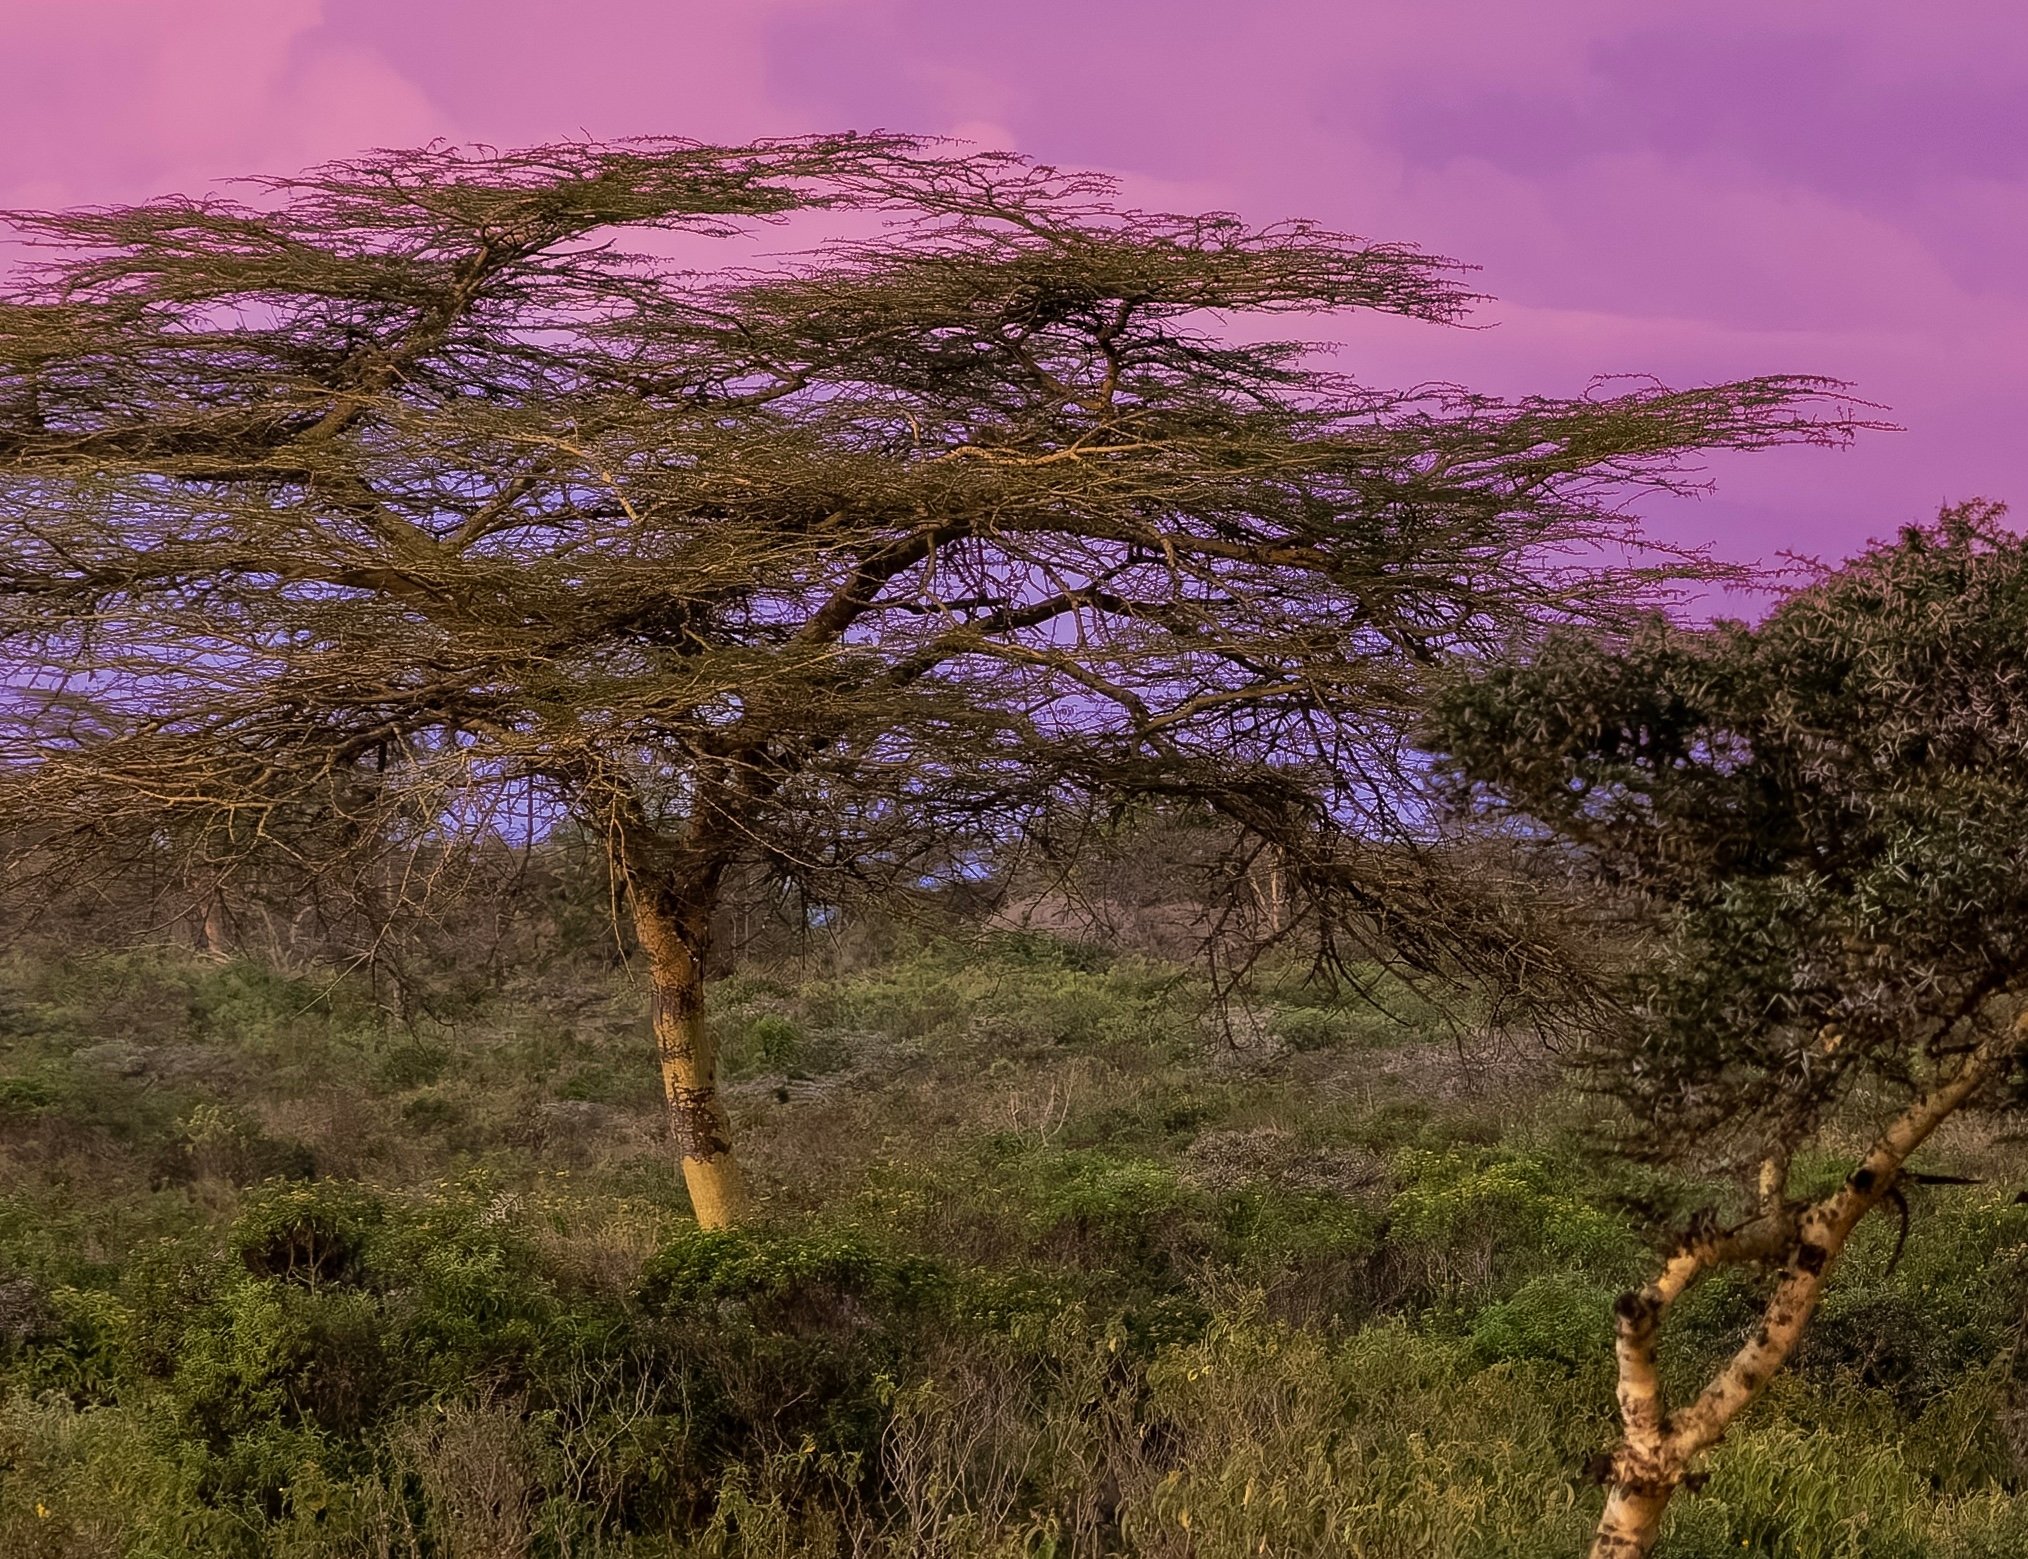
Left: AI Sky mask from PL9; Right: AI Sky mask from LrCC. Lightroom is far more adept at picking up ‘sky’ between the branches of the acacia tree, without including any of the branches themselves.
It’s nice to see that both Duplicate Mask and Invert Mask are offered, but it would be helpful to also add ‘Duplicate & Invert’. I use this frequently in landscape photography to generate a mask for the foreground after generating a sky mask, and with wildlife, to generate a background mask after masking the subject.
Sadly, a mask I routinely use is not part of the PL9 repertoire: Radial Gradient. I frequently use this to subtly focus the viewers attention, especially with wildlife. Perhaps PL9’s Control Points can be used in the same way. As well, I see that the Luminosity Mask, which is part of the masking routine in Lr, is only available by purchasing the DxO FilmPack for USD $150. To me, this is a blatant up-sell, within an app that already costs USD$240.
Control Points are a masking technique unique to PL9 and, at first, I was a bit stumped about what they actually do. After doing a deep dive to learn all the ins and outs of them (thanks, in part, to TakeBetterPictures), I’ve decided that (a) Control Points do not take the place of a Radial Gradient mask in Lr, as I had hoped; and (b) advanced users appear to use them in the same way I might apply an Auto Brush mask in Lr. I can certainly see the benefit and versatility of Control Points for shaping light, refining colour, raising shadows, and reducing highlights, but building an Auto Brush mask in Lr achieves what I perceive to be a similar result.
Note: Auto Brush in PL9 is different from the Auto Brush in Lr. In PL9, it assumes/predicts what I might want. I don’t like it when technology does this as it rarely matches my vision. I would prefer to do a little extra work in selecting the hue of pixels for masking.
Lastly, something else I’ve noticed is that as more masks are added, the overall refresh rate seems to slow down. The lag occurs every time a photo is opened, every time it is adjusted, and every time it is exported. Even if each lag is only a second or two, those seconds add up and interrupt the overall fluidity of the workflow. Suggestion: do all masking with denoise turned off!
History
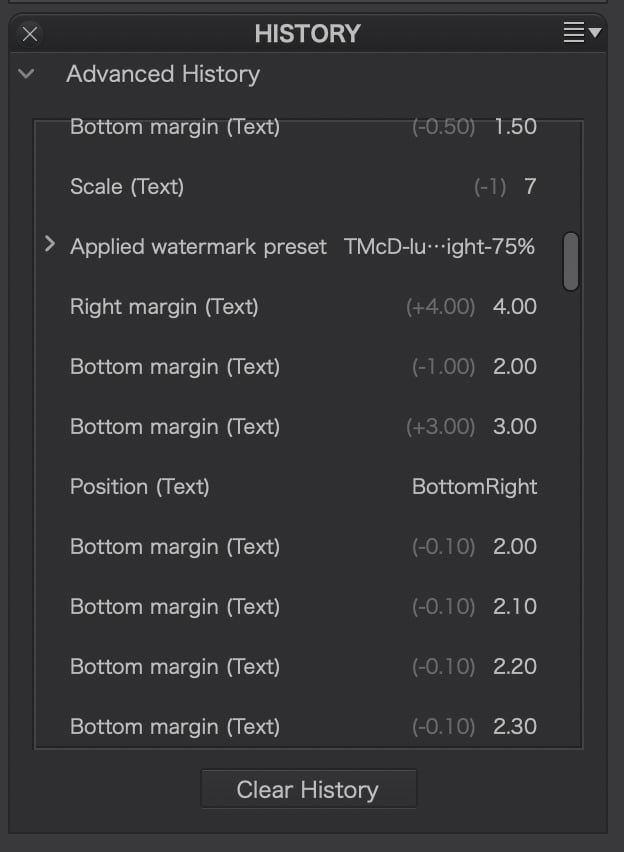
Having a History palette is one of those essential functions that LrC has, but not LrCC, and I miss it. PL9’s History palette is very functional. While it resides in the left panel and could be moved to the right panel, I like that it can be set to ‘Float’ over the image as I go back and re-examine edits.
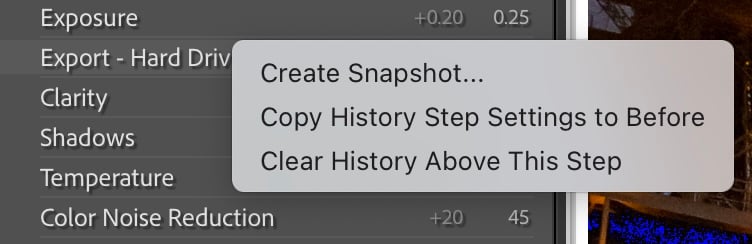
It would be even more helpful if it had a few of the functions from LrC such as ‘Create Snapshot’ or, one I use most frequently, ‘Copy History Step Settings to Before’, which allows before/after comparisons over more than just one step in History. As well, the PL9 History does not show when a file was exported as LrC does. Showing each Export is very helpful as Exports are our visual confirmation of the processing to that point. The closest I could see in PL9 was when it showed ‘Applied Watermark’, which may indicate an Export, though not always.
Compare
Being able to compare two images side-by-side or the same image before and after is essential to image selection and processing workflows. With Lr, it’s easy—simply select two images and choose Compare (Opt-C). With PL9 the workflow requires a few extra clicks but is easy to do.
To compare two different images, users select the reference image then choose ‘Use current image as reference’ from the compare menu. This command can also be done by right-clicking on the image. Then, simply select the image you wish to compare with it. As a further refinement, both images can be zoomed in and out to check details and the right-hand image can also be processed while next to the Reference image. As with Lr, the comparison can also be top and bottom and split views, both left and right and top and bottom. Excellent! This is a huge step forward for PL9 compared to previous versions. Next steps would be to align the navigation around a zoomed in comparison so that both images click-and-drag to the same location/view.
To compare before and after is even more straightforward: simply selecte the image, choose how you want to compare it (with or without Geometry applied) and select the orientation: L-R; T-B; or either in split view.
Cropping and Geometry
There is a Crop tool along the top (or simply R) for straightforward changes, but there is also a Cropping and Geometry palette in the right panel. It would be helpful if, when selecting R or the Crop button, the Crop palette opened in the right panel. Also, some tools are found above, and others below, which means additional cursoring around. What’s missing from these immediate tools (it’s in the palette) is the vertical crop tool, although, as in Lr, a vertical crop can be forced by pulling one of the bottom handles across towards the other.
I must admit to being cosy with tools such as Straighten and the Transform functions of Vertical, Horizontal, Rotate, Scale, etc. of Lightroom. This is perhaps the greatest challenge I faced with PL9. Horizon (and Auto Horizon) is an easy switch for Straighten, but the Force Parallel, Rectangle and 8 Points tools took some getting used to. They are powerful—particularly when using Intensity to nudge the changes, as well as the Advanced settings under Distortion and Perspective—and may well be better than what I’m used to with Lightroom.
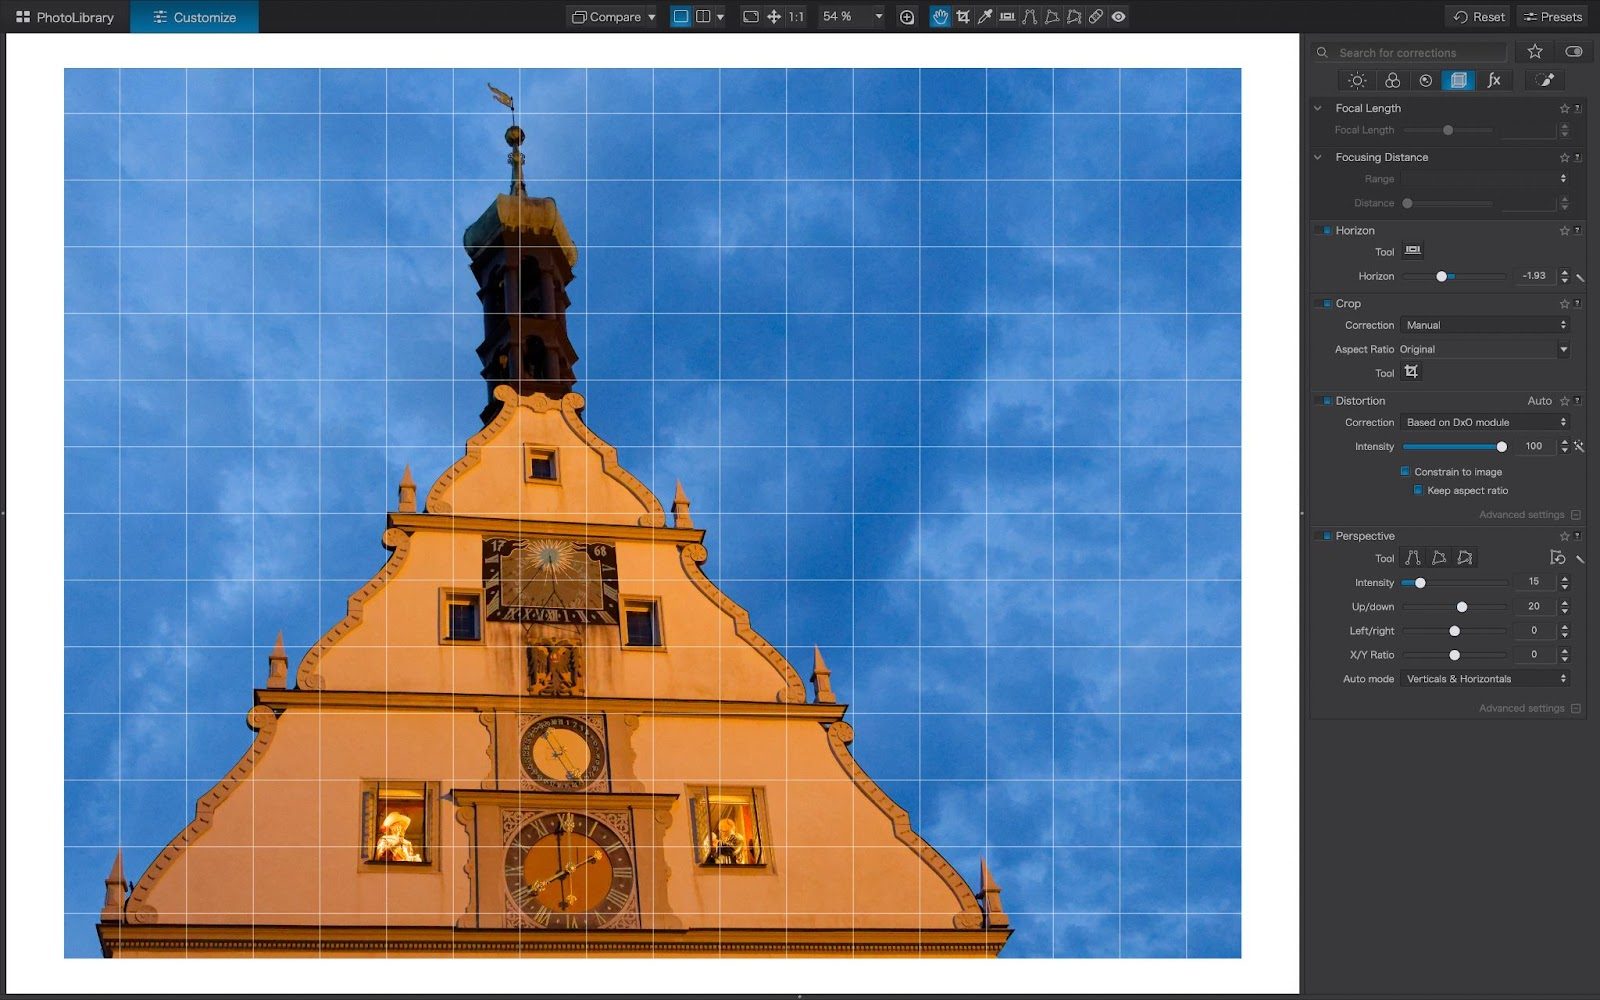
I love setting myself a challenge, in this case straightening an oblique view of the Rothenburg Ratstrinkstübe Clock Tower. This was a throw-away image as, at the time, I moved to capture it straight-on, but it provided me with a way of comparing PL9 and Lr, in this case, LrD. I’m happy with both results, though PL9 seems to edge out Lightroom in this regard.
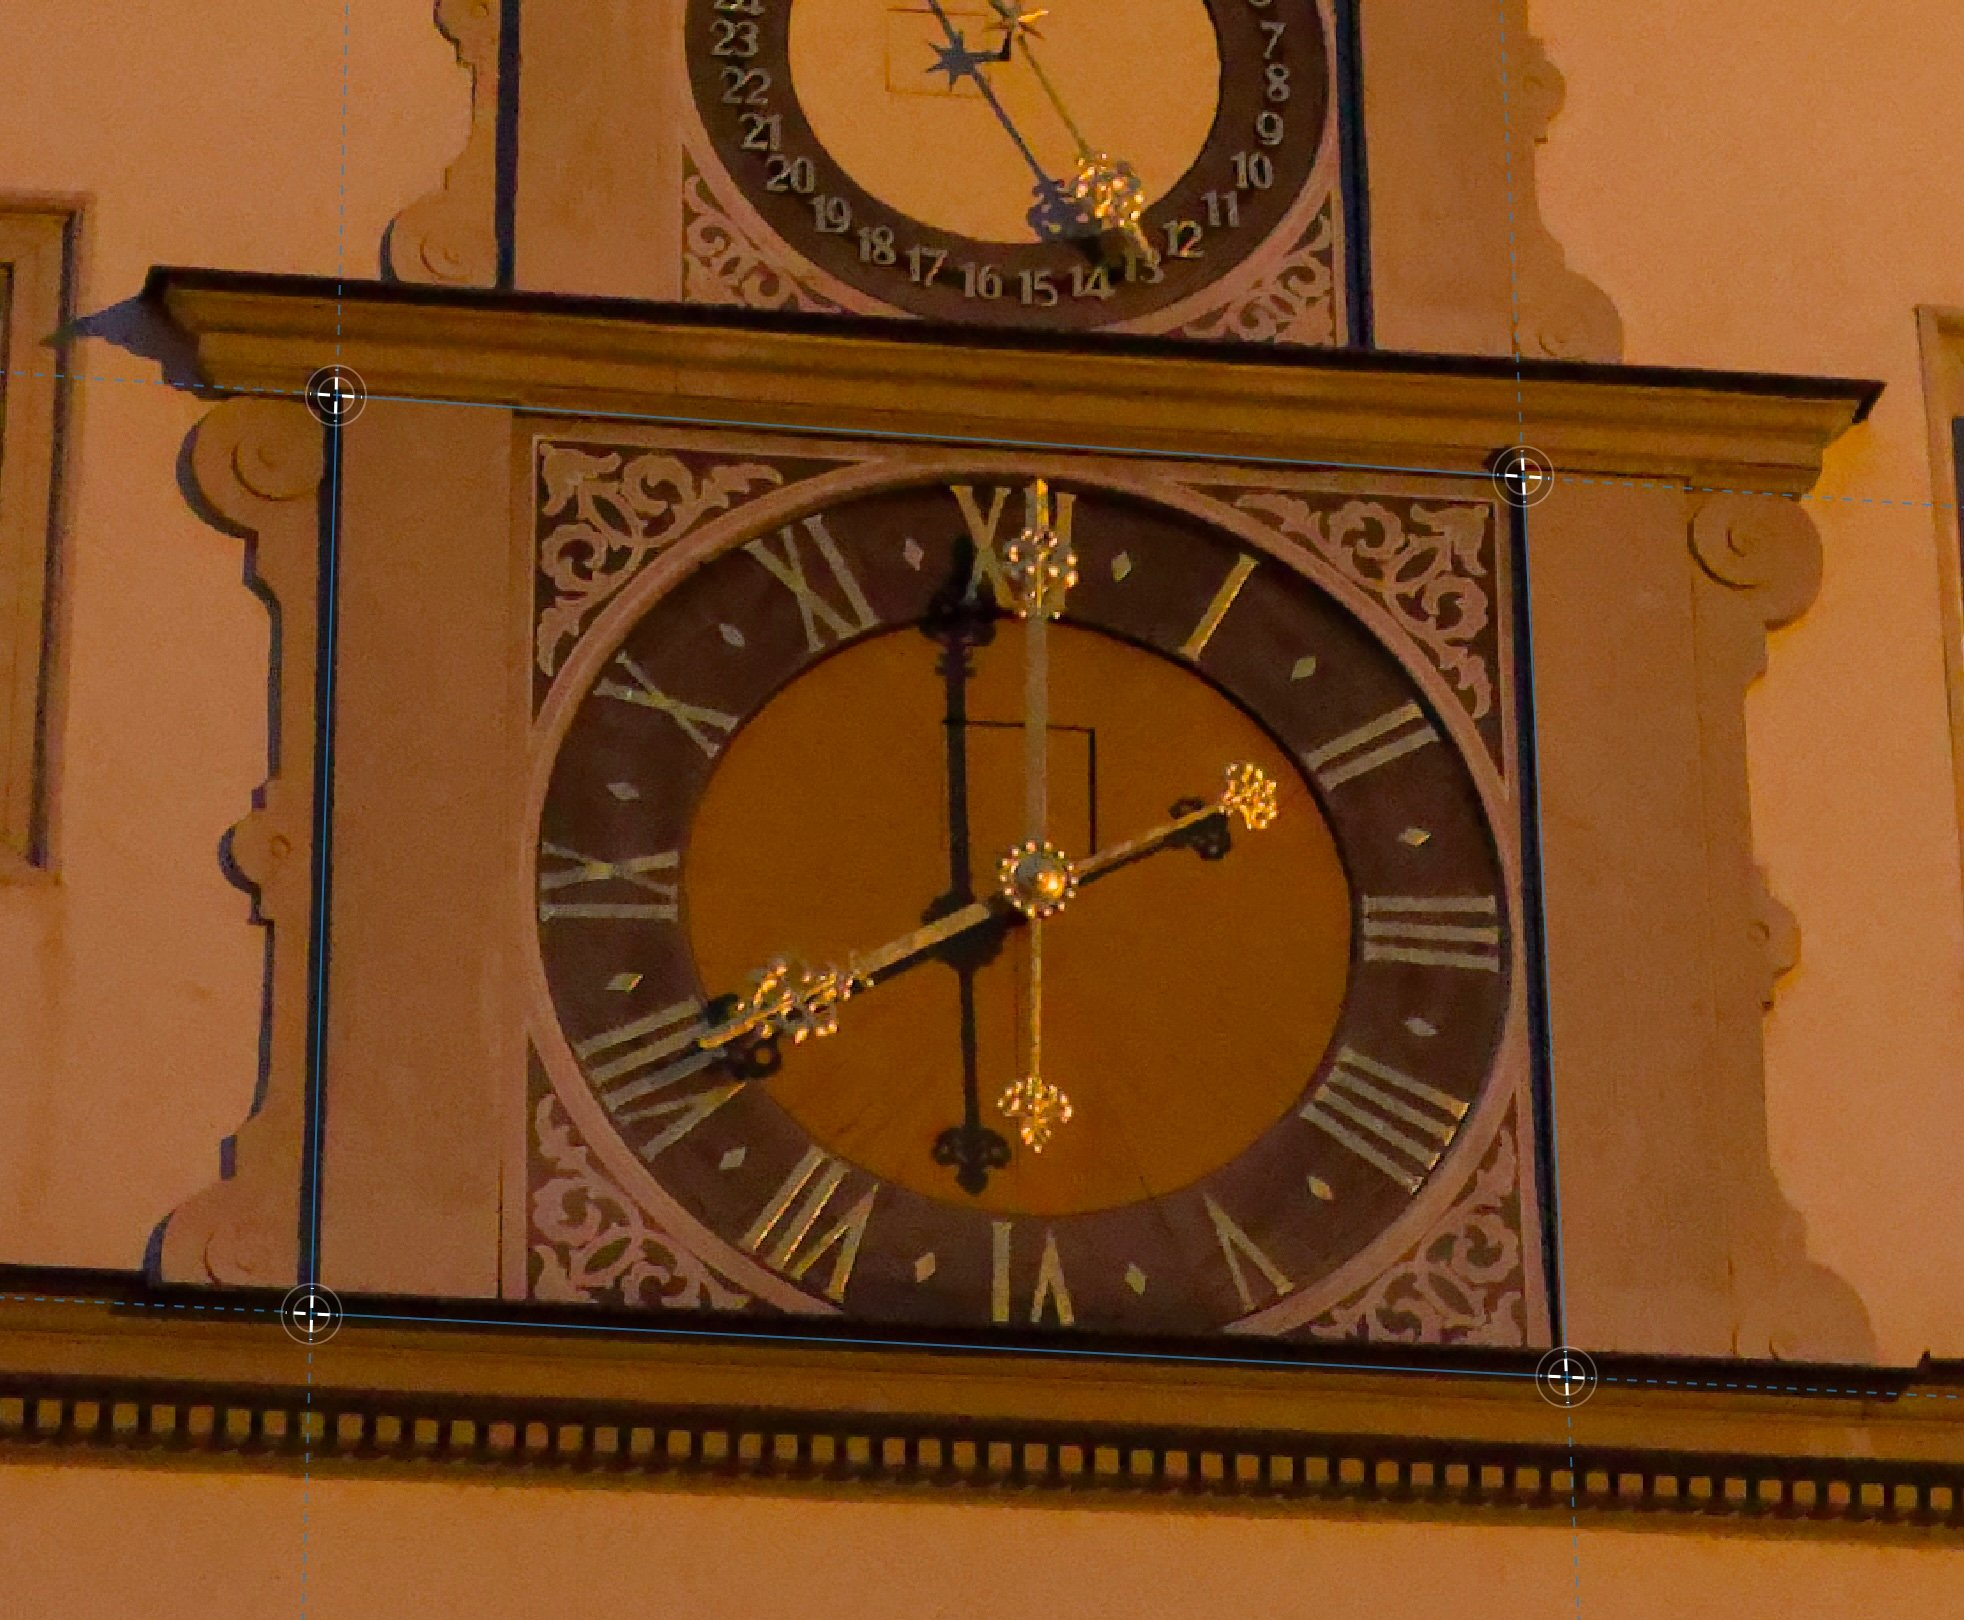
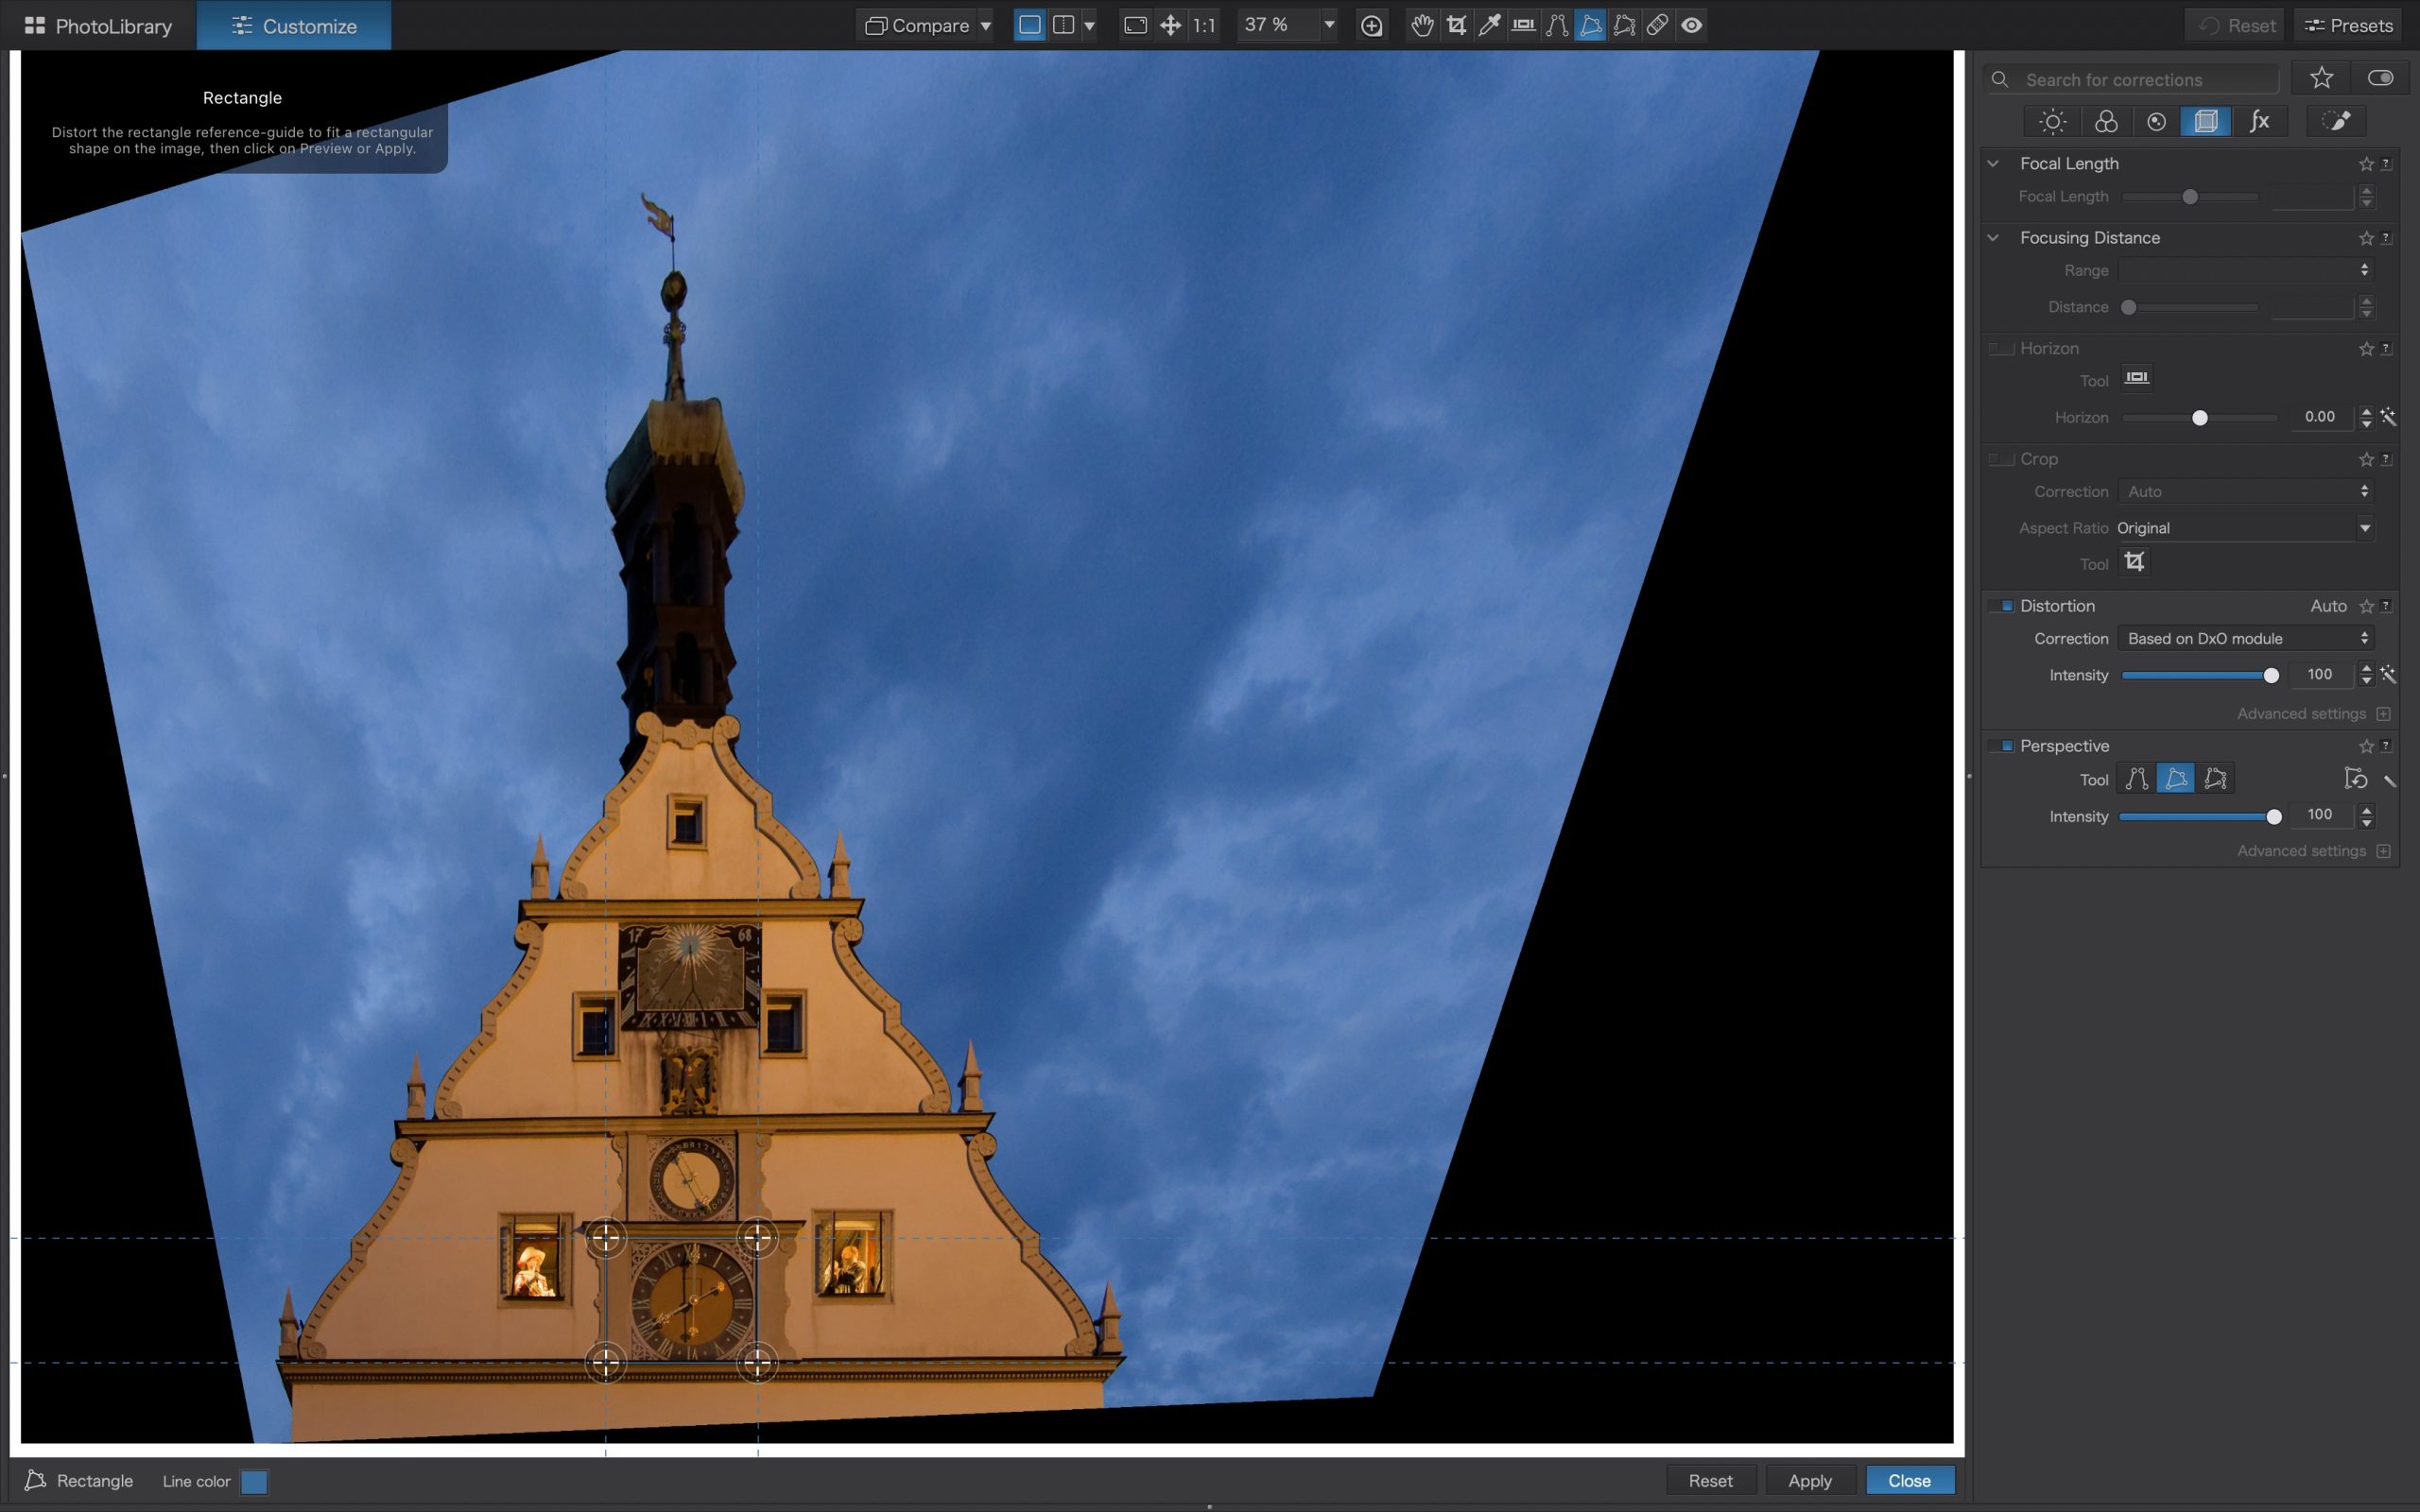
Left: PL9: I drew a rectangle around the oblique rectangle of the clock to delineate how I wanted the whole image to be corrected.
Right: PL9: Here is the initial result. Not quite what I had envisioned, but at least the clock is now a true rectangle!
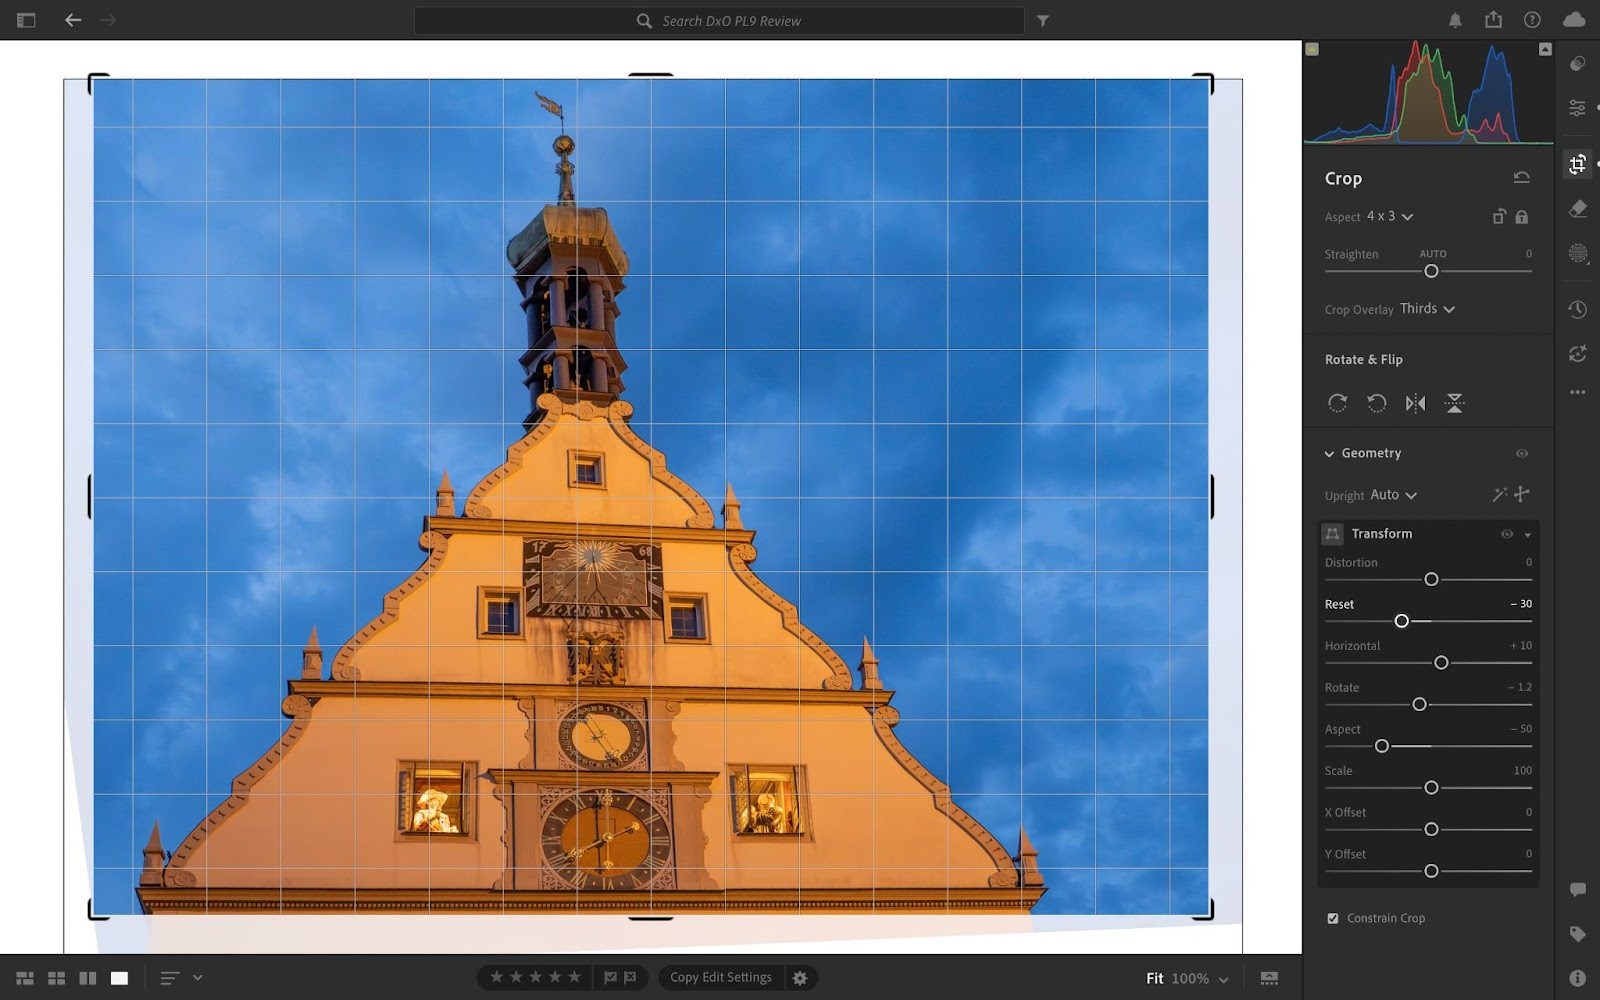
Left: PL9: The final result made by adjusting the Intensity slider of the Perspective tool.
Right: LrD: The final result of my best attempts to reproduce the corrections I achieved in PL9.
There is so much to unravel with this comparison of PhotoLab 9 with Lightroom. We’ll take a break here and return with a look at monochrome, export, printing, and cost–and an overall conclusion.
Readers are sharing their thoughts on this review in our Forum, check out the conversation here.
Elevate Your Vision


Read this story and all the best stories on The Luminous Landscape
The author has made this story available to Luminous Landscape members only. Upgrade to get instant access to this story and other benefits available only to members.
Why choose us?
Luminous-Landscape is a membership site. Our website contains over 5300 articles on almost every topic, camera, lens and printer you can imagine. Our membership model is simple, just $2 a month ($24.00 USD a year). This $24 gains you access to a wealth of information including all our past and future video tutorials on such topics as Lightroom, Capture One, Printing, file management and dozens of interviews and travel videos.
- New Articles every few days
- All original content found nowhere else on the web
- No Pop Up Google Sense ads – Our advertisers are photo related
- Download/stream video to any device
- NEW videos monthly
- Top well-known photographer contributors
- Posts from industry leaders
- Speciality Photography Workshops
- Mobile device scalable
- Exclusive video interviews
- Special vendor offers for members
- Hands On Product reviews
- FREE – User Forum. One of the most read user forums on the internet
- Access to our community Buy and Sell pages; for members only.
You may also like