


By: Terry A. McDonald, luxBorealis.com
For the past 4 months, I have been working towards improving my raw file optimization. Previous articles showing the results of numerous tests have included:
- Raw File Optimization
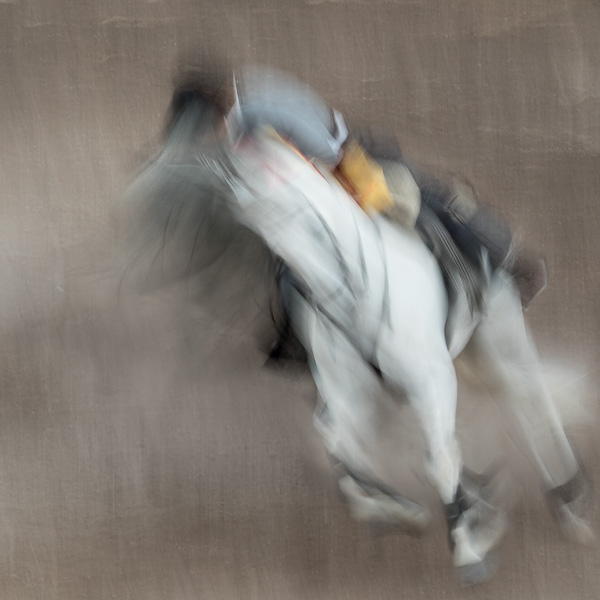
- How well can Topaz PhotoAI and ON1 No Noise ’rescue’ images with motion blur?
- Up-scaling Raw Files 1: High quality cropped images with Lightroom, ON1 and Topaz
Having tested and compared Lightroom Enhanced Noise Reduction, DxO PureRAW and Topaz PhotoAI, I know I can confidently recommend any one of them to demosaic, denoise, and sharpen raw files, extracting the maximum image quality possible.
But now, DxO has upset the cart by releasing the latest, greatest update to PureRAW: PureRAW 5 with Deep Prime 3. Rarely do I have the opportunity to test one version of software against the next, so when DxO announced the new and improved PureRAW 5 was on the way, I was excited and purchased it.
I am not one for superlatives unless they are truly warranted and I am never impressed by advertising weasel words. I want results. Does the product do what it claims, or not? Is it truly an improvement, or not?
You tell me . . .
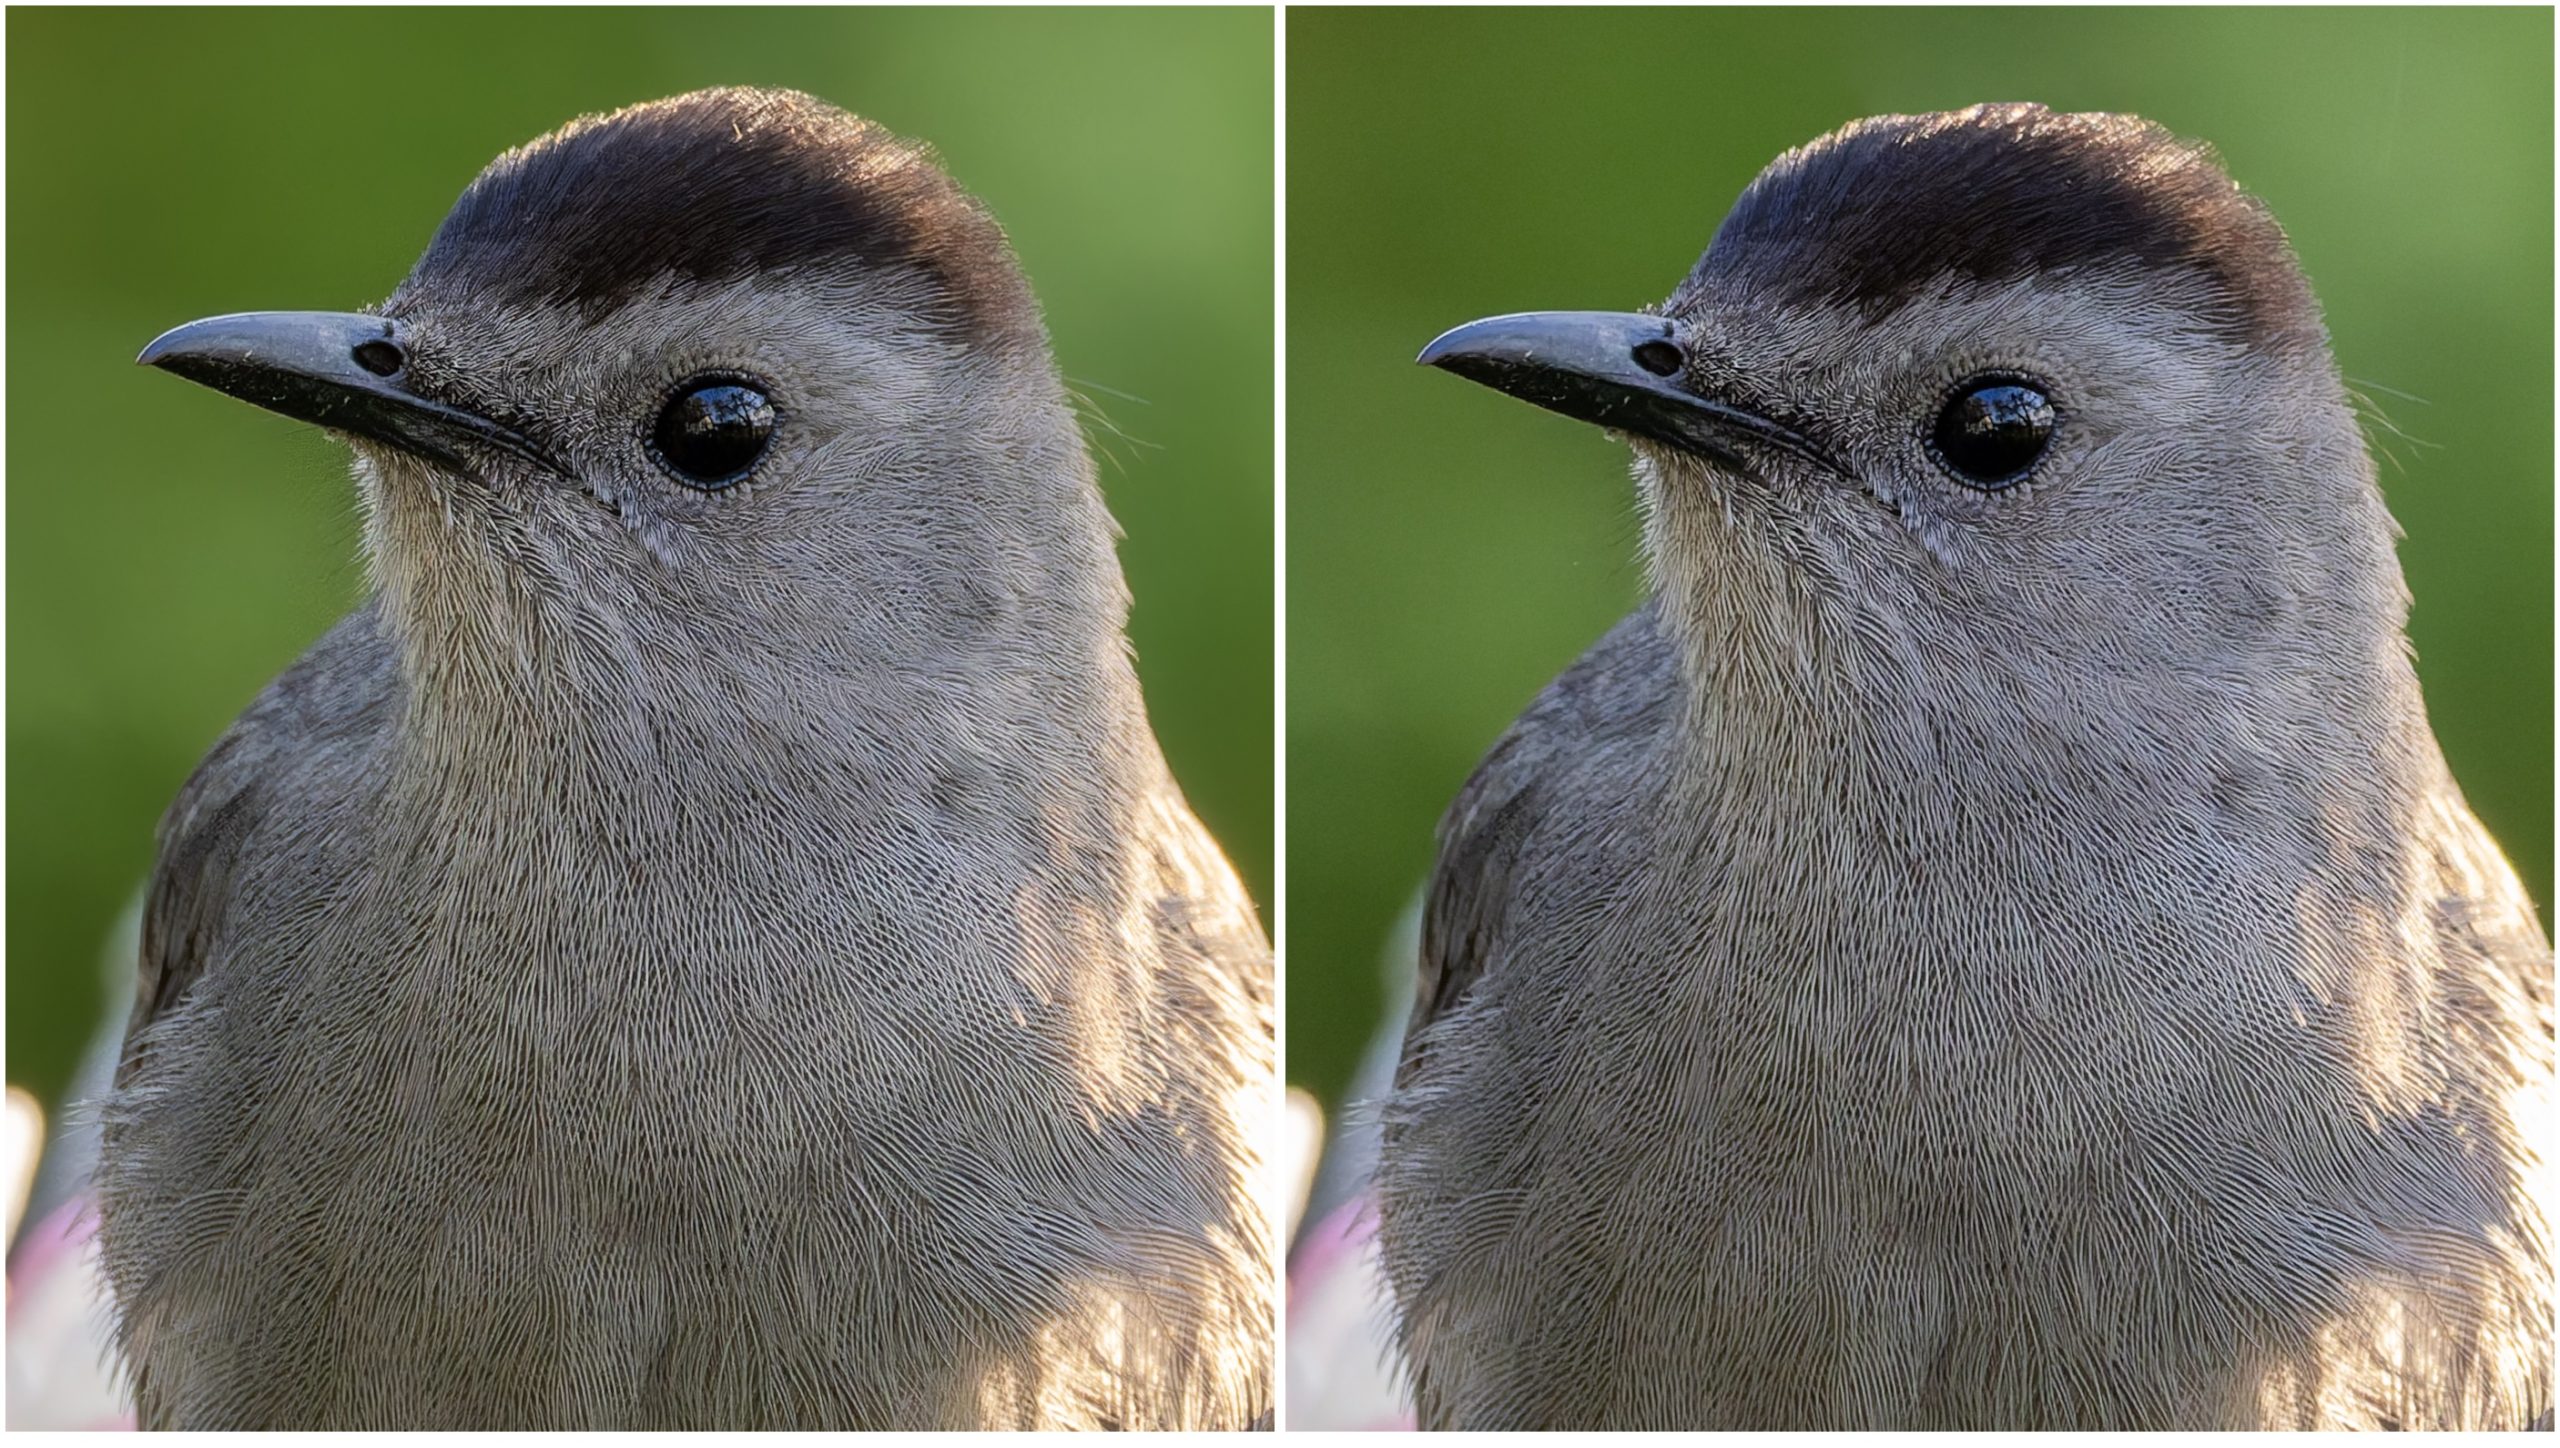
Click or tap on the image to view the original file at full size
Here is the same Catbird image I used in my first article comparing the various methods of raw optimization, processed in PureRAW 4 and 5.
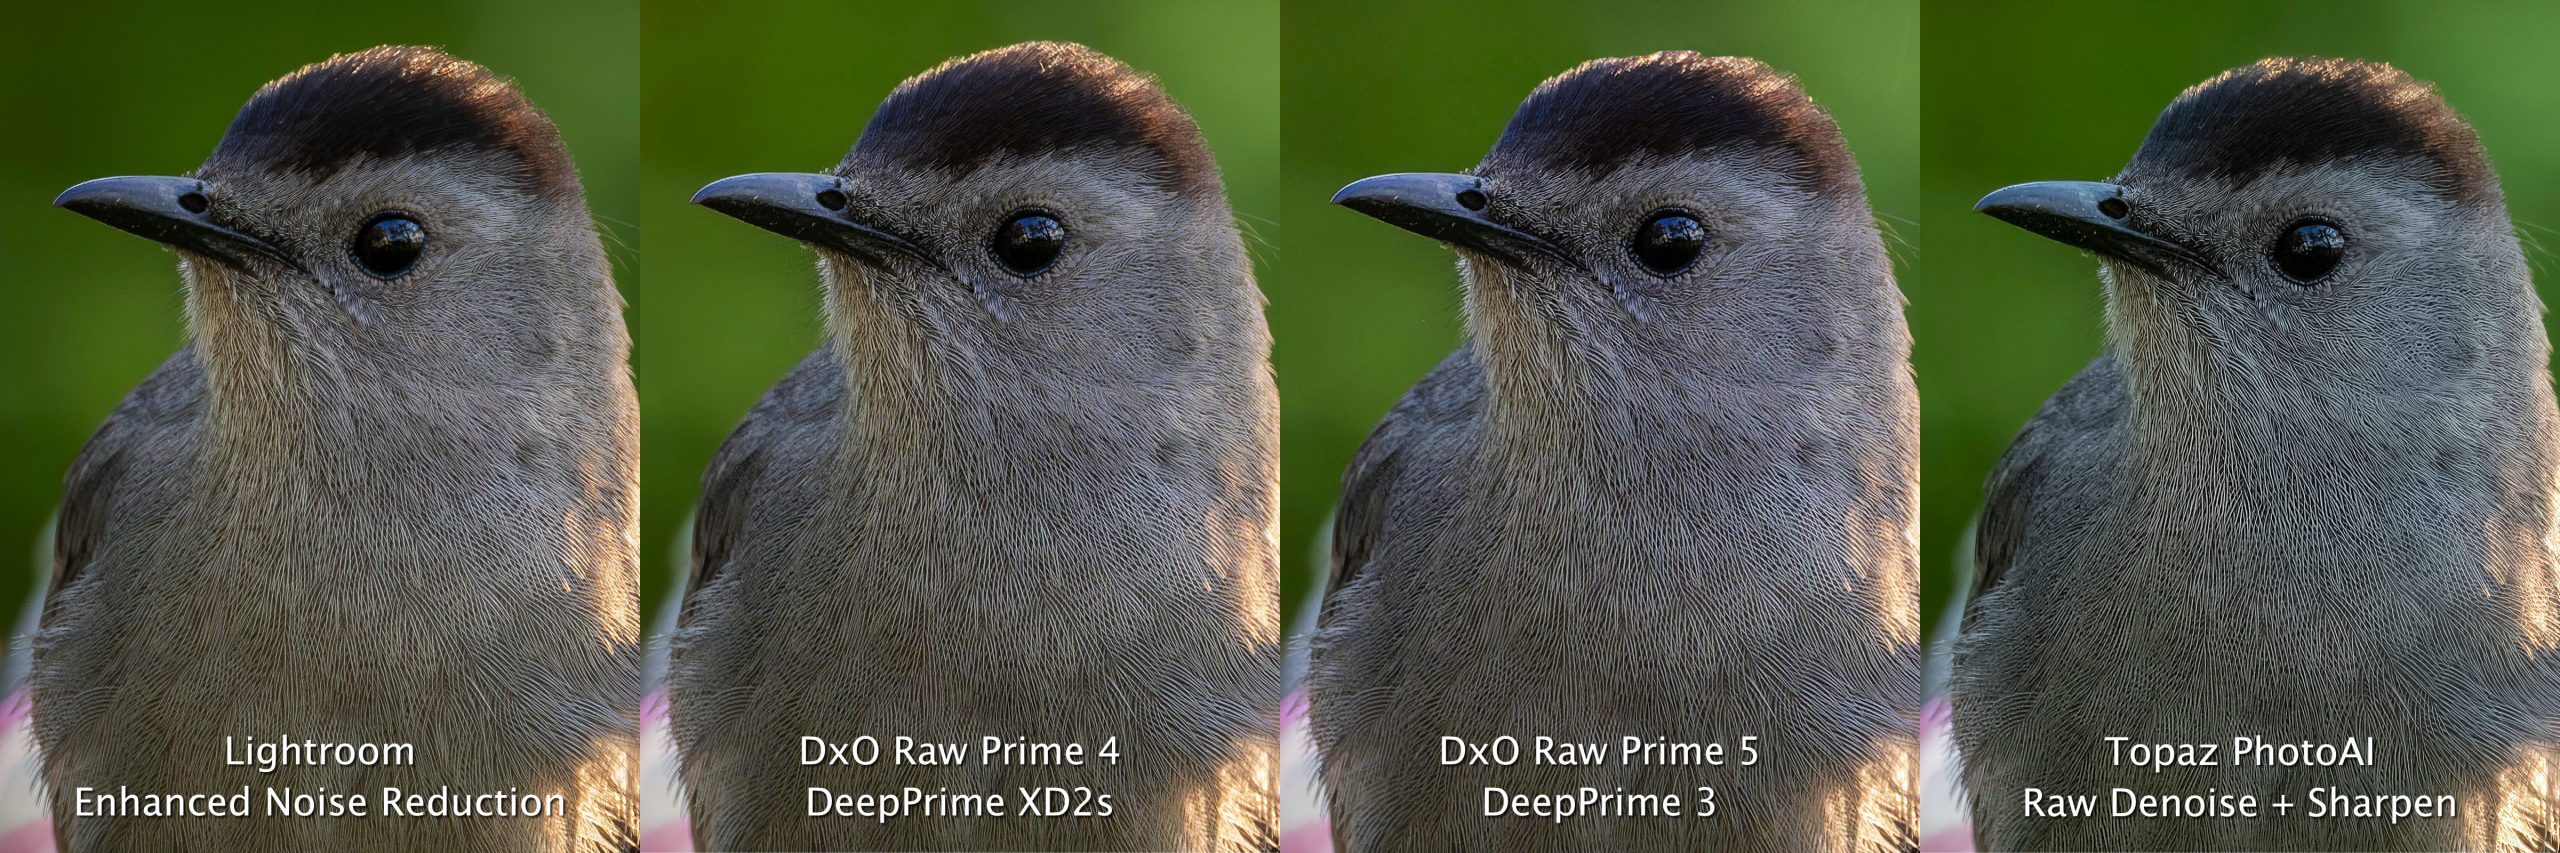
And here is the image compared to Lightroom Enhanced Noise Reduction and Topaz PhotoAI.
I feel like we’re watching that laundry detergent ad from the 1980s:
”Can you tell the difference?”
”No, I can’t tell the difference. Can you tell the difference?”
Hmm, not really.
The difference between v4 and v5 does not seem to be in the overall demosaic and denoise part of the upgrade. It may be there, but even with further testing—here is Sunset Vigil—I do not see any appreciable difference.
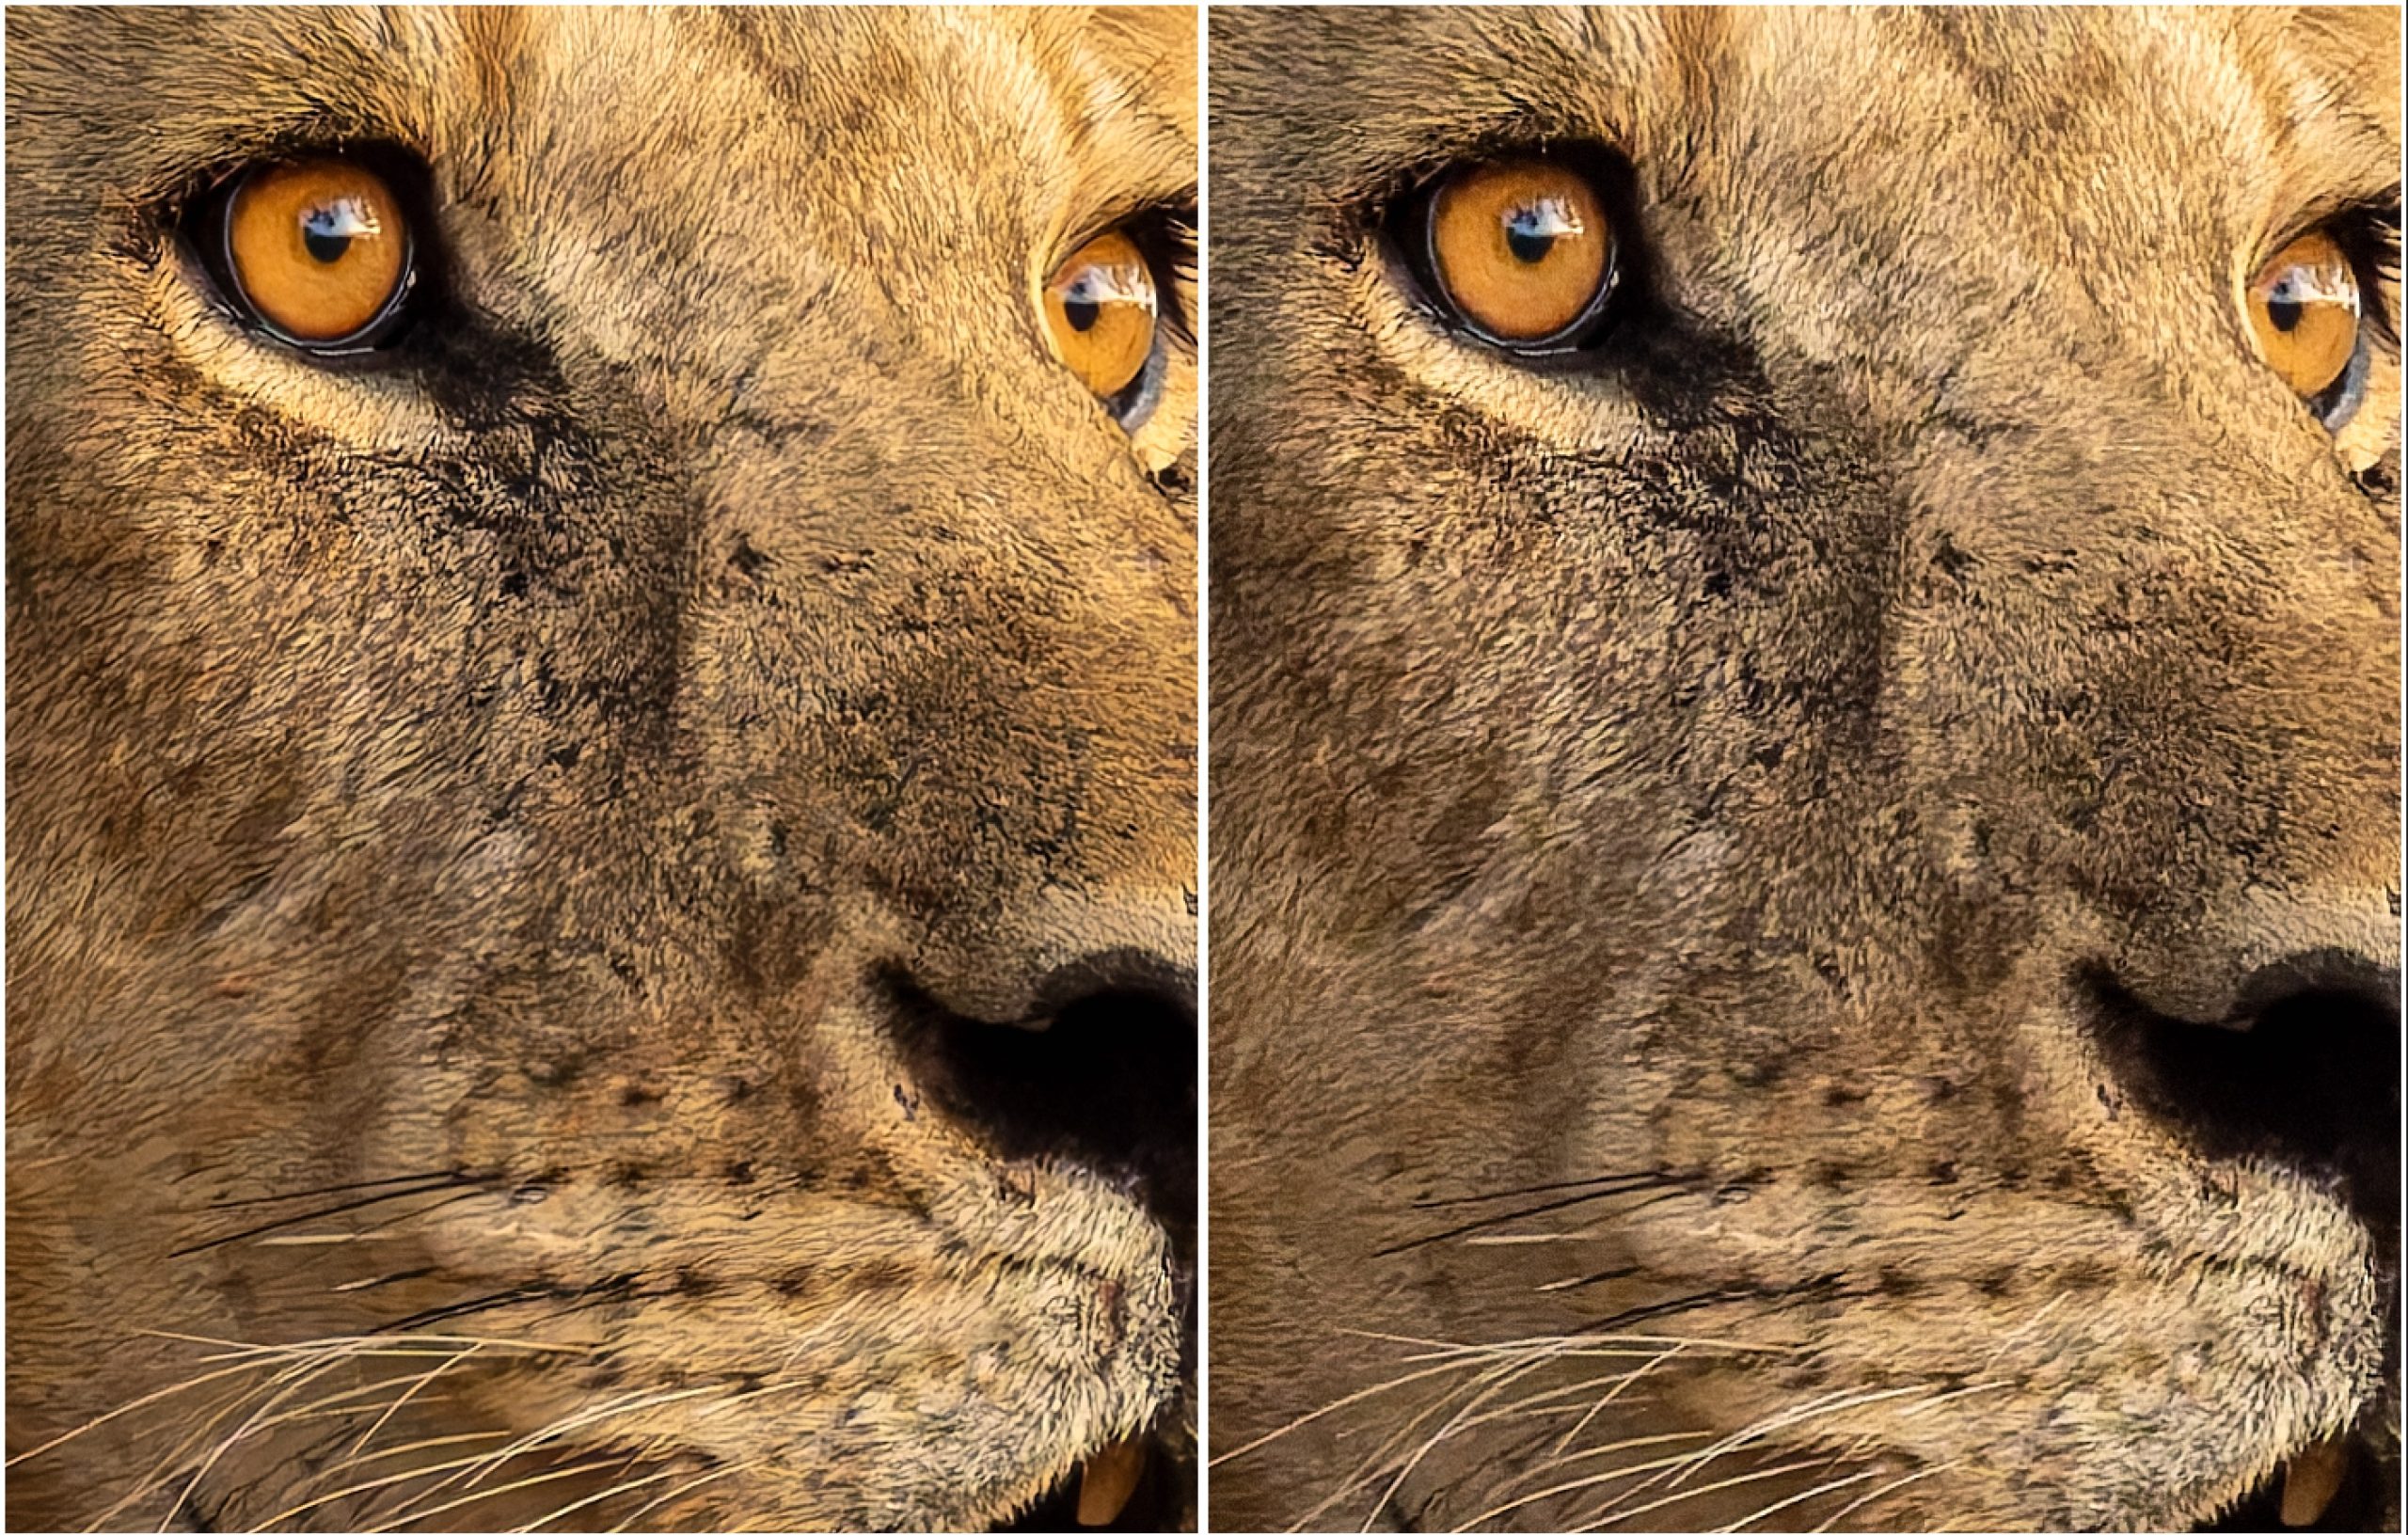
Click or tap on the image to view the original file at full size.
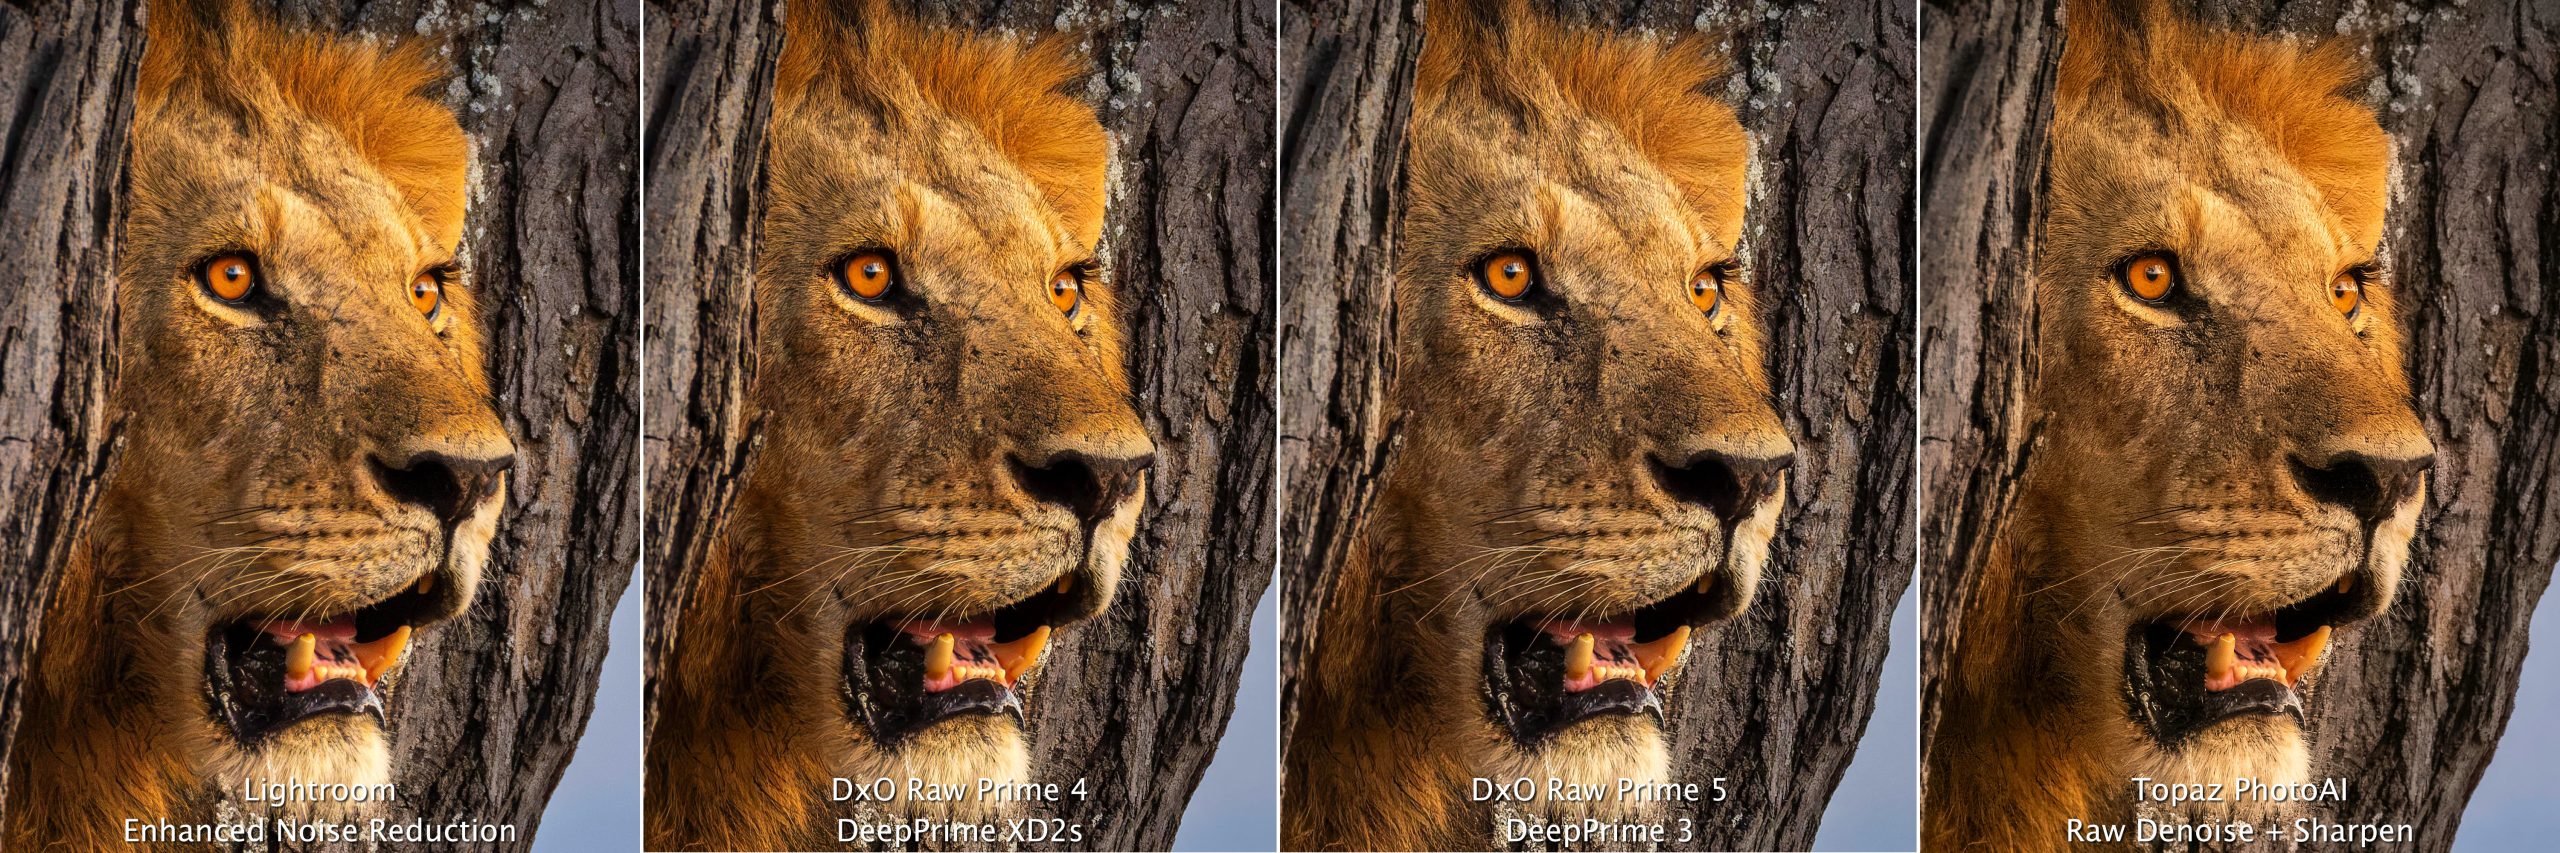
And the 4-up comparison:

According to the DxO website, DxO PureRAW 5 is supposed to deliver ”the ultimate in RAW image quality”. It is supposed to give us, ”sharper, cleaner, more detailed RAW files without upgrading your gear”.
But I’m not seeing that. At least not right away. Repeated testing has shown some improvement to some images, but I’ve not yet determined why it performs better for some and not others.
The Real Upgrade
Perhaps of greater relevance is that PureRAW 5 offers ’Local Adjustments’ allowing users to ”make targeted changes when processing challenging RAW files. Simply create masks to fine-tune denoising and focus Lens Sharpness Optimization with a new level of accuracy” the website tells us.
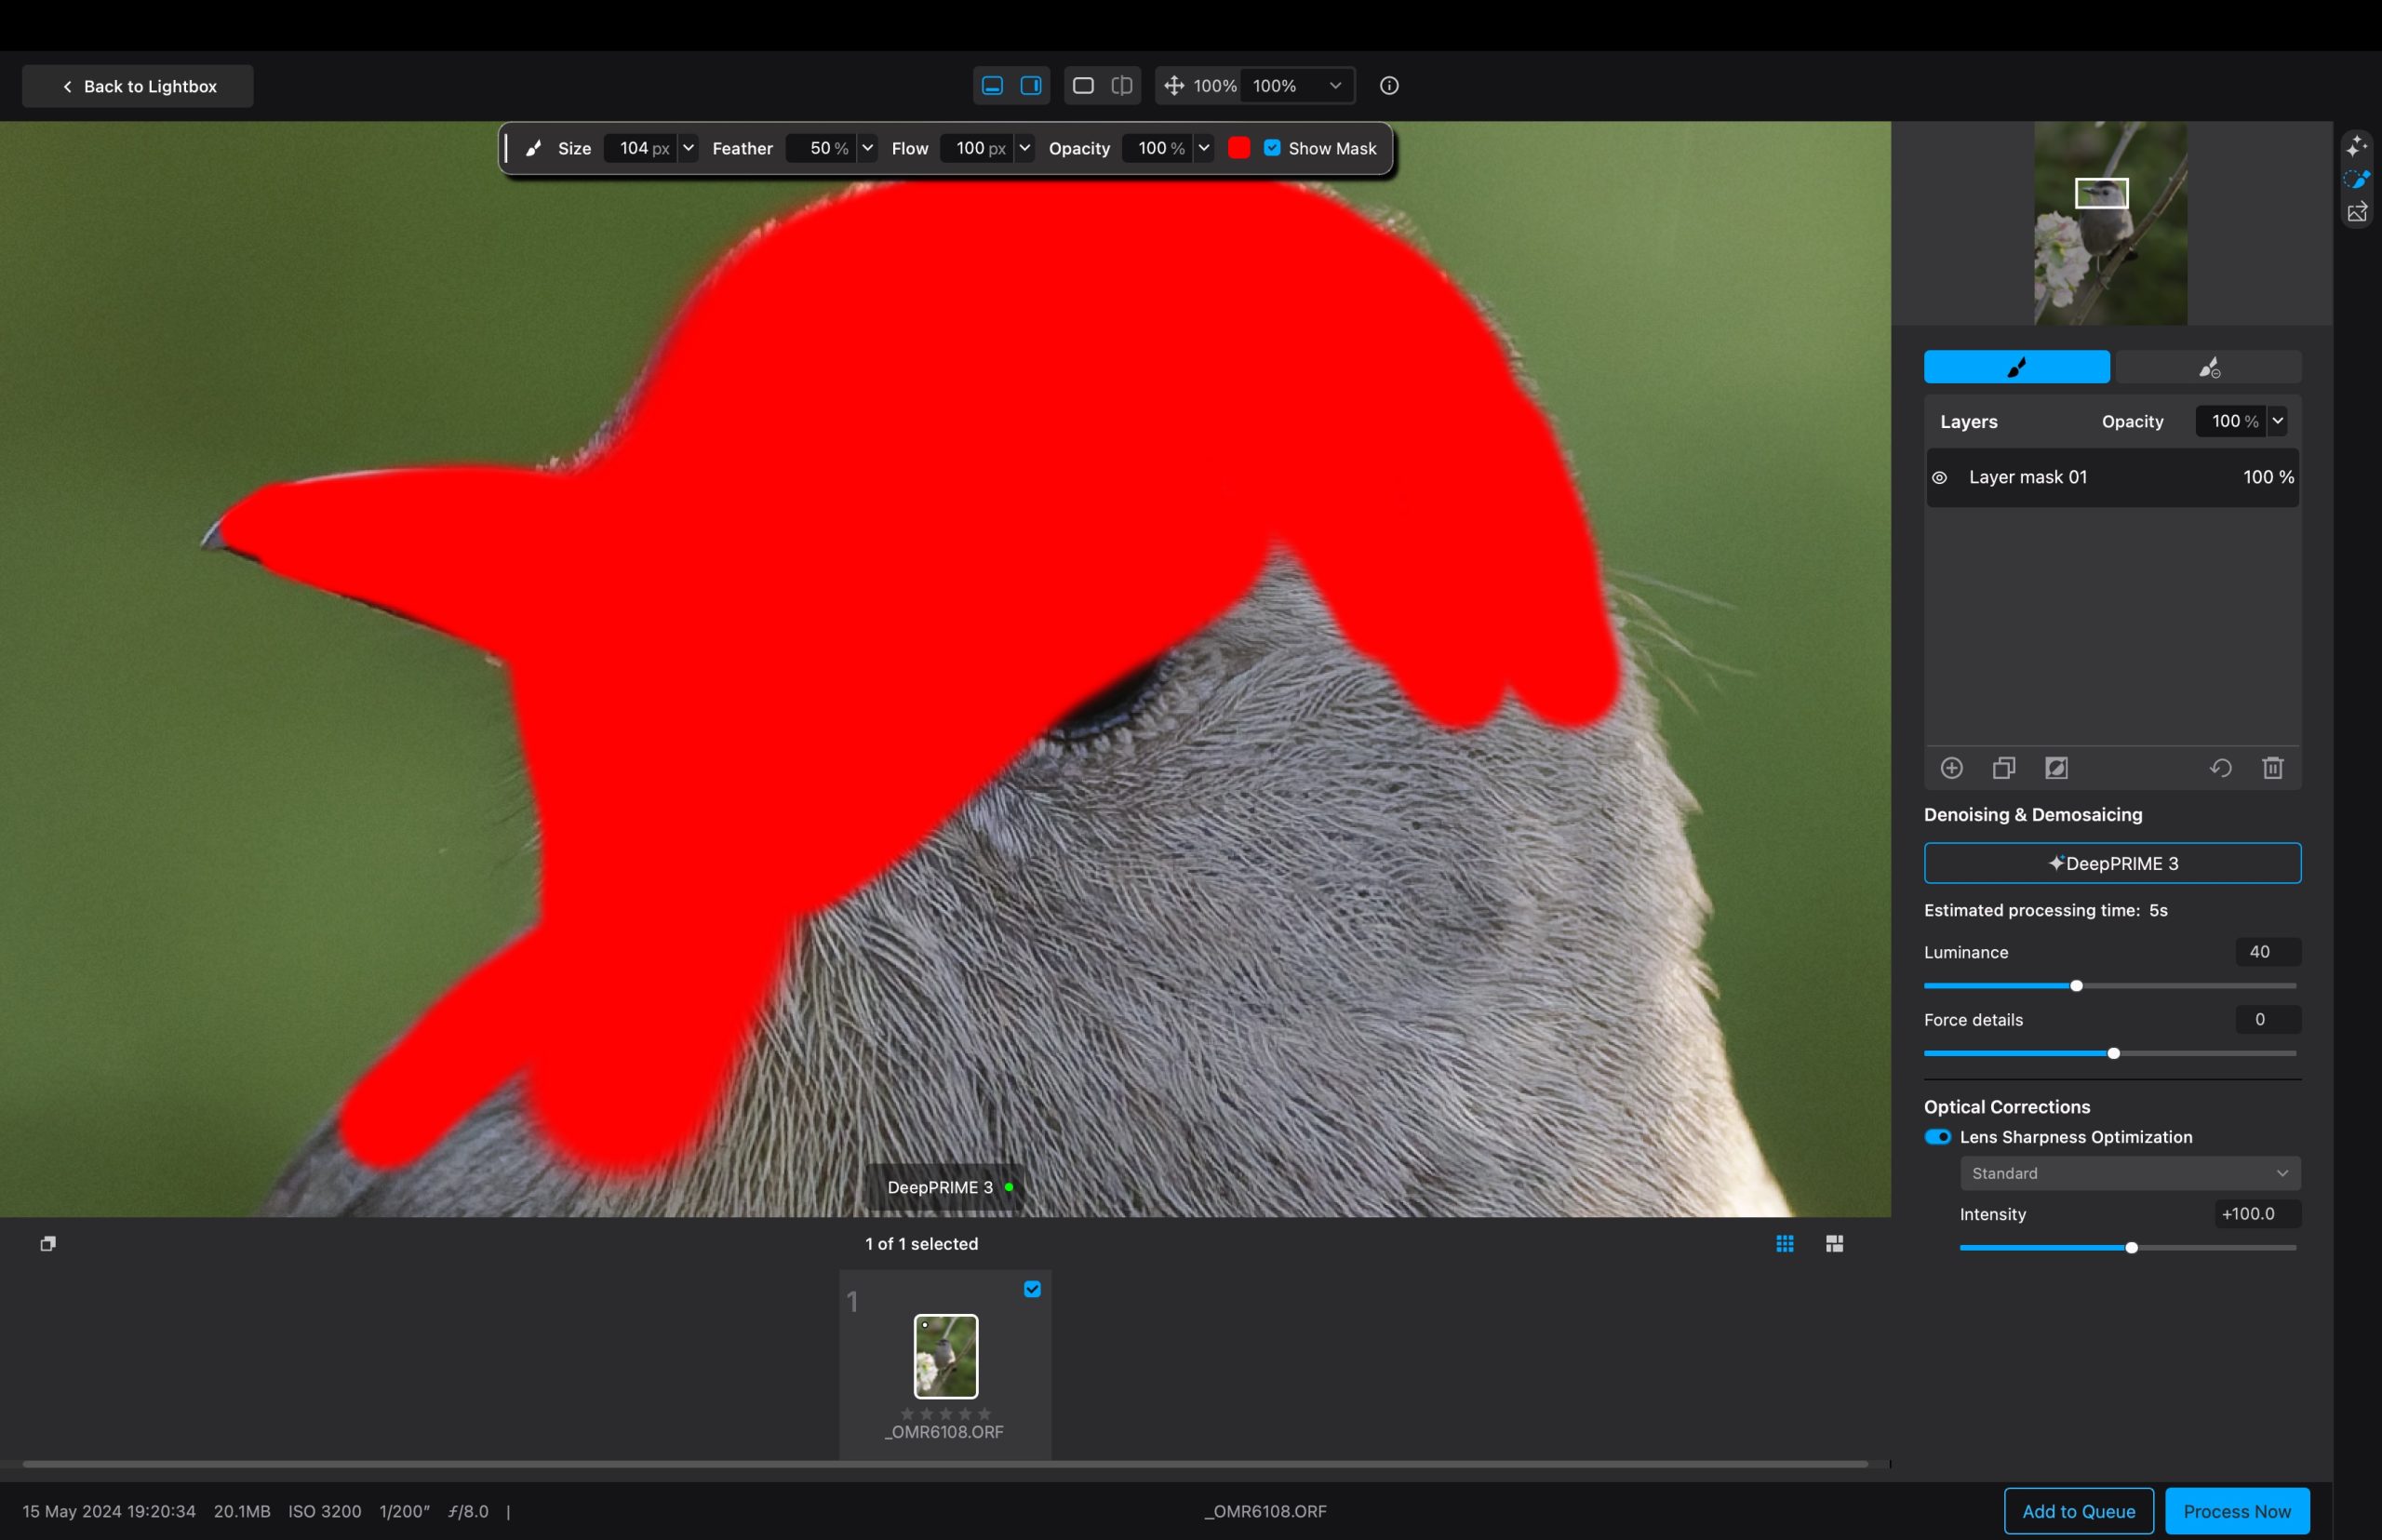
Finally! We can create masks to, for example, sharpen only the subject and not the background. Except, Topaz PhotoAI already has this AND it has a better implementation of it. With Topaz, it automatically selects the subject for you. With all the power of modern AI, why doesn’t DxO have this as an option. Huh? Did I miss something?
That being said, while Topaz’s subject detection is good and helpful, it’s not perfect. I often need to paint in additional subject details and/or paint out areas not part of the subject. However, it always begins with a pretty close approximation, meaning less work for me. Not in DxO PureRAW. Frankly, in 2025, I find it bizarre. How could a bunch of six-figure software engineers miss this simple AI feature?
The other issue is that when painting in the mask, you can set the view to either full or to 100%, nothing in between. I wanted 50%, to see more of the bird as I masked it, but nope, it was all or nothing, at least up on the settings bar at the top. I subsequently discovered I could un-pinch on my trackpad to zoom in. Okay, so other viewing options are available, but why not just have a selection of viewing % in the top bar?
The Big Reveal
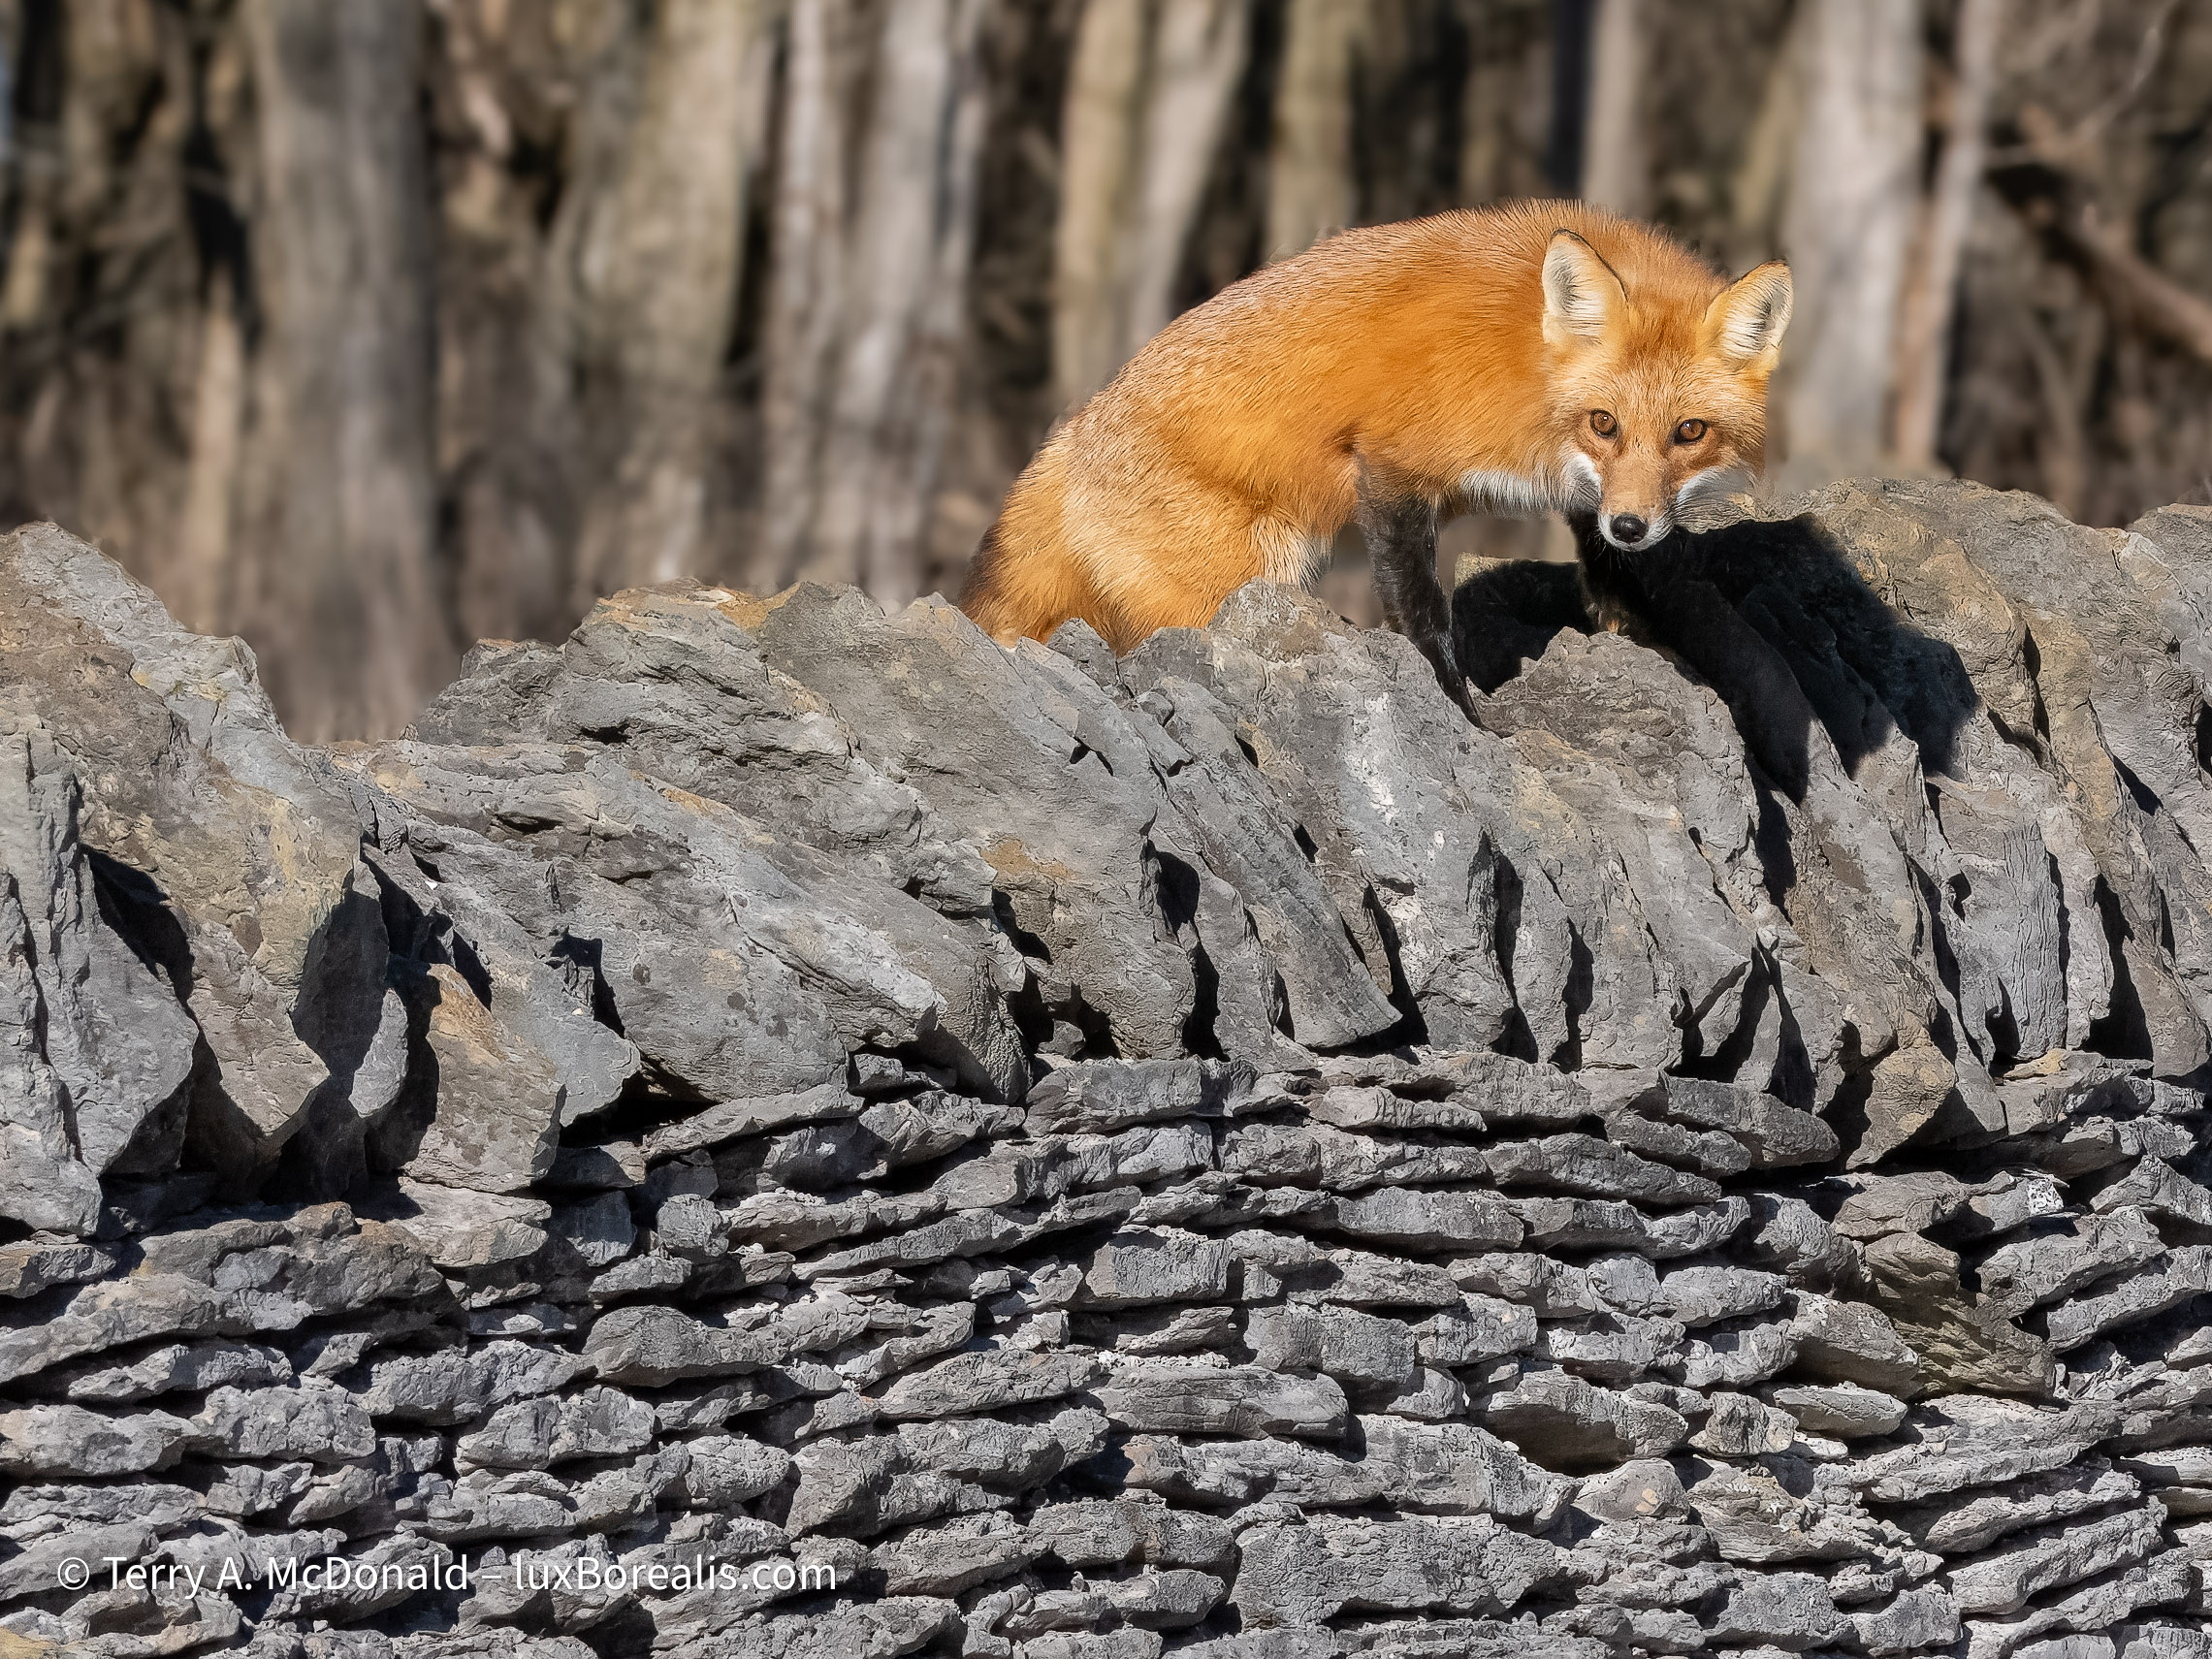
One thing I’ve been clamouring for with Topaz is to have the ability to set the amount of sharpening for different masked areas. In a previous blog, I wanted the Red Fox to be 100%, but the stone wall to be between 50 and 75%. First of all, Topaz only allows one mask, so it’s all or nothing. However, DxO allows multiple masks—and DxO allows users to set the ’Flow’ and ’Opacity’ of the paint brush while masking. Brilliant! The masking brush is almost as intuitive as Lightroom’s, though theDxO brush seems ’blobby’ and has slight delay as you drag it over the image.
I see two areas of improvement here:
- The pixel size of the brush is not actually the pixel size of the brush. If it was, then the paint brush would increase in size as I zoom in. It does not; it remains the same size on screen. However, there may be a silver lining as when I zoom, I tend ot want a smaller brush for details. Hmm—I’ll need to work with this.
- If I paint something then decide I’ve made an error, I cannot use the industry-standard ’Undo’ (Cmd/Ctrl+z), which would be very helpful! Instead, I need to drag my cursor over to the panel and switch to ’Erase’ mode, which to me, is an unnecessary couple of clicks.
High ISO
Interestingly, when I passed one of my High ISO files through DxO PureRAW 5, I saw a decrease in image quality using the default settings. This is the Junior Cardinal I used in my Raw File Optimization comparison article.
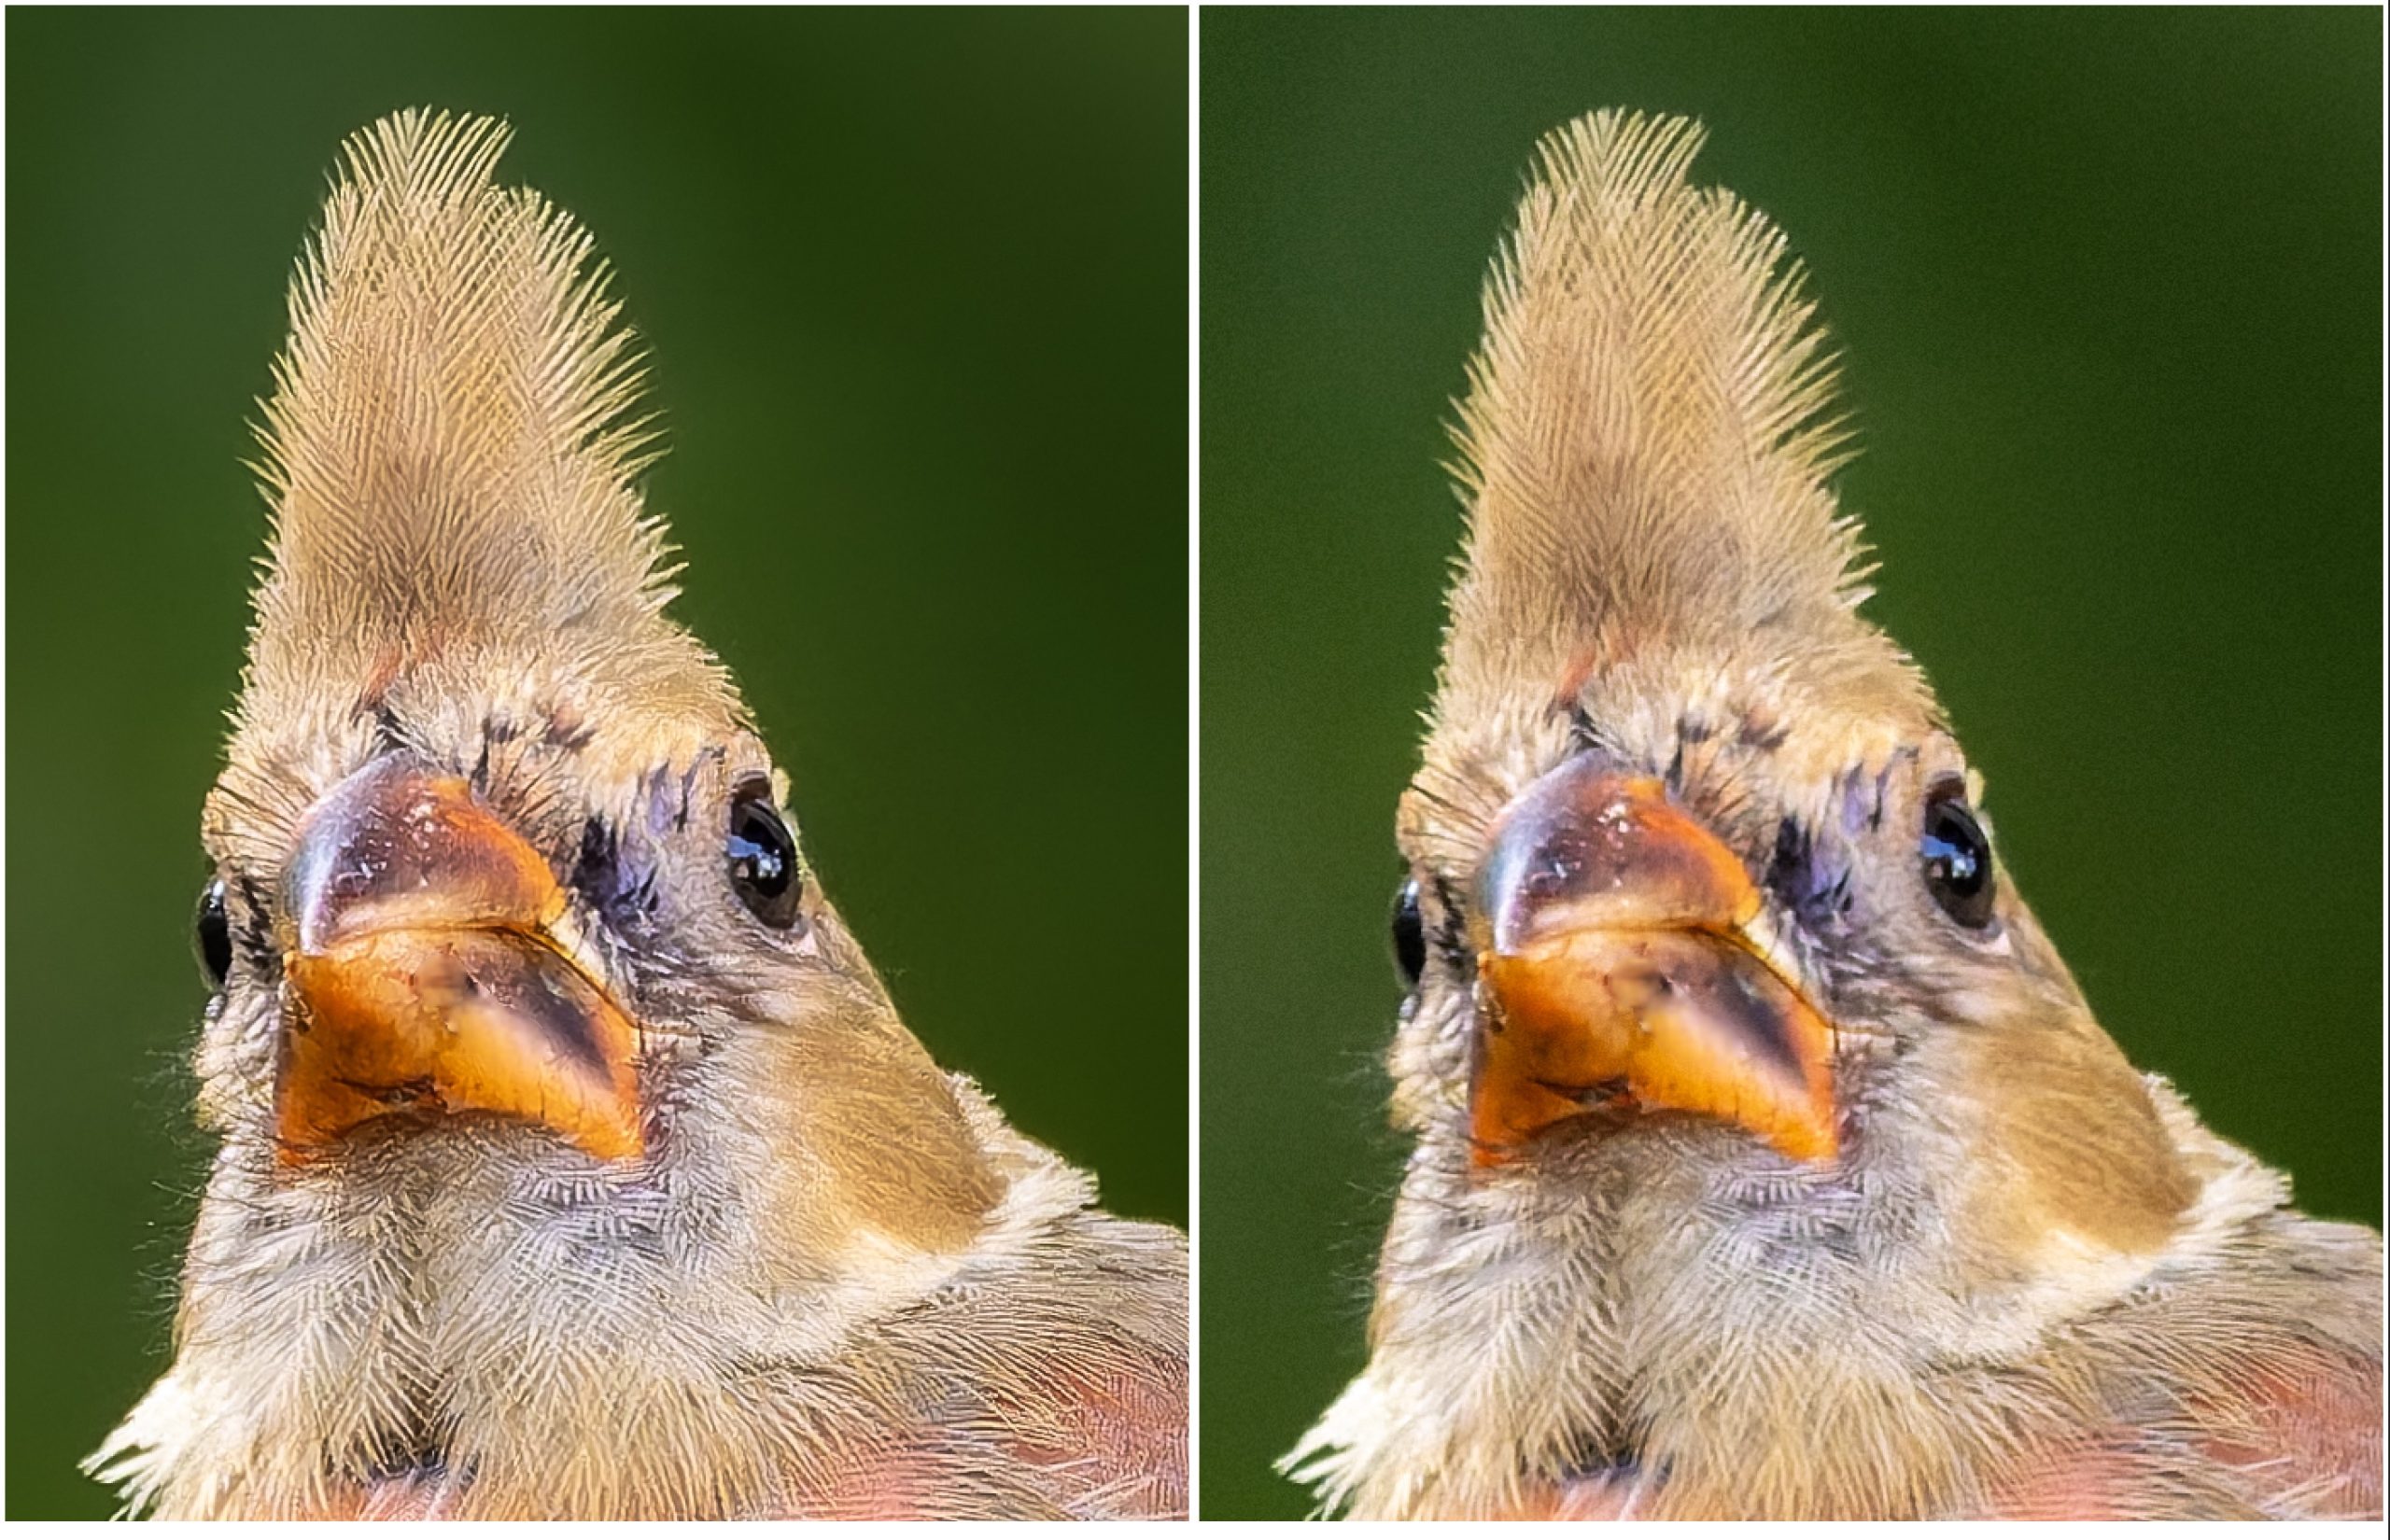
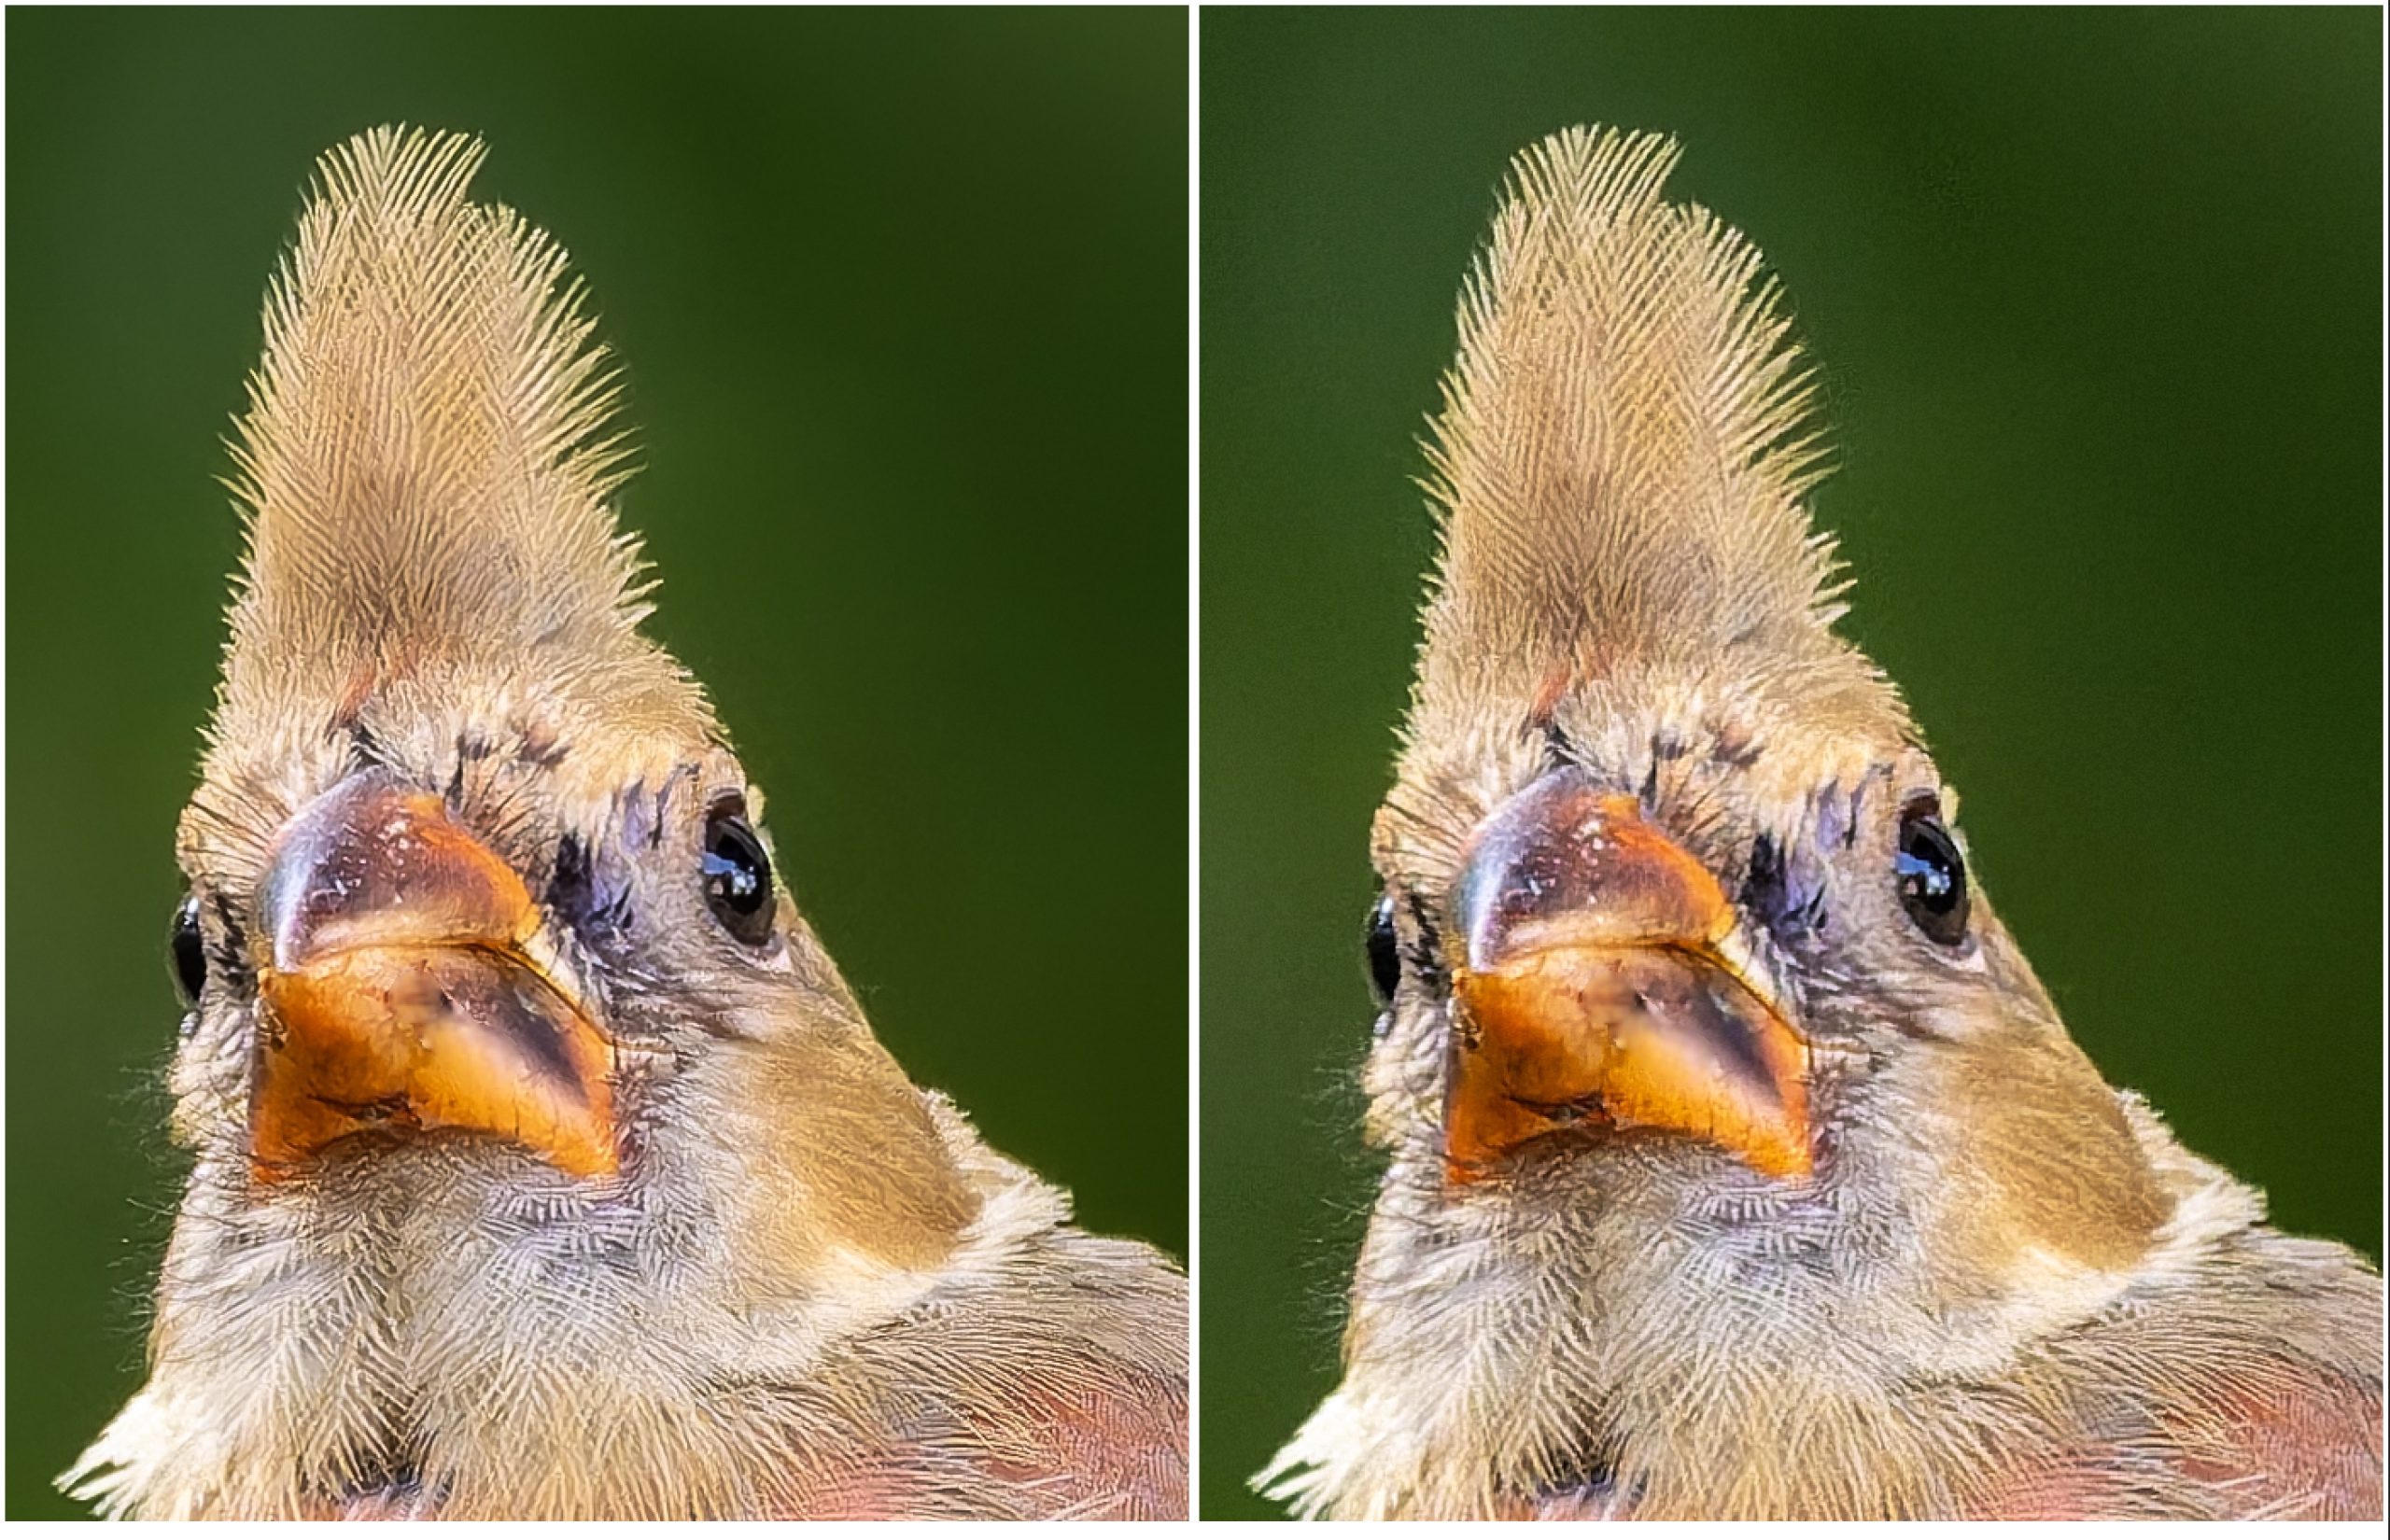
I must admit to being dismayed at the High ISO results. I checked and re-checked them to ensure it wasn’t ’user error’, but time and again, the v5 results did not have the same finesse. I don’t shoot a lot of High ISO, but it is worth investigating. My only guess is that the engineers at DxO made the decision to be less aggressive with the default settings because now users can mask areas for more or less sharpening. So let’s test it out . . .
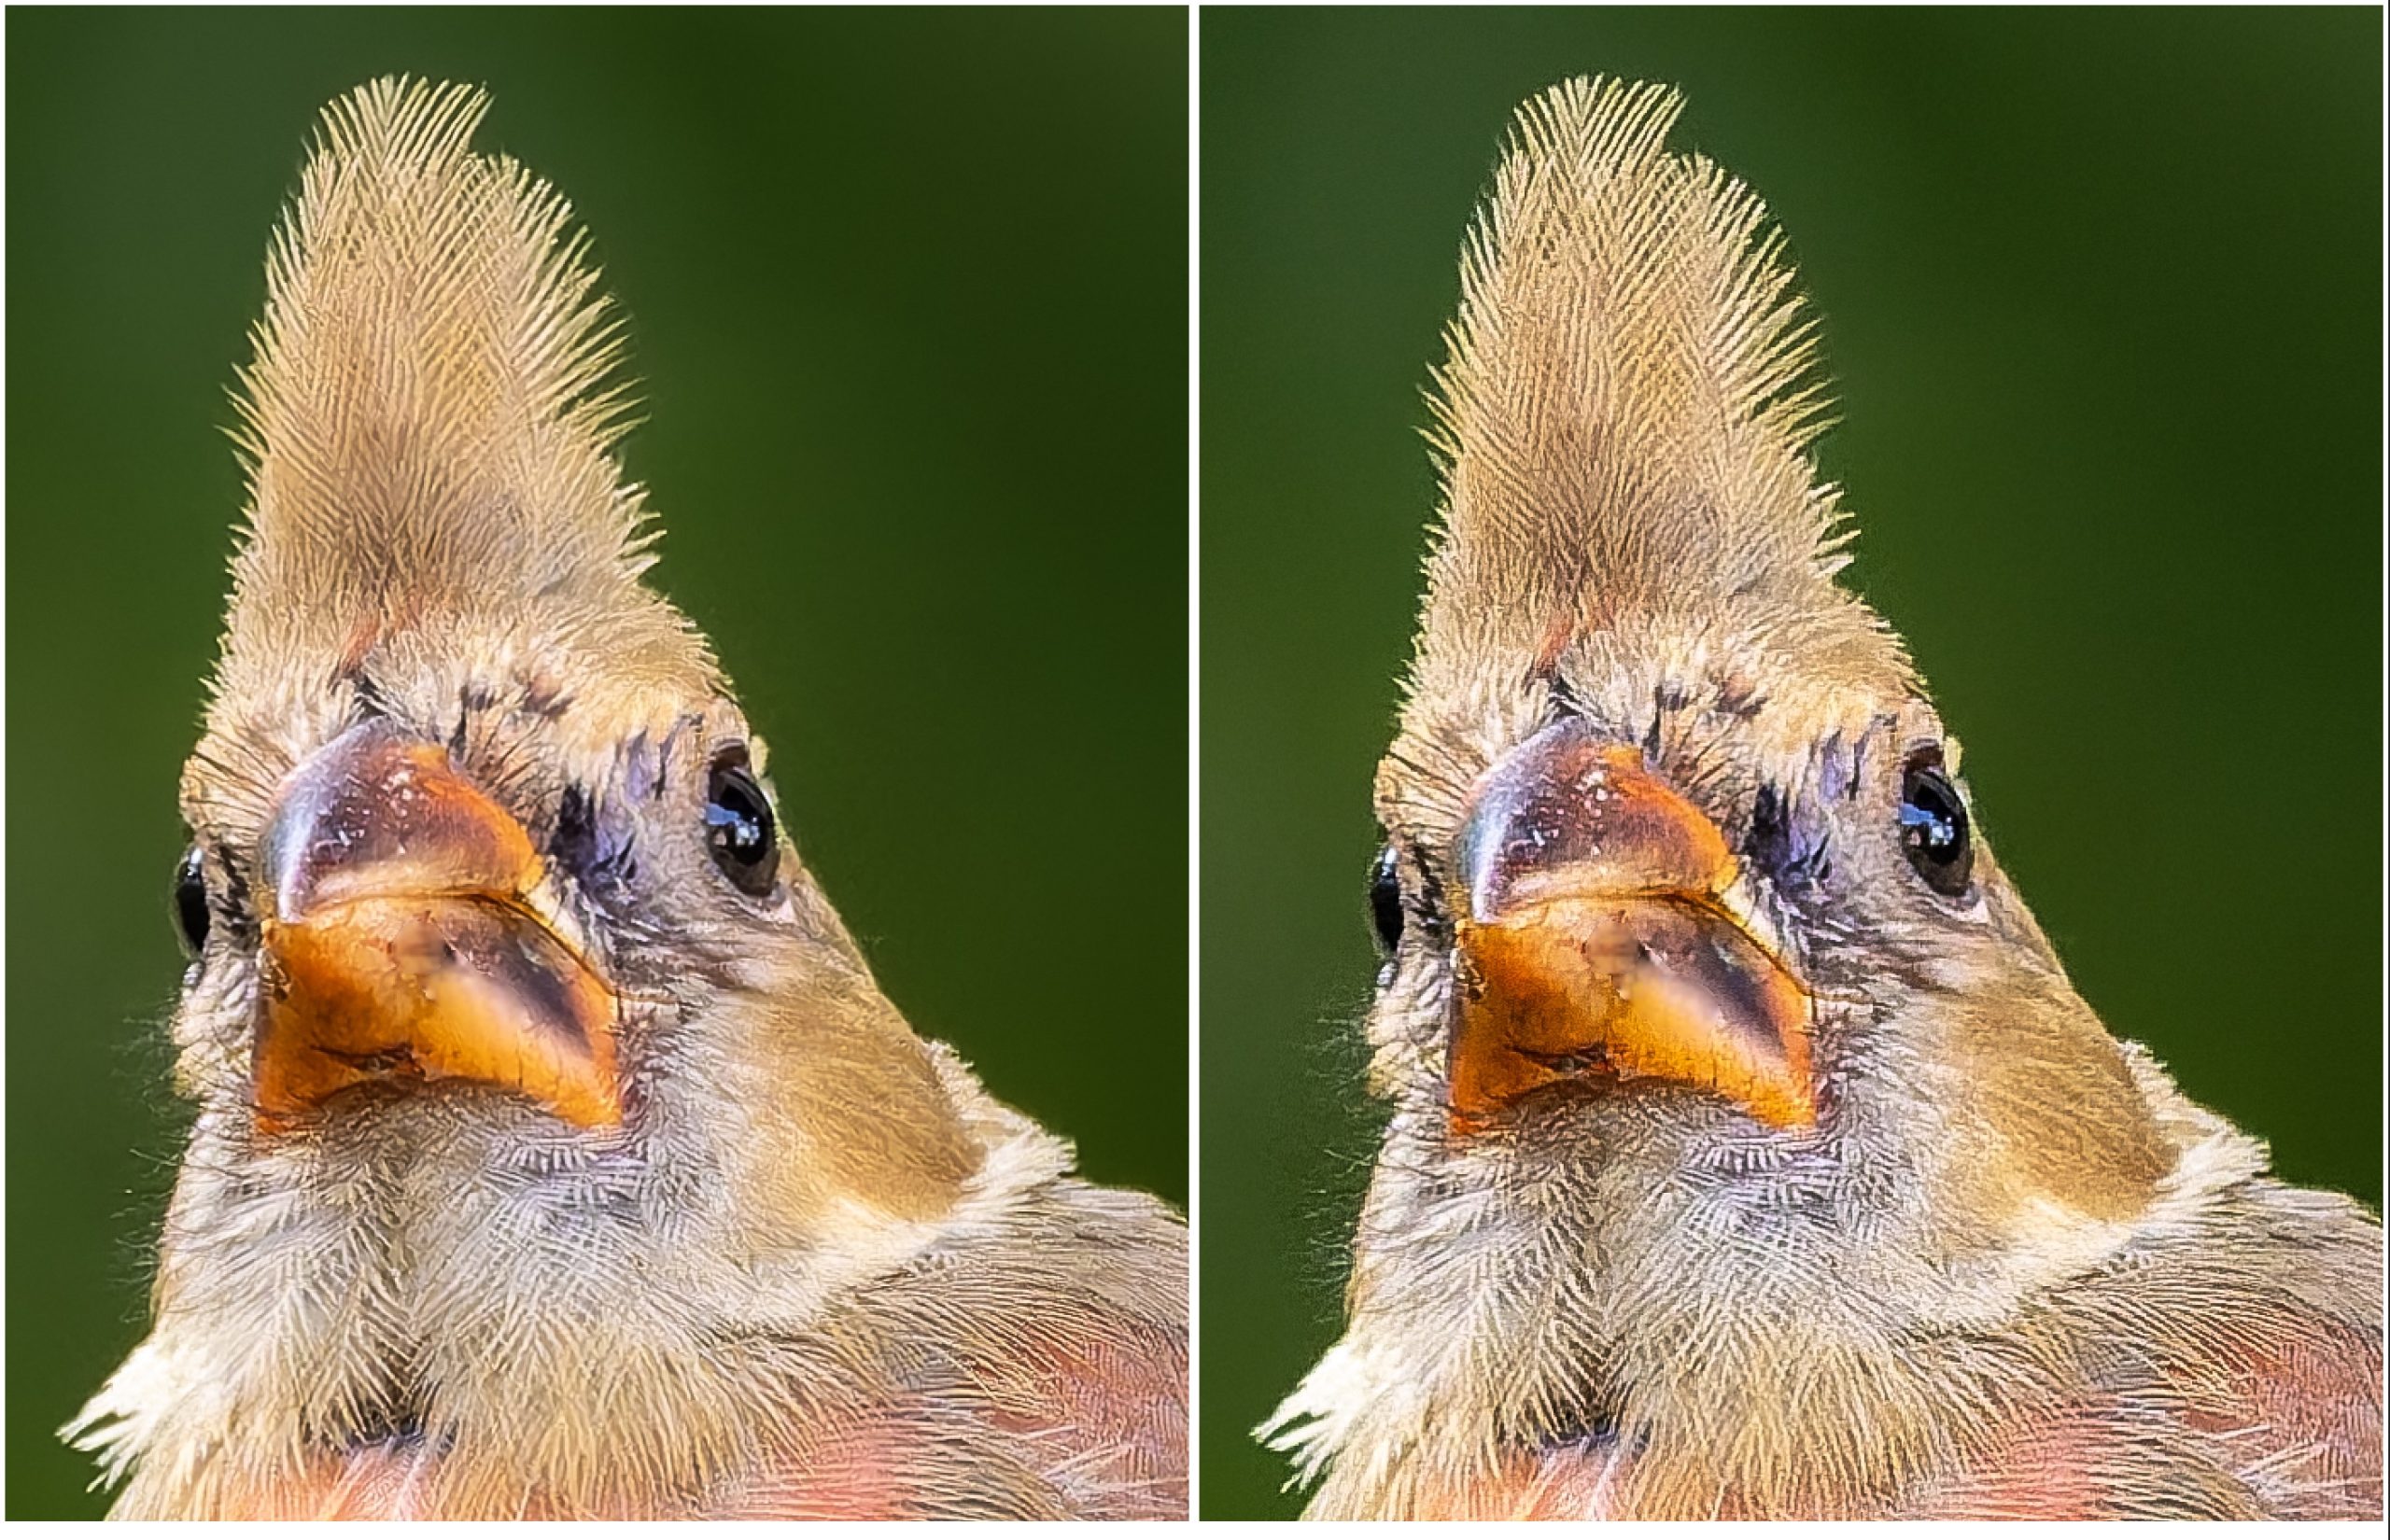
The double masking worked, so, maybe that’s it—allow users more control, more finesse by using masks. However, it took longer—significantly longer than using default settings—but it wasn’t onerous. I set the Subject mask to 50% Feather and painted away; duplicated, inverted and worked on the settings. Probably 10 minutes in total. The final version is worth it, except it only 30 seconds using the default settings of PureRAW 4!! Interesting.
Workflow
Something I appreciate is how easy it is to move from Lightroom to DxO and back again. Note: I never use ’File > Edit In . . .’ from Lightroom as that creates a useless TIF—I prefer DxO has the original raw file to work from, and so does DxO. So I ’Export > Original’ to a folder, right-click the file and select ’Open in > DxO PureRAW 5’. When the processing is complete, DxO applies the changes, saves the file back to the same folder then prompts me to select where I want it opened. I choose Lightroom and voilà, there it is, ready for importing. I can certainly work with that.
Bottom Line
First of all, another small gripe. When I visited the DxO PureRAW 5 Learning and Support page, to look at the tutorials for masking—the great new feature—there weren’t any. And, when I selected the ’What’s new in PureRAW 5’ video, the ’What’s new in PureRAW 4’ video played. Hmm. Someone’s dropping the ball here. I really want to give a positive review, but it’s becoming more difficult.
Will DxO replace Topaz PhotoAI as my go-to raw file processing app?
In a word, no. Lightroom’s own Enhance Noise Reduction already does the job. In fact, I think I really have it nailed down: EnhancedNR at 80% followed by aggressive Detail Sharpening of 100 or more with Masking. It’s this final step of masking which eliminates the sharpening of smooth areas. So, Lightroom already allows for great demosaicing, noise reduction and sharpening. Plus it has extensive, intuitive masking with auto selection of ’Background’ and ’Subject’ and any additional Adjustment Masks I might need to increase or decrease Texture, Clarity, and Sharpening.
However, when I need the use of masking of subject and background for raw file processing, beyond what Lightroom can do for me, then DxO would be the app I turn to. The thing is, since Lightroom already does an excellent job, (as shown in previous blog articles), I won’t be making that shift too often.
Is it worth upgrading to DxO PureRAW 5? If you use Lightroom, then perhaps not. Check the comparison files above. If you’re using Lightroom properly, then you already have excellent Denoising and Sharpening. However, if you are not a Lightroom user, then yes DxO PureRAW 5 is worth it because now you can mask out the background from any sharpening.
Is it worth switching from Topaz PhotoAI to DxO PureRaw? No, not unless you’ve run into cases where you need masking beyond the simple subject mask offered in Topaz PhotoAI.
Remember, all of this talk around improving raw image processing is really geared to those making significant use of their images. If you’re sharing images on social media or online, then it really doesn’t matter—the images are not large enough. However, if you’ll be printing your files or entering them into photo contests and competitions, then a case can be made for spending the additional time and money on improving your raw files.

Elevate Your Vision


Read this story and all the best stories on The Luminous Landscape
The author has made this story available to Luminous Landscape members only. Upgrade to get instant access to this story and other benefits available only to members.
Why choose us?
Luminous-Landscape is a membership site. Our website contains over 5300 articles on almost every topic, camera, lens and printer you can imagine. Our membership model is simple, just $2 a month ($24.00 USD a year). This $24 gains you access to a wealth of information including all our past and future video tutorials on such topics as Lightroom, Capture One, Printing, file management and dozens of interviews and travel videos.
- New Articles every few days
- All original content found nowhere else on the web
- No Pop Up Google Sense ads – Our advertisers are photo related
- Download/stream video to any device
- NEW videos monthly
- Top well-known photographer contributors
- Posts from industry leaders
- Speciality Photography Workshops
- Mobile device scalable
- Exclusive video interviews
- Special vendor offers for members
- Hands On Product reviews
- FREE – User Forum. One of the most read user forums on the internet
- Access to our community Buy and Sell pages; for members only.
You may also like