


NB: This review covers the Epson Stylus Photo 2200 as shipping in theUnited States andCanada . In Europe and much of the rest of the world it is called the model 2100, and inJapan PM-4000PX. Most of my comments and observations will apply to all models, but be aware that there are minor differences, including provided software utilities.
Maturity
The firstEpson Stylus Photowas introduced in 1995, and the photographic world hasn’t been the same since. Arguably Epson has set the standard for digital colour printing over the past 7 years. Every year or two since then Epson has advanced the state of the art‚ and has done so to a far greater extent than any other manufacturer. In fact, it’s fair to say that during the past 7 years there have been greater advances in colour printing technology that in the previous 50 years.
During the mid-to-late 90s the search was for improved print resolution and superior dithering algorithms. Once prints became truly‚ photographic the challenge was stability and longevity. That was finally achieved through the use of pigment-based inks, but metamerism and reduced colour gamut were the price that had to be paid.
Now, in 2002, we have a new printer and inkset‚ theStylus Photo 2200withUltraChromeinks, (U.S. $699). It appears to successfully address virtually every issue that has been raised till now. I believe that it’s fair to say that with the 2200, and its larger brothers the 7600 and 9600, inkjet printing has now reached a level of maturity that requires no excuses or apologies. Ultra-high quality archival inkjet printing has truly arrived!
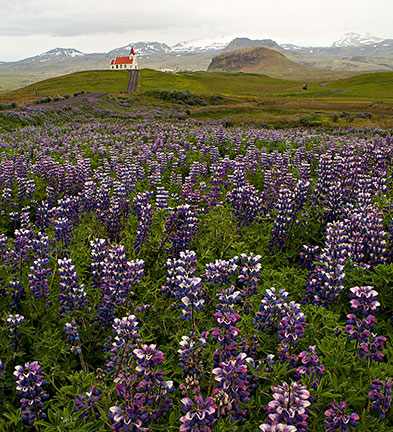 Church & Lupins‚ Iceland, June 2002
Photographed with a Pentax 67II and 55-100mm f/4.5 zoom on Provia 100F
First Impressions
For anyone familiar with Epson’s previous generations of desktop 13X19 printers the 2200 will be a bit of a surprise. It’s bigger for one thing, and cosmetically looks more like a C80 than a 1280. If anything, the 2200 is a more‚ professional looking printer than its predecessors.
The printer ships with an automatic roll paper holder and cutter, and also a cloth print catch basket. Clearly Epson anticipates that this printer will be used in some commercial settings for volume printing. (I have not reviewed these items at this time).
In a first for Epson, the power cord is detachable. I’ve always found it very annoying to have a fixed cord when it becomes necessary to move a printer around, and Epson is to be applauded for the small but worthwhile improvement.
The 2200 ships with both Windows and Macintosh drivers. The Mac drivers include OS X, but there are still a few limitations under this new OS, such as the lack of banner-length printing. I installed the software on both platforms (OS 9.2 on the Mac and under Windows XP, and both installations went flawlessly.
For anyone who has installed and used an Epson printer before the printer driver interface will be comfortable and familiar and for newcomers I can only suggest spending some time with the manual, which is good if sometimes a bit vague on the finer points.
Seven Inks
This is Epson’s first seven ink printer and (praise be) there are 7 separate cartridges. The additional ink is aLight Blackwhich is proported to (and does) give smoother shadow area transitions and better neutrals. There is an optionalmatte Blackcartridge to replace the Photo Black that gives denser dark tones when printing on matte papers.
UltraChrome
The new UltraChrome inks used in the 2200 (as well as the larger 7600 and 9600 models) are pigment based and are rated by Epson as producing prints that will last without appreciable fading for as much as 80 years. This makes them somewhat less archival than the previous generation of pigment inks as used in the 2000P. But, the reduced longevity isn’t much of an issue. With a rated life without visible deterioration under normal display conditions of three quarters of a century, these prints will outlast those from virtually any colour process, including Cibachrome.
Of course longevity without accuracy, purity of colour and other desirable characteristics wouldn’t be of much use. The UltraChrome pigment inks are a definite step up from the 2000P’s inks in this regard. Yellows in particular are brighter and more saturated, as are reds. These are pigment inks that are very close indeed to the wider colour gamut of dye-based inks. This means that longevity and colour stability are not being sacrificed by using dulled-down colours.
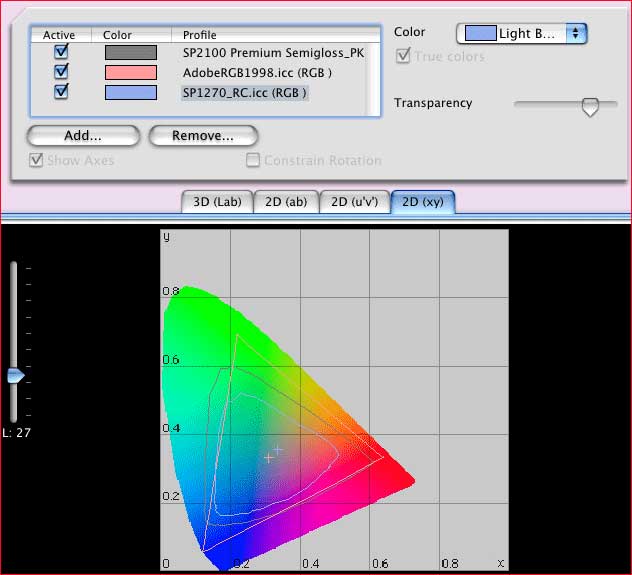
Gamut Plots courtesy‚Ian LyonsofComputer Darkroom
The gamut plot is actually a "slice" from a 3d plot and represents the maximum difference between the two profiles. I have attached a similar plot for 2100 semi-gloss compared to 1270 Prem Gloss compared to Adobe RGB for interest. Note that at the point shown the 2100 has a larger gamut than the 1270 and can print cyan way beyond anything Adobe RGB can handle, but is shy in saturated green and blue. I can look at the profiles is 3D and still see that 2100 is a lot better than some would have us believe.
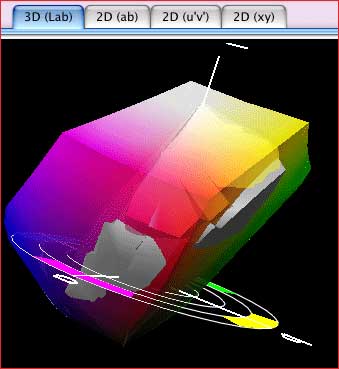
This 3d plot shows us looking into the Adobe RGB gamut at the 2100 semi-gloss gamut.
Firewire, USB & Parallel
For the first time Epson has shipped a desktop printer with a Firewire connection. There isn’t a difference in printing times between USB and Firewire (though there may be with parallel), but there is one great advantage to having this extra connector‚ at least for those with two computers. Both can be connected at the same time.
I have both a Windows XP machine and a Mac G4 on my desk. I have the Mac connected through the Firewire port and the PC connected through USB at the same time. This works perfectly. I haven’t tried sending data to the printer simultaneously from both printers, and won’t. But, if anyone wants to test this, please let me know what happens 🙂
Profiles & Colour Management
The 2200 driver software for the Mac ships with 9 different paper profiles as well as two standard ones. There are two each forEnhanced matte(the new name forArchival matte) and forVelvet Fine Art,a new paper. They are labeled either MK or PK. The MK profiles are for use with matte papers when you use the optionalmatte Blackink, and the PK profiles are for use with matorglossy papers with the standardPhoto Blackink.
On the Mac there are two ways of dealing with the issue of color management and profiles. The follow descriptions assumePhotoshop 7. It isn’t that different with earlier versions of Photoshop, or with other programs.
Method #1
Or¦
Method #2
You’ll find that both methods do a very good job and that only through producing custom profiles can you get somewhat better print results. I find the provided profiles to be very good indeed.
The PC (for reasons known only to Epson) does not ship with profiles for various papers. You’ll find though that during driver installation a profile calledStylus Photo 2100/2200has been installed in your ICM directory. Do not print with it directly. Here’s what to do.
On the PC the steps are as follows¦
If you have access to a Mac you can install the Mac driver and then copy the profiles over to the PC. You just need to put them in the right subdirectory and rename them with an .ICM extension. If you do this then usePrintingMethod #2from the Mac section above.
Because these profiles are the same for the Mac and the PC it really makes one wonder why Epson doesn’t provide them on a PC installation. Do they think that PC users are less sophisticated users than Mac owners?
Update‚ Aug 9, 2002:This mystery is now resolved.Here is the solution.
Photo 1440
Vs . SuperPhoto 2280
Since the introduction of the 1280/1290 models Epson’s Photo printers have been able to print at 2280 PPI as well as 720 and 1440 PPI. When I first tested the 1280 model I spent a lot of time looking at prints through a high quality loupe as well as by eye alone, trying to determine if the higher resolution mode was worth the extra printing time.
What I saw with that printer was that under a 4X magnifier I could see aslightdifference in sharpness and a somewhat smoother dithering pattern. But, to the naked eye there was no visible difference. I found the same thing to be true with the Epson 5500 printer, and so I never used 2880.
When I made my first prints on this new printer at 2880 I fully expect to see the same results as with previous Epson printers, but indeed there is a difference with the 2200. Prints done at the highest resolution definitely appear sharper to the naked eye. Curiously, when 2880 resolution prints are viewed with a loupe, though the dithering pattern is definitely smoother than on 1440 prints, they do not show any higher resolving power. But, to the naked eye they appear sharper!
The only explanation for this is that what is being seen is not a resolution difference, but rather an acutance improvement. In other words, edge sharpness appears to be enhanced rather than resolution. Since these printers are already producing prints that are at the limit of the human eye’s ability to see detail (seeUnderstanding Sharpness), this explanation makes sense. By enhancing edge detail Epson’s engineers have found a way to make prints appear sharper, even though they don’t resolve any higher detail.
The net of all of this is that I intend on printing withSuperPhoto 2880mode for my exhibition and sale prints, while using 1440 mode for testing and more casual applications. The small but definitely visible image improvement makes the additional printing time worthwhile.
Metamerism‚ Not!
It’s now been exactly 2 years since the 2000P, Epson’s first printer to use pigment inks, first appeared. The good news at the time was that 2000P produced prints with a rated longevity of between 100 and 200 years, depending on the paper used. This was longer than even the most archival photographic processes previously available, likeCibachrome/Ilfochromeand evenDye Transfer.
The bad news was that the 2000P suffer from metamerism‚ badly. (Å“Metamerism is a word used to refer to the fact that some colour inks (particularly pigment-based inks) can appear different under different light sources).There was great consternation in the photographic community over this and many, myself included, were torn between wanting to be able to make truly archival prints and yet nervous about selling or exhibiting prints that looked quite different in either daylight or incandescent light.
The next generation of pigment ink printers, the 5500, 7500, 9000 and 10000 improved on this quite a bit. The metamerism was still there, but one could live with it.
Now with the 2200, as well as the 7600 and 9600 printers, all of which use the same newUltraChromeinks, metamerism is a thing of the past. Yes, it’s still very slightly there.Slightly. Place identical prints side by side, one under a 5500K light source and the other under a 3200K light source and there is a small visible difference. But, look at one in daylight and then take the other indoors, and without a direct side-by-side comparison you’ll be very happy in both instances.
You can now take the wordmetamerismand place it in that part of the brain that contains words and phrases you know the meaning of, but don’t use much any longer, likehula-hoopanddot-com success story.
Timing
Compared to its predecessor the 2000P, the 2200 is a much faster printer. In fact it prints at almost exactly the same speed as the heavy duty Epson 5500. A 6X9 image printed on A4 paper at 1440 PPI takes exactly 5 minutes to print. Worst case‚ the largest print possible with this printer on Super B (13X19) paper takes 30 minutes in 2280 PPI mode. It’s not a speed demon like the new Canon 5000 but I can live nicely with its pace for fine art applications. Those doing more commercial applications (like school portraits) where time is money, may find the Canon a better choice in this regard. The inks appear to be very moisture resistant, with no smearing when wet.
Matte Black Ink
As mentioned earlier, the 2200 has two black ink cartridges‚ Photo Black and Light Black. The Photo Black can be replaced at any time by an optional matte Black cartridge. According to Epson the purpose of this optional ink is to provide improved shadow area printing when using matte paper likeEnhanced matteandVelvet Fine Art. (At the time of this writing, just shortly after 2200 printers have become available in
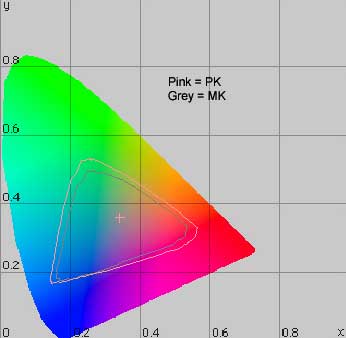 Gamut Plot courtesy‚Ian LyonsofComputer Darkroom
This gamut plot shows how the use of the PK profiles along with the use of matte paper and the optional matte Black ink has a smaller gamut than the PK profiles used with glossy papers and the normal Light Black ink.
The Missing Gray Balancer
The 2100 (the European version of the 2200) shipped a number of weeks before the 2200 shipped in North America. For some reason this has become Epson’s usual practice with new printers. It ships with something called theGray Balancer.
This is a combination of printed targets and associated software which allows one to fine tune monochrome (B&W) printing to better achieve either very neutral, or purposefully tinted monochrome prints. There was initially some consternation when it was discovered that the 2200, as shipped in the
I made some enquiries to try and understand why this was the case, and here‚ unofficially‚ is what I’ve heard. Apparently Epson
Now, why Epson
Monochrome Prints
Due to the use of the second black ink I was eager to see how the 2200 handled printing in B&W. I have been doing monochrome printing with thePiezographysystem on anEpson 1200with aContinuous Inking Systemfor a while now and have been extremely happy with the results. (I said I’m happy with the‚ results, not the system itself. It suffers badly from head clogs and is a total pain to use. No head cleaning technique [and I’ve tried them all] will keep it running reliably).
I’m really happy to report that straight out of the box‚ with no messing around whatsoever‚ the 2200 produces beautiful B&W prints. Under indoor lighting they are slightly warm in tonality, while under daylight they appear to me to be essentially neutral.
Frankly, after a couple of days of testing the 2200 when printing black and white, and comparing the results to Piezography prints, I’ve now retired that system and will be doing all of my monochrome printing with the new 2200 from now on. Goodbye clogged heads.
Conclusion
This report is based on less than a week’s testing. But, this has been sufficient for me to become totally sold on this printer. It appears to answer every need that a serious desktop darkroom worker could ask for¦
In the weeks and months ahead, as I have a chance to test this printer and inks further, I’ll update this report with additional observations. And, lest my enthusiasm be misinterpreted, the 2200 that I’ve been using is one that I’ve purchased at retail, not a loaner from Epson. It has now become my primary printer. In a couple of years Epson, or someone else, may bring out a desktop printer that surpasses the 2200, but for the time being I believe it to be the finest printer currently available for the serious photographer.
Postscript
The question now becomes‚ how does this printer compare to the other choices available, including theEpson 1280/1290and especially the newCanon S9000.
If archival issues aren’t critical for you, but lower purchase price and ongoing ink costs are, then the Epson 1280/1290 is a very good choice. The biggest strength of the S9000 is its speed; dramatically faster than anything from Epson. So if that’s a major concern then the Canon is a very good choice.
But if neither speed nor costs are of paramount importance then theEpson 2200is today’s hands-down choice in a photographic printer.
Oh yes‚ one more thought. My preference is for matte printing papers, and the 2200 is outstanding with these. But frankly, with glossy papers the 2200 isn’t quite as good and one should look at sample prints before making a purchase decision if high gloss papers are your preference.
Related Articles
The Missing Windows Profile Mystery Solved
Velvet Fine Art Paper‚ A First Look
Another Opinion on the 2200, Including Mac Issues & Ink Usage Costs
A Review and Commentary on the Missing Gray Balancer
Making Beer – the Epson Download and how to use a Kodak Gray Scale


Elevate Your Vision


Read this story and all the best stories on The Luminous Landscape
The author has made this story available to Luminous Landscape members only. Upgrade to get instant access to this story and other benefits available only to members.
Why choose us?
Luminous-Landscape is a membership site. Our website contains over 5300 articles on almost every topic, camera, lens and printer you can imagine. Our membership model is simple, just $2 a month ($24.00 USD a year). This $24 gains you access to a wealth of information including all our past and future video tutorials on such topics as Lightroom, Capture One, Printing, file management and dozens of interviews and travel videos.
- New Articles every few days
- All original content found nowhere else on the web
- No Pop Up Google Sense ads – Our advertisers are photo related
- Download/stream video to any device
- NEW videos monthly
- Top well-known photographer contributors
- Posts from industry leaders
- Speciality Photography Workshops
- Mobile device scalable
- Exclusive video interviews
- Special vendor offers for members
- Hands On Product reviews
- FREE – User Forum. One of the most read user forums on the internet
- Access to our community Buy and Sell pages; for members only.
You may also like


