


Monument Valley: A Special Place
If you are an outdoor photographer whose passion drives you to:
- Travel to many locations seeking to capture and create striking images
- Spend much of your time thinking about the next photo-outing
- When not thinking of trips, think about new equipment that will enable better images
- Make at least 2000 exposures a year
- Wonder how to increase your percentage of winning images, but
- Value diversity over depth in assembling your portfolio, then this article is written for you.
Before you feel singled out, let me say that this profile probably fits the great majority of outdoor photographers, including me, which is why I feel qualified to offer some observations and guidelines that may help you produce more images that satisfy your own demanding standards.
First, there is nothing wrong with expanding your geographical reach. But, the discipline of taking “full measure” of each location and capturing its various moods is the most important step to consistently bring back meaningful vibrant images. Therefore, consider following these steps to guide your field trips:
- Develop a short list of high priority scenic locations that offer a variety of photographic opportunities. Most likely, you have already photographed some or all of those.
- Even if you feel you already know a lot about these sites, research these locations in great depth to know your subjects more intimately. Consider how these sites look from different perspectives, where the sun rises and sets, and how the modeling changes over time and season to season. Review images made by others and when they were made.
- Plan multiple trips to these sites and note the seasons that produce the strongest images.
- Schedule more time on each trip to fully explore diverse perspectives and compositions.
- Check weather reports regularly, and be alert to changing conditions, and ready to move quickly to capture shifts in mood and nuance.
- Consider all the elements in the scene as important to your composition, and wait until they fall into place. Recompose as necessary.
- Review your most recent images and think about the essence of that location, and of additional ways to express that. Make that the basis for your next trip there.
I selected the opening image and 16 others along with brief comment to illustrate how these guidelines were applied in my case.
The above image of Monument Valley, taken in October 2016, is the same image that I saw and, regrettably, didn’t stop to capture six years earlier. It is an expansive vista seen from outside the park, and except for distant views from Hunt’s Mesa, differs from my other Monument Valley images which were taken inside the park and more closely focused on individual buttes and spires. Yet, it captures more of the mood and setting of Monument Valley. Six years earlier, I would not have included the barbed wire fence that circumvents the park. But, it is an important compositional element that helps portray the vast stretch of sage-filled desert, but without monotony. The blue sky filled with fleecy clouds makes the image, and is more likely found in the months of April and October. This is a single image cropped to a panoramic format.
The remaining sixteen images were taken in three of my favorite locations, two red rock formations in Sedona, Arizona, and the Teton Range in Grand Teton National Park.
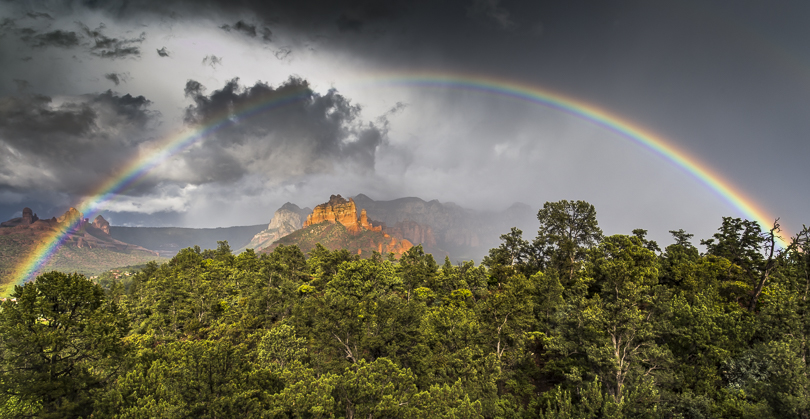
Following are five images of a red rock formation called Crimson Cliffs and another image of a nearby formation known as Carrousel Rock. Both formations stand apart from the Mogollon Rim, the southern edge of the Colorado Plateau. I see these two formations every day from my house. So, it’s easy for me to understand the moods of this location in great depth. But, easy or not, I’ve devoted much time to producing a collection of images that fully present the different contexts in which the Crimson Cliffs and Carrousel Rock can be viewed. As you review these images, consider how different focal lengths, camera locations, foregrounds and atmospheric conditions combine to produce dramatically different presentations, but all with strong appeal.

Before viewing the next image, please note a second red rock formation on the left margin of the above photograph. This is Carrousel Rock (though in reality it is comprised of separate formations that appear as one from a certain angle and distance). This formation is the background for the next image.


Last Monsoon Clouds of the Season, September 2016The next image was taken one day before the super-moon was 100% full, to catch the moon-rise while the rock surfaces reflected the last rays of the setting sun.

The final image in this Crimson Cliffs series was taken in winter, and again from the street in front of my house. But, it is a two-image stitched panorama spanning a normal 40-degree field of view. I used a Sony 90 mm macro lens, rather than a normal lens, to provide maximum sharpness, and confine the vertical field of view to what was most important.
Despite the same general view of this subject, the winter storm conditions provide drama not seen during other seasons.
Cathedral Rock is another of my favorite locations in Sedona, as it is for millions of visitors who have photographed this Western icon. I have photographed this formation from other orientations, though those images never came close to the beauty exhibited by Cathedral’s westward facing orientation. Therefore, you will see little change in the angle of view in the following six images. The variations result from differences in foregrounds and lighting. All four seasons are represented.


The next image was taken in a Monsoon rain storm. It was shot from across Oak Creek with Cathedral Rock standing against a dark forbidding sky. I waited in the rain for two hours until the sun shone through a small opening in the clouds and brilliantly illuminated the rock formation for about twelve seconds.

The following image of Cathedral Rock was taken a considerable distance from where the previous ones were shot. This is a scene that I had taken two years earlier with a wide-angle lens to maximize depth of field. Since this diminished the size of Cathedral Rock in the background, the image was disappointing. This time, I used a short telephoto lens and took four exposures, each focused on a different point, and merged them in Photoshop to get both the gnarled Juniper trunks and Cathedral Rock in sharp focus.


In the winter-time, the setting sun illuminates Sedona’s red rocks with a more delicate light, though it can seem bright in comparison to the surroundings. The last image of Cathedral Rock was taken from a vantage point higher up on Oak Creek where the only view of the formation is from a small point of rock jutting out into the creek allowing the viewer to look under a tree branch hanging over the water. There is room for only one photographer and tripod on this rock; and I arrived too late to lay claim. But, the sun slipped behind the clouds several minutes before sunset, and the entire horde packed up and left. I stayed and took my place on the rock, remembering that the sun often dips below the cloud layer just before setting. It did, and with less than a minute to go Cathedral Rock shone with unearthly brilliance.

Living in proximity to some of your favorite locations makes it easy to spend sufficient time to maximize photo-opportunities. But, what do you do when you travel to distant and remote locations and can only spend three or four days there? This isn’t even close to impossible. It merely requires thorough research, and discipline to select the two or three most important sites. and allocate quality time to be devoted to just those.
My Spring 2016 trip to Grand Teton National Park and the Teton Mountain Range is a good example of that. There are very few places where a mountain range rises from a flat plain, and where you can see entire mountains from almost any angle. The many great viewpoints along the Snake River and from lakes and meadows makes this area worthy of numerous trips.
I have photographed scenes and wildlife in the Teton-Yellowstone eco-system for decades. On occasion, I have returned from there feeling that my images failed to meet my expectations. After some thought, I realized that I didn’t do enough research, and didn’t set forth specific objectives and a detailed plan before each trip. I remember thinking “with so much great scenery, how could anyone miss?”. My 2016 trip to the Tetons was different. I spent much time researching favorite viewpoints and comments of local photographers, and studied photographs of these scenes taken at different times of day and times of year.
I chose to concentrate on three vistas, with emphasis on sunrises. The Tetons which are normally a uniform dark-gray take on a beautiful pink to purple hue at first light, depending upon time of year and weather. The most satisfying images of these early moments show reflections in still water such as seen in river bends and ponds. Therefore, I decided to confine my early morning shooting to:
- Schwabacher Landing, which views the southern part of the range with Grand Teton Peak as the focal point;
- the Oxbow location of the Snake River, which has the northern range in the background with Mount Moran featured prominently, and to
- Moose Flats from where the entire Teton Range is in view. I also wanted a time of year when the mountains would have extensive snow cover, but when the skies would be mostly blue with abundant clouds. That put me in mid-to-late May.
After arriving mid-afternoon, I checked out these three locations to eliminate uncertainty regarding routes and travel times, and the best places to place my tripod.
The first morning was spent at Oxbow, a broad deep curve in the Snake River from which the northern Tetons and, with luck, great reflections are to be seen. I left a group of photographers who stayed up on the road turnout and hiked down to the river’s edge and along it for about 500 yards. Soon after I set up, the first few rays hit the top of the peaks and turned them purple-pink. The cloudy sky was dark blue, and the tones of the foreground were very muted. I had already decided to use a short telephoto focal length and took a series of five overlapping images covering the full extent of the visible peaks to produce digitally stitched panoramas.
Within a minute or two, the mountains turned a rosy color, and a few clouds turned pink. From the several sequences that I took at that time I chose one in which the early light illuminated a stand of young trees along the left river bank. This following image is the result, and is also one of two that the Phippen Museum of Western Art (Prescott, Arizona) selected from my submission for their National Parks exhibit.

On the second morning, we drove to Schwabacher Landing and set up well before sunrise. I used my Pentax 645 Z medium format camera with a 28-45 mm lens and zoomed in to 40 mm. The sunrise seemed to develop more slowly. But, after five minutes the mountains and sky displayed more color and the foreground water smoothed out, resulting in the next image.

Though the color vanished within another ten minutes, I kept shooting. The cloud cover broke up; and the remaining clouds hovered over the mountains touching Grand Teton Peak as shown in the next image.

On the third and final morning, I stayed at the Jackson Lodge to photograph the sunrise on the Tetons viewed from Moose Flats. My plan was to produce a high-resolution stitched panorama of the entire range. The sky was overcast as I set up. But, the mountains were fully visible except for a wide bank of low lying clouds hugging the valley floor. The lighting was extremely flat. I took several sequences of seven overlapping exposures with the Pentax 645 Z and waited for the sun to break through. It never did; but, I kept shooting anyway. When I returned home the following week, I picked the best sequence and worked on it to bring out more tonal differentiation. My disappointment in the prevailing conditions of that morning disappeared after studying the final editing. Now, I believe this image to be one of my best Teton images, and one that is not often seen.
Because of the number of 50-megapixel exposures required to make this image, it is extremely high resolution. In my opinion, a print large enough to show all the detail inherent in this image is the next best thing to being there. This scene goes beyond stereotype, and shows how rich and varied the moods of Grand Teton National Park are.

In summary, the contents of this article are the result of analyzing many years of photographic experience and determining the ways in which I could increase the quality of my images, and the percentage of successful ones. Of all the guidance that I could give to skilled outdoor photographers who wish to improve their work, the steps listed earlier are likely to be the most helpful.
Harvey Stearn
February 2017

Elevate Your Vision


Read this story and all the best stories on The Luminous Landscape
The author has made this story available to Luminous Landscape members only. Upgrade to get instant access to this story and other benefits available only to members.
Why choose us?
Luminous-Landscape is a membership site. Our website contains over 5300 articles on almost every topic, camera, lens and printer you can imagine. Our membership model is simple, just $2 a month ($24.00 USD a year). This $24 gains you access to a wealth of information including all our past and future video tutorials on such topics as Lightroom, Capture One, Printing, file management and dozens of interviews and travel videos.
- New Articles every few days
- All original content found nowhere else on the web
- No Pop Up Google Sense ads – Our advertisers are photo related
- Download/stream video to any device
- NEW videos monthly
- Top well-known photographer contributors
- Posts from industry leaders
- Speciality Photography Workshops
- Mobile device scalable
- Exclusive video interviews
- Special vendor offers for members
- Hands On Product reviews
- FREE – User Forum. One of the most read user forums on the internet
- Access to our community Buy and Sell pages; for members only.
You may also like