


With the April, 2014 introduction of the Panasonic GH4 photographers and film makers have been given a very special tool. Indeed the GH4 is, for the moment at least, the most advanced DSLR style video camera available, not to mention a highly featured and versatile stills camera as well. It is a true pro-grade hybrid camera.
But, before looking at what the camera can do in the video realm, and how it does it, we need to have a some jargon defined. This is not an attempt to explain in detail and in theory the many intricacies of video technology. What I will attempt to do in a few paragraphs is to take the major jargon and describe what it means, particularly with regard to video settings on the GH4. These descriptions will be short of theory, but rather more focused on how to set them so that the camera will produce the kind of results that you want.
What Does The Jargon Mean?
FPS
Frames Per Second. Movies, whether on film or video, are created by taking a large number of images every second, and then playing them back (usually) at the same rate. The human eye and brain integrates these separate images a s long as this rate is higher than about 19 FPS, and an illusion of continuous motion is created. The “normal” speed for shooting movies is 24 FPS.
Video (TV, in other words) is at 30 FPS or 60 FPS. In countries with 50 cycle electricity, 25 FPS and 50 FPS are the norms.
The GH4 is a so-called “world camera”. It can be set to shoot at 23.98 FPS, 29.97 FPS, 59.95 FPS, for NTSC countires, 25P and 50P for PAL TV system countries. It can also be set to a true 24 FPS. More on this in a moment.
Why are the numbers 23.98, 29.97, and 59.95 and not simply 24, 30 and 60? This is a hold-over from the early days of the NTSC colour broadcast television standard. In the 1950’s with B&W broadcast TV the frame rate was exactly 30 frames per second. But when color information was added there was a problem. The colour carrier signal was phasing with the sound carrier signal because they were very close in the spectrum. The solution was to reduce the framerate by .03fps which moved the two signals out of phase . So much for the history lesson.
But be aware that the GH4 can also shoot 4K video at an exact 24FPS as well as at 23.98FPS. This will be discussed further-on under the topic of 4K vs. UHD.
Selecting NTSC, PAL or Cinema 24 is found under the main Gear menu, System Frequency. The camera has to be turned on and off for one of these changes to take effect. You can record any of these to the same card, but you can only play back, in camera, one frequency type at a time without rebooting the camera.
Bit Rate, Bit Depth and Color Sampling
Unless a video camera shoots raw, (which the GH4 does not, and which changes the game in many ways), there are two pieces of information to be considered. One is Bit Rate and the other is Color Sampling. The GH4 when recording to a built-in card shoots in 8 bit mode. This is similar to a JPG image. It looks great, but just as with a stills JPG you can’t do a lot of luminance manipulation to the image before it starts to show artifacts such as banding. 8 bit just doesn’t have enough tomnal samples for heavy manipulation.
When recording to the internal card the GH4 shoots with 4:2:0 colour sampling. This means that there is full luminance data (the first 4) but only one quarter of the possible colour data, (the other 4:0 in the equation). A full luminance and full colour file would be 4:4:4.
When recording to an external 4K capable recorder, such as the upcoming Atomos Shogun ($2,000 and coming in Q3, 2014), we will be able to record 10 bit 4:2:2 video from the camera’s HDMI output. This will offer a considerably enhanced image in terms of ones ability to colour correct and “grade” the image.
Bit Rate is a measure of how much data is being recorded. The GH4 has numerous bit rates, depending on the frame rate and resolution, but can record HD at up 200 Mbps and 4K at up to 100 Mbps. The higher the bit rate,theoreticallythe higher quality of the recording. But, you will find that actual bit rates are often not as high as speced, because the camera throttles back on its bit rate to save card memory if it’s not needed (ie: a scene with little motion).
4K vs. UHD
What is now commonly called 4K video is in fact two different standards, and it causes no end of confusion among consumers. There is 4K and there is U ltra H igh D efinition TV, called UHD. Cinema 4K on the GH4 is shot at exactly 24FPS with a resolution of 4096 X 2160. UHD is at 23.98FPS with a resolution of 3840k2160. Not a huge difference, but real.
In PAL countries UHD is shot at 3840 X 2160 and 25.00p. Cine 4K mode at 24 FPS is independent of AC line frequency and TV standards, and is therefore the same in both regions.
You’ll notice that the ability to choose Cinema 4K is found under the main Gear menu, System Frequency. There one chooses NTSC, PAL or Cinema 24. The camera has to be turned on and off for one of these changes to take effect.
Unless you like the slightly wider aspect ratio of Cinema 4K, you’re likely to find that UHD mode on the GH4 is preferable since the aspect ratio of UHD and HD are the same, and mixing them on a timeline is straightforward. If you’re shooting a real theater-bound production, rather than one destined for TV or the web, then Cinema 24K may be the way to go. Or, maybe just use it because the wider aspect ratio looks cooler.
NOTE: The SMPTE, the body that controls standards for the technical aspects of the motion picture and TV industry, says that we should not use the term UHD or Quad HD any more. Instead UHD-1 should be used for 3840×2160 pixel. True Cinema 4K remains unchanged. We’ll see if this catches on.
I-Frame and IPB
Video is generally highly compressed. One means of compression is Intraframe, in which each frame of video is individually compressed and is a stand-alone. The other means of compression is what is known as long-GOP (long group of pictures) or IPB. In this form of compression there are three types of frames, ( I, P, and B). One has the whole image, and the other two have information looking backwards and forwards at the changes that are taking place between frames and only recording those changes. The popular but unloved AVCHD standard is a long-GOP.
Note that while one would intuitively think that I-Frame is superior to IPB, it ain’t necessarily so. One of the top technical gurus at Panasonic reports that their tests show that IPB footage is every bit as robust as I-Frame. Also, be aware that once on your timeline in ProRes or a simpler editing format, there’s no appreciable difference between them. It really pays to do your own testing with various formats and judge the results of your video for yourself.
About Time Lines and Frame Rates
If you are using a contemporary pro-level video editing program, such as Adobe Premiere or Apple’s Final Cut X, then when you place a clip on the timeline the program will automatically play it back at the frame rate that you have set for the timeline.
Be aware that if it is the first clip placed, the settings for the Project may be set to match it when the default Project Settings are used . You should manually set your desired image size and frame rate when creating a new project.
So, for example, if you have set up a 24 FPS timeline and put footage on it that was shot at 60 FPS, the program will simply play them both back at the “normal” speed. Playback is determined by the timeline, not by how the footage was shot. But you can easily tell the software to “retime” the clip and it will play back accordingly.
As an example, if you shoot 60P and put it on a 24P timeline with what is now called Automatic Speed in Final Cut X 10.1 (which is the NLE that I’m most familar with) then the 60P footage will play back in roughly 2X slow motion.
Permutations and Combinations
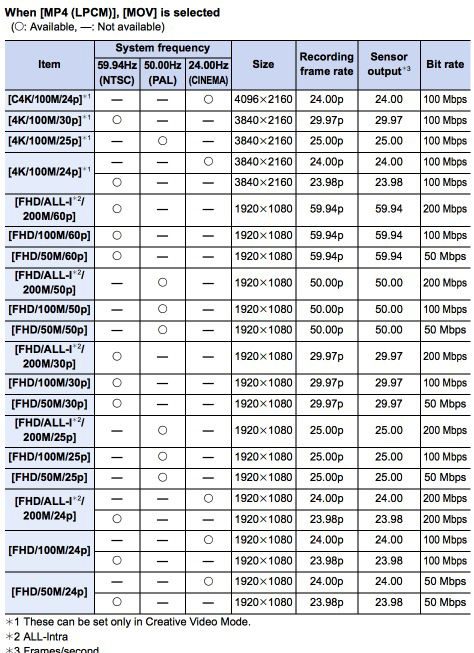
The table above, taken for the GH4’s PDF Advanced User’s Manual shows the various purmutations and combinations of data rates, frame rates, resolutions and encoding schemes that are available with the GH4. It’s quite a confusing list. But hopefully with some of the information provided on this page you can start to make some decisions on how you want to set up your own camera.
By the way, there is no difference in quality between .MOV and MP4. These are just “wrappers“. Choose whichever seems most appropriate for use with your operating system as well as editing system.
Shoot 4K – Deliver HD
There is no question that UHD-1 is the future. 4K TVs are dropping in price, and one only needs to watch something in 4K to see how stunningly beautiful it can be. Some pundits insist that unless one has a very large screen in a very large room there is no difference between 4K and HD, and to them I say –please visit an optometrist.The difference is visible to anyone.
But the open secret is that there is no readily available means for delivering 4K content at present. There is no 4K disc format (though apparently Sony and Panasonic agreed on a standard some time ago) and it’s impossible to broadcast 4K over the air. Too much bandwidth is required.
Cable operators could do it, but they are reluctant to give up their bandwidth and reduce the number of channels available. YouTube has some 4K content, but well, it’s YouTube. Netflix has some 4K content, but again these are early days.
However, that does not mean that there is no point in shooting 4K today. Firstly, you will be creating an archive of material against the day when 4K does have distribution means. But much more importantly, by shooting 4K today you are able to output the highest quality HD footage you’ve ever seen.
All you need to do is create an HD timeline and then drop your 4K footage onto it. When you finally output your edited project as HD, the results will have greater detail and greater colour depth than if you’d shot in HD. Remember, you ressing down by 2X.
The other big advantage is that with a 4K clip on an HD timeline you have an image which you can crop and on which you can do Ken Burns animation effects – without degrading image quality. You can even shoot a scene (say two people sitting side by side) and create two separate HD quality files to intercut, as if you had used two cameras.
A Random Video
I was in the process of testing various shooting and editing tools when I found myself heading downtown by subway on an errand. Just a few stops in either direction, and a walk though one of Toronto’s city center squares. I decided to bring the GH4 along and shoot some tests, and this allowed me to shoot 4K @ 24P, HD @ 60P and HD @ 24P variable speed, all with the intention of putting them on an HD 24P timeline.
As explained above, this is a terrific way of working, because it allows for extremely high quality on the 4K segments that are downsampled to HD; great 2X slow motion from the 60P clips, and impressive 4X slow-mo from the 96 FPS clips, though these can be a bit soft.
These were just to be test clips, never seen by anyone but me. I played with the clips, did some rough assembly, some rough grading, and then I started to see a story unfold. Not a particularly coherent one, and not one that I had planned, but a glimmer.
The first thing that I did was to find some music. I always prefer to find music to fit the style or mood of what I’m doing, and then cut to the music, or at least to have it inform the pacing. I use a site called FreeMusicArchive. And just a word to the wise – unless you never intend to show your videos to anyone except friends and family, and certainly never online, don’t use commercial music. All you need is a lawyer’s letter from The Rolling Stones telling you that they’re going to sue your ass for usingSympathy for the Devil as your video’s soundtrack.
Curiously, it didn’t take long for me to find what I thought was an ideal sound track. I started to assemble the clip, not really sure what the story was, but then it started to emerge. There was yellow and orange in almost every shot – quite unintentionally – and an ambulance attending an accident, people milling in the stations and streets, and somehow these disparate clips came together.
This was fun to do. I found myself mixing 4K and HD footage, using 60P on a 24P timeline for 2X slo-mo, and doing some “camera” moves on the 4K footage, because no moves or zooms had been done while shooting.
I also used the new “Tripod” stabilization mode in FCP-X 4.1.1, and it’s remarkable. Having the large 4K footage “real estate” for the stabilization to work with makes a huge difference.
I also did basic colour control work using standard FCP tools, and then added a slight warming grade using a custom made preset in Magic Bullet Looks.
In other words, I just fooled around, but in doing so learned a lot about the GH4 and and how to integrate 4K and HD footage in a project. The best way to learn is to play. Ask any child.
Using Video Frames for Stills
It wasn’t that many years ago that 8 Megapixels was a decent sized image capture. Many an ad campaign, magazine cover and fine art image was made with 8MP or even less. Now with 4K video cameras we have what is essentially an 8 Megapixel camera shooting stills at a machine-gun like 24 images per second. I have taken many of these frames and made very nice 13X19″ prints from them and I would not hesitate to put one in a book or on a gallery wall. But there’s a gotchaand it has to do with frame rates and shutter speeds .
Video or film shot at 24 FPS, the industry standard for cinema. It is normally shot with a shutter speed of 1/48 second, or what the film industry calls a 180 degree shutter. In other words the shutter speed is double the frame rate.
That 1/48th second shutter speed is what gives movies their familiar motion cadence. Things that move have a small amount of blur and this makes the action look “natural”. Now, there are decade-long debates about this, but for the moment accept it as the norm. And if you don’t believe me, try shooting some video with a shutter speed of 1/500 sec and see what it looks like.Yikes.
What this 1/48 second shutter speed means is that when you try and extract a still frame there may be some blur when anything in the frame is in motion, or even from camera shake. Now, if you’re using a tripod or a stabilized lens hand-held, then camera shake is not likely to be a problem – unless a long lens is in use. But if someone is turning their head, or otherwise in motion, you simply won’t be able to extract a clean still. Sometimes you’ll get lucky. You do have 24 stills every second to choose from, but maybe not.
The answer is to shoot 4K 24 FPS video with a high shutter speed, and forget that you’re shooting video. You’re shooting high frame rate stills. So at an event with rapid action, go ahead and set the shutter to 1/500 sec, or even higher. With the video clip on a 4K timeline find the frame(s) you want and just do a “Capture Frame”. Then load it into Lightroom, Photoshop of whatever is your favourite. You’ll have the equivalent of a 8 Megapixel JPG to work with. If you have set the camera to a low contrast, low sharpening setting you’ll likely be able to do some reasonable amount of post processing without the image degrading.
Photo Styles
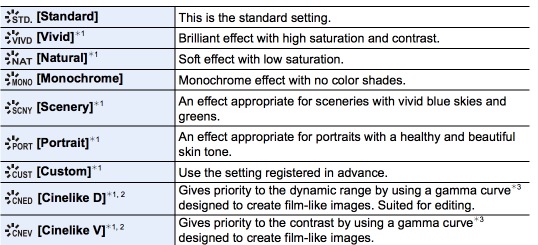
There are nine different Photo Syles available within the GH4. These determine how JPGs and videos are treated in terms of “look”. They don’t affect raw stills other than to have an influence on how the camera’s on-screen histogram looks. For video I suggest Cinelike D or Cinelike V.
If you’re going to use clips without any post-processing or grading then V is likely what you’ll prefer. For a more “filmlike” look use Cinelike D. This produces a less contrasty image and is more suitable for grading.
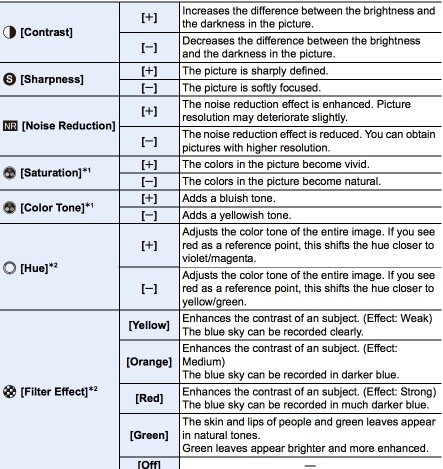
Each of the looks is also adjustable in terms of Contrast, Saturation, etc, and these customizations can be saved. Most early GH4 users as well as me have found that Cinelike D with Contrast and Sharpness each reduced to -5 gives a very pleasant and gradable image.
And finally, if that’s not enough control, there is also the ability to do Curve adjustments in-camera.
Servo Video Lenses
The Micro Four Thirds format has the largest selection of lenses in the so-called mirrorless camera universe. In addition to a huge range of native M43 lenses from Panasonic, Olympus, Sigma and others, one can use – through the use of adaptors – everything from legacy Four Thirds lenses, Leica M, Leica R, Olympus OM, Nikon and dozens of other lenses.
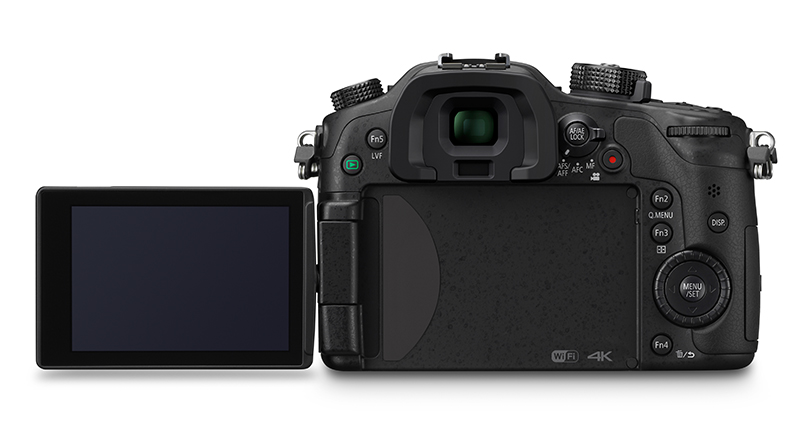
But there are two Panasonic lenses, the Lumix G X Vario PZ 14-42mm F3.5-5.6 ASPH Power OISand the Lumix G Vario PZ 45-175mm f/4-5.6which have powered servo zoom capability. In addition to being able to set the focal length or actually zoom manually, you can do so with a powered lever on the side of the lens. The GH4 also displays a zoom control on the rear LCD which lets you “touch” zoom, even while shooting. You can even control it with the free WiFi iPhone or Android app. Touch focus on the screen is also really welcome.
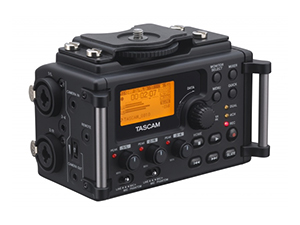
YAGH vs Tascam DR-60 D
 |
|
| YAGH |
DR-60D |
Panasonic has a special accessory available for the GH4 called the YAGH. Priced at USD $1,999 this provides two channel audio input using XLR connectors, and also 3G-SDI connectors for video. It requires a 12V battery supply (not included).
Frankly, I just don’t get it. It is a very overpriced accessory that really doesn’t do much. In addition to providing pro grade audio inputs it converts the GH4’s HDMI signal into 3G-SDI for connection to an external 4K recorder. We’ll that’s nice, but that’s about all it does.
My solution was to purchase the Tascam DR-60D for $199.00. Need I point out that this is one tenth of the price of the ill-named YAGH, and is powered by AA batteries rather than an expensive and bulky external battery. It has four audio channel inputs instead of just two (and yes, two of them are XLR with phantom power), and oh yes, it’s also a digital audio recorder rather than simply a passive audio connector box. It’s also about the same size as the YAGH and also mounts underneath the camera.
Video? Glad you asked. The DR-60D is audio only. But all the YAGH does is convert the camera’s HDMI signal to 3G-SDI. If you are buying a 4K video recorder such as the upcoming Atomos Shogun, then this can be connected to the GH4’s HDMI port for full 4K 10 Bit 4:2:2 output. No YAGH needed.
If you have a YAGH you still need a serious audio recorder, so really, all the YAGH is is an expensive junction box with 3G-SDI connectors. If that’s exactly what you need, fine. If not, save your money.
One final note. The YAGH connects very securely to the micro-HDMI port on the camera. I wish that Panasonic had invested its development dollars into a robust HDMI connector rather than this extraneous box.
A Recommended Rig
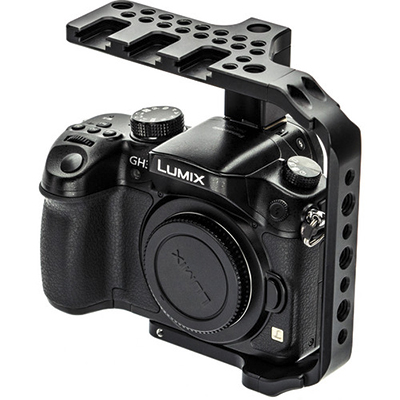
If you are planning on rigging out your GH4 with a cage for use with recorders, mics and other accessories, I can recommend the Swedish Camerleon Cage. Originally designed for the GH3, since the GH4 is physically identical, it is a perfect fit. A bit expensive as cages go, but very well designed.
The Full Frame Myth – A Contrarian View
There is a lot of nonsense written on the web about sensor sizes and video. Canon, with its introduction of the 5D series of DSLRs with video capability did a very good job of convincing people that a full frame sensor was preferable for shooting video.
Well, maybe not so much. In fact a 24MP or 36MP full frame sensor has to be scaled down or binned to be reduced to HD format, or even 4K. This scaling and binning causes artifacts, which are one of the dirty little secrets of most DSLR video.
The forthcoming Sony 7s will have a full frame 12 Megapixel sensor, because that’s all it needs to be to able crop an 8 Megapixel 4K image from the sensor. But, note that the 7s will not be able to record 4K internally to a card. An accessory external recorder will be required, otherwise its simply an HD format video camera with high sensitivity.
The argument, by some, for larger sensors is that they provide shallower depth of field at any given field of view over an APS-C or MFT format sensor. This is of course true. But talk to any DOP and he or she will tell you that this is a mixed blessing. For some dramatic work, shallow DOF is important. But for many shots it is not. And what this means is that for studio work, when something more than a nose and an ear in focus is desired, more light is needed for smaller apertures. This translates directly to greater production expense in both time and equipment.
Keep in mind that a fast medium focus length lens on a Micro Four Thirds camera like the GH4 offers more than adequate DOF in most situations. Indeed, as both a photographer and videographer, I want the deeper DOF that smaller sensors give me more often than I want the shallower DOF of a full frame sensor. That’s my real-world experience, not based on simply listening to web pundits and forum speculators who typically are grinding a particular axe.
May, 2014


Elevate Your Vision


Read this story and all the best stories on The Luminous Landscape
The author has made this story available to Luminous Landscape members only. Upgrade to get instant access to this story and other benefits available only to members.
Why choose us?
Luminous-Landscape is a membership site. Our website contains over 5300 articles on almost every topic, camera, lens and printer you can imagine. Our membership model is simple, just $2 a month ($24.00 USD a year). This $24 gains you access to a wealth of information including all our past and future video tutorials on such topics as Lightroom, Capture One, Printing, file management and dozens of interviews and travel videos.
- New Articles every few days
- All original content found nowhere else on the web
- No Pop Up Google Sense ads – Our advertisers are photo related
- Download/stream video to any device
- NEW videos monthly
- Top well-known photographer contributors
- Posts from industry leaders
- Speciality Photography Workshops
- Mobile device scalable
- Exclusive video interviews
- Special vendor offers for members
- Hands On Product reviews
- FREE – User Forum. One of the most read user forums on the internet
- Access to our community Buy and Sell pages; for members only.
You may also like


