


Absolutely Brilliant
It isn’t often that a new product comes along which attempts to redefine a product category. And it is less often that such a product emerges fully developed, virtually flawless in its execution, and largely fulfilling its promise. Such a product is the new Z series of pigment photographic printers from HP.
Since the early 1990’s and the Iris inkjet (giclee) printers, through the first photographic quality printers from Epson mid-decade, we have seen huge advances in the technology of photographic quality printing. HP has always been a major player, but for the past several years as the trend toward the use of matte fine art papers and pigment inks gained strength, HP, who had concentrated on dye-based ink sets and printers lost ground to Epson. That company’s latest Ultrachrome K3 pigment inkset and 2400 / 3800 / 4800 / 7800 / 9800 printers gained a deserved reputation for very high image quality, wide gamut, and print longevity. Pigment inks rapidly became the new norm.
Early in 2006 HP announced the Photosmart B9180 printer, a 13″ desktop unit using 8 pigment inks. It used a brand new inkset called Vivera Pigment . Then, at Photokina in September, HP dropped the other shoe, or at least two other shoes with the Designjet Z2100 and Z3100 models which also use this new family of pigment inks.
The Z2100 uses the same 8 inks as the B9180, while the Z3100 uses 12 inks. Both of these new printers are available in 24″ and 44″ sizes. (A 17″ desktop Z series printer could be a 2007 offering, but there’s no official word on this yet.)
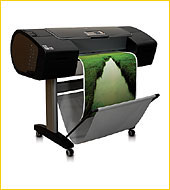
With that historical introduction out of the way, and a pretty broad hint as well as to my ultimate findings, let’s look at what makes these printers so special. The one under test here is the Z3100 / 24″. I chose this model because it offers the most advanced technology and also suits the type of printing that I do, with its 24″ carriage. I seldom print wider that that, and also would have serious space constraints with a 44″ machine. A 24″ printer is big enough for almost all my needs.
________________________________________________________
September ’06 Video
In September, 2006, just prior to Photokina, which is when the new Z series printers were officially announced, I visited with HP at their worldwide printer headquarters in Barcelona, Spain. Below is a video shot during that visit that gives some insights into the new printers, along with an interview with HP’s product marketing managers.
This Vodcast appeared here in October, but is repeated for those that may not have seen it at the time.
________________________________________________________
The Spec List
The full technical specs can be found on the HP U.S. web site, so no need to repeat them in detail here. There are 12 inks, including light cyan, magenta, light magenta, yellow, red, green, blue, light gray, gray, photo black, matte black, and gloss enhancer. The observant among you will have noticed that cyan is missing. HP claims that it’s not needed, and that the R, G and B inks compensate. Instead there is a Gloss Enhancer cartridge, along with 4 blacks. More on the GE in a while.
Probably the most fascinating feature of the Z series printers is its built-in spectrophotometer using Gretag Macbeth iOne technology. This device lives in the printer’s head assembly and allows the user to create ICC profiles for just about any paper one could wish to use, and to do so in about a half hour with the press of a single button. If that doesn’t get your juices going, I don’t know what will. Much more on this in a while.
The printer comes with 128MB of RAM, and a built-in 40GB hard drive. This is used to spool large print jobs and frees the attached computer for other tasks. The hard drive is also used to store profiles in a networked environment. Computers are attached either via USB 2 or through a LAN connection and an Ethernet RJ45 cable. Windows as well as Mac OSX software is provided. There is a also a built-in web server for remote printer monitoring. More on this shortly as well.
The printer takes paper rolls up to 24″, with either 2″ or 3″ cores, and also sheet-fed paper of any size. The maximum print length is stated as 300 feet, so pano freaks can rejoice. The 44″ model is essentially identical except for being able to handle rolls up to 44″ in width.
The printer ships with all 12 cartridges, each of which can hold 130ML of inks. The initial carts which come with the printer hold 69ML of ink, about $400 worth.
________________________________________________________
Setting Up
I’m providing a bit more information on printer set-up that I normally would, for a couple of reasons. First and foremost is that I believe that this may prove to be the first large-format roll-paper printer that many serious fine art photographers will buy, and therefore a close look at what is entailed in initial setup may prove to be of benefit to some.
To this end, in addition to a description of the set-up process, and some photographs of what it all looked like, we are including a Vodcast (streaming video segment) showing assembling the printer and making the first test prints. This video runs 10 minutes, and if you have a high speed connection you may find it of interest. If you are on dial up, all the pertinent information is also found here as text, so don’t feel left out.
The Z3100 weights 143 lbs, and the shipping carton as delivered, with wooden skid, was listed as weighing in at 200 lbs on the shipping manifest. This is not something to be picked up from your local dealer in the back of your Mini. Do plan on having a minimum of two people to set it up once the shipping company has dropped it at your home, studio or office. The assembly manual suggests three people for actually lifting the printer onto its supplied stand, but we managed with just two, and found it not to be a problem.
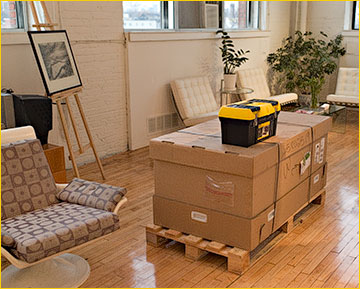
The 24″ version of the Z3100, as delivered.
We were prepared with a toolbox, but other than a pair of wire cutters to remove the metal strapping from the carton no tools were needed, other than a Torx screwdriver, which HP provides in the box. As will be seen, this sort of attention to detail really makes the Z3100 stand out from any other printer that I’ve ever used.
Physical assembly of the Z3100 basically consists of putting together the stand and mounting the printer on it. The printer itself is fully assembled and only needs to have the heads and inks installed. It took about an hour to put everything together and to reach the point that software could be installed. And, as for the assembly process, I’m the type of person who finds putting together any type of Ikea furniture to feel like a day spent in the 6th Circle of Hell. So when I say that assembling the Z3100 was a breeze, you can appreciate what I mean. The assembly instructions are excellent, and HP even provides little cardboard supports for holding the printer stand’s legs in place during assembly. Real thought and attention went into making the initial process of getting this printer up and running as straightforward as possible.

About 60 minutes after opening the carton the Z3100 was assembled,
leaving a wooden skid, Styrofoam and a lot of cardboard to discard.
Once the device is together it’s time to plug it in and start installing the inks and heads. Head installation is straightforward, as is handling the ink cartridges. The carts each have a physical “key” in their plastic molding, and so the wrong cart can not be inserted into an incorrect slot. The whole process takes about 45 minutes, which includes time for the printer to prime itself and run its internal diagnostics.

Fully assembled, ready to have the 12 inks and 6 heads installed.
The final step is to install the software from the provided CD, and then run an initial calibration routine. This is done using a roll of ultra high gloss paper which HP provides. The process is automated and all you have to do is sit back and wait.
Once this is over, with a total time between 90 minutes and two hours, you’re ready to start printing. If you are using one of HP’s papers then you can select one of the 30 odd installed paper profiles and get right to work. But, since on day-one I had no HP paper available other than the very plasticy ultra-gloss paper that’s provided for initial calibration, I loaded up a roll of Moab Entrada Bright White, 300gm.
No provided profile of course, but – what me worry? Of course not, since the Z3100 has built in self-profiling, which is what I did next.
________________________________________________________
Built-in Automatic Self-Profiling
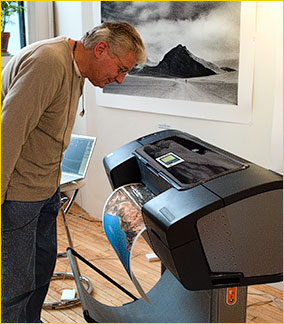
Chris closely inspects the first test print as it emerges.
There are several ways of working with profiles, regardless of the printer used. The first is to use profiles provided by the printer manufacturer. These are usually installed at the time of initial software installation, or can be downloaded from their web site. Such profiles are only for that manufacturer’s own papers.
The second alternative is to obtain profiles for a particular paper that you’re interested in from the paper maker’s web site, assuming that they have one for your particular model of printer. The third method is to download a profiling target from a third-party profile making company, print it out, and mail it in. Some days later you will receive a custom profile for your particular printer, ink set, and paper. This typically costs between $50 and $100 per profile, and takes several days to a week, or more, depending on the mails and the workload of the company making the profiles. This will need to be done for each type of paper that you use.
The fourth alternative is to buy a profile making system of your own. The most popular medium-to-high-end system currently available is the Gretag Macbeth Eye-One system. Depending on the configuration, and where you purchase from, figure on spending between $1,250 and $1,700.
Making ones own profiles is not difficult. It involves printing out a target file or two, than manually scanning each row of colour patches. The entire process typically takes about 30 minutes, excluding print drying time. It’s a bit tedious, but not that big an issue unless one is making more than a couple of profiles at a time, in which case a good neck massage and a double Scotch at the end of an afternoon of profiling is welcome.
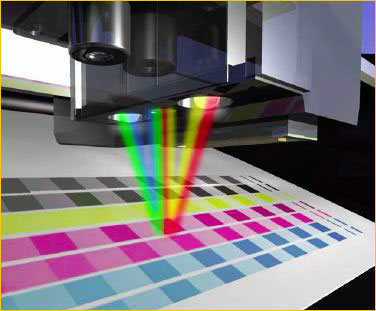
Illustration Courtesy Hewlett Packard
Then there is the solution provided by HP’s Z Series printers, which have a Gretag Macbeth Eye-One spectrophotometer built into the printer’s head assembly. Creating a custom profile is as simple as selecting a paper type (glossy or matte / thick or light weight), giving it a name, and then clicking Profile. Approximately 30 minutes later a custom profile for your printer, paper, and ink set has been created and saved in the proper directory on your computer’s hard drive. All you need to do is restart Photoshop and start printing.
The process of creating a profile has two steps; calibration and profiling. I’ll have more to say about calibration shortly. In the meantime its enough to note that the calibration step takes about 10 minutes and is automatically followed by profiling. In between printing the profile target and drawing it back in for scanning, the Z printers pause for the ink to dry. HP’s ink scientists have determined that only 5 minutes of drying are needed, but if the user wishes this time can be extended to any length, and the target reloaded at a later time for scanning and profile generation. It’s the user’s choice. (HP claims colour stability with Delta E <1 after 5 minutes).

Illustration Courtesy Hewlett Packard
It’s worth noting that with the Z printers and their self profiling capability HP is the first printer manufacturer that I know of that actually recognizes that one isn’t just going to only use their own brand of papers. Other printer manufactures require you to choose one of their branded papers, guessing if its the one that’s closest to the paper actually used. HP plays no such games, allowing the user to choose paper thickness and type by category rather than by guessing game.
The profiles produced by the Z3100 use about 500 patches. For those who demand a higher level of precision there is an optional “Advanced Profiling Solution” which offers both RGB and CMYK profiling, several sizes of profiling charts, including a roughly 1,000 chip target, monitor calibration (with an Eye One Display provided in the box), profile editing, and more.
________________________________________________________
Of Print Heads and Calibration
There are two schools of printer design. In one camp is Epson, who uses heads that are calibrated once at the factory and which are then designed to last the life of the printer – however long that might be. In the other camp is Canon and HP, which use heads that can be calibrated by the user at any time; which are designed as consumables, and which can be user replaced.
I am not a printing engineer and thus not able to comment intelligently on the pros and cons of these two approaches from a technical perspective. Epson would have you believe that factory calibration and permanent heads are the way to go, while obviously Canon and HP preach otherwise. Looking at the new HP printers, here’s what I have read, as well as determined for myself.
The six heads in the Z3100 printer, at $69.95, each cost less than an ink cartridge, have a projected average life expectancy throughput of about 2,500 ML of ink, while being warranted for a minimum of 1000ML of ink. For the sake of argument, since the printers are so new and don’t have a public track record yet, let’s split the difference and rate the heads conservatively at 1,750 ML. Since each ink cartridge holds 130 ML of inks ($74.95), that means that on average one will have to replace each of the heads after about 13 cartridges of the same ink have been used. In other words, head costs add about $5 to the effective cost of each ink cartridge. This is essentially a trivial amount, and by way of comparison, far, far less than the cost of a single large sheet of fine art paper.
And, to save you the math, with these numbers it will only be after you have used some 156 ink cartridges of all colours before all six heads will have needed to be replaced – the equivalent of more than 4,000 large prints. This is several years worth of printing using a few hundred dollars worth of heads.
With the cost issue aside, let’s look at the question of consistency. One of the things that matters a great deal in professional level printing is consistency, both self consistency over time – meaning that the prints that one makes today look exactly the same as the prints made last month – and also consistency between individual printers. This is important in a large printing studio or lab where the work load is spread over multiple printers of the same model.
In the case of the Z series printers, their built-in densitometer and spectrophotometer means doing a full calibration and linearization in less than 10 minutes, automatically. Apparently some printing studios run a calibration every morning as a matter of course, at a cost of just 10 minutes and a few cents worth of ink and paper. That’s what I now do. Why not?
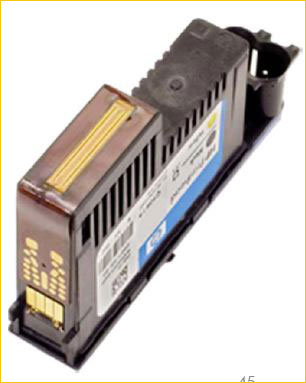
Illustration Courtesy Hewlett Packard
Which brings us back to the question of consumable heads and their effect on consistency. Self calibration aside, lets look at the mechanisms that are available to assure image consistency. Firstly, HP recommends leaving their Z series printers turned on continuously. In their Powersave mode they consume 27 watts of electricity. (Full power while printing uses 200 watts). By remaining on all the time the printer is able to run periodic head checks. These are claimed to use just a tiny amount of ink, much less than is required for a self test and cleaning when the printer is turned off and then on again.
There is a device onboard the printer called an Optical Drop Detector which periodically tests each of the 12,672 nozzles in a Z3100 printer. This testing apparently uses 1 ML of ink for every 550 tests, so the cost per test is about 10 cents worth of ink. This contributes to the heads being always free of clogs and available for printing without lengthy start-up delays and expensive and time consuming cleaning cycles when clogs are discovered.
This detector also detects any failed nozzles in real-time, meaning that only properly functioning nozzles are utilized on any print. Then, during the next service cycle, the printer tries clearing the problem, but if it can’t that nozzle is noted internally as permanently disabled. It is then only when enough nozzles have been so marked, and perfect prints can no longer be made, that the printer will warn that a print head replacement is needed.
When a head is replaced, or an ink cartridge as well, a calibration needs to be performed. Again, this takes just 10 minutes and is completely automatic. The advantage being that one is always assured that the printer is performing optimally. Of course profiles remain unaffected, and can be used on any printer of the same model that has itself had a calibration run.
________________________________________________________
Built-in Web Server
The Z3100 can be attached to either a PC or a Mac in one of two ways – a USB 2 connector, or via Ethernet. If you go for a LAN connection, which makes sense in a shared environment so more than one computer can use the same printer, then you’ll be pleased to note that the Z series printers comes with a built-in web server.
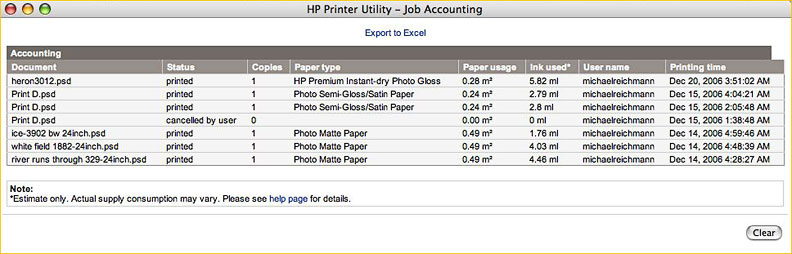
What this means is that any computer on the LAN, or even anywhere else on the Internet, can receive job accounting information like that seen in the figure above; when the job was done, how much ink and paper was used, whose computer it came from – everything that one needs to know to properly cost a job.
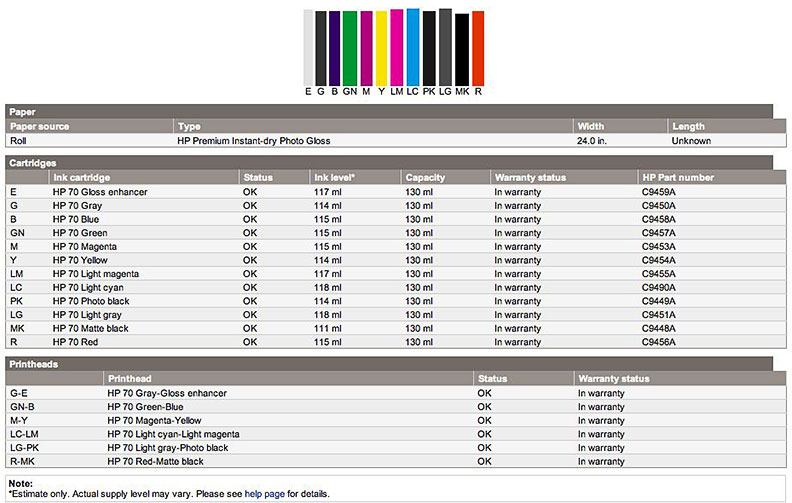
It’s also possible to obtain, either locally or remotely, a full status report at any time showing ink levels and head condition, along with the type of paper currently loaded. A Type A lab manager’s delight, not to mention reassuring to the individual printer owner.
Mac users should note that there is a bug in the Mac’s current OS that causes Z series printers that are connected via USB to occasionally hang. This is known by Apple and apparently will be fixed in the next OS update. This problem is not seen with Ethernet connected printers.
________________________________________________________
Hard Drive & Drivers
The Z series printers each have a built-in 40GB hard drive. This is used to spool print jobs and also to store profiles in a shared computer use environment. It means that one doesn’t necessarily have to load profiles made onto every computer using that printer over a LAN. In normal use it is transparent to the user.
But, if you purchase the option HP/GL2 language support, or a RIP, then these can access files and jobs stored on the internal hard drive. Canon’s new large format printers provide software access to their internal HD, and I would have preferred if HP had found a way to do so from within their regular driver as well.
There is a plug-in program called HP PrintPro Plug-In For Photoshop that is supposed to ship with the Z3100, but as of early January ’07 it was still in development. I’ll be reporting on it when it does become available.
As for RIPs, most of the major publishers have their development underway. I am told by ColorByte to expect support for the HP Z series in their latest version of Imageprint, “..any day now“. Of course I’ll have a full review when it does ship.
________________________________________________________
Gloss Enhancer
One of the 12 ink positions in the Z3100 houses a Gloss Enhancer (GE) cartridge. As you might imagine this is only used on glossy and semi-gloss media. Its purpose is to solve a problem that is inherent with all pigment-based inks. What this is, is a result of the need to encapsulate pigments in a resin (transparent polymer) which can then bind to the paper’s surface. Depending on the amount of ink deposited in any area, the thickness of this transparent resin will vary. This is especially noticeable in white or clear areas which receive little or no ink.
What the GE does is combine with the other inks, depending on the image content. This effectively mixes gloss enhancer with the other pigments as required, depending on total ink coverage. The net results is that the use of a GE effectively eliminates dull or shiny patches on the print, causing the surface to become uniform in appearance. Consequently both gloss differential and bronzing (a metallic sheen sometimes seen at odd viewing angles) are effectively eliminated.
The user can choose to use the GE or not, on any particular print, and also whether the GE is used just on parts of the image where its required (economy mode) or over the entire print for maximum uniformity. It can also be turned off completely if desired.
________________________________________________________
Monochrome Printing
The Z3100 houses four black inks; Matte Black, Photo Black, Gray and Light Gray. On glossy media only three of the inks are used, but on matte media all four black inks are utilized, making this effectively a quad-tone monochrome printer.
As with its competitors, HP provides a gray balance tool within the printer driver for tinting images. The tonal range is broken down into three segments. Highlights, Midtones and Shadows, and sliders are provided for determining the cross-over points.
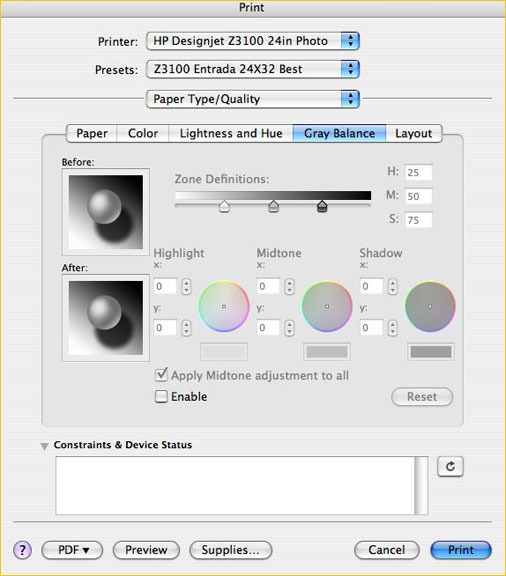
Then, using three colour wheels or numeric entry boxes separate tints can be set for each. These can then be saved as a pre-set within the driver and so recalled for other prints at a later time.
________________________________________________________
Gamut Comparisons
Naturally there is bound to be discussion and controversy over the pros and cons of 8 inks vs 12. I can only assume that once Epson produces a 12 ink printer (as I am guessing they inevitably will) this debate will fade. But, in the meantime enquiring minds want to know whether or not 12 inks beats 8.
I’ve spent a lot of time pouring over gamut plots in ColorThink, as well as comparing Epson Ultrachrome K3, Canon Lucia and HP Vivera Pigment prints. While I see differences in colour gamut, when properly profiled (which they all were), there really isn’t that obvious a difference as to make one choose any particular ink set and printer over another.
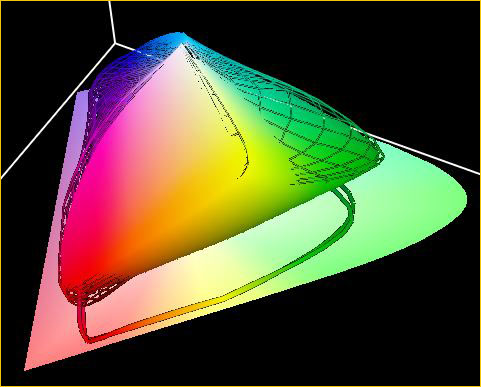
In the gamut plots above you see one perspective on a plot of Epson Premium Semimatte paper (uses photo black) done with an Epson 3800 printer and also the Z3100. The Epson is solid and the HP is wireframe. If you pass your mouse over the image you will see them reversed, with the HP solid and the Epson wireframe. There are differences, to be sure. But they are not huge.
From what I can gather reading the technical literature and comparing this to my own analysis, what we see is that Epson printers appear to have a slight gamut advantage in the darker chromatic colours, while the HP has a similar advantage in the lighter colours. The Use of Red, Blue, and Green primary inks also has an influence producing superior coverage in some areas. This is similar to what I saw when testing the 12 ink Canon iPF 5000.
________________________________________________________
Overall Image Quality
After both testing and printing extensively with Epson’s, Canon’s and now HP’s latest pigment ink printers it is my belief that there they all produce excellent image quality. While there are some visible differences, these tend to be limited, and not that obvious unless one is doing direct comparisons, and knows what one is looking at. In a double-blind test I sincerely doubt that one could come to any sort of definitive conclusions about overall superiority of one brand over another by simply comparing prints.
The numbers also don’t tell us much. Things like pico liters per cubic parsec and dot density are simply irrelevant when it comes to prints in the real world, and one would be foolish to base any sort of buying decision on these numbers. It would be like buying an audio amp based on its THD and IM figures, and not on how it actually sounds.
Much more relevant are issues like price, need to swap ink cartridges when changing media types, dealer support, paper handling, clogging, maintenance, software and drivers, and the like.
There has also been some discussion about whether the new HP printers have a more visible dithering pattern than do Epson printers. (The same discussion was had when the Canon iPF5000 was introduced). The answer is that under a magnifier the patterns look different. But, to the naked eye at normal viewing distances, neither I not any of the other photographers to whom I showed comparative prints were reliably able to differentiate one brand printer from the other based on image “sharpness”.
________________________________________________________
General Usability
Hopefully, without sounding like too much of an HP booster, I have to say that the Z3100 printer provided the best out-of-box experience that I’ve yet had with any printer. And, not to put too fine a point on it, when it comes to set-up and installation instructions, as well as overall documentation, HP is head and shoulders ahead of Canon, and even slightly ahead of Epson, who have always done a very good job in this regard.
The user interface presented by the printer driver as well as various HP utilities are models of clarity. The front panel LCD is large, clear, and communicative.
Paper handling is straightforward, and one is never in doubt as to what to do next, or how to do it. One hint though, when feeding roll paper – look through the smoked plastic lid and watch for when the paper goes under the platen. It will then be grabbed and start to feed. If you don’t look for the proper positioning it can be uncertain as to when the paper has been fed through enough to be grabbed by the printer.
I found that it can be a bit annoying to have to feed a new roll of paper when standing behind the machine, because the LCD and controls are difficult to see. I found it preferable to load the roll, and then return to the front of the machine. The paper can then be fed while leaning over the front, making observing the proper feed path and the LCD screen much easier.
________________________________________________________
Catch Apron
As with all large format printers the Z3100 has a catch apron so that prints don’t fall on the floor when they’re cut, or if their length is long enough to reach there while printing. I was concerned to note that the material used in the Z3100’s apron has a coarse texture, with the potential to possibly scratch the delicate surface of some fine art papers. This concern was reinforced by Craig Samuel who has extensive experience with making such very large fine art prints at his print studio.
I queried HP on this and was assured that the apron material was suitable, but by comparison with the Epson 7800 and 9800, which have a very smooth nylon type apron, and smooth plastic guide bars, this still remains an area of concern for me.
I also noted that the Z3100 is designed to only catch prints to the front of the printer. The apron system on the Epson printers is much more versatile, allowing the orientation to be either front or rear.
________________________________________________________
Competition
An obvious question to ask is – what’s the direct competition to the Z3100 / 24″? At the moment, only the Epson 7800, though there are rumours of a 24″ 12 ink Canon iPF6000 some time in the first half of the year. The Epson has been a benchmark for some time, but in terms of features it now comes second to the HP due to the latter’s self profiling capability, Gloss Enhancer, and particularly not having to swap black inks on the HP when changing media types.
Since I’ve been printing heavily with the 17″ Canon iPF5000 for the past six months, a question that’s bound to be asked is – how do they compare, and given than the Canon is 2.5X less expensive, is it a better deal?
As far as print quality goes, the Canon and the HP are very close. I wouldn’t choose one over the other on this basis alone. Of course the iPF5000 is a 17″ printer, while the Z3100 is a 24″. This makes a huge difference in the size of print that one can make, though it doesn’t sound like that much when comparing numbers alone. The fact that the HP has the built-in profiling spectrophotometer means that one would have to spend another $1,250 or more to equal it in capability, though even then not in convenience.
Yes, the Canon has a paper cassette, but its use is limited in terms of the types of papers that can be sheet fed from it, so that’s not as big a differentiator as one might at first imagine. Size is a factor, with the iPF5000 being quite large and heavy, but still able to be table mounted. The Z3100 is definitely designed to be floor standing on its provided pedestal.
Finally, for those printing on glossy and semi-gloss papers the Gloss Enhancer in the HP printer is a big plus when compared against the Canon offering. And, let’s not even talk about documentation and ease of use. The HP is streets ahead of the Canon in this regard.
________________________________________________________
The Bottom Line
If you’ve gotten this far in the review you’ll have gathered that I’m mightily impressed with the HP Z3100. The company appears to have really sweated the details and produced what can only be called an absolutely brilliant printer. Truly state of the art.
And while the price may appear to be higher than the competition, when you factor in the built-in profiling spectrophotometer, 40GB hard drive and web server, along with 12 inks, 4 simultaneous blacks, and a Gloss Enhancer, the value for the money is clearly there. And in any event, as anyone doing production or large format printing well knows, the cost of the printer itself is ultimately found to be small compared to the eventual cost of the paper and ink which it uses over time.
Pricing
The Z3100 has a U.S. MSLP of $4,095 for the 24″ model (the one I tested) and $6,295 for the 44″ model. The less expensive 8 ink Z2100 has a U.S. MSLP of $3,395 for the 24″ model, and $5,595 for the 44″ model.
As for my opinion regarding purchasing an 8 ink Z2100 over the 12 ink Z3100 – well, I can’t see the point of the Z2100. The wider gamut, enhanced monochrome, and gloss differential cartridge, all seem to me to be well worth the modest incremental cost of the 3100 series.
________________________________________________________
Thanks
I’d like to thank my friend Craig Samuel of Studio One, a photographic services company in Toronto which offers, among other things, a high-end printing studio. I used this studio to run my tests and comparisons, as it offers one of the best environments I know of in Canada for fine art printing technology and resources. (Craig also has a wonderful Espresso machine – a must during long hours of testing).
________________________________________________________
Full Disclosure
My equipment review policy is that items are returned to the manufacturer following a review period. I never accept “complimentary” products, with the only exception being software, which obviously doesn’t make sense to return. I will occasionally purchase a review item that really interests me.
In the case of the HP Z3100, and because it is such a complex product, I have accepted HP’s offer of an extended loan. This will allow me to use the product during the coming months for a number of different projects and therefore be able to eventually report on it on a long term basis – in terms of reliability, as well as ink and head usage, and anything else that might come up. Watch for future reports, including RIP reviews, as these become available for testing.
________________________________________________________


Elevate Your Vision


Read this story and all the best stories on The Luminous Landscape
The author has made this story available to Luminous Landscape members only. Upgrade to get instant access to this story and other benefits available only to members.
Why choose us?
Luminous-Landscape is a membership site. Our website contains over 5300 articles on almost every topic, camera, lens and printer you can imagine. Our membership model is simple, just $2 a month ($24.00 USD a year). This $24 gains you access to a wealth of information including all our past and future video tutorials on such topics as Lightroom, Capture One, Printing, file management and dozens of interviews and travel videos.
- New Articles every few days
- All original content found nowhere else on the web
- No Pop Up Google Sense ads – Our advertisers are photo related
- Download/stream video to any device
- NEW videos monthly
- Top well-known photographer contributors
- Posts from industry leaders
- Speciality Photography Workshops
- Mobile device scalable
- Exclusive video interviews
- Special vendor offers for members
- Hands On Product reviews
- FREE – User Forum. One of the most read user forums on the internet
- Access to our community Buy and Sell pages; for members only.
You may also like


