Digital ICE
Reviewed by Cris Daniels
Composting Techniques Using Adobe Photoshop and Digital ICE
T his article will s how you some tec hniques for usingDigital ICEto help you quickly and effectively retouch scanned images. Digital ICE is a hardware and software technology licensed by companies such asNikonandMinolta, that provides an automated scratch and dust removal system. ICE (Image Correction & Enhancement) works by reading surface defects of color film and recording them in a separate channel. A proprietary algorithm is applied to the image, removing all the surface defects within the scan and leaving the original film intact to produce and optimal scan. While this technology sounds immensely helpful to the average photographer, ICE quite often also has the effect of softening the image to an unacceptable degree for some users and therefore never gets used except for damaged film.
It almost seems that regardless of how careful one is, keep all dust off of my film is extremely difficult. Even mere moments of exposure to the room air (and I do use a filtration system) can have minute particles falling on film very quickly. This, my current method of working with ICE, allows me to waste less time clone stamping images, and also achieves better results than cloning out flaws.
IÃve been using the following technique with theNikon Super Coolscan 8000ED.
Step #1
Load film into the carrier. I ALWAYS handle film with film gloves. Make the minimal investment and buy a bunch. Fingerprints are not easy to deal with and using gloves assures that they will never be a problem. If you are scanning somebody elseÃs film you probably have no excuse not to use gloves and handle their film correctly.
Step #2
Load carrier into scanner and begin the scanning process. If you load the film, and simply set the carrier on the desk (with intentions of scanning later), dust and minute particles will fall on the film. At this point youÃll need to use a blower bulb to clean the surface again.
Step #3
Scan the image as usual. Setting the appropriate crop, setting black and white points, curve adjustments, etcÖ
Step #4
Using the SAME settings, enable Digital ICE in the software. Do not change the crop or other settings.
Step #5
Save both of the scans. One will be the original version, and the second scan is with the digital ICE processing.
Step #6
Open both of the scans in Photoshop.
Step #7
The scanwithoutthe ICE processing will be our main image. I renamed the layerƒ¬Original Imageî as it is the scan with no processing applied.
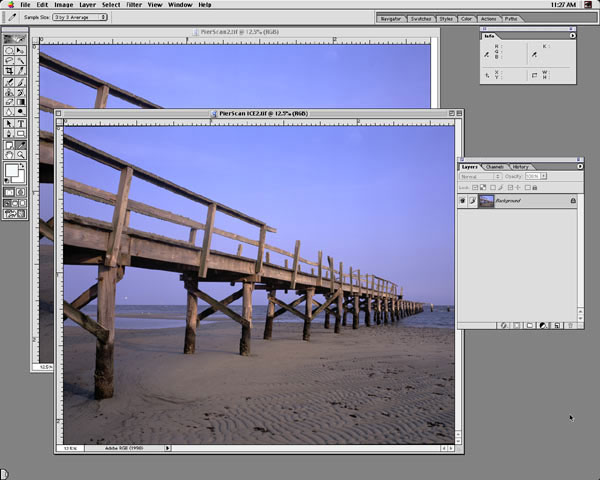
My two scans with identical settings except the foreground image was processed with Digital ICE.
Step #8
Holding the shift key, drag the Digital ICE image over ourƒ¬Original Imageî, Photoshop will automatically register the image perfectly. The reason this works is because we did not change the crop in the original scan.
Step #9
Rename the layerƒ¬ICE Layerî or something other than what Photoshop name it. Labeling the layers is important in order to know which image we are working on. These are very similar images and it is easy to wind up on the wrong layer.

The first layer is theƒ¬Original Imageî and theƒ¬ICE Layerî has the eyeball turned off which exposes the dirty original image.
Step #10
C lick on theƒ¬ICE Layerî so that it is the active layer. Then click on the layer mask icon.
Step #11
Go toƒ¬Selectî and choose,ƒ¬Select Allî
Step #12
Go toƒ¬Editî and chooseƒ¬FillÖî. We are going to fill the mask with black which fully reveals theƒ¬Original Layerî underneath. This mask renders our current layerƒ¬invisibleî even with the opacity at 100%. Pressƒ¬Selectî, and chooseƒ¬Deselectî to deselect our image.
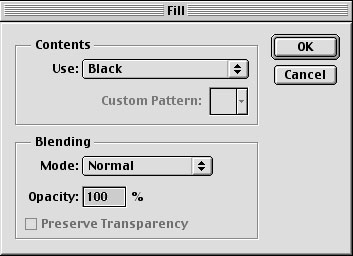
Fill dialog box, here we are specifying how our mask will be filled.
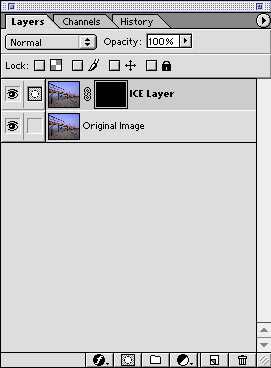
The end result is our black mask, which hides the effect of the current layer.
Step #13
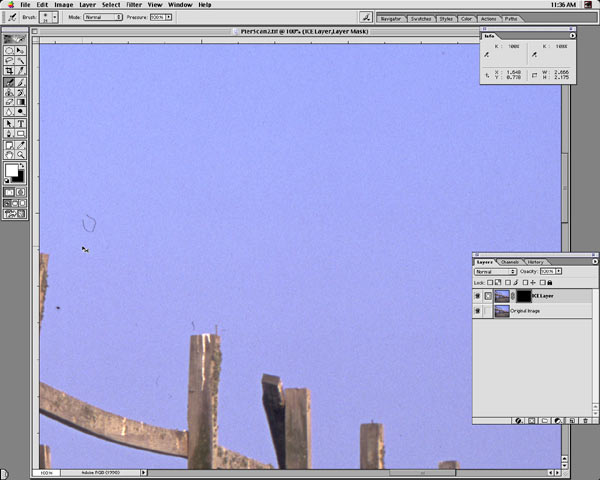
At this point we simply switch to the paintbrush tool, switch to white as our foreground color (press D to switch to default colors, and X to switch the background color white to the foreground) and begin painting. As we paint on the mask, the digital ICE layer is exposed and we can very quickly paint out the scratches and defects. In this screen shot I have painted out most of the defects except the left side of the screen. You can of course vary the size and opacity of the paintbrush to change the potency of the effect. To reverse any changes you have made, simply press the X key to make black the foreground color, and paint back the original image.
Digital ICE may not suit everybodyÃs needs applied to a whole image, but using an ICE layer can really save significant time retouching and is less obvious than the cloning tools (especially in the sky areas). You can use this technique by using the Photoshop Dust and Scratches filter also, but ICE works better and preserves more detail.
Cris Danielsis a Florida-based photographer who also works with other photographers in migrating to digital imaging.Crisis anAdobe Certified ExpertinPhotoshop.
© 2001 Cris Daniels / All Rights Reserved
Read this story and all the best stories on The Luminous Landscape
The author has made this story available to Luminous Landscape members only. Upgrade to get instant access to this story and other benefits available only to members.
Why choose us?
Luminous-Landscape is a membership site. Our website contains over 5300 articles on almost every topic, camera, lens and printer you can imagine. Our membership model is simple, just $2 a month ($24.00 USD a year). This $24 gains you access to a wealth of information including all our past and future video tutorials on such topics as Lightroom, Capture One, Printing, file management and dozens of interviews and travel videos.
- New Articles every few days
- All original content found nowhere else on the web
- No Pop Up Google Sense ads – Our advertisers are photo related
- Download/stream video to any device
- NEW videos monthly
- Top well-known photographer contributors
- Posts from industry leaders
- Speciality Photography Workshops
- Mobile device scalable
- Exclusive video interviews
- Special vendor offers for members
- Hands On Product reviews
- FREE – User Forum. One of the most read user forums on the internet
- Access to our community Buy and Sell pages; for members only.


