Reviewed by Cris Daniels
This review is of a RIP (Raster Image Processor) designed for large-format printers. With prices starting just shy of US $2,000 this is a product for the photographer doing either commercial or high volume fine art printing. Even if this doesn’t include you, the article makes for interesting reading because it shows what the possibilities are.
Michael
Let ‘er RIP
This review was written to clarify the function of third party software designed to run larger format printers. Most current users of inkjet printers are unaware of what benefits this third party software has. In just the last 2 years, wide format digital printers have dropped in price so dramatically that many people who were not previously owners of this technology now are purchasing this types of product.
Today’s inkjet printers come bundled with proprietary driver software that allows the printer to communicate with the operating system of your computer. The driver also allows you to control the output of the printer through the typical software interface where you choose the appropriate media type, printing resolution, and activate or de-activate other capabilities of the output device. There is also a very large market in third party software that enhances the productivity, capabilities, and output of certain printers.ImagePrint from Colorbyte software is the third party RIP software discussed in this review. It operates a wide range of today’s popular professional wide format printers.
Firstly, RIP stands for R aster I mage P rocessor. It is essentially a high performance engine that converts the image data into information that the printer can utilize, and therefore print. RIP vendors write their own algorithms to try to enhance the output and versatility of the stock software supplied with the printer. RIP software has numerous advantages over the drivers included with many printers. In fact, many wide-format printers ship with a custom written RIP which give professionals the added productivity they need out of the box.
My search for a competent RIP for my needs, which are photographic quality output and “Giclee” level printing, has brought me to this product. Many RIP packages are written for pre-press proofing and the sign market, unlike ImagePrint which does those operations but also provides simply the best printed image quality in any aftermarket RIP I have seen, as ImagePrint was written for the photographic and Giclee markets. Although the stock print driver does include many output options ImagePrint takes the versatility of a printer to a new level. All the screen shots and my testing were done on an Epson Stylus Pro 10000 archival printer, and the Epson Stylus Pro 5500.
ImagePrint like many other third party RIP software requires a Windows computer to run the software on. This is primarily because until OSX, the Mac OS has not been terribly good at multitasking, and while some users might prefer to use only Macs in their studio, really the Windows machine is delegated to the simple task of driving the printers. You can do all of your work as normal and setup ImagePrint as a desktop printer, therefore sending files to the Windows machine by simply printing the document as usual. The included software to set up this Mac/PC network is simple to install and included in the software package. However, Colorbyte is working on a Mac version of this software that should appease the Mac market. Currently I am running ImagePrint on a Pentium III 600mhz machine with 768MB RAM and Windows 2000SP2. I installed a IEEE-1394 Firewire card to drive the Epson 10000 as it is the recommended connection method for the fastest data transfer. You must have a working parallel port on your machine as well, as the copy protection is in the form of a hardware key (dongle), and the software will simply watermark all of your images without the key installed.
So what advantages are available by using a dedicated using a RIP?
1. The printer driver processes data at a far slower rate than the RIP, even large files over 150MB start printing very quickly, sometimes in only a few seconds depending on the file size and speed of the host machine.
2. The RIP frees up the main imaging computer, this allows you to dedicate an older machine to the tasks of printing while moving ahead with new jobs on your more powerful imaging computer, and since printing large posters can take some time to print we are not talking about simply a few minutes. From my testing, using background printing on the Mac OS can cause the printer to glitch in the middle of large jobs and/or band, as the computer struggles to allocate resources to the print driver while running another application (Photoshop) simultaneously. Remember that large format printers are using huge amounts of data on every pass, sometimes 150MB files can triple in size once ripping is done, it takes a lot of computer to hand off this data and still be responsive for the user.
3. Each image can have its own color profile. You can mix sRGB, Colormatch, EktaSpace, Adobe RGB (etc..) images on the same page.
4. Images are tiled to make the best use of the paper, less wasted paper per print jobs means more profit per print.
5. In order to print 3 different but large documents on a single page using the driver, you have to make a document in Photoshop which ends up being outrageous, hundreds of megabytes which can slow even the fastest computers to a crawl and take a very long time for the stock driver to handle.
6. Most RIPs include features for proofing, and ImagePrint supports this feature of course by allowing you to print CMYK images, simulate a printing press, handle spot colors correctly, and do fantastic layouts of PDF documents. This is where I found a weak spot with my oldEFI Fiery RIP. W ithout using a convoluted method it was difficult to get 8 prints to open across the page and use the paper most effectively. If I’m printing on a 44″ printer, I want 8.5 pages to automatically print across the page and position them as the RIP best can. ImagePrint is extremely good at this and totally automates the process after you set the image space between each page.
7. ImagePrint offers two higher resolutions than the Epson driver gives you, Colorbyte calls these modes 1440 8-pass, and Photo Modes. While they slow the printer down, the Epson 10000 is fast to begin with and the image quality is visibly better than the stock driver can give you.
8. In a business environment, ImagePrint allows you the setup hold folders which automatically position the images and prints them once they are dropped into the appropriate folder. Each of theses hot folders has a unique print setup, you can have one folder for Premium Luster Paper 13�x19� and another folder for Watercolor paper 13�X19�, once you send the image to the appropriate folder and have the paper loaded, ImagePrint automatically positions the page and starts printing. All of this works very quickly and seamless for workgroups sharing the printer, certainly more effective than Mac or Windows built in print sharing capabilities.
9. ImagePrint also prints RGB images. I never send CMYK images to the RIP even though its possible. All of my work stays in RGB and the RIP colorspace matches the working space I’m use in Photoshop.
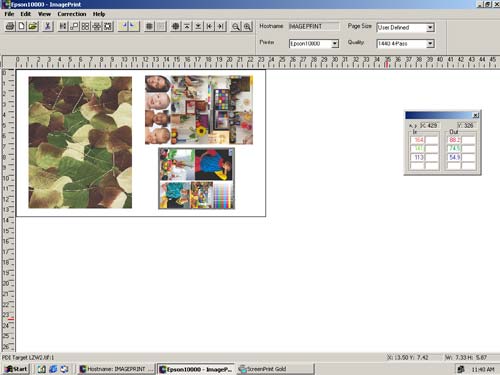
ImagePrint Main Screen Layout
Using the simple File / Open command or dragging and dropping images will bring images on to the main layout screen. My paper size is set up in the appropriate dialog box and I can drag the images into any position I see fit. Any images outside of the paper border simply will not be printed, you can leave them on the work area to drag them in to subsequent jobs if needed.
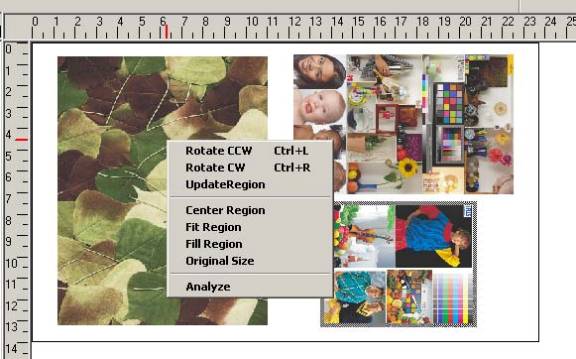
ImagePrint – Image Properties Menu
Right-clicking on any image brings up this menu. It is here that you can rotate images and set them up on the page as you see fit. The Center Region command automatically centers the current image on the page and the Rotate commands allows you to manually position the images as you see fit. Dragging on the border of the images allows you to resize the image while maintaining the correct aspect ratio. Enlarged images are interpolated according to the settings in the appropriate dialog box, you can also manually enlarge image in numeric increments. Each of these features illustrates how ImagePrint behaves more like a page layout program than anything else. Very simple to use.
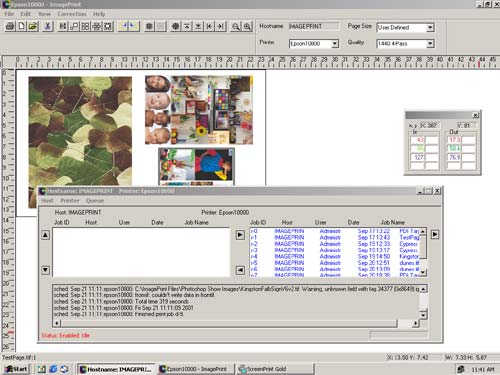
ImagePrint Spooler Window
The spooler is a second program that is open along with ImagePrint. The spooler lets you control the order of jobs and allows you to monitor the progress of each print job. You can also switch between installed printers with one click of the mouse. The spooler also allows you to re-send jobs and delete jobs from the queue. The spooler is the only program that has to be open in order for ImagePrint to work, once the job is sent from ImagePrint to the spooler program you can close ImagePrint and the job will print fine. ImagePrint is the layout and feature control portion of the RIP, and the spooler is the program that RIPs the job, prepares them for printing, and controls the printer throughout the process of printing.
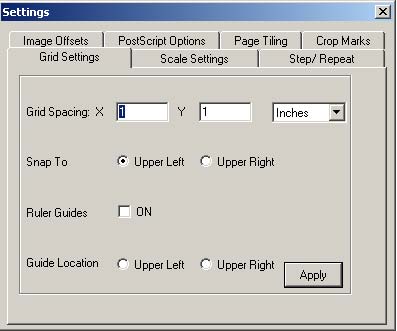
ImagePrint Settings Menu
The settings menu allows you to adjust some of the features of ImagePrint. The grid spacing is how large the layout grid will be if it is enabled. This allows you to lay out your images on a non-printing grid.Image Offsets allows the user to adjust the spacing between each image on the page.Postscript Options allow the user to assign a default size to imported Postscript files. ThePage Tiling option allows the user to span images over multiple pages and set the space between the images so that the images overlap slightly. The Crop Marks menu allows you to specify the distance, thickness, and length of the crop marks if you decide to print them. Step and Repeat settings allow the user to specify the horizontal and vertical settings for the currently selected image. The step and repeat process allows you to drag an image and the software will replicate the image according to the settings in this menu. This allows you to print many copies of the same image very efficiently and they will all be aligned and properly spaced for cutting.
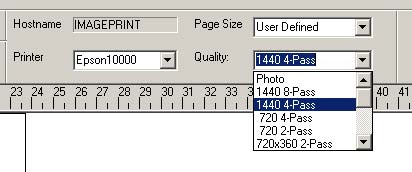
ImagePrint Quality Settings
In theQualitydrop down menu, you choose the print mode of the printer and print job. The choices are unidirectional and bi-directional at various settings appropriate for your printer. The settings listed here are for theEpson 10000, 1440 4 pass gives equivalent quality to the Epson Driver at maximum resolution. 1440 8 pass and Photo modes are modes that surpass the output quality of the Epson driver at a reduced print speed. Unidirectional printing on most wide format printers will almost always achieve higher quality than bidirectional printing, so for the best output stick with the Unidirectional settings. For signage and less critical images the 720dpi print modes print extremely fast and are free from banding issues (not that the stock driver is a problem). ImagePrint also correctly controls the Epson DX3 variable droplet printhead which in the 10000 lays down a 5,8, or, 11 picoliter droplet.
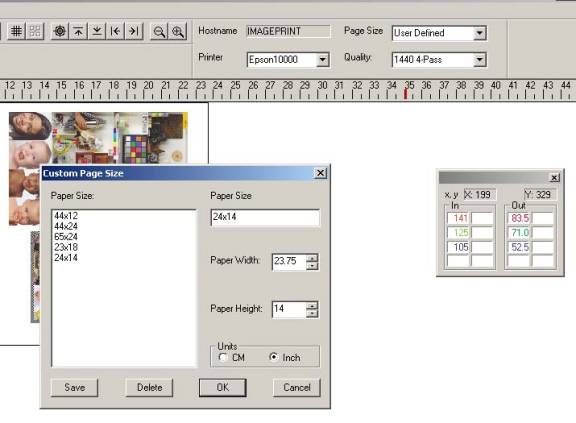
ImagePrint Custom Page Size Box
The custom page size dialog box simply allows you to change the paper size in a quick and efficient manner. You simply enter the width and height, name the paper size, and it will be available for future use in this menu. The rulers along the top of the layout area reflect the page size accurately so that you can visually layout your documents in any way you desire. The small box to the right of the Custom Page Size menu is the Probe, the left numbers display the original color values before profiles are applied, and the right side displays color values after the profiles are applied.
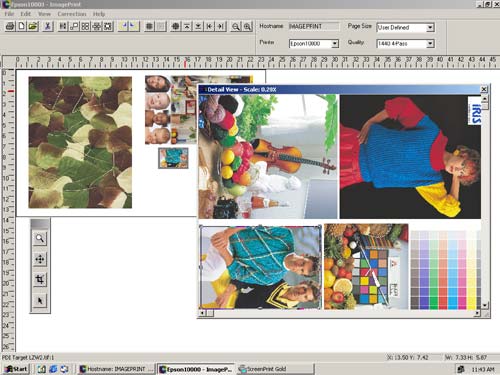
ImagePrint Toolset Box
ImagePrint has a toolset that activates any time you double click on an image in the layout area. These tools essentially allow you to zoom in on the image or crop the image. As you can see from the example (the two men is the sweaters are surrounded by a box with grab handles), I have cropped the lower left corner of this image so thatonlythat part will print. If at any time I double click on the image again, I can revise these crop settings up until the time we click print. The image is not truly cropped, you are only specifying what parts of the image will print during this print job.
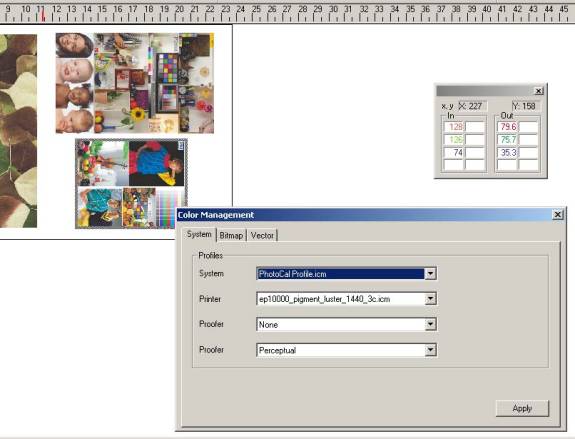
ImagePrint – Color Management System
The color management system allows you full control of all of your images. In the System tab the system profile should be the current monitor profile you are using. This system setting is only used for accurate blowback to the screen and does in no way affect the print colors or quality. For this machine I have selected the profile I made with PhotoCal and the ColorVision monitor spyder. The printer drop-down is obviously where you choose the appropriate output profile for the media you are printing on. The profiles are pre-optimized for the media type, so unlike the Epson driver, you do not choose the media type and a profile. The proofer profile section is used to select a printer simulation file. This profile is used to cause your printer to match the output of another printer or press. Below that setting is another drop-down which allows you to choose the appropriate rendering intent for the proofing job.
ImagePrint – Color Management System
In the RGB profiles box you can select the source profile for each image in the document. Remember that this settings box can be configured different for each image in the layout area, as can the rendering intent. In the CMYK field, you can also enter the correct CMYK profile for your needs. The embedded field is possibly the most critical area to get correct. The choices are toIgnore any embedded profile, makes ImagePrint use the embedded profile regardless of the previous settings in the RGB and CMYK fields, or which allows the user to ignore or apply the embedded profile on a per image basis.
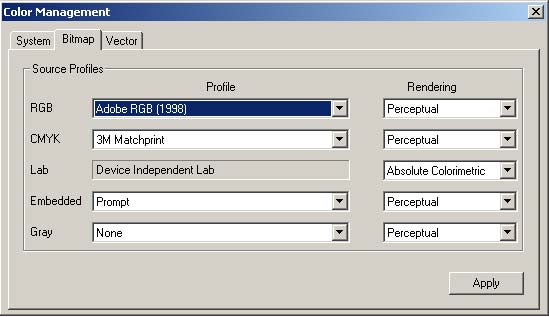
ImagePrint – Color Management System
In the Vector tab, you choose the appropriate settings for images that are output from programs like Illustrator ,Canvas, or Corel Draw. If you are primarily printing images from Photoshop, the Bitmap section is the more important field to have set properly.

Properly configured, you have a completely color managed output system that is written specifically for professional output. Although the standard print drivers from most vendors give you good functionality, nobody in the sign or Giclee industry works without a RIP. You will achieve visibly better output, have a more reliable workflow, and be able to get the most out of your printer. As previously mentioned, I’ve been using ImagePrint with the Epson 5500 and the Epson 10000 printers. Some of the improvements are in shadow detail, where the Epson driver clearly falls flat, ImagePrint can render shadow detail in finer increments much like the Cone Piezographysystem does.
There is no experimentation with different media settings. Each profile lays down the optimal amount of ink for the media used. Under a loupe the differences are more readily apparent, and while the Epson driver is hardly bad, if you want to take digital printing to the next level ImagePrint offers higher quality output that any other RIP I�ve seen, especially for the Giclee market.
ImagePrint is available with a few different options. First, you can buy ImagePrint in the RGB only form, or the Postscript version which allows you to also print CMYK postscript files. Also, you can run multiple printers off the same machine by purchasing additional encryption keys, allowing you to reap the benefits of this program over multiple printers if they are indeed supported.
ImagePrint also supports the Cone BW Piezography inkset, and the Lysonic Quad Black inks as well. If there is something I haven’t covered, you can call John or Daniel at Colorbyte Software,1-813- 963-0241. They are better suited (than I the end user) to answer really technical questions about the product and can tell you which printers are currently supported. You can get a free Demo version of this RIP from Colorbyte if you call. The demo watermarks your images but allows you to print and try before you buy. Awesome product indeed, and costs less that almost any other professional RIP on the market.
Cris Danielsis a Florida-based photographer who also works with other photographers in migrating to digital imaging.Chris is an Adobe Certified Expertin Photoshop.
© 2001 Cris Daniels / All Rights Reserved


Elevate Your Vision


Read this story and all the best stories on The Luminous Landscape
The author has made this story available to Luminous Landscape members only. Upgrade to get instant access to this story and other benefits available only to members.
Why choose us?
Luminous-Landscape is a membership site. Our website contains over 5300 articles on almost every topic, camera, lens and printer you can imagine. Our membership model is simple, just $2 a month ($24.00 USD a year). This $24 gains you access to a wealth of information including all our past and future video tutorials on such topics as Lightroom, Capture One, Printing, file management and dozens of interviews and travel videos.
- New Articles every few days
- All original content found nowhere else on the web
- No Pop Up Google Sense ads – Our advertisers are photo related
- Download/stream video to any device
- NEW videos monthly
- Top well-known photographer contributors
- Posts from industry leaders
- Speciality Photography Workshops
- Mobile device scalable
- Exclusive video interviews
- Special vendor offers for members
- Hands On Product reviews
- FREE – User Forum. One of the most read user forums on the internet
- Access to our community Buy and Sell pages; for members only.
You may also like