


Definition:Vignetting–In an optical system, the gradual reduction of image illuminance as the off-axis angle increases,
resulting from limitations of the clear apertures of elements within the system.(The Photonics Dictionary)
News Flash #1:Allwide angle lenses vignette to a greater or lesser extent
News Flash #2:Digital sensors display vignetting more than does film
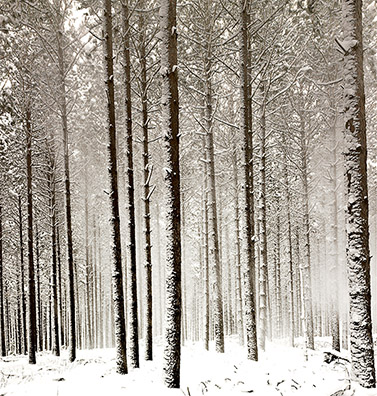
Kennedy Forest. Ontario. February, 2006
Cambo Wide DS with 35mm Digitar lens and Phase One P25 @ ISO 100
Many newcomers to photography, especially digital photography, are shocked when they discover that their wide angle lenses display vignetting. They are especially peeved when they find that their extreeme wide angle zooms vignette a lot, especially when used on a DSLR.
The reasons are twofold. It simply isn’t possible to design a very wide angle lens that doesn’t vignette. Even high-endSchneiderandRodenstockWA lenses for view camera have optional center filters (worth more than most people’s lenses) to compensate for their vignetting.
The second issue is that the photo sites (individual pixels) on a sensor do not lay on the surface of the chip, but rather, in shallow wells. This means that the light hitting the ones toward the corners of the image area lose some photons, because these are blocked by the sides of the well. Less photons, less exposure. Less exposure of the corners vs the center = vignetting.
As mentioned, center filters are one solution. Not a very attractive one though since they are expensive, and one loses two stops of exposure overall.
__________________________________________________________________
Solutions
For the film-based photographer there are three alternatives; use a center filter, create a mask during printing (using ones hands or a mechanical device), or simply ignore it, and consider it an artistic virtue.
For the digital photographer there are other solutions.Adobe Camera RawandLightroomhave vignetting tools built-in (other raw programs may have as well), andPhotoshop CS2has a similar vignetting correction tool.
These work, and work reasonably well. But for critical applications, especially with the finest lenses and high-resolution medium format backs, I have found that I can’t quite get the final image quality that I want and need.
What lead me to this next solution, and the subject of this article, is that when I got myCambo Wide DS with 35mm Schneider Digitarlens, for use with myPhase One P25back, I also ordered a center filer. But, a couple of months later the filter is still on back-order. I tried Photoshop’s vignetting tool, but as I just wrote, it didn’t quite fill the bill.
__________________________________________________________________
Expodisc
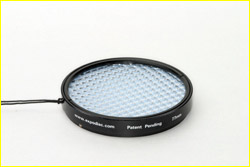
I bought my firstExpodiscabout 25 years ago. It was a handy way of turning ones camera into an incident light meter. Today, the Expodisc has become a well accepted tool for setting custom white balance.
In buying a new Expodisc for another purpose,Lens Cast Calibration, I read in the manual a technique using Photoshop to address the problem of wide-angle lens vignetting. The only problem was, it didn’t work very well, and was fussy to do. So, after some experimentation, I came up with an alternative method.
In the Field
The first thing to do is to take your photograph as usual. Then, place the Expodisc in front of the lens and take another exposure, with about 3 stops more exposure. Do this by changing the shutter speed.
In Photoshop
Process your files the way you normally do, using the raw processor of your choice, and then load both files intoPhotoshop. I’ll call the example filesImageandCalibration.
Select the Calibration file and turn it into a Grayscale. (Image / Mode / Grayscale).
Then, invert it. (Image / Adjustments / Invert, or CMD / CTRL I)
Inverted Grayscale of Expodisc exposure
Next, with the Image file selected, change the mode to LAB (Image / Mode / Lab Color) and then select the Lightness channel (CMD / CTRL 1).
The next step is to blend the inverted Calibration file with the Image file so as to neutralize the vignetting.
Go toImage / Apply Image. In the dialog box set the Source: to the Calibration file, and then set theBlendingmode toOverlay.
You can now change the Image file back toRGBmode and delete the Calibration file, as it’s no longer needed.
That’s all there is to it.
NB:It is best if both your Calibration file and your Image file remain in 16 bit mode. The tonal jumps seen in the inverted image immediately above show what can happen when the file is in 8 bit mode (which was necessary for web display).
__________________________________________________________________
Expodisc and Lens Cast Calibration
This next will likely be of interest to only a small number of people, but it explains why I bought an Expodisc in the first place.
Wide angle lenses, when used with medium format digital backs with Kodak sensors, and lenses that have movements, like the35mm Digitar on a Cambo Wide DS with a Phase One P25 back, not only suffers from vignetting, but also from what is calledlens cast. This is a colour variation across the field caused by the shifting of the optical axis.
Phase One has a very elegant solution. It consists of a large sheet of perspex (translucent plastic) which one holds up in front of the lens and with which one takes a second exposure, right after the main one. Open the aperture 2-3 stops. Then inCapture One, process this shot using program’sLens Cast Calibrationtool, and apply the setting to the accompanying photograph. In a few seconds any colour cast caused by the use of lens movements is gone.
This only takes a few seconds in Capture One, but it’s a fiddly process in the field, especially with the Cambo because its lenses each have bull bars, which prevent the Phase One-supplied perspex sheet from being able to easily get close enough to the lens. Also, while the sheet of plastic is fine in the studio, in the field it is awkward to carry around.
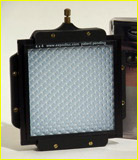
It occurred to me that I didn’t need a large piece of plastic in order to create a calibration frame. A small Expodisc held in front on the lens would do the trick. Also, Expodisc make a version that fits theLee Filtersystem, which I use, and so this looked to be an ideal solution.
And it was. I now take a shot through the Expodisc and use it to create aCast Calibrationframe. But while I was at it, and also while I was still waiting for the Center Filter for my 35mm Digitar lens, I found that the Expodisc also provided a means for solving the vignetting problem as well. This is the technique described in the above article.


Elevate Your Vision


Read this story and all the best stories on The Luminous Landscape
The author has made this story available to Luminous Landscape members only. Upgrade to get instant access to this story and other benefits available only to members.
Why choose us?
Luminous-Landscape is a membership site. Our website contains over 5300 articles on almost every topic, camera, lens and printer you can imagine. Our membership model is simple, just $2 a month ($24.00 USD a year). This $24 gains you access to a wealth of information including all our past and future video tutorials on such topics as Lightroom, Capture One, Printing, file management and dozens of interviews and travel videos.
- New Articles every few days
- All original content found nowhere else on the web
- No Pop Up Google Sense ads – Our advertisers are photo related
- Download/stream video to any device
- NEW videos monthly
- Top well-known photographer contributors
- Posts from industry leaders
- Speciality Photography Workshops
- Mobile device scalable
- Exclusive video interviews
- Special vendor offers for members
- Hands On Product reviews
- FREE – User Forum. One of the most read user forums on the internet
- Access to our community Buy and Sell pages; for members only.
You may also like


