


My use ofPhotoShopis usually limited to straightforward image control and the occasional special technique to "rescue" or enhance a particular image. But many artists use PhotoShop as a creative tool in its own right.
Below is an advanced technique byGregory Georgesthat gives a photograph a watercolour enhanced pen and ink drawing appearance. While not everybody’s "cup of tea", for those that find it of interest a fascinating technique.
A Guest Tutorial By: Gregory Georges
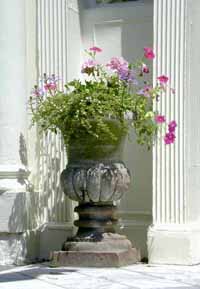 I have always liked loose pen and ink drawings, and soft light-colored watercolor paintings are my favorite kind of painting. This technique was developed to combine these two kinds of art. To demonstrate the use of this technique we will use a picture of an urn that I found sitting on the front porch of a fancy home in Charleston, South Carolina. The picture was taken with a Nikon 950 digital camera that was set to fine mode, which resulted in the 1600×1200 pixels image that is shown to the right.
STEP 1: Make a second copy of the original image‚After opening the image "urn-original.tif", you will need to make a copy of it as you will need one image to make a pen and ink sketch, and a second image will be needed later when you begin coloring the sketch. To make a copy, SelectImage>Duplicateand then name the new image‚³pen-ink.tif² before hitting theOKbutton.
STEP 2: Turn one image into a black and white line drawing ‚Now click on the‚³urn-original.tif² image to begin the process of turning it into a pen and ink sketch. To turn it into a black and white image, selectImage>Adjust>Desaturateand then click on theOKbutton.
 STEP 3: Change b&w image into pen and ink sketch ‚Next we want to make the sketch. SelectFilter >Blur > Smart Blur. You will get the dialog box shown to the right..
SetQualityto High and setModeto Edge Only. Once these settings are made, you can begin adjusting theRadiusandThresholdsettings to get the quality of drawing that you want. To see the results of the current settings, move your cursor over the image box. You can click on the image and the Hand cursor will appear allowing you to select the portion of the image you want top view. As we want an accurate sketch of the flowers without too few or too many lines, I have dragged the image around until it is on several of the flowers. With some experimentation, I finally chose a Radius of 25.0 and a Threshold of 35.0. Then with a click on the OK button, you’ll get white lines on a black background drawing.
Note:This image is a good example of an image where it is hard to get a nice pen and ink sketch, as the edges are not properly delineated. TheSmart Blurfilter works on image contrast and you may find that there is too much, or two little contrast. For images like this one, you will want to preprocess the image by settingLevels. To set levels, selectImage>Adjust>Levels. Alternatively, or in conjunction with levels, you can useImage>Adjust Curves(See below) and select a curve that will allow theSmart Blur filter to give you the results you want.
Note: Once the pen and ink sketch is complete, you may decide that the line weight is too small or you may want to vary the character of the lines. In these cases, you should tryFilter>Artistic>Poster Edge. Again, with some experimentation, you¹ll find you can create some wonderful lines that are bolder than those initially created by theSmart BlurFilter.
Now we need to turn the white line on a black background image (it looks like a scratch board drawing) into a black line on a white background. To do this, simply selectImage>Adjust>Invertand you will have the image shown just below and to the right.
Note: Stylize>Find Edgesis a much more frequently used filter to make a line drawing. However, I find I get much better results from theSmart Blurfilter and they are line drawings not line drawings with grayscale pencil smudges like you get with theFind Edgesfilter. 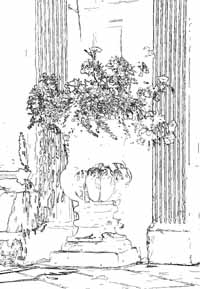
STEP 5: Transform the second color image into a watercolor-like painting ‚Our next step is to create a light watercolor wash that we can lay over the top of our pen and ink sketch. To accomplish this, we need to return to the original image and do some work on it. After clicking on the‚³urn-original² image, selectFilter>Artistic>Dry Brushand setBrush Sizeto 2, Brush Detail to 8, and Texture to 1 ‚then click on theOKbutton. This helps make our image look a bit more like a painting. Once again we need the assistance of ourSmart Blurfilter. SelectFilter>Blur>Smart Blur.This time however, we need to make sure we change the mode setting toNormalwhile we again use aQualityof High. In this case, I used aRadiussetting of 10.0 and aThresholdof 50.0. After making the appropriate settings clickOKand you’ll see how this filter softens the hard edges that were made by theDry Brushfilter.
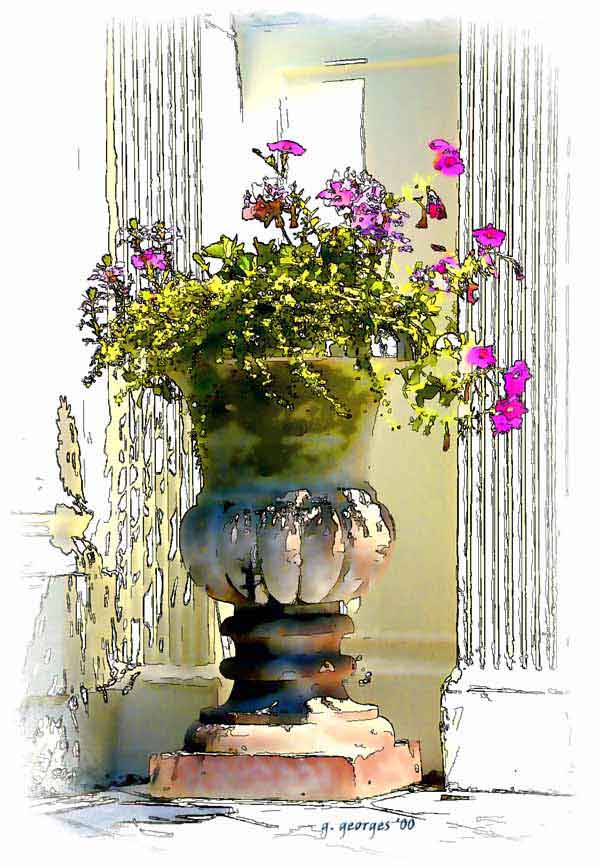
STEP 6: Combine both images: We are now ready to blend the two images together. Once again, select the pen-ink.tif image and copy it by selectingSelect>All, and thenEdit>Copy. Then, select the modified urn-original.tif image and selectEdit>Pasteto paste the line drawing over the top of the colored image. To get the color to show through the line drawing, open theLayersdialog box if it is not already open and click on Layer 1 ‚which should be the line drawing. Then, selectSoft Lightas the overlay method and you will get a painted "pen and ink" sketch like the one shown at the top of this article.
Step 7: Fine-tune image colors ‚Our final step is to adjust the colors of the image to suit our taste. To get the final image shown on the first page, I applied the following settings in the specified order ‚order is important! To apply these color settings, you must select the background layer (or colored image layer) in theLayerdialog box.
1. SetHue / Saturationsettings to: -50, -20, 0 by selectingImage>Adjust>Hue / Saturation.
2. SetLevelsto 0, 1.0, 180 by selectingImage>Adjust>Levels.
3. SetColor Balanceto: 16, 0, -16 for highlights by selectingImage>Adjust>Color Balance.
To permanently combine these two images, selectLayer>Flatten Image. After making the final color changes, the image will look like the one shown at the top of this page. Well almost I should say ‚the real image looks much better than the compressed image shown above. When this image is printed on a quality watercolor paper with a photographic quality ink-jet printer, the image looks even better!
Note: There are a number of other options you might like to consider, including adding a texture by selectingFilter>Texture>Texturizer, and then selecting something like Canvas. The final image will also look better if an appropriate edge treatment is applied. An edge treatment takes away from the hard square look of the original digital image and makes it look more painterly. One last tip ‚add your hand-painted signature and you’ll have a work of art.
This tutorial is Copyright 2000 by Really Useful Content, Inc. All Rights Reserved.
For additional information please visitwww.reallyusefulpage.com


Elevate Your Vision


Read this story and all the best stories on The Luminous Landscape
The author has made this story available to Luminous Landscape members only. Upgrade to get instant access to this story and other benefits available only to members.
Why choose us?
Luminous-Landscape is a membership site. Our website contains over 5300 articles on almost every topic, camera, lens and printer you can imagine. Our membership model is simple, just $2 a month ($24.00 USD a year). This $24 gains you access to a wealth of information including all our past and future video tutorials on such topics as Lightroom, Capture One, Printing, file management and dozens of interviews and travel videos.
- New Articles every few days
- All original content found nowhere else on the web
- No Pop Up Google Sense ads – Our advertisers are photo related
- Download/stream video to any device
- NEW videos monthly
- Top well-known photographer contributors
- Posts from industry leaders
- Speciality Photography Workshops
- Mobile device scalable
- Exclusive video interviews
- Special vendor offers for members
- Hands On Product reviews
- FREE – User Forum. One of the most read user forums on the internet
- Access to our community Buy and Sell pages; for members only.
You may also like


