


1. A Short history of photographic life until LF days
How I evolved over the course of 15 years from taking airplane pictures with a Praktika 1000TL to writing this article about LF photography forThe Luminous Landscape? Well, I don ‘ t know! I will try very hard throughout these pages to rationalize this personal adventure, to map it with a set of reasonable facts and opinions I have learned to base my decisions on, but the very truth underlying the whole story is that I did those things because I felt like doing them !
Galen Rowell, asmallformat photographer that I admire a lot, wrote about the convergence of heart and mind that has to enable the making of great images. One of the things that I found out while putting these thoughts on paper is that the same can probably be said of the making of a career as a photographer. Be it in terms of artistic orientations, be it also in terms of equipment selection. Heart is key, and it is above all heart that took me by the hand and showed me the way to the holy realm of Large Format photography. Fortunately, as I ‘ ll try to show below, there are still some very good reasons to use Large Format analog devices and their illegitimate digital children, but we ‘ll go into a lot of details over those in a few seconds.
For now, how about a bit of history? The sad truth is, after being born in Belgium in 1972 from Jacques, a father very fond of photography and Francine, a supportive mother that once spent 2 entire weeks to create from scratch a slide cabinet for him, I wasted the first 16 years of my life by not taking a single picture. Hardly a nice way to thank them for my photographic genes ! That was fortunately corrected when my father gave me the East German Praktika 1000 TL referred to above, as well as a set of screw mount Pentax lenses I would end up taking pictures of planes with.
Image quality became a concern the day I got my first Nikon, a manual focus F601m that is now the property of a close Japanese friend, mostly used as a very efficient dust detector. It became a concern because of the gap it showed compared to the Praktika but also because it opened up a world were image on film lives a second life on high quality prints through the eyes of the people that watch them. I already sort of knew what Ansel Adams had written years before . There is nothing worse than the sharp image of a fuzzy concept – (or something approaching) but I was finding out that a sharp concept had often a lot more success embodied in a sharp image. Or at least do I now think that I did then…
My moving to Japan in 1997 for personal and professional reasons influenced my photographic future in at least 3 ways:
l Japan is one of the few remaining developed places on earth where the act of taking of picture of strangers in a public place is not felt as an aggression. That helped me develop a taste for street photography,
l Japan features some very decent wilderness areas and hiking quickly became a great option to escape the stress induced by Tokyo’s over-speed life. That helped me develop a taste for landscape photography,
l High quality second hand gear can be purchased easily. That helped me acquire at reasonable cost the gear I needed to get even sharper images of the 2 afore mentioned subjects.
Besides the purchase of a good tripod, t he next move probably worth mentioning happened in 2000 when I replaced my little used B&W enlarger by a Coolscan 4000ED film scanner. The scanner was of course only the visible part of an iceberg made up of a fast AMD box, PS, an Epson 2000P pigment ink printer as well as a few other toys. Not only did my fake stainless steel sink stop rusting from then on, I was also able for the first time to get quickly printed results that made my friends say WOW! sometimes. Looking back at those first prints today, I realize how nice my friends were.
My full entry in the digital world coincided with the purchase of a Coolpix 5000 weeks after its release in December 2000. The real shock though happened when burglars broke into my flat early 2001, stole the Coolpix 5000 but completely ignored my F100 and the other Nikkor lenses worth 10 times more. This made me realize that times were changing quicker than I had thought. The D100 I bought a bit later further strengthened my links with digital shooting. To the extend that I didn’t take a single image with a film body for the next 15 months. The F100 had joined the F601m as yet another dust detector! The full size Kodak SLR/n purchased a year later obviously didn’t change this a single bit, neither did the D2X that recently replaced it.
Then came a chilly winter day early 2004 when I came across a Japanese LF landscape photographer near the top of a famous Japanese ski resort (I believe it was Shiga Kougen – Japan Alps). The weather was terrible, and I thought back then that the gentlemen fighting with its focusing cloth in 60 kph winds was probably crazy. Heck, I was able to snap a perfectly exposed high res image with my D100 in a matter of seconds. Why bother?
It got me wondering though, and this started a whole process of investigation whose outcome was me purchasing a full LF kit in November 04.
What I’ll try to explain in this article is why I took this seemingly surprising analog decision, both from a rational and emotional standpoint, and how the whole story connects with my digital self.

Ebony 45 SU – Schneider 110 XL – Tokyo – Japan – Apr-05
2. Comparison of small size digital against film LF
The basic question I tried to answer throughout 2004 was “To what extent does the small format digital SLR differ from a LF for my type of shooting?” that can be rephrased as “would it make any sense for me to start LF?” My past experience, a lot of reading and the kind help on many great people on various photo forum including largeformatphotography.info and lula.wpengine.com to only cite a few, allowed me to come up with a quick comparison chart of the respective advantages of both types of equipment.
Your mileage may vary, and I am sure that some of you will have diverging opinions on these topics. I do obviously have no pretense to have found the universal truth, and some of the advantages I found to small format might very well look like drawbacks for other photographers with different shooting habits, goals and experience. My view is that each of us might be well off creating one’s own criteria in order to match such a decision tool with one’s unique needs.
2.1 SMALL FORMAT
Most of us coming from casual photography take it for granted that a camera is a small carry along item. What are the actual advantages and drawback of those small format cameras for an amateur landscape photographer (or at least for me)?
Advantages
l Light and compact meaning easy to carry and not too obtrusive. This goes beyond the camera since most accessories, including the tripod itself, are typically lighter.
One of the main advantages resulting from the compactness is that it is possible to walk with a compact camera in hand, or in a small banana pack on one’s chest, or hanging from the side of a pack’s hip belt. This does significantly speed up the shooting when trekking.
l A lot of DOF. This is being challenged by compact digital cameras though whose small sensors do provide virtually infinite DOF, but the DOF provided by 35 mm cameras appears to be a very good compromise for many applications,
l It is possible to use in the field a really wide range of locales by carrying only 2 lenses (17-35 and 80-400 for instance),
l Quick to operate thanks to AF and built-in accurate matrix type light meters,
l Various accessories are available from various suppliers. One can think of lenses, flash, L type plates for easy set up on tripod standard clamps (namely RRS or Kirk plates for Arca-Swiss clamps).
l Those small cameras are overall really sturdy, although they tend not to like water too much.
è They can withstand moderate falls and shocks better than any other camera around,
è They are immune to some extend to upper floor neighbor bathtub leaks and cricket storms.
l The scanning solutions are much cheaper if one shoots film,
l The cameras and lenses are often cheaper than those of larger formats. They are also easier to find new and second hand thanks to mass production. This ensures also a likely stable supply of accessories and prolonged maintenance over time.
Another pleasing consequence of how widespread those cameras are is that there is a lot of books and articles devoted to explaining how to optimize their usage. The more a camera sells, the larger the advantages for the buyers! A bit like Windows in a way!
Drawbacks
Limited area of the film/sensor limits the resolution that can be attained. Practically, this is not an issue for most amateurs who rarely print larger than A4/A3. Landscape is one of the areas of photography where this limitation is felt most strongly though. The small details found in trees are very difficult to reproduce well, and failure to so has a clear impact on the quality of the prints,
The viewfinder remains small even with full frame DSLR.
This might only become clear after using medium of large format cameras, but it makes it rather difficult to assess framing, sharpness and, most importantly, feeling for the texture of the scene. Small format APS sized digital cameras like a Nikon D70 or Canon 20D are even worse than traditional film 35 cameras in this regard.
I have somehow come to wonder if there isn’t a tight relationship between the size at which an image appears best in print and the size of the viewfinder through which the photographer composed it. According to this theory, it would be difficult to visualize how a large print would look when viewing a scene through a small viewfinder.
l Uses batteries which reduces the autonomy in cold weather (unless you get a Nikon FM, but this cancels many of the advantages of shooting small format),
l Limited control over image geometry and focus (although the few available T/S lenses are an option).
è On the other hand, a lot of amateurs using small cameras are not even aware that other options exist in this regard. Besides, camera movements are said not to be that super important for many landscape applications,
l Mostly uses a mirror whose vibrations typically affect image sharpness enough that you will want to use MLU and a tripod for serious landscape work. This reduces somewhat the actual speed of operation of the small format cameras,
l Those highly efficient 35 mm bodies do severely lack charm. Where is the smell, where is the signature of the artisan?
l Unless you get a 1DsMKII, they will not impress the upper floor neighbor too much.
Ebony 45 SU – Nikkor 300 mm f9 – Zao onsen – Japan – Feb-05
2.2 DIGITAL
After discussing what I see as the main advantages of small format, I will now try to do the same exercise for digital against film. A much discussed subject so that I’ll try here again to focus on those aspects that actually impacted favourably or not my actual usage. There might be a little controversy here also.
Advantages
l Theoretical ability to check images in the field
è Although this is actually true, the LCD screen is often small and lacks contrast in bright situations, the histogram is jpg based and doesn’t always reflect the actual RAW clipping, or only does for a given RAW converter, etc… There is still a definite need to visualize and anticipate what the final image will look like. This is actually more an implementation issue rather than a fundamental shortcoming of digital cameras. Minolta and Nikon are showing the way with the 7D and D2H/X LCD screens,
Al No more cost of film and processing. This is obviously a huge plus for anyone but those shooting a few rolls on their kids’ birthday every second year,
l The ability to use large memory cards makes it possible to bracket widely with zero cost
è With minimal ACR skills, it becomes very hard not to get the exposure one is trying to achieve out of the box,
On the other hand, memory cards are expensive, and there is often a need to take along an Epson P-2000 or compact laptop along to empty memory cards. These are both expensive and more or less heavy options,
l Possibility to combine multiple exposures to increase the potential of 35 mm camera gear along one or several axis:
Ø Extend the limited dynamic range of the sensor by overlaying multiple images one stop apart from each other,
Ø Increase the angular coverage of the lenses by creating cylindrical or flat panoramas,
Ø Increase the DOF of the lens by overlaying a few images focused at different distances,
These could also be achieved when scanning film, but it is a lot easier to do with digital thanks to the ability to check the results immediately and thanks also to the lower cost,
l Control over white balance.
è Although it is often quite tricky to find the perfect one and I often end up doing only minor corrections around daylight settings. The thing is that the “correct” white balance one would get from measuring it on a white sheet is more than often not the one giving the result most pleasing to the eye, or closer to what one actually saw in the field. For natural outdoor light, I don’t see this as a huge advantage. This might be a direct consequence of my limited skill set though.
One thing is sure, the White Balance setting as well as the validity of a one dimensional approach to color temperature should be a the core of any discussion on the authenticity of digital capture in terms of colors.
l No need to take many films along and to change them regularly.
è Gain in shooting autonomy, convenience in fool weather and reduced risk of missing a shot when changing film (changing light, wildlife,…). This also reduces the risk of losing some exposed film, or some money by sending to processing unexposed rolls,
l Reduced need to study the seemingly intricate science of lens filters. Besides PL (and then again, mostly when it is used to reduce reflections), most effects can be achieved with Photoshop or another photo editing package in post-processing. Gradual density filters still have some value, but digital layering of multiple bracketed image is a lot more flexible and ends up being faster too.
l Immediate access to the images taken when one gets back home
è It becomes very easy to batch images and provide people who traveled with you very quickly with some images in order to thank them for waiting for numerous slow tripod set-ups. Granted, these automatic conversions will not tap into the full potential of each single image.
Drawbacks
l The colors one gets out of the box are still not as punchy as those one can get from a nicely scanned Velvia 100F (especially in the blues). Besides, it isn’t that easy with digital images to get a consistent look across images taken with different bodies or with different RAW conversion settings. All the images taken with Velvia used to have common characteristics that made it easier to produce a coherent set of work. How to achieve something similar when changing RAW converter for instance?
The Nikon D2X that I have just started to use for landscape work does seem to produce great natural looking colors when used in Color mode II though. But again, this is largely influenced by the RAW converter used for the conversion.
l Setting up and executing a RAW based workflow is a very time consuming task. On the other hand, scanning films was slow too.
l Need to take several batteries along and potentially a charger. The seriousness of this appears to be strongly reduced with the latest bodies like the Nikon D2X or 1DsMKII.
è The autonomy gain is a bit of an illusion unless you carry a few batteries or a heavy high capacity battery along,
l The image definition of all but the very high end DSLR is still not on par with well scanned medium format velvia 100F, even if there is no grain. Actually, a certain level of grain is IMHO not detrimental for organic subjects like landscape, it it for high key automotive photography for instance,
Now, this is one touchy subject, and I have to admit that D2X or 1DsMKII prints that I made myself or saw recently make me rethink this statement a little bit. Those cameras are probably in the same ball park as scanned medium format from an objective standpoint. More on this below.
l Need to learn some post-processing techniques to solve some issues like moire, etc… On the other hand, a certain level of digital skills is also needed to correct and improve scanned images (the sharpening routine being rather more complex),
l Dust on the sensor.
è Not a huge issue in terms of black speckles, but more of an issue in terms of general decrease of contrast and colors. Scanners equipped with ICE functionality are nowadays easier to use then digital cameras from this point of view! On the other hand second hand or refurbished LF scanners are more often than not not equipped with ICE.
l Even moderately long exposures can become an issue in terms of noise with some bodies. Granted this was especially bad with the SLR/n. Most notoriously Canon, but also Nikon are much better in this regard,
l The storage of the large images becomes quickly a real nightmare and is very time consuming. Besides, the risk of loosing an original by having CD-R/DVD-R become un-readable is very real (more a problem for amateurs than pros I would think). On the other hand, the file sizes one gets from scanning medium or large format are even much larger with a rather low efficiency (the actual image information per pixel being lower),
l There seems to be no end to the progress of digital, and one looks ridiculous very quickly with a 2 years old D100 compared to that stupid colleague who doesn’t know a thing but bought a 20D last week (even if yes, the D100 still takes very good images) 🙂
l Reduced life span of bodies. The fact that taking images is very easy, the possibility to correct immediately in the field mistakes made when taking an image lead to a much higher frame count compared to film bodies. With cameras like the D70 and 20D having a shutter rated at around 50.000 frames, the life span of a camera (or at least of its shutter) for a busy amateur might not be over 2/3 years.
l Get tired of feeling like one has to check an interpret the histogram of each and every picture taken.
Ebony 45 SU – Schneider 110 – Nikkou – Japan – Aug-05
3. A natural heart driven blindness
I will now try to cast some light on the reasons why I decided to start working with a 4×5 view camera. Hang on!
Based on the more or less objective facts reviewed in chapter 2, reasonable human beings should reach the conclusion that a small format high res DSLR like the Canon 1DsMKII or the Nikon D2X is the ultimate tool for practical landscape work.
If so, why did I decide to get involved in the old fashioned and seemingly a bit irrational LF World when masters like Alain Briot are going just the opposite way?
As I wrote in the introduction, it basically just appeared to be the right thing to do – A mix of objective and subjective reasons influenced my decision, some having to do with the qualities of LF, some having to do with a certain ignorance of its weaknesses. Let’s review a few:
l A desire to print larger and larger with increased definition and better fine details rendition. The willingness to try entering the fine art landscape market as a side activity was clearly a driving force here,
l A need to see the world upside down on a ground glass larger than life, to feel the leather of the bellows, to apply movements to get infinite DOF and to hear the soft clicking of the lens copal shutters,
l A naive idea that the financial impact would be limited (amount of shooting done is reasonable), that the gear wouldn’t be that heavier that the shooting wouldn’t be that slow!
Besides, I let some gentle irrational obsessions regarding the drawbacks of small format digital creep in and become a supporting force too:
l A temporary disgust for the annoyance of having a small viewfinder,
l A feeling that the necessity to use a tripod for 35 mm landscape images anyway pretty much reduces the shooting speed advantage of small format,
l A desire to get back to the somehow simpler world of slides.
As if I really needed excuses!
On top of these key factors, the following considerations convinced me that moving into the realm of large format photography was the best option at this moment of my photographic life:
l Evolving perception about what a good image is, and careful analysis of which of my images I/other people typically like best in relation to this ideal.
Indeed, I ended up noticing that very few of the images I took quickly were successful (assuming that some are) or at least as successful as they could have been. I got to understand that there was for me no way around taking the time to analyze a scene, moving around it, identifying patterns and shapes and waiting for the light to get sweet. Speed is needed sometimes (when the light is quickly changing for instance), but lack thereof ends up being an asset in many cases.
I believe that you produce a great image in 2 steps:
l An instant feeling for a situation attracts your eye to a given part of the surrounding world and you start to think about making an image,
l A lot of small investigations around this topic lead you to finding the most successful point of view and framing.
The second step takes time. It is a bit like a tennis player that needs those last small adjusting steps to get to the perfect position to hit a great shot.
l Desire to know how things work.
How could anyone interested in the ‘mechanical’ dimension of photography not be willing to try out those beautiful tools? Why would one not want to try to control perspective or the plane of focus of an image?
l Pretentious willingness to integrate a long line of great landscape photographers who have been working with similar tools, be it in ways that I don’t always find very exciting,
Can a photographer claim to be a landscape photographer without having at least tried the tools used by the masters?
These various factors could have remained latent hadn’t’t they been crystallized by the encounter I made with what I see as one of the only 4×5 camera matching perfectly my needs: the Ebony 45SU.
In the next Chapter, I’ll try to explain what it actually takes to get from a point where you feel like trying LF to the actual taking of a first image with gear you own. I’ll also give a quick overview of the available options in terms of scanning of the resulting slides.
Ebony 45 SU – Schneider 110 XL – Tanzawa – Japan – Feb-05
4. Gear selection
Tons of material is available in print and on the web to help people select LF gear. Nonetheless, I couldn’t find a single reference gathering all the information needed for a landscape shooter to select a suitable starting kit to start off on the right foot. This is what I have tried to create in the following section, everything being based on my own experience over the past few months.
4.1 Selection of camera architecture
The very first thing to do when selecting a large format Camera is to select the basic architecture you are looking for based on the main application intended. To keep things simple, there are basically View Cameras and Field cameras.
l View camera (or Rail camera):
Ø Many movements,
Ø Heavy and slow to use,
Ø Pretty large when used and packed.
l Field camera:
Ø Fewer movements,
Ø Lighter and quicker to use,
Ø Much smaller when packed.
The common wisdom seems to be that landscape shooters use field cameras and, besides a reasonably light weight Arca Swiss rail camera used by some for landscape work, there are very few exceptions to this.
Field cameras are further categorized according to:
l The materials used:
Ø Wooden cameras: As one might have guessed, these are typically lighter, cheaper and less robust than metal cameras,
Ø Metal cameras which are basically just the opposite.
l How they fold when not in use:
Ø Foldable: most of the field cameras are foldable, which means that they collapse into a closed box when not in use. This is great for protection, but taking the first image takes more time as you need to open the box and put the camera back in working condition. This can be a problem for a busy landscape shooter. Furthermore, it is not possible to keep all lenses on the camera when it is folded – sometimes no lens at all.
Ø Non foldable: these cameras behave pretty much like rail cameras when not in use. The front a rear standards are just moved as close as possible to one another on top of the base. This provides obviously less protection, but taking the first image can be very fast. Only a handful of brands to produce such non foldable field cameras.
As we ‘ ll see later on, these differences of architecture will have an impact on the lenses that can be used. Non foldable cameras tend to favor wide angle shooting and to have more movement potential, especially on the back standard.
Upon getting to this level of knowledge, I was pretty much leaning towards a field camera, but had no real opinion beyond this. The cameras on my list of options were classics among landscape shooters: new or second hand Linhof MasterTeknica 2000 or 45, second hand Horeseman 45FA or wooden field camera like a Wista.
I had also seen cool looking aforementioned wooden cameras from a Japanese brand called Ebony in one of Tokyo ‘ s main Camera stores. The availability of both foldable and non-foldable versions had triggered my interest.
4.2. Selection of a format
In parallel to the choice of camera type, a landscape shooter should also consider what format to use. The type of application considered is an important main input here again. The 3 common options are 4 x 5, 5 x 7 and 10 x 8.
Simply put, the larger the better the image quality but the heavier and more expensive it becomes. Starting from the conclusion, I decided to select 4 x 5 as my entry point in the LF World.
What would have been theadvantagesof selecting 5 x 7 instead?
l The weight of a 5 x 7 camera is not that much higher,
l Film surface is twice larger (in a way, this is at least as good as moving from a 8MP DSLR to a 16 MP one) which will of course further push the limit in terms of print sizes,
l The aspect ratio of the images is closer to 6 x 45 (the image is more rectangular).
On the other hand, thedisadvantagesthat made me reject this option are:
l Quick load films are not available. You ‘ ll have to load your sheets one by one in holders in a dark place at home or to carry a light proof tent to reload in the field,
l Limited DOF becomes even more of an issue,
l Film is even more expensive and nobody seems to know until when they will be produced,
l Less options for scanning. Flatbed scanners become basically the only option (although some Imacon scanners like the currently produced 646 can seemingly scan up to 5 x 7 if one accepts to loose a few mm),
l Fewer lenses available, and those that work are typically more expensive and heavier,
l Further limitation on camera movements since the gap between image size and image circle is smaller. This might not be a huge problem for landscape, but seems a bit scary for beginners.
I might move up to 5 x 7 in the future and have decided to buy at least some lenses that could potentially be used on 5 x 7 too, even if their cost/weight ratio are maybe not the best for 4 x 5 usage (Schneider 110 mm f5.6 and Nikon M 300 f9).
Backs allowing shooting 4 x 5 with a 5 x 7 camera, as well as enlarging backs making it possible to shoot 5 x 7 with a 4 x 5 camera are available. These items do however impose some limitations in terms of usable wide angle lenses (the minimal distance between back and lens is increased).
As a final comment, it should be said that formats larger than 8 x 10 also exist, be it 11 x 14 or 12 x 20. Those are basically B&W only, and most people create print by contact. A fascinating World in its own right, if somewhat difficult to get into for obvious reasons.
4.3. Selection of camera and lenses
Although there are obviously much cheaper options new and second hand, I decided to purchase an Ebony 45SU. The reasons why I chose a product designed and manufactured by Ebony were:
l Very good reputation of the brand in terms of robustness/weight ratio and ease of use in the field,
l Use of very noble materials and beautiful craftsmanship of the cameras make them a joy to use,
l Possibility to meet the people behind those wonders. Ebony is based in the Western suburbs of Tokyo and do organize regular gatherings of users in the Tokyo area. I have attended 2 of those so far.

The selection of a non foldable 45SU over other foldable options like the SV45 was based on the following rationale:
l The 45SU was designed from the bottom up for wide angle shooting, but with reasonable tele capability (max extension is 365 mm which makes it possible to use up to 400 mm tele lenses – probably also 500 mm at infinity),
l It is non-folding. This makes it very quick to operate in the field since the most commonly used lens can stay on the camera permanently, and there is no need to unfold the camera first. Reduced operation in the field is key when shooting in cold climate for instance,
l Availability of asymmetrical movement that seem to speed up the focusing process a lot for certain types of images since you get rid of the focusing/tilt/focusing/tilt iterations to converge to both a sharp foreground and background. I ‘ ll elaborate a little further down on the actual advantages of this,
l Offers back shift, which I intend to use to do easy plane stitching in order to get results similar to what a Fuji 6 x 17 offers with zero parallax problems. This turns out to be a lot easier/faster than traditional cylindrical stitching, since there is no need to move the camera (there is also no need to identify the focal point of the lens).
Now, wouldn ‘ t is cool to give a look at this wonder in 3D? Clicking on the following link will enable you to download a rough 3D unofficial model of the Ebony. The dimensions of the camera are close but not exact and the kinematics were also simplified.
You will need to download and install the free 3D XML viewer from the Dassault Systemes web site to be able to open the 3D XML file. (URL is: http://www.3ds.com/3dxml/).![]()
4.4. Selection of lenses
It is actually impossible to decouple the selection of the lenses from that of the camera. You have to pick a camera that will be good at handling the lenses that you intend to use most. Indeed, the potential of the camera in terms of bellow extension controls which lenses will be focusable to infinity (minimal bellow extension) or at smaller distances (longer bellow extension).
As far as I am concerned I use wide angle extensively in 35 mm and medium format and like the wide angle work of many famous LF landscape shooters. This drove the choice of a camera able to handle wide angle lenses well.
Besides, the selection of lenses can be helped by the following considerations:
l There is typically a need to have 3 of 4 lenses to start with in LF since only fixed focal lenses are available,
l Start by looking at the 35 mm format lenses you use most and convert to 4 x 5 focal lengths. For me it is clearly the upper end of a 17-35 zoom and the wide end of a 80-400,
l Check in LF landscape books the lenses that were used by famous photographers to take images that you like (Jack Dykinga for instance as far as I am concerned),
Whether to buy second hand or new is an open question. However, it is currently possible to find very cheap second hand LF lenses in Tokyo in mint condition. Those tend to be much cheaper than comparable 35 mm gear since many pros have recently gotten rid of their LF gear in favor of 35 mm or medium format digital. Some of this gear has been through a very heavy usage and reasonable care should obviously be taken before buying.
I did personally end up purchasing the following set of lenses:
l Second hand Nikkor 75 mm f4.5,
l New Schneider 110 mm f5.6,
l Second hand Fujinon 180 f5.6,
l New Nikkon 300 mm f9.
What comes next? Perhaps a Schneider 58 mm and Fujinon 400T.
Ebony 45 SU – Schneider 110 XL – Okutama – Japan – Nov-04
4.5. Selection of accessories
4.5.1. Selection of tripod mounting solution
I had to find a suitable plate matching my Arca Swiss quick release clamps (I am currently using a RRS BH-55 PCL head). Fortunately, Ebony sells a specially designed Arca Swiss compatible plate that they can mount if requested to. The plate is rigidly screwed to the tripod mount shipping standard with the camera, ensuring minimal impact on its vibrational behavior.
As a side node for those who have never used a LF camera. It is possible to switch the back of the Ebony from horizontal to vertical mode in a matter of seconds. Thanks to this, there is no need for those heavy L type brackets that we have to equip our 35 mm or medium format bodies with.
4.5.2. Selection of light meter
A lot of information on light meter selection can for instance be found athttp://www.largeformatphotography.info.
To make a long story short, I ended up buying a Pentax digital 1 degree spot meter and am very happy with it so far. It is simple to use, sturdy and idiot proof (an important factor as far as I am concerned ! ). It does obviously not do incident light measuring, but this can be simulated to some extend by averaging a few measures off a gray card.
4.5.3. Selection of quick load solution:
Fuji Quickload II seems to be the best option available today, although it is quite pricey (18.000 Yen in Tokyo). It seems to be most appropriate for the Fuji films I typically use and be the most foolproof (which I know I will severely need). The B&W shooting might be an issue that still needs to be investigated as the compatibility of Kodak B&W films with the Fuji Quickload system appears to sometimes pose problems.
4.5.4. Selection of instant film solution
After comparing Polaroid and Fuji offerings, I ended up selecting the Fuji F100C. Those sheets are smaller than 4 x 5 by a few cm, but still make it possible to assess accurately the correctness of the exposure. At about 200 Yen per sheet, they are twice cheaper than the equivalent full size instant sheets. The mandatory Fuji instant film loader costs about 8000 Yen and does add an extra bit of bulk to the gear.
Using an instant film is very re-assuring for the beginner, as it sort of acts as the TFT screen of a DSLR, you can immediately check on location the kind of results to be expected. Nonetheless, I quickly stopped using them, the main reasons because the time required by their operation, cost and extra bulk of the sheet holder.
In my book, they just aren ‘ t a very good match for landscape applications where reasonable speed of operation is often key. I ended up more than once getting really neat instant film versions of a scene, but the light had vanished the time I put the actual Velvia sheet in the holder ! Your mileage may vary and I will probably use these more when shooting static subjects like interiors or architecture.
4.5.5. Selection of roll film solution
The main advantages of using a roll film holder over film sheet are:
l The cost,
l The speed of operation when taking several shots in a row (when bracketing for instance)
l The possibility to scan with a medium format scanner like the Coolscan 9000ED,
l The possibility to use special films that are not produced in 4 x 5 sheets (like the Japan only Fuji Fortia or Fortia SP for example),
l When mounted on a camera with a rear shift capability, they can also be used to take 2 successive view of the same scene that can then be stitched together to simulate a 6×17 camera. The same can be done with sheet films, but at greater cost and with more time lags.
The main drawbacks are:
l The extra weight and bulk,
l The fact that the ground glass of the Ebony does not have marks showing the actual location and size of the film area, which makes framing a bit difficult by default. Sticking small markers on the ground glass solves this issue
The Horseman holders seem to be considered by many as the best option. They can easily be found second hand in Tokyo in 6 x 7 and 6 x 9 sizes for both 120 and 220 roll film types. I decided to buy a second hand type 253 holder that can handle 6 x 9 220 films. It ended up costing three times less than the new 6 x 12 Horseman back I had been considering. It is important to make sure that the roll film holder purchased can be mounted on your camera as Horseman also makes proprietary holders that can only be fitted to their own line of 4 x 5 cameras.
As a side comment, the actual size of the film area of an Horseman 6 x 9 film holder is actually closer to 5.7 x 8 cm !
What comes next? Probably a 6 x 17 roll film back if I can find one cheap on Ebay.
4.5.6. Selecting miscellaneous items:
The following items are more or less mandatory, and their selection can be difficult. Here are my takes:
l Cable release for lenses: the world seems to be divided between those who swear that each lens should have its own release cable, and the heretics who believe that one + spare is more than enough. I decided to stay in the middle of the road and currently use 2 cable releases that I leave on those 2 lenses I use 80% of the time,
l Focusing cloth vs. focusing bellow: since one of my goals shooting LF is join the long stream of the old masters, what could I choose but a focusing cloth? The Ebony cloth is white on the outside which seems to be a major plus when shooting during the summer months. Recent shooting in windy situations has led me to reconsider this a little bit though, and I have been using a focusing below on and off recently,
l Focusing loupe: I have decided to go for the 3.5 times fixed Ebony Loupe. It is light, compact and very easy to use in the field. Some claim that a higher magnification loupe is a must to be able to achieve critical focus. Although this is probably true, I already find it difficult to find the exact peak of focus when shooting wide angle lenses in the field. I am therefore personally not sure to what extend a 10 x loupe would provide a real advantage,
l Lens shade (and how to carry it when you are not shooting): the Ebony clip type shade is very light, quick to set up and easy to use. It clips in the flash shoe located on top of the front standard, and its orientable arm can grip any flat object that will play the role of the shade. I typically use the plastic plate protecting the ground glass when the camera is not in use, this saves a few grams and helps not loosing the plate anyway,
l Filter system: various filter system exist on the market, but Lee appears to be very well reviewed. Although I found their kit to be a bit expensive, I am satisfied with the way it works. The kit is made up of the main filter holder that fits on a ring adapter screwing to the lens filter front thread. You obviously need one ring adapter per lens filter thread size.
I have never been a big filter guy, and the only two I bought were a soft gradual density filter as we ll as a polarizer (no need to get a circular one).
l Pack to carry the camera and/or the lenses: since it doesn’t seem reasonable to carry a 3kg Photo trekker inside a backpack, I have just been using my Osprey 42 +5 hiking pack in which I pack a smaller Loewe Pro Stealth Reporter 200 AW. Additional lenses go into their own poach.
Ebony 45 SU – Schneider 110 XL – Nikkou – Japan – Aug-05
5. Scanning 4×5 slides
As I wrote in the introduction of this article, I have been shooting digitally for about 3 years, and do currently own the equipment needed to produce high quality prints within my own digital dark room. I took it for granted since the very first day I started to think about LF that the downstream digital part of the process would have to be common with my current DSLR workflow in order to take advantage of the image treatment capability of Photoshop and ability to produce prints myself.
This means one thing: scanning.
5.1. Scanning options
Many professionals sub-contract scanning to specialized labs equipped with the best and the latest drum scanners operated by experts. This option should be remembered when critical scanning is needed for those special images. There is however a significant cost associated with working with the best !
In case you decide to scan yourself, Let ‘ s review quickly the options available.
I had been scanning medium format slides with a Nikon 9000 Coolscan for some time and knew how well these toys perform. The only limitation being that they can only scan up to a width of 6 cm. Chopping up 4 x 5 slides with scissors being a not very elegant option, I was facing the issue all LF amateurs are facing: how to scan those huge slides?
The options available if you need to scan 4 x 5 sheets are:
l A cheap flatbed scanner from Epson or Canon: these cost around 500 US$ and can deliver an acceptable quality. One of their main advantages is that they can scan up to 8 x 10 inch, which will enable you to buy the big brother of your new 4 x 5 when you will have started to think that the 4 x 5 slides are too small ! They can of course also scan reflective material,
l A slide in type cheap scanner like the Epson F3200: a disguised Epson flat bed scanner coming with a full set of holders as well as many other bells and whistles that you typically will not need. I bought one of these as it appeared to me to be the best option at a given time. I ‘ ll go in details about how well it performs in the next section,
l A pro level flatbed scanner from companies like Creo/Scitex: same thing but much more expensive, in the same price range as the Imacon actually. I have no experience with these and can therefore not comment but they are said to deliver high quality results, especially when doing wet scanning,
l An Imacon Flextight scanner. Those able to scan up to 4 x 5 being the Precision II and III (SCSI), the 646, 848 and 949 (firewire). They are seen by many as the best option for those photographers who can afford one in terms of ease of use/performance ratio. They come at a premium though, but are starting to be available second hand from a few specialized vendors on ebay. Imacon/Hasselblad still supports these marvels. I purchased a second hand refurbished Imacon Precision III and have been using it as my only scanning solution for 4 x 5 since then. More on this below,
l A drum scanner, the main player being Howtek and Heidelberg. These appear to deliver the very best quality and they also can be found on ebay at prices not that much higher than those of the equivalent Imacons. The Howtek 4500 appears to be a popular model. I have to confess that I got a little bit scared by these monsters and the additional set of skills they require. Others claim to have mastered them in a reasonable amount of time and to get amazing results. I will leave it to you to decide if you want to take up that challenge ! My view is that it is a credible solution for a working pro, but doesn ‘ t make too much sense for amateurs targeting the fine art market.
Finally, an alternative worth considering is to stick to using a roll film back for 120 or 220 film (6 cm width), in which case a scanner like the Coolscan 9000 appears to have by far the best quality/price ratio.
A lot of information and comparisons are available online, namely at the following URL (http://www.largeformatphotography.info/scan-comparison), and I will not go through much depth on the quality aspect of the scanning here.
5.2. Epson F3200 vs Imacon Precision III
I ‘ ll start from the onset by saying that I was not very impressed with the Epson F3200. The 4990 appears to be a better option. Since this article is not aimed at being a thorough review of the product, I ‘ ll just go over the main characteristics and limitations of the package and touch on the quality of the scans delivered by comparing further down the scan quality of the Epson vs the Imacon.
Back to the F3200. In short,
l The software does appear to be under-sized relative to the amount of data it has to handle. It is for instance unable to scan both at the maximum resolution and bit depth. Scanning at 3200 DPI isn ‘ t possible at 4 x 5 size. The highest usable resolution appears to be 2400 DPI and it forces you to sample on 8 bits only. The maximum resolution achievable at 16 bits is 1200 DPI. These limitations will hopefully be lifted in future releases of the driver (tests done on version 2.65J).
l The DR is unfortunately rather limited, and 16 bits scans do appear to only offer limited advantage over 8 bits scans. Granted, a little less posterization occurs in the highlights, but there is little more detail that is captured in the shadows,
l The sharpness is acceptable to good at 2400 DPI, but I just don ‘ t feel the crispiness that I expect from 4 x 5 scans. Does this show on prints? Well, to some extend it does. I would personally not recommend the F3200 to people intending to print much larger than A3.
On the positive side, the F3200 is
l Cheap,
l Very fast,
l Easy to use,
l Compact, which can be important on our busy desks,
l Can deliver scans suitable for prints up to A3.
The Imacon, on the other hand, delivers consistently impressive results when properly calibrated for focus, resolving just short of the level of the films grain when used at its maximum resolution of 2040 DPI. Flexcolor 4.01 being fully color managed, each scan is tagged with an Adobe RGB profile, and the tests I have done scanning ITF8 targets show that the results are good, with blacks, mid gray and whites that are nearly perfectly neutral. This was one area of concern when buying a second hand scanner.
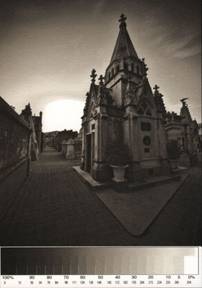
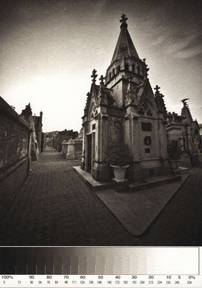
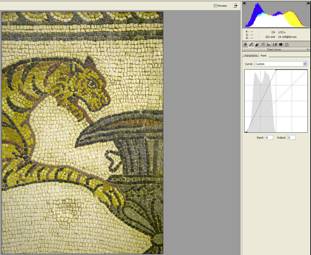
The following image shows the gap between the Epson and Imacon on a sample image shot in April 2005 in Kamakura (Hachiman Grand Shrine). The barrels supposedly contain Sake, but I was unfortunately not given the chance to check!

The 100% crop being:
Imacon on the left – Epson on the right
Imacon Precision III
Epson F3200
Driver level
Flexcolor 4.01
Epson scan 2.65J
Resolution
2040 DPI
2400 DPI
Bit depth
16 bit
8 bit
Image size
9300 pixel high after crop
No re-sizing
Down-sampled from 11000 pixel high to 9300.
Sharpening
Default driver USM
Default driver USM
Image size at 240 DPI
100 cm x 80 cm
100 cm x 80 cm
Size of 100% crop
10 cm x 4 cm
10 cm x 4 cm
One problem which is common between the Imacon and Epson is the pain of removing dust before scans and to clone them out in PS. I am just starting to realize how spoiled I had been scanning with an ICE equipped Nikon Coolscan until now. Thoroughly cloning out the dust specks of a critical 4×5 slide can easily take one hour of painfully boring work if the scanning was done without care! Compared to flat bed scanners, both the Imacon and the Epson F3200 Epson are designed in such a way that the slide is exposed during the scanning. Assuming you manage to start the procedure with a perfectly dust/spots free original, dust is very likely to settle on the slideduringthe scanning process. I guess that I might just have to spend some money on a cleaning person to reduce the amount of dust in the room where I scan!
I have been using the PEC-12/PAD cleaning fluid/wipes combination recently to remove dust from slides before scanning, but still find it hard to get scans without dust specs. The flextouch function now included in Fexcolor 4.01 seems to help to some extend, but isn’t as efficient as the ICE function used by most smaller format film scanners.
6. Imacon scanned 4×5 vs D2X
This being a controversial topic, allow me to be careful with the wording and the description of the testing procedure.
The first factor that caused me trouble is that it is difficult to find perfectly equivalent test set ups on both formats. Ideally, you would want to compare 2 frames that:
l Have the same framing and crop,
l Have the same distance to subject,
l Have the same DOF,
l Were taken with a lens which is actually used in the field by landscape shooters (meaning typically a zoom lens on the DSLR), but still good enough not to limit too much the resolution potential of the sensor/film,
l Were taken at an aperture which is not too far from the sweet spot of the lens.
Besides, I decided to use actual images rather than shooting test targets that provide little information on the actual behavior of the gear. This further enhanced the difficulty of meeting these perfect conditions.
Anyway, all my tests were performed with the Nikkor 300 mm f9 on the Ebony vs the Nikkor 28-70 f2.8 on the Nikon. Both of these lenses are high quality options on the wide end, and I believe that similar results could be obtained with a Canon 24-70 f2.8 for instance. The following table is a summary of the DOF obtained in the conditions of the test.
Parameters
Distance to subject (m)
HF (m)
Near limit of sharpness (m)
Far limit of sharpness (m)
Nikkor 28-70 f2.8 AF-S at 60 mm
Circle of confusion (m)
0.00001
6
2.89
1.95
infinity
f stop used
10
Focal length (m)
0.060
Nikkor 300 mm f9
Circle of confusion (m)
0.00005
6
3.52
2.23
infinity
f stop used
32
Focal length (m)
0.3
How would rate the image quality of the D2X vs what I have managed to achieve so far with the Ebony-Imacon combo? Well, my feeling is that they are in fact no as different as I would have initially expected.
The D2X version of the Sake barrels image being:

The following image is a 100% comparison of the 4×5 and D2X image. The image were adjusted to a print height of 72 cm at 240 DPI (the Imacon image was down sampled). Some will probably argue that the 4×5 image is penalized by this downsampling, and I guess that they are right. However, I do personally not print larger than this and do therefore find this way of proceeding relevant relative to the actual use I am doing of both tools.
The Imacon is on the left.
Imacon Precision III
Nikon D2X
Driver level
Flexcolor 4.01
.nef converted in NC4.2.1
Resolution
2040 DPI
NA
Bit depth
16 bit
12 bit
Image size
Down-sampled from 9300 pixel high to 6800.
Up-sampled from 4300 pixel high to 6800 high.
Sharpening
Default driver USM
Default NC USM
72 cm x 57.4 cm
72 cm x 47.3 cm
Size of 100% crop
10 cm x 4 cm
10 cm x 4 cm
After comparing the results I obtained by using the 2 set ups in actual scenes, my conclusion is that qualitywise, top level DSLR have reached a level where they are equally good at A3 print size, and not that far behind at A2 print size. How did I reach this conclusion?
l The 4×5 is still clearly ahead in terms of resolution on the Velvia 100 slides when scanned on a Imacon Precision III at 2040 DPI. I assume that one could achieve better scans yet with newer Imacons or drum scanners though. Either way, on the samples above, corresponding to a 72 cm tall print, the gap I currently see with the D2X is significant, but not huge. Similar comparisons at A2 equivalent print size are even closer.
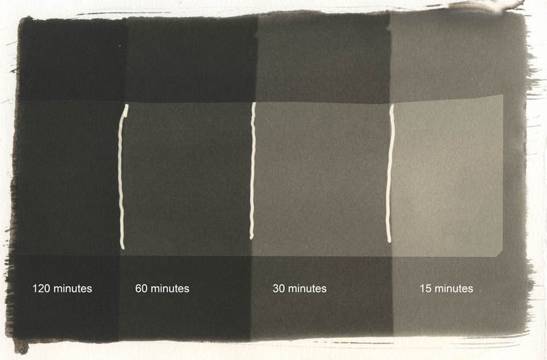
l How about dynamic range? Well, this is a difficult topic since the DR of the 4×5 combo is obviously the combination of the slide limitations on top of which the scanner further reduces the DR. The following image comparison probably speaks for itself. The top 2 images are ‘As Is’ images that were scanned and converted in Nikon Capture without making any adjustment. The D2X image was shot to as to avoid blowing the highlights, while the 4×5 Velvia slide was shot in such a way as to over-expose the cherry blossom 1.3 stops compared to neutral gray
In my book, the 2 are similar, with a slight edge to the DSLR. The D2X does indeed show more detail in the shadows on the image above, but this may have to do with improper selection of black point during scanning or with slight differences of exposure.
Other things affecting the actual usage of both 4×5 and a high end DSLR are:
l When shooting landscape, the actual 4×5 results are often negatively affected by blur resulting from wind induced movement. This results from the need to use a small f stop in order to gain enough DOF. The lack of DOF is sometimes a problem too for those scenes where overhanging elements or tall subjects in the foreground reduce the potential of applying a tilt movement. I ended up realizing that I use such compositions rather often in fact,
l The sharpening of D2X files appears to be a lot more straightforward than that of the scanned Velvia images. I would appear to Provia 100F is easier to scan, I’ll have to try that too. I guess that it is just a matter of finding the best sharpening workflow. Today, I turn off completely the sharpening in Flexcolor, and apply a double sharpening in PS using Photokit Sharpener.
l The images printed from the D2X at A2 size tend to appear more natural colorwise than those printed from the Imacon scanned images after typical PS corrections (the print being done using ImagePrint on an Epson 4000). I am sure that this could be corrected for, but it adds yet another post-processing step that I could do without,
Now, feel free to look at these scans and make up your mind. I am obviously by no means an expert image quality tester nor an experienced image quality reviewer.
Ebony 45 SU – Schneider 110 XL – Zao onsen – Japan – Feb-05
7. First feedbacks
Did things come out the way I had anticipated? Well, the answer is obviously not black and white.
On the positive side, I would say that:
l Shooting 4×5 is indeed fun and a great way to improve one’s photography, but the potential for something going wrong in the first months is obviously high compared to DSLR shooting. Rigor has to become a second nature, and casual shooting is probably only thinkable for those with a lot of experience,
l Most of the gear I selected, starting with the wonderful Ebony, work fine. I have been getting some very nice results both on the light table and on screen after careful scanning with a second hand refurbished Imacon Precision III scanner as described above,
l The A2 prints are simply breathtaking once the dust has been removed from the scans.
l The learning curve is not as steep as I had anticipated coming from small format photography. The main lessons that I have learned are:
Ø Always go through the check list in your mind before taking the image (I do have a clear tendency to forget locking the rear standard before introducing the film holder! blurred images guaranteed!). Since mind can sometimes not be very focused after hours of trekking in the cold with a heavy load, I have decided to stick the aforementioned check list to the rear standard of the camera itself! know your weaknesses,
Ø Always double check the focus in ALL areas of the image before and after stopping the lens down. Even if the focus plane is tilted to become closer to horizontal, the elements under and above that focal plane will be out of focus! By the way, it is true that checking the sharpness with a less stopped down to f90 is difficult! Stopping down the lens progressively helps a little bit. Besides, things that are almost sharp at f32 will be very sharp at f90 (OK, diffraction!).
Ø Measure the light with the 1 degree spot meter focusing on the highlights of the scene, overexposing the base shot about 1 or 2 stops from the spot meter reading (depending on how bright that highlights should be rendered),
Ø Bracket 2 images +0.7 stop and -0.7 stop around the base shot by varying the aperture OR take 2 or 3 images at the same settings, and vary the development time. The second technique is more likely to deliver 1 or 2 perfect images providing the shot was taken conservatively away from blown highlights.
This very simple technique delivers one technically perfect image 99% of the time, which does unfortunately not guarantee that the image will be any interesting!
More on the negative side, I see:
l I was first disappointed to notice that I didn’t use the camera as much as I intended to. I did however quickly come to realize the obvious: you just need to use the best gear for each job. 4×5 can be it at times, but a medium format film camera or high end DSLR is often more efficient.
Based on my short experience, here are the criteria I use to decide what to take along when I go out in the field to shoot landscape:
Ø Social dimension of the job! Nowadays, I mostly take the 4×5 along when I shoot alone, or with friends using similar gear. I tried a few time taking the Ebony on casual hikes with friends. I managed to impress them alright, but ended up taking only a mere 3 or 4 images per day! it just takes to much time to do things well,
Ø Weight that I am willing to carry in relationship to the length of the trekking considered, how steep the terrain is and the type of accommodation (the weight of the camping gear largely outdoes the extra-bulk of LF compares to MF or even small format digital),
Ø Weather that can be expected (winds, temperature, precipitations,!),
Ø Typical distance to subject to photography. It is probably obvious, but a view camera like the Ebony 45SU shines in wide angle situations, but is not the most appropriate tool when less angular coverage becomes needed (wildlife, etc…),
l Asymmetrical back movements are indeed very useful overall, but they only speed up the shooting significantly in some well defined situations. Those situations are when the subject is predominantly in the horizontal plane extending from one’s feet to infinity, with no features in the scene whose verticality should be preserved (trees,!). The prefect locales would be a desert scene with mountains in the distance or beach scenes at sunset for instance.
Now, what happens when you are unfortunately not in those perfect conditions?
Let’s assume you are shooting in a little densely populated forest in October. The fall colors are breathtaking, and you are trying to capture both the texture of the fallen leaves in the foreground as well as the distant trees receding in the morning fog. The trees should of course stay sharp too, and you decide to apply a tilt to adjust the plane of sharpness in order to bring both the foreground and the distant trees in perfect focus.
According to the famous Scheimpflug rule this can be achieved with either a tilt of the front standard or with a tilt of the rear standard. I will not go into the details of the advantages and drawbacks of both options, but let’s say that the Ebony, thanks to its asymmetric back tilt function, delivers additional value when you use back movements. The Ebony web site has a set of articles in English explaining with more detail what asymmetrical back movements are.
The way to proceed is to first adjust the focus of distant subjects in the upper part of the scene coinciding with the asymmetrical tilt line in the bottom part of the ground glass. You then need to tilt the back backwards around that asymmetrical line so as to bring the foreground elements in perfect focus too. This works fine and is indeed very fast. The problem is that you will then have a back which is often not vertical anymore. This will result in converging verticals, which are often a side effect you are trying to avoid by shooting large format.
What you need to do then is to rotate the whole camera around an horizontal axis perpendicular to the axis of the lens so as to bring the back back to verticality. The relative angle of the front and rear standards being preserved, you still have a plane of focus which is roughly the same, and which will keep both the foreground and background in sharp focus. You have however slightly modified the distance to subject of the camera, and there is probably a slight need to refocus the back somewhat. Looking a bit a the math of this, you realize that rotating the camera around the center of the tripod head is in fact not able to maintain the exact same plane of focus before and after the rotation. It seems that it is close enough in most cases that there is no need to iterate in order to reach satisfactory focus.
Granted, this works fine, and is still probably faster than the front standard tilt/refocus iterations that one has to go through otherwise, but it is not as fast as I initially thought it would be, nor is it as rigorous.
Ebony 45 SU – Schneider 110 XL – Hakuba – Japan – Jul-05
l In terms of equipment, some of the mistakes I made were:
Ø Spend money on an instant film solution. It works fine, but I hardly ever use it,
Ø Not buying a focusing below from scratch. The focusing cloth works is OK, but becomes unusable as soon as the wind starts to blow,
Ø Wasting money on a cheap scanner (Epson F3200). The results are not awfully bad in terms of resolution, but the dynamic range is just too limited for subtle rendition of those saturated colors we love in the slides. The final image quality obtained will always be strongly influenced by the weakest part of the workflow. I reached the conclusion that it just doesn’t make sense to work with demanding 4×5 gear and downgrade the result to medium format level because of average scanning.
This is of course theoretical, as this reasoning doesn’t factor in cost considerations. This line of thought is purely focusing on trying to achieve the best possible quality down to the digital steps of the process. I do believe that there are many people for which using 4×5 to obtain good quality on slide is the main goal. Being able to scan with a reasonably cheap scanner then becomes mainly a way to share results and to do one own’s prints at a reasonable cost. This is of course fine to, but it doesn’t seem to make good sense if you are targeting fine art digital applications.
l The investment and running cost end up being really high. I do currently not own a car, do not smoke and live mostly on love and water. Even then, I found it very hard to pay the 12.500 US$ bill over half a year. How do I get to this astronomical figure?
Ø Well, the Ebony it self cost me about 4000 US$ in Tokyo, they might be significantly cheaper in North America (or at least were before the drop of the US$ relative to the Yen),
Ø Add a few good lenses, even if half of those were bought second hand, and you end up paying an extra 2300 US$,
Ø Some accessories totaling about 1200 US$ (the spot meter and roll film holder being the painful ones),
Ø The killing item is the second hand top level Imacon Precision III scanner bought from ebay at around 5000 US$ after long negotiations with a US based vendor.
On the other hand, this is definitely a dream set up, and things could have been done a lot cheaper though. Here is how:
Ø Get a cheap second hand Tachihara, Wista or Horseman 45. These can be found in Tokyo for around 800 US$,
Ø Don’t compromise too much on the quality of the lenses, but just get 2 to start. I would recommend a Schneider 110 mm and a Nikon M300, the 2 lenses that I use most. Amazingly sharp, readily available and not too heavy. That will cost you about 2000US$,
Ø There was not excess done with the accessories on my side, and the roll film holder will strongly contribute to reducing your running costs, so you won’t be able to go much under the 1000 US$ border I guess,
Ø Get a cheap flatbed scanner from Epson or Canon and use it for your A3 prints, and get a scan done by a pro lab when you need A2 quality. A good flatbed will cost you about 600 US$.
Well, we are now at a much more reasonable 4500 US$, about 1/3 the amount I paid! still not really cheap though.
Was it worth paying the extra 8000 US$? Well, looking at things objectively, it really depends on the intended usage. As I mentioned above, I do believe that there is no way to cut on these 8000 US$ significantly if the purpose is fine art digital applications. For more casual usage, this money should better be spent on something else.
Another thing to consider is that the word ‘investment’ is probably not the right one! The price of second hand LF gear is very low, and my Ebony lost 2/3 of its value the very moment I paid the bill. Ebony being one of those brand whose value remains on the high side! The scanner might not drop in price that much and can be considered a slightly more stable investment in its own right. Anyway, the bottom line is that such gear has value through the usage you make of it, not through it potential re-sale price. Actually, this is something DSLR users should actually be painfully aware off.
Ebony 45 SU – Nikkor 300 mm f9 – Kamakura – Japan – Nov-04
8. Perspectives
Are these comments engraved in stone? For sure they aren’t. Some of the things I consider as negative might improve, some might get worse.
On the positive side, I anticipate that my LF gear is likely to gain further appeal in the coming years when reasonably cheap very high definition backs will have become available. When that will occur is difficult to predict, but my crystal balls tells me within 5 years. The chance is though that the perfect support for such backs might be a 6×9 LF camera instead of the 4×5 I currently own. Future will tell.
For now, I have already considered getting a scanning back from Better Light ( www.betterlight.com ), but have rejected the idea because of the constraints resulting from the length of the exposure and the very high cost.
Besides, only regular usage over a long period of time will provide answers to the following questions:
l Is the harsh treatment that my small/medium format gear often undergoes not going to tear apart the delicate LF camera in a matter of weeks?
l Will Fujifilm and Kodak stay involved in what is increasingly becoming the 4×5 niche market?
l Will the further quality increase of next generation DSLR not reduce the gap with scanned 4×5 slides to such an extend that it will just become pointless to shoot LF?

Ebony 45 SU – Schneider 110 XL f5.6 – Hakuba – Japan – Jul-05
9. Conclusion
After a few months of casually shooting 4×5, I do have mixed feelings.
l The pleasure of shooting 4×5 is very real and the results can be very impressive once the technical aspects have been mastered, which proved not to be as tricky as I had thought,
l The Ebony was a great choice, and I doubt that another piece of gear would have offered significant advantages over it, it is a real joy to use. There are nonetheless much cheaper option that should work very well too,
l I am probably not using the camera as much as I had anticipated because of the bulk, but mostly because it is just too slow to use when non photographer partners are part of the trip,
l Up to A2 prints, the latest high end DSLR do very well when compared to Imacon scans of 4×5 slides. There is a difference, but my feeling is that most knowledgeable people looking at a D2X A2 print would probably feel that the quality is good enough for fine art applications already (the 1DsMKII being in the same league).
Was the money worth spending? I would say that it was, but within the limitations described above.
The bottom line is that the journey is just starting for me, like it started before for many others before. I do hope that the present article will contribute to awaken a few photographers to the slow pleasures of shooting LF but would prefer them to be reasonably aware of the kind of journey they will be embarking on.This being said, I know that you will probably just go for it, following your heart like I followed mine!


Elevate Your Vision


Read this story and all the best stories on The Luminous Landscape
The author has made this story available to Luminous Landscape members only. Upgrade to get instant access to this story and other benefits available only to members.
Why choose us?
Luminous-Landscape is a membership site. Our website contains over 5300 articles on almost every topic, camera, lens and printer you can imagine. Our membership model is simple, just $2 a month ($24.00 USD a year). This $24 gains you access to a wealth of information including all our past and future video tutorials on such topics as Lightroom, Capture One, Printing, file management and dozens of interviews and travel videos.
- New Articles every few days
- All original content found nowhere else on the web
- No Pop Up Google Sense ads – Our advertisers are photo related
- Download/stream video to any device
- NEW videos monthly
- Top well-known photographer contributors
- Posts from industry leaders
- Speciality Photography Workshops
- Mobile device scalable
- Exclusive video interviews
- Special vendor offers for members
- Hands On Product reviews
- FREE – User Forum. One of the most read user forums on the internet
- Access to our community Buy and Sell pages; for members only.
You may also like


