


By Michael Reichmann

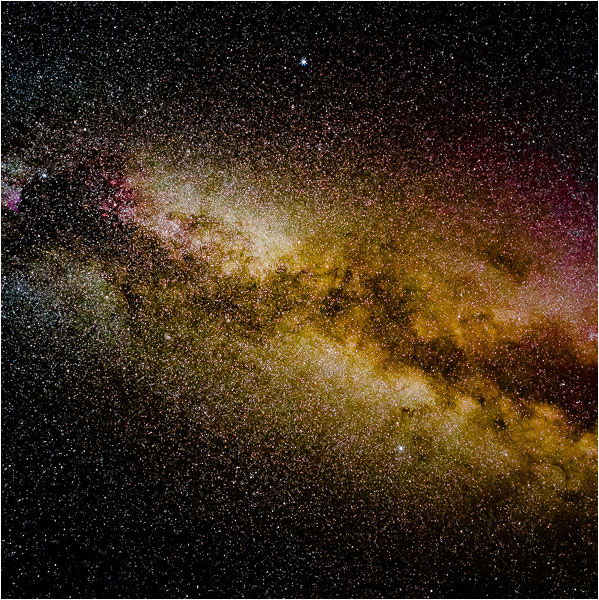
Milky Way #2
Pentax 645z with 35mm lens @ f/4.5
122 seconds at ISO 12,800
One of the most beautiful sights in the night sky is the Milky Way, the band of stars and dust lanes that stretches from horizon to horizon. Our ancestors could always see and wonder at it on any clear night. But with the invention of electric light our skies in cities, towns and even villages are no longer dark enough to see our galaxy – the Milky Way. The problem is called “light pollution“. Only far out in the country is the Milky Way visible, and even then if there is a city or town without about 50 miles the air glow near the horizon will mask some of the star lane’s beauty.
I was in an astronomy store the other day, and ahead of me was a man buying a fairly expensive telescope rig. He said that he lived in the city and was mainly interested in observing and photographing the planets. I asked him if he had any interest in deep-sky objects, and his reply was telling. ” I live in the city. I’ve never even seen the Milky Way“.
I’ve always been interested in astronomy. Just one of my hobbies. But I’ve owned a telescope or two over the years. If I lived in the American desert southwest I think I would have taken it much more seriously. But living as I do in Eastern Canada, the number of nights available for serious observing are limited…cloud, rain, snow, cold, and mosquitoes all take their toll. I know people do it, but I always have ended up restricting myself to just casual observing, and then only when the opportunity presented itself.
Combining my interest in photography with that of astronomy is a natural, but to do it properly takes a commitment and a situation and location that I don’t have. I often travel to remote areas with dark skies, but I already am burdened with my usual photographic gear. Bringing an extra mount, scope and imaging set-up is just too big a load without a level of dedication to the craft that I somehow lack.

100% view of Milky Way #2
But there is a form of astronomical photography that I greatly enjoy, and which with the right piece of gear (under $500) can be done with just about any digital camera. Most importantly, the device is small enough to carry along, even on a distant trip. The added weight and size are negligible.
![]()
This type of photography is called deep-sky imaging and the device I chose to do it with is the IOptron SkyTracker. It is available from B&H Photo and almost every astronomy equipment retailer world-wide. The device is small enough and light enough to fit in a briefcase, and along with a decent tripod, which you certainly already have, is all you need for deep-sky imaging.
Some Theory

Milky Way #4
Pentax 645z with 35mm lens @ f/4.5
125 seconds at ISO 12,800
If you’re already familiar with the basics of astronomy and night sky photography you might skip to the next section. But otherwise, this will explain the nature of the problem that needs to be solved.
As you no doubt are aware, the Earth is a ball that rotates once every 24 hours. (If you are a member of the Flat Earth Society you can leave the room now). The axis of rotation runs though the north and south pole. Imagine a desk-top globe with a rod running up though the base and out the top. That’s the earth, except that there is no rod, just an imaginary line.
Now extend that line a distance of about 323 Light Years and you’ll find that it points to a star called Polaris (the North Star, or Pole Star). Because the Earth rotates once each 24 hours it appears to us, standing on its surface, that the stars are rotating, not us. The point of rotation is Polaris, which therefore doesn’t appear to move, but the rest of the stars in the sky appear to rotate around it once a day.
The apparent movement of the stars can’t be seen in real time, it’s too slow. But if you note the position of a star or group of stars, go inside and watch an episode of Breaking Bad, and then go outside again, you’ll see that they have indeed moved….quite a bit, in fact.
Photographing Stars
Stars appear as points of light. No matter how big a lens you have; no matter how high a degree of magnification you use, all you will ever see is a point of light. Though they are suns, they are also so unimaginably far away that all they can ever be to us visually is a point of light. But, there are other objects in the night sky. There are of course planets, which do lend themselves to telescope photography – but for now that’s the subject of another article. This one is about doing so-called deep-sky imaging. This includes dust lanes in the Milky Way, planetary nebulae, galaxies and more.
When you look at the images of the Milky Way above you might have remarked on the amount of colour seen. Is it real? Yes, it is. The reason we don’t see any colour in the night sky is because the human eye is incapable of registering colour at such low light levels. But with a long time exposure, the camera has no such limitation, and the colour that is there in the night sky is lovely to behold.

Milky Way #7
Pentax 645z with 75mm lens @ f/4.5
150 seconds at ISO 12,800
Solving The Problem of Motion
If the sky (Earth) didn’t rotate, astro-photography would be a breeze. Just set up a solid tripod, open the shutter on “B” and voilà, beautiful images. But it does rotate, and if you don’t have gear that can compensate for the rotation then you’ll end up with star trails. Pretty, but maybe not what you want,
Below is a photograph I took while on a rafting trip down the Colorado River through the Grand Canyon in 2002. This was shot on medium format film and was a three hour long exposure. (The foreground rock in the river was exposed with a couple of pops of a flash prior to the long exposure).

Star Trails – Grand Canyon, 2002
Focusing
One aspect which can be a bit tricky is focusing hyper-accurately at infinity. You can’t trust your lens’ infinity stop. Also, autofocus won’t work, and focusing through the SLR finder isn’t accurate enough. The best way to focus is to find a bright star and then use Live View with 100% magnification. It’s a good idea to put a piece of black electrical tape in the focusing ring, so as to avoid accidental touching of the ring during handling the camera rig, especially when re-pointing the camera to another part of the sky.
Just be aware that even when you’re perfectly focused, have the lens stopped own a bit, and have almost perfect tracking, there will be some blurring of stars. This is caused by air currents, but also can be attributed to optical defects which all lenses display to some extent.
A Numbers Game
Photography is a numbers game. We vary the values of aperture, shutter speed and ISO so as to achieve the effect that we want. In deep sky photography what we want is to capture as much light as possible, but with the added complication of having to compensate for the earth’s rotation. More on how this can be done in a moment.
The title of this article is Pentax 645z Astrophotography for good reason. This camera is uniquely suited to this game because of its sensor – both its size and its sensitivity.
Up until the release of Sony’s new CMOS 33X44mm 50 Megapixel sensor, and its use in new medium format cameras by Phase One, Pentax and Hasselblad, medium format cameras used CCD sensors. These had their strengths, but low noise at high ISO was not one of them. This new Sony sensor is a game changer. According to one commercial testing lab, as used in the Pentax 645z this sensor has 13 stops of measurable dynamic range, and my own real-world testing shows that it can be used at ISO 12,800 with little need for noise reduction. Yes, DR drops a bit, but that isn’t that important for this application.
I should mention that although Hasselblad, Phase One, and Pentax all use the same Sony-sourced sensor, Pentax seems to have stolen a march on the other two companies when it comes to high ISO performance. The net of this is that the Pentax 645z may have the highest performing sensor on the market today for this application.
The only rub is that the fastest lenses available for the 645z are f/2.8. Most are in the f/3.5 to f/4 range. This places them at a disadvantage against full-frame 35mm DSLRs which have lenses as much as two stops faster. But of course, few cameras other than the 645z can shoot clean deep sky images at ISO 12,800, so that disadvantage is counter-balanced. Now add the very high resolution of the 50MP sensor, and the ability to make truly large prints from its files, and I feel that there likely isn’t a camera more suitable for this task.
Stop the World – I’m Taking a Picture

Typical Astronomical Polar Mount
So – we know the problem that we have to solve. Either stop the Earth from spinning on its axis, or find a mechanism that can rotate a camera exactly in step with this rotation. Cancel out the rotation and you have a sharp image.
There are a vast number of telescope and camera mounts available to do this. These can range from home-made to ones costing many thousands of dollars. One thing that they have in common is that almost all commercial units are large, heavy and not terribly amenable to air travel. Most can be transported in one’s car, but few are small enough to fit in a briefcase or camera bag, along with all the other gear one brings on a shoot.
![]()
As mentioned earlier in the article, the device I chose is the IOptron SkyTracker. It is available from B&H Photo and almost every astronomy equipment retailer world-wide. The device is small enough and light enough to fit in a briefcasese, and along with a decent tripod, which you certainly already have, is almost all you need for deep-sky imaging. Well, as we’ll see, a bit of software helps as well.
The SkyTracker is about the size of a paperback book, and mounts onto your tripod via a built-in base that tilts and swivels. There is a small compass built into the top panel (to help you find north, where Polaris is found) and also supplied is a Polar finder scope with an illuminated reticule and engravings for positioning.
You will also need a small, solid yet lightweight ballhead. This attaches to the silver plate that you see on the front of the SkyTracker. You can now attach a camera to this ballhead and point your camera freely almost anywhere in the sky. The Acratech GV2 is a somewhat pricey choice. It’s a good one though, because a Pentax 645z plus lens is close to the weight-handling capability of the SkyTracker, and the more rigid all of the components, from tripod to ballhead, the better chance of reliably solid and clear images.
Though it seems counterintuative, the ballhead allows the camera to point almost anywhere in the sky. Only the SkyTracker on which it’s mounted needs to be precisely aimed at Polaris. An internal drive motor powered by 4 AA batteries turns the brass screw seen above, and with the ballhead attached to that the whole ballhead and attached camera accurately keeps track of the Earth’s rotation. Look at the figure below titled My Rig. The way things fit together will make more sense when you see it all at once in an as-used configuration.
Setup is fairly simple. Point the face of the Skytracker northward and then adjust the vertical angle knob to roughly your latitude. Where I currently live, just north of Toronto, Canada I’m at about 44 degrees. Now, look through the polar alignment scope and find the North Star – Polaris. Easy, right? Well, not quite.
Firstly, until you become familiar with the sky and can find Polaris at a glance, you’ll need some help. For this I recommend an App called Redshift. This can create a virtual planetarium on your iPad or iPhone’s screen. Indicate that you want to find Polaris (or any celestial object) and it will show an arrow pointing to where in the sky it is located. Hold the device up to the night sky, follow the arrows, and there you have it. Very cool. Now, you need to go back, look through the Polar scope, and using the tilt and pan controls on the SkyTracker, center Polaris in the eyepiece.
For the accuracy needed for astrophotography there is one more step. Polaris isn’t really located on the true polar axis of the earth. It’s off by three-quarters of a degree, about 1.5X the apparent diameter of the full moon; which is considerable. But exactly where is it?
iOptron has a solution in an App called Polar Scope. Using the iPad’s GPS, compass, and clock it determines exactly where you are on the Earth, and therefore exactly where in the sky the true celestial north is located. Using the illuminated reticule of the Skytracker’s scope, align the device with the same spot as indicated on the app’s screen, and you’ll be dead on. This should be of sufficient accuracy for using quite a long lens for several minutes of exposure, or even more.
One final suggestion. Whatever lens you use, stop it down one stop from wide-open. Almost all lenses improve dramatically when stopped down slightly. Another stop would help even more, but then you’re also halving the light being recorded. You can try longer exposures, but I have found under 5 minutes to be optimum with my setup.
Stacking of images is also possible using specialized software. Remember though that most DSLRs (including the Pentax 645z) do in-camera dark frame subtraction as an automatic form of noise reduction during long exposures. So, a five minute long exposure requires that you wait another five minutes until you are able to take another shot. This can make for long evenings.
May you have dark skies!

Milky Way #4
Pentax 645z with 75mm lens @ f/4.5
245 seconds at ISO 12,800
The Rig

My Rig

The above is my rig, as described earlier. From top to bottom – the Pentax 645z with O-GPS1 (all star images look alike…nice to be able to check later on where they were taken, if you travel), Acratech ball head, SkyTracker with polar scope, Arca Swiss Cube head, and RRS TCV-34L tripod. Though it looks a bit ‘Rube Goldberg“, and possibly unstable, in fact it is quite rigid at any orientation. It sets up and comes apart in just a few minutes, and the self-locking geared movements of the Cube make polar alignment a breeze, though aren’t manditory.
Everything except the Astrotracker and Acratech ballhead are part of my normal shooting kit, and these extra items fit nicely into a small bag that goes in my luggage, making the whole set up easy to take on a foreign shoot. Next stop Manau Kea, on the Big Island in Hawaii in December, 2014.
You may also wish to read two articles on night sky photography previously published on this site, Landscape Astrophotography by Manel Soria, and Introduction to Landscape Astrophotography, by Adam Woodworth.
I also highly recommend a new book called Astrophotography, from Rocky Nook, written by Thierry Legault. This is without doubt the newest and best book on the subject, and if you have any interest whatever in this subject, it is a must for your book shelf.
A article on the making of an image of Andromeda is found on Michel’s Phlog.
Michael Reichmann
(Originally) October 2014


Elevate Your Vision


Read this story and all the best stories on The Luminous Landscape
The author has made this story available to Luminous Landscape members only. Upgrade to get instant access to this story and other benefits available only to members.
Why choose us?
Luminous-Landscape is a membership site. Our website contains over 5300 articles on almost every topic, camera, lens and printer you can imagine. Our membership model is simple, just $2 a month ($24.00 USD a year). This $24 gains you access to a wealth of information including all our past and future video tutorials on such topics as Lightroom, Capture One, Printing, file management and dozens of interviews and travel videos.
- New Articles every few days
- All original content found nowhere else on the web
- No Pop Up Google Sense ads – Our advertisers are photo related
- Download/stream video to any device
- NEW videos monthly
- Top well-known photographer contributors
- Posts from industry leaders
- Speciality Photography Workshops
- Mobile device scalable
- Exclusive video interviews
- Special vendor offers for members
- Hands On Product reviews
- FREE – User Forum. One of the most read user forums on the internet
- Access to our community Buy and Sell pages; for members only.
You may also like


