


At a recent media event, I was sitting with fellow content providers discussing the state of the industry. We all agreed that this had been an incredible year of camera releases and that just about every camera was delivering amazing quality. It was harder to find fault with any of the cameras, compared to what we were finding several years ago. Then, one of the group made a statement, and, while I may be paraphrasing somewhat, he made a point: “While most cameras are good these days, deliver great image quality, and are built well,” he said, “they all could take a lesson from Phase One.” He continued, “Phase One, without a doubt, has delivered, with the XF Camera, one of the finest-designed, and best thought-out camera systems available today. And, camera makers could take a few lessons on interface design and out-of-the-box thinking, like what Phase One did in designing the XF camera.”
http://luminous-landscape.wistia.com/medias/u6djf4yt2x?embedType=async&videoFoam=true&videoWidth=640
I was both surprised and not surprised by these comments. As many of you may know, I was a VP with Phase One for 13 years. It has been over three years since I left Phase One to become CEO and publisher of Luminous-Landscape. I know medium format cameras, and I know better than almost anyone the frustrations of working with the older Phase One DF camera. While Phase One did a good job adopting the Mamiya 645 Pro Camera to their digital backs, the system never really lived up to what the competition was offering. When running workshops, as well as doing demos, we had always hoped that users would not do certain things that would cause firmware issues and lock up the cameras. It was frustrating for everyone when errors occurred. The only way that they could be fixed was to remove the battery and reinsert it.
There was no question that Phase One had the image quality nailed down, and their digital backs evolved over the years from the LightPhase to “P” series, then to the IQ 1, 2, and now the 3 series digital backs. Color, sharpness, and dynamic range from the Phase One backs were the best there was, and they always tested at the top. When Phase One introduced the IQ series, they delivered a digital back that was built like a tank. Solid construction, a revolutionary touch screen, and an incredibly simple and intuitive user interface. There was no question that Phase One had the digital back part figured out. The only problem was that it needed the DF Camera to sit on.
While Phase One was enhancing the DF camera system and doing the best they could to work with it, they did start introducing new lenses at a very fast rate. Through a partnership with Schneider-Kreuznach, Phase One has developed a wide range of lenses that cover 28mm through 240mm. At the last count, there were 19 lenses, plus a 2X teleconverter. The quality of this glass is astounding, and some lenses go beyond this, redefining what image sharpness and resolution is all about.
So, Phase One had terrific glass and a great digital back but lacked the camera in the middle. Many photographers found the DF camera to be usable and, to Phase One’s credit, they did an incredible job taking an existing platform and stretching its capabilities farther than anyone expected.
For some years, there were rumblings and the typical rumors that Phase One was working on a new camera body. You didn’t need to be a genius to figure that out because, without a new camera, it was questionable just how far Phase One could go. The big question was, “When would this new camera arrive?” On June 1st, 2015 Phase One finally announced the Phase One XF Camera.
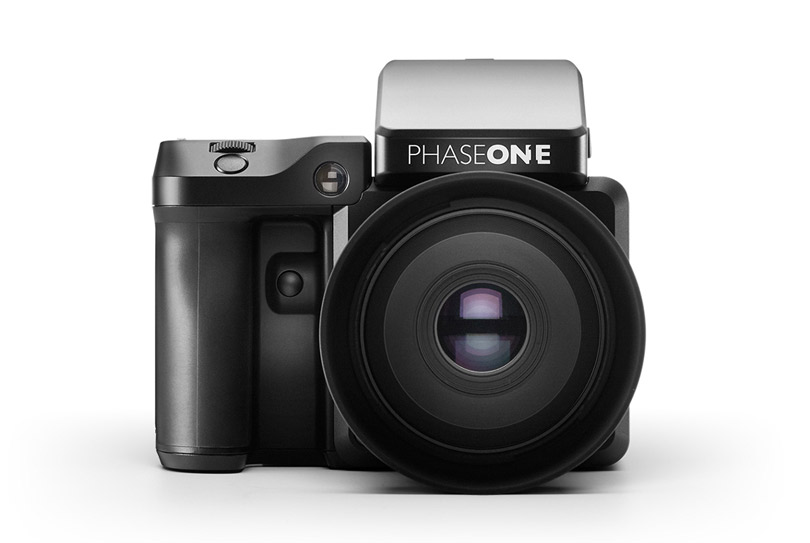
We reported on this when it was announced, and it was big news. This was not just another camera, but something completely different. It was as if the Phase One camera engineers had locked themselves in a room and designed a camera without any of the outside influences of existing camera designs. They took years of comments and ideas from users, and designed a camera that not only fixed all the issues of the past but leap-frogged generations in camera design with new ideas for user interfaces and capabilities. After all, this had to be a camera system that would last a decade or more, and be capable of advancements and upgrades as needed.
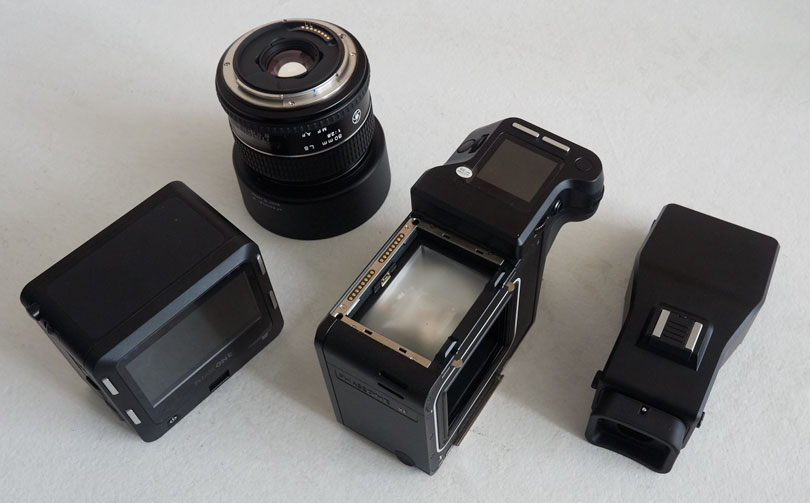
Modularity was a major design factor, but with it came the challenge of integrating the modular concept to different lenses, digital backs, and viewfinders. At the same time, the engineers took a look at how photographers worked with their cameras and designed an interface of buttons, touch screens, and tool sets that gave a photographer a camera capable of doing what no other medium format camera – and for that fact, DSLR Camera – was capable of doing.

This past January, Phase One introduced the Phase One XF 100MP camera system. We covered this camera on the day of launch in detail and, subsequently, with a more in-depth detailed interview with the VP of R&D at Phase One, Lau Nørgaard.
Phase One was the first out of the gate this year with a camera announcement in what has turned out to be a banner year for camera introductions. This announcement was significant, though, because Phase One, with the help of Sony, designed a 100MP sensor that is quite remarkable. This was the second CMOS Sensor that Phase One incorporated into a back. The first was the IQ250, which was a 50MP digital back but not full frame. The new IQ3 100MP back was full frame with a sensor size of 53.7 x 40.4 mm in size. The 50MP CMOS back was not, but it certainly did give us something to anticipate because it was really no secret that the 100MP was being worked on. Once again, though, it was not “if” Phase One would make it, but “when”.
Let’s take a look at the XF camera and the 100MP back in a bit more detail.
There is one thing for certain when you lift the Phase One XF camera with a back and lens, and that is that this camera has entered a whole new arena as the heavyweight champion of the world. Weighing in at nearly 4 pounds with the 80mm lens, this camera has heft. While it is big, it feels right at home in your hands.
This is a solid camera, and seems as if it were built to military specifications. The grip is well designed and the whole camera, regardless of its weight, feels good when holding it. Very quickly, you notice how well the dials and buttons are designed and placed for easy use while holding with one hand. You notice that there are two dials and one button conveniently placed to be used by your thumb. Your hand, and especially the thumb, wrap around the rubberized grip to find a comfortable fit. Your index finger finds a comfortable position on the top of the camera grip where there is another dial, as well as the trigger for the shutter. Nothing protrudes to any extent, but your fingers will immediately recognize the feel and differences of the dial and buttons. The middle finger finds an almost perfect position for the programmable function button.

On top of the camera, there is a recessed power button. Pressing this button powers up not only the camera, but also the back. It takes about 5 seconds for the system to power up and be ready to take a photo.
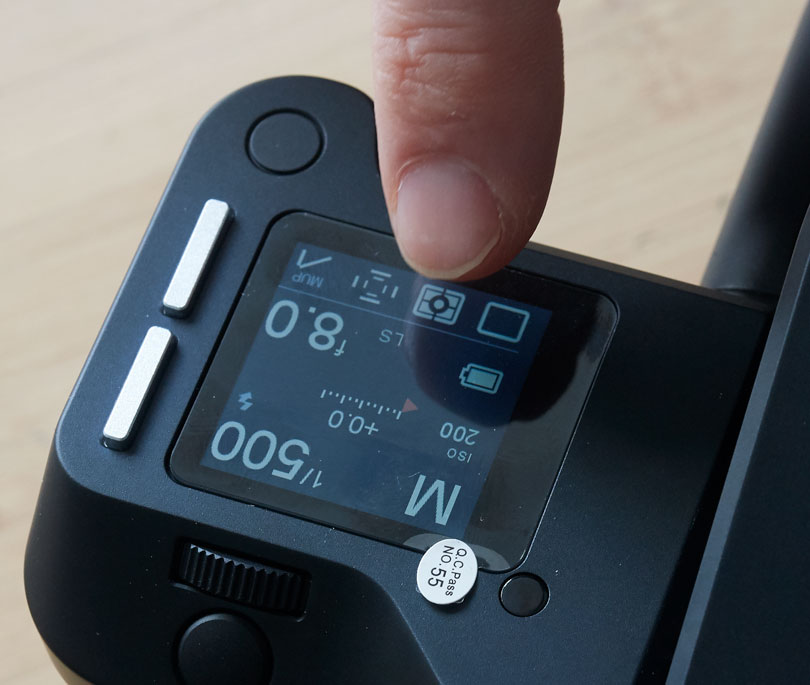
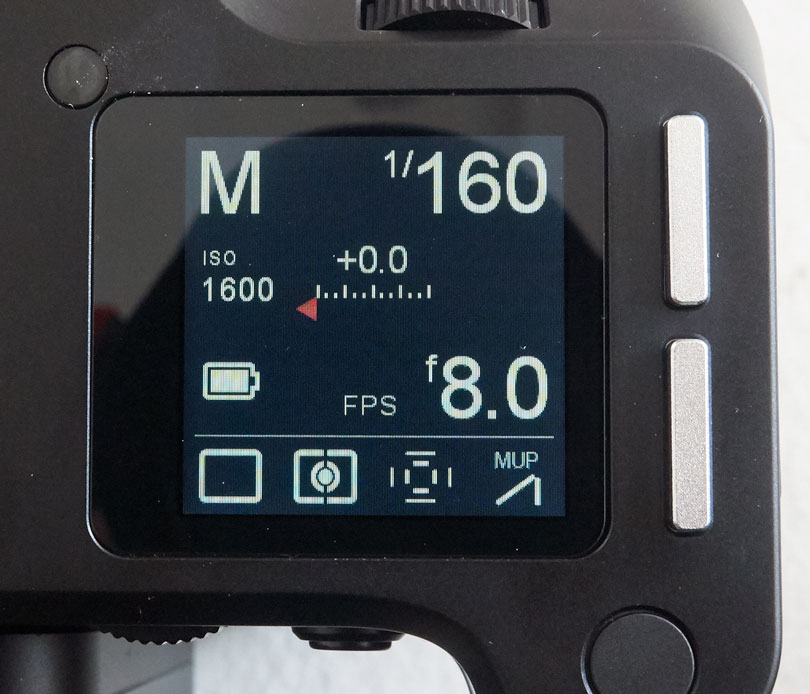
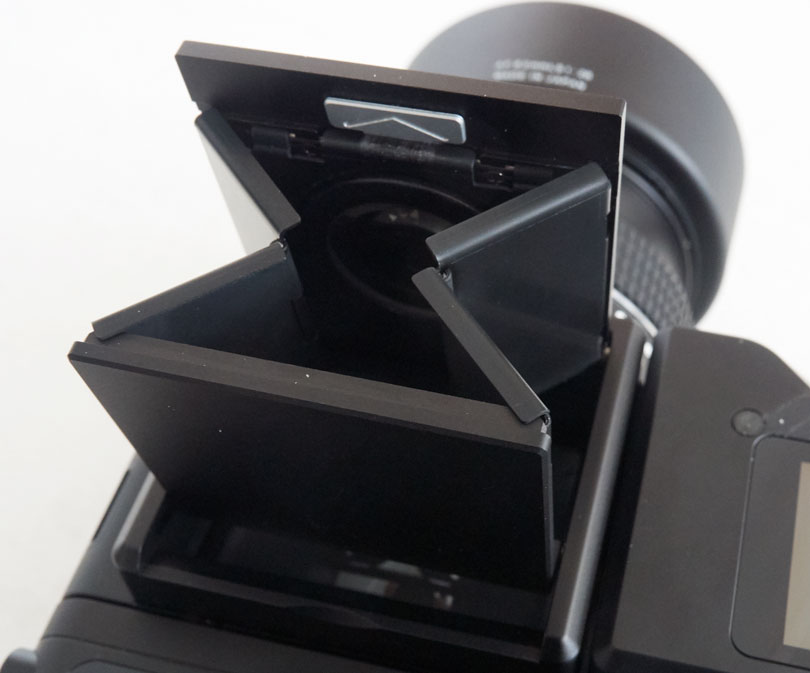
The top of the camera has an OLED touch screen and two silver navigation buttons. To use this camera, it is incredibly simple. The screen shows all of the familiar controls for a camera. There are no dials or buttons. Simply touch the item you want to adjust or change, and then rotate the control dial or just touch the selection.
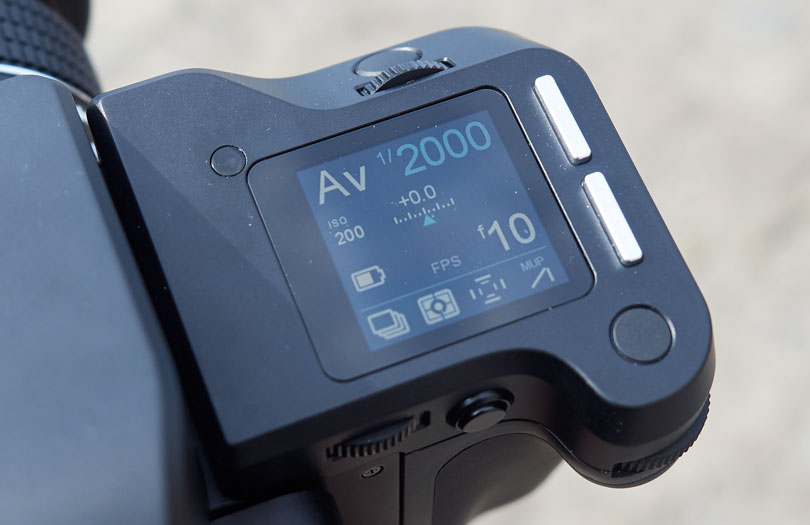
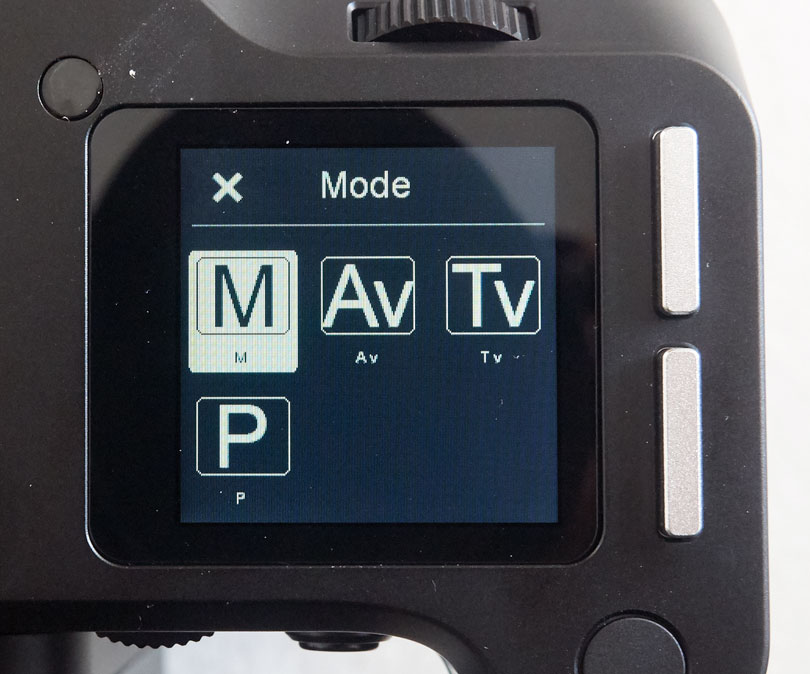
For example, if you want to change camera modes from, say, the Manual setting to Aperture Priority, you just touch the Icon and it opens a screen with your choices. Touch the desired choice and, just like that, the mode is set.
Touch the f/stop or shutter speed icons and you can set the limits, as well as the mode that it will operate in (Auto or Manual). So, for example, you can touch the shutter speed icon, and you will be shown another screen. Rotate the front dial to set Auto on or off. Rotate the left or right rear dials to set the limits. You can set the maximum and minimum f/stop or shutter speeds this way for the auto modes.
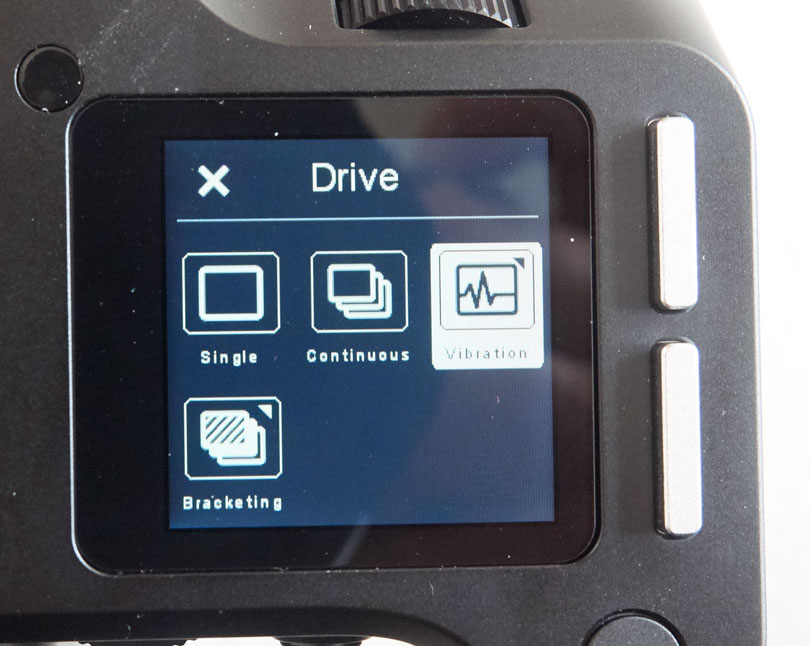
You do the same with the drive, metering, auto-focus, and mirror-up icons. It’s so simple that you are left wondering why no one thought of an interface like this sooner. Positively brilliant.
There are two other surprises that we can access from the top of the camera screen. If we press the silver bottom button along the side of the screen, we will get a whole new menu. These selections are Capture Setup, UI (User Interface) Setup, Load Setup, Save Setup, and Tools.

You navigate this menu screen with the top or bottom silver buttons. Once highlighted, you rotate the right rear dial to open up the next screen.
Then navigate to your choice until it is highlighted, and then use the right rear dial again to make your selection.
Most of these settings are the same ones that you can access by touching the icon on the touch screen. There is a load selection. This lets you load saved-custom settings that you have previously saved.
Just when you thought you saw it all with what this little screen can do, you will find out that there is another feature. While touching the screen, flick left or right. This reveals a whole new set of menus. You can see some of these in the video above. Below are a few screens from these selections.
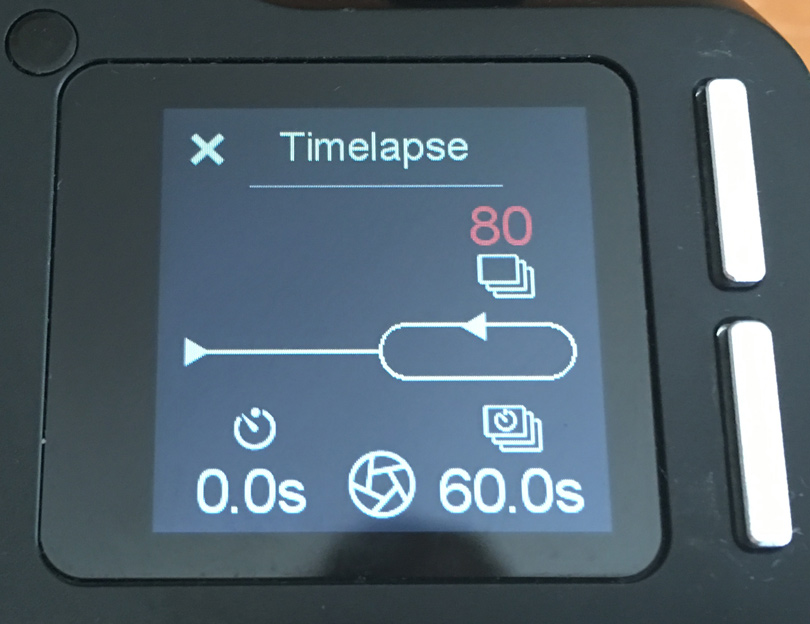
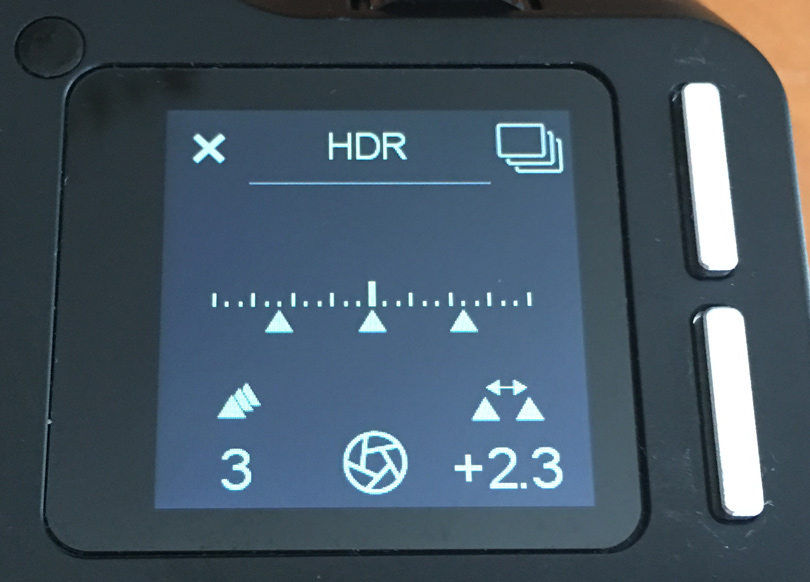
There is an HDR menu where you can set up HDR exposures. You can select the number of exposures and f/stop difference between exposures. This is incredibly simple, especially for anyone having ever tried to do HDR set up on some DSLRs. The next menu is Time-Lapse. With this selection, you set up, by using the dials, all the aspects needed to shoot a time-lapse sequence. Below is an amazing 100MP Time-Lapse video created by Joe Capra of scientifantastic.com
PHASED | LA from SCIENTIFANTASTIC on Vimeo.
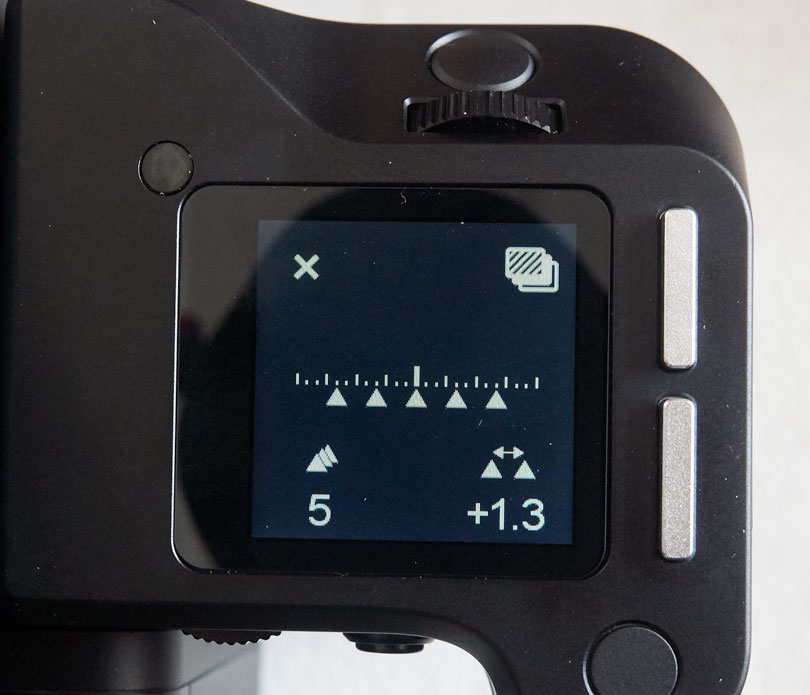
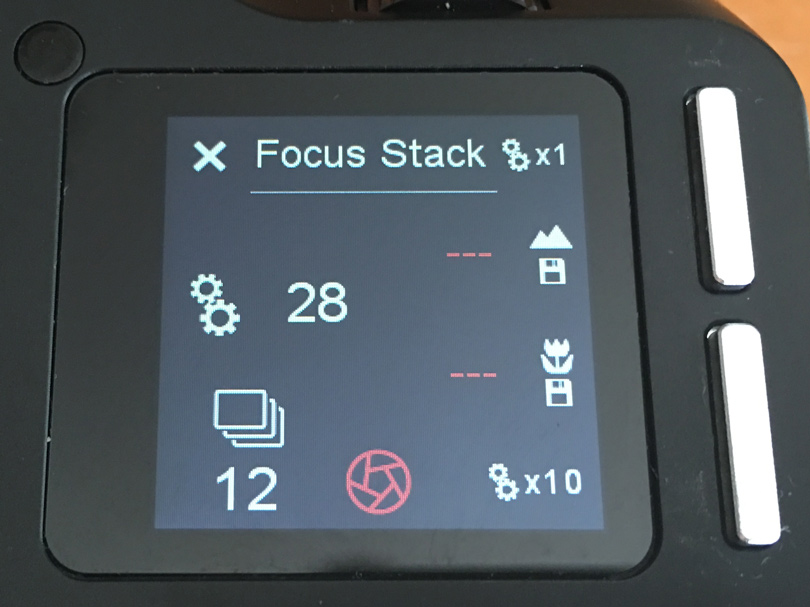
The third screen is for Focus-Stacking. I like this option, and, since I wrote an article on Focus Stacking, I just had to try it. I set the focus minimum and maximum range, and the number of exposures I wanted. It took one or two tries to get it right but, once I did, it was: push the shutter release, and step back. Watching the camera run through the process was fun without having to do anything. I then processed the images using the method from my article. Below are the results and images.
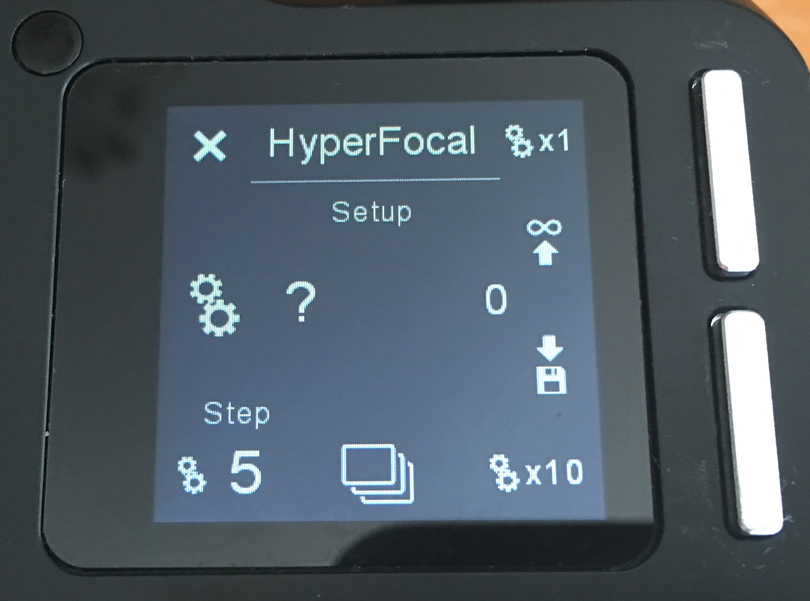
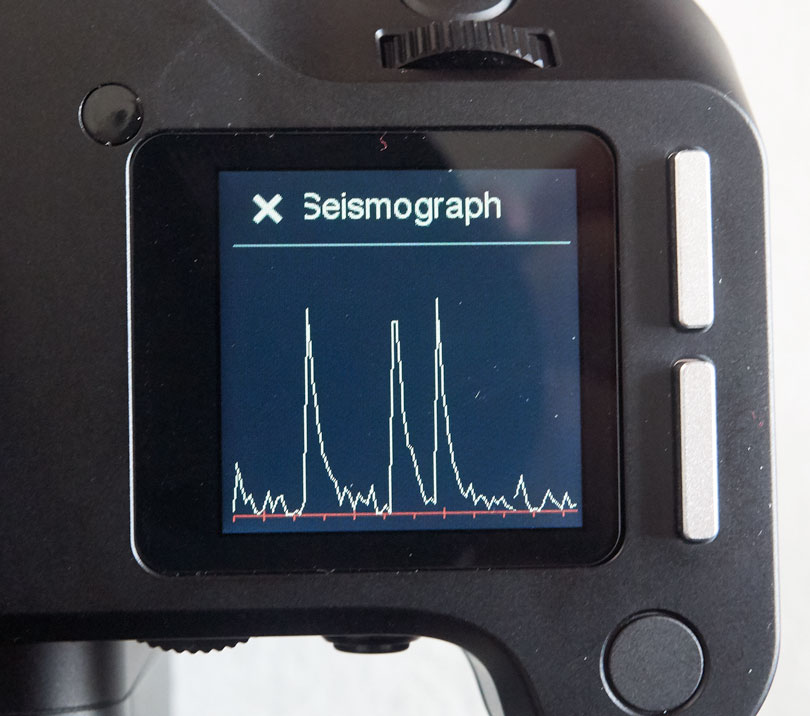
There is also a Hyper Focal selection that is used to find the best focus point for focusing the lens you are using. Another swipe accesses a really clever feature, the Seismograph. This is something that I have never seen on any camera. This feature shows you the vibrations the camera is registering. It may scare you, especially when your camera is on a tripod. A tripod you thought was sturdy might be shown to be otherwise. I was fascinated with this and under different conditions I was always checking this feature. My tripod could be on a concrete floor, and just walking nearby would register. This feature is very sensitive. You can also use a setting that delays the shutter release until the seismograph sees no vibrations. When shooting with a 100MP back, which will show any issues outside of good shooting discipline, this assures that you will only be shooting when there is no vibration. I typically used this with the self-timer feature. I would set the mirror up, and self-timer, along with vibration delay, and then trigger the camera. The mirror would go up and then, after 2 seconds, the shutter would be triggered, as long as there was no vibration. The Seismograph would also pick up vibration from the use of a remote shutter release.

Finally, there is the electronic spirit level, which is perfect for leveling your camera. Oh, one more thing: touch the battery icon on the main display, and you will get a system status check list. After using this camera more and more, I kept wishing that these features would make it to other cameras. This is a pure case of Scandinavian function and design at its best.
One of the challenges Phase One faced when designing and building this camera was the Auto-Focus system. I know that early on they looked at buying existing AF systems from third-party manufacturers, but they couldn’t find a system which would deliver what they were insisting on having for the XF camera. So, being Phase One, they designed their own and aptly named it Honey Bee Auto Focus. While trying to explain how this differs from other AF systems would be worthy of a whole article, it does work, and it does do auto focus fast and accurately. Performance in low light was really good, and, with AF Assist light on, it focused in almost dark conditions. Curiously, the AF light puts out a diagonal zebra-like image. I suppose this adds contrast definition on the subject it illuminates and helps the AF find its mark quicker.
The next time I am with the Phase One guys, I’ll see if we could do a video on the AF system. It is different from other designs and looks like it has the capability of improving even further. We’ll see what the future holds there.
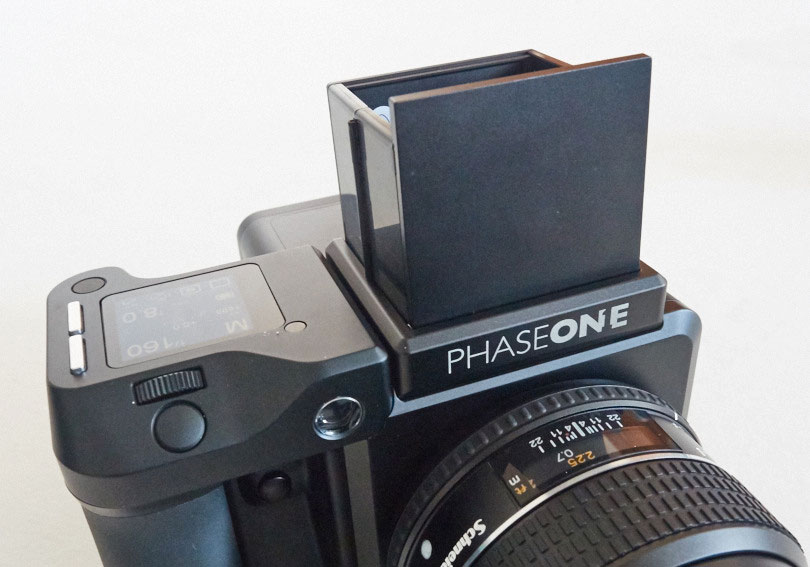
With the DF camera system, I was always losing the rear eye cup, as it would pop off if it bumped on anything, especially when being carried using the neck strap. I am happy to report that this eye cup is securely attached, and it looks like you need a miniature screwdriver to remove it. To the right of the eyepiece is a viewfinder curtain used to block off light from entering the viewfinder during long exposures. On the left side of the viewfinder is the standard diopter correction dial.
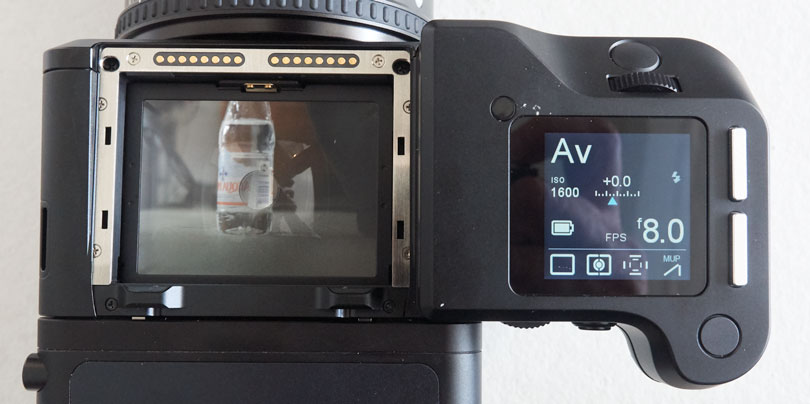
This XF camera has a removable viewfinder which has been requested for years. At the time of writing this review, there are two viewfinders available: a waist level, and ab eye level viewfinder. Removing and attaching the viewfinder is really simple. When you do remove the finder, you’ll see a row of two sets of 8 electronic contact points. One can only guess that there will be other viewfinders available in the future. I did inquire about an electronic viewfinder and, while the good folks at Phase One would neither confirm or deny it, they did explain the difficulty of a finder like that and power consumption. The image for the viewfinder would be read off of the chip and I presume would function pretty much like live view does presently, but have the ability to add data read out at the same time. These are just presumptions on my part.
During the use of the camera, I used the Phase One L-Bracket, which fit the Arca-Swiss Clamp mount tripod system that most of us use.
On the left side of the camera, there is a shutter release port for use with the remote shutter cable. I prefer not to use this, as most of my work is landscape. My typical shooting method was to use mirror up with a 4-second delay. On the left side of the viewfinder is a PC flash port for those who still use wired flash cables. You’ll also find a PC flash port on the back.
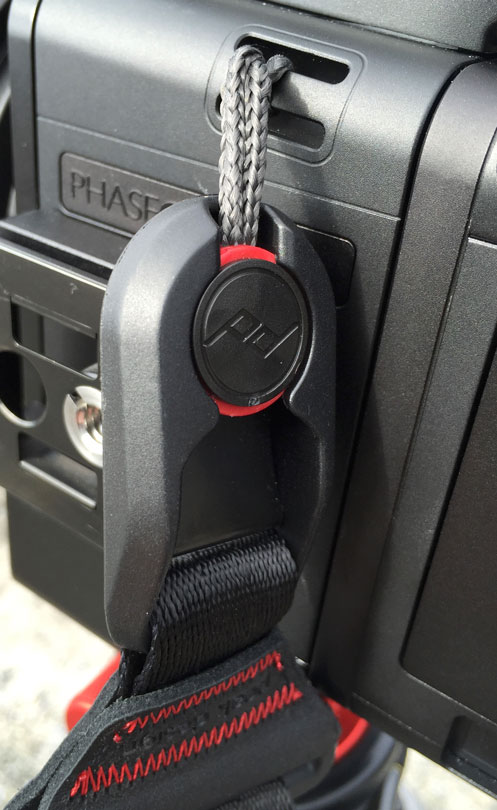
One small annoyance I had with this camera was trying to use the beautiful elk-skin neck strap. I could not, for the life of me, thread it through to neck strap eyelets. I switched over to the Peak Design neck strap (that I have a few of) and it worked perfectly. The Peak Design strap is practical and has a very clever connector system, so removing and reattaching the strap was easy. Phase One should talk to Peak Design and see if something could be worked out to include their straps.
Shooting with this camera is a much nicer experience than the previous DF and DF+ models. The camera can shoot with either a focal plane shutter or leaf shutter, and this is selectable on the top screen. The focal plane shutter would be good when high shutter speeds are needed. Overall shutter speed range for this camera is 60 minutes to 1/4000th of a second.
Flash sync speed with the focal-plane shutter is 1/125th, but jumps to 1/1600th of a second with the leaf shutter. For photographers shooting with a flash outdoors, this is a very high speed and allows for all sorts of interesting effects when shooting with flash, but also allows for a very natural balance of light for typical exposures.
The XF100 MP camera also boasts an Electronic First Curtain Shutter (EFCS). Essentially, this means that the first physical curtain is lowered before the exposure has technically begun. Once capture is initiated, the already-exposed sensor electronically scans downward at the same rate that the second curtain covers the sensor. This removes any vibration that may be caused by the initial curtain during exposure. This works in the background with shutter speeds shorter than 125/s. It is automatically activated with Vibration Detection (seismograph), or when selecting mirror up mode.
For the most part while shooting with this camera, I used the Leaf Shutter setting. Responsiveness of the shutter was one of the complaints with the older cameras. While I typically shot with mirror up and self-timer, therefore not worrying much about shutter-lag, I did give it a try with this camera. I did not see any kind of shutter lag that would bother me. The AF system was fast, and the shutter kicked in almost instantly. No complaints there, issue solved.
The sound of the shutter and feel while taking a photo was much different than with the past system. I could describe it as being softer. There wasn’t all the big flip and flop and banging that the older cameras had. To put it in camera terms, it seems that this camera is well dampened. There is still a big mirror and focal plane shutter, plus a leaf shutter and f/stop, that all have to operate to take an exposure, so it is somewhat loud and noticeable, but not objectionable.
This camera requires two large BP911 type batteries. One goes in the camera grip, and the other goes in the digital back. Both batteries work in conjunction with each other. If a battery quits, the camera will operate with just one battery, and you can take out the dead battery and put a new one in without losing power. While the camera allows for some customization with buttons and dials, I used it with the default settings. The front button I left for depth of preview, and it worked just the way I wanted.
 Overall, I enjoyed shooting with the XF. My only complaint is that, at the end of the day, if you are not using a tripod, your neck – from carrying the camera, and your hand and wrist from holding the camera – will remind you that the camera is heavy. The more I used the camera the more I became accustomed to it and the quicker it was to make adjustments. Unlike some of the smaller mirrorless cameras I use now. There is no confusing menu system, Everything is kind of where you expect it and things that needed to be set corresponded to the adjustment wheels that the selection was closest to.
The 100MP Digital Back
The IQ3 100MP back is in a league all by itself. This is evident by the build quality, functionality, and price. Phase One has had a lot of time to perfect the design of the back, and they really understand how to deliver a simple, intuitive, easy-to-operate four buttons or touch screen system.
The back is simple in design and feels very solid in your hands. All openings for connection ports are covered with little spring loaded flip doors or rubber grommet seals. On the back of the camera at the bottom, there is a port for Firewire 800. On the left side of the camera is the USB3 port, as well as a port for camera sync cords and a PC Flash socket.
The Back also uses UDMA 7, CF Cards, and there is only one slot. I’m surprised at this, as most storage for cameras has gone to SD cards and two card slots. I’m hoping that this is something that changes in the future or is offered as an option when purchasing the camera.
Next to the card slot is an HDMI port. This is a new addition and allows you to output to an external monitor for live view shooting on a large external monitor.
Before we get too far into the 100mp back, I want to say that the concept of a back that is not entirely mated to the camera is a big plus. Other digital back providers have stated that their digital backs are integrated to a particular camera. Phase One’s back can be put on any XF camera and/or technical cameras. While I love the new XF camera system, I am also a big fan of technical cameras, and the ability to add this back to a technical camera with the optics that these technical cameras have is just incredibly versatile. While there are some different technical camera systems available, I have been a long-time owner of the ALPA System and have a number of different lenses in my kit.
The 100MP back for Phase One is a breakthrough. It’s one hundred mega-pixels, unheard of until this year. The Phase One backs have always delivered great image quality and, except for the release of the 50mp CMOS Back a little over 2 years ago, Phase One’s backs have been CCD-based chip technology. You won’t find CCD technology in the DSLR world, and many wondered why it took Phase One so long to adopt the CMOS sensors. Phase One’s response was that they were waiting until they could deliver the image quality that their customers expected.
It’s no secret that Phase One worked with Sony to help design this chip. Phase One is the first one with the chip and has been delivering cameras with it for over six months. While Hasselblad has announced their 100MP Camera and back, they are still not delivering it. Some of the slowdowns for HB and others have been due to the earthquake in Japan, which heavily damaged the Sony chip manufacturing facility. Phase One had some chips on hand and were able to fulfill some orders, but many purchasers are still waiting for their backs.
I spoke with the CEO of Phase One, Henrik Hakonsson, who says that Phase One is shipping 100MP backs again and that they expect to fulfill all backorders by the time you read this article.
Operationally, the back can’t be easier to use. Everything can be set by using the advanced touch screen on the back. Phase One sets another great example of how touch screens can be an integral part of camera design. Also, if you are not a touch screen fan, you can do all of the back setting and operations with one or a combination of the four buttons on the back. After you become accustomed to the back, you’ll find that you will be using a combination of both.
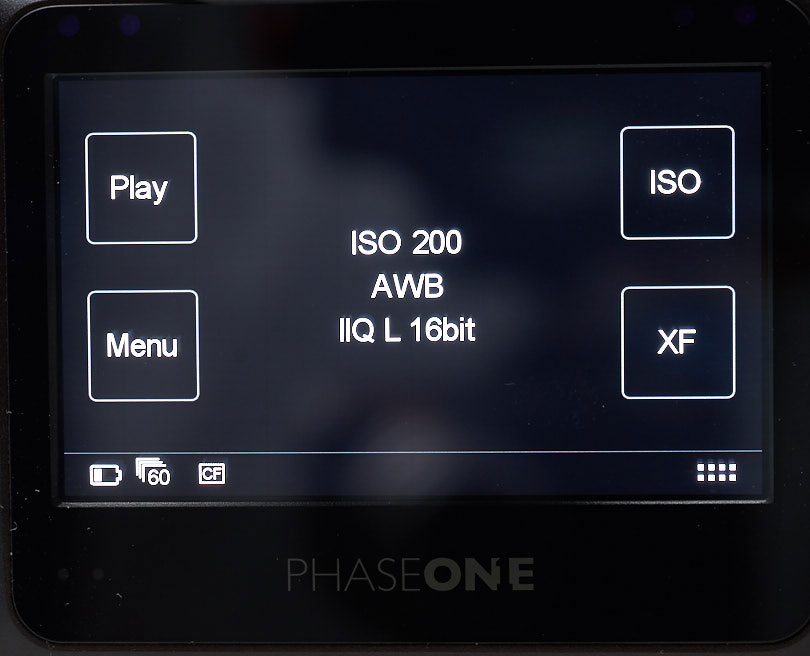
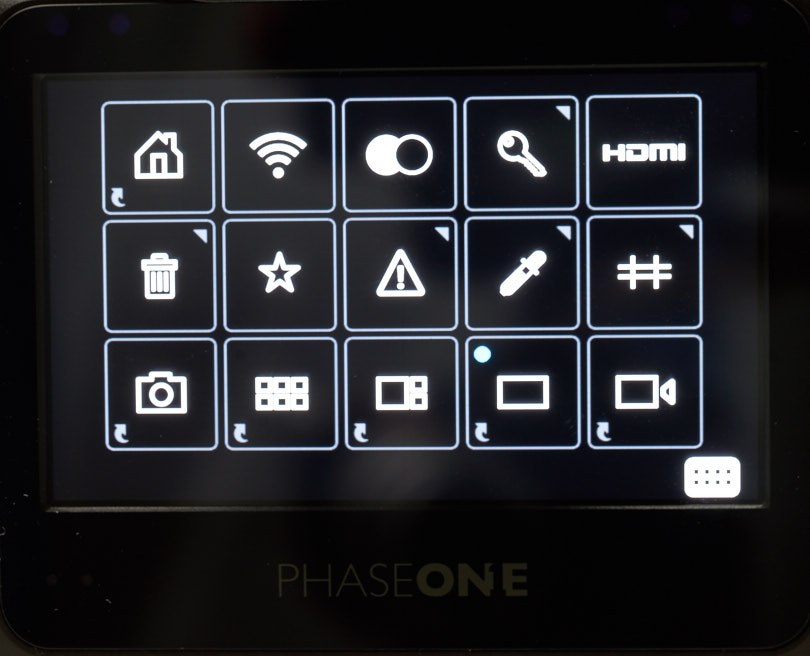
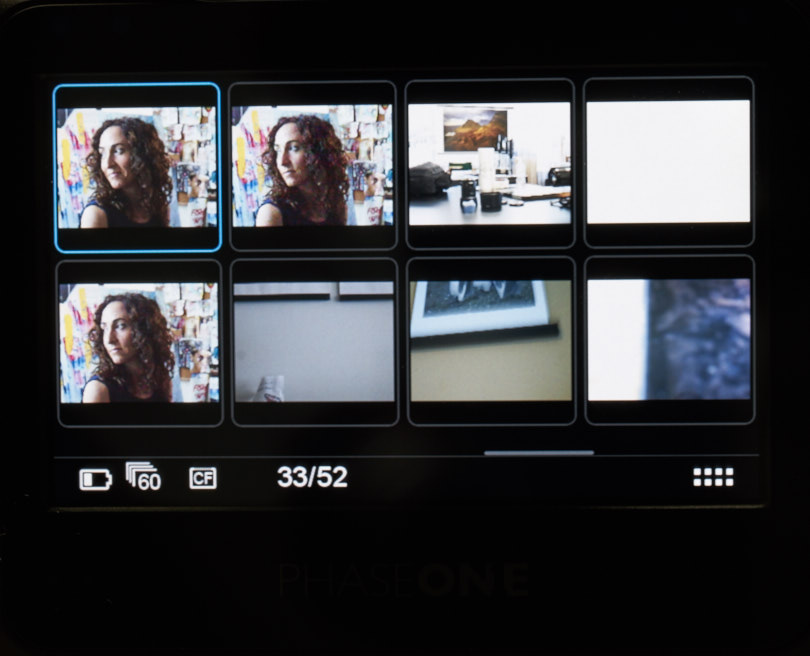
No matter where you are in back operations, a simple long press of the upper left button will take you back to the home screen menu (picture above), where you can then navigate to where you want. The home screen has four choices: Play, Menu, ISO, and XF.
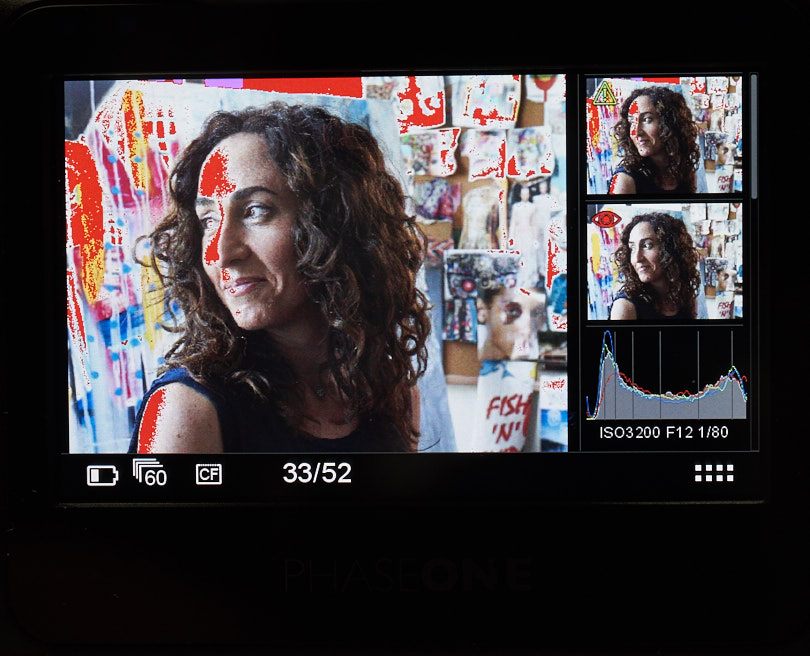
The Play menu opens the play screen; here, you can view images that have been taken. There are sub-screen buttons on the right side of the screen. These are scrollable and there nine of them. These allow you to activate certain features regarding the images that you are viewing. They can all be customized by pressing a sub-screen and holding. This will launch the customizable setting for that sub-screen. It’s so simple and intuitive. You can also reposition the sub-screens to where you like them to be by using the position arrow in the menu. I set my back up, so I had an exposure warning on top, focus check was second, and then histogram. Next up was the level screen and the colorful exposure evaluation screen. Other screens below this are metadata, exposure calculator, back temperature, and camera controls. You’ll find you will be using the top 5 sub-screens the most.
I placed the histogram screen at the bottom of the first set so that if I scrolled to the next set, I could still see the all-important histogram. A single tap of any of these sub-screens will open it to a full-screen view. Tap again and it goes back to the previous view.
For exposure warning, I set my max level to 245. I wanted to be able to see if I was heading to a clipping range. You can also set the warning to flash both in the small screen mode or, when tapped, to see it full screen.
The Focus Check sub-screen allows you to see what areas are in focus. You’ll have to experiment where you want the setting, but I found – for what I was doing – that 26 worked fine. For example, you can choose the histogram setting if you want it to be blinking and visible in small screen mode.

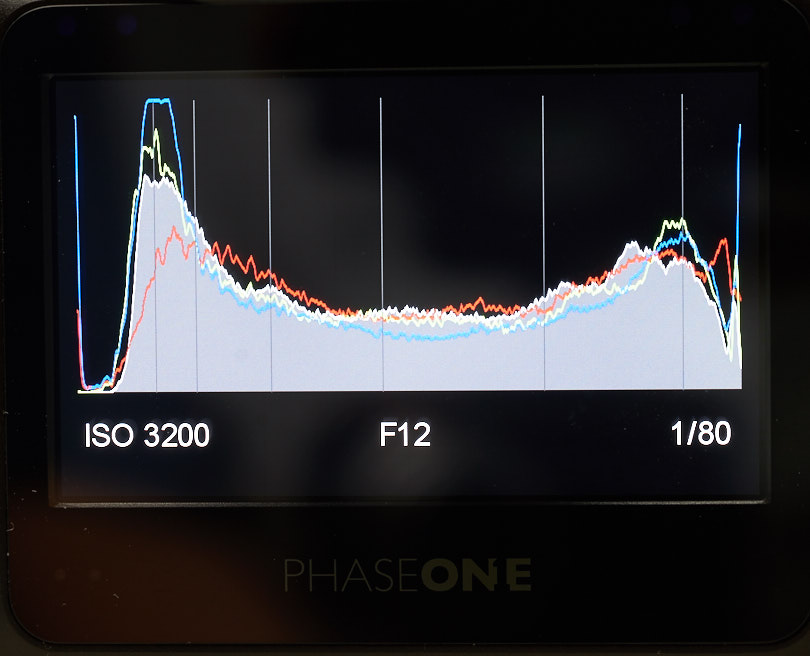
The Histogram screen allows a setting for showing an RGB histogram or just an average one. You can select if you want basic Exif data to show, as well as how you want the full-screen histogram displayed.
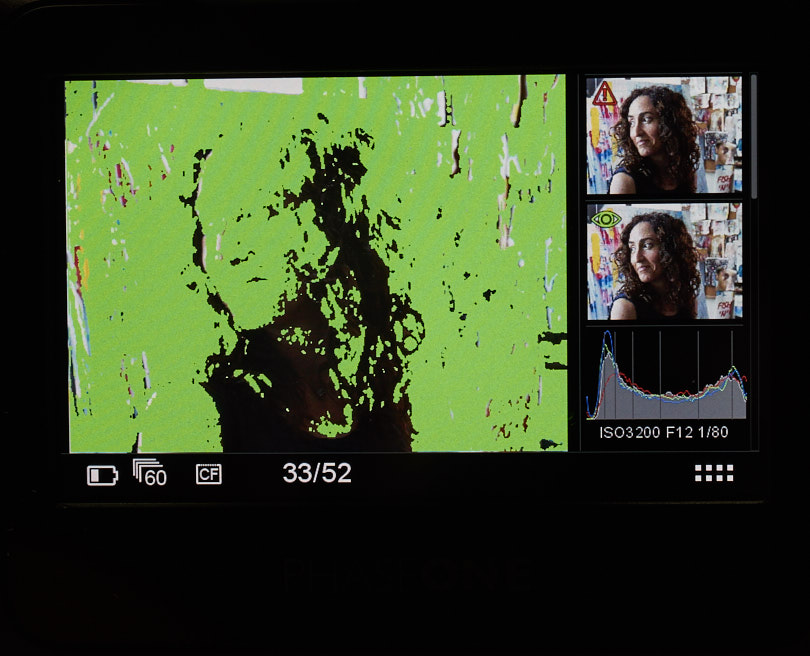
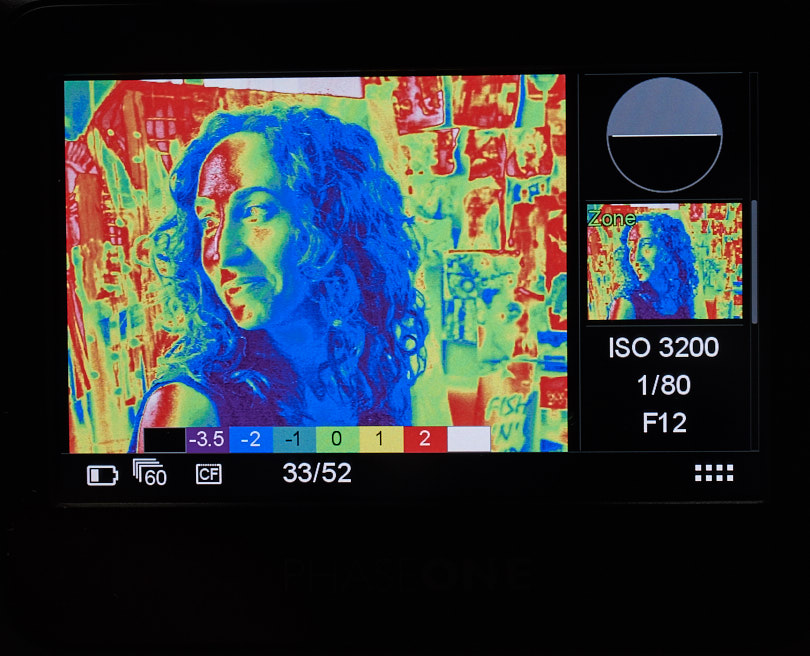
Skipping down to one of the cooler features on the back is the Exposure Evaluation screen. This is different and fun to use. It gives you a color representation of the exposure. By pushing on the sub-screen, you open up the customize setting, and you can choose how you want to see the display. I used EV Scale. This meant that anything in Red was two stops over, Green was right on the money, and Blue was two stops under exposed. I found that I used this screen a lot when shooting, partly because it looked cool, but eventually because it was very helpful, especially shooting those tough images with a lot of dynamic range.
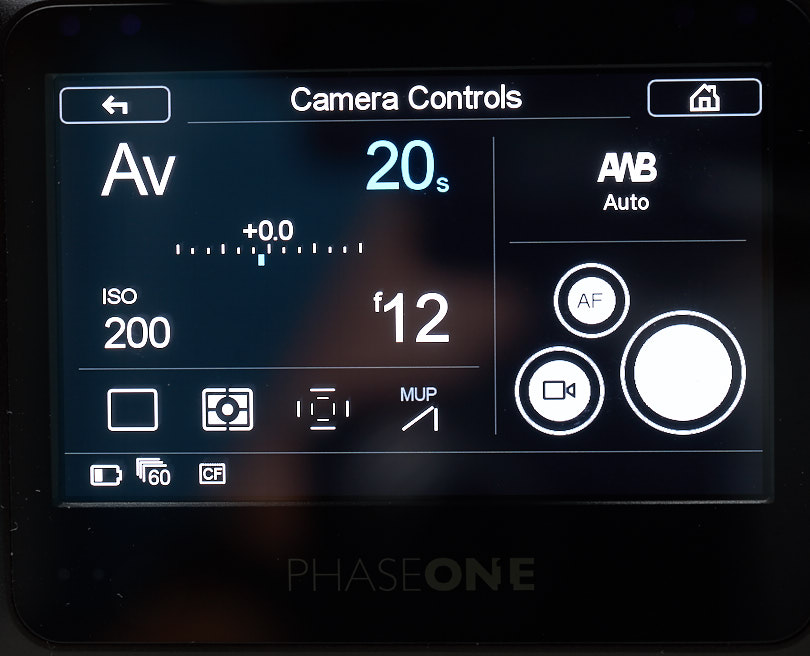
The camera setting sub-screen does the same thing as the XF button on the home screen. It takes you to the camera controls. Here, you can do all the same settings as on top of the camera handle. On a tripod, I spent a lot of time using this feature. I could activate Live View by using the button with a movie camera icon. It was great for composing; tapping twice on the screen took me to 100% view and then I could scroll around with my finger to see any part of the image at 100%.
Live view refreshes at 30 frames per second and works well to see changes in focus and composition. It is nice to have this feature, which, on the older backs, was almost unusable.
Tap on the screen and you will see an icon pop up on the bottom right; tapping that will take you to a screen with 15 icon choices. They are pretty much self-explanatory, and tapping on any one of them will send you to where you want to go. You get used to this fairly quickly and, before long, you are an expert at navigating to screens and tools with this back.
When using the live view mode, the back does get hot (warm), but you can always check the temperature of the sensor by using the temperature sub-screen. Longer exposures will also heat the back up. This is not unusual, but, with this back, you can at least monitor the temperature.
Using this back and camera combination was fun and easy, although heavy. I keep coming back to that, but I kept reminding myself that in the old analog days I was hauling a 4×5 camera into the field with lenses and film holders, and it weighed a heck of a lot more. So, I suppose I am spoiled, as we all are, as cameras have gotten lighter and smaller. In the end, the weight was not much to be bitching about, considering that I was getting 100 MP image quality.
Many years ago, when I sold Michael his first Phase One, it was because he put in one of his reviews that if Phase One could ever untether their cameras from a computer (back then you needed a whole laptop tethered by firewire to the camera to the take picture), that he would give Phase One his car keys in exchange for that camera. When Phase One finally had an untethered system, I called Michael up, and he and I went out shooting together. Over a few days, he shot with this new untethered camera and on the last day, when we were sitting in his dining room evaluating the images, he muttered some not-so-nice words to me, and slid the car keys across the table.
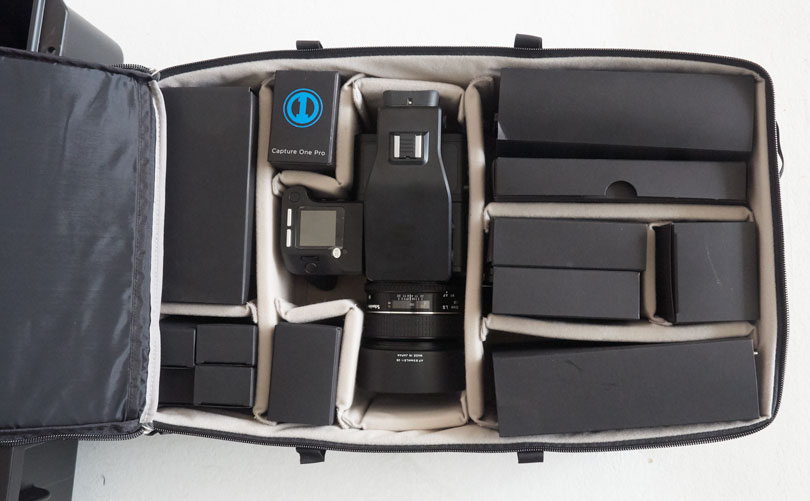
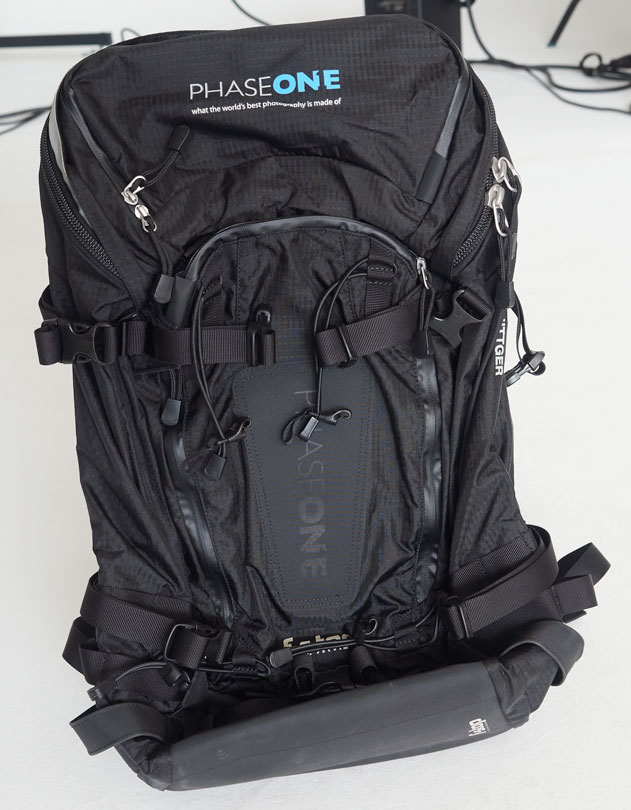
Well, Phase One, even though I won’t fall for that car keys game (mainly because I need my car), I think it is time to challenge you again. I long for the day where we can go out into the field with a 100MP system and several lenses that will fit in a small backpack, and be easily transportable with good battery life, with a weight that won’t cause me to be seeking out a chiropractor after using it.
Except for one issue that I’ll explain below, I enjoyed shooting with the Phase One XF. Image quality, as expected, was nothing less than incredible. I had no lock ups, faults, or operational issues. I dragged my feet on this review so I could keep shooting with the camera. But, alas, I finally have to complete this review and send the camera back.
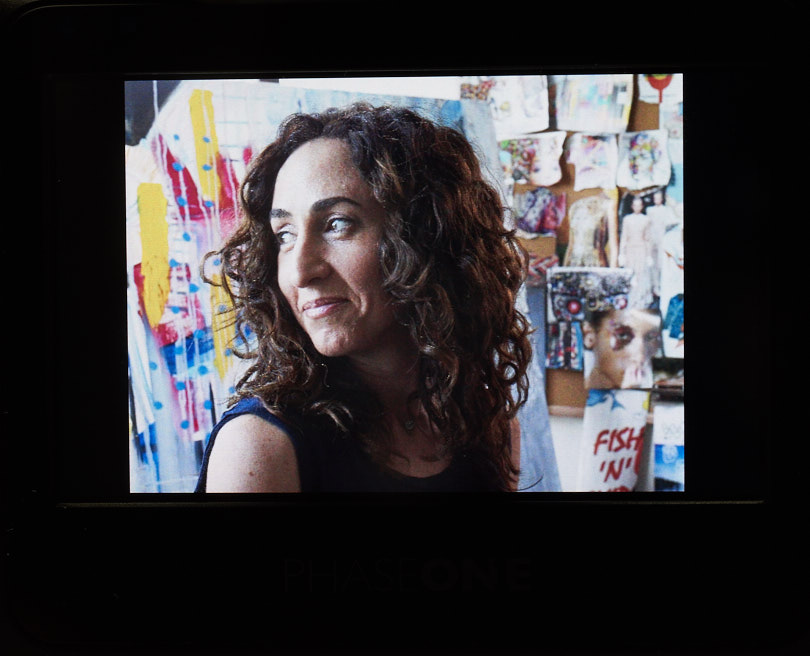
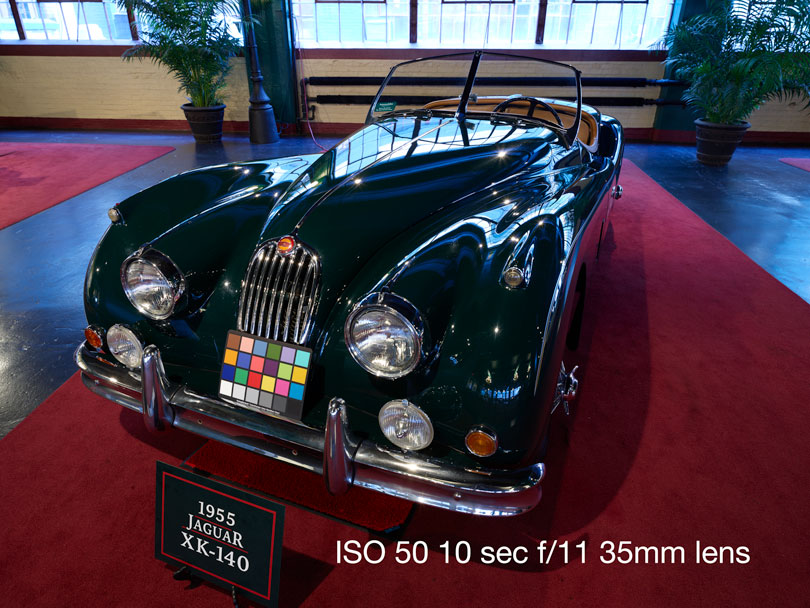
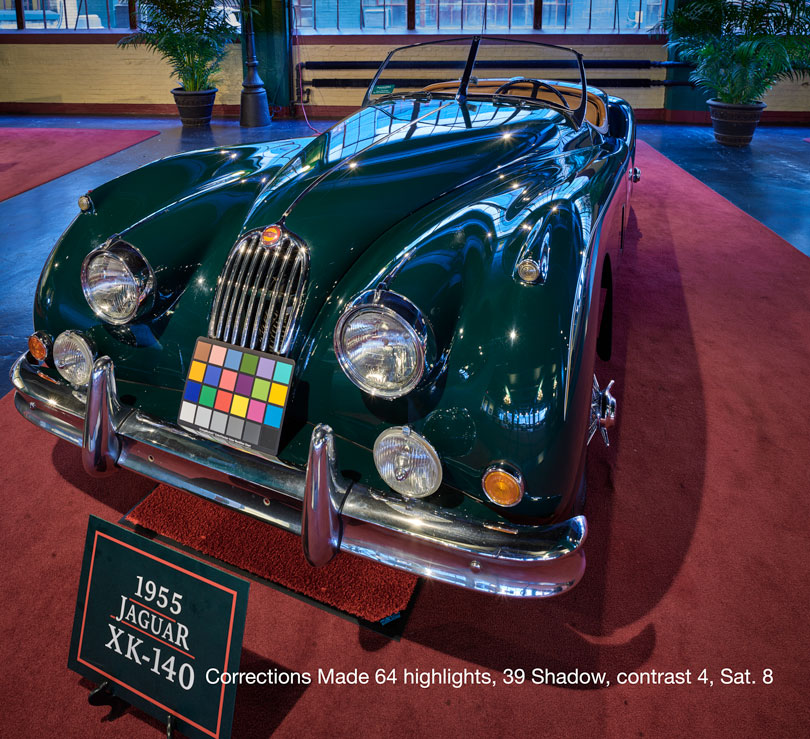
I shot a variety of subjects and liked the images. The ISO, for the first time in Phase One backs’ history, was actually usable at higher ISOs, and the dynamic range was astounding. Phase One claims 15 stops, and I’ll let others do the quantitative testing of this. I, however, found that, on images where I expected to see a histogram with clipping, I was presented with a clean histogram with toes at both ends. The Highlight and Shadow recovery tools in Capture One easily helped to recover any of these, and allowed an image of incredible detail and light to dark range. In many of my landscape images, I loved the subtle details in shadows that would have gone completely black with other systems.
I wish there were a way to show on this site the details and subtleties that are present in these files. But, at 72ppi in 8-bit sRGB, that is just not possible. As a side note, it has made me look at some things that we can do to the site in the future that will show comparisons, and show images at full size. Look for these in the not-so-distant future.
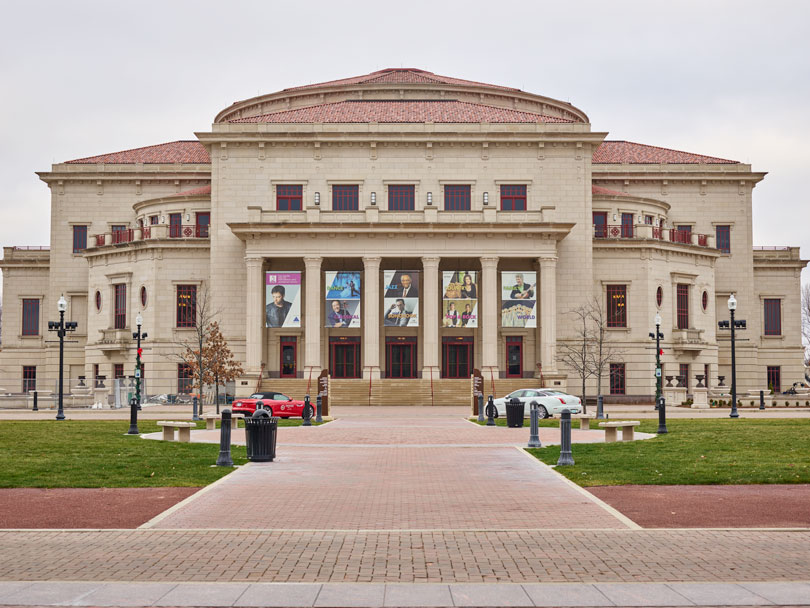
I made some prints from the 100MP files I shot. I am going out on a limb here, but I think we have reached a point where these files have so much resolution that even an Apple Retina screen cannot show the full detail that this back can capture. Case in point: I ended up making some 44 x 72-inch prints on my Epson 9900 printer of an interior of a concert hall. I made these from a full-size file exported from Capture One at 16-bit ProPhoto 360ppi. I added just a tad of sharpening in Photoshop, saved the image, and printed it through my normal workflow using ColorByte’s Imageprint 10 RIP.
You have to experience the 100MP images as prints to truly appreciate the detail. In this image, there were speakers and spotlights hanging from the ceiling of this large hall. On the print, you could see the texture of the knobs on the spotlight and letters, too – and I’m talking about objects 75-100 feet away. These prints begged to be examined with a loupe. I was not able to see this detail on my computer when working on the image. I knew that it was sharp, but I could not see the kind of detail on a computer screen that I could on the print. There isn’t any way to show this to you on this site, either. However, if you are ever in Indianapolis and visit the gallery, I’d be happy to roll out the prints and let you see this for yourself. The funny thing is, that I shared these with some of the Phase One engineers and experts, and they told me that they thought it should be even sharper.
This reminded me of an article by Mark Dubovoy a few years ago about focus, and how shimming digital backs could improve your images. It’s an interesting read if you’d like to have a better understanding of what I am referring to.
Some Image Samples

ISO Examples – Cropped From The Image Above


The images below are available for download. They were saved as a 100% sized JPEG at JPEG Setting 90 out of Photoshop. While they will be fun to explore they do not reflect what a 16 bit full size tiff file would show. Our system has download limitations. We are exploring new ideas for providing this in the future.

Download The Above Image

Download The Above Image
Download The Above Image

My Only Problem
During the testing of this setup, I did some photos on my ALPA Technical camera. When shooting with this camera, you lose all integration to the back, and it is just like shooting with film. To make sure the back works, you need to set the back to Zero Latency and hook it up via a flash PC Cable to the PC port on the lens. Then, what happens when you trigger the shutter is that the PC sync wakes the back up in milliseconds, and records the exposure.
The back worked great, and I didn’t need a wake-up cable like I needed at one time with earlier backs. The problem arose when I replaced the back onto the XF camera, and started to use it again. I was getting funky double-exposure images. It was very strange and I was getting pretty angry. I checked all of the settings of the back and camera and, from what I could tell, I was OK. I eventually called tech support and spoke with Ulf, who is one of the resident geniuses at Phase One. He told me that the latency wasn’t set right. I told him that there was nowhere to set the latency in any menu at all.
It turns out that we found a bug. He told me to take the back off of the camera and then access the menus. Sure enough, when I did that, the latency menu was there, and I could set it back to normal latency, which is the proper setting for using the XF Camera. The way to fix this would be to either reactivate this menu when the camera goes onto the XF camera, or make it an automatic setting that will go to normal latency once the back is reattached to the camera. Either way, the problem was solved, and now we all know to look for this. I was promised that this would be fixed in the next firmware upgrade.
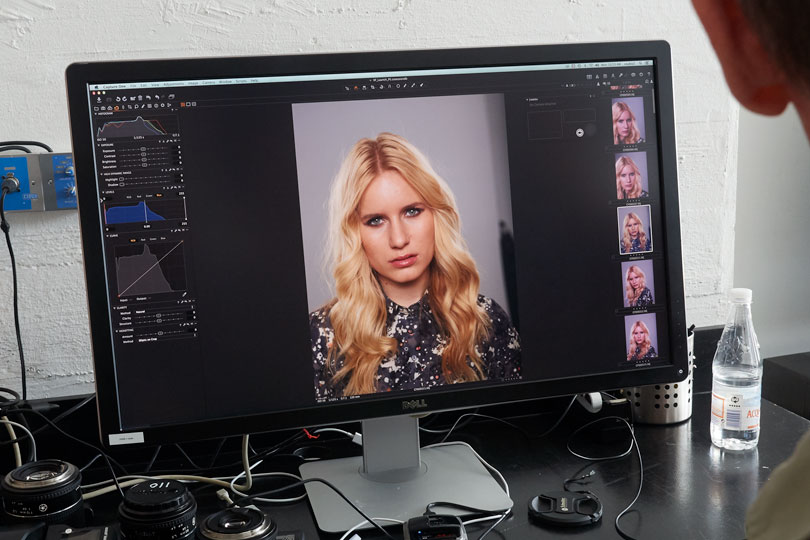
While Lightroom will handle Phase One RAWs, there is nothing better than Phase One’s own RAW processor for processing your images: Capture One 9.2.x. Capture One is fast and versatile, and offers a lot of super features. The interface is customizable, and you can set it for a workflow that works for you. A nice feature working with C1 is that it can use sessions or catalogs. Sessions are great for working in remote locations. You create a session, and it is a folder with captures, output images, selects, and trashed images. Rather than trying to sync catalogs, you can simply move the session folder at a finder level to any new destination.
My workflow consists of using session when in the field. Then when I get home, I drag the folder to a Raid storage device, open up the most recent catalog, and import the images from the session into the catalog. I run several different catalogs. I have a catalog for every year since 2005. Inside the catalog, I have created smart albums for finding images by certain EXIF data, like camera make, lens, etc. I can also set different levels of keywords. I also make catalogs for specific locations and projects that may span multiple years. For example, I have a catalog of Iceland images and Antarctica images. All of these catalogs – with each having from 60,000 – 100,00 plus files – fits on an external drive. This allows me to take my catalogs with me wherever I go. If I make changes to any images, I simply drag the catalog over the older catalog icon on my return, and all the settings I made are now applied to the original RAWs which are still resident on my Raid Drive. This Catalog has only previews and the information for settings.
One difference of Capture One, when compared to Lightroom, is the ability to print. While Capture One has a print module, it is not very strong and isn’t as robust as Lightroom. This has never bothered me, as I like to output my files to a 16-bit TIFF file and print from Photoshop, or my preferred output method: using Image-print. Personally, I like having a TIFF file of my images of choice. I can take these files and work them, using third party applications to enhance them further. There is a module in the tutorials we have that shows how to round trip your files so that the TIFF or JPEGs will sit in the catalog with the RAW file.
If you want to learn more about Capture One, we have major tutorials in our video library.
Wrapping It Up
As I started this review, I’ll also end this review. It seems that anyone who has had the chance to work with the Phase One XF Camera has had the same feelings. It is a camera that sets the benchmark for other cameras when it comes to features, interface, and, especially, image quality.
This is not a camera for everyone, and many people on forums and chats around the Internet have made comments and such, showing that they have difficulty understanding the medium format cameras and the concept as a whole. For years, there have been comments that medium format is dead and/or will die off. All this time, Phase One has continued to make cameras and backs, and sell to a market that paid no attention to the comments being made. Call it a niche market if you will, but, in my opinion, it is more than a niche market. It’s a market of photographers, many of them Pro, but more and more consists of serious photo enthusiasts. These folks want the very best, not only in image quality, but with the hardware and innovations that come with it.
You’re not going to shoot sports or birds with this camera. Phase One never tried to make a camera that could do everything. They made a camera that did something well and continually worked at making it better. This camera doesn’t do multi-shot, and I know many people will bring it up. Multi-shot, while it is something that works well, only works well when the camera and the subject are locked down. This limits the use of multi-shot to a select few studio shooters. The higher megapixel backs that Phase One offers (80 and 100mp) make files just fine for about any kind of work. The Phase One back doesn’t make JPEGs. I hear this one all the time. That would require a bit of on-board processing power and, for the majority of users, is not needed. If you want JPEGs, then import your images into Capture One, select all of the images, and output to JPEG.
The XF and 100mp cameras are heavy. The lenses are heavy, and they are expensive, at around $48,000 USD. However, Phase One says that they are selling all of the cameras and backs they can make, and have backorders, so that must say something.
Contrary to the many naysayers, medium format is coming to life again. Pentax has a system, and Hasselblad has their system, and a new camera they just introduced, and rumors abound that even Sony and Fuji are looking into the medium format business. Medium format is alive and well.
You owe it to yourself and your photography, even if you may never purchase an expensive system like this, to at least look at and understand the medium format camera better. You should take some images with the camera and see the difference in image quality. Image quality is not determined by megapixels alone. While megapixels certainly play a part, it is the quality of the file that sets it apart. Phase One’s 16-bit capture with a 15 stop dynamic range becomes very obvious when doing comparison images from some of the higher megapixel DSLRs.
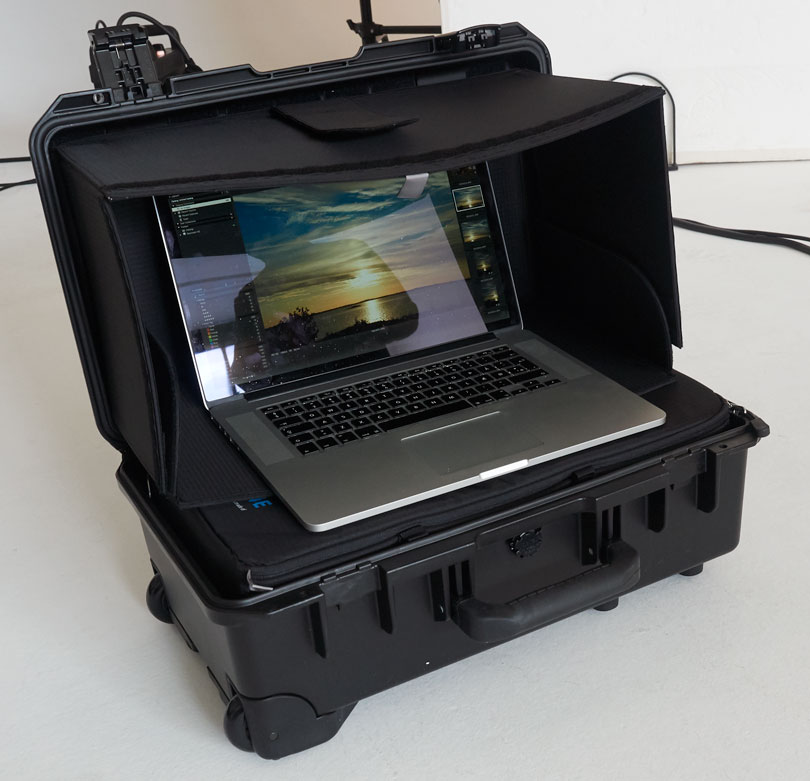
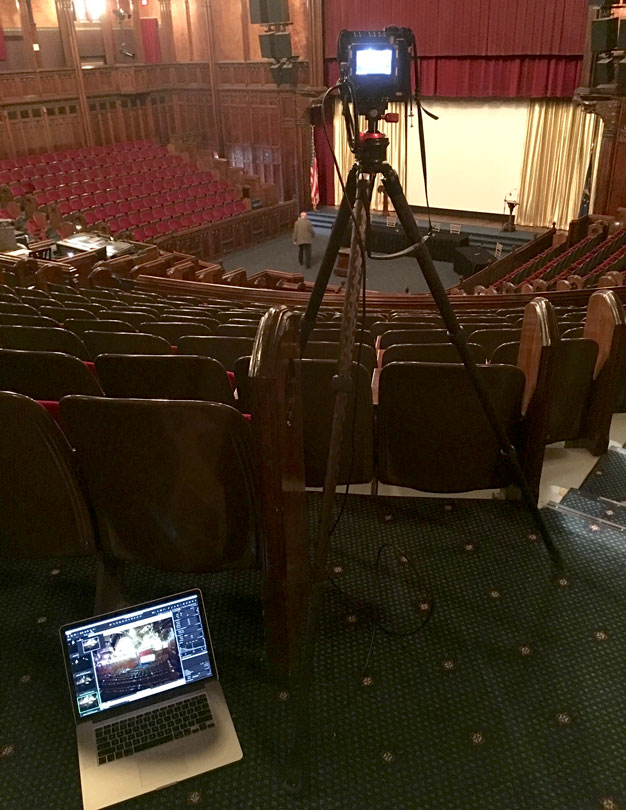
In this review, I did not cover tethered shooting and the use of Capture Pilot, a wireless Ipad app that allows you to control your camera remotely. I used these features, and they work quite well. There is even a picture in the article above showing my laptop tethered during an interior shoot with the 100MP back. Capture Pilot is fun to work with and sets up a proxy network and allows you to see images via live view and make camera adjustments, as well as remotely control the camera. Pretty cool stuff, for sure.
Phase One has a series of workshops fondly known as PODAS. These workshops, usually held at great locations with great instructors, are all about letting attendees shoot with their cameras. Also, Phase One attends many Luminous-Landscape workshops like the upcoming Antarctica cruise. Their representative is on board with cameras and lenses, so, if you’d like, you can try them out on the trip. We hope to do more with Phase One on the workshop side of things in the next couple of years.
It’s hard to find fault with the Phase One systems. The interface is bold and is well thought out. It’s very much like picking up an iPhone. You can figure it out without a manual. Once you get past the weight and heft of the camera, you begin to enjoy taking pictures. It’s a breeze to make changes and adjustments. The camera doesn’t get in the way of the picture taking experience. No, it doesn’t have tons of AF points and Focus Tracking. It’s not meant to be a camera for sports and such. The new A is fast though and is worlds better than the previous version. F
I will have to send this camera back now. I do so reluctantly I would like to get to a point where I can own the 100MP back. Once you experience the file and make a few prints, it is hard to shoot with anything else. Especially for those magnificent Ansel Adams like landscapes. Phase One has set the bar high, not only for themselves but the rest of the industry. I can’t imagine that Phase One is done innovating. The question is: once you have delivered what is considered the best camera there is, what do you do next?
Publishers Note: As full disclosure and not wanting to cause any unnecessary controversy I did work for Phase One for 13 years as VP. I left Phase One 3 years ago to become the publisher of this site. It’s been three years now and I feel I can do a review on Phase One or any other medium format camera system objectively and without bias. My Phase One days are over as well as my connections to Phase One. Phase One treats us just like they do any other media outlet. Yes, I still have friends there and it does help when I seek out answers to my questions but there was no outside influence in the production of this review except begging me to finish it so they could have their camera back. Frankly I was dragging my feet so I could enjoy using it.
Kevin Raber
July 2016


Elevate Your Vision


You may also like


