


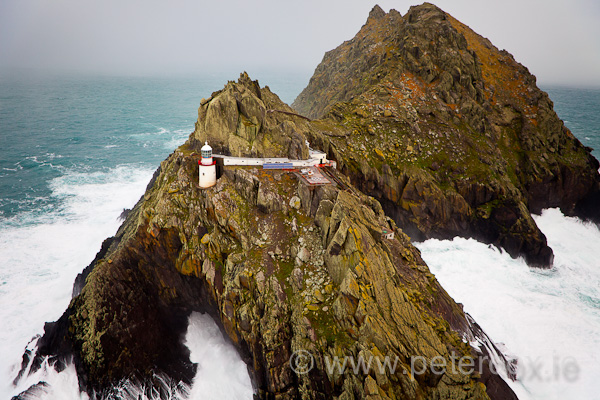
A Stormy Day, An Tiaracht, Co. Kerry
Canon EOS 5D Mk II, EF 24-70mm f/2.8 @ 24mm
Exposure: 1/800 @ f/2.8, ISO 400
Few structures have the universal appeal and fascination of lighthouses. They are superbly romantic constructions: beacons of hope on a wild night, symbols of human ingenuity and perseverance in the face of the unforgiving seas. The more remote and inhospitable the location, the more interest they generate.
On top of all that, they make excellent photographic subjects. This relies on the marriage of two factors: an emotionally engaging subject and a prominent visual that lends coherence and focus to a dramatic scene. This article will give you some tips on how to make your own compelling lighthouse photographs and help you develop your own unique style.
Access
Lighthouses are built all around the coast and access ranges from trivially easy (such as those built on the end of public piers or sited on open coast with good infrastructure) to very challenging (offshore rock stations which are accessible only by boat or from the air). Any lighthouse can make a compelling photograph, but the more remote ones tend to be more dramatic, and due to the difficulty of access are the least often photographed. Chartering a boat is often the only practical way to get close to these stations.
This can be expensive, but why not consider pooling resources with other photographers and splitting the cost? This way the trip can be entirely photographic in nature – you can pick the ideal time and a good charter captain can position the boat accurately to give you the best angles. I find dive boat skippers are particularly suited for this, as they have to be adept at keeping the boat in one location so as not to lose their divers.
It can be difficult to gain close access to any lighthouse, as they are all private property. Don’t cross the boundary without the permission of the relevant authority (Trinity House in the UK, the Commissioners of Irish Lights in Ireland). The good news is that access of this type is rarely required to get the best images.
Composition
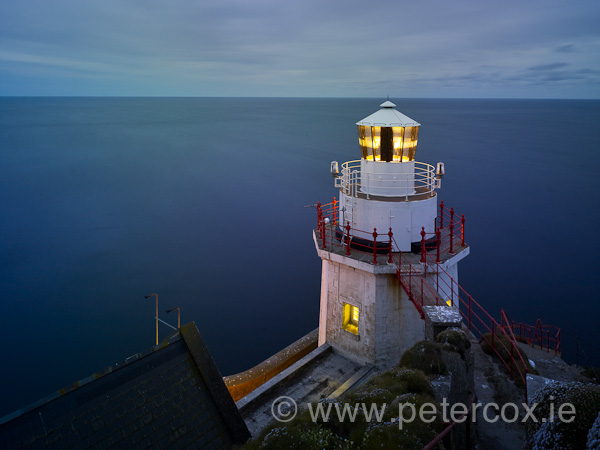
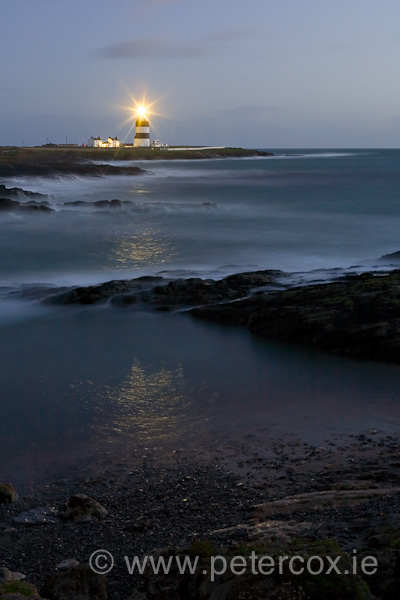
As with any subject, you have a variety of options when composing a lighthouse image. Your initial decision will be whether you’re going to dominate the frame with the structure itself or if you’re going to show it in the context of its environment. Below are two images of the same lighthouse, Tory Island off the coast of Donegal. They couldn’t be more different. The close-up was taken from the bottom of the tower and aims to highlight its sheer size and presence. The black & white processing links the bands of the tower with the tones in the sky. The second image was made from about two miles away. It shows the empty landscape around the tower and gives a sense of the remoteness of the location.
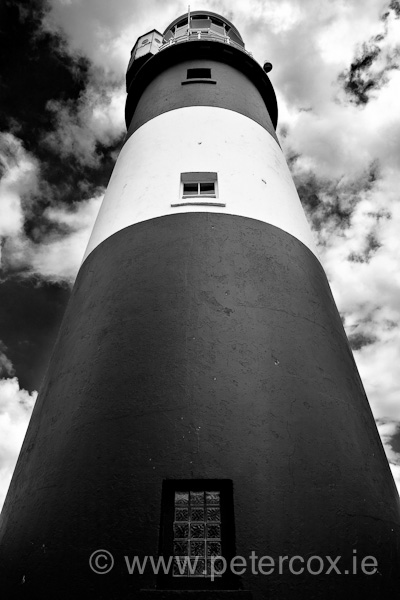
Tory Island Lighthouse, Co. Donegal
Canon EOS 5D, EF 24-70mm f/2.8 @ 24mm
Exposure: 1/20 @ f/20, ISO 200
Tory Island Lighthouse Nocturne
Canon EOS 5D, EF 24-70mm f/2.8 @ 50mm
Exposure: 2.5sec @ f/2.8, ISO 400
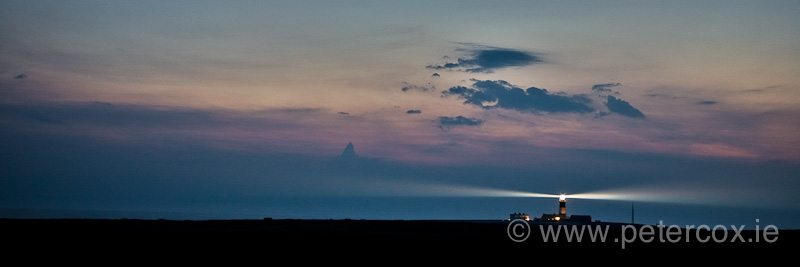
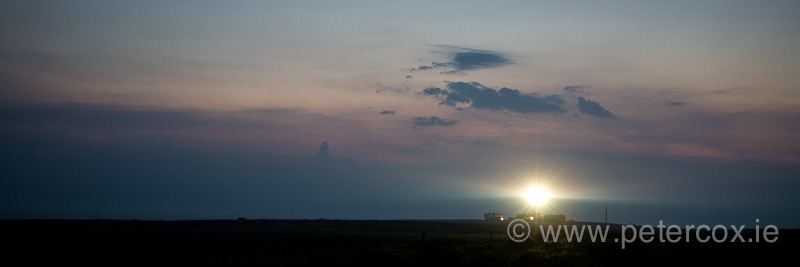
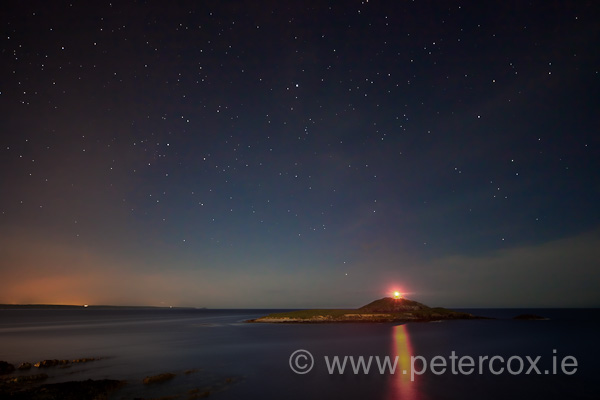
Lens choice will have an impact on the composition. I find most of my lighthouse images are made with a wide-angle lens – roughly 24mm on full frame digital. However, if you are unable to get physically close to the lighthouse but you still want it to appear larger in the frame, then a short telephoto lens can be useful. In the image below, I used a 70mm lens to isolate the part of the larger scene to include the moon and the two lighthouses. The second image was made at almost 300mm from almost the same spot, allowing me to get greater detail in the lighthouses and ship.
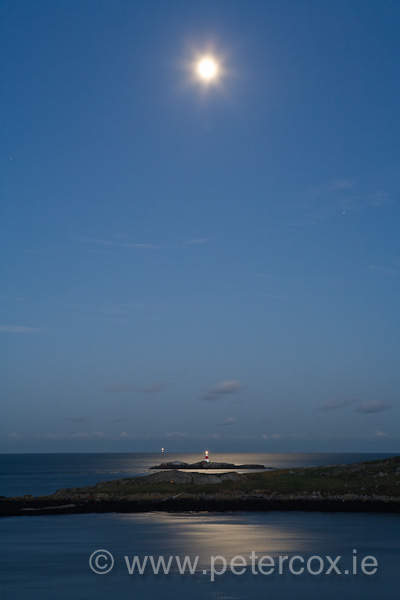
The Muglins by Moonlight II, Co. Dublin
Canon EOS 5D, EF 24-70mm f/2.8 @ 70mm
Exposure: 15sec @ f/13, ISO 100
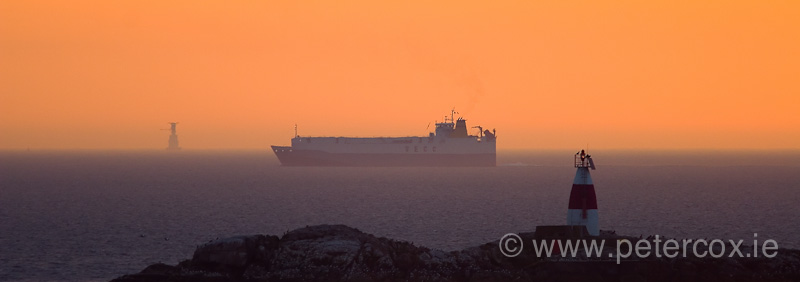
Dawn Cargo, Dublin
Canon EOS 20D, EF 70-200mm f/4L with 1.4x Extender @ 280mm
Exposure: 1/100 @ f/5.6, ISO 200
Time of Day and Exposure
Undoubtedly the best time for lighthouse photography is the half-light around dusk and dawn. At these times, the light is in operation, but the surrounding landscape is not completely dark, which makes exposures straightforward. The image below was a 40 second exposure at ISO 100 and f/11. I positioned myself so the camera was in the shadow cast by the blackout sector in the middle of the lantern. If I hadn’t done so, the light would have been a starburst obscuring the details of the lantern itself. It would have been a fine image, but not what I was looking for.
Nocturne, The Bull Rock Lighthouse, Co. Cork
Phase One P45+ on Arca-Swiss Rm3d, Rodenstock 23mm Digaron-S f/5.6
Exposure: 39sec @ f/11, ISO 100
As it gets darker, the relative intensity of the beam increases. For images made in full darkness, this can become a problem if the light is close by, as it can drown out important bits of the image. Compare the next photograph with its cousin above. The exposure is the same in both images (f/2.8, 2.5 seconds and ISO 400). It was a humid evening and the beams of light were visible, reflecting off the droplets suspended in the atmosphere. I wanted to capture this effect, but to get both beams equally bright on either side of the lantern, the shutter needed to be open while one was shining directly at me. In this image, I did nothing special. You can see the lighthouse itself is lost completely in the overexposed lantern. In the image above, I simply put my hand in front of the lens for the split-second that it took for the beam to sweep over my location. Because of the relatively long exposure and the short time my hand was in the frame, it’s not visible. I successfully prevented overexposure and was able to capture the image I wanted.
Tory Island Nocturne, Overexposed
Canon EOS 5D, EF 24-70mm f/2.8 @ 50mm
Exposure: 2.5sec @ f/2.8, ISO 400
Weather
Weather is a real factor in lighthouse photography. Clearly the most memorable photographs come from bad weather, but fine weather can produce some excellent imagery as well. While big waves do make for spectacular images, don’t take unnecessary risks. Standing on exposed shoreline during a storm is a dangerous business – even if your position seems safe, rogue waves are a reality and can sweep you out to sea before you realize anything’s wrong.
If you are photographing in stormy weather, Murphy’s Law will generally ensure that the spray will be coming from the direction you want to shoot. This can create big problems for your image quality. I find it’s best to set up on a tripod, compose the image and get the exposure set. Then, clean the lens and shield it with your hand until you’re ready to take the actual photograph. Remove your hand, click the shutter while looking at the front of the lens (a cable release is handy for this) and replace your hand immediately. If drops appear, repeat the process until you’re sure you have an image without droplets.
When you get home, give the camera a good wipe-down with a damp cloth to clear the salt residue.
Converging Verticals
When photographing any structure, attention should be paid to the vertical lines. If you tilt your camera up to include the top of a tall structure, or to get more sky in the frame, any verticals in the scene will converge towards the centre of the frame. If you put your lighthouse off to the side of the frame, this will make it look like it’s falling over. To prevent this, there are a couple of things you can do, both in-camera and in Photoshop afterwards.
If possible, it’s preferable to fix the problem at the time of exposure. This can be done by making sure the camera is perfectly level. This will put your horizon right in the centre of the frame, which is not usually the best for a dynamic composition. However, if you intend to crop the image to a panoramic shape later on, you can raise or lower the horizon at that point.
Failing that, a tilt/shift lens allows you to move the front of the lens up or down. This means the image circle of the lens moves around and the sensor will see a different part of the image. This allows you to raise or lower the horizon without tilting the camera up or down – which eliminates the converging verticals problem. The image below was made from the deck of a boat with the Canon 24mm T/S-E f/3.5 lens, shifted up to drop the horizon. I concentrated on holding the camera level, using the horizon and the vertical of the lighthouse tower as references. If the horizon was straight but the lighthouse looked like it was falling over, I knew I wasn’t quite level.
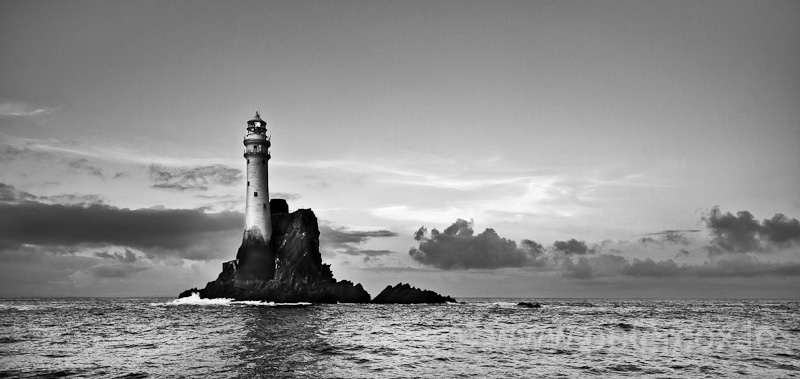
A Summer’s Evening, the Fastnet Rock Lighthouse, Co. Cork
Canon EOS 5D Mk II, TS-E 24mm f/3.5
Exposure: 1/250 @ f/4, ISO 400
These lenses are a little expensive, and wouldn’t be in most people’s kit bag. If you have Photoshop Elements, you can use the ‘Correct Camera Distortion’ tool from the Filters menu to correct the problem. Simply slide the ‘Vertical Perspective’ slider until the verticals in the image look straight. You’ll need to crop the image when you’ve done this, as it will appear as if the photograph has been tipped towards or away from you, creating wedges of empty space. Plan for this in advance and don’t compose your image too tightly or you may have to crop out important elements.
Another way to work with converging verticals is to embrace them. In the close-up photograph of the Tory lighthouse earlier in the article, I’ve used a very wide-angle lens pointing almost straight up. This causes the sides of the lighthouse to lean in aggressively, conveying a real impression of height. Here, symmetry is very important; the lighthouse is centered in the frame so it’s not leaning to one side.
Location Suggestions
There are plenty of accessible lighthouses in Ireland and around the UK. In Ireland, one of the most iconic is Hook Head in Co. Wexford. It’s dramatically situated on the end of a peninsula and offers plenty of angles which have easy access. It’s also open to the general public if you want to get in close.
The Hook Lighthouse, Co. Wexford
Canon EOS 5D, EF 24-70mm f/2.8L @ 46mm
Exposure: 30sec @ f/16, ISO 200
Lighthouses on islands close to shore also make dramatic subjects – Ballycotton in Co. Cork is just such an example. You can use the foreshore to lead in to the main subject, and photographing at night lends a real feeling of drama.
Ballycotton Lighthouse, Co. Cork, Night
Canon EOS 5D Mk II, Sigma 12-24mm @ 18mm
Exposure: 30 mins @ f/5, ISO 125
In the UK, Trinity House has a good interactive map showing all its lighthouses and details about each. This can be found here.
In Ireland, the Commissioners of Irish Lights have a similar resource.
Find the one closest to you and pay it a visit. You might just find yourself addicted like myself!
January, 2011
About the Author
Peter Cox is a landscape photographer and educator living in the beautiful south-west of Ireland. He leads regularphotography workshopsin that area, bringing participants to the best locations, from unknown nooks and crannies to the well-known vistas. For more of his work, you can visit his website at:http://www.petercox.ie


Elevate Your Vision


Read this story and all the best stories on The Luminous Landscape
The author has made this story available to Luminous Landscape members only. Upgrade to get instant access to this story and other benefits available only to members.
Why choose us?
Luminous-Landscape is a membership site. Our website contains over 5300 articles on almost every topic, camera, lens and printer you can imagine. Our membership model is simple, just $2 a month ($24.00 USD a year). This $24 gains you access to a wealth of information including all our past and future video tutorials on such topics as Lightroom, Capture One, Printing, file management and dozens of interviews and travel videos.
- New Articles every few days
- All original content found nowhere else on the web
- No Pop Up Google Sense ads – Our advertisers are photo related
- Download/stream video to any device
- NEW videos monthly
- Top well-known photographer contributors
- Posts from industry leaders
- Speciality Photography Workshops
- Mobile device scalable
- Exclusive video interviews
- Special vendor offers for members
- Hands On Product reviews
- FREE – User Forum. One of the most read user forums on the internet
- Access to our community Buy and Sell pages; for members only.
You may also like


