This article is the second in a series exploring how to get the most from your raw files. The first was simply entitled Raw File Optimization and explored how to demosaic, denoise, and sharpen raw files using Lightroom Enhanced Noise Reduction, DxO Pure Raw, ON1 No Noise, OM Workspace, and Topaz PhotoAI.
I tested ON1 No NoiseAi plus TackSharp and Topaz PhotoAI Raw Noise and Sharpening on three recent photos that I would love to see improved.
We’ve all been there—excited by the sudden view of a bird or mammal, we shoot first, then engage the thinking. Is my shutter speed fast enough for the telephoto lens I’m using? How can I increase the speed? Larger aperture? Higher ISO? Is there something I can brace myself against?
In an ideal world, we would have everything set and ready to go, but that’s not always the case. And if you’re on safari, or with others in a vehicle, you have that motion to deal with as well. Someone in the vehicle may shift in their seat to stretch a leg, or even yawn, resulting in movement of your platform, invariably, just when you press the shutter release.
There are also times when you have everything set and still, but in dim light, motion blur remains a hazard. Not only are birds and wildlife on constant alert for potential danger, they may also be under a dim tree canopy. Branches may be moving from the wind or from other occupants. Even very slight movement can translate into blurred images when shooting with telephoto lenses. It’s bound to happen!
Enter software such as ON1 NoNoise AI and Topaz PhotoAI. Let’s see what they are capable of.
Method
Photos
I chose three recent photos: one with only slight blur, one with definite blur, and a third that, well, let’s just see what the software can do.

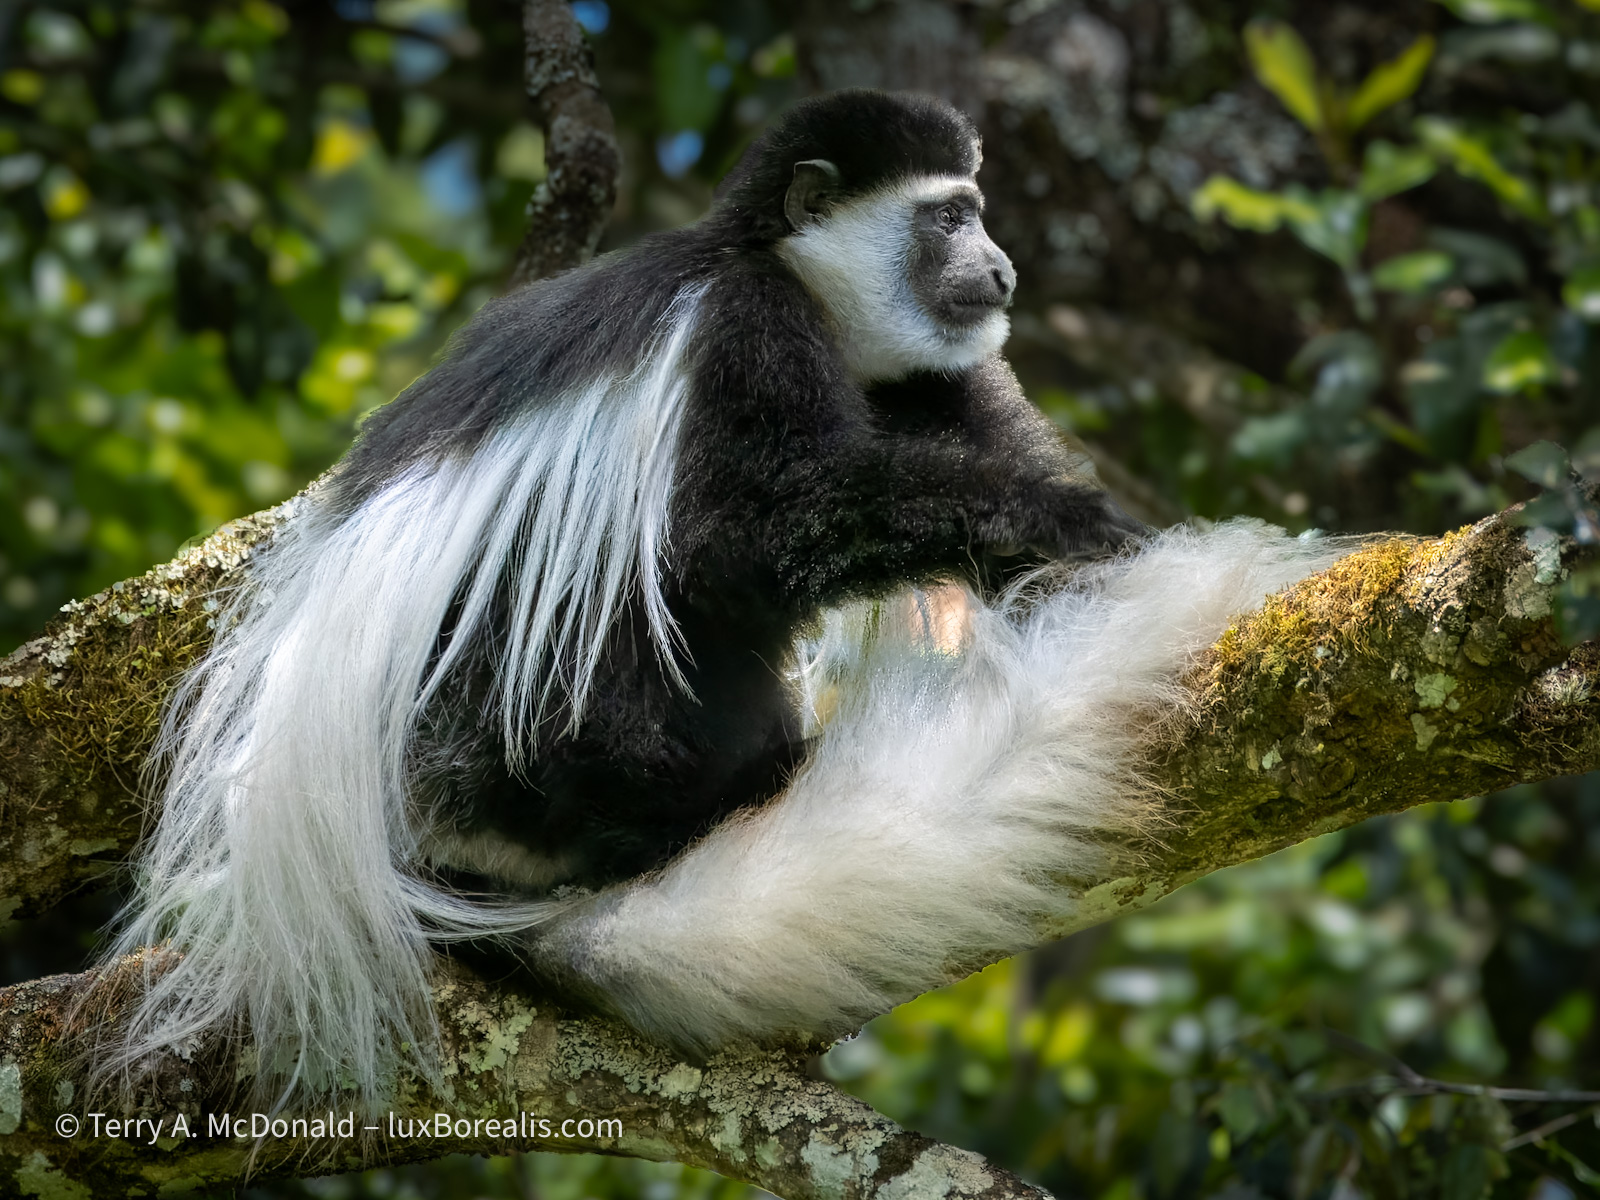
- Black-and-White Colobus Monkey (Colobus caudatus): This is a near full frame (4760x3570px) image made in the depths of the cloud forest on the slopes of Mount Meru in Arusha National Park, Tanzania. It is almost sharp, but slight movement of the monkey’s head seems to have caused the slightest of blur to the hairs surrounding its face, so it doesn’t appear to be camera movement. The photo was made with an Olympus OM-1 and M.Zuiko 100-400mm ƒ5.0-6.3 IS lens with the Olympus MC-14 1.4x teleconverter, at 381mm (762mm efov), ƒ11 @ 1/250, ISO 1600. The lens itself is tack sharp as we saw with the photos of the lion and catbird in the previous article. In retrospect, I should have trusted using ƒ8 and ISO 3200 which would have provided a shutter speed of 1/1000, two EV faster.
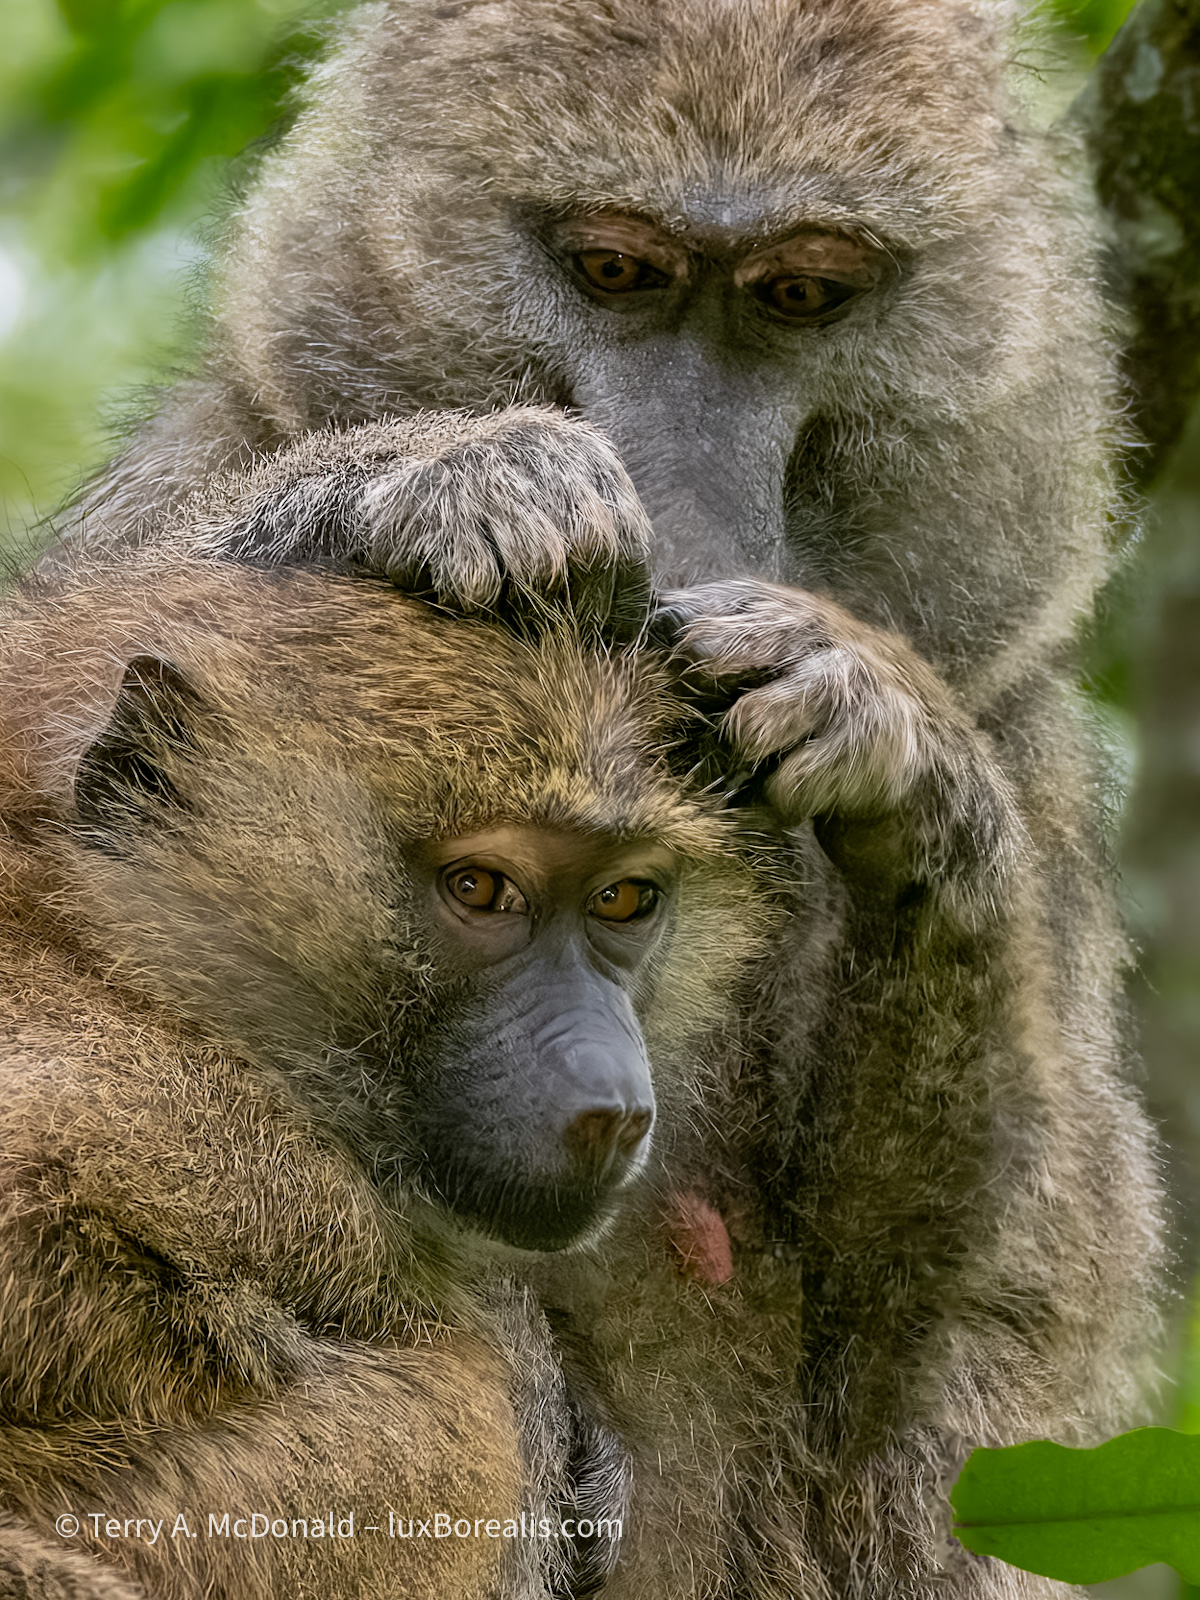
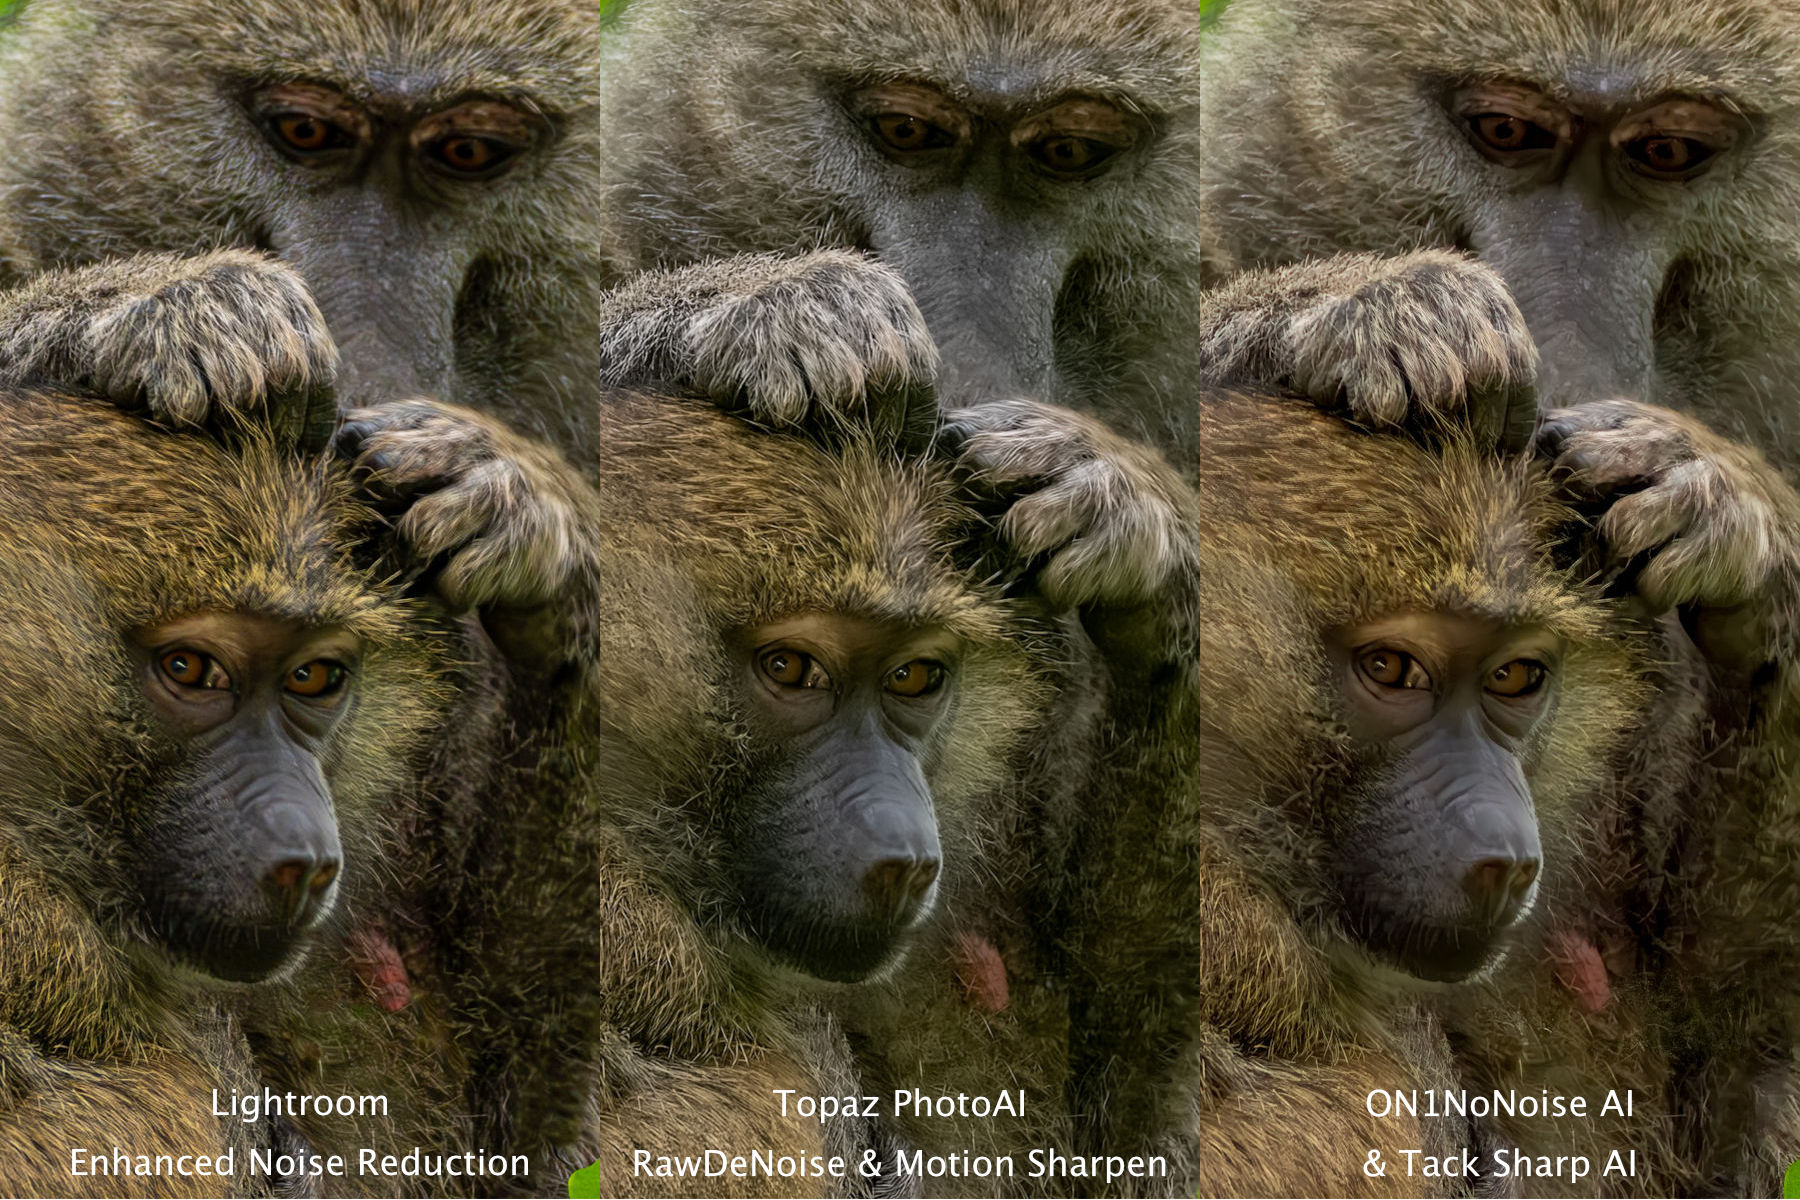
- Olive Baboons Grooming (Papio anubis): Also made in Arusha National Park, this adult and juvenile would not sit still. Mom was grooming the kid, and when do kids sit still, especially when having their hair picked over! It was an overcast morning which, under a dark forest canopy, only added to the dimness of the scene. As well, there appears to be some camera movement, as I can see some hairs with double-blur. The 100-400 was at 210mm (420mm efov), but the dim lighting demanded ƒ6 @ 1/50, ISO 3200—not ideal. This image is a centre-crop of 2916x3888px within a horizontal frame.

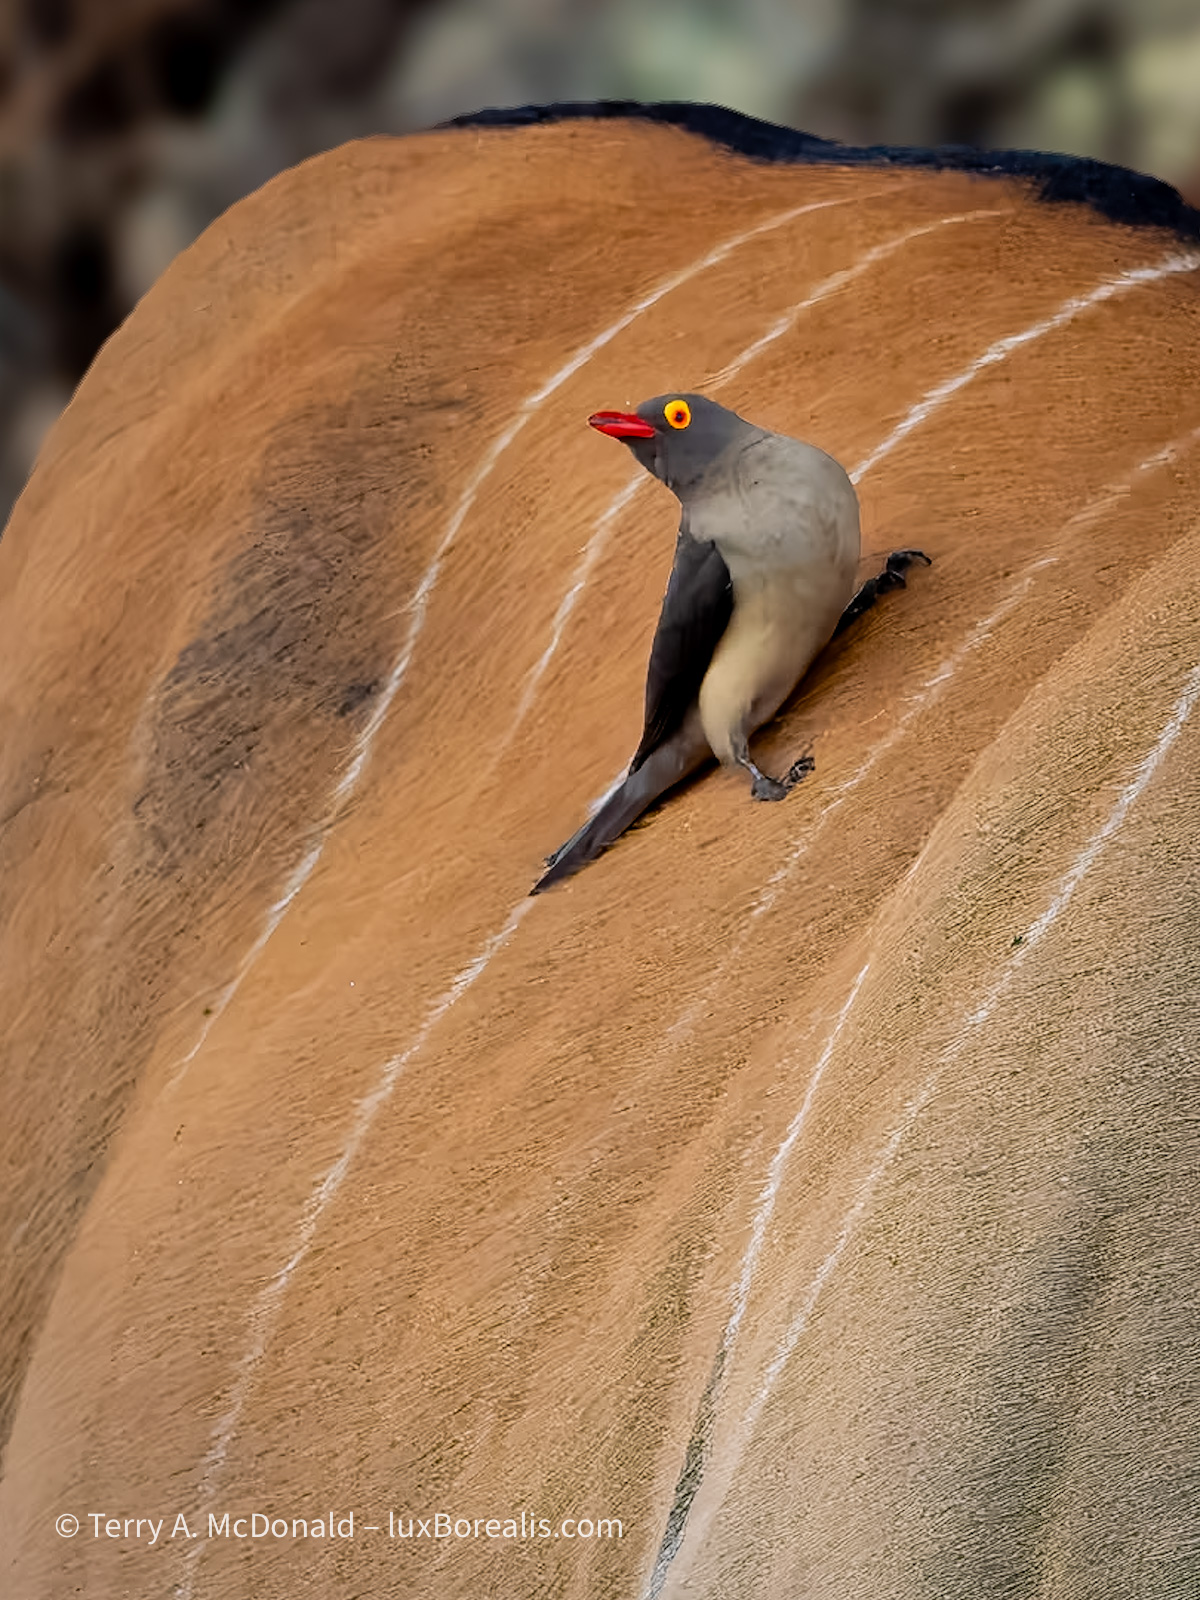
- Red-billed Oxpecker (Buphagus erythrorynchus) on Eland: This was a late evening shot, so focus was slower and less accurate than expected. OM Workspace shows the focus point to be just ahead of the right foot of the Oxpecker as it clung to the back of an eland. Clearly, this is a case of operator error, so I take full responsibility for not getting the focus point on target! The photo was shot at 400mm (800mm efov) with the 100-400 zoom, ƒ8 @ 1/80, ISO 1600, and is an 1825×2460 crop. Yes, the oxpecker was far away, but I had yet to get a decent photo of one from our trip! It’s still not decent, but it’s better than nothing and makes for a good example to test just how far the software can go.
Processing
For each photo, I started with the original ORF raw file, edited in Lightroom. My goal, as always, is to re-create the photo as visualized in the field, using subtle adjustments of Exposure, White and Black Points, Highlights and Shadows, Contrast, White Balance and Tint. Adjustment Masks are applied as needed to shape the light; Lens Blur was applied to the Colobus Monkey photo.
Once the initial editing was complete, the ORF was exported from Lightroom, processed within ON1 and Topaz separately, then each was output as a DNG file to be added back into Lightroom where the same original edits were then copied from the original and applied.
Treatments
Within ON1 No Noise, I used both the No Noise AI and Tack Sharp AI modules together, beginning with the Defaults, then adjusting the ‘Enhance Detail’ as needed. Micro Sharpening was not applied beyond the default as it always appeared as too aggressive, making the results look ‘crunchy’.
In Topaz PhotoAI, Raw Denoise was used along with Sharpening using Motion Blur applied to the subject only. The mask was adjusted as needed to ensure only the subject was being sharpened. With the Oxpecker photo, I tried the Super Focus BETA with surprisingly good results. However, it took a couple of minutes to see the Preview results and another 10 minutes(!) to process the image. All processing was done on my M1 MacBook Pro with 16gb of ram. There must have been some seriously intensive number crunching going on as I was a bit surprised by how long it took. It felt like 20 years ago, when trying to send a photo over dial-up! But, I went on to do other things while it chugged along. Were the results worth it? We’ll see.
Results
In each case, I compared each treatment with the Lightroom base image, which had been run through Enhanced Noise Reduction and given appropriate sharpening, typically 80 with Masking set to 30. I’m pleased to say both ON1 and Topaz apps have the potential to achieve very good result when rescuing images from slight camera movement. Neither is good enough to rely on to perfectly correct mistakes, but when the mistakes are minor, they do a pretty good job. While I don’t think either quite matches up to the advertised improvements, both can make some recovery of IQ possible.
Colobus Monkey Of the three test images, this one came up with best results. In fact, the results are good enough for a full-size print 12×15” in size. It could even be up-sized to 16×20” with no loss of quality. However, of the three test images, this was also the largest in pixel size, the best exposed, and had the least amount of motion blur to begin with.
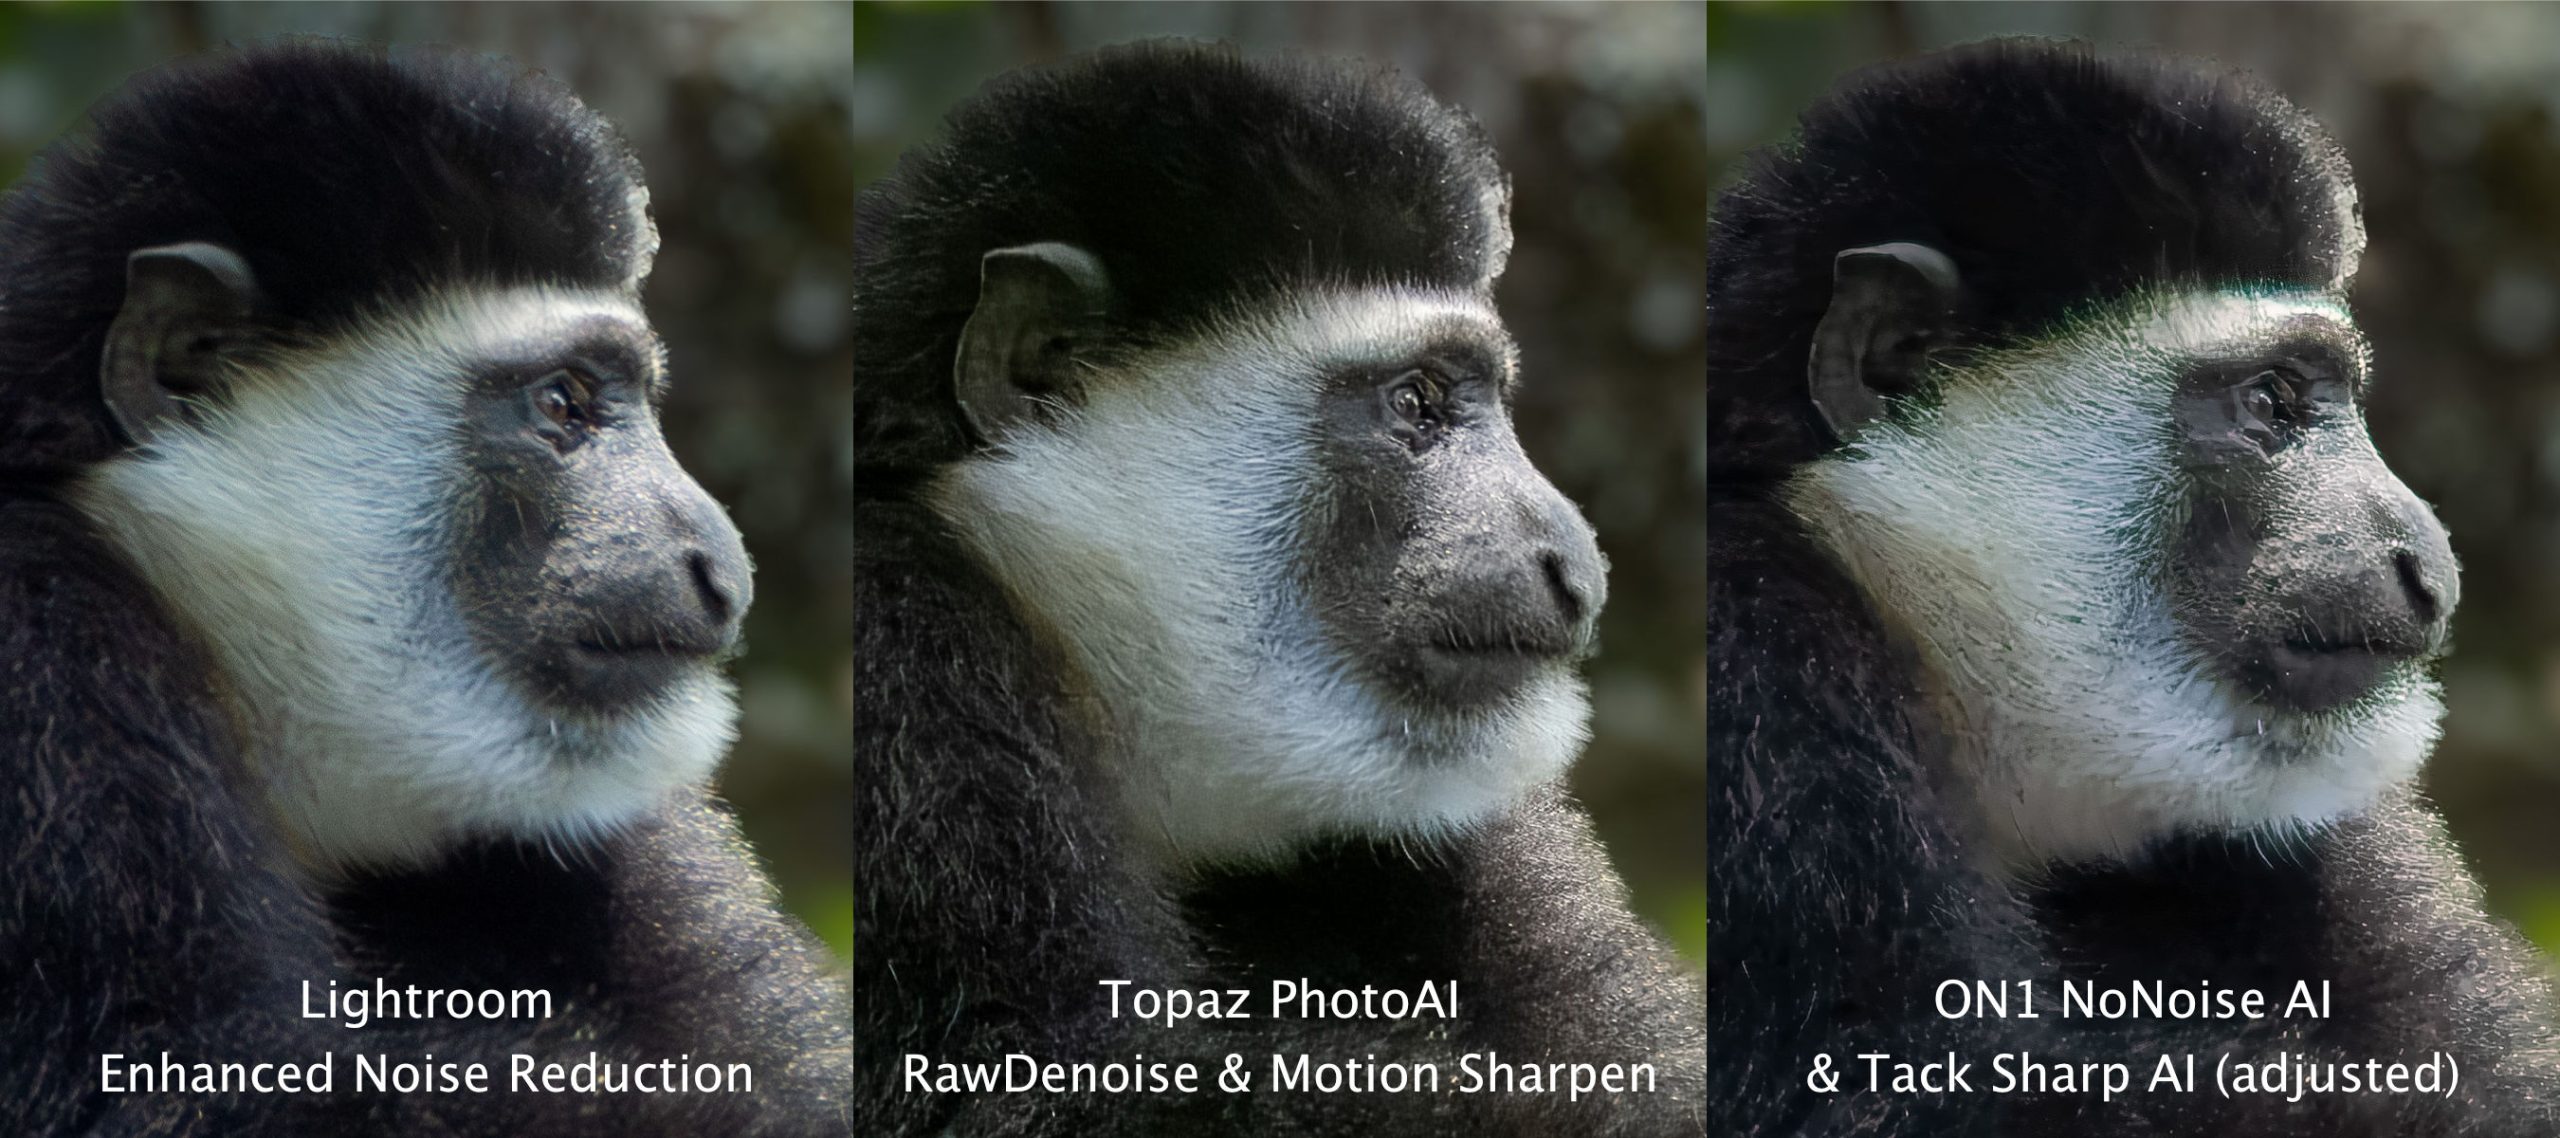
For proper viewing, click to open to view at full size (2700x1200px)
For proper viewing, click to open to view at full size (1800x1200px)
Overall, I prefer the Topaz results. To me, they appear cleaner, especially in the white cheek fur. The facial features also appear more natural. In the ON1 version, the facial features appear carved from wood or plasticine.
Baboons Grooming took a little more work. While the hair appears a bit coarse/crispy, the movement is mostly gone. Using the defaults produced an image with double fine hairs. By increasing both the ‘Strength’ and the ‘Minor Denoise’, this issue was partly solved, but not entirely. Back in Lightroom, I reduced Sharpening to ’0’ and I further reduced the crunchiness of the individual hairs by moving the Texture slider to -50, softening the coarse hairs into something more natural-looking.
I’m not completely happy with the ‘cheek fur’ as it looks a bit too soft and random. However, Topaz did the best job of sharpening up the area around the eyes of the closest baboon, which is the critical part of any wildlife photograph.
Oxpecker: Interesting results. I don’t think any of them adequately render the bird acceptably sharp for printing, but it could be used for ID purposes or a record shot posted online—not what I was hoping for, but then again, I didn’t give the apps much to work with.
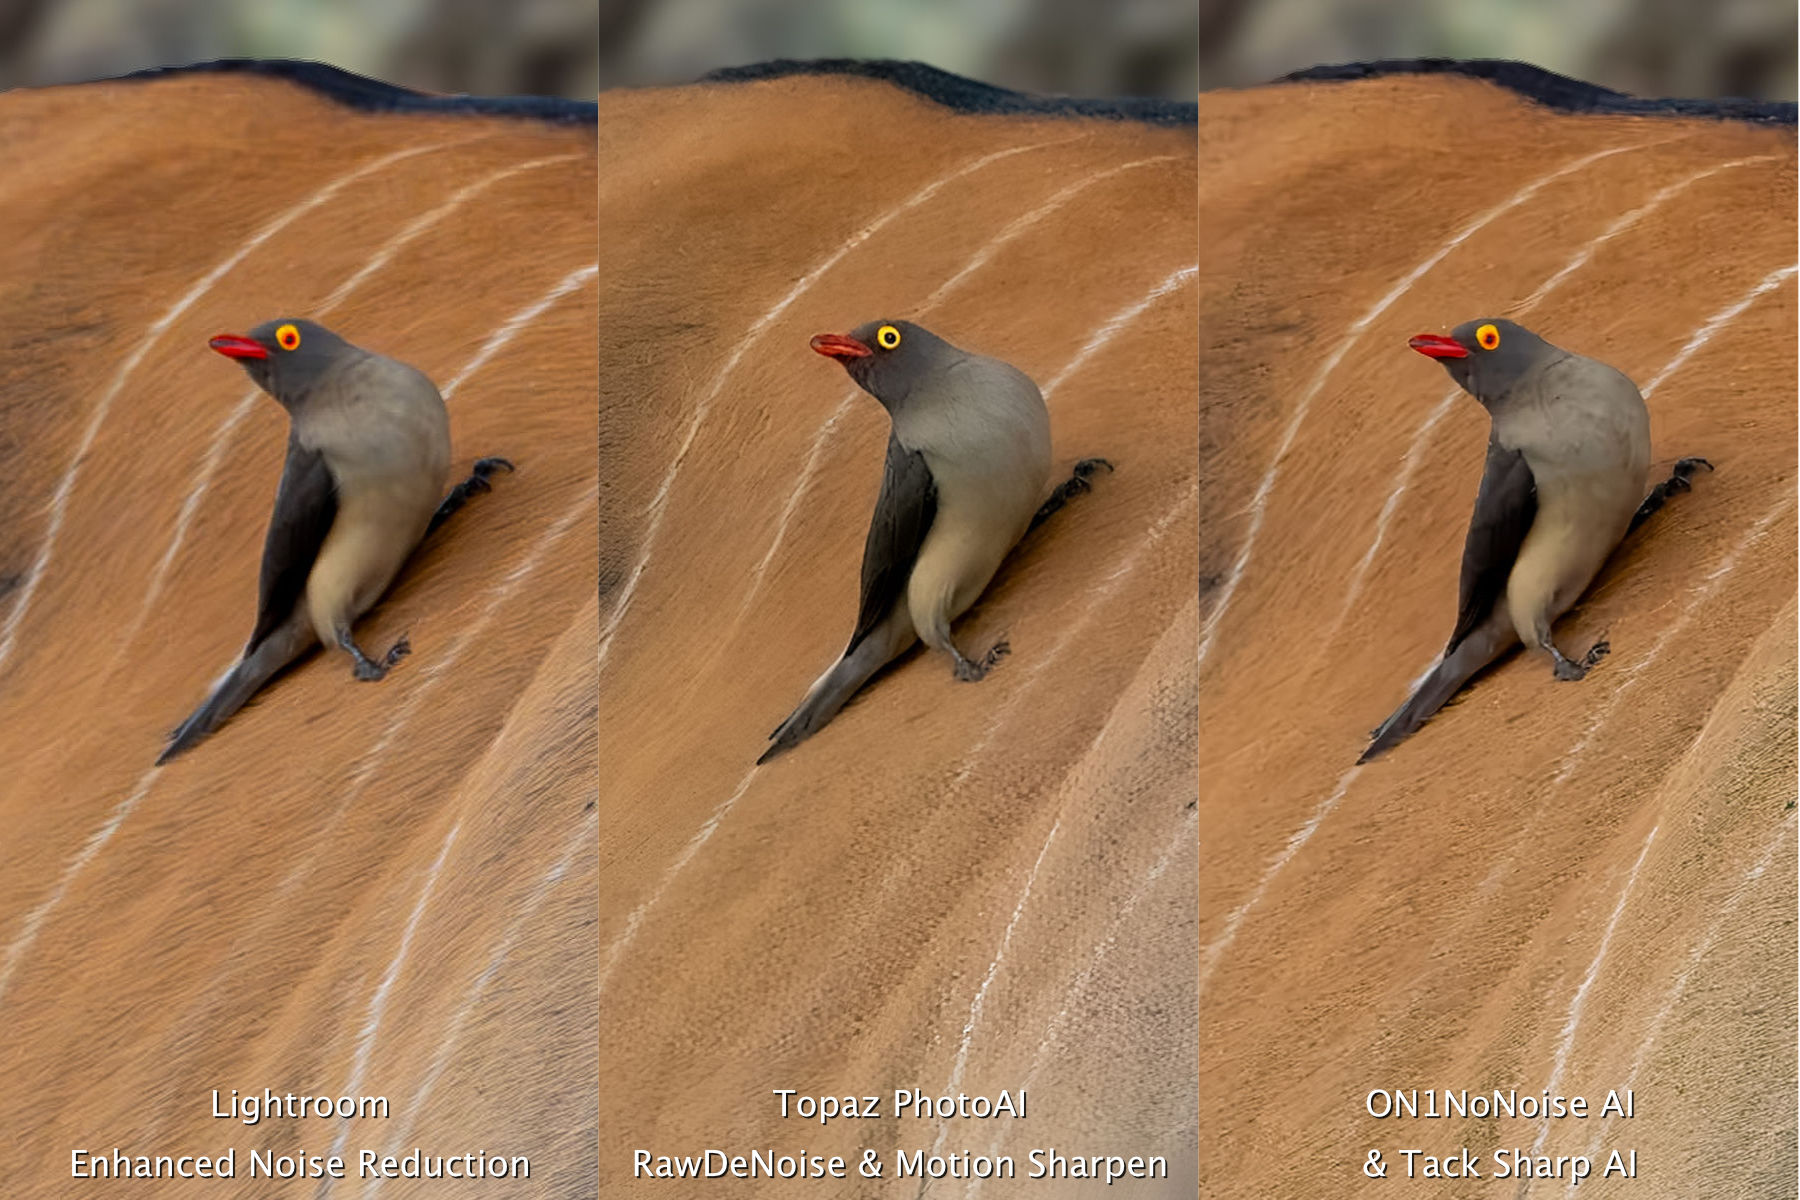
For proper viewing, click to open to view at full size (1800x1200px)
Initially, I used Topaz’s Super Focus BETA, setting the Focus Boost to ’Minor’ and the Sharpening Strength to ’Medium’, but that was too high. Unfortunately, setting it to ’Low’ meant another 10-minute wait for results. However, the wait was worth it, perhaps. While the results were not nearly as ’crunchy’ looking, they’re still not quite up to a visual quality I was hoping for. It introduced an un-natural pattern to the fur and the Oxpecker, without its red eye ring, is a fail.
The ON1 file processed much faster and, at first glance, has a slightly more natural appearance. It managed to retain the red eye ring which Topaz completely lost. However, while the fur on the eland may look more natural, the Oxpecker itself looks forced. The Topaz version, at least, managed to keep, or generate using AI, some feather detail. So Topaz wins for the Oxpecker and ON1 wins for the fur of the eland, though, even the out of focus fur on the Lightroom version looks more realistic.
Conclusions and Discussion
First of all, it’s important to do everything in your power not to fall into the trap of needing to correct for motion blur. Brace your arms or lean against a support; relax your breathing; gently press the shutter release at the ‘bottom’ of your breath; engage IBIS; open the lens aperture; increase the ISO; if you’re in a safari truck, ask everyone to be still—any or all of these help. While motion blur can be corrected, it is not ideal.
Secondly, do not expect much improvement from software correction. While this isn’t a definitive test, I have learned that very slight motion can be corrected to the point where full-sized prints at 300ppi are possible. But it also shows that the advertising is showing only best case scenarios.
It’s best to think of the improvements as a sliding scale of severity versus tolerance. The worse the motion blur is, the more tolerant you will need to be of how limiting the correction is. In more severe cases, such as the Oxpecker, the photo may only have limited use as a record shot. You can share an image like this online, but again, don’t expect to make large prints and be satisfied. It would work as a small image in a photo book, but it might be stretching it for a decent print any larger than 5×7.

As far as which app to buy to correct blur . . . ? My go-to has become Topaz PhotoAI. It did an excellent job with the Colobus monkey and the Baboons. But a case could be made for ON1 No Noise, given its results for the Oxpecker photo. Depending on how often you need to correct and the types of correction needed, it may be helpful to have both in your arsenal.
And please, if you are sharing a motion-corrected image, we, the viewing public, don’t need to know it is motion-corrected. If you highlight the fact, then some viewers will become determined to ‘find’ artefacts, even if there are none there. If you don’t tell them and someone notices or suspects, then be honest with them. Explain the situation, but don’t get dragged into long-winded apologies or explanations. It is what it is. We do our best with the situations we are presented with and the tools we have. You could even play it up a bit, using it as an opportunity to engage the viewer, describing how dim the lighting was and how difficult the capture was. 😊
The bottom line is don’t expect miracles! If you are able to correct motion blur using software—great. But don’t count on it. Also, be conscious of the fact that you may think the correction is fine, when really, to an objective viewer who has no skin in the game, it may not be. As with any rescue mission, you need to be honest with yourself.


Elevate Your Vision


Read this story and all the best stories on The Luminous Landscape
The author has made this story available to Luminous Landscape members only. Upgrade to get instant access to this story and other benefits available only to members.
Why choose us?
Luminous-Landscape is a membership site. Our website contains over 5300 articles on almost every topic, camera, lens and printer you can imagine. Our membership model is simple, just $2 a month ($24.00 USD a year). This $24 gains you access to a wealth of information including all our past and future video tutorials on such topics as Lightroom, Capture One, Printing, file management and dozens of interviews and travel videos.
- New Articles every few days
- All original content found nowhere else on the web
- No Pop Up Google Sense ads – Our advertisers are photo related
- Download/stream video to any device
- NEW videos monthly
- Top well-known photographer contributors
- Posts from industry leaders
- Speciality Photography Workshops
- Mobile device scalable
- Exclusive video interviews
- Special vendor offers for members
- Hands On Product reviews
- FREE – User Forum. One of the most read user forums on the internet
- Access to our community Buy and Sell pages; for members only.
You may also like