


AberrantBehavior
Photographers read about (and often fret about) all sorts of optical phenomena when lens shopping. One of these ischromatic aberration. It’s not often an issue, but it is seen occasionally. It is caused when a lens is unable to bring all colours to the same point of focus. The effect seen is colour fringing, usually most noticeable around brightly coloured objects, and usually seen with long focal length or very wide lenses. The red/magenta end of the spectrum is where its effect is most pronounced.
If you buy a lens that is really apochromatic (APO) the problem will have been well corrected. These lenses are expensive though, because to bring all colours to a common focus requires the use of fluorite or some other form of ultra-low dispersion glass.(Incidentally, just because a lens has the wordsAPOin its name doesn’t necessarily mean that it’s truly an apochromatic. The designation has been abused by quite a few manufacturers. Caveat Emptor.)
If you’ve read my review of thePentax 600mm f/4lens for thePentax 67you’ll know that while this very large telephoto lens is remarkable sharp and contrasty it does suffer from chromatic aberration. This is most noticeable when the lens is used at wide apertures, and it mostly disappears as the lens is stopped down. While not a show-stopper by any means, it can be a cause for concern with some subjects.

This photograph was taken to test the lens for chromatic aberration. It contains some very high contrast subject matter‚ perfect for showing the problem. It was taken with the aperture 2 stops down from wide-open, at f/8.
As you can see in theBeforeframe below there is red fringing visible. This isn’t a serious issue even in a 13X19" print, but it can easily be seen at "actual pixels" 100% resolution. (This 6X7cm frame was scanned with anImacon Photoscanner at 3,200 ppi.)
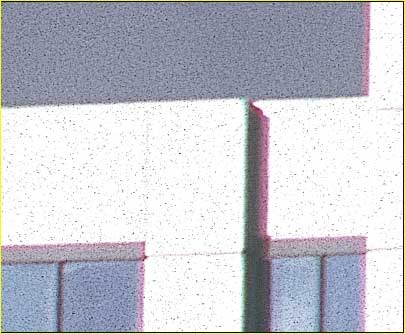
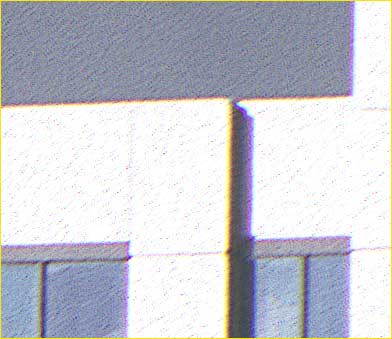
Before After
The area to look for the most important change is in theverticalsmearing, seen best at the junction of the white wall and blue sky near the top, and in the vertical shadow area beneath it. Also, please note that these views are at 100% (actual pixel) enlargement. At this size the print would be10 ft wideonscreen. At more normal print sizes the improvement in this image is considerable.
Enter‚Picture Window 3.1
I didn’t think that there was anything that could be done about this until my friendJonathan Sachs, the author and publisher ofPicture Window Pro(and also a Pentax 67 owner) mentioned that his program has a tool built in specifically for eliminating chromatic aberration.
Needless to say I quickly loaded it up and tested it. The result of just a few minutes work is seen with theAfterframe above. In a large print the red smearing that was visible before has now almost completely disappeared. Quite remarkable.
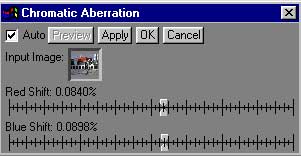
What the program does is as follows. The green channel (arbitrarily) is kept fixed, and as you move theRedandBluesliders you are expanding and contracting the radius of these channels to make all three the same size. The cause of chromatic aberration is that the lens isn’t able to focus all colours equally. The center of the lens will show no chromatic aberration, while it will be worst at the periphery of the frame.
Therefore choose an important and suitable spot that is toward the edge of the frame that shows fringing. Making the correction is done visually and dynamically in a preview window. When you have the sliders set to minimize the fringing effect you click OK. On a large file (175MB in the example above) it takes about 3 minutes on a 600Mhz Pentium 3 with 1GB of RAM to correct the file.
You’ll notice that the grain structure has been affected somewhat, though this isn’t really noticeable in a normal sized print. You should use this program on an unsharpened file that has been "spotted" first. The reason for this is that any artifact (such as dust) that isn’t part of the image produced by the lens will show colour fringing afterward.
The improvement is striking. Not perfect by any means, but a significant improvement. If you own a lens that displays chromatic aberration this program is a must. Incidentally, this routine truly shows the power of digital image processing. Nothing like this could ever be accomplished in the analog world.
Picture Window Pro 3.1(the version that includesChromatic Aberrationcorrection) is available for a free 30-day test download. If you decide to keep it the purchase price is $89.95. This is a very powerful image processing program and well worth the price for its numerous features. If you have a problem lens and need chromatic aberration correction then the choice is clear. Try a test download. You have nothing to lose.
Chromatic aberration is also seen in consumer level digital cameras.Phil AskeyatDigital Photography Reviewhas a small article describing how to reduce the effect usingPhotoshop. While not as effective as the routine inPicture Window, it can be useful if the problem is small and the results don’t require critical quality.
If you enjoyed this article, as well as the hundreds of other tutorials, features,
reviews and essays on this site, you can support its continued growth
and discover an exciting new photographic resource by …


Elevate Your Vision


Read this story and all the best stories on The Luminous Landscape
The author has made this story available to Luminous Landscape members only. Upgrade to get instant access to this story and other benefits available only to members.
Why choose us?
Luminous-Landscape is a membership site. Our website contains over 5300 articles on almost every topic, camera, lens and printer you can imagine. Our membership model is simple, just $2 a month ($24.00 USD a year). This $24 gains you access to a wealth of information including all our past and future video tutorials on such topics as Lightroom, Capture One, Printing, file management and dozens of interviews and travel videos.
- New Articles every few days
- All original content found nowhere else on the web
- No Pop Up Google Sense ads – Our advertisers are photo related
- Download/stream video to any device
- NEW videos monthly
- Top well-known photographer contributors
- Posts from industry leaders
- Speciality Photography Workshops
- Mobile device scalable
- Exclusive video interviews
- Special vendor offers for members
- Hands On Product reviews
- FREE – User Forum. One of the most read user forums on the internet
- Access to our community Buy and Sell pages; for members only.
You may also like


