


I have been an enthusiast for wide aspect ratio (panoramic) photography for many years. I have owned, used and shot with a range of cameras, including theHasselblad Xpan,Fuji 617, andNoblex 150UX. But with the advent of digital I slowly sold off most of my film cameras (I must say that I regret selling the Xpan the most). But my interest in wide aspect ratio images remains, and from time to time I’ve donestitchingwith Photoshop (the new stitching capability in CS3 is amazing) and with various stand-alone products.
But over the past year or two a couple of photographers attending my photographic expeditions have been using theSeitz Roundshot 28/220, and it captured my imagination.
The Roundshot require a bit of explanation. In fact the Roundshot requiresa lot of explanation.
Firstly, it’s a bit of a strange duck. The camera shoots 120 or 220 format film, yet uses a 35mm format lens. Though it can be ordered with a Nikon, Leica R or Contax lens mount, the only focal length that it can use is 28mm. The best possible lens to use with the Roundshot is the Nikon 28mm f/3.5 PC, yet its long been discontinued. Contax 35mm lenses have been discontinued as well for several years.
So what on earth is this camera about? The Roundshot is a rotating aperture camera, but unlike the Noblex, where the lens rotates, with the Seitz the entire camera rotates around the stationary handle with its built-in motor, battery and electronics package. And unlike other panoramic cameras which have fixed aspect ratios, 2:1. or 3: 1, for example, the Roundshot can shoot just about any aspect ratio and amount of coverage that you like, starting at 45 degrees and ranging right up to 360 degrees, and even beyond.
So, rather then mess with your mind any further here is an explanation of what the Seitz Roundshot 28/220 is all about.

Wheat and Sky. Palouse, Washington. June, 2007
Seitz Roundshot 28/220 with Provia 100
___________________________________________________________________________________
The Company & The Camera
Seitzis a small Swiss camera maker specializing in panoramic cameras. A visit to their web site will provide information on the film-based as well as digital models. (Incidentally, the6X17 digitalmodel announced to much excitement at Photokina in September 2006 has apparently gone back to the drawing boards, and is therefore still some months off. I have been promised a sample for testing though when it does become available).
The Roundshot 617 is the company’s most popular model, and one of the least expensive, though at about US $3,200 without lens it isn’t exactly cheap.(I purchased mine fromBadger Graphics, whom I found provided excellent service). Each camera is hand made, and made to order. In other words, don’t expect to find a dealer with one sitting on the shelf. You place your order with a local / national dealer and then some weeks later a camera with the lens mount and accessories of your choice is delivered. Given the time that the camera has been on the market, and my serial number, I’d judge production to be well under 100 cameras of this particular model per year.
The 28/220 is unlike any camera that you may have seen or used before. As mentioned, it uses a 35mm format lens but 120 or 220 format film. It is also about as small a medium format camera as you can imagine holding in your hand – barely taller than a spool of 120 film, and hardly wider than a 6X6 format frame. Yet, the camera is capable of producing a single image that can be up to the entire length of a roll of 120 or 220 film.
The way it does this is by rotating the body of the camera while at the same time pulling the film across a narrow slit though which the lens is projecting an image. Rotation is accomplished via a synchnous motor built into what looks like a pistol grip beneath the camera body. This is powered by a built-in NiMh battery which it is claimed can power the camera for about 100 rolls of film. I have not tested this, but clearly you can easily get a full day’s shooting (maybe even a busy week’s worth) from a single charge.
All camera controls (other than those on the lens) are electronic, and activated by four buttons on the grip, with user settings guided by a clear LCD display.
___________________________________________________________________________________
Build Quality
Like most photographers, I like well made camera gear. Though the quality of materials used and the fit and finish may not necessarily translate into superior image quality, they usually tell us something about the company and its gestalt. In the case of Seitz and the Roundshot 28/220 I can honestly say that I have never seen a better made product. Materials used as well as the way in which they are put together is of mil-spec, which means that it looks to have been made as if money was no object.
Indeed, the camera appears as if it could survive reentry from orbit, or ground zero of a nuclear explosion. I hardly exaggerate. Cameras like those from Leica and Linhof are jewels, but the 28/220 is like a jewel embedded in a polished black steel casing. Beauty and brawn. The only company that I know that makes cameras of comparable quality is another Swiss company,Alpa.

Yellow Crane – Hamilton Ontario. June 2007
Seitz Roundshot 28/220 with Provia 100
___________________________________________________________________________________
A Matter of Degree
The aspect of the Roundshot 28/220 that’s the hardest to get ones head around (pardon the pun) is that of aspect ratio and angle of coverage. The user can set the camera via its control buttons and LCD panel to any number of increments of 45 degree coverage. So in other words, if you set the camera to 45 degrees you get a frame that is about 28mm wide. If you set the camera to 90 degrees the frame will be about 56 mm wide. For 180 degree coverage the frame will be about 130mm wide.
And of course because this is a 28mm lens on 120 format film the angle of coverage is very wide, essentially 90 degrees vertically.
Here’s another way of looking at it. Shoot one frame and you have 90 degrees vertical and 45 degrees horizontal coverage and a frame that looks like 645 format. Set the camera for 90 degrees and you have a square 6X6 format image. Set it to 180 degrees, and you have…… (you get the idea). So, essentially you have a variable format wide angle medium format camera which allows you to set the angle of coverage, and therefore the aspect ratio, as you wish.
The only fly in the ointment, so to speak, is that this variability comes at the expense of some slight image overlap. What happens is that there is no fixed spacing between frames as there is with a fixed format camera where the film can be advanced just slightly beyond the end of the last frame, creating a gap between frames. This would be annoying, except that there is another small issue. That is, that the motor takes a small amount of time to get up to speed at the beginning of the frame and a little while to slow down at the end. So at the beginning and end of each image, regardless of the width and aspect ratio you set there will be a couple of millimeters where the exposure is off. This area overlaps from the preceding frame. In other words the trailing end of one frame overlaps the leading edge of the next. This is part of the reason that there is no gap between frames.
The first time that you see this it’s a bit disconcerting, but ultimately is of little consequence. The only real effect is that though you may set the camera to 180 degrees, for example, producing a 90 X 180 degree frame, which measures roughly 60 X 120mm, both the angle and coverage and the actual size will be somewhat reduced due to this overlap issue.
For this reason, though it tends to waste a bit of film, I like to set the Roundshot to shoot one 45 degree segment wider than I actually expect I want. This means that there will be nofade inorfade outnear a part of the frame that I want, not any potentially destructive overlap.
___________________________________________________________________________________
Loading and Setting Up
The 28/220 is loaded with film by unscrewing a knob on the top panel. This cause the entire combined top and rear panel to remove, and provides easy access to the film spools and pressure plate. Film loading as as easy as any roll film camera I’ve ever used.
The LCD allows you to choose either 120 or 220 film, and then with the cover replaced simply press the release button. The head will spin rapidly until the film is wound into position. The LCD also displays the number of 45 degree images that can be shot on the remaining film ( 35 on a roll of 220 film). It’s up to the user to determine how many actual shots this might be by calculating how many such increments are in each shot taken (4 in a 180 degree image), and then dividing this into the number shown. So, for example, if the display indicates 16 segments remaining one can shoot four 180 degree images, or one 360 degree shot.
___________________________________________________________________________________
Shutter Speed Settings
Shutter speeds can be set from as fast as 1/500 sec to as slow as 8 seconds. These settings are done in two ranges, from 1 second to 1/500 sec, and from 1/60th to 8 seconds. The ranges are set by flipping a switch inside the lens house, which means having to remove the lens to accomplish. This is just about the only minor annoyance with the ergonomics of the camera.
Be aware though that long exposures are really long exposures because they mean that each part of the film is receiving the exposure in turn. This is only problematic if you’re in a hurry or shooting in changing light conditions. The sun could set by the time you’ve completed an 8 second exposure 180 degree panorama.
___________________________________________________________________________________
Slow Shutter Speeds and Tripods
During my initial testing I was concerned and disappointed. Many of my shots appeared unsharp. A little sleuthing turned up the reason – too light a tripod. I had gone shooting in the woods, hiking with a light weight tripod. The ground was soft and springy, and the combination during some lengthy low light exposures was enough to cause unsharp results. My recommendation is that one use the most massive tripod possible, even though the camera itself isn’t that bulky. Once I switched to a larger tripod results improved dramatically.
___________________________________________________________________________________
Viewfinders
The Roundshot 28/220 does not have a viewfinder. Zero. Nada. Zip. Frankly, how could it with an angle of view that varies, and extends from 45 degrees to 360 degrees and beyond? There is an accessory finder of sorts that is simply an open frame with target line that allows you to judge the vertical angle of view. In other words – where is the top and bottom of frame? It rotates manually in a proprietary mounting shoe so that one can peer though it, top and bottom, to see what’s included.
I ordered one, but frankly found it to be useless. Its awkward to use and not terribly accurate. The camera’s vertical angle of view is 90 degrees so it isn’t that difficult to judge the coverage visually. But it occurred to me that a 15mm lens on a 35mm format camera also has a 90 degrees vertical angle of view, and so I have adopted the use of aVoigtlander 15mm finder, which I fortunately already owned.
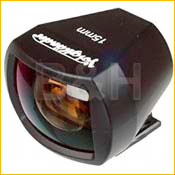
This does the job nicely, and isn’t too bad for judging horizontal angle of view as well, as long as one recognizes that how one sets the 28/220 can make the coverage considerably less or more than what is seen through the viewfinder. The only downside is that the camera doesn’t have a standard accessory shoe fitting, and so the 15mm viewfinder needs to be hand held. I put mine on a lanyard around my neck.
___________________________________________________________________________________
Lenses
As mentioned above, the 28/220 Seitz can only use a 28mm focal length lens. When you order the camera you choose the brand lens mount, either Nikon, Leica or Contax. Any of the 28mm lenses in these lines will work in terms of optical alignment, and most will cover the vertical frame format when stopped down to f/11 or f/16. There are only two lenses which will provide comfortable vertical coverage at wider apertures and the ability to have rise or fall movements.These are the Nikon 28mm f/3.5 PC lens and Schneider 28 PC Super Angulon. The Schneider is available in both Nikon and Contax mounts (as well as others).
The reason why a 35mm format lens can cover 120/220 format film is that the 28/220 camera only exposes a thin vertical slit that is centered on the optical axis of the lens. Since the image circle is tall enough at the center, there is little vignetting, and none when the lens is stopped down a bit, which increases its coverage capabilities.
It should be noted that by only using the center of the lens the Roundshot is taking advantage of the lens’ sweet spot, and thus even the corners of the frame are receiving the lens’ highest possible resolution and contrast. No more fuzzy corners, no matter how wide the shot!
The advantage of having the ability to do rise and fall by using the Nikon or Schneider PC lens is that the Roundshot needs to be absolutely horizontal, or else nasty-looking bending of horizontal lines takes place. This usually places the horizon smack in the middle of the frame, and so being able to rise or fall the lens means being able to have a more dynamic and pleasing composition without having to tilt the camera.
The bad news is that the Nikon 35mm f/3.5 PC lens has been discontinued, and if you want to put together a system that includes this particular lens you’re going to have to find a used one. It’s also not inexpensive. New they cost about $1,750. I was fortunate to find a referbed Nikon factory demo via Ebay for under $1,000. The Schneider is available from a few speciality dealers as special order for close to $2,000.
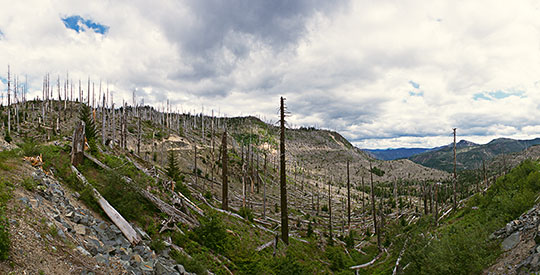
Mount St. Helens. Washington. June 2007
Seitz Roundshot 28/220 with Provia 100
___________________________________________________________________________________
Scanning
First, a little background. In 1995 I bought my first scanner, aNikon Coolscan 1000. This was the scanner that was my entree to the world of digital imaging. Over the next couple of years I tested and used a number of scanners, including theAgfa Duoscan,Polaroid 4000,Nikon 8000ED, and finally in 1999 theImacon Flextight Photo. I also had drum scans made from time to time, and did extensive comparisons between drum scans and various "affordable" scanners. My testing showed that while well made drum scans were slightly better than those from the Imacon, the differences were quite small. Given the cost of having drum scans made (around $100 each for really good ones), and the vast superiority of the Imacons over any other scanners on the market, the purchase decision was a no-brainer.
When I bought the Imacon (for $10,000 at the time) I thought that this would be the last scanner I’d ever buy. I was both right and wrong. It wasn’t more than a year later that I started shooting with digital cameras, and eventually, after stopping shooting film almost completely, I sold the Imacon for $5,000.
I sold it not so much because I didn’t need a scanner any more. I do from time to time as I still have some film cameras, and use them. But mainly because theImacon Photowas a SCSII device, and my computers were no longer able to support SCSII. I looked at and tried various SCSII to Firewire adaptors, but none were reliable.
Once I started using the Roundshot in 2007 I found that my scanning needs were increasing again. I have been using Epson flatbed scanners for my non-critical work (currently theEpson V750 Pro), and doing Imacon scans at one or another of the local do-it-yourself rental labs when needed.
Looking at the current state of the art in scanners what I found was that in dedicated film scanners the only players now left are Hasselblad, Nikon and Microtek. Epson appears to be the leader (especially in terms of price) in flatbed scanners with film scanning capability, and that’s about it.
Imacon is no more, having amalgamated with Hasselblad, and that company now only sells two very high-end scanners, the X1 and X5, at some $16,000 and $20,000 respectively. But I was fortunate in being able able to find aHasselbladFlextight 343scanner for $3,995 from Calumet. (It appears, alas, that Calumet has now sold the last of the US inventory of this scanner). A search of the web and some phone calls failed to turn up any remaining stock anywhere else.)
The 343 is essentially the same scanner as theImacon Photowhich I owned and sold some years ago, except that it has a Firewire interface and comes with updated software. At this price I didn’t hesitate, since in essence I was getting the equivalent of myImacon Photoback, but for a thousand dollars less that I had sold it for several years ago because of the SCSII limitation.
The 343’s strength for scanning long pieces of 120 format film lies in its film holders. Unless one uses glass holders with anti-Newton glass and / or fluid mounting, getting a long strip of floppy 120/220 film to lay perfectly flat is really difficult. This is one of the reason’s that drum scans are so highly regarded. Yes, they offer high resolution and high Dmax, but by being fluid mounted and taped to a drum they are always in perfect focus.
The magnetic flexible holders of the Imacons provides perfect flatness, even for a piece of film 180mm long, and their lack of the need for fluid mounting and taping, with the messy clean up afterwards, is most welcome. The bottom line is that my previous experience with an Imacon Photo and now with the Imacon 343 shows me that they have the quality of maybe 95% of that from a well-made drum scan, and are head and shoulders better than scans from any other dedicated film or flat bed scanners.
I should add though that for the money, the Epson V750 scanner offers very good value.Photo-ihas a recentin-depth review. I would suggest though that anyone considering an Epson scanner look at the holders fromBetterscanning, as the ones from Epson leave a lot to be desired.
A Word or Two About Scanning Resolution
Though film scanning is being done less and less these days as the photographic world continues its inexorable march toward digital hegemony, wherever scanning is discussed the topic of scanning resolution comes up. Since there are scanners that can scan at optical resolutions as high as 6000 ppi or even 8000 ppi, there are those that feel that this is what they should do to get the utmost image quality.
Well, I beg to differ. First of all, there’s the practical matter of file size. When scanning a 35mm transparency, if one uses a scanning resolution of 4000 ppi or higher file size is still manageable; maybe 200 MB. But a 3200 ppi scan of a piece of 6X12 film comes in at some 350 MB in 16 bit mode, and this is starting to strain even computers with 2GB of RAM, when opened in Photoshop, especially when any layer work is done. Layered files in the 1.5GB range are extremely awkward to deal with.
Scanning large medium format or 4X5 format files at resolutions higher than this is even more problematic. I know of no desktop computer, even an 8 core Mac Pro with 4GB RAM that is going to be happy dealing with a 2GB file.
Fortunately, scanning at much above 4000 ppi isn’t really necessary. It’s pretty well accepted by most experienced workers in this area that film simply doesn’t contain more than 3,000 – 4,000 ppi worth of real information. Maybe the finest grained films with the best lenses shot under optimum conditions can command a 4000+ ppi scan, but frankly, I’ve never produced one, no matter how hard I’ve tried.
This is why most professional-grade film scanners over the past 15 years or so top out at between 3200 and 4000 PPI real optical resolution. More scanning resolution simply isn’t needed, as all one is essentially doing above 4000 ppi is magnifying grain particles. If one truly needs a larger file than up-ressing in Photoshop after the fact will do much the same thing.
Yes, I know that Epson claims that their new V750 scanner can do 6000 PPI optical, and some drum scanners can go as high as 9000 ppi. Try it. Compare these files in real world print to scans done at 3000 ppi. I’ll bet dollars to donuts (remember that wonderful phrase?) that you won’t be able to see much difference, except in terms of absolute magnification.
The reason for this long digression about scanning is that unless you are going to be making prints in the chemical darkroom (a 5X7" or 8X10" enlarger would be needed), then you’ll be scanning. And once you’ve spent some $4 – $5,000 on camera and lens, it’s foolish to compromise on final print quality by scanning with an inferior scanner.
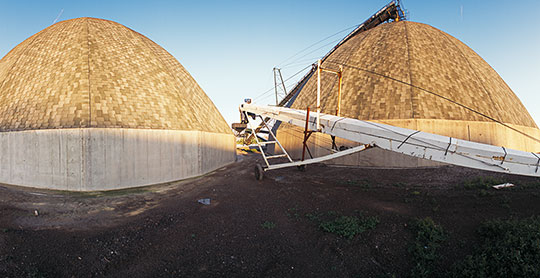
Cones. Hamilton, Ontario. June, 2007
Seitz Roundshot 28/220 with Provia 100
___________________________________________________________________________________
The Bottom Line
The Roundshot 28/220 is on odd duck. It likely isn’t that appropriate a camera for most photographers. Indeed it may not be the right camera for all except a handful of specialists, and I’m not even sure that I’m one.
Firstly, there’s the cost. Though compared to some digital camera the camera is not outrageously priced, and compared to medium format digital it’s a bargain. By the time you add a lens it will set you back the better part of $5,000. Then, unless you already have an appropriate scanner, there’s that cost, or the ongoing costs of Imacon rentals or custom drum scans. And, speaking of ongoing costs, at about $1 / frame film isn’t cheap. If you’ve been shooting digital for the past few years you’ll be shocked at the cost of medium format film and processing. Finally, there’s the hassle of getting film processed, when you can find a lab that is still in existence and doing decent work. (BTW –Colorgenicsin Toronto is in that category).
From a shooting perspective the Roundshot is a hard beast to tame. Wide aspect ratio photography is challenging, but ultra-wide angle wide-format is even more so. Imagine shooting stitched panos with a 15mm lens, and you’ll get some idea of the problem. There simply aren’t that many subjects that lend themselves to this sort of treatment. But, when they do the results can be exciting, and for this reason I will continue to persevere with the Roundshot. A year from now I’ll either have produced some decent work with it, or it’ll show up on Ebay. Time will tell.
July, 2007
___________________________________________________________________________________


Elevate Your Vision


Read this story and all the best stories on The Luminous Landscape
The author has made this story available to Luminous Landscape members only. Upgrade to get instant access to this story and other benefits available only to members.
Why choose us?
Luminous-Landscape is a membership site. Our website contains over 5300 articles on almost every topic, camera, lens and printer you can imagine. Our membership model is simple, just $2 a month ($24.00 USD a year). This $24 gains you access to a wealth of information including all our past and future video tutorials on such topics as Lightroom, Capture One, Printing, file management and dozens of interviews and travel videos.
- New Articles every few days
- All original content found nowhere else on the web
- No Pop Up Google Sense ads – Our advertisers are photo related
- Download/stream video to any device
- NEW videos monthly
- Top well-known photographer contributors
- Posts from industry leaders
- Speciality Photography Workshops
- Mobile device scalable
- Exclusive video interviews
- Special vendor offers for members
- Hands On Product reviews
- FREE – User Forum. One of the most read user forums on the internet
- Access to our community Buy and Sell pages; for members only.
You may also like


