Soft Proofing
Photoshop 6.0
Photoshop 6.0, which was introduced in late 2000, has been one of the most important advances since Photoshop 4.0 was introduced a number of years ago. Among the most interesting and beneficial new features, and of particular interest to photographers using inkjet printers, isSoft Proofing. If you haven’t yet done the upgrade to version 6.0 this feature alone should be motivation enough.
Soft Proofing
Simply put this is the ability to view on-screen what your photograph’s colours will look like when printed on a particular printer and even on a particular type of paper. The onlygottchais that your monitor has to be properly calibrated and your printer has to have a customICC/ICMprofile. If you are not familiar with these topics a good place to start is my article onSystem Calibration.
Assuming that your monitor has been calibrated and is giving you an accurate representation of your work, and also assuming that you are using a printer that has anICC/ICMprofile‚ such as one of theEpson Photoseries of printers‚ the rest is easy. Note though that you can use the suppliedEpsonprofiles only if you have aMacsystem. You can only use this approach with aWindows-basedsystem if you are using a custom profile for your specific printer and paper.(Seebelowfor availability of custom profiles for certain Epson printers if you’re a Windows user.)
Set up
The set up is simple and straightforward. The first thing to do is go toView / Proof Setup / Custom.
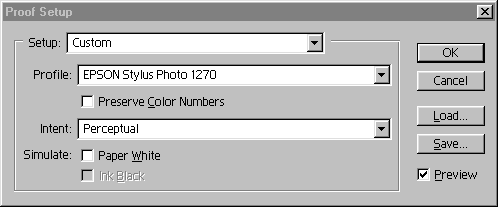
Using theProfiledrop-down find and select the profile for your printer. If you have anEpsonprinter the profile will have automatically been added when you installed the printer. If you have created a custom profile with a profiling package select the specific profile for the paper/ink combination that you want to use.
Turn offPreserve Color Number,and only turn onSimulate Paper Whiteif you have created a custom profile for a specific paper. If you have an image onscreen while you do this you’ll be able to see the effect by clicking thePreviewbox on and off. Intent should be left atPerceptual.
Finally, click onSaveand name this particular setting.
In Use
Now, whenever you want to do a soft proof simply select the profile that you want to use withView / Proof Setup, and then pressCTRL-Yto switch back and forth at any time between your monitor’s profile and the one that your printer will be using. The file name line at the very top of the page reminds you whether you’re looking at a soft-proof or not.
Custom Epson Profiles
If you do not have the ability to create custom printer profiles you can obtain several for theEpson 1270and2000PfromIan Lyons’excellent web site‚Digital Darkroom, atEpson 1270 Media Profilesand Epson 2000P Media Profiles.


Elevate Your Vision


Read this story and all the best stories on The Luminous Landscape
The author has made this story available to Luminous Landscape members only. Upgrade to get instant access to this story and other benefits available only to members.
Why choose us?
Luminous-Landscape is a membership site. Our website contains over 5300 articles on almost every topic, camera, lens and printer you can imagine. Our membership model is simple, just $2 a month ($24.00 USD a year). This $24 gains you access to a wealth of information including all our past and future video tutorials on such topics as Lightroom, Capture One, Printing, file management and dozens of interviews and travel videos.
- New Articles every few days
- All original content found nowhere else on the web
- No Pop Up Google Sense ads – Our advertisers are photo related
- Download/stream video to any device
- NEW videos monthly
- Top well-known photographer contributors
- Posts from industry leaders
- Speciality Photography Workshops
- Mobile device scalable
- Exclusive video interviews
- Special vendor offers for members
- Hands On Product reviews
- FREE – User Forum. One of the most read user forums on the internet
- Access to our community Buy and Sell pages; for members only.
You may also like