By: Amadou Diallo
Introduction
At this year’s PMA show ErgoSoft announcedStudioPrint 10, a RIP (Raster Image Processor) the company hopes will set a new benchmark for fine art b/w printmaking. While fully compatible with an ICC compliant color workflow, driving inkjet devices in their native CMYK mode, it is through unprecedented support of quadtone inksets that ErgoSoft seeks to distinguish their product from competing RIPs. This review is devoted exclusively to the quadtone printing and production capabilities of StudioPrint, which is now shipping.
Quadtone Printing: Then and Now
It was 3 years ago that Cone Editions launched Piezography™, an ink and software solution which made quadtone printing a reality for Epson inkjet owners. Piezography in one fell swoop removed the major obstacles to fine art digital b/w printing: poor image permanence, color casts, visible dots, and limited tonal range.
Instead of trying to force cyan, magenta, and yellow inks to blend into a neutral gray, this system introduced a black ink and three densities of gray. Its print driver allocated these inks over a range of 0 (paper white) to 100% (ink black) with smooth tonal transitions and dithering that was dotless to the naked eye. The carbon pigment composition of these new inks also made strides towards greater print longevity than was possible with more commonly used dye-based inks.
Print quality, while outstanding, came at a cost to users as the inks produced frequent clogging, density shifts, and prematurely wore out printheads. In addition, both the consumer and pro versions of the software were based on an in-house profiling system. End users were completely dependent on a single company for even canned ink/printer/paper profiles. This at a time when many paper manufacturers began introducing new media to the market.
In light of these shortcomings, 2002 saw some exciting developments. Cone Editions released PiezoTones, a newly formulated inkset available in four different hues, which exhibited impressive performance and longevity qualities. And for the first time an outside developer, Colorbyte Software, released a RIP supporting quadtone inks. The product, ImagePrint 5.0, further attracted users through Colorbyte’s offer of custom profiling for those printing on unsupported media. ImagePrint’s flexible layout features were well beyond what was previously available. But while producing high-quality prints in an out-of-the-box solution, a growing number of users have come to feel limited by a per-printer licensing program and the proprietary quadtone profiling engine which utilizes only profiles built by Colorbyte themselves.
A New Player
Enter StudioPrint 10 from ErgoSoft, a Swiss based company with a US subsidiary. This PC only RIP promises full featured page layout, support for quadtone inksets, control of individual ink positions, and end user profiling when used with any of the more popular spectrophotometers or colorimeters. All at an attractive price point where a single license is authorized to drive as many printers as you can access through a particular workstation.
Equipment notes:I’m using StudioPrint version 10.01 on a 1.2Ghz Celeron laptop running Windows XP and printing to an Epson 9000 and 7500 with both Warm Neutral and Selenium PiezoTone inks. To calibrate the printers I am using the newly released Eye-One Photo spectrophotometer.
Installation
StudioPrint arrived with an install CD, bound manual and USB dongle. Installation was straightforward: connect the dongle, turn on the computer, insert the CD and follow onscreen prompts. When launching StudioPrint for the first time a dialog appears asking for a valid license code.
Print Environment
Once licensed, you must create a “print environment”. This is a collection of print settings identifying the driver, dithering method, density adjustment, and ink ordering among other things. In short, it holds all the information needed to print to a specific printer with a specific inkset, on a specific paper. You create as many print environments as you have printer/ink/paper combinations.
With so many settings to configure, a helpful feature lets you base new print environments on previous ones you’ve created. For example, on my 7500 I’m using 2 different inksets (more about this later) on 4 different papers. That’s eight separate print environments. But since each of these is referring to the same printer, on the same port, with the same dithering and resolutions, I only need to enter this information once. For each successive print environment I simply base it on a previous one and only make the few necessary changes. A huge time saver.
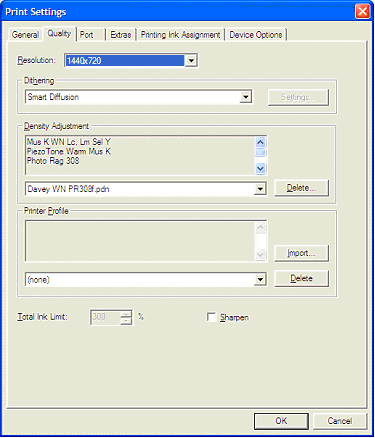
The print settings dialog’s numerous tabs allow you to define your print environment.
Calibration
After naming a print environment you can begin the process of calibration by printing out a density target. This target, a series of square patches (choose 10, 20, 40, or any value you wish) prints from 0 to 100% black in evenly divided input values. When printed, these patches will ramp up very quickly to 100% black, showing the printer in it’s pre-linearized state. Once the ink is dry and you’re ready to measure, a target measurement window automatically pulls in readings from the Eye-One in real time as it passes over each patch. The resulting values are displayed both numerically and as a density curve. StudioPrint’s calibration engine uses this data to map input values to measured output. In essence saying, “when this printer receives an input value of x, it prints out a density of y. Without delving into color management minutiae, this is the crux of characterizing a device. And when it’s known precisely how a device responds, it’s possible to make it behave in a predictable way.
Now that measurements are calculated you have the option of setting an ink limit at the point where increasing the amount of ink fails to increase density—eliminating unnecessary ink usage and improving device stability. For the most precise calibration possible you will then print a new target which takes into account your measurements. A final calibration, or density adjustment as StudioPrint calls it, is then built based on this second target. Redundant? Not quite. The first set of measurements broadly defines your printer’s linearization characteristics. The second set of patch readings allows for an even more precise division of the values from 0 to 100%. So if you want to see shadow separation between 98% and 100%, this is time well spent.
This density adjustment is technically not a profile and therefore not ICC compliant, so you cannot call it up under the soft proof menu in Photoshop. But there’s an alternative. During the calibration process you select a dot gain adjustment curve anywhere from 0-40 to apply to your measurement data.
Now for a little color management minutiae. On printing presses, ink dots spread in size (hence the term dot gain) once they hit the paper. This has the effect of making dots physically closer than they were intended. And as dots get closer we see darker colors. The earliest solution to this problem was to take the amount of dot gain into account when editing images. So what gets sent to the printer is a bit light, with the understanding it will darken up on press. Now what does this have to do with modern inkjets using ever smaller nozzles to fire onto coated paper which excels in holding dots in place? Well, the idea of dot gain has been around for so long that monitors are tuned to compensate for it. They do this through gamma settings. A gamma curve is a monitor’s default way of simulating dot gain in the non-linear fashion in which our eyesight operates. OK, class dismissed.
The upshot is that my monitor, when calibrated to a gamma of 2.2 (monitor gamma, not PS working space) matches very closely a 20% dot gain. By setting a dot gain adjustment of 20 in StudioPrint, I’m able to get prints which are very close to what I see on my monitor. Your mileage may vary, but if it does, simply select a higher or lower adjustment that reflects your screen display. It’s important to understand that this dot gain adjustment is applied inside the RIP and does not alter the pixel values of your image. It is simply mapping them to output densities which better match your monitor. You can select a different dot gain adjustment for each print environment you create. And changing this amount on a pre-existing print environment is as simple as typing in a different value. It is not necessary to re-calibrate.
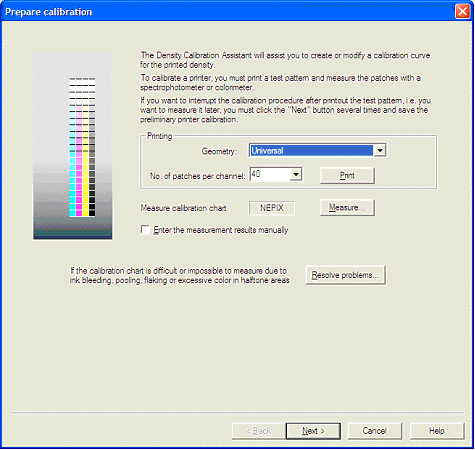
The first screen in the calibration process lets you specify the number of patches to be printed, It also generates a random name for each target, which is very helpful when you find yourself wading through multiple target strips.
Customizing
StudioPrint is for those who love choices. There is very little about the way this RIP drives your printer that you cannot change. Do you want stochastic or smart diffusion dithering? A micro dot or normal dot? And perhaps most exciting for those using quadtone inks in a six ink printer, there is an ink reordering feature. In my 7500 I have the following PiezoTone inks installed:
1. K-Museum black
2. C-Selenium
3. M-Selenium
4. Lc-Warm Neutral
5. Lm-Warm Neutral
6. Y-Selenium
I have one print environment using all selenium, printing from heads 1, 2, 3, and 6. A second print environment uses warm neutral in the 3/4 and mid-tones, printing from heads 1, 4, 5, and 6. This is but one option. You could load all three PiezoTone blacks and switch between them with a common set of grays. Even if you loaded the stock duplicate positions in the Lc and Lm heads, you could have emergency backup if your C or M head went bad. Simply turn it off and use the corresponding light position instead. And hey, for you 7600 owners; with your 7 print heads, how about loading 2 complete inksets sharing a common black? This is a remarkable evolution, of special interest to those who’ve been using 2 (or more) separate printers to achieve similar results.
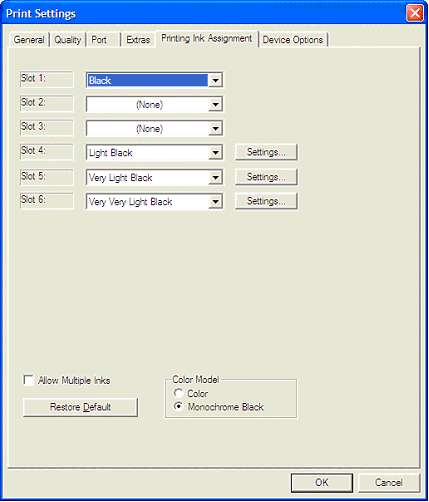
This ink assignment prints from heads 1,4,5, and 6 on my 7500.
Page Layout
StudioPrint presents an application window with 2 rows of icons and pull down menus, allowing access to most settings without going up to the File and edit menus. All jobs open as document windows with a live image area and rulers which can be toggled on and off. Mildly frustrating is that there are no preset or saveable sheet sizes. You have to type in the dimensions whenever you print to a different sized sheet. One convenience is that when loading a sheet the width of the printer (i.e. 24 inches in a 7500) you can select “maximum” as a width. There is no button to select a roll. When you’re using one, type in “0” for paper length.
Images can be moved around by dragging with the mouse or typing in coordinates. Simply holding the cursor over an image displays filename, file size, width, height, even area. There is no center function, but StudioPrint has built in margins of 1/8 inch on all sides, so you don’t need a Ph.D. to determine margin offsets. Right clicking on an image gives easy access to many commands such as rotate, set crop marks, and duplicate. At any point a layout can be saved for future use. StudioPrint will even search through local directories if a file has been moved since the job was last opened. StudioPrint cannot read native Photoshop or 16 bit files. Other common formats such as tiffs (8 bit), jpegs and pdfs are supported.
A most welcome feature is the ability to set crop marks on a per image basis. Within a single layout, you can set one image with 2 inch crop marks, one with crop marks at the image edge, and one without any at all. You also have the option of selecting description fields to print outside the image area. Presets include date, filename, print environment, and dithering method. You can even add your own text in a desired typeface and then save this choice as a preset for repeated use. Considering the staggering array of options available, the page layout interface is easy to navigate. Certainly users migrating from other RIPs will have little trouble finding their way around.
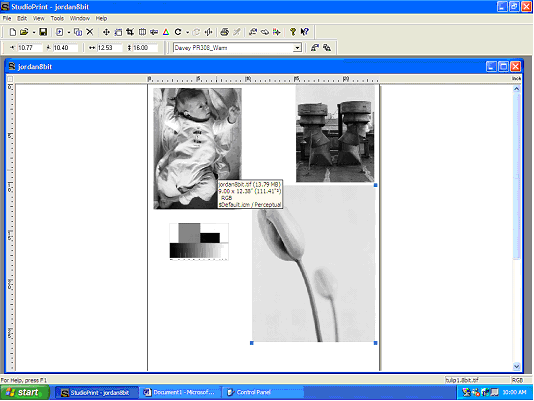
A clean interface provides easy access to features. A pop up window shows brief details of each image.
Image Resolution
There is nothing in the manual regarding optimal ppi, or whether StudioPrint upsamples or downsamples to hit a desired resolution, but I’ve found that skin tones in particular start to fall apart below 360ppi. Fractional resolutions such as 467.35ppi are also to be avoided as they frequently result in corrupted layout previews. Images with resolutions as high as 1000ppi print without problem.
Printing
Printing itself couldn’t be much simpler—that is if you can resist all the choices you have in front of you. The print dialog shows your current print environment. From here you can switch to another one, or temporarily change any of your print environment settings for just this print job. These changes do not get saved, so your print environment will return unaltered the next time you call it up. Once the job starts printing a handy progress bar gives you both elapsed and remaining print times. As the Epsons are notoriously slow, this lets you plan for either a coffee run or dinner and a movie. Users with multiple printers can set up a print queue. This enables jobs to spool much faster, freeing up the layout application. You can then quickly send a job to another printer and have both machines running at the same time.
Print quality is absolutely stunning. Sky areas and skin tones print without posterization. I can see tonal separation between paper white and 2% ink laydown and between 98% and maximum black. Step wedges show a smooth transition of tones through the entire range.
I recently installed a studio show here consisting of 20 prints, all made with StudioPrint. Image sizes ranged from 3×2 up to 25×36. A frequent comment from visitors (including other photographers) was “I didn’t know digital could look like this.”
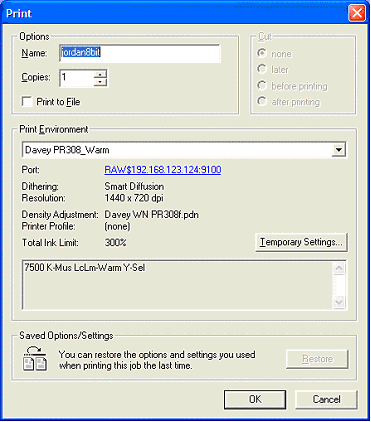
The print dialog allows for confirmation and adjustments of output settings.
Tech Support
The fact that I was even able to print this show; software arrived on a Friday, the show was printed by the following Thursday is testament to a phenomenal level of tech support from ErgoSoft. Peter Supry, VP of Technical Services, made himself available by phone 7 days a week, talked me through the calibration process and quickly resolved minor issues. The manual itself is very thorough and only occasionally belies its roots as a translation from the original German.
ErgoSoft US is a small subsidiary of committed individuals, and certainly as they attract more users, it will be a challenge to maintain such stellar support. Evaluation licenses are available. These are fully functional copies of StudioPrint—printing without watermarks—that will run for about 7 days. A great opportunity to kick the tires, although for any meaningful comparisons it helps to own a spectrophotometer or similar device so you can calibrate your printer.
Conclusion
End user control seems to have been the mantra of ErgoSoft’s programmers. Virtually every nook and cranny of this powerful RIP’s feature set is open to user input. Quadtone printmakers now have unprecedented control over their printers’ behavior combined with the production gains offered by professional layout features. The output is among some of the finest printing I’ve ever done, darkroom or digital.
All of this control obviously comes at the expense of your time. This is not a RIP where you’ll be making prints 10 minutes after unwrapping the box. A spectrophotometer now becomes a required addition to your toolbox and making calibrations requires waiting at least a few hours for ink drydown before taking measurements. But if your goal is high-quality repeatable output and control over every performance enhancing aspect of your printer, no other solution on the market comes close to StudioPrint. In the interest of a fair and balanced review I’ve tried to come up with a list of shortcomings. Lack of paper size presets, no Mac OS support…umm, well that’s it. I suppose it could do my laundry and balance the federal budget deficit…well maybe in v10.5
Spec Sheet
Product: StudioPrint
Version: 10
Company: ErgoSoft
System Requirements: Windows 95, 98, ME, 2000, NT, XP
Supported Printers (partial): Epson 3000/5000/7000/9000/10000 series, Roland HiFi series, Mimaki JV series, Mutoh RJ series
Supported (raster) file types: tiff, bmp, pdf, jpg
Supported File Modes: RGB, CMYK, Grayscale
Supported Spectrophotometers (partial): X-Rite: DTP series, Gretag Macbeth: SpectroScan, Spectrolino, Eye One
Dongle type: USB
Licensing: per workstation
List Price: $1300 for 24 inch and smaller printers; $2300 for >24 inch printers. Street price is lower.
Available: in both the U.S. and Europe; for US sales contact Damon Rando, ErgoSoft US: drando@mac.com 919.467.4863 or Jim Robbins, AllSquare Computer Technologies: Actjimrobbins@aol.com 888.286.8801
Author’s Bio
Amadou Diallois an award-winning fine art photographer working primarily in the medium of large format black and white. He owns and operates adigital print making studioin New York City. He is recognized byCone Editions Pressas aCertified Piezography Printerand is a founding member of theDigital Printmakers Guild(DPG), an association of print studios dedicated to advancing the art of museum quality digital printmaking. He offersworkshopstailored specifically to b/w digital imaging.
You May Also Enjoy...
DxO Analyzer Explained
Introduction and Results Tutorial __________________________________________________ This tutorial is based on a pre-release version of DxO Analyzer. Therefore, test methodologies may be altered prior to commercial
Panasonic GX1 First Impressions
Before I begin my report on the new Panasonic GX1, please allow me a brief digression. We now have the Canon 1D X , Samsung
