


Zabriskie Point, Death Valley National Park
by Alain Briot
The difference in “seeing” between the eye and the lens should make it obvious that a photographer
who merely points his camera at an appealing subject and expects to get an appealing picture
in return, may be headed for a disappointment.
Andreas Feininger
1 – Introduction
I am often asked by students and photographers what should be done to a photograph to make itmatch what we saw. This is an important question because it addresses the differences between what we see and what the camera captures. It addresses the difference between our visual apparatus – our eyes and brain – and the camera’s image-capture apparatus – the lens, filters, camera, film or sensor- apparatus (from now on referred to as “the camera”). The differences between the two are not only notable, they are also damaging to the reality we see because the camera introduces numerous changes to this reality.
In order to create an image that matches what we saw, we not only have to become aware of what this damage is, we also need to learn how we can fix this damage. Only then will we be able to create an image that not only “matches what we saw” but also expresses how we felt when we took the photograph. Only then will we be able to create an image that represents what our eyes and brain saw and not just what the camera captured, an image which is not only a factual record of what was in front of the camera, but also a visual expression of our emotional response to the scene we photographed.
______________________________________________________________________
2 – Two different categories of differences
The differences between what we see and what the camera captures fit into two different categories: art and science. These two categories are described in myArt & Scienceessay, Part 2 of myReflections on Photography and Artseries.
In this essay we will see what the differences in each category consists of, starting with the science category that encompasses all things technical about photography and continuing with the artistic category that encompasses all things related to our emotions, our inspiration and our personal style. As I move along from one area to the next, I will point out solutions that can be used to fix what we will soon see are defects in the way cameras record reality. As I point out these solutions, I will only do so “in passing” and make no effort to delve into a detailed technical explanation of how these solutions can be implemented. In doing so I will follow my premise that this is an essay on the differences between what we see and what the camera captures, and not an essay on the workflow needed to fix these differences. If you are interested in learning how to transform a Raw file or scan into a fine art print I have created a DVD titledThe Printing Mastery Workshop on DVDwhose goal is to teach exactly that, by following my 28 steps process.
As I often say, rule number 1: one step at a time. Rule number 2: before we can fix the problem we first have to define the problem. This essay is aimed at following rules number 1 and 2 by going step by step in defining the problem that preoccupies us today.
______________________________________________________________________
3 – On to technical issues in regard to what cameras capture that the eye never sees
The camera does not see the way we do. I address what the general differences between the two are in mySeeingessay, Part 1 of myAesthetics & Photographyseries. In this new essay I want to focus on differences that I did not detail in mySeeingessay. These differences are found when a close inspection of a photograph is conducted and when the result of this inspection is compared to a close inspection of what we see with our eyes. The differences between the two are numerous and I will try to list as many as I can here, in no particular order:
A – Contrast and dynamic range
The dynamic range represents the amount of contrast a given capture device can record. Film and digital sensors are able to record a fixed range of contrast. This range varies from film to film and sensor-to-sensor, or rather analog to digital converter (A/D converter) since in a digital camera it is the converter that controls dynamic range. Even a 16-bit A/D converter can only capture a dynamic range of 16 stops at the very maximum. However, most Digital Single Lens Reflex cameras as of Fall 2006 use a 10 to 14-bit A/D converter, which translates into a dynamic range of 10 to 14 stops. Even then this dynamic range is limited by noise levels, meaning that shadow areas in the image where detail was captured may exhibit so much digital noise as to be visually unattractive and best rendered as pure black.
Sensors are far better than film when it comes to dynamic range, being able to capture a much wider dynamic range than film, on average. However, this pales in comparison to the human eye which is not only able to see details in a scene containing a contrast range of nearly 24 stops, but also able to instantly change its contrast-perception ability in order to see, alternatively, details in highlights and in shadow areas without the conscious awareness that we are doing so. In other words, the human eye-brain apparatus is not limited to a fixed dynamic range, but instead can adapt to whatever the light situation calls for. If you doubt this statement, or find yourself calculating the exact difference in dynamic range between sensor “x” and the human eye, pause for a second and ask yourself if you ever heard someone say, “I cannot see this landscape because it exceeds the maximum dynamic range that my eyes can capture.” Indeed, you haven’t. You haven’t because humans do not see the world like cameras see it when it comes to contrast.
The fact is that our eyes are far superior to the best films or digital sensors currently available. It is this superiority that, in part, causes us to be disappointed when we see the results of our efforts at capturing what we see with a camera.
Resolving this contrast issue means creating an image whose contrast is closer, or similar, to what we saw. This means either reducing or increasing the contrast of the photograph to make it match what we saw. In some instances, such as with photographs where large areas of shade and sunlight are present in the same image, it means both increasing and decreasing the contrast of the scene, again to match the way our eyes adjust to seeing shadowed and directly-lit areas. Our eyes see these two areas differently – reducing and increasing contrast alternatively – and the photograph of such a scene needs to be altered in a manner that reproduces this approach.
B- Lenses: wide angle distortion
Lenses are one of the main causes of differences between what we see and what the camera captures. This is a large area, so let’s start with the distortions introduced by wide angle lenses. This is an arbitrary place to start, but start we must, so we may as well cover this first.
Lenses can be classified in 3 categories: wide, normal and telephoto (see myChoosing the Best Lensesessay in theAesthetics & Photographyseries and in my new bookMastering Landscape Photography). While normal and telephoto lenses create little or no distortion, wide angle lenses are famous for distorting what nature created. To some extent photographers desire this distortion. After all, this is why we use wide angle lenses: to see more than what our eyes see, which in turns means distorting reality as we see it with our eyes. But some of these distortions are unwanted, such as a curved horizon, the stretching of elements located in the corners of the image, or trees and buildings that are tilted up or down.
Some photographers like to keep some of these “effects” for artistic purposes. I personally see them as unwanted defects and my goal is to remove them as completely as possible. To me, they stand as a reminder that the photograph is a distant reproduction of the scene that I saw. To me, they stand as an obstacle, a “filter” of sorts, placed between the viewer and the photograph, constantly reminding the viewer that this is an image, a pale reproduction of reality afflicted by the technical limitations of the photographic medium. What I want is for the photograph to be as close as possible to the scene that I saw. Anything that reminds me, and my audience, that this is a photograph is something I want to remove, fix or otherwise get rid of.
Removing lens distortions can be done in two ways. First, I recommend you get the finest lenses you can get, lenses as free of distortions as possible. This is, essentially, first a matter of finding out which lenses are the best for your camera system, and second a matter of being able to afford them since top-quality lenses also fetch top-quality prices. As always, you get what you pay for.
The second way to remove lens distortions is through software. The first step is the raw converter, and for this task DxO stands alone. DxO, currently at version 4.0 (Fall 2006) is the only Raw converter that doubles-up as lens correction software. Using calibration data targeted to each specific lens, f-stop, focusing distance and camera-body combination, DxO calculates the distortion imparted by these variables and proceeds to remove them. The result is a new image, an image different from the one captured by the camera in regards to the geometry of the image. Depending on the kind of distortions introduced by the lens-camera combination, after processing in DxO the horizon may be leveled, elements in the corners may be “unstretched”, and buildings or trees may be straightened out. The result is nothing short of a visual miracle and demonstrates the ever-increasing presence that digital technology – software in this instance – has on the final outcome of our photographic efforts.
Photoshop, in its latest implementation, CS2, also offers tools to remove a certain amount of lens distortion through theLens Distortion filter. To some extent this filter is useful, but because the image has already been converted, the filter is acting on the photograph one step later than DxO, resulting in a correction that, in my opinion, is less thorough.
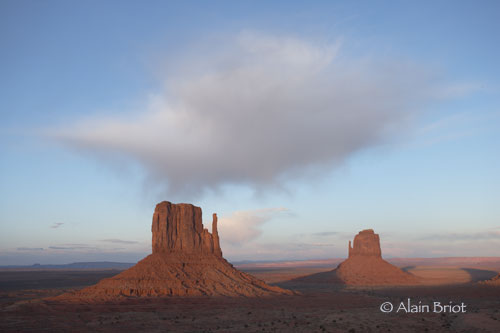
Monument Valley Cloud. Original Raw conversion.
This is the photograph as it emerged from the Raw converter. Compare it to the final version below.
>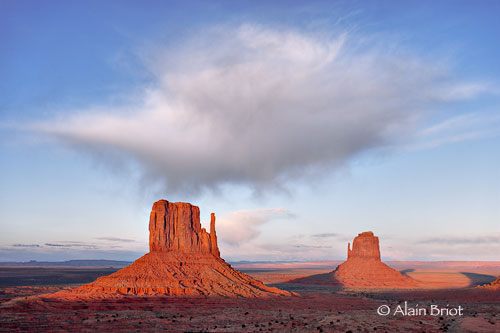
Monument Valley Cloud, final version
This is the same file as above, but after two days of work optimizing the image file.
Because my vision for this image was dependent on the impact of the cloud over the monuments, a lot of time was spent on that part of the image.
However, every other aspect of the image was optimized as well.
When comparing thebefore and afterversions, as I like to call them, I find it difficult to believe that I am looking at the same photograph.
______________________________________________________________________
C- Lenses: Vignetting
Distortion is but one of the many possible problems introduced by lenses. In this regard not all lenses are created equal. Some lenses are nearly free of problems while others are plagued by a multitude of technical issues.
Let us now look at a plethora of such problems, again, in no particular order, and without any claim that these affect all lenses, or are present in lenses at the same time.
The world, when we frame it into either a rectangular, panoramic or square composition, does not suddenly get darker at the corners of our composition. Instead, the world continues to be the same tone as it is in the center of the image, or along the image borders, or anywhere else in the framed composition for that matter.
Yet, in a photograph, and of course depending on which lens you use, the corners of the image are sometimes darker than the rest of the image. This is called vignetting, and it is caused by a variety of factors including lenses that vignette naturally, filters added to the front of a lens and obscure the corners of the image, lenses not adapted to the film or sensor format, objects obstructing the corners of the image, lenses used without their dedicated center filter, use of a non-dedicated center filter, and more.
At any rate, and without delving any deeper into technical considerations, the fact is that some lenses, especially wide angle lenses, unnaturally darken the image corners and that this darkening is not something that we naturally, through our eyes only, witness in nature. Rather, this is a purely photographic effect, which to me is a defect unless I chose to darken the corners purposefully. As a result, this defect – for it is a defect – has to be removed from the image if our goal – and such is my goal – is to create an image that reflects as precisely as possible what I saw and experienced when I created the image.
One way to do this is to use the Lens Correction filter in Photoshop CS 2. A second way is to dodge the corners of the image. A third is to create an adjustment curve with a layer mask restricting the density adjustment to the corners of the image.
D-Lenses: Chromatic aberration
Another defect introduced by lenses is halos. This defect reveals itself through the presence of colored outlines along the edges of objects. These lines are frequently found when a sharp edge separates two objects with a significant difference in color, contrast or both. For example, the area where the top of a mountain meets the sky, or where a canyon wall is superimposed onto an area of a different color, are often prone to halos.
As with vignetting, we do not see this effect when we look at the real world. In other words, a red/cyan fringe does not follow the shape of a snowy mountain peak where it meets the sky. Nor does a blue/yellow fringe follow the shape of a sandstone formation standing in front of a shadowed area. Halos are not phenomena found in nature. Halos are a defect introduced by the lens-camera combination, a defect that has to be removed during raw conversion, using the Chromatic Aberration slider available in several raw converters, or in Photoshop, using the aforementionedLens Correctionfilter or by hand using the clone tool in color mode.
E-Color changes
Lenses, film and digital sensors all introduce changes in the color we perceive in the real world. These changes vary from lens to lens, film to film and sensor to sensor. To some extent, these changes can be reduced, or eliminated, through the use of light-balancing filters, when using film, or careful color adjustments, when using digital cameras or scanned film.
Furthermore, lenses, films and sensors also change the color contrast of the scene. In fact, specific brands of lenses are desired by specific photographers for the unique color and contrast they impart to the landscape. These subtle color and contrast changes become part of the personal style of specific photographers.
Similarly, films are frequently sold on the basis of their unique color and contrast qualities, so much so that certain films have become the trademark not only of specific photographers, but also of entire generations of photographers. Films have built-in contrast and colorfulness boosters, as well as highlight compression, to make pictures look more pleasing and to give each film a unique look. Kodak Ektachrome, characterized by its ability to reproduce blue tones, was widely used by landscape photographers from the 60’s to the mid-80s. Kodak Kodachrome, characterized by its warm tone and it’s ability to reproduce reds, was the film of choice (read the film they had to use) of photographers working for National Geographic. Fuji Velvia, characterized by high contrast, high color saturation and the ability to reproduce warm tones and greens, became the film of choice of an entire generation of landscape photographers starting in the late 80’s and continuing until today. So much so that, by the time digital imaging came of age in the late 1990’s, the majority of landscape photographers had switched from using Ektachrome to using Velvia.
Here too, as we saw before, the world does not change color to our eyes when we replace the film in our camera, change lenses, or use a different sensor. The colors of the world are fixed at any given time. Certainly, they change throughout the day as well as according to the weather and the seasons. But at any specific time they are fixed. In short, the colors of the world are what they are. And what they are is fixed at any given time. Yet, to different films, different lenses and different sensors, the colors of the world are not fixed. To films, lenses and sensors, these colors are not what they are. Instead, these colors are what each film, each lens and each sensor sees them as, records them as, and, in fact,modifiesthem. This modification is the problem, for it results in a significant difference between what we see and what the camera captures.
The changes introduced by film were set in stone, so to speak, because relatively little could be done to make significant changes to the contrast and color of a specific film during printing. Certainly, some changes could be made, but they required that expert knowledge and equipment far beyond the reach of the average photographer be used. The same holds true for the colorcasts introduced by lenses, for which the only solution was filtering either during image capture or during printing.
F-The Raw Conversion Transformation
Things are vastly different now that photographs can be captured in digital format and that processing can be done digitally. For one, the image captured by a digital camera is not really an image. If shooting in Raw format, which is the format used by most fine art photographers because it results in the highest quality image a given sensor can deliver, the camera captures Raw data in a single channel file. This Raw data needs to be converted into a specific color space in order to create a photograph. This is done through the use of a Raw converter. The goal of the Raw converter is both technical and artistic. On the technical side the Raw converter is responsible for converting the color gamut and dynamic range of the scene photographed into the color space chosen by the photographer. On the artistic side the Raw converter offers the opportunity for the artist to modify the conversion settings to match his original vision for the photograph.
The term conversion is, to me, somewhat of an understatement. I much prefer to use the term “transformation.” Let me explain.
Raw conversion is such an important transformation that technical terms are used to describe thebefore and afteraspects of this process. The before, meaning the Raw file captured by the digital camera, is called theScene-Referredimage. The after, meaning the photograph created after raw conversion, is called theOutput-Referredimage. The reasoning behind these two terms is simple. The raw file refers to the scene photographed while the converted photograph refers to the color space, and indirectly to the color device – either a monitor, a printer or the web — where this photograph is going to be displayed or printed. The Output-Referred image also contains the adjustments made by the photographer in order to make the converted image match his personal vision.
While the Scene-Referred image contains only what the camera saw and recorded, the Output-Referred image contains what the camera recorded plus the dynamic and color gamut changes that occurred when the image was converted to the chosen color space, plus the aesthetic choices made by the photographer during raw conversion.
With digital photography, just about any color can be changed to whatever the photographer’s heart desires. Similarly, contrast range – the difference between the lightest and the darkest tones of a photograph – is no longer solely controlled by the film or sensor used. Rather, it is controlled by the photographer’s vision since not only do digital sensors (or rather A/D converters) offer a density range larger than film, as we previously saw, but digital images can also be exposed separately for shadows and highlights then combined into a single image in Photoshop using a range of options such as layered files with layer masks, or image combinations plug-ins such as Fred Miranda’sPhotoMerge,or Photoshop CS 2Merge to HDR, or a number of stand-alone applications such asPhotomatixand others.
The fact that, through digital capture and processing, the photographer has nearly complete control over color and contrast is something that radically changes how we approach the color and contrast changes introduced by films, lenses and digital sensors. Instead of seeing these changes as ineluctable, we now have it in our control to modify these changes so that the resulting image, the final print, matches what we saw rather than what the camera captured. Rather than being limited by what the film could capture and the lab could process and print, we are now limited by our imagination, our inspiration and our vision for the image. In this new world, it is frequent that the photographer, and not the equipment, is the limiting factor.
This is, in my estimate, is one of the most profound changes introduced by digital photography. Prior to that, choosing a specific film, camera and lens meant also choosing a specific color range, color contrast and image contrast for the photograph. Today, choosing a specific film, lens or digital sensor, is only a point of departure, a decision far more neutral (if there can be such a thing in photography) than it was in the days of film-photography. So much so that, among photographers who continue to use film, Velvia, with its high color and scene contrast, has been dislodged as the film of choice and replaced by Provia and even Sensia, because these other films are far less contrasty and far less color saturated than Velvia. The logic behind this change is that contrast and color saturation can be easily increased in Photoshop, and that starting from a more neutral and softer image, in terms of color and contrast, gives the photographer more latitude for change than starting from an over-saturated and over-contrasty original.
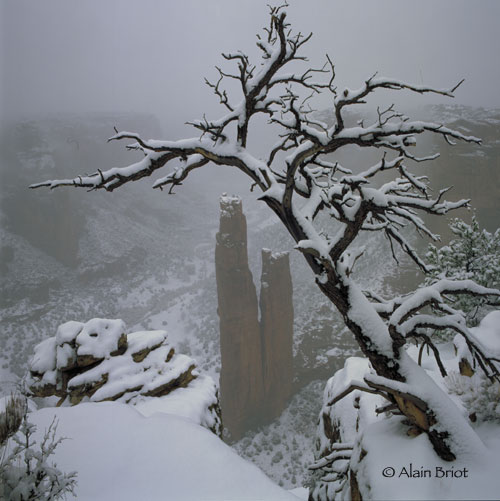
Spiderock in Snowstorm, original scan
This is the original film-scan forSpiderock in Snowstorm.
Just like with raw conversions, I prefer to create a scan that has a full tonal range and later make color and contrast corrections in Photoshop.
In this instance the problems that plagued this image included grey snow, an overall greenish cast, excessive contrast, lack of brilliance, inappropriate format, and more.
The work I did on the image was aimed at recreating the scene that I saw and felt and to which the camera did a number, fortunately one that was repairable.
It is amazing how much can be done to restore an image that at first seems hopelessly lost,
as long as your memories of the original scene are intact and your technical abilities are up to the task at hand.
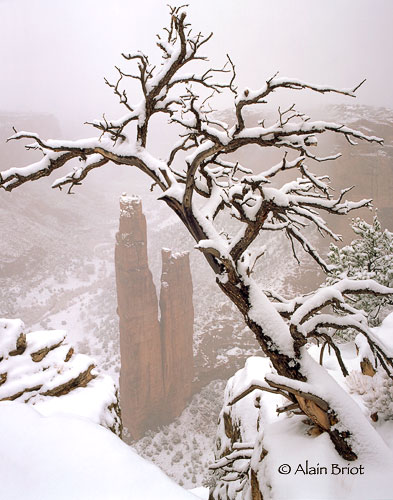
Spiderock in Snowstorm, Final Version
This isSpiderock in Snowstormas it appears in my Navajoland Portfolio.
As withMonument Valley Cloud,compare it to the image of the original scan to study the changes made to the photograph.
Do keep in mind, as with all reproductions in print, on the web or in PDF files, that the actual print has a quality of color, tone,
contrast and brilliance, not to talk about texture, that is simply and purely lost in reproductions.
F-Film Grain and Sensor Noise
When we look at the natural world we do not see a fine pattern composed of little dots of irregular size and of various colors superimposed all over the landscape. Yet, when we record the world in a photograph, and depending on the film, sensor and ISO setting we use as well as on how much light is available, we do get such a pattern superimposed over the landscape. To this can be added lines in shadow areas on scans or on digitally captured images whenever the light level is too low for the capture device to record a continuous-tone image.
In a way, noise and film grain may be some of the easiest defects to remove. The use of fine grain film or the use of a low ISO setting on your digital camera, or again exposing to the right of your histogram to maximize the quantity of information captured by the digital sensor will take care of the matter. The logic for exposing to the right is based on the fact that digital data increases logarithmically. As a result, an image that receives more exposure during capture will have more digital data than an image that receives less exposure during capture. This is true until the image exceeds the limit of the sensor’s density range, limit that is represented by the extreme right side of the histogram. The resulting overexposure is easily adjusted back to normal during Raw conversion (See my essayDetermining the Best Exposurein my new book and on this site for a more complete description of this process).
G-Color shifts
I mentioned colorcasts previously. However, color shifts are a problem different from colorcasts. Color shifts are introduced by certain digital sensors and manifest themselves on photographs as a magenta or green cast in specific areas of the image. They are most often encountered with digital backs used on a view camera when shifts (and to a lesser extent tilts) are used. These colorcasts have to be removed with a curve and a layer mask either during or after raw conversion.
Here too, and as you are getting accustomed to I believe, we do not see the world with a magenta cast in the right or left side of our field of view when we shift our head right or left, nor do we see a green cast in the lower or upper area of our field of view when we tilt our head forward or backward. Clearly, and leaving all tongue-in-cheek statements aside, the world is radically altered by the camera, to the point that this altering has to be removed so that a believable reality can be presented to the audience.
H-Out of focus, unsharp and blurred images
When we look at the world with our eyes, the world is sharp everywhere. We do not see areas that are in-focus and areas that are out of focus. Everywhere we look, things are in focus, provided we have good vision or wear the proper corrective glasses. Similarly, we do not see areas that are unsharp, blurred, or slightly fuzzy.
Things are quite different with a photograph because a camera can only focus on a single plane and relies on depth of field, controlled by the lens’ aperture, to create sharpness throughout the image. Similarly, the camera is affected by slow shutter speeds, or focusing issues, both of which can adversely affect the sharpness of the image.
Our eyes do not have to contend with depth of field, slow shutter speeds, or focusing issues the way a camera does. Again, you may be tempted to argue that human vision isn’t as perfect as I make it appear in the paragraph above and you may be equally tempted to argue that depth of field is also present in human vision. Maybe. But think about it this way: have you ever met someone, or have you yourself, said that you couldn’t see things sharply because the light level was too low for your eyes to use a fast enough shutter speed? Or that your vision was blurred because you couldn’t hold your head steady while looking at far away objects? Or that again you could not set the proper pupil aperture to see things sharp? Clearly, the camera sees very differently than the way we do, and while there are similarities, comparing these similarities to the way cameras operate is trying to turn people into cameras, the exact opposite of what we are trying to achieve here.
______________________________________________________________________
4 – On to Artistic issues in regard to what cameras capture that the eye never sees
A camera is a machine, a mechanical recording device. No matter how much we would like to believe it has a soul (and I am the first one to hope that it would) the truth is that it does not. Certainly, a carefully constructed camera – hand made, or of limited production for example – has an ineffable quality that a mass-produced digicam will never have. But a soul – the ability to feel and impart emotions to the images it captures? Sorry, this is not to be. Not in our lifetime.
The soul part of photography, the ability to impart emotions in our images, is not within the domain of abilities of the camera. Instead, it is ours to take responsibility for. It is our domain, our responsibility, ourburdenif we so choose to perceive this part as difficult (I don’t) or ourblessingif we choose to perceive this part as a pleasure (I do).
To say that a camera is an inanimate object is not far off the mark, though it shows far less respect than photographers usually pay to their equipment. Yet, what concerns us here is the nature of the equipment, its ability to do certain things and not others, and above all the differences it introduces between what we see and what the camera records. And for this purpose, to define the camera as asoul-less and inanimate objectserves our purpose and serves it well. So let’s go with it.
Soul-less we are not. As artists – and artists is what I take it we are, or are working towards becoming – soul is what we are all about. Soul is what we want to express.
Inanimate we are not, either. In fact we are nothing but inanimate. We are motivated to move by the passion for landscape photography that inhabits us.
In short, we are in front of a conflict, of a paradox which can be stated as such: as artistically inclined photographers, our passion must make use of an inanimate and soul-less object for our vision to become reality.
How can that be and how can that work? Or rather, can it be or can it work? Infants, if of age of being able to reason a logical answer to this question, and with the incomparable veracity that infants usually have, would say “no.” Adults tend to be more lenient, and may answer that there is a way to muster this tool into submission. Fact is, it is bound to be a difficult proposition, one that we better understand as clearly as we can before we launch into it.
A – Frustrations
The artistic aspect of photography, and the fact that the camera alone is simply unable to impart this artistic aspect (because, as we just saw, it is a soul-less inanimate object) is the source of great frustration for many budding photographers. Let us now explore the different areas that cause this frustration.
B – Five senses into one
When we experience the world, we do so through all our senses. We not only see the landscape, we also hear the wind, the birds and the other ambient sounds, we smell the rain, the flowers, and all the other scents, we feel the wind on our skin, the warmth of the sun or the cold of the snow or again the wetness of the rain. We can, on occasion, even use our sense of taste, if for example we put a twig in our mouth, or if the wind blows sand towards us.
Yet, when we capture the scene we experience through all our senses with a camera, only the sense of sight is captured. Only what we saw is recorded on the photograph, and even then with all the defects that I listed previously.
Without going back over the defects I already described, and assuming that all these defects are understood and will be taken care of during image processing, let us ask what happens to the information gathered by our four other senses. Indeed, what happened to this information –to what we heard, smelled, tasted and touched? What happened to these four other feelings, to this non-visual information that, potentially, can be four times the size of the visual information recorded by our camera?
Do you really want to know? Well, ok then. In short, bluntly and metaphorically: it went out of the camera frame. It was discarded, tossed aside, pushed back as if it never existed. And never existed it did, for the camera that is. Not for us. And that is all the difference. A photograph exists in a world that is purely visual. And a camera is designed to do one thing and one thing only: capture the visual aspect of the world. We, on the other hand, exist in a full-sensory world, a world in which visual information is but one of the five ways we experience the world.
If we record, with a camera, a scene that enthralls us for non-visual reasons, the resulting photograph will not only be disappointing, it will also be frustrating. Why? Because what we like in the scene we photographed is not captured in the photograph. What we loved about the scene we photographed is gone, forgotten, forever absent because it was never recorded except in our memory.
While there are ways to express feelings other than visual in a photograph, expressing these feelings must be done in a visual manner, for this is all we have to work with in photography. How to do so may very well be the goal of a lifetime of work and research. Learning how to do so, while extremely important, is beyond the purpose of this essay. I do address it, however, in my other essays. Here, my purpose is simply to point out that, as with all the other aspects of photography we previously discussed, the ability of the camera to capture only the visual reality of the world is a defect that must be fixed, if we want to create an image that truly represents what we felt and not only what we saw.
C – We see the world selectively, the camera captures everything in front of the lens.
Very often, untrained photographers see something of interest in a selective fashion. A specific object in the scene, or a particularly attractive lighting in the scene captures their visual attention. However, when they take a photograph of this selective area of interest, the camera photographs everything in the scene. The camera captures interesting objects and lighted areas as well as less interesting objects and lighted areas. The proverbial tree, or telephone pole, growing out of somebody’s head is a case in point. While it can be said that such photographs are the result of monocular capture applied to binocular sighting, it is also the result of seeing one thing in the scene – namely the person photographed – rather than everything in the scene – namely the person photographed and the tree located behind this person.
Cameras also capture the world within a specific format and aspect ratio. At the risk of stating the obvious, let me say that 4×5 cameras capture the world in 4×5 inch format, 35mm in 24x36mm format, 6×17 cameras in 6x17cm format and so on. Obviously, the world does not come in 4×5, 35, 6×17 or any other format or image ratio. The world, as we saw previously, comes as it is, in full size, all around us as well as above and below us. As the Navajos say in this excerpt from theNavajo Beauty Way Ceremonychant:
With beauty above me I walk
With beauty below me I walk
With beauty all around me I walk
The camera however, if it could speak, would most likely say:
With beauty in 4×5 format I shoot
With beauty in 6×17 format I shoot
With beauty in 35mm format I shoot
Pardon the parody. I have lived long enough among the Navajos to know that their sense of humor far outweighs what some readers’ may consider lack of consideration, disrespect or sacrilegious behavior on my part. The fact is that cameras do not have religious experiences. Cameras do not see beauty all around them. Cameras capture the world in the format they were designed for. It is our responsibility to choose the proper format at the time of capture, or to crop the image in the most appropriate manner at the time of image processing and optimization.
The problems of selective vision I just described can only be fixed by learning how to see. By this I do not mean seeing solely in terms of developing a unique way of seeing the world or a personal style. I mean seeing in terms of looking at everything in the scene and not just at the object that captures our attention. Only then – when we have learned to see the entire scene, when we have learned to see beauty all around us as we walk – can we stop taking photographs of things we should have seen but failed to notice.
If we fail to learn this fundamental photographic skill, we will equally fail to fix one of photography’s most prevalent defects, a defect which I like to callthe camera’s non-selective vision. This non-selective vision is another significant difference between how we see the world and how the camera captures it.
I desire to capture the emotions generated in me by the landscape in front of me. These emotions are located in my heart and soul. The camera however captures only what is in front of the lens. The camera does not know my feelings and is unable to capture what is in my heart.
I recently photographed a storm moving over Black Mesa on Navajoland (above). The scene I saw –I should say the scene I experienced – was one of gloom and active weather, a scene where grey, fast-moving clouds menaced the surrounding plains with heavy rains. There was little about this scene to look forward to if one found himself onto the path of the storm.
Because I was driving at the time I saw the approaching storm, I simply pulled over to the side of the road, took my Canon 1DsMk2 camera with whatever lens was on it at the time, and photographed the scene hand-held standing in front of my vehicle. Because there was some traffic, I did not feel safe pulling my camera bag out of my vehicle and trying different lenses.
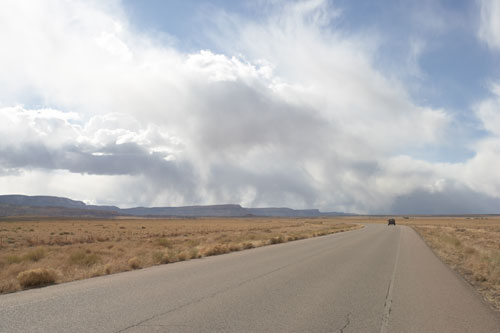
Storm over Black Mesa, Navajoland
Original, uncropped Raw conversion using “as shot” settings
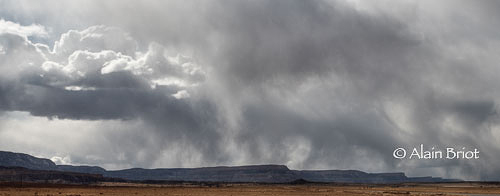
Storm over Black Mesa, Navajoland
Final Version after cropping and image enhancement
I knew when I created this photograph that I would crop out the road and that the final image would be composed as a panorama. I did not know the exact cropping I would use, but I was about 75% sure, roughly, of what it would be. I was also aware that the image could only be printed to a moderate size, given the sizable amount of cropping that was to be done.
I did not think of crossing the road and photographing from the other side, a move that would have allowed me to avoid getting the road in the photograph. Why didn’t I think of it? Probably because I felt uncomfortable being parked on the side of the road, and probably because I knew I was going to crop the image as a panorama. In the end, it did not make any difference whether I cropped out the road or cropped out the field of grass. No matter what was in the foreground, it was not going to make it to the final image.
The resulting photograph, as I first saw it in the Raw converter, possessed few, if any, of the attributes I remembered and that I just described. In the Raw file the sky was a soft whitish gray, with barely outlined clouds. The grass was a relatively saturated yellow, reminiscent of a clear summer day rather than of a spring storm moving in. And of course, the road, with a car on it, was dominating the foreground. Where was the scene that I saw and experienced? How could I make it surface out of the reality presented to me by the camera, a reality so far away from my recollection that, was I not the photographer, I could not put the two together?
The reality was there, embedded somewhere in the Raw image data, waiting for me to bring it out. This reality was not going to surface on its own, and neither was I going to experience this scene again through the photograph without serious work on my part and without remembering clearly what I saw and felt when I took the photograph.
The steps I took in Photoshop, to keep things simple and to the point, was to darken the sky, increase the density of the clouds and selectively de-saturate the image. I focused my efforts onto further de-saturating the grass whose yellow color was wholly inappropriate in order to communicate to the audience the feelings I had at the time I took the photograph.
I was able, through my knowledge of the differences between what I see with my eyes and feel in my heart, and what the camera sees with the lens and captures on the film or sensor, to ‘interpret” the raw image and turn it into what I remembered. I was able, in short, to move the image away from what the camera recorded. If I had not done so, or if I had failed in my attempts at expressing what I saw, the image would have been miles away from the reality that I experienced.
______________________________________________________________________
5 – Conclusion
Once you reach a certain level of experience and proficiency as a photographer you start to see a print in your mind when looking at a landscape that inspires you to photograph it. You no longer see just the landscape. You see the image recorded as a histogram. You see areas that may be clipped if converted to the wrong colorspace. You see the modifications that you will have to make in order to correct the defects introduced by the camera. You see ink on paper and more precisely specific shades of ink on specific types of paper. You see the image displayed matted and framed, with a specific mat size and in a specific moulding.
Yet, while all this is going on in your mind, the landscape in front of you is still the natural landscape: unframed, unmated, un-printed, un-corrected and un-photographed. It is, as I said before, exactly what it is, nothing more and nothing less, but certainly not a matted and framed photograph in a specific print size.
What the camera will capture is exactly what is in front of the lens, with the added remark that, as I detailed in this essay, it will impart a number of defects to the natural scene, depending on the exact equipment, exposure and settings used to capture the photograph.
In other words, as experienced photographers we see a final print in our mind. The camera on the other hand sees and captures exactly what is in front of the lens. Certainly, not all the defects I listed in this essay will be present in each of our photographs. Some photographs may be afflicted by only a couple of them while others may be burdened by many more. However, no photograph will be left untouched by the differences between what we see and what the camera captures.
As I detailed above, going from what the camera captured to what we saw and felt in the field demands proficiency in image processing. The process of capturing the photograph ends in pressing the shutter. However, the end of this process marks the beginning of a process which is complex, demanding and which can stretch over days, weeks, months and occasionally years. This process consists of re-creating on paper what we saw and felt at the time we pressed the shutter and took the photograph.
Through this long and arduous process, which I like to callImage Optimizationbut which is also aninterpretationof the original photograph, our guiding light will be one thing and one thing only: our memories of the original scene and our memories of the feelings we have associated with it. Should this memory fade, or vanish altogether, our chances of creating a print that comes close to what we saw and felt will similarly fade.
So what is a photographer to do? Simply this: take time to record your feelings about the scenes you photograph. Preferably, use pen and paper, or a voice recorder, to take notes in the field while you photograph. Record the colors you see, the contrast level of the landscape, the color and nature of the light, the kind of clouds in the sky, the time of day and year, the weather pattern, the color of the plants and rocks around you, the feelings you have, the emotions that made you decide to record this scene as a photograph and any other detail which is important to you.
Take notes as extensively as you can for these will be your guide later on, when the process you started by pressing the shutter will enter its second, and usually its longest, phase.
Also, hone your technical skills. The extent to which you will be able to remove the defects introduced by the camera is equal to your technical knowledge. If your goal is to achieve the highest level of photographic quality, you need to develop Mastery of the photographic medium. Mastery, I believe, is reached by practicing your art on a continuous basis, day-in and day-out, until the technical aspects of photography, be it in the field or in the digital darkroom, become second nature. Mastery is reached through repetition and a desire for perfection. Mastery is eventually a matter of perseverance combined with hard work, a refusal to give up and a constant search for solutions that afford you the finest image quality.
In my next essay, number 6 in theReflections on Photography and Artseries, I will expand on this essay and go beyond the differences between what we see and what the camera captures. In doing so I will venture into an exploration ofVision and Inspiration(the title of the next essay in this series) and define how we can find inspiration for our work. In later essays in this series I will also explore how emotions can be translated into photographic representations.
Don’t go away!
Alain Briot
Arizona, November 2006
______________________________________________________________________
Printing Mastery Workshop on DVD special offer for Luminous-landscape readers
In this essay I referred several times to the steps and techniques I follow to go from an original scan or raw file to a finished, matted and ready to frame final print. How to do so is beyond the scope of this essay. However, I have created a unique DVD Tutorial to describe the 28 steps and 80 sub-steps I follow. Creating this tutorial took me one full year. Called the Printing Mastery Workshop on DVD it is equivalent to attending my Expressive Fine Art Print Seminar except you do not need to travel and can study each step as many times as you want and in the comfort of your home.
The DVD is priced similarly to my Expressive Print Art Seminar because the contents of both the DVD and the Seminar are the same. The normal price is $975. I am extending the special offer of $200 off the regular price to Luminous-Landscape readers, for a total of only $775 including shipping anywhere in the world. This is a limited-time offer. To place your order, or to discover the exact contents of this new DVD, simply visit thePrinting Mastery Workshop on DVD page on my site.
Footnote:
I found some of the information on dynamic range, as well as the Scene-Referred and Output-Referred terminology, in a white paper published by the International Color Consortium (ICC). This white paper is titledDigital Photography Color Management Basicsand it is available at this link:http://www.color.org/whitepapers.html


Elevate Your Vision


Read this story and all the best stories on The Luminous Landscape
The author has made this story available to Luminous Landscape members only. Upgrade to get instant access to this story and other benefits available only to members.
Why choose us?
Luminous-Landscape is a membership site. Our website contains over 5300 articles on almost every topic, camera, lens and printer you can imagine. Our membership model is simple, just $2 a month ($24.00 USD a year). This $24 gains you access to a wealth of information including all our past and future video tutorials on such topics as Lightroom, Capture One, Printing, file management and dozens of interviews and travel videos.
- New Articles every few days
- All original content found nowhere else on the web
- No Pop Up Google Sense ads – Our advertisers are photo related
- Download/stream video to any device
- NEW videos monthly
- Top well-known photographer contributors
- Posts from industry leaders
- Speciality Photography Workshops
- Mobile device scalable
- Exclusive video interviews
- Special vendor offers for members
- Hands On Product reviews
- FREE – User Forum. One of the most read user forums on the internet
- Access to our community Buy and Sell pages; for members only.
You may also like


