


Technical Details: Phase One P65+ digital back on an Alpa TC with a 23mm Rodenstock lens, f5.6, 1/125 second, ISO 50, tripod mounted, stitched.
They say you’re mad if you travel in Australia’s North West during summer and, having done a trip in the middle of February (the southern hemisphere summer), I can understand why! It was so hot in some places that the orange witches hats (road markers) had melted on the bitumen! Summer is ‘the wet’ and while it isn’t necessarily raining all the time, you have a good chance of storms building up in the afternoon, creating wonderful cloud formations and photographic opportunities. If you can handle the heat, it’s a great time to travel.
I was with the ND5 group: Christian and Michael Fletcher, Tony Hewitt and Les Walkling. We were working for FORM, creating images for an exhibition. We were driving out to Marble Bar, Australia’s hottest town, when we spied two or three willy-willies (small heat twisters or dust devils) in the distance, picking up the loose red top soil and lifting it in a spiral into the air. Behind the willy-willies was a gathering thunderstorm and it appeared that our road was going directly towards it.
However, the landscape conspired against us because we couldn’t see a suitable place to pull over, but after a few tense minutes, we spied a dirt track off to the left. After following a couple of dead-ends, we found ourselves at the base of a small hill with the storm directly behind. A huge thunderclap erupted as we got out of the cars. We grabbed our gear and ran, climbed and stumbled our way around the base of the hill.
Slightly higher than the table-flat plain below, we were treated to a natural amphitheatre with the storm cell right in front of us. Huge clouds billowed above the red earth, lightning forked and thunder roared. The willy-willies combined into one large whirlwind and the lightning started several brush fires, all only a few kilometres from where we were standing.
It was a remarkable experience.
And it was interesting to know there were three other expert photographers all shooting the same thing. It didn’t take Einstein to work out that the differences in the images would be in our interpretations of what we saw.
Capture
The photograph is a stitch. The storm was so close to us that even using an ultra wide-angle lens couldn’t fit everything in. I was using an Alpa TC with a Phase One P65+ medium format back. I focused the 23mm Rodenstock Digaron lens on infinity, turned the back to the portrait (vertical) position, and placed the horizon in the middle of the frame to make stitching the resulting images a little easier – I wanted a straight horizon.
I also had an issue of exposure to deal with. I exposed for the sky to ensure I didn’t clip any highlight detail in the clouds, but in doing so my foreground was very dark. This isn’t a big problem with medium format as you can lighten up the shadows very nicely. I processed the files in Capture One with low contrast to retain as much detail as possible throughout the tonal range. The image was then stitched together using PTGui.
I have processed this file twice and spent many hours on it. And there are around 30 layers in the final file that coax and encourage different areas to produce specific tonal results. However, really all I am doing is looking at the image and asking what needs to be darkened or lightened.
The following screen shots give you a simplified overview of the steps taken.
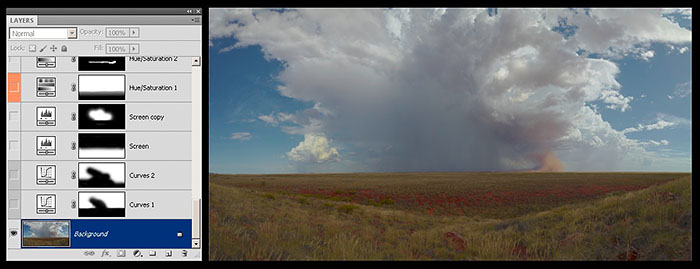
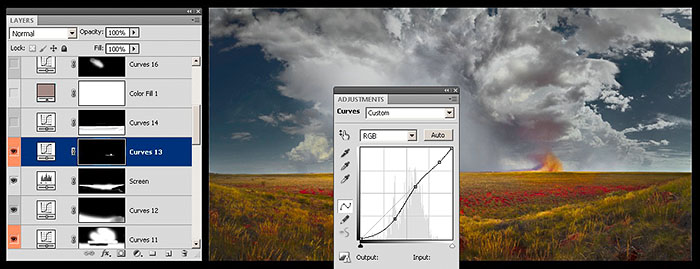
Step 1
This is the base image straight out of Capture One after stitching. Note, I have intentionally used Capture One to produce a very flat image, but it retains tone in all the areas, including the white clouds. On the left is my Layers panel with all the adjustment layers turned off. I have marked a few of the key adjustment layers in orange so if you are really keen, you can follow all the adjustments as they are made, but the technique isn’t really what this article is about. It’s the thought process behind the changes. My first observation is that the cloud in the middle is very dark, but I want the viewer to look into this area as this is what I found most interesting. It will need to be lightened along with the foreground.
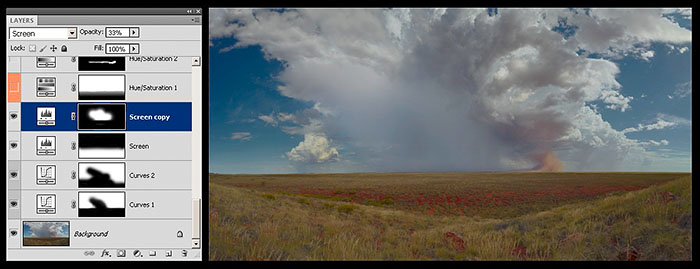
Step 2
I used a combination of Curves and Levels adjustment layers with masks to lighten and darken areas, some small, some large. I also use adjustment layers with different blend modes, so instead of tweaking a curve or a level slider, I change the blend mode of the layer from Normal to Screen or Multiply. However, all I am really doing is lightening and darkening different areas, or increasing or decreasing the contrast.
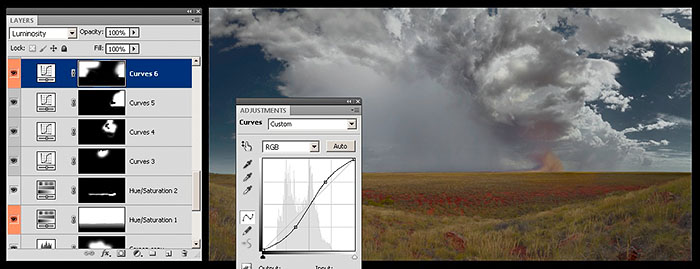
Step 3
A lot of the early steps are designed to retain detail in the sky. I find a number of small adjustments work better than a single adjustment, especially when you use a variety of masks. This tends to hide the post-production process. Here I am darkening down the blue sky so the clouds stand out more strongly.
Step 4
Only once I have good balance of tones with low contrast do I begin to increase the contrast overall. The next few steps lighten up the central cloud and the foreground, with a lot of detailed work increasing local contrast in the clouds. This gives the clouds more shape.
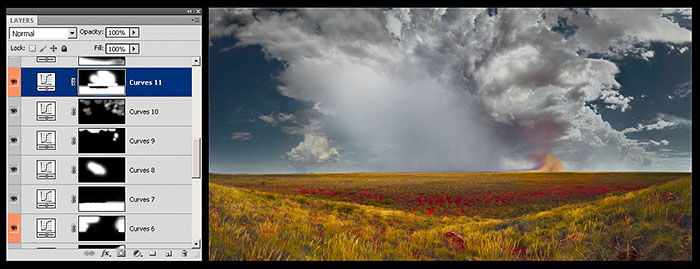
Step 5
The whirlwind of dust looks as though it has been coloured by hand, but all I have done is change the contrast a little. The whirlwind was so full of fine red dirt that I didn’t need to tweak the color at all. Note, this is dust, not the flames of the tiny brush fires (which you won’t be able to see on an image this size).
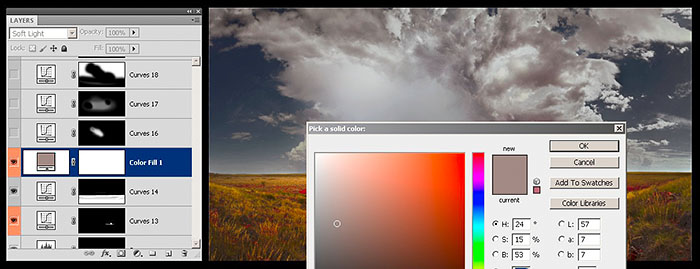
Step 6
One of the techniques I have adapted from friends who work in film is the concept of color grading. Sometimes when you adjust an image in lots of different places, you can end up with ‘different’ color balances in different parts of the image. Here I’ve added a warm brown overlay using the Color Fill adjustment layer with the blend mode set to Soft Light. This can be further adjusted with the opacity slider as you only want a subtle effect.
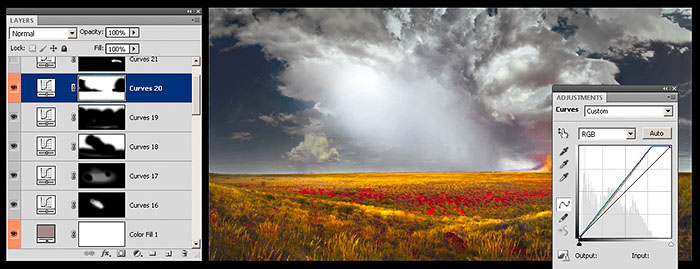
Step 7
The final series of adjustment layers refine the tonalities in different areas of the image. It’s just like being in the darkroom and dodging and burning in, but with much more control.
The final image was around 13,000 pixels across with plenty of wonderful detail for a large two metre print. It has recently been exhibited at the International Loupe Awards Fine Art prize as a finalist, and also at the FotoFreo exhibition in Perth, Western Australia. I printed on Canson Platine and, if I don’t say so myself, it looked pretty impressive!
If you’re interested in the other interpretations of this image, take a look at Les Walking’s version athttp://www.leswalkling.com/what-does-landscape-do, while Christian Fletcher’s version is here:http://www.christianfletcher.com.au/2010/02/storm-over-the-pilbara/
Michael Fletcher produced a small video of our trip and the first of two exhibitions which you can find here:http://vimeo.com/18996639
July, 2012
Peter Eastway
Peter Eastway has won the AIPP Australian Professional Photographer of the Year twice, and has been Australian Landscape Photographer of the Year three times. You may also have seen him on the Phase One website and working with Capture One software. Peter also publishes a number of photography magazines in Australia. You can see more of his work atwww.petereastway.com, and more of his tutorials and articles (including his Landscape Photography MasterClass) atwww.betterphotography.com.


Elevate Your Vision


Read this story and all the best stories on The Luminous Landscape
The author has made this story available to Luminous Landscape members only. Upgrade to get instant access to this story and other benefits available only to members.
Why choose us?
Luminous-Landscape is a membership site. Our website contains over 5300 articles on almost every topic, camera, lens and printer you can imagine. Our membership model is simple, just $2 a month ($24.00 USD a year). This $24 gains you access to a wealth of information including all our past and future video tutorials on such topics as Lightroom, Capture One, Printing, file management and dozens of interviews and travel videos.
- New Articles every few days
- All original content found nowhere else on the web
- No Pop Up Google Sense ads – Our advertisers are photo related
- Download/stream video to any device
- NEW videos monthly
- Top well-known photographer contributors
- Posts from industry leaders
- Speciality Photography Workshops
- Mobile device scalable
- Exclusive video interviews
- Special vendor offers for members
- Hands On Product reviews
- FREE – User Forum. One of the most read user forums on the internet
- Access to our community Buy and Sell pages; for members only.
You may also like


