


After Bill Atkinson and I did our workshop at The Luminous Landscape Gallery this past October, Michael Reichmann was very intrigued with one of my methods for making selections. In many cases, this technique can make daunting selections incredibly easy! (In some cases, it will not work at all!) I developed this technique about three years ago, and although it’s not rocket science, I have not yet seen it described elsewhere.
I’m calling it “tonal selections,” since it’s based on a curve’s ability to discriminate between lighter and darker tones. I’m sure that many people use a form of this technique without realizing it. For example, when I want to slightly lighten an image, I’ll routinely first “lock-down” the lower part of the curve, and then brighten the lighter tones. Notice that the lower point shows the input value the same as the output—preventing these darker tones from changing.
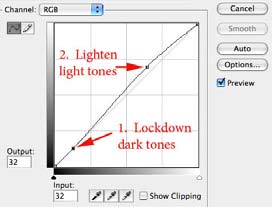
Without this locked-down point, the lightened image many times feels washed-out. This lockdown point basically turns this into a small “S curve,” resulting in slightly increased contrast and saturation.
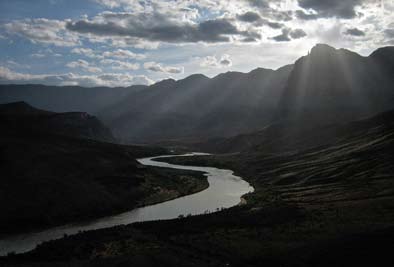
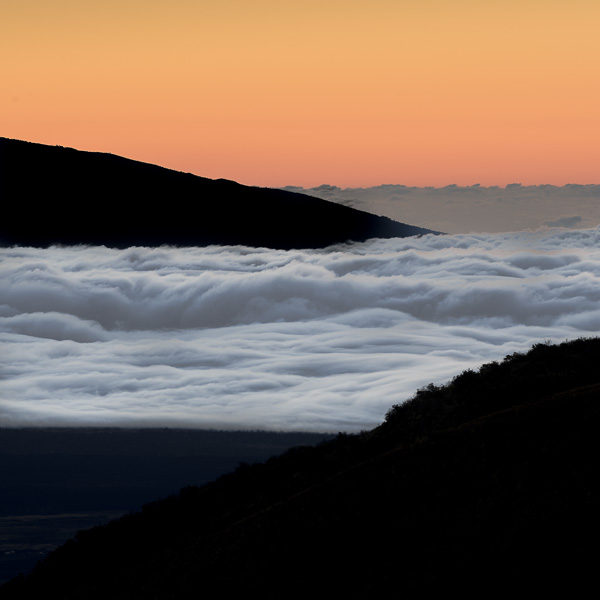
Here is a image that illustrates this technique in its simplest form. On a recent Grand Canyon trip, I had my little “happy snap” point and shoot camera handy when the following scene appeared. This was quite a contrasty image, and I’m surprised it worked as well as it did. The exposure for the backlit clouds results in the river and foreground going quite dark, even though parts are in direct sun. To recreate the sense of light in the image, I want to substantially lighten the river. But, to maintain the drama, I want to keep the foreground the same.

This is a fairly high resolution jpeg-so that you can download it, and try this technique yourself.
Click on it to see a larger version which you can then download with a right click
(control-click on the Mac) to save, or just drag the image to your desktop.
To lighten just the river, I need to create a mask to “select” the river. The river is a complex shape, and would be a nightmare to select with the magic (“tragic”) wand. Notice the trees sticking up against the river—a hard-edged selection here could take hours to fine tune! And even then, there’s always problem areas that will show artifacts in a large print. The stronger the lightening, the more perfect this mask needs to be. In this case, the river and foreground are tonally distinct—and this is the key that will make this incredibly easy! Why not select the riverandsome foreground, and use a curve to do the differentiation between the lighter and darker tones? I highly recommend that you download the image above and try this yourself.
To select the river—and a little foreground—I recommend the lasso tool. A loose and sloppy selection works just fine here.
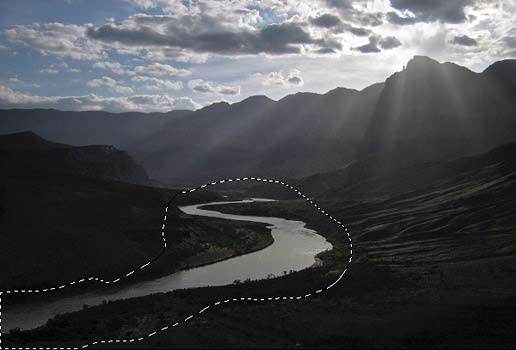
Notice that I have left a lot of space around the river. One of the lasso tool’s options is “feather”, which should be set to zero. The new “refine edge” control in CS3 provides more intelligent feathering and greater control. For this jpeg, enter around 10-15 in the “feathering” slider (with the other sliders at zero) in the Refine Edge control.
Now, with the “marching ants” visible, create a new curves adjustment layer, which will capture the current selection. With this curve open, if you “drag” in the image (holding the mouse down), you’ll see a little circle that shows where these tones are on the curve. Drag in the foreground—pretty dark. Now drag in the brighter river—it’s lighter. Now for the big secret! You want to lockdown the foreground tones so they won’t change, then really yank the lighter river tones to the left to lighten. Here’s the curve I used. Notice that the lower three points are “lockdowns” (input equals output).
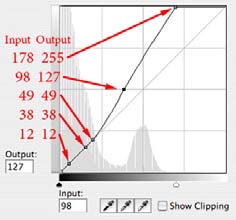
The easy way to place lockdown points on the curve is to move the cursor over the desired tones in the image, and then command-click (control-click on the PC). When we yank the upper part of the curve over, the lower part will want to move in the opposite direction (to stay “curved”), so you need to place several points to immobilize the darker tones. The only critical point is the highest lockdown point—the “pivot” point where the curve starts changing. I chose level 49, as that includes all except the very lightest foreground tones. To lighten the river, I then placed a point around input 98, and moved it to the left to get an output value of 127. And, to get the specular highlights in the river to really shine, I moved the highest curve point quite a bit to the left. (This actually “clips” a few tones, but—they’re specular highlights). (If not before, they are now!)
If you now close the curve, and click its eyeball on and off, you’ll see the improvement. Here’s the before and after..
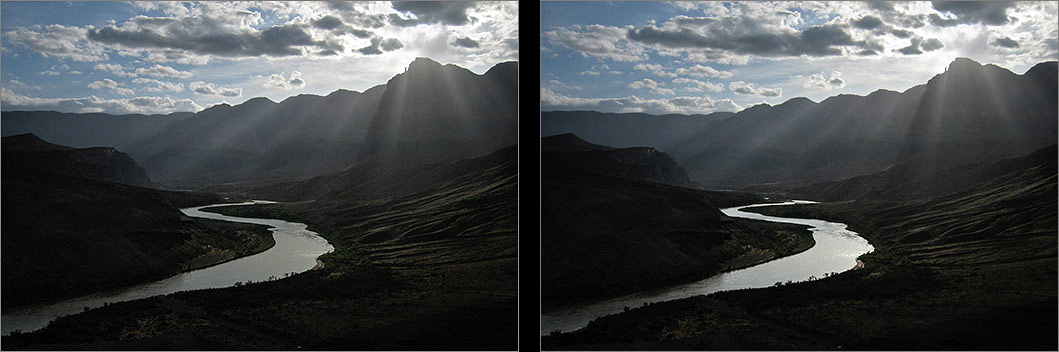
Let me review the theory here… In this example, you could have wasted lots of time making a hard-edged selection of just the river. Instead, since the river is tonally different from the surrounding foreground, you can exploit that difference. By selecting the river and some of the darker surronding tones, you can then use the curve to do the hard work of lightening just the river. This is an “organic” selection, since it comes from the actual tones in the image—not some arbitrary hard-edged selection of certain pixels.
This technique has two parts:
A selection of your subject plus some of the surrounding tones.
-
-
- A curve that has the surrounding tones locked-down, allowing you to change the subject tones.
-
This technique does not work in many situations, but is very effective when you want to lighten something lighter against darker tones. As in this next example.
Example Two
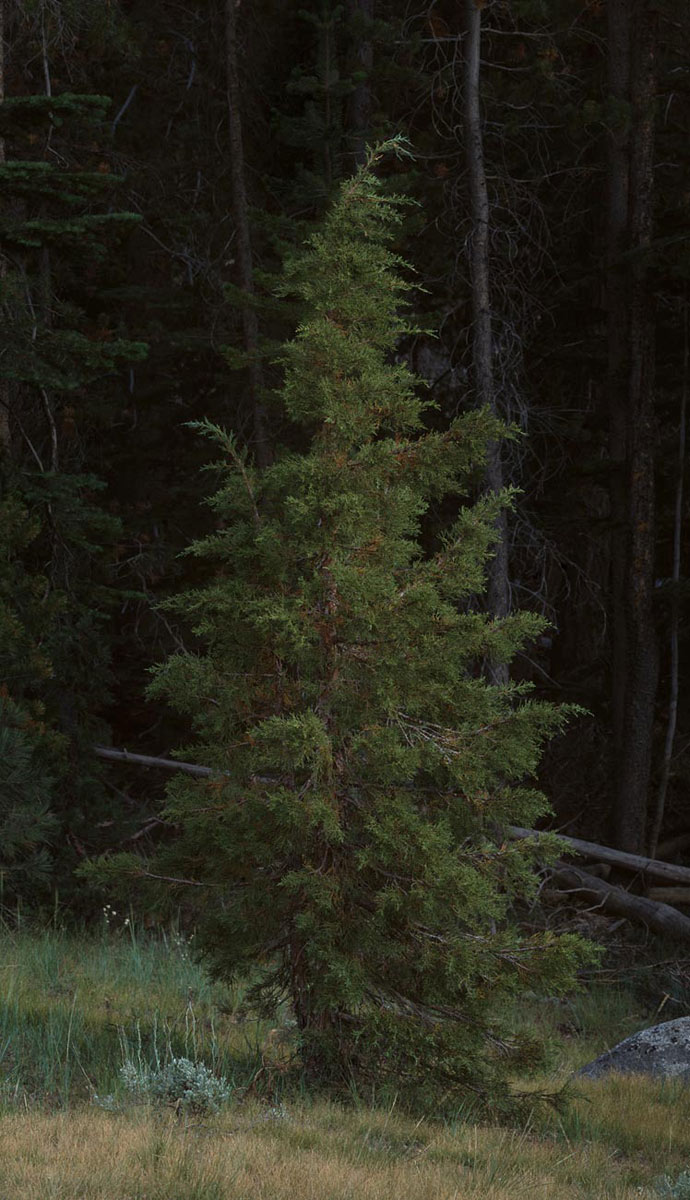
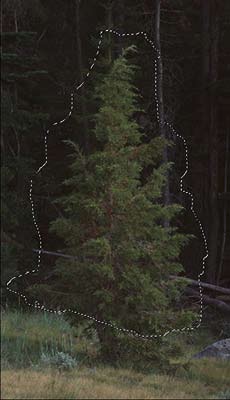
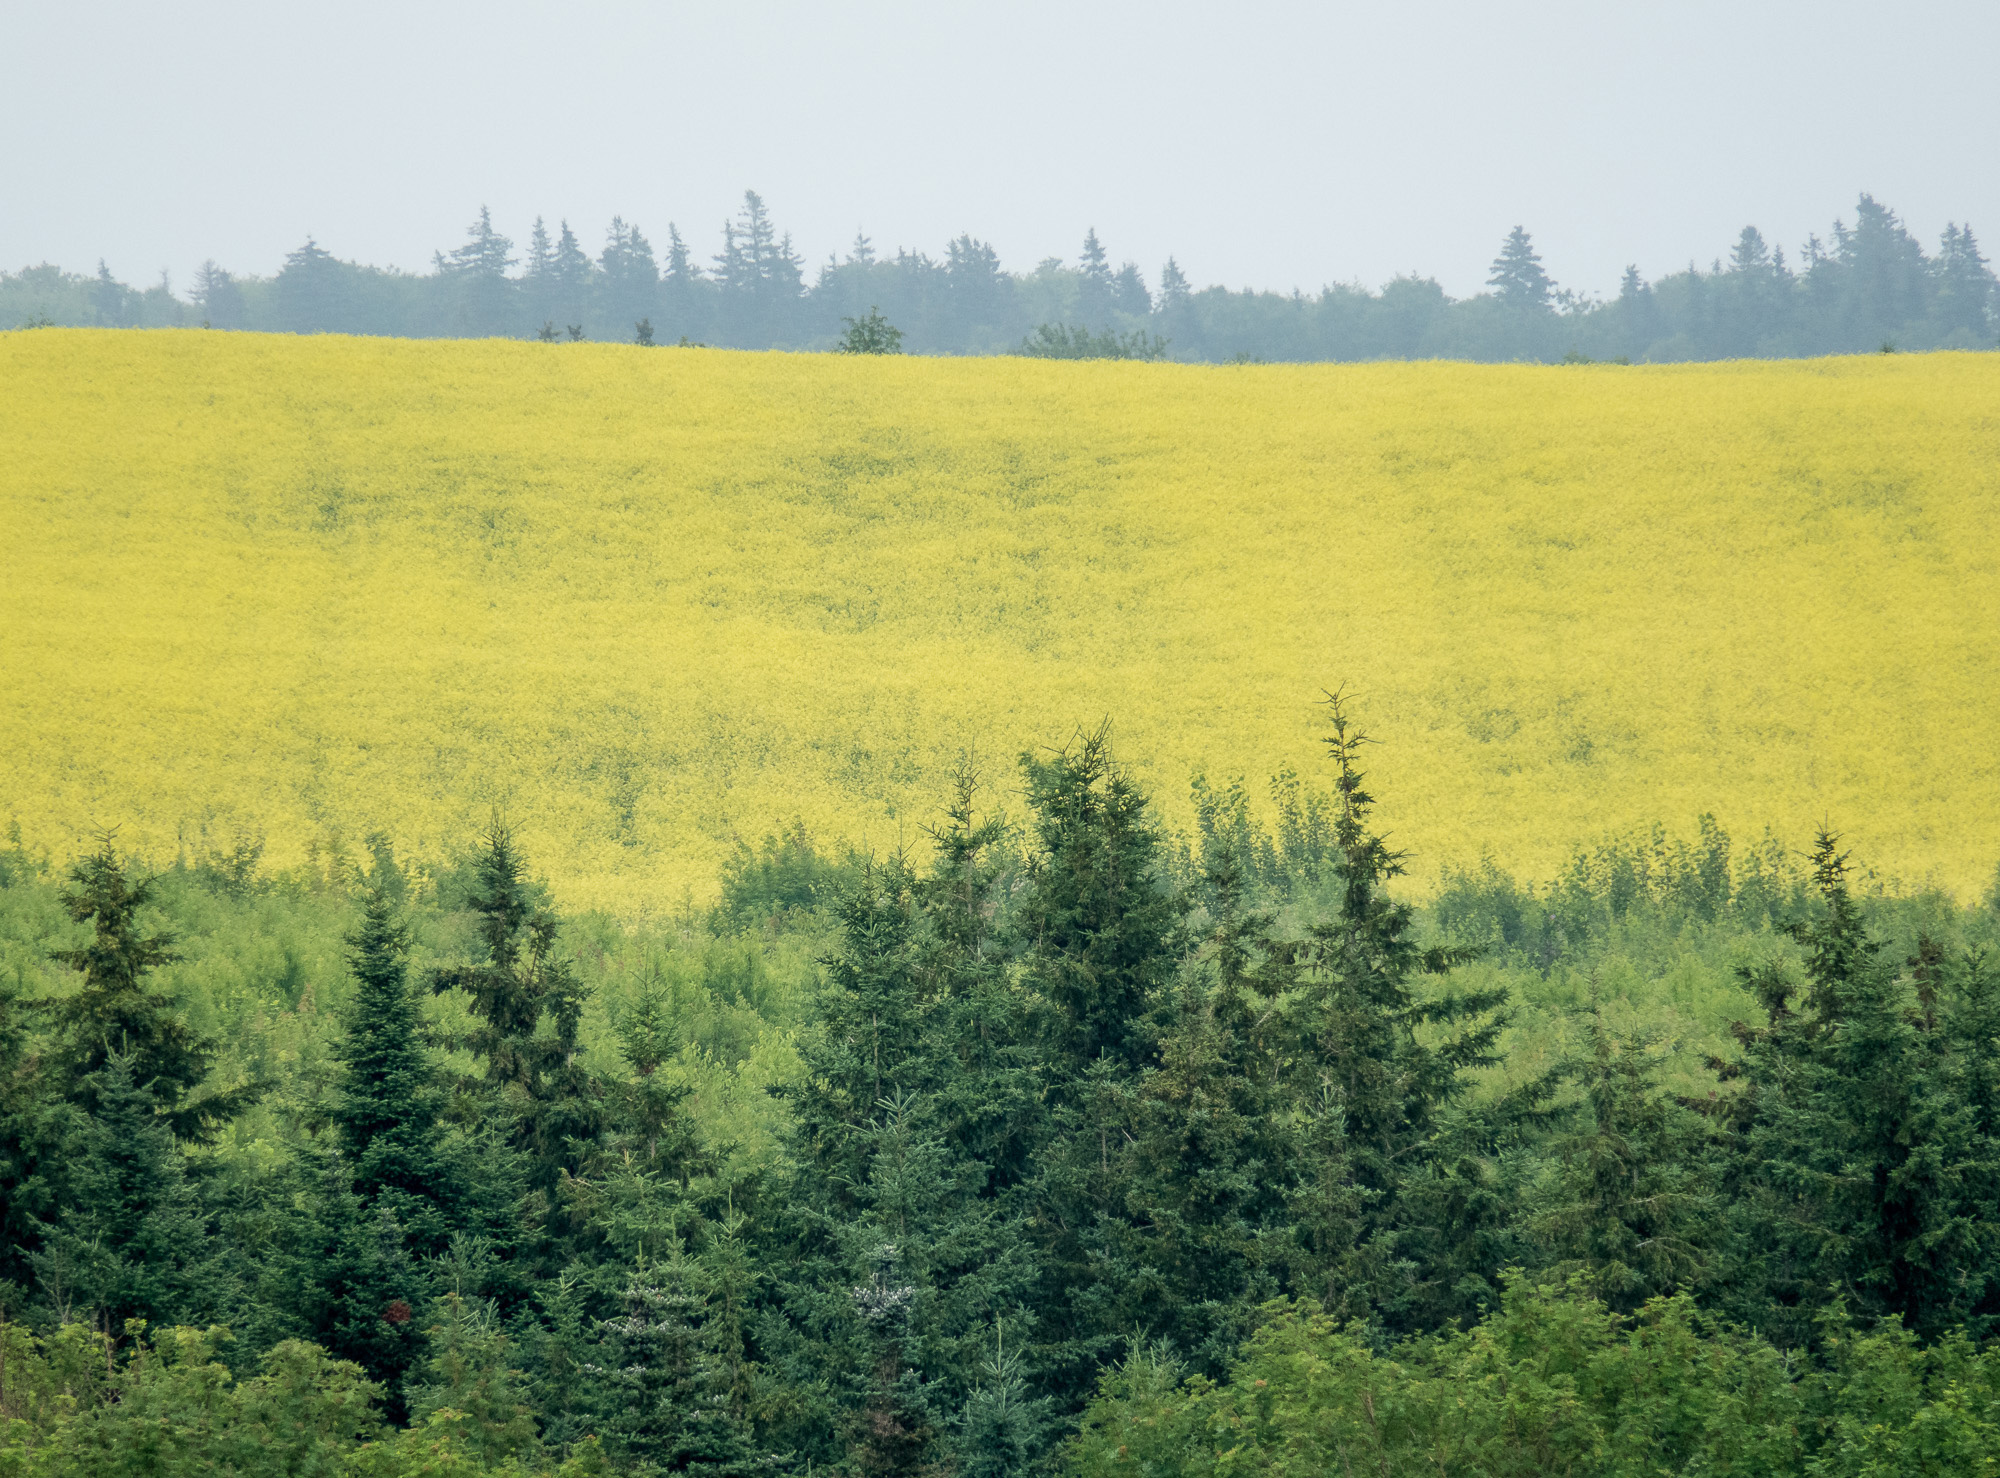
Here is a section of an image where I first stumbled onto this technique. The entire image shows a wonderfully huge dead tree, with this little upstart on its right. This tree is deceptively dark, and needs to be lightened substantially—without lightening the background. So, the tree needs to be selected.
This is also a fairly high resolution jpeg—so that you can download it, and try this technique your self.
Click on it to see a larger version which you can then download with a right click
(control-click on the Mac) to save, or just drag the image to your desktop.
Shall I select the tree with the new “Quick Selection” tool? Magic Wand? These tools will give you a hard-edged selection that is difficult to exactly match to the subject (especially a tree like this). It might work in a small print, but enlargement will show artifacts. Since I want to do major lightening on this tree, the mask has to be even more perfect! But—who needs a fancy mask when the tree and background are tonally distinct! It’s radically easier to select the tree and some background, and use a curve to do the differentiation.
To select this tree—and a little background—I recommend the lasso tool. Here is my lasso selection.
Notice that I have left a lot of space around the tree. And I didn’t include the grass at the bottom—those tones are as light as the tree, and will be lightened if included. For this jpeg, use around a 10-15 pixel feather. With a new curve adjustment layer, drag in the image (holding the mouse down) to see the little circle that shows where these tones are on the curve. Drag in the foreground—pretty dark. Drag in the tree—not much brighter! Now, where to place the “pivot” point—the brightest lockdown point? Most of the background tones are below level 23, although the fallen horizontal log is much brighter. The darkest part of the young tree is around level 29.
Since I want to brighten all the tones in the tree, I’m going to ignore those brighter background tones for now and place the pivot point around level 24-26. (It can be worthwhile to experiment with the placement of the “pivot” point on the curve. With the pivot point selected, the arrow keys can move it up and down so you can see which placement looks best). Here’s the curve I used.
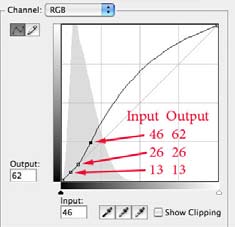
Remember to have at least two lockdown points. To lighten the tree, I then put a point on the curve around level 46 and yanked it to the left. Since this curve is quite steep, there is also a great increase in saturation of the tree, which is very helpful. If you now close the curve, and click its eyeball on and off, you’ll see the improvement. And you’ll notice that the horizontal log and tree trunk on the right do get caught up in the excitement! To prevent the curve from lightening them, just paint them out of the curves layer mask with a small feathered brush (zero hardness, foreground color black, 100% brush opacity).
In this example, the curve needs a little fine-tuning on the mask. With a small feathered brush, these corrections are smooth and undetectable. The really critical, difficult differentiation is done by the curve, not the mask. Again, I recommend downloading the first big jpeg of this image to see how nicely this works!
Here’s the original tree, the corrections I made to the mask, and the finished, lightened tree..

Example Three
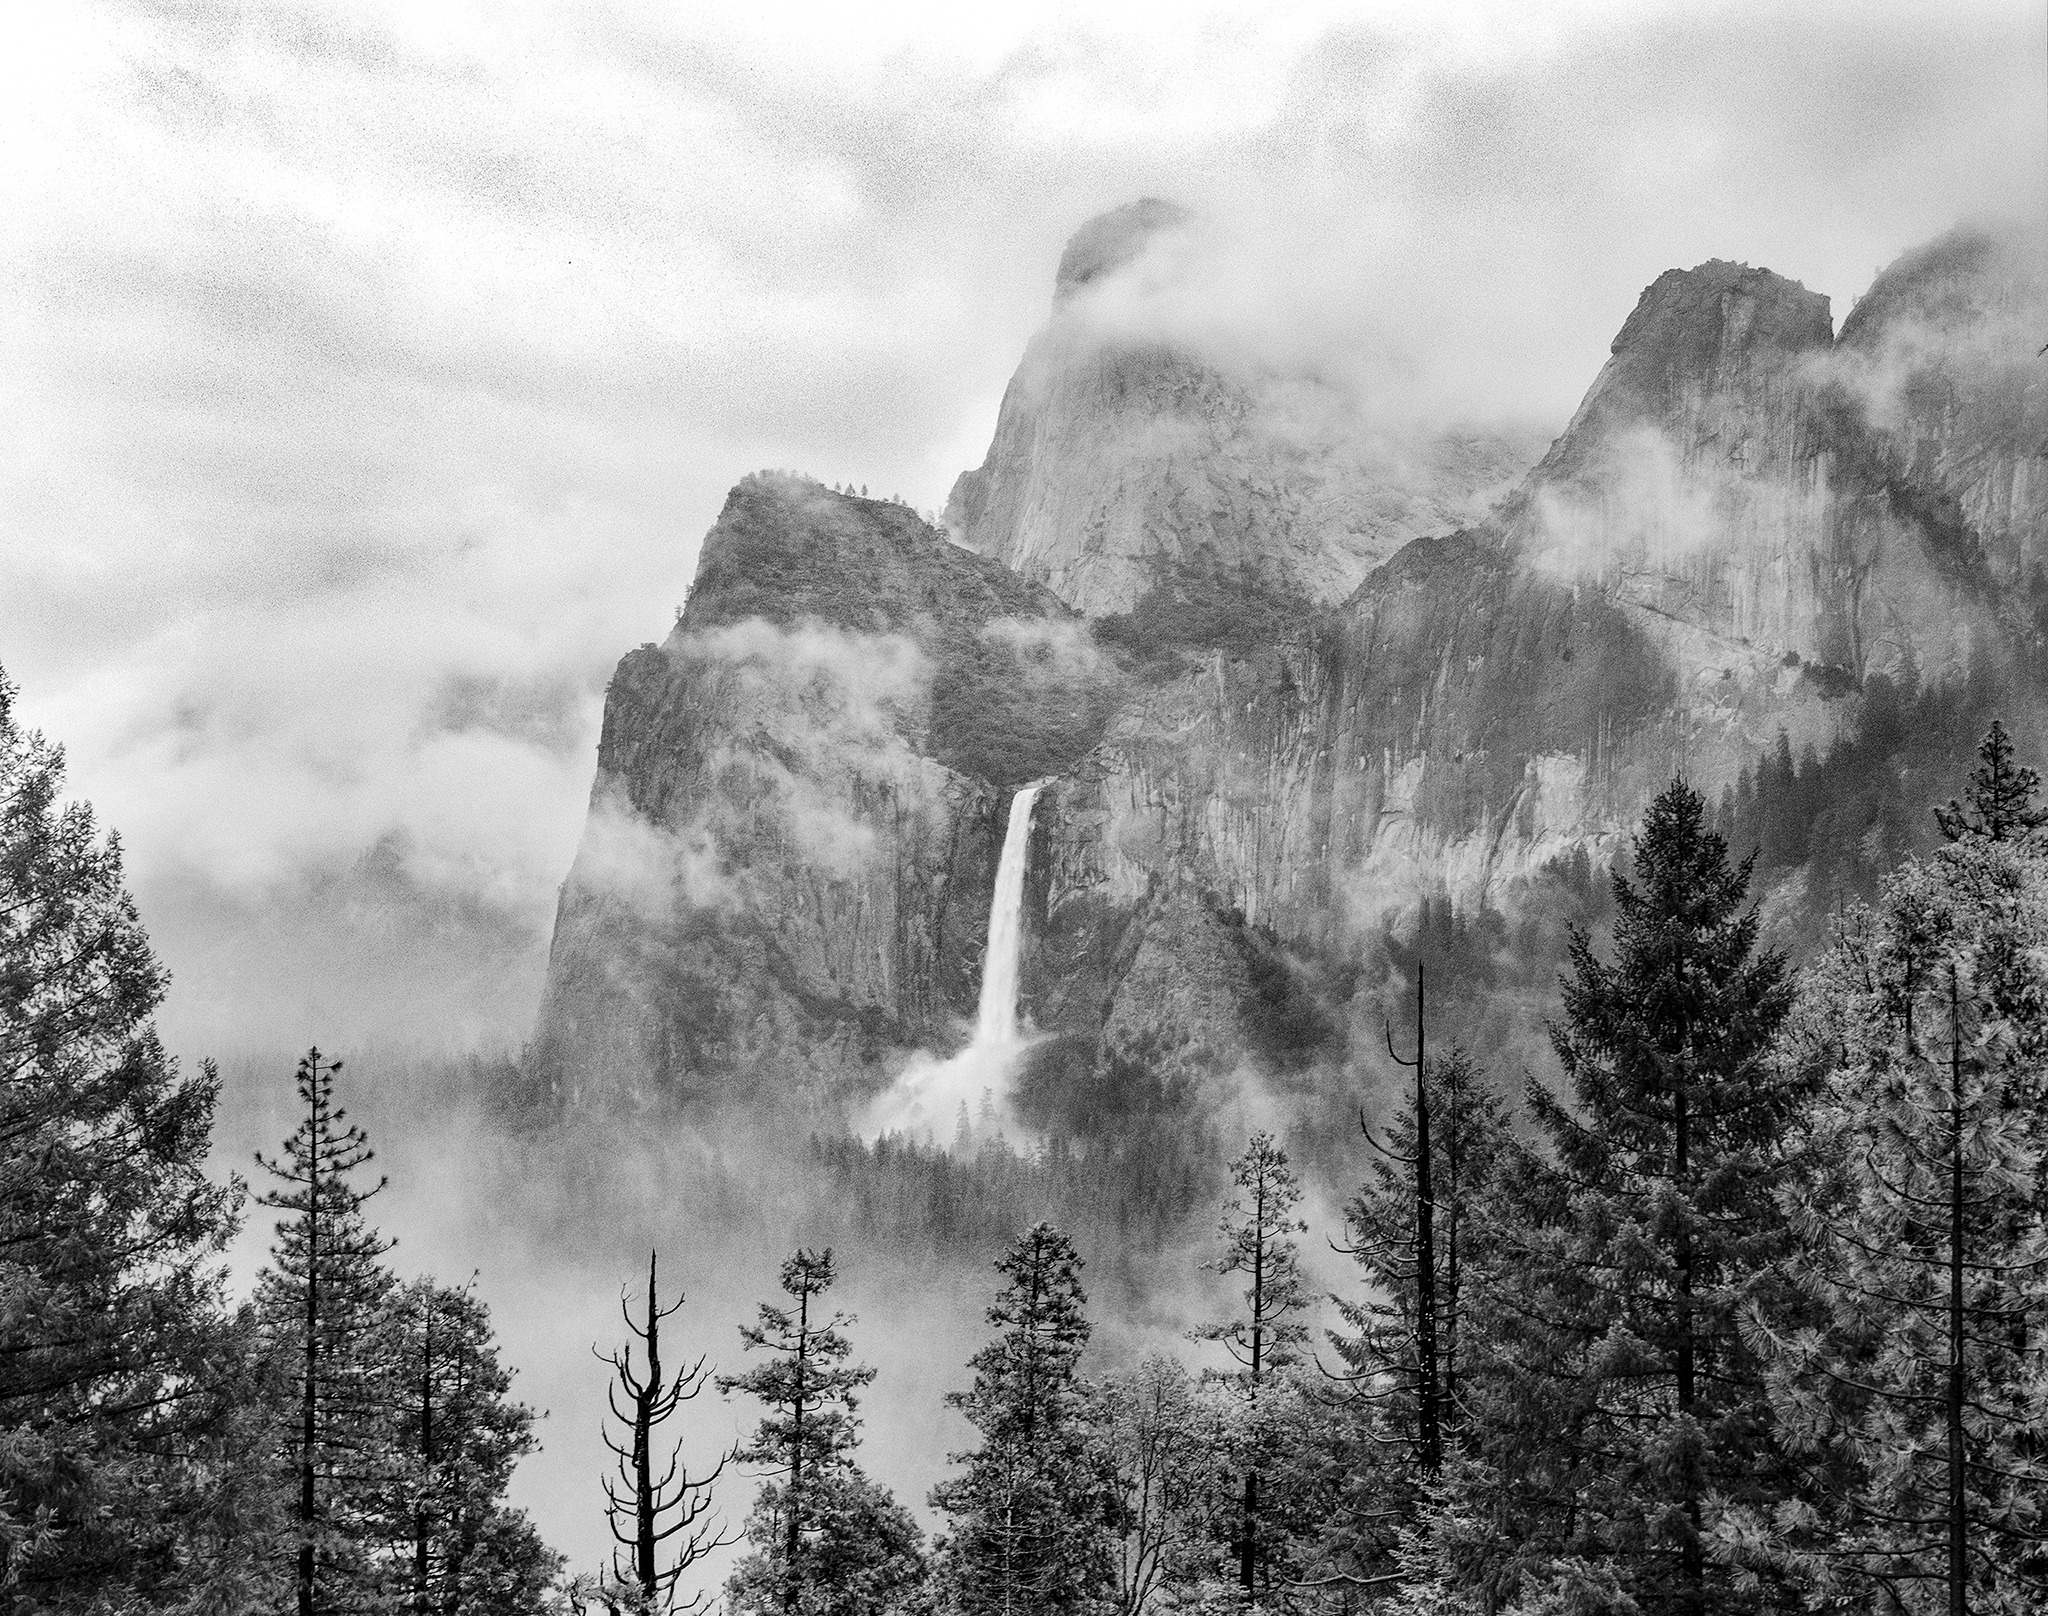
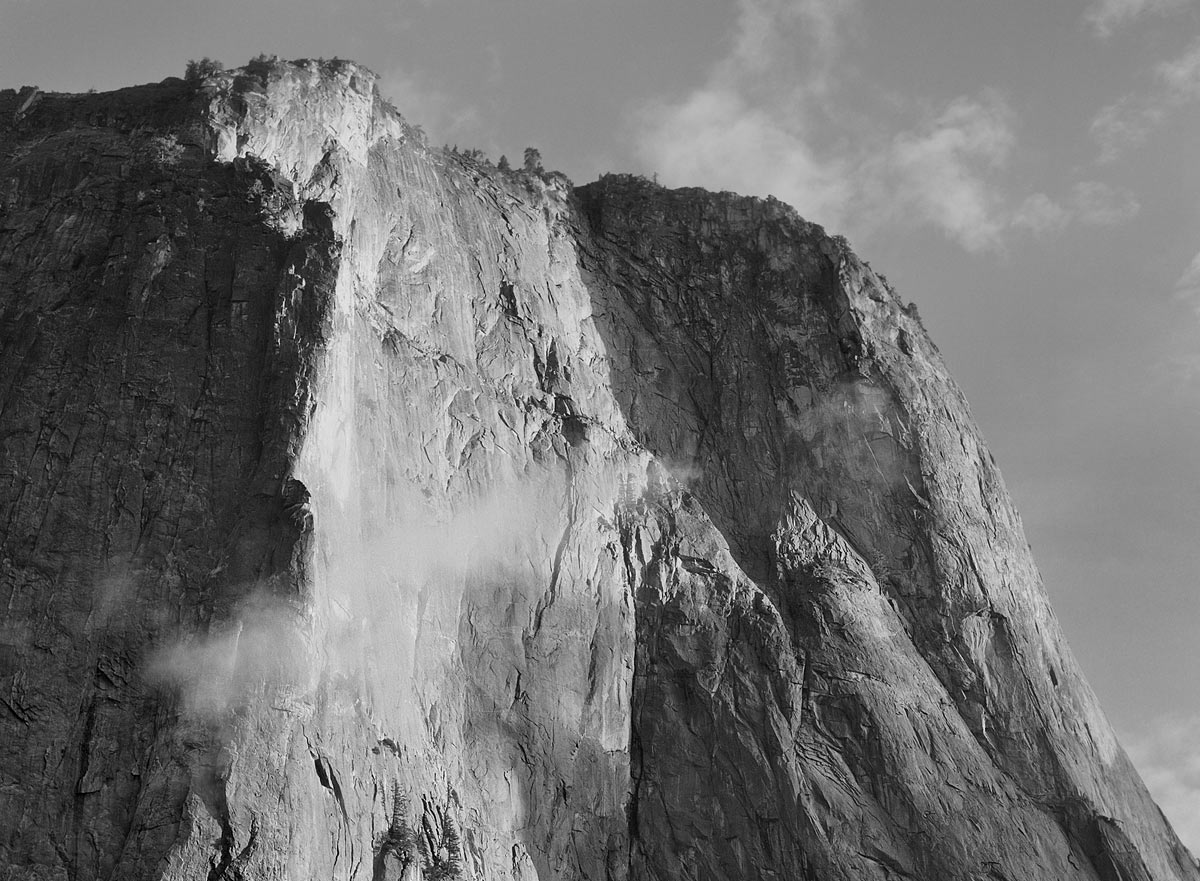
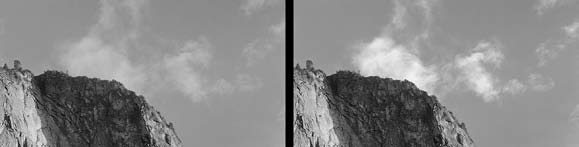
This is a B&W image of Cathedral Rock in Yosemite, around sunset. I think I could get more of a sense of light in the image if the cloud above the rock (on the right) was brightened. The sky is fine—I just want to lighten the cloud. And more contrast in the cloud would be a big plus…
Another large jpeg that you can download to try this at home!
Sounds almost impossible—but it’s actually easy. First, select the cloud with some sky and cliff included. Use Refine Edges to feather about 15 pixels. Here’s my lasso selection, and the curve I used.
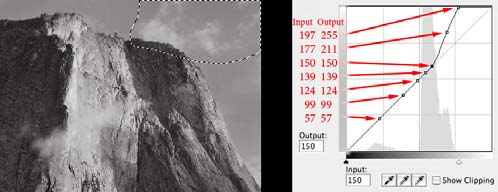
Notice that I have locked down a few more points in this curve. Since the sky is even-toned, I don’t want it to change, and more lockdown points reduce any tiny curve bulges between points. I used 150 as the lockdown point for the brightest part of the sky. From that point, the curve makes a steep upward lunge—this will brighten and add significant contrast to separate the tones in the cloud. Here’s a section showing the before and after. The sky and cliff have not changed.
An alternate method to lighten the cloud would be a “soft light” or “overlay” layer, fairly commonly used to do miscellaneous dodging and burning. But this would not increase the contrast in the cloud. Plus you would have to be very careful not to paint in any sky—with the resultant halos. Trying to select only the wispy cloud—and nothing else—is very difficult. With my method, you select sky and cloud and cliff—and let the curve do the hard work. Try it at home!
Example Four
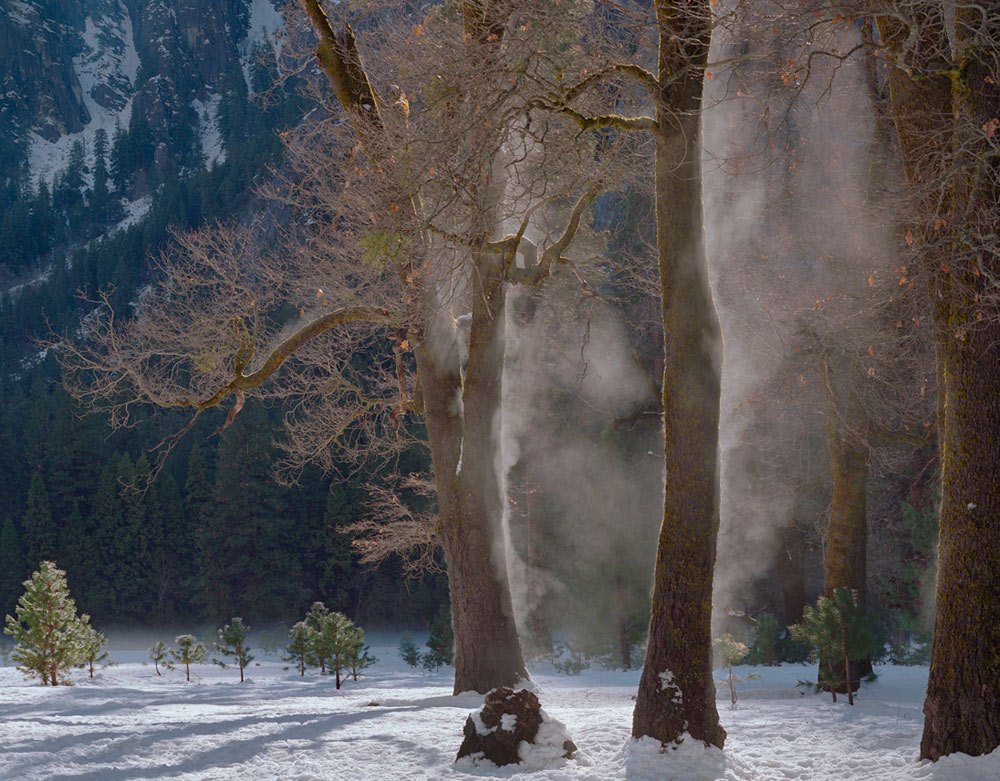
A few winters ago, I happened to be in Yosemite Valley near El Capitan meadow when the sun came over the canyon rim, and illuminated these oak trees for the first time that day. The trees were moist, and steam started coming off these trees—backlit steam!
Another large jpeg that you can download to try this at home!
Unfortunately, the film did not share my excitement about the steam, because it rendered more like a middle gray. I wanted brilliant, backlit steam. I realized I needed to lighten just the steam—but how do you select steam? The backlit tree branches could also use lightening. Since the steam is the lightest thing in that section of the image, I realized I could use a “tonal selection” curve to do all the hard work. Here is my lasso selection.
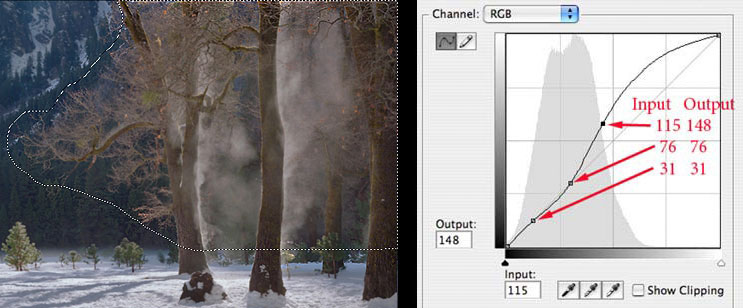
Use the Refine Edges control to feather about 15 pixels, and then create a new curves adjustment layer with points as shown above. This very steep curve will increase saturation in the selected area—which we don’t want in this image. Change the blending mode of the curve from Normal to Luminosity mode to prevent any color changes, but allow luminosity changes.
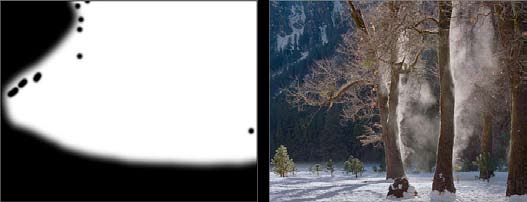
I chose 76 as the brightest point to lock down, as that is the lightest part of the lightest tree trunk on the left. (Parts of the tree read brighter—but that is steam on the tree). Remember to lock a lower point down, too. Place a point around 115, and yank it to the left (I moved it to output 148). If you now close the curve, and click its eyeball on and off, you’ll see that there are a few tiny sections of snow on the left canyon wall that are getting lightened. I used a small feathered paintbrush, using black, to paint these out. Here is the mask from the curve, and the finished result.
I can’t really think of any other method that would give such natural results. In my Master file from my 500 MB film scan, this technique gives a flawless “mask”, with no artifacts. Imagine trying to select all the backlit tree branches on the left using the magic wand—a nightmare!
To refine this image further, I find that I am slightly bothered by the upper left canyon wall—is that snow in the distance a little light and distracting? I think I want to subdue it slightly by darkening just the snow. Do I need to spend an hour selecting just the snow? I bet you now realize how easy this will be! That snow is surrounded by the much darker canyon wall. If we select the snow and some wall, we can use a tonal selection to do the hard work. Here’s the lasso selection, and the curve I used to darken the snow.
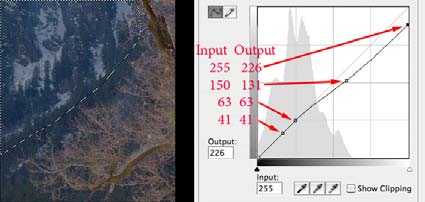
This does just what I want. But, if you try to darken the snow too much, you’ll have problems—because the curve will start to get flatter, and detail will be compressed in the snow. A slight darkening like the above is fine. But much more, and you end up with what I call “tonal constipation”!
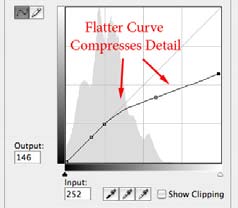
If those lower points were not locked down, the curve would flow more freely and naturally. But here we have a sudden shift from a normal curve to a much flatter curve, from normal tones to very compressed tones. Just be aware of the resulting curve shapes—and avoid those flat areas in your curve.
Example Five
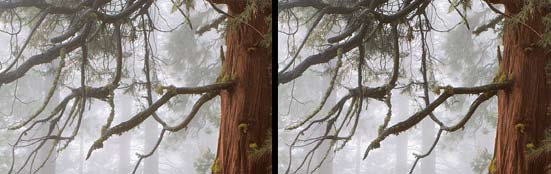
Here’s a final example that illustrates some darkening of certain tones. This is a section of a bigger image, with a wonderful incense cedar in fog. The branches at the top of the image seemed a little too light and needed more weight. When I first printed this image digitally ten years ago, I darkened these branches by painting them into a curves layer by hand. This technique is so much easier—and better.
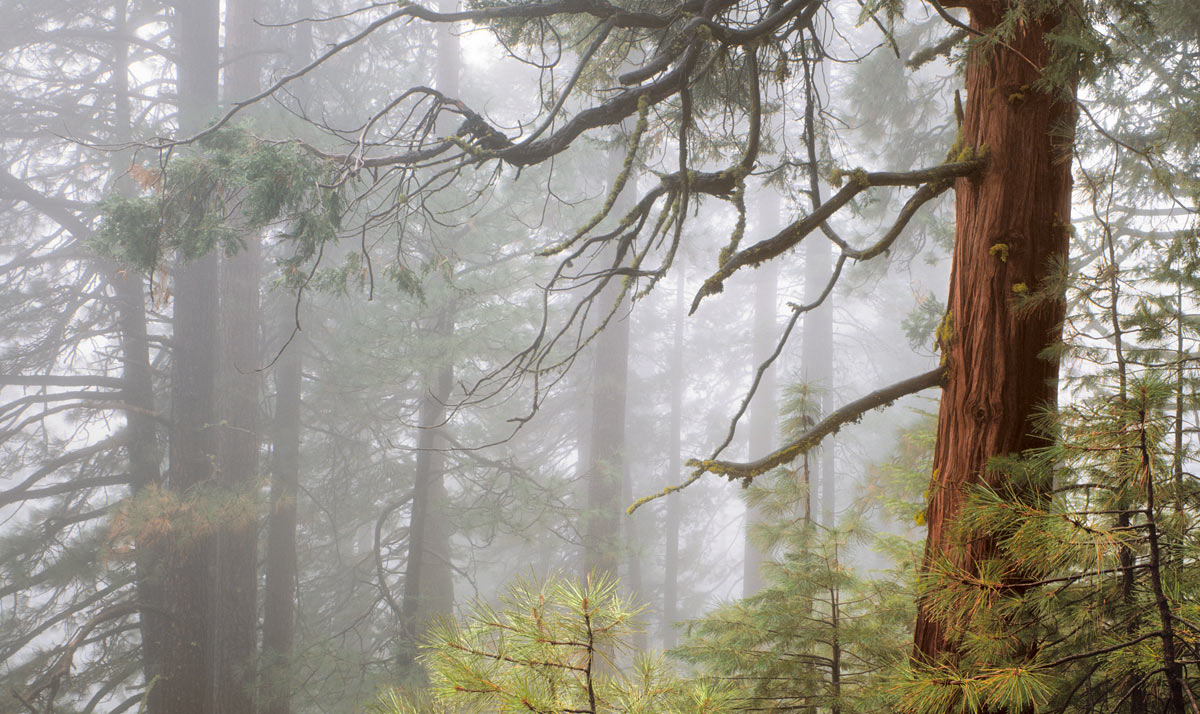
Another large jpeg that you can download to try this at home!
I selected the branches as shown below—be careful not to get any of the big tree in the selection. I adjusted the curve to lockdown the tones in the fog, but darken the tones in the darker branches.
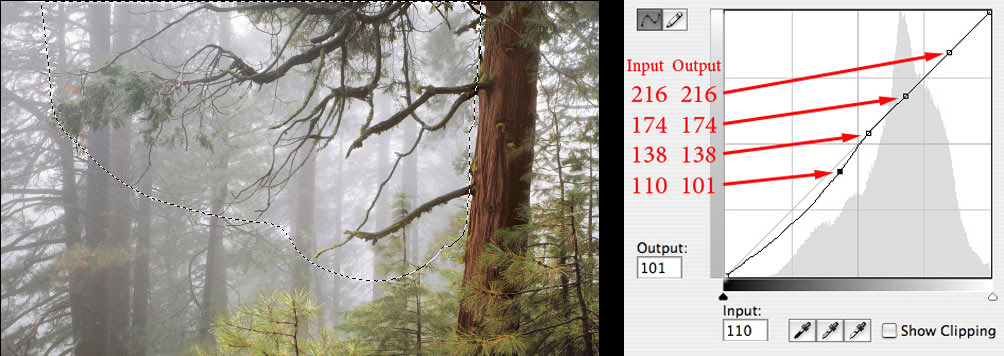
This is a subtle, but powerful improvement. Below you see a part of this section enlarged, showing the before and after.
Once you understand this technique, you’ll discover all kinds of simple and effective ways to work with your images. You’ll probably save hours of work, avoiding the misery of creating and messing with hard-edged masks! But, you can’t do everything with this method. It requires a tonal difference between your subject and back ground. It works best when brightening objects against a darker background. It doesn’t work as well if you try to lighten dark objects against a lighter background. Still, I find this technique to be incredibly helpful.
After teaching this method to various workshops, I find people suddenly putting tons of points onalltheir curves. Unless you’re doing a selection as described here—to lighten or darken selected tones—you usually don’t need lots of points. If you’re just lightening or darkening an image globally, a nice free-flowing curve is what you probably want. Too many points lead to “pointitis,” and that leads to flat spots, which leads to….tonal constipation! Just pay attention to the resulting curve shapes. Flee from flattening the curve and the resultant tonal compression.
Note: Doing some of these big tonal changes on these small jpegs gives a kind of grungy result. These downloadable jpegs are certainly not optimal, but will hopefully help you start to understand this technique.
© Charles Cramer 2008
February, 2008
Your can view more of Carles Cramer’s work here.

Elevate Your Vision


Read this story and all the best stories on The Luminous Landscape
The author has made this story available to Luminous Landscape members only. Upgrade to get instant access to this story and other benefits available only to members.
Why choose us?
Luminous-Landscape is a membership site. Our website contains over 5300 articles on almost every topic, camera, lens and printer you can imagine. Our membership model is simple, just $2 a month ($24.00 USD a year). This $24 gains you access to a wealth of information including all our past and future video tutorials on such topics as Lightroom, Capture One, Printing, file management and dozens of interviews and travel videos.
- New Articles every few days
- All original content found nowhere else on the web
- No Pop Up Google Sense ads – Our advertisers are photo related
- Download/stream video to any device
- NEW videos monthly
- Top well-known photographer contributors
- Posts from industry leaders
- Speciality Photography Workshops
- Mobile device scalable
- Exclusive video interviews
- Special vendor offers for members
- Hands On Product reviews
- FREE – User Forum. One of the most read user forums on the internet
- Access to our community Buy and Sell pages; for members only.
You may also like