I’ve always been fascinated by the interplay of light and shadow. Recently, while working on a project while using my DJI Inspire 3 drone – I was reminded of the importance of mastering dynamic range. This experience challenged me to revisit some past HDR techniques but also pushed me to explore new creative avenues. The test images I included here were testing the ability of multiple exposures in flight and being able to deliver the sharpest and highest dynamic range image to my client (think golfcourses).
Let me take you through my journey and thought process – adapting classic photo techniques for aerial use while discussing dynamic range and post-process techniques.
Understanding Dynamic Range
Dynamic range in photography refers to the range of light from the darkest of shadows to the brightest of highlights that a camera can capture in a single exposure. Mastering this concept can help create stunning landscape images, especially in challenging lighting conditions like sunrise or sunset.
While working on this recent drone project, I faced a unique challenge – I was to capture the full range of light and shadow for a client. The DJI Inspire 3, despite being an incredible piece of camera equipment (8K Full Frame camera). It is primarily designed for cinematography rather than still photography. This means it lacks some features typically found in still cameras and lower end drones, such as the very important auto-bracketing function. This limitation forced me to think about how to capture the full dynamic range of the scenes and if it was possible to capture a high dynamic image from a drone that lacks auto-bracketing.
** DJI must have known that this hard-hitting expose about the lack of auto-bracketing from their best camera drone (the DJI Inspire 3 ) was about to be published on LuLa and so DJI decided to release AEB firmware yesterday.
Planning the Shot: Traditional Wisdom Meets Modern Tech
Scout Your Location
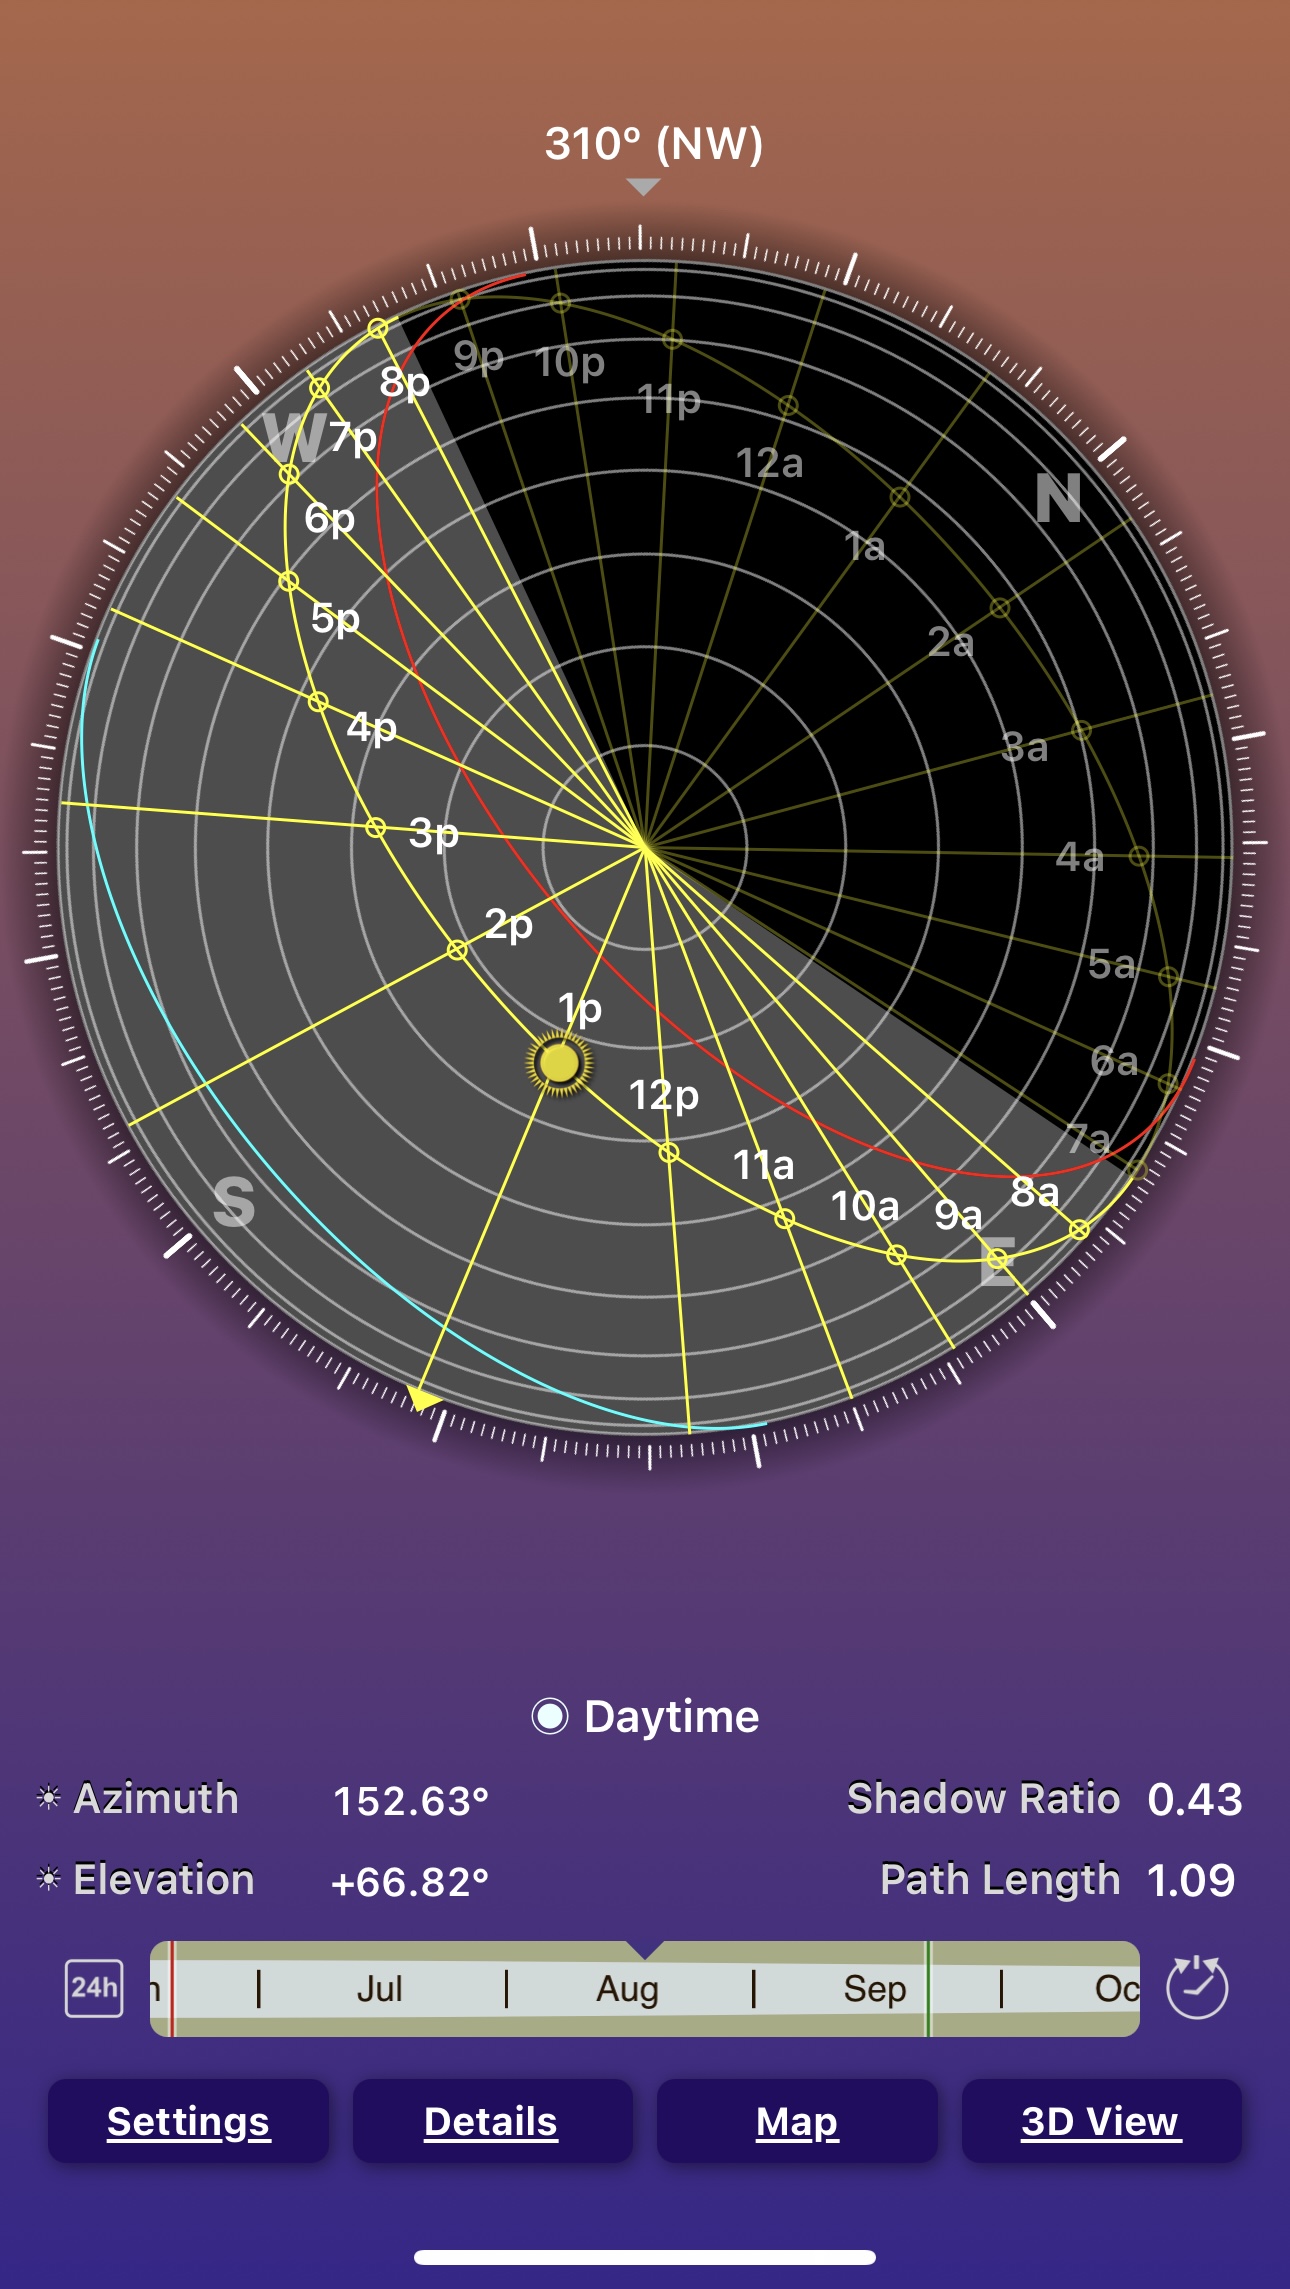
Before heading out with my camera or when I arrive at a location, I use a weather app and photo apps like PhotoPills and Sunseeker to predict the sun’s position and plan my composition. Sunseeker’s 3D view is helpful in visualizing how the sun would interact with landscape elements. It helps to know when the sun is coming over the tree line or the mountains.
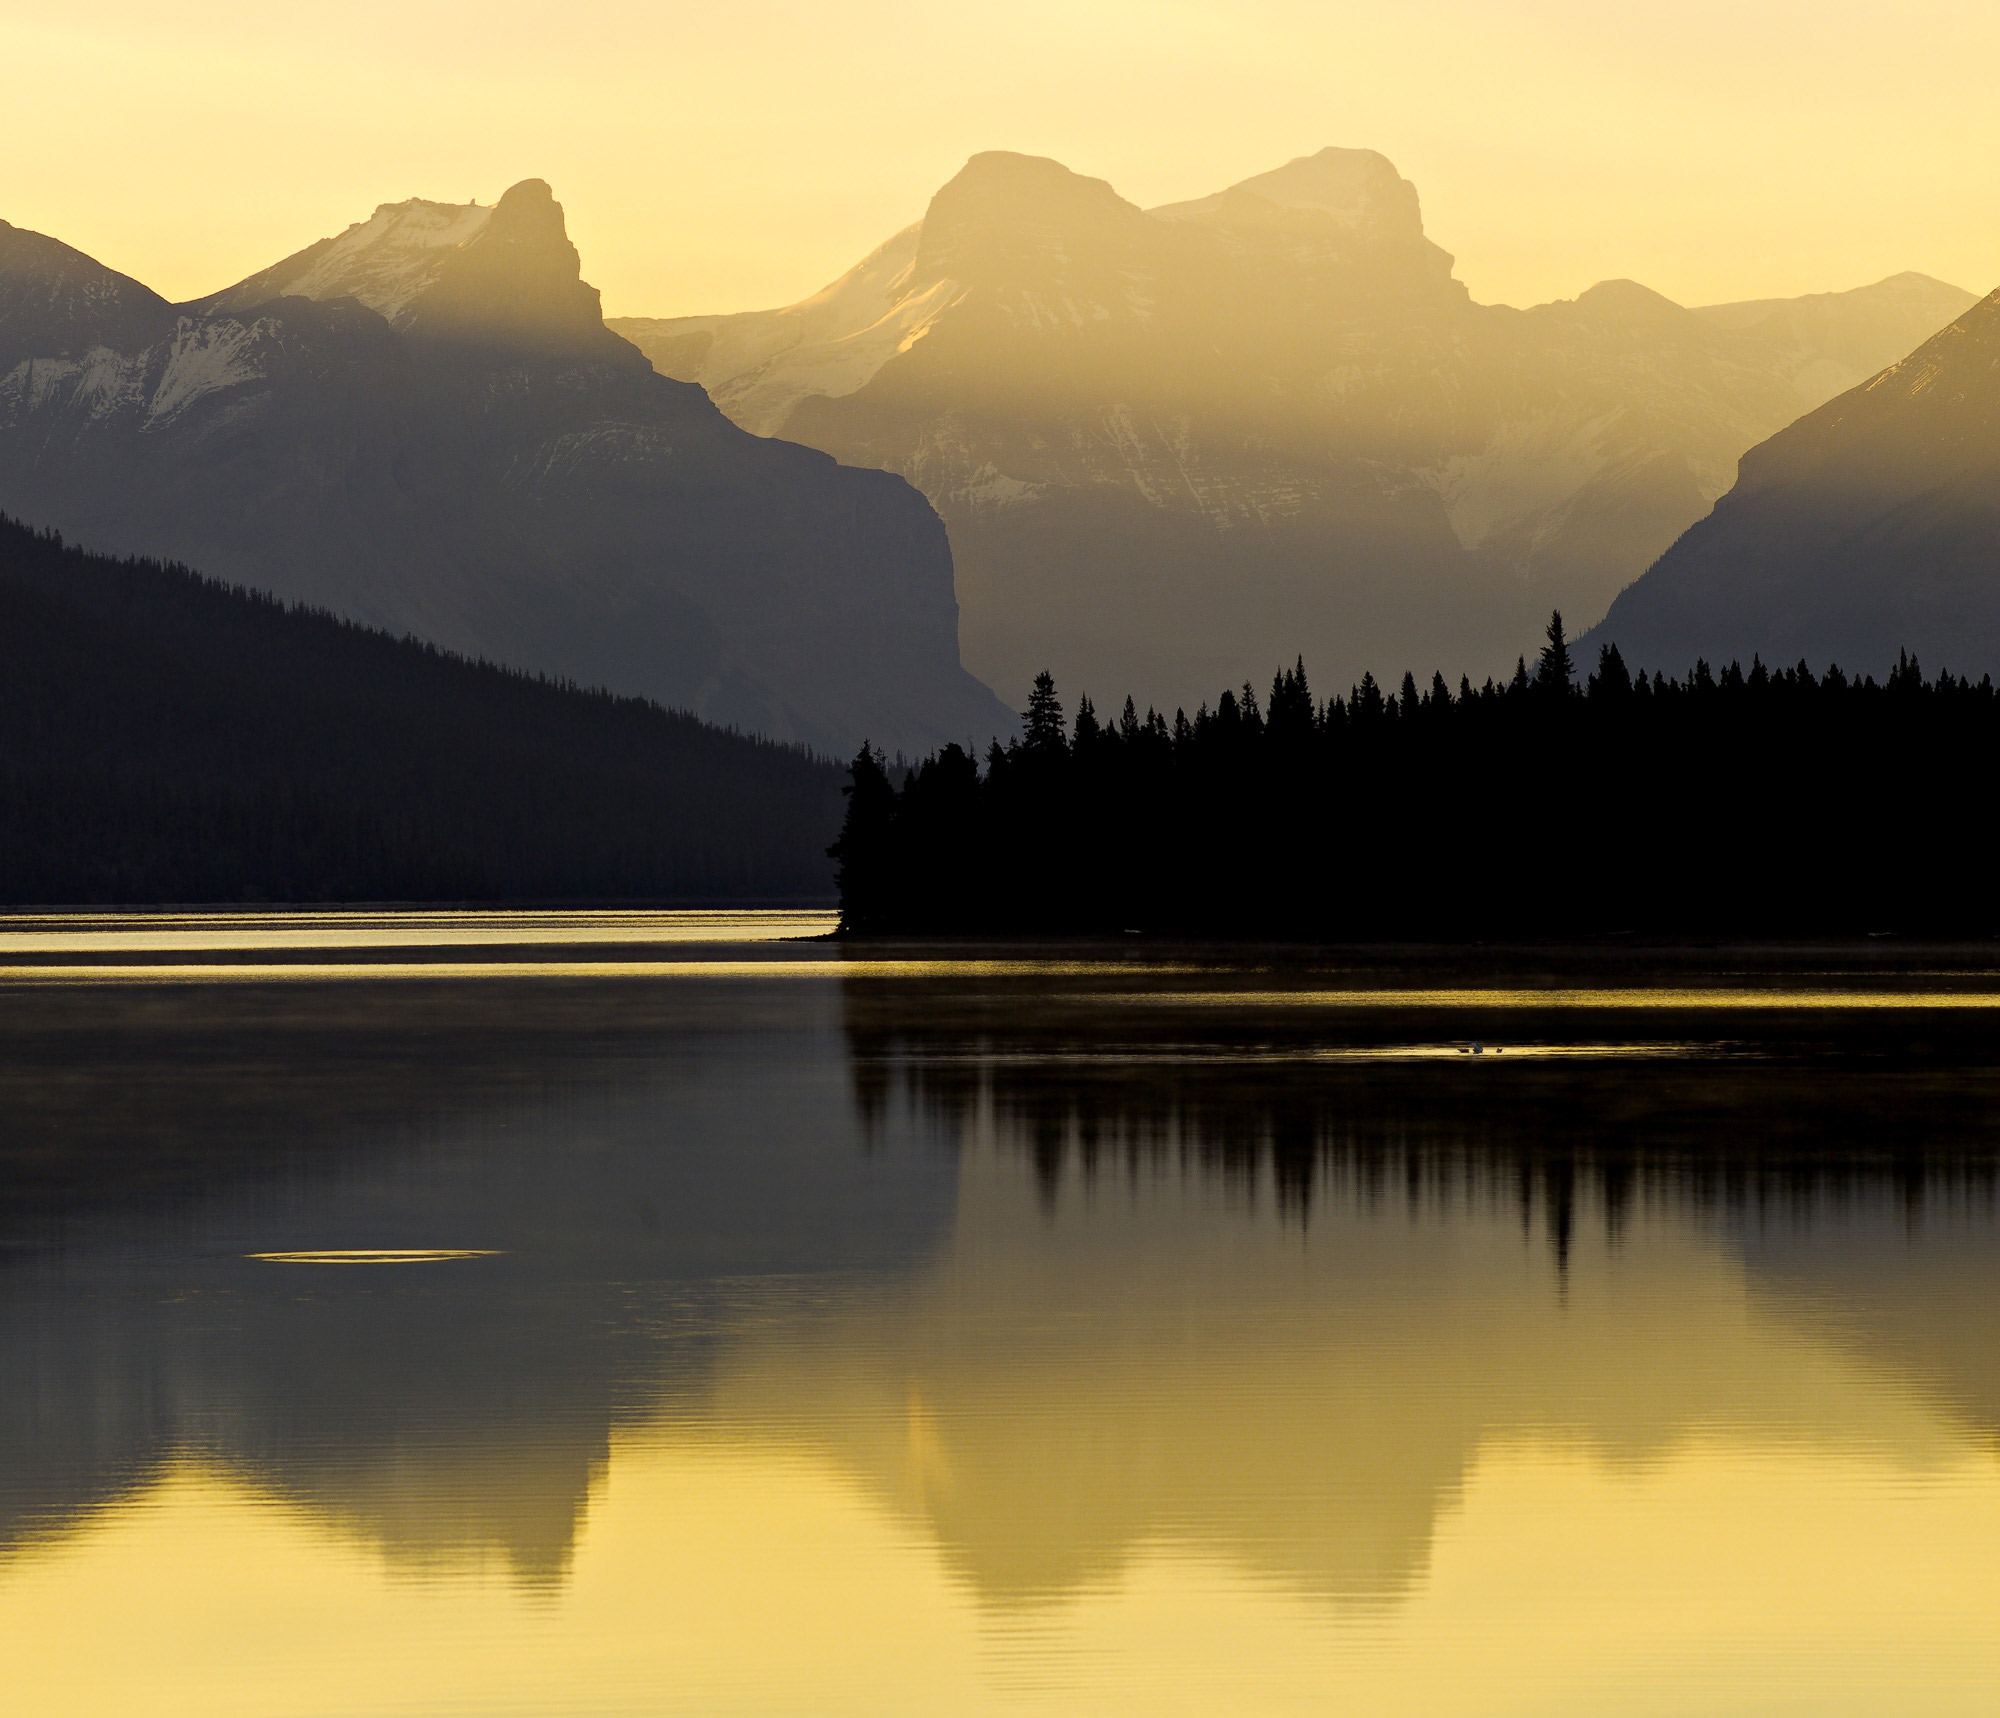
Choose the Right Time
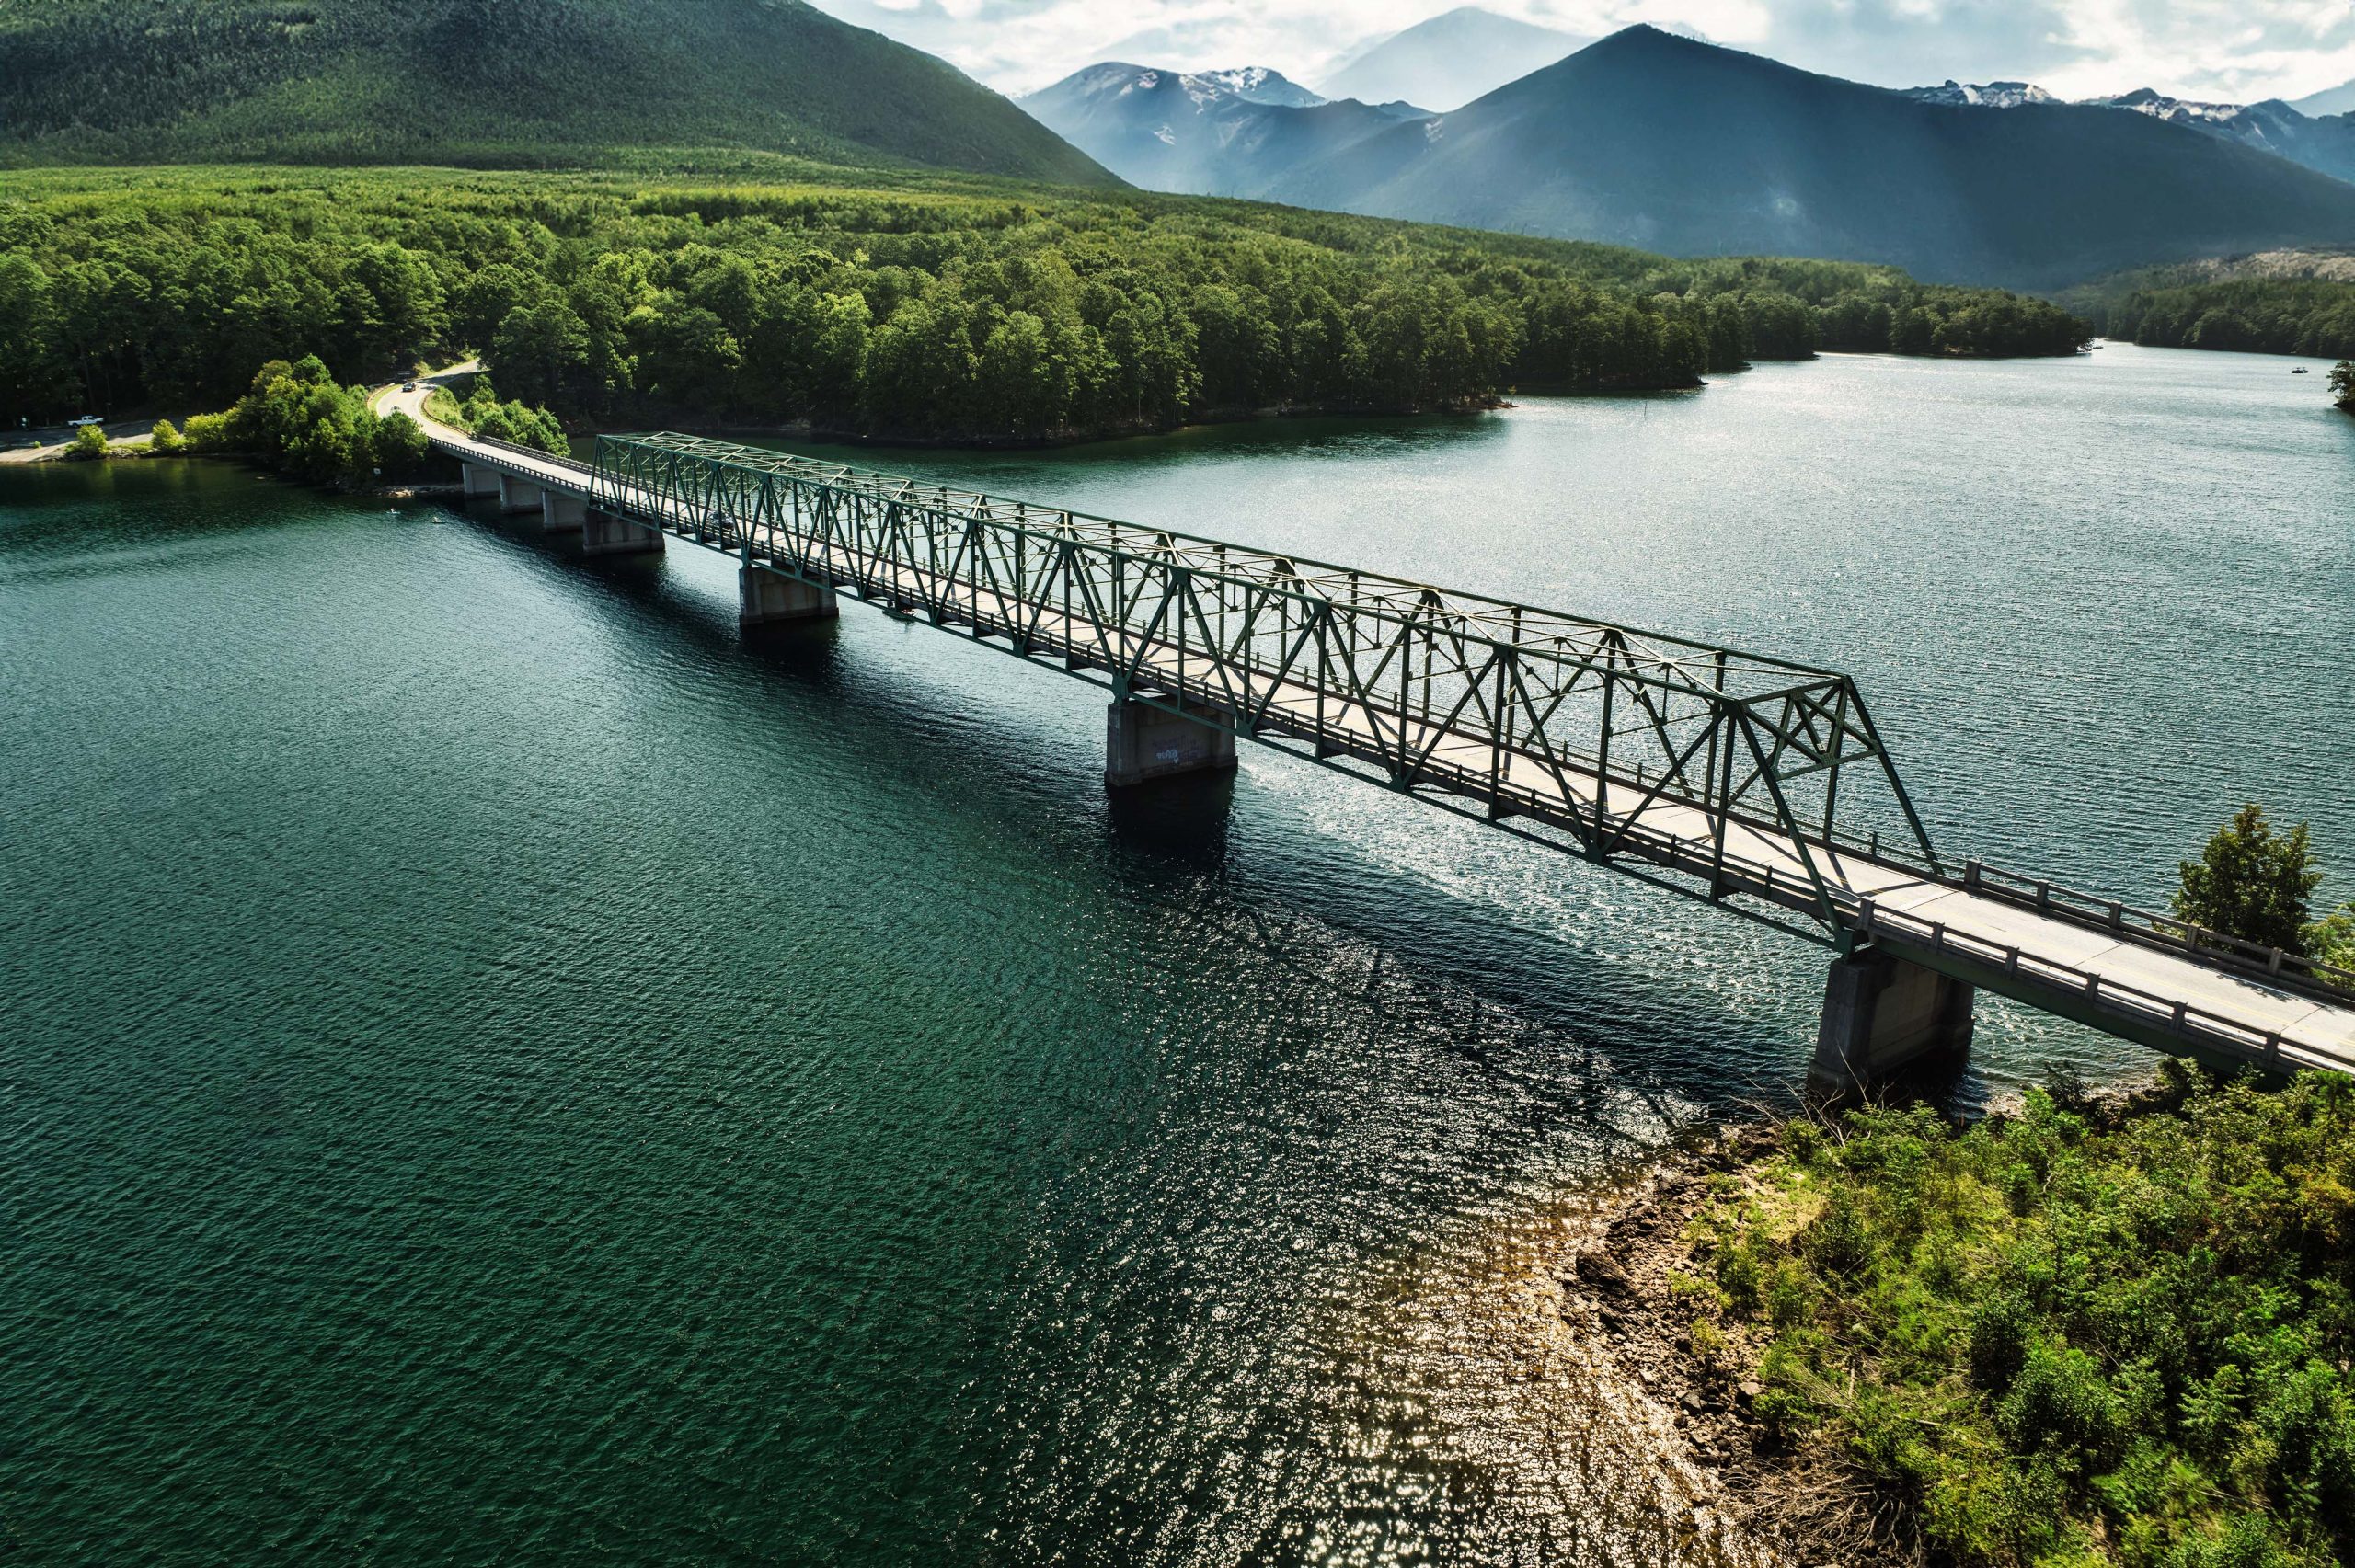
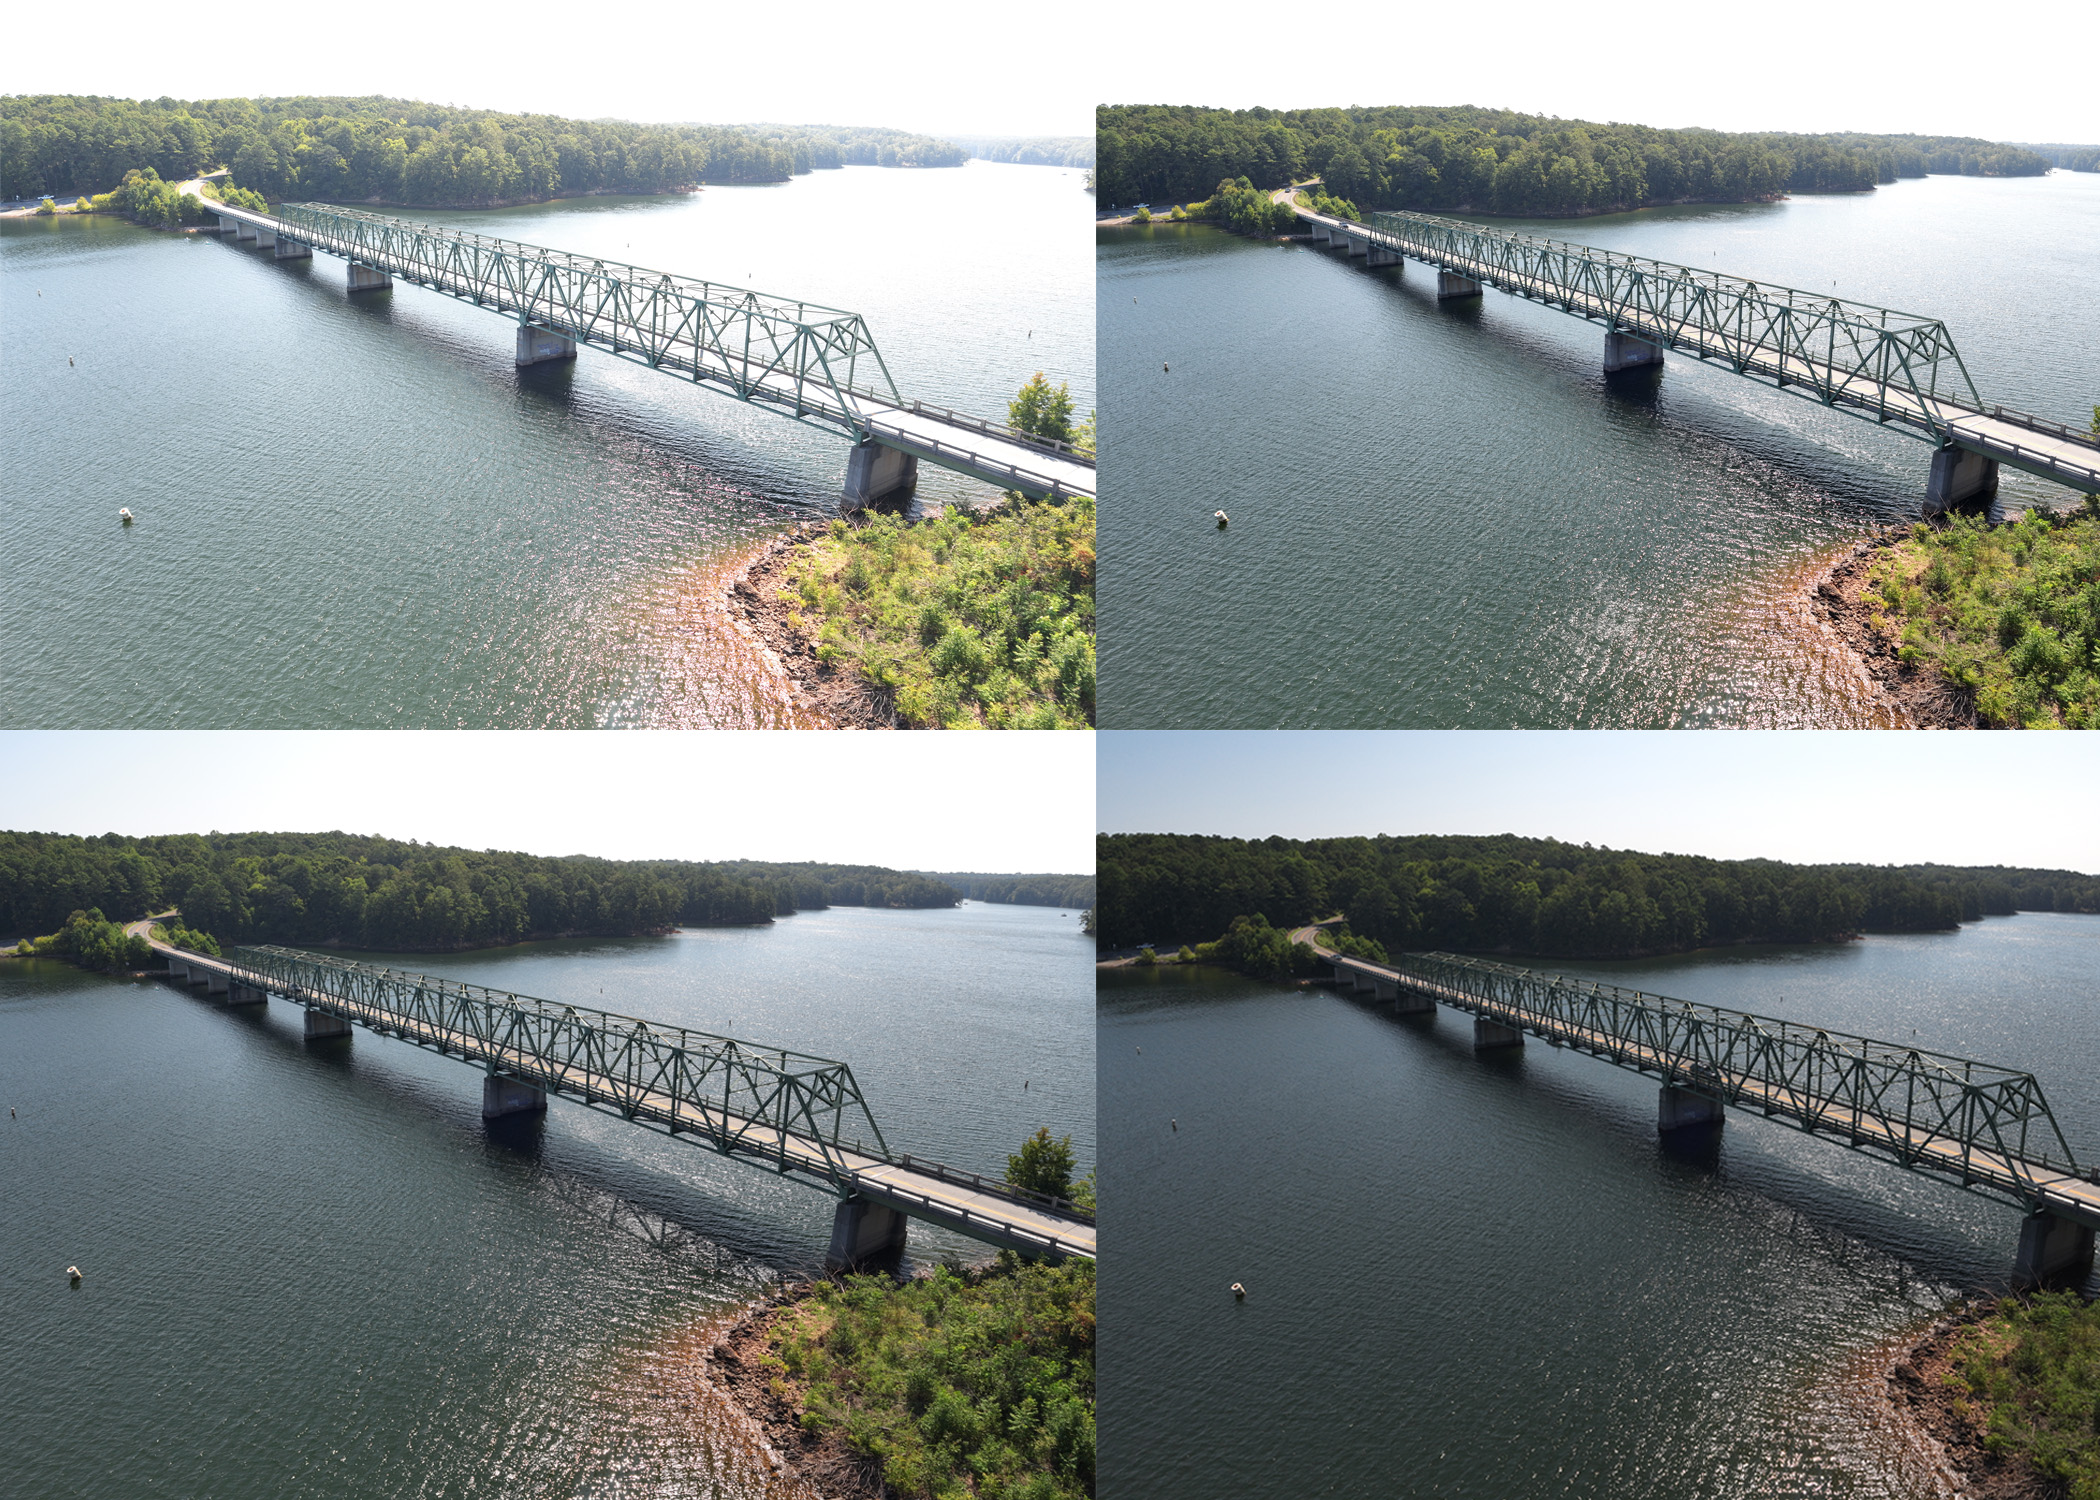
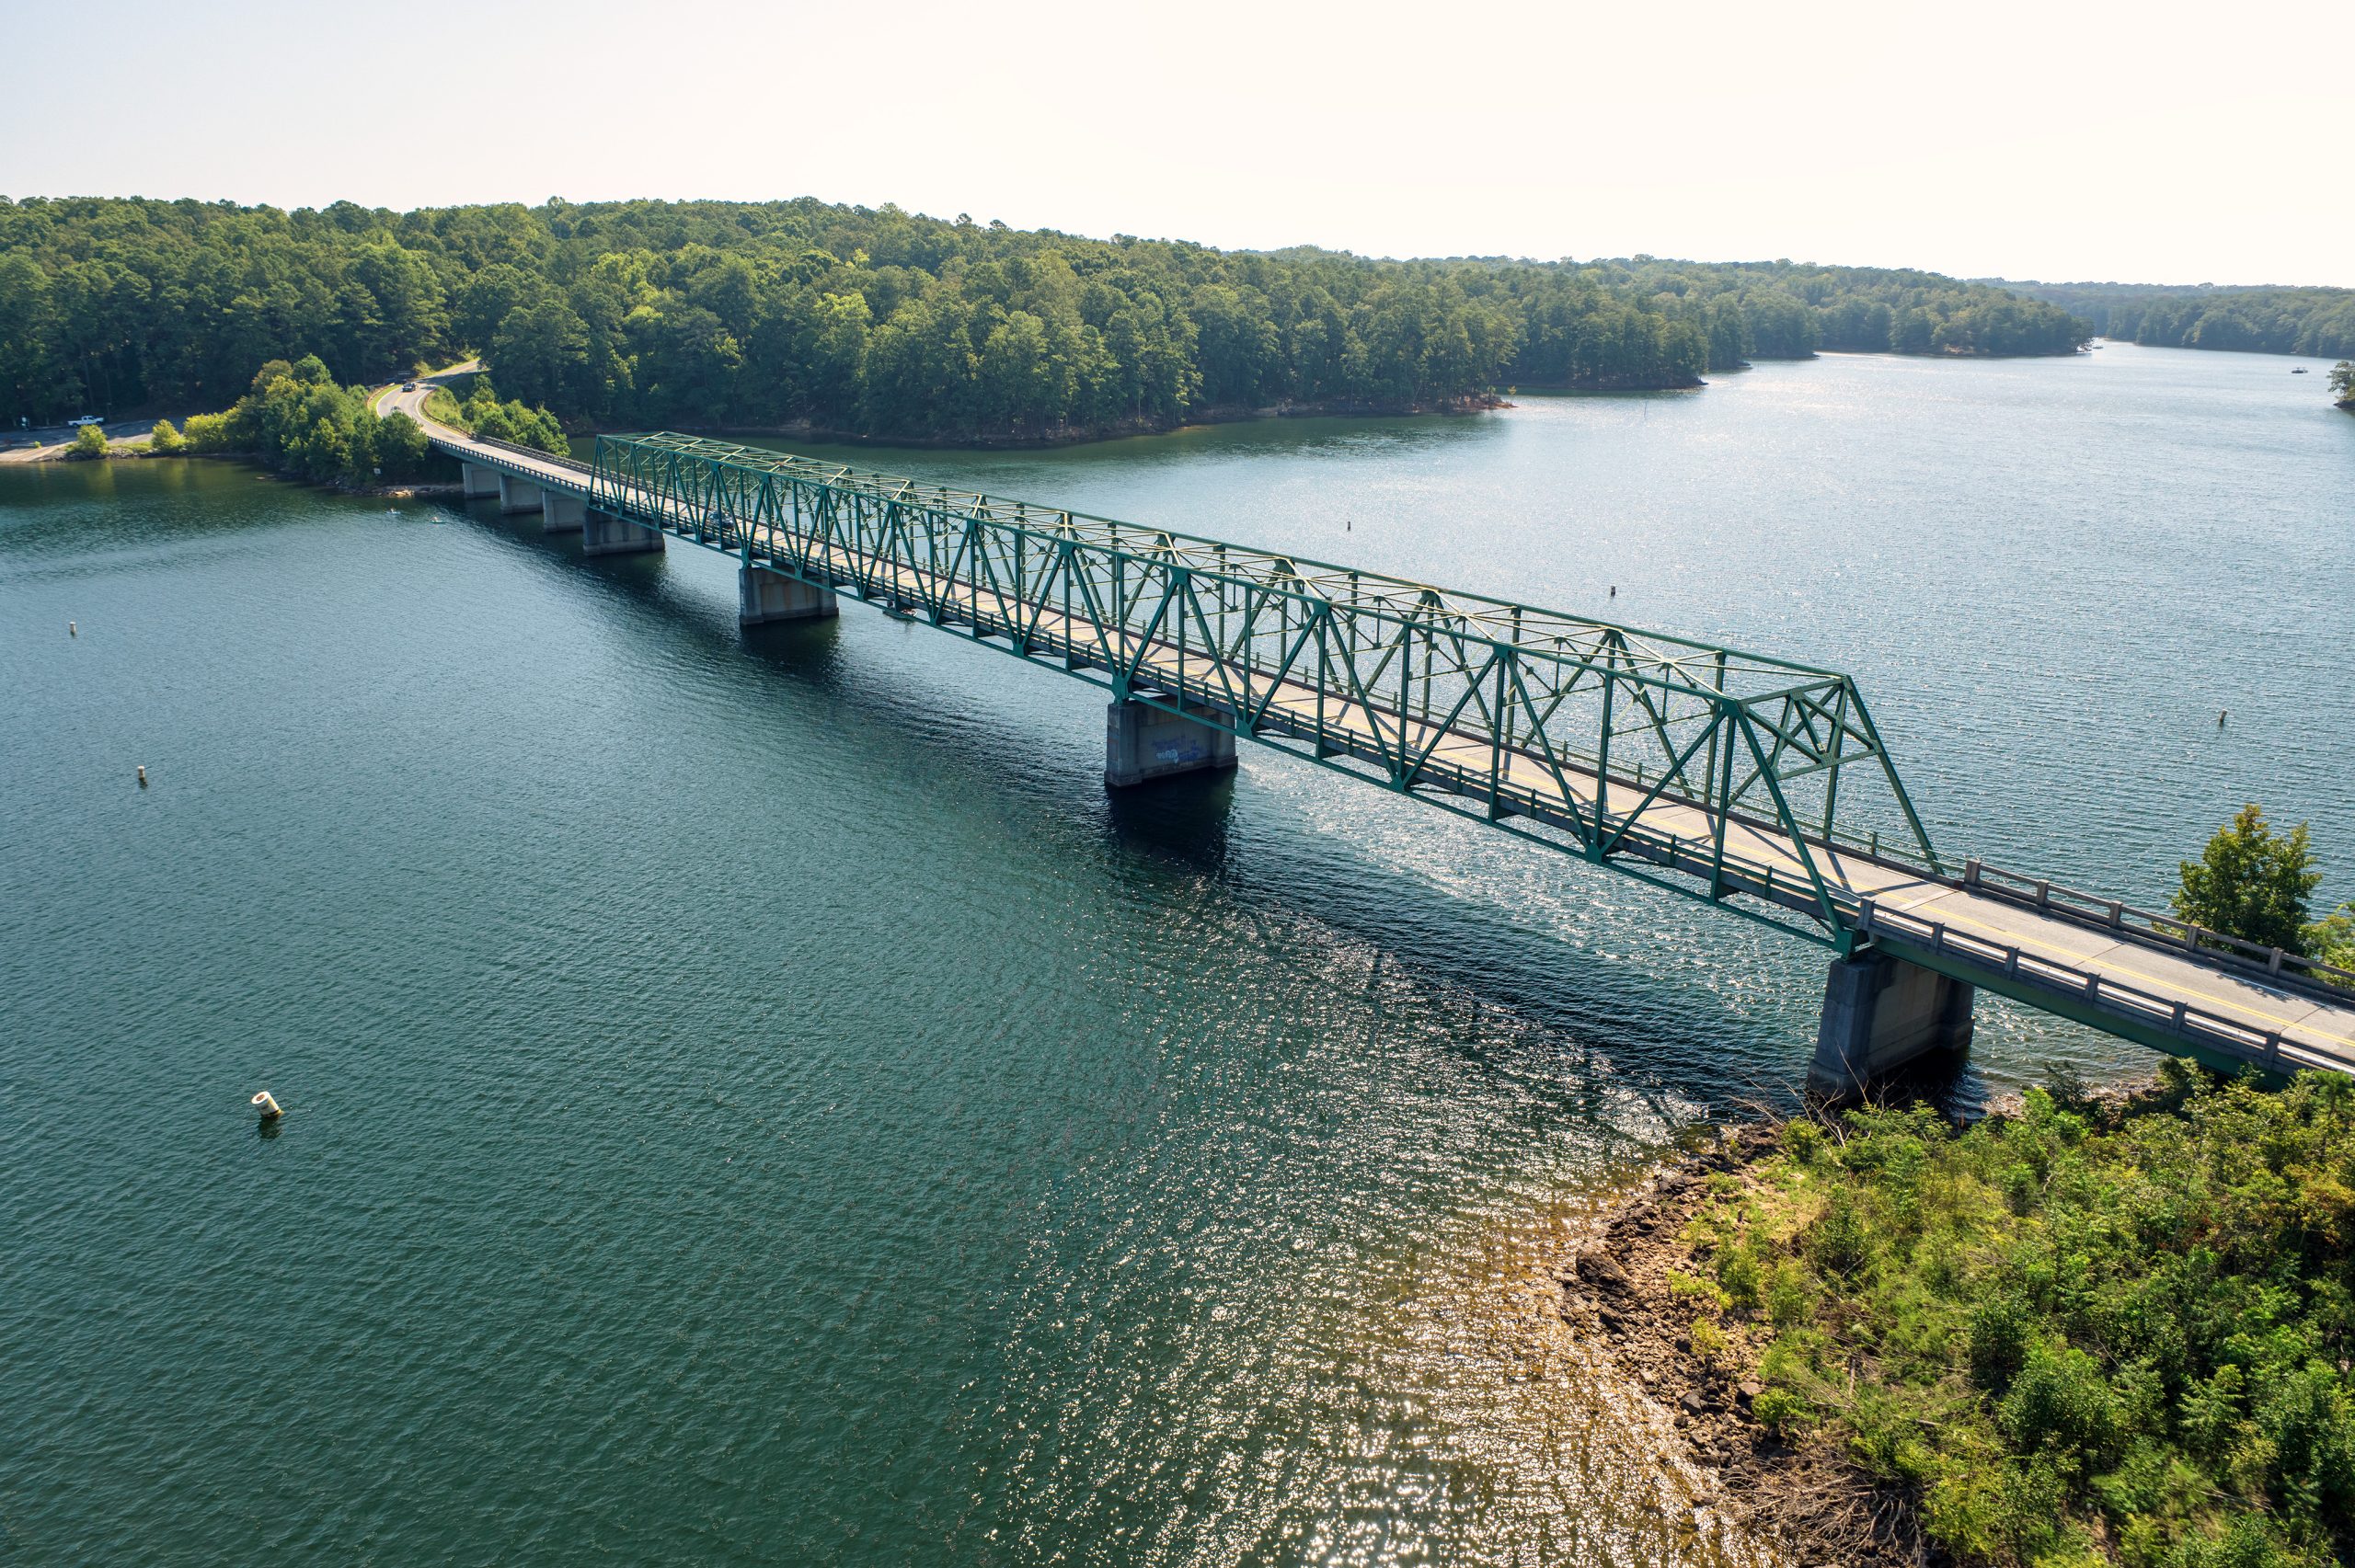
Usually, we aim for the “golden hours” around sunrise and sunset for the “best” shooting. These times often provide the most dramatic lighting conditions and typically present the greatest dynamic range challenges. This test shot was less than ideal – by the time we got to the bridge it was midmorning already and not spectacular.
Assess the Scene’s Contrast
Evaluating the difference between the brightest and darkest parts of the composition helps me determine my exposure strategy, even without the built-in bracketing function. Light meter anyone? Test exposures work as well and is what I did to determine filtration. Bright sun, clear sky, and hard shadows.
Use a Stable Platform
While my recent project involved drone photography, for ground-based shots, a sturdy tripod is invaluable for keeping your camera perfectly still across multiple exposures. I always recommend using a remote shutter release, or connecting your camera to your phone via bluetooth, or using your camera’s timer to avoid camera shake.
However….Lightroom’s “auto-align” feature was incredible how fast it merged the images from a bouncing camera platform like a drone. Good to know it could probably handle a “hold-your-breath” handheld bracket in a pinch.
Choose Your Aperture/Shutter Wisely
When I’m not constrained by drone settings, I typically use Aperture Priority mode for bracketed exposures. This approach keeps the aperture constant across all shots which help maintain a consistent depth of field, which is important for seamless blending later. The camera then adjusts the shutter speed to create the different exposures, ensuring that only the brightness changes between shots, not focus.
I aim for an aperture between f/11 and f/16 to maximize depth of field, but I’m careful not to go to the extreme to avoid diffraction. Usually while shooting stills in the air, I am mindful of the shutter, I feel to minimize camera bounce and be “sharp” you should be aiming for at least 1/200 sec to stop any small wind gusts or movement.
Use Filters
I opted for an ND 16/Polarizer combination (4 stops plus polarizer) for the drone shot. This choice allowed me to balance the exposures between the bright sky and darker foreground in-camera, allowing for a range of bracketing of highs and lows. The ISO for this camera is base 800.
Capturing the Scene: Adapting to Equipment Limitations
Bracketing Techniques
For scenes with the sun in the frame or high contrast:
- Start with your camera’s metered exposure
- Use auto-bracketing to capture at least 3 exposures: normal, underexposed (for highlights), and overexposed (for shadows).
- Consider using 5 or 7 stop brackets for extremely high-contrast scenes.
- Pay attention to your histogram to ensure you’re capturing the full range of tones
- Remember, in Aperture Priority mode, these exposure changes are achieved by varying the shutter speed, keeping your depth of field consistent. Motion will be affected.
- Take notes! Note the weather conditions, time of day, and any other creative ideas. This information can be helpful when you’re processing your images later.
In my drone testing with the Inspire 3, I manually changed the iris during the process. In hindsight, I will keep the f-stop the same and change the shutter next time. I couldn’t see any notable differences in the shots but to maximize sharpness for this client I’ll work the shutter speed rather than iris.
Work the Sun
When shooting directly into the sun, where there’s a challenging dynamic range situation, try this technique:
- When taking on-the-ground photography, take additional shots with your hand or another object blocking the sun.
- This prevents lens flare and allows you to capture clean foreground details.
- In post-processing, you can blend these shots with your main image to create a more balanced exposure.
In drone photography sometimes a lens hood is all you can do to help control contrast.
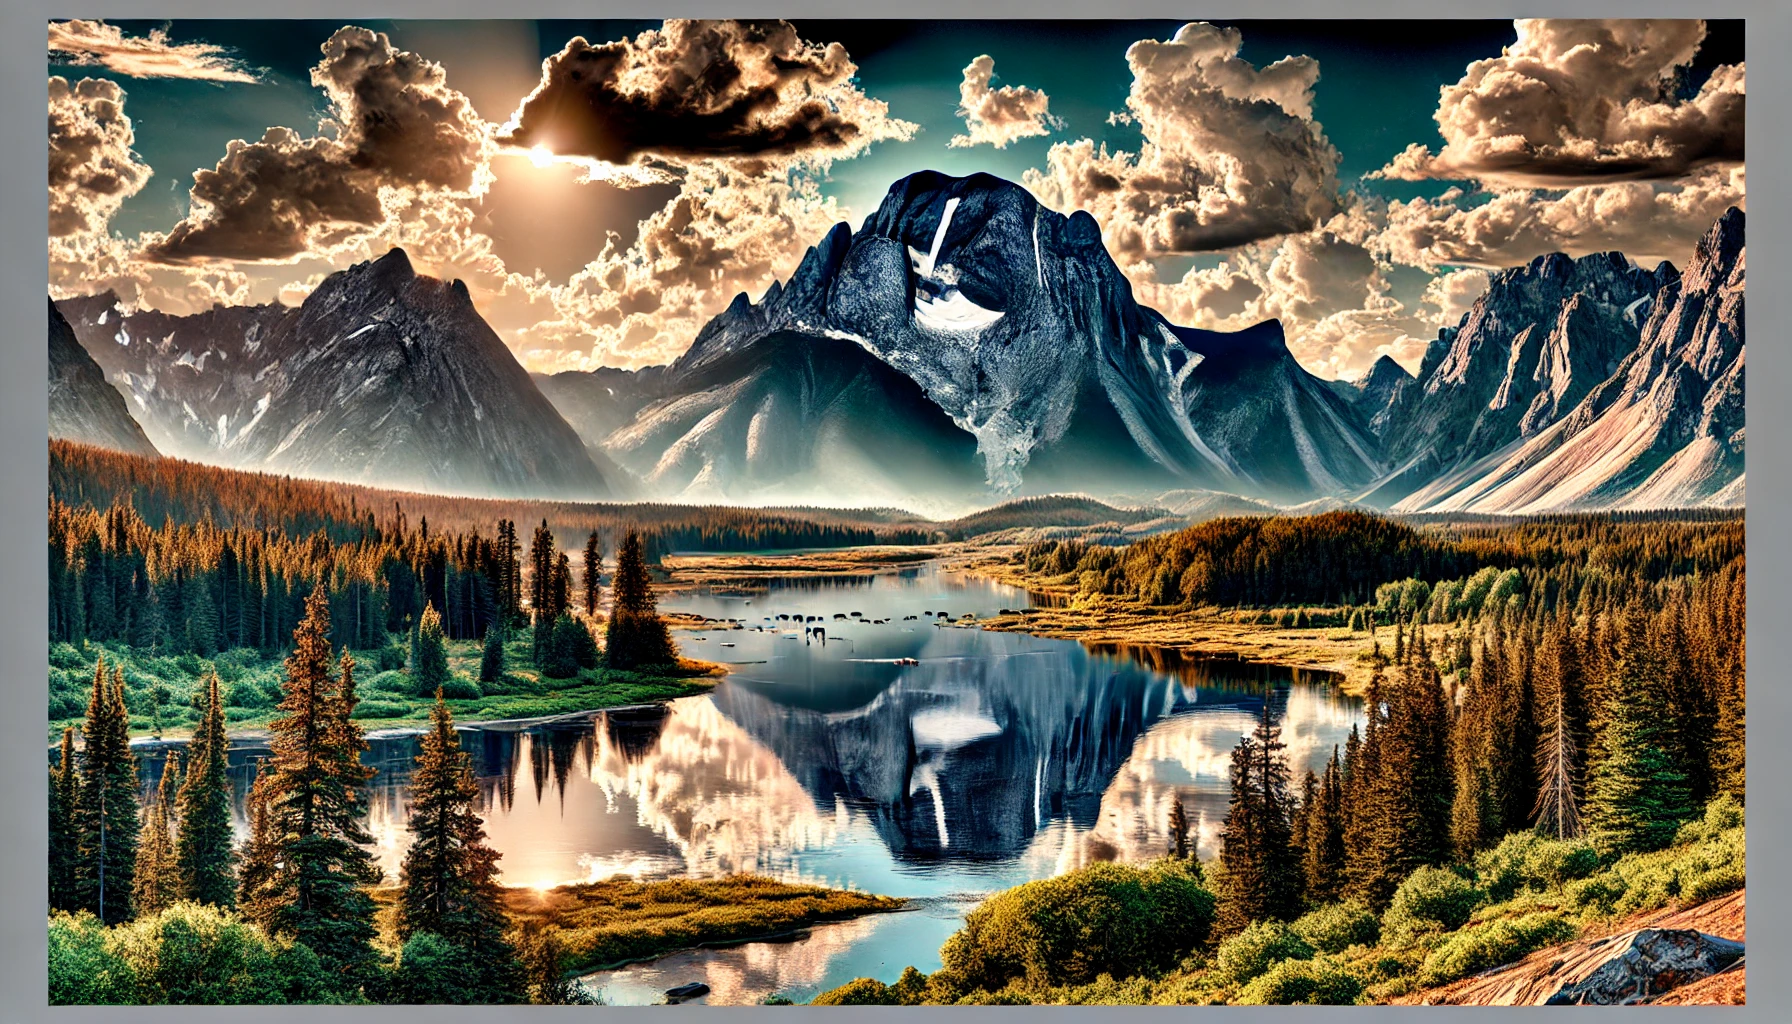
Post-Processing Workflow: Painting with Light and Pretend skies
Back in the digital darkroom, I realized that the lack of auto-bracketing had actually pushed me to capture more varied exposures than I might have otherwise. This gave me a rich some room to work with in post.
Step 1: Exposure Blending – Laying the Foundation
I have always been mindful of using a “stable platform” for shooting multiple exposures and was curious how to best match the shots from a camera bouncing in the air. I started by using Lightroom’s “Auto-Align” feature which to my excitement – perfectly matched up the drone shots. This tool was incredible how it combined multiple exposures from a moving platform. Incredibly easy.
From there, I moved into Photoshop, using layers to blend the different exposures. Labeling layers clearly (e.g., “Sky Bright”, “Foreground Dark”) helps keep my workflow organized.
Step 2: Refining the Blend – Adding Depth and Dimension
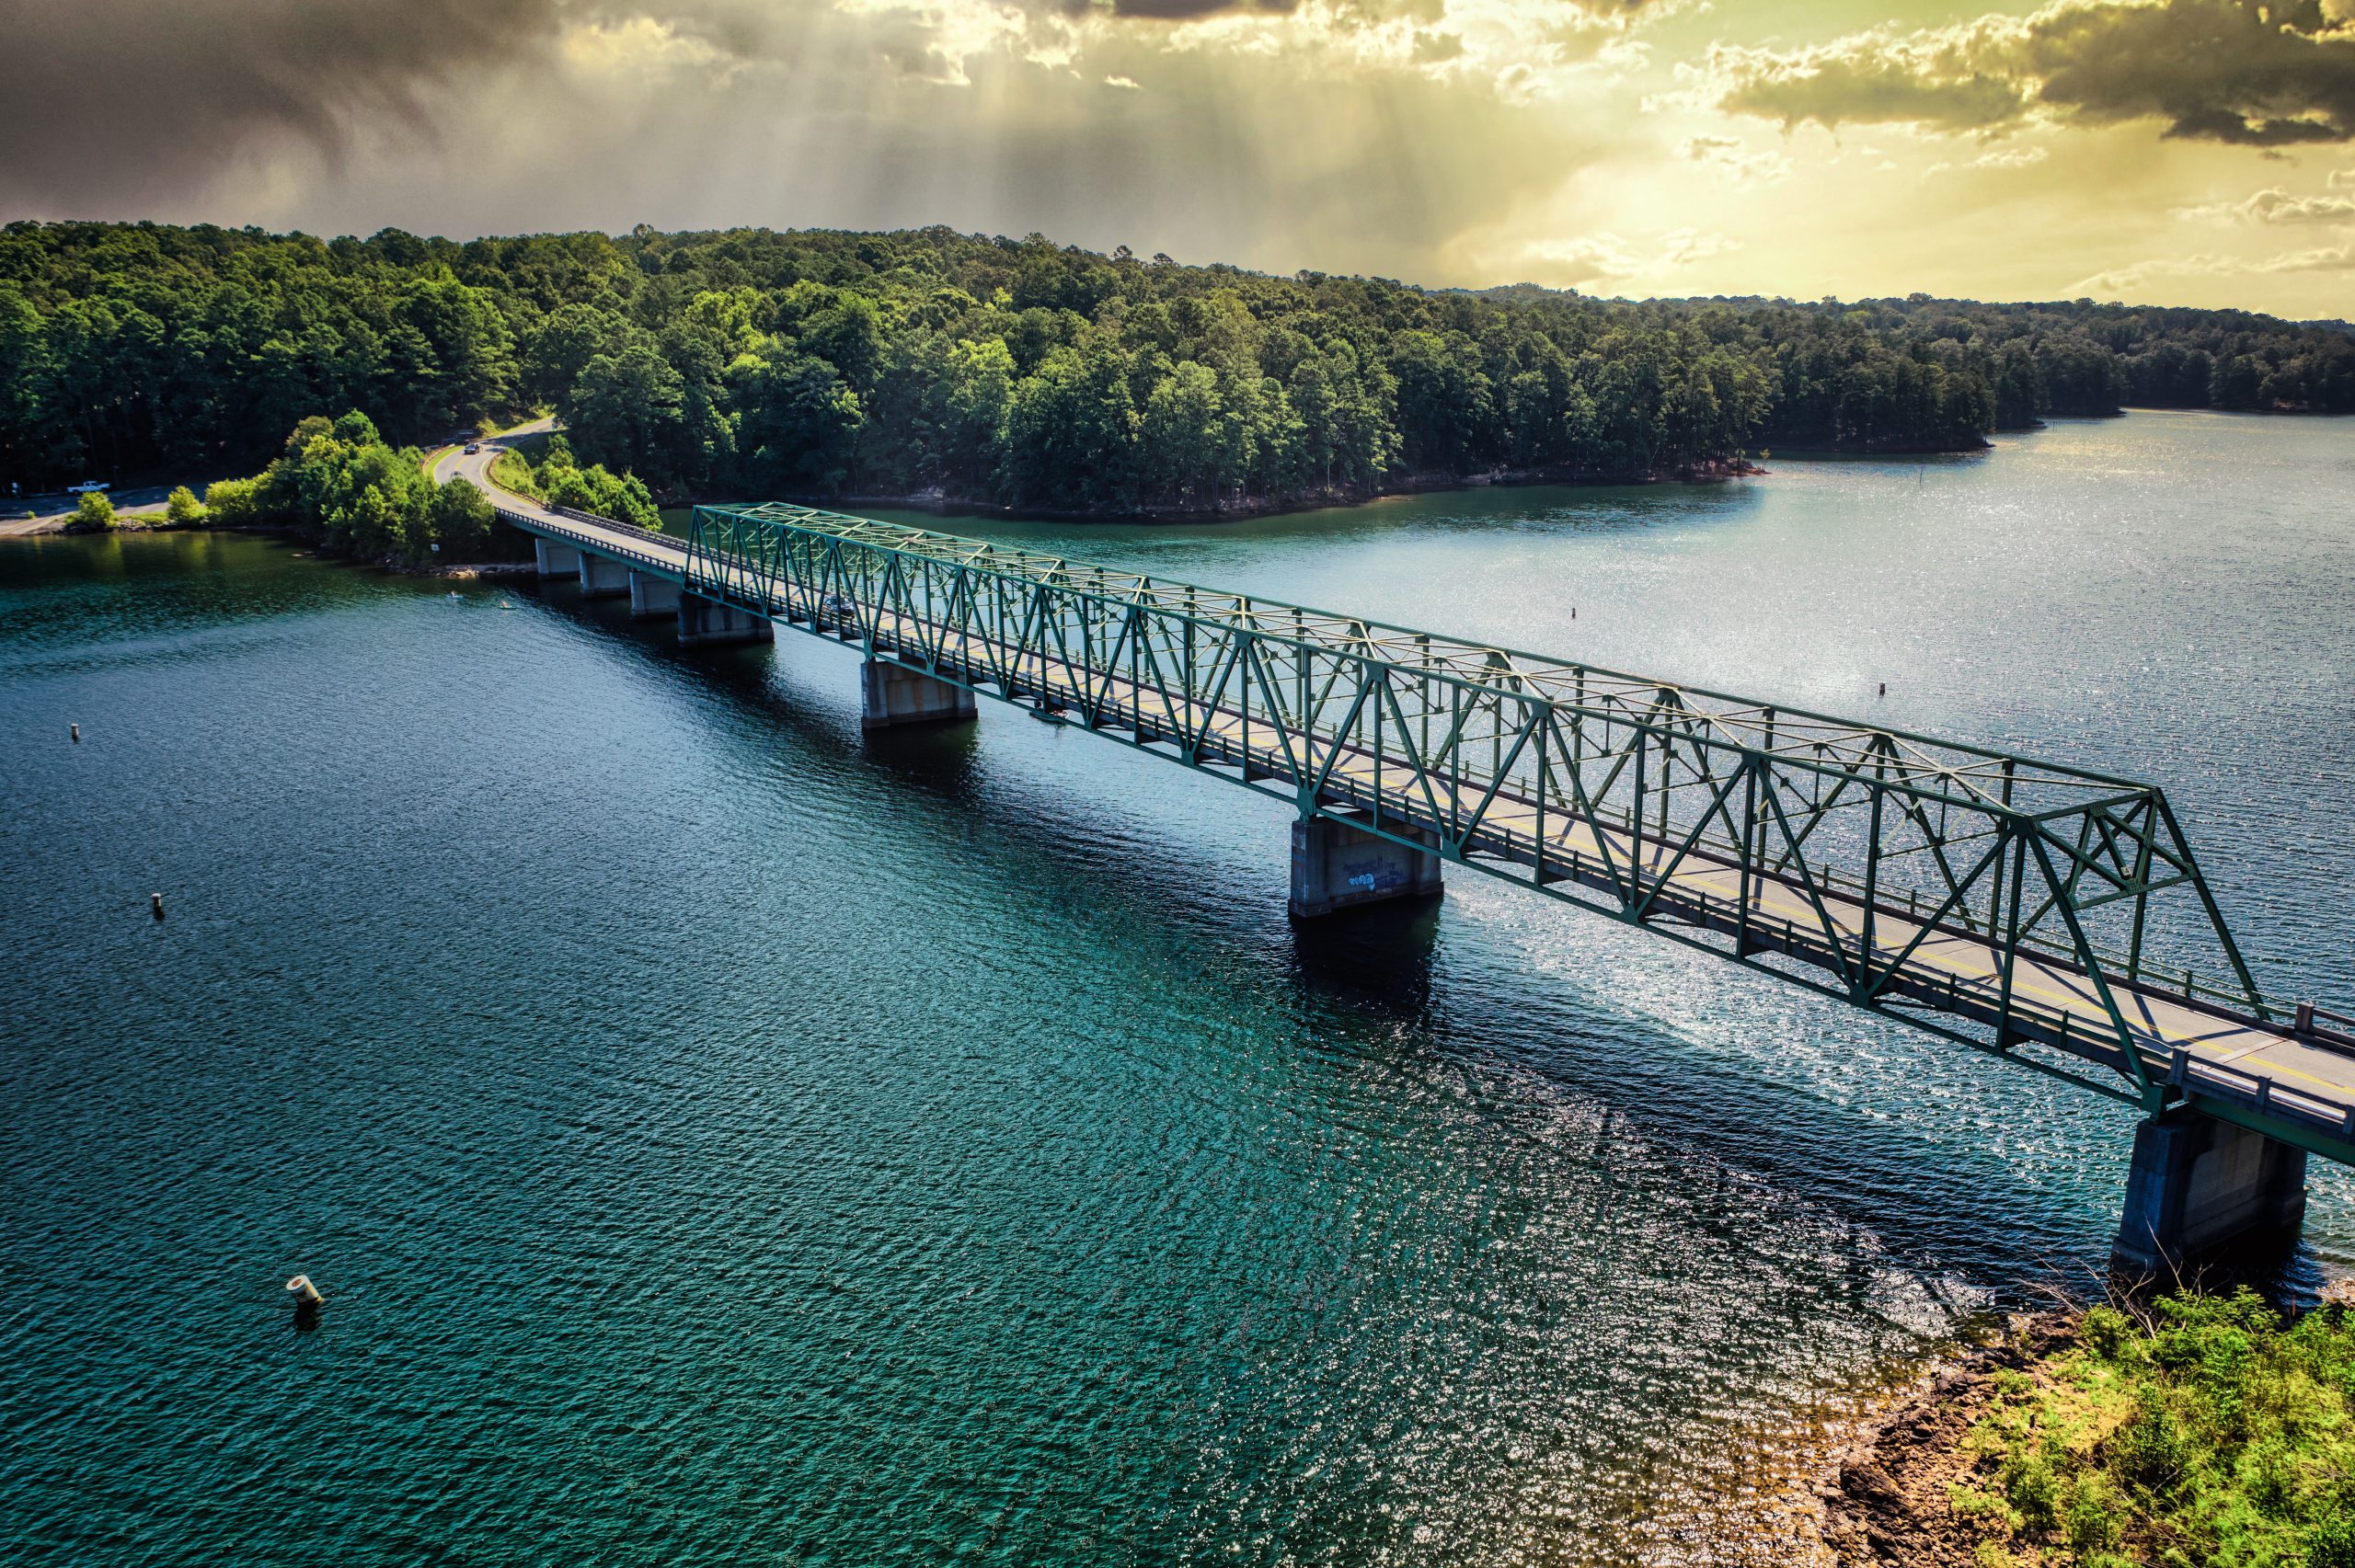
I combined masks and used manual brushwork for precise control over the light in different parts of the image. This allowed me to bring out details in the shadows of the bridge while maintaining the drama in the sky.
- TIP: Check Your Work at Different Zoom Levels: Ensure your “touches” look good both up close and from a distance. Like a painter stepping back from their canvas, give yourself some perspective on your work.
Step 3: Sky Replacement and Lighting Effects
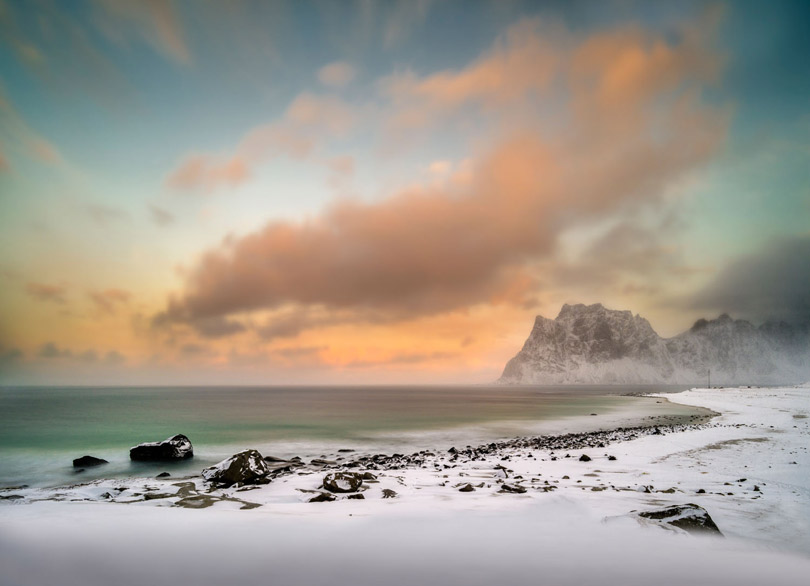
Here’s where things got really interesting. I used both Photoshop and Luminar Neo to experiment with sky replacement and generative fill. While the generated sky didn’t always fit perfectly, the “generative fill” was entertaining. I got some interesting interpretations of dolphins and eagles in Photoshop!


I found myself bouncing between Photoshop and Luminar Neo, using each program’s strengths to shape the light in my image. Luminar Neo’s sky replacement tool provided a great starting point, while Photoshop’s more granular controls allowed me to fine-tune the details of the lighting.
One approach I used was in Photoshop to use the select tool to select the sky. I used “Generative Fill” in Photoshop to ask for mountains “like the Colorado Rockies” and it did a good job of blending and making it congruent to the existing environment. It gave several choices – all looked pretty passable.


Step 4: Final Adjustments – Perfecting the Light Painting
In the final stages, I used layers and curves adjustments to fine-tune the overall exposure and contrast. I also did some soft “erasing” of the layer beneath with a brush tool, much like dodging and burning in a traditional darkroom. T
he lighting effects in Luminar Neo are incredible. The fog effects are fun to play with as well – “Mystic” did some great things to the atmosphere of the mountains and lowered contrast in a believable way.

Working with Focus Stacks
For on the ground scenes with important elements in both foreground and background, try taking multiple shots with different focus points if needed. This technique, known as focus stacking, ensures sharpness throughout the image. In post-processing, align these layers and blend them carefully to create an image that’s sharp from front to back.
A Word of Caution: Avoid Overworking Your Image
While post-processing tools offer incredible possibilities, it’s easy to get carried away. Remember:
The goal is to enhance what you saw and felt in the moment, and express that.
- Subtlety is key. Aim for a natural look that maintains the integrity of the original scene.
- Step away from your editing periodically. This helps you spot over-processing and maintain perspective.
- If you’re unsure, err on the side of less processing. You can always add more later if needed.
- Consider creating multiple versions of your edit, from subtle to more dramatic, and compare them after a day or two with fresh eyes.
Lessons and Tips for Success
This project reminded me of some points to share:
- Embrace limitations: The lack of auto-bracketing on the Inspire 3 pushed me to be more intentional with my exposures. And, as a side note, DJI just did a software release update to the Inspire 3 for Auto-Bracketing!
- Master the basics: Understanding how to manually bracket shots is crucial, even in this age of advanced technology.
- Use filters: The ND 16/Polarizer combination was key in managing the dynamic range in-camera.
- Experiment with software: Don’t be afraid to use multiple programs. Each has its strengths.
- Stay organized: Clear labeling of layers and groups in your editing software is crucial for complex blends.
- Take breaks: Step away from your editing periodically to refresh your eyes and spot issues you might have missed.
- Use a tripod when possible: Even with image stabilization technology, a sturdy tripod can make a significant difference in image sharpness, especially for long exposures or bracketed shots.
- Master aperture control: Understanding how aperture affects depth of field is crucial. For landscape work, I often shoot between f/11 and f/16, but I’m always mindful of the potential for diffraction at very small apertures.
- Practice focus stacking: This technique can be a help for scenes with important elements at varying distances from the camera.
Additional Tips for Advanced Photographers
- Experiment with luminosity masks for even more precise control over your exposure blending.
- Consider using specialized software like Aurora HDR or Photomatix Pro for complex HDR situations.
- Don’t forget about the creative possibilities of intentionally high-contrast images. Sometimes, embracing deep shadows or bright highlights can create dramatic effects.
Mastering Light, Crafting Vision
My journey with the DJI Inspire 3 reinforced the idea that mastering dynamic range is as much about artistic vision as it is about technical skill. It’s about seeing the potential in a scene and using the tools—both in-camera and in post-processing—to bring that vision to life.
So create, chase the light, and paint your own visual stories. The world is waiting to see.
Please see the wonderful essay from Ignacio Palacios on LuLa about image manipulation: The Very Old Debate About Image Manipulation
Also as a member of Luminous Landscape – remember that you can get 15% off of rentals at Lensrentals.com. Use code “Lula15” for your discount.
And please let me know your thoughts on things and what you’re working on.
We’d love to hear from you: [email protected]


Elevate Your Vision


Read this story and all the best stories on The Luminous Landscape
The author has made this story available to Luminous Landscape members only. Upgrade to get instant access to this story and other benefits available only to members.
Why choose us?
Luminous-Landscape is a membership site. Our website contains over 5300 articles on almost every topic, camera, lens and printer you can imagine. Our membership model is simple, just $2 a month ($24.00 USD a year). This $24 gains you access to a wealth of information including all our past and future video tutorials on such topics as Lightroom, Capture One, Printing, file management and dozens of interviews and travel videos.
- New Articles every few days
- All original content found nowhere else on the web
- No Pop Up Google Sense ads – Our advertisers are photo related
- Download/stream video to any device
- NEW videos monthly
- Top well-known photographer contributors
- Posts from industry leaders
- Speciality Photography Workshops
- Mobile device scalable
- Exclusive video interviews
- Special vendor offers for members
- Hands On Product reviews
- FREE – User Forum. One of the most read user forums on the internet
- Access to our community Buy and Sell pages; for members only.
You may also like