


While HDR is most likely the preferred approach for squeezing the last bit of stunning detail and tonal gradation from highlights and shadows, if you havenít prepared your captures for HDR post-processing not all may be lost. There can be an astonishing amount of information hidden in your raw files just waiting to be revealed by the right treatment in Lightroom 2.x or Camera Raw 5.x.
Cityscapes on bright, overcast days can be a classic case in point, as I found from working on this image (and others) I shot in Tonghai (Yunnan Province, China) last October. Figure 1 shows the “really raw” image in Lightroom 2.4 portrayed according to all my default settings (White Balance “as Shot” and everything else “0”, tone curve linear).
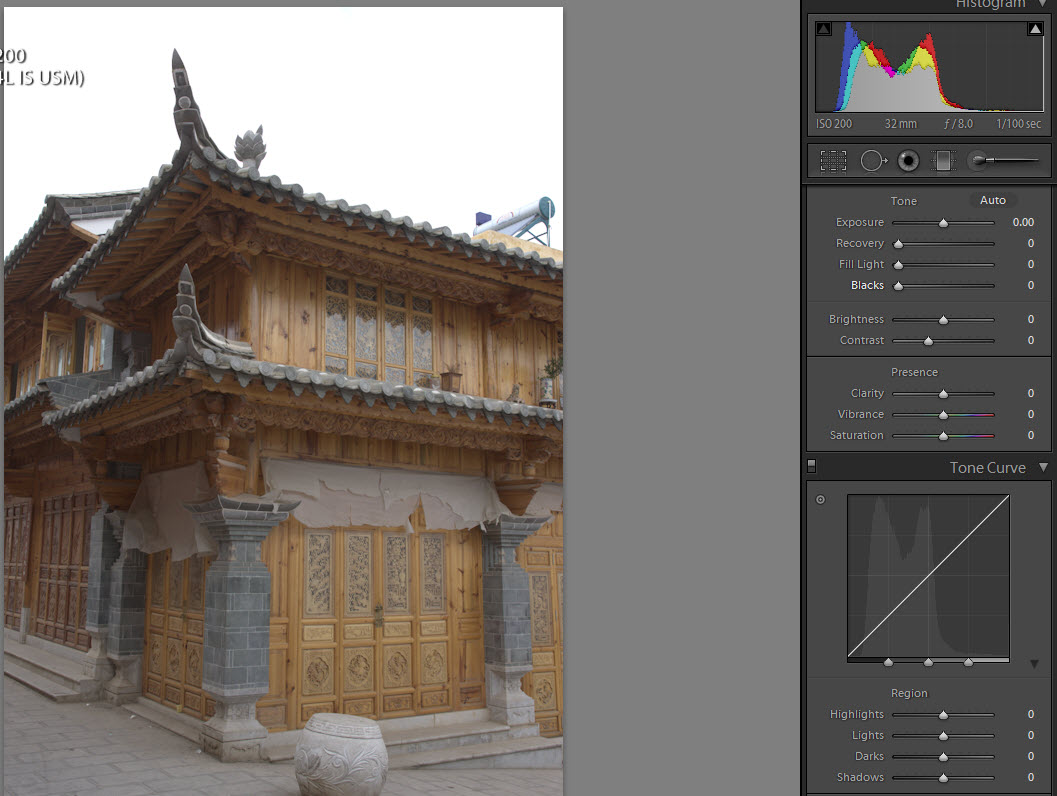
Figure 1 – No Adjustments Yet
The sky looks completely blown, hence featureless, and the shadows under the buildingís fancy eaves are muddy, suppressing the gorgeous carved detail which exists there.
Lightroom makes it very easy to move a few sliders around for exploring whether there is hidden content capable of rescue to an acceptable standard of image quality. In this case, and for other images taken at the same time, I first confirmed that indeed there is.
Starting with the sky, which really is a “deal-breaker” for this image, the first step is to move the Recovery slider increasingly rightward to see what amount of information it can elicit. The result is shown in Figure 2.
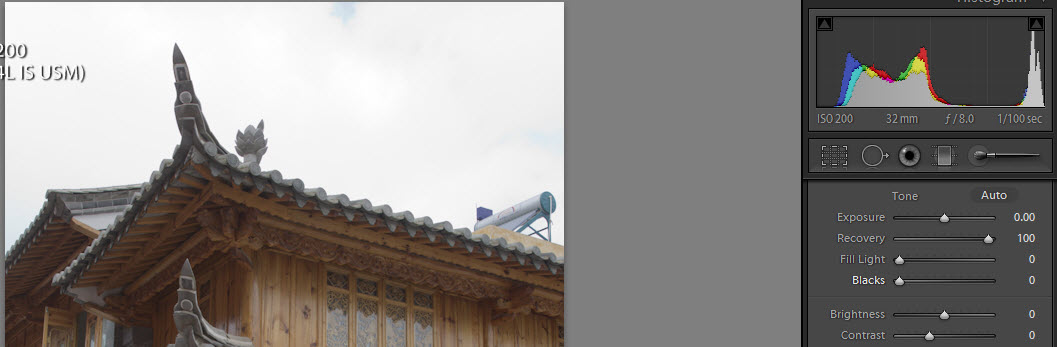
Figure 2 – Using Recovery for the Sky
We see grounds for hope here – moving Recovery to a value of 100 revealed a smattering of blue from the previously faceless grey, and there is slight evidence of modeling in the clouds – still nothing visually exciting here. Perhaps we can drag out more.
The next tool in the arsenal is the Tone Curve, which allows us to adjust contrast in each part of the imageís tonal range very effectively. For now, I’m focused on the sky, hence the Highlights and the Lights. As shown in Figure 3, by reducing the Highlights to -100 and reducing the Lights to -44, Iíve extracted enough tonal gradation to reveal the contours of grey clouds and make the sky visually “interesting”. Had I shifted the Lights darker than -44, the sky would have become darker than I considered natural for that scene. OK, so there must be a downside to this scenario? Indeed there is: the building is dull and anemic. Shifting Blacks to a value of 7 (Figure 3) corrected the Black Point inducing a bit of contrast, but this is not nearly adequate. Fixing the building requires contrast-inducing shifts to the Lights and Darks of the Tone Curve, but this would counteract the results achieved for the sky. Enter the use of Lightroom for implementing an old friend – luminosity blending.
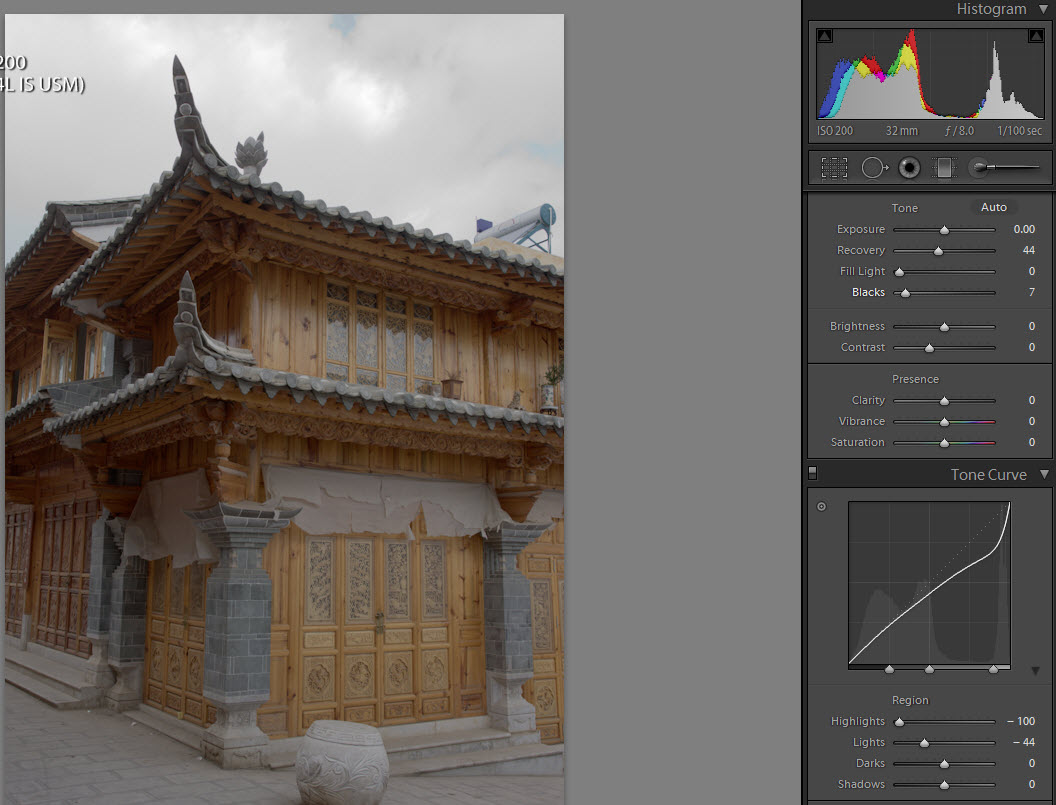
Figure 3 – Sky Completed
To do this I created a “virtual copy” of the image in Lightroom (Develop>Photo>Create Virtual Copy) and set to work on fixing the building, ignoring any impact on the sky. The objective here is to breathe life into the structure by brightening it up, giving it contrast and revealing shadow detail, the results of which are shown in Figure 4.
Starting with the shadow detail under the eaves, I set Fill to a value of 21 (I could have gone further of course, but then the shadows would not have looked like shadows, and we expect there to be shadows in such a scene – but we also want to see the detail within. I then reset the Blacks to just before the clipping point, allowing a value of 12 for the Blacks. This combination of increasing both Fill and Blacks has the combined effect of opening the shadows and increasing the contrast of the tones within. It’s a handy way of enhancing shadow detail in many kinds of images, but needs to be handled with some discretion to avoid producing “unnatural” (overly bright and detailed) results relative to one’s expectations for such a scene.
Moving on to the rest of the building, recall the objective is to both brighten and increase contrast. Shifting much of the tone curve to the left remaps darker pixel values to become lighter values, and increasing its slope increases contrast by lightening lights and darkening darks.
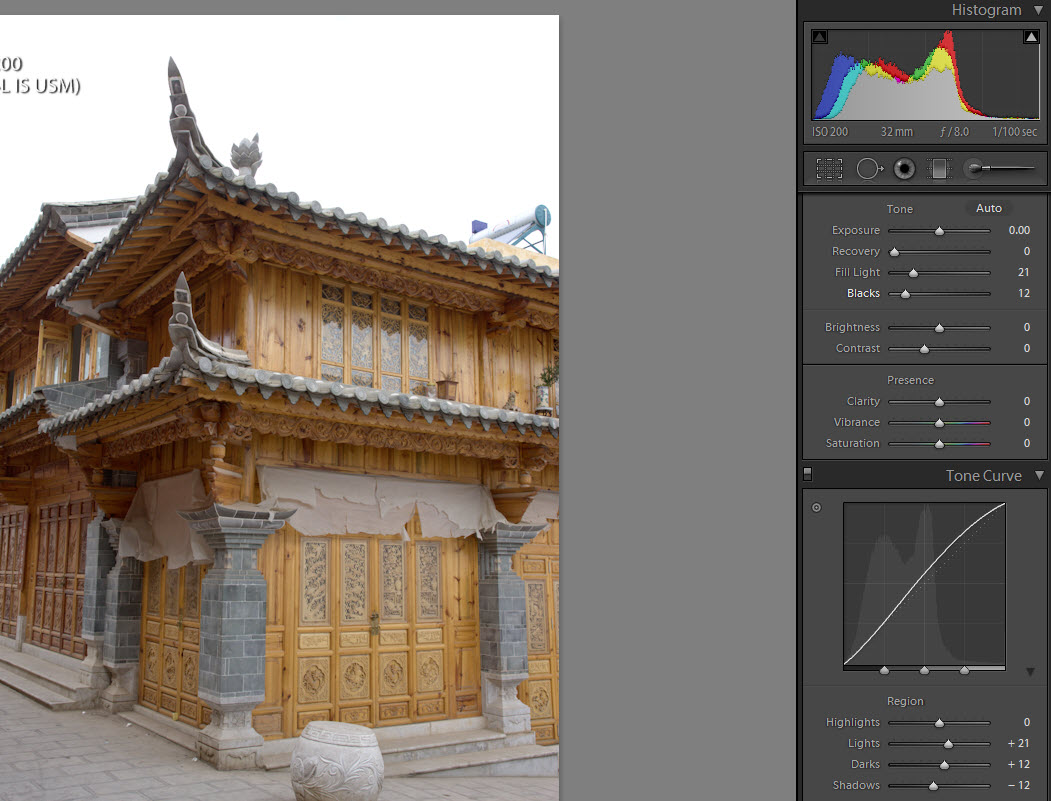
Figure 4 – The Building Adjusted
The specific settings which worked well for this image are Lights +21, darks +12, and Shadows -12. (Darkening the shadow area using the Tone Curve steepens the Tone Curve adding contrast and some body to the colours, but it can counteract the “Fill+Blacks” strategy mentioned just above, hence it is sometimes necessary to iterate between the two groups of settings until the balance is good.) Increasing both the Lights and the Darks but the former by more than the latter, increases both overall brightness and contrast as they shift the curve to the left and steepen it over the tonal ranges relevant to the building. But of course the sky is completely blown. But we have a good sky in the other image (Figure 3), so over to Photoshop.
Next, I “Exported” (in Lightroom CMD/CRL+SHIFT+E) both images to Photoshop CS4 (but previous versions at least back to Photoshop 6 can handle this too) giving them distinctive names (I add “sky” to the file name of the corrected sky image and “bldg” to the file name of corrected building image). I now have both images open in Photoshop at the same time, and do NOTHING else to them until the blending operation is completed. With CS4, using the “Arrange Documents” button on the top ribbon of the program, I select “Float All in Windows”, which makes a very convenient set-up for the next steps.
It is now necessary to either select the sky and plunk it into the building image, or select the building and plunk it into the sky image, so that the merge is exact.
Making good selections is often the bane of Photoshop, but for this kind of image it’s dead-easy. First, using the Building image, I pressed CMD/CTRL J to duplicate the Background as a new layer containing the whole image. The selection strategy is to use the tools and the image content yielding the most accuracy for the least amount of fiddling around. For this image, it so happens that the much maligned “Magic Wand” (alias Tragic Wand) set to a value of 20 worked just fine to make the selection of the blown-out sky. Only several clicks (using Shift to add areas) were needed to capture the sky including the isolated areas between the struts of the water tank on the roof. I do NOTHING to the selection edge (no feathering, no smoothing) as I want a crisp, precise register between the sky and the building in the end result. Once the whole sky is selected, I click on the “Add Layer Mask” button (third from left at the bottom of the Layers Panel, red arrow in Figure 5) and this adds a mask containing the sky (Layer 1 in Figure 5). But we don’t want this sky to show in the final image, so we hide it by selecting the layer mask and pressing “CMD/CTRL I” to invert the mask – whereupon the sky area within the layer mask becomes black (white reveals, black conceals) as seen in Figure 5.
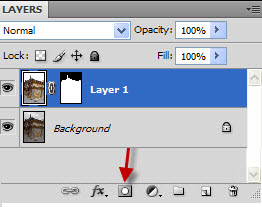
Figure 5 – Layer Masking the Sky
Now, we click on Layer 1, hold the SHIFT key down, drag Layer 1 onto the open “Sky” image, release the SHIFT key and the good building will fall exactly into place under the good sky, as shown in Figure 6, the completed operation (with keystoning corrected and a local contrast enhancement layer to slightly enhance the building detail (using John Paul Caponigroís “High Pass” technique, free to members on his website). Note how the hidden detail of the sky, the eaves and the luminosity of the building are vastly better than expected from what we originally saw in Figure 1.
By the way, it is highly likely that an in-camera JPEG simply couldnít manage the range and gradation of luminosity achieved here with the raw file, once again demonstrating one of the numerous advantages of working from raw images.
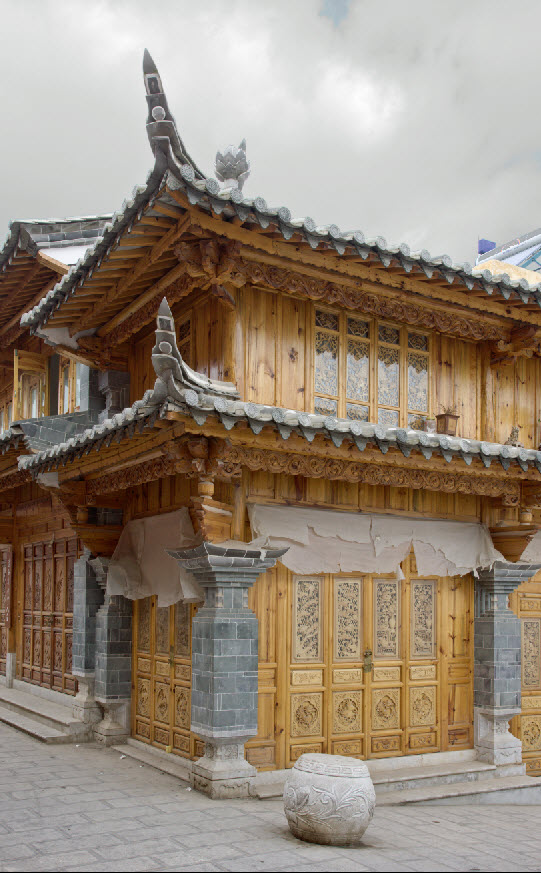
Figure 6 – Completed Blend
Because of how powerful some of these Lightroom and Photoshop adjustments can be, unless one is seeking some unusual artistic effect, a really important aspect of doing this work is to delicately adjust tonal values in relation to each other, such that the end result is “believable”. For example, I could have punched-up the building a whole lot more in Lightroom, but then it would have been out of character with the sky.
As an alternative technical approach, had I exported the Lightroom images to Photoshop as “Smart Objects”, I could return to the Lightroom adjustments from within Photoshop to fine-tune at the level of the raw files.
Finally, on an aesthetic note – this is not intended as a “fine art” photograph – I liked the building and I wanted a record of how I remembered it, but one with some visual appeal.
August, 2009
________________________________________________________________
Mark Segal is a periodic contributor of essays and ideas to this website. He has been making photographs for five decades, got into digital imaging with Photoshop 6 and a film scanner in 1999, was fully digital and a “raw image” convert since 2004 and has produced thousands of inkjet prints using successive generations of Photoshop, Camera Raw and Epson professional printers.


Elevate Your Vision


Read this story and all the best stories on The Luminous Landscape
The author has made this story available to Luminous Landscape members only. Upgrade to get instant access to this story and other benefits available only to members.
Why choose us?
Luminous-Landscape is a membership site. Our website contains over 5300 articles on almost every topic, camera, lens and printer you can imagine. Our membership model is simple, just $2 a month ($24.00 USD a year). This $24 gains you access to a wealth of information including all our past and future video tutorials on such topics as Lightroom, Capture One, Printing, file management and dozens of interviews and travel videos.
- New Articles every few days
- All original content found nowhere else on the web
- No Pop Up Google Sense ads – Our advertisers are photo related
- Download/stream video to any device
- NEW videos monthly
- Top well-known photographer contributors
- Posts from industry leaders
- Speciality Photography Workshops
- Mobile device scalable
- Exclusive video interviews
- Special vendor offers for members
- Hands On Product reviews
- FREE – User Forum. One of the most read user forums on the internet
- Access to our community Buy and Sell pages; for members only.
You may also like


