


By: Jon Swindall
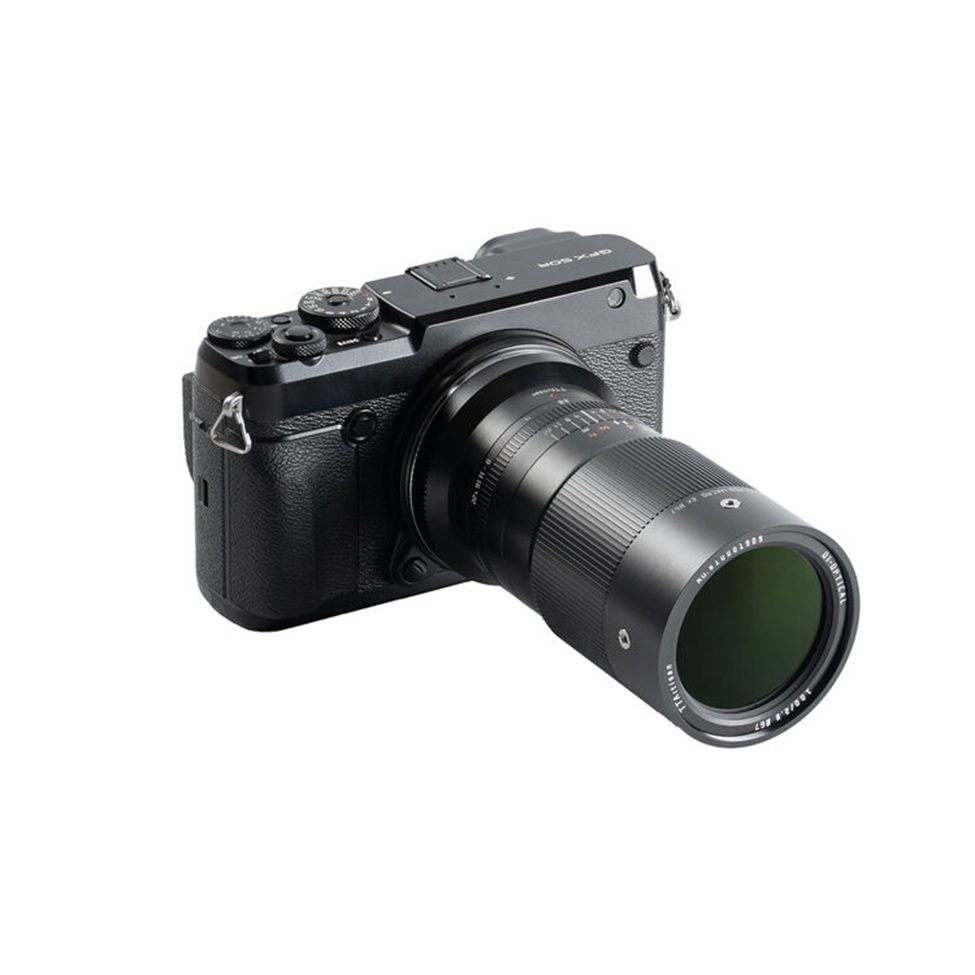
There’s a special kind of excitement that comes with adding a new lens to your kit – that moment of possibility, of seeing the world through a different perspective. When I first mounted the TTArtisan 100mm f/2.8 2x Ultra-Macro on my GFX system, I wasn’t quite sure what to expect. As a medium format shooter, the options for true macro work have been limited, and often eye-wateringly expensive. The Viltrox extension tube experiment had left me frustrated, more convinced than ever that I needed a dedicated macro solution – but without the budget for native glass.

A Budget-Friendly Gateway to Macro
Enter the TTArtisan, an intriguing proposition that promised to open up the world of extreme close-up photography without requiring a second mortgage. Available across multiple systems – Fujifilm GFX, Sony E, Canon RF, and Nikon Z mounts – it’s a lens that democratizes macro photography while bringing its own distinct character to the table.
First Encounters and Physical Reality
The moment you lift this lens, you know it means business. The all-metal construction feels solid in hand, and this is where we need to be absolutely clear: this is a hefty piece of glass that demands proper support. At approximately 700g, this isn’t a lens for casual handheld work, especially at macro distances. A lightweight travel tripod simply won’t cut it – you need substantial support with a robust head capable of precise adjustments.
The technical specifications tell part of the story:
- 2:1 magnification ratio
- 14 elements in 10 groups
- 11-blade aperture
- 67mm filter thread
- Manual focus only
- No lens hood included
- Built-in screw points for lighting accessories
- Included hot shoe mount
Speaking of lighting – while the lens comes ready for serious flash work with its mounting points, be sure your support system can handle the combined weight of lens, camera, and lighting setup. My initial attempts with a lighter tripod setup proved inadequate for the complete system.
Learning the Dance: Real-World Performance
Working with this lens is very much like learning a new dance – there’s a rhythm to it, a sequence of movements that become more fluid with practice. That first morning in the botanical gardens taught me plenty. While the lens opens to f/2.8, for macro work you’ll want to stop down considerably. The lens really sings beyond f/8 – this is where the magic happens for macro detail. The extra depth of field becomes crucial when you’re working at such close distances.
Getting Critical Focus
The GFX’s focus assist features become your best friends with this lens. I found a workflow that consistently delivered sharp results:
- Use the touchscreen to position the small focus square on your subject
- Activate the focus assist zoom function to magnify the view
- Make micro-adjustments while watching the magnified display
- This combination of tools makes achieving critical focus much more reliable
Distance and Framing Realities
- Watch that 3-inch threshold – get closer, and the barrel becomes an unwanted guest in your frame
- No lens hood means flare management becomes part of your creative process
- Significant vignetting, especially at closer focusing distances
- Focus breathing that requires composition adjustment as you change focus – look at both focus points and make sure you have enough “breathing room” available for post
Botanical Garden Revelations
There’s something magical about those early morning hours in a greenhouse, when sunlight streams through the glass and everything glows with possibility. My first serious outing with this lens found me at our local botanical gardens, tripod planted firmly before a terrarium of tiny tree frogs.

Here’s where I learned my first real lessons with this lens. That bright shirt I wore? Reflected perfectly in the glass, reminding me that dark clothing becomes part of your macro kit when shooting through glass. The dehazing tool in post-processing became my friend that day, but the experience taught me to think about every element in the frame, including myself. I’m also curious to try Photoshops Beta “reflection removal function” and see how it stacks up. Speaking of stacks…

Mastering the Focus Stack
The real artistry with this lens emerges when you begin focus stacking. Let me walk you through the process I used, along with what to watch for at each step.
The Focus Stacking Dance
Before you even begin capturing images, you’ll notice something interesting with this lens: as you rack focus, the image frame shifts noticeably. This focus breathing is significant – you might see your subject move position in the frame as you adjust focus from front to back. Don’t fight this – it’s part of the lens’s character, and we’ll deal with it in post-processing.
Here’s my step-by-step workflow that accounts for these characteristics:
- Initial Setup
- Mount your camera on a solid tripod – this lens demands stability
- Compose your shot with room around the edges (that focus breathing will come into play)
- Set your aperture beyond f/8 where the lens shows its true capabilities
- Enable your 2-second timer to eliminate vibration
- Capture Sequence
- Start with focus on the nearest point of your subject
- Take your first shot
- Slowly rock the focus ring slightly backward
- Watch how the frame shifts – this is normal
- Take your next shot
- Continue this process until you’ve captured the entire depth you want
- I typically find three to five shots sufficient for most subjects
- Post-Processing Journey
- Import everything into Capture One
- Make your initial adjustments for exposure and color
- Export as high-resolution JPEGs
- Bring these into Lightroom
- Export to Photoshop as layers
- Here’s where the magic happens: use Auto-Align layers
- This step compensates for that focus breathing we saw earlier
- Follow with Auto-Blend (more magic!)
- Return to Lightroom for final color grading and adjustments


Real-World Example: The Soccer Ball Stack
To put this workflow to the test, I tried something different – focus stacking shots of an old soccer ball. The key lesson here? Frame wider than you think you need. The focus breathing means your composition will shift as you move through the focus range. Using five separate images and allowing for that wider initial frame, the auto-align and auto-blend features in Photoshop handled the focus breathing beautifully, creating a final image with depth and detail that would have been impossible in a single shot.
Creative Possibilities and Limitations
This isn’t a clinically perfect lens, and that’s part of its charm. The lack of a lens hood means flare management becomes a significant part of your shooting experience. In bright conditions or when light hits the lens directly, you’ll notice a pronounced drop in contrast and distinctive flare patterns. While this might be challenging for traditional macro work, it can create some uniquely ethereal effects.


The flaring characteristics particularly come into play when considering portrait work. Yes, the bokeh has an interesting wispy quality, and yes, you could potentially create some dreamy, atmospheric portraits – especially when working with backlight. However, the combination of manual focus challenges, weight, and the lens’s tendency to flare makes this more of a creative experiment than a reliable portrait option. The loss of contrast in bright conditions or when dealing with strong light sources means you’ll need to carefully consider your lighting direction and background elements.
For critical work where contrast and clarity are essential, you’ll want to carefully manage your shooting angle relative to light sources or consider crafting a makeshift lens hood.
This lens is about getting close – really close – to subjects that were previously out of reach for many shooters.
Value Proposition
Let’s be clear: if you’re doing critical product photography or professional macro work, the native GFX macro lens (at 4-5 times the price) is probably your better choice. But that’s not really what this lens is about.
This is a lens for:
- Exploratory macro photography
- Creative projects where “perfect” isn’t the goal
- Learning the fundamentals of macro technique
- Having fun with close-up photography without a massive investment

Final Thoughts
After extensive field testing, I can say without hesitation that this lens has earned its place in my kit. Would I buy it again? In a heartbeat. It’s filled a crucial gap in my capabilities, offering a window into the macro world that was previously out of reach because of money. Yes, it demands patience. Yes, it is heavy. Yes, it requires practice. But the reward is a new way of seeing, a new perspective on the world around us.
This lens has taught me to slow down, to work more deliberately, to embrace imperfection as part of the creative process. Most importantly, it’s taught me that great macro photography starts with a solid foundation – literally. Invest in proper support first (it’s heavy for micro adjustments), learn to work with the focus assist tools, and embrace the methodical nature of macro work.
I challenge you to step into this world of extreme close-up photography. Share your experiments and process with us at [email protected].
Show us what you discover when you look more closely at the world around you. May you find beauty in the details!


Elevate Your Vision


Read this story and all the best stories on The Luminous Landscape
The author has made this story available to Luminous Landscape members only. Upgrade to get instant access to this story and other benefits available only to members.
Why choose us?
Luminous-Landscape is a membership site. Our website contains over 5300 articles on almost every topic, camera, lens and printer you can imagine. Our membership model is simple, just $2 a month ($24.00 USD a year). This $24 gains you access to a wealth of information including all our past and future video tutorials on such topics as Lightroom, Capture One, Printing, file management and dozens of interviews and travel videos.
- New Articles every few days
- All original content found nowhere else on the web
- No Pop Up Google Sense ads – Our advertisers are photo related
- Download/stream video to any device
- NEW videos monthly
- Top well-known photographer contributors
- Posts from industry leaders
- Speciality Photography Workshops
- Mobile device scalable
- Exclusive video interviews
- Special vendor offers for members
- Hands On Product reviews
- FREE – User Forum. One of the most read user forums on the internet
- Access to our community Buy and Sell pages; for members only.
You may also like