PREVIEW
Camera Raw’sJPEG Adjustment
A comprehensive demonstration of Adobe Camera Raw v.4.3.1 within
Adobe Creative Suite 3 with Photoshop CS3 10.0.1 and Bridge 2.1
________________________________________________________________
About Camera Raw
Adobe Camera Raw has become the ‘place’ where many photographers now do much of the work on their images.
From its early days as a file import plugin, Camera Raw has now become a very powerful, completely non-destructive photo editing tool. All the work that is done on a Raw, TIFF or JPEG file in Camera Raw forms simply a list of instructions (metadata) that is carried with the original
file. You can always get back to the original’s state. This is the true power of parametric as opposed to pixel editing. Not only is the original saved untouched but as new versions of Camera Raw are released, the user can return to the original file and reprocess it with more powerful or even more precise tools for an even better correction or interpretation of the original.
Camera Raw can not only be run out of Photoshop but also out of Bridge. The use of Camera Raw within Bridge opens up a whole new area of labour-saving workflows for those faced with reviewing and processing many images (even many hundreds or thousands). Batch saving and batch processing can reduce many hours of work to a few minutes.
The finely detailed and highly precise controls available within Camera Raw are designed by photographers for photographers. The equivalent controls and steps required within Photoshop can be far more complex, time consuming and far less intuitive. Camera Raw’s workflow for processing and optimising pictures is logical, straightforward and very powerful.
About The L-L Guide to Camera Raw
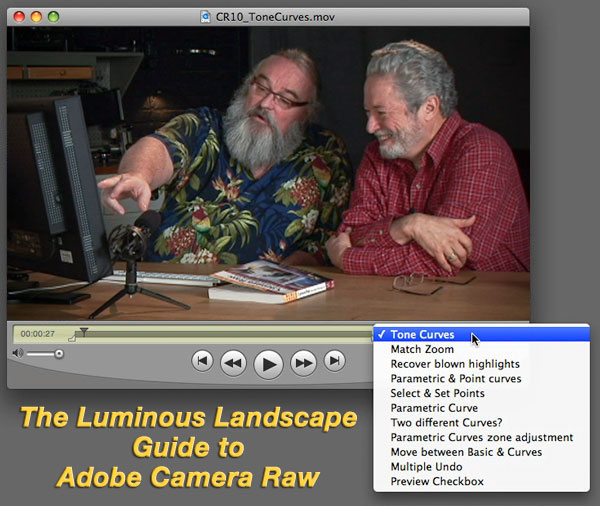
The nearly eight hours of video tutorial is hosted byJeff ScheweandMichael Reichmann.
Jeff is co-author with the late Bruce Fraser* ofReal World Camera Raw with Adobe Photoshop CS3fromPeachpit Press. Jeff brings his unique and straightforward style to the presentation of the video – along with his colourful shirts and humour. Michael needs little introduction to Luminous Landscape readers; he is the primary author of this site and a noted photographic journalist and educator. Both Michael & Jeff use a large number of their photographs in each of the tutorials they produce.
* A portion of the purchase price will be given to Bruce Fraser’s estate to honour his involvement in the industry.
Thomas Knollkindly offered to give explanations of several technical aspects of Camera Raw and appears in short cameos within the video presentation. Additionally an extensive interview ofAdobe’s Camera Raw and Lightroom engineering teamis included.
Tom Forsmakes a guest appearance and helps demonstrate his ACR Camera Calibration script.
The Luminous Landscape’s Download Video Tutorials do not fit the normal mode of tutorial presentation with their dry mix of screen grabs and voiceover. The Tutorials are recorded with multiple cameras and take more the form of a television talk show. All the information you will need is there but the presentation is far more palatable and entertaining. Many of our customers find that learning is greatly enhanced by this less formal style.
Along with specific ‘How To’ advice and examples, the tutorial gives a great deal of important ‘sidebar’ information. There are in-depth discussions covering the nature of Raw files, White Balance, Expose-To-The-Right, Sharpening and other topics. The tutorial is designed not simply to teach you how to use Camera Raw but how to become a better and more informed photographer.(There is even a quick trip to Sam’s Wine store in Chicago!)
Presentation and Content of The L-L Guide to Camera Raw
The video files are in the QuickTime file format playable on either Windows or Mac platforms. The screen size is 640 x 360 @ 30fps – a size that can easily be doubled for larger screen viewing if required.
With the more relaxed and less artificial presentation of our tutorials comes the need for careful organisation and titling of the videos. The more complex videos have built in chapter markers to enable quick access to a particular sub-topic.
The eight hours of video are divided into 28 separate segments:
1. Introduction:What is Camera Raw? (14 min)
2. Raw Files:What are they? How do they work? (10 min)
3. White Balance:The first adjustment. (12 min)
4. Exposure:Setting the white point; Expose to the right? (13 min)
5. Camera Raw or Photoshop?Editing parameters or pixels? (12 min)
6. Hosting Camera Rawin Bridge or Photoshop. (6 min)
7. Preferences:File handling (11 min)
8. Anatomy of Camera Raw(8 min)
9. Camera Raw’s Basic Panel(21 min)
10. Tone Curves:Point and Parametric curves (15 min)
11. Sharpening(22 min)
12. Noise Reduction(10 min)
13. HSL & Grayscaleconversion (12 min)
14. Split Toning:its use in grayscale and colour (8 min)
15. Lens Correction(12 min)
16. Camera Calibration:ACR Calibrator with Tom Fors (20 min)
17. Presets(15 min)
18. The Toolbar:Crop, Straighten, Re-touching (24 min)
19. Workflow options:Colour space, bit depth, resolution (21 min)
20. Preferences & Defaults(28 min)
21. JPEG Adjustment(13 min)
22. Colour Rendering(21 min)
23. A shoot’s Workflow:Synchronise White Balance, Balance Exposure, Metadata, Keywords, Ranking (23 min)
24. Photoshop Actions and Batch Process(19 min)
25. Batch Save(8 min)
26. A Tethered shoot and Smart Objects(20 min)
27. Conclusion(5 min)
28. Interview with the Camera Raw & Lightroom Engineering Team(39 min)
29.L-L Guide to Camera Raw –Extras
– PDF document detailing Camera raw Plugin locations for Windows & Mac OS X
– PDF document of Camera Raw Keyboard shortcuts
– PDF document ‘About’ this video tutorial
________________________________________________________________
FAQ
AFAQfor Download Video and QuickTime can be foundhere.
________________________________________________________________
About this video
The video was shot in January 2008 in Chicago.
Equipment used:
– Mac Pro tower with dual quadcore 3Ghz processors, 16 GB of RAM
– 4 internal 750 GB drives with 3 in a striped 0 array
– Dual NVIDIA 7300 GT cards (usually running dual 30" Apple Cinema displays)
– 4 x 1TB External Firewire 800 drives
– Monitor used for taping: NEC 2690WUXi
Special Thanks
Many thanks to Tom Fors, who generously gave us a day of his time to demonstrate his ACR Calibrator script.
Many thanks to Thomas & Ruth Knoll for inviting us to their home.
Thanks to the Adobe Camera Raw / Lightroom engineering team of Thomas Knoll, Mark Hamburg, Zalman Stern, Jon Steinmetz & Peter Merrill for giving us time out of their engineering meeting to record an interview.
Credits
Shot and co-edited by Christopher Sanderson with additional editing by Mark Guertin
Copyright
All video is ©2008 Terra Luma Inc. All Rights Reserved
________________________________________________________________
Note that because this tutorial is a Hi-Res download
there are no shipping costs, import taxes, or duties.
Begin Learning Camera Raw in-Depth Now!
________________________________________________________________
April, 2008
Read this story and all the best stories on The Luminous Landscape
The author has made this story available to Luminous Landscape members only. Upgrade to get instant access to this story and other benefits available only to members.
Why choose us?
Luminous-Landscape is a membership site. Our website contains over 5300 articles on almost every topic, camera, lens and printer you can imagine. Our membership model is simple, just $2 a month ($24.00 USD a year). This $24 gains you access to a wealth of information including all our past and future video tutorials on such topics as Lightroom, Capture One, Printing, file management and dozens of interviews and travel videos.
- New Articles every few days
- All original content found nowhere else on the web
- No Pop Up Google Sense ads – Our advertisers are photo related
- Download/stream video to any device
- NEW videos monthly
- Top well-known photographer contributors
- Posts from industry leaders
- Speciality Photography Workshops
- Mobile device scalable
- Exclusive video interviews
- Special vendor offers for members
- Hands On Product reviews
- FREE – User Forum. One of the most read user forums on the internet
- Access to our community Buy and Sell pages; for members only.


