


1 – Introduction
This essay is about a specific lens, namely the Canon EF 8-15, f4 USM fisheye. However, it is also about expressing a personal artistic and photographic vision, the subject of my current focus and research.
Vision can be expressed in many ways and one of them is through the use of gear that allows you to represent the world in a different way. If you follow my work you know that I distort my images regularly to increase the size of specific elements, to strengthen the composition, or to emphasize the aesthetic appeal of the image. The Canon 8-15 allows me to do this in camera rather than during post processing. While the possibilities are not as extensive, being limited by what the lens does rather than by my imagination, they are still extensive and worth investigating for their creative potential.
2 – The lens
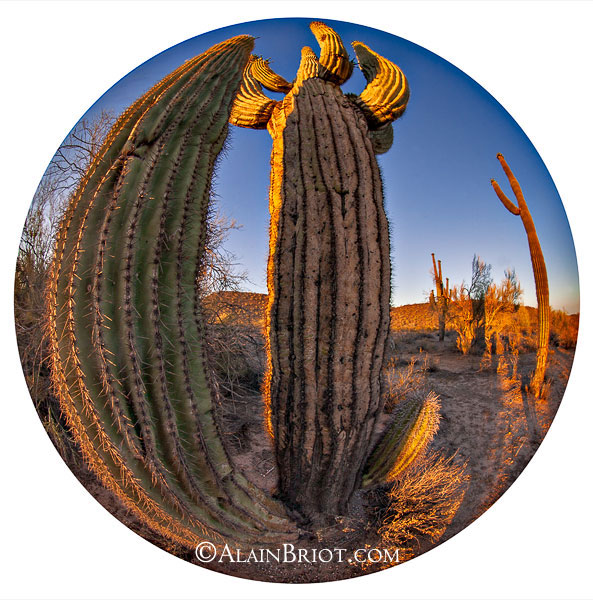
The Canon 8-15 is a zoom lens. On a full frame 35mm camera, you get a rectangular image with no vignetting in the corners at 15 mm, and at 8 mm you get a circular image. The lens can therefore be used in two ways: to create a super wide rectangular format image, or to create a circular image.
 |
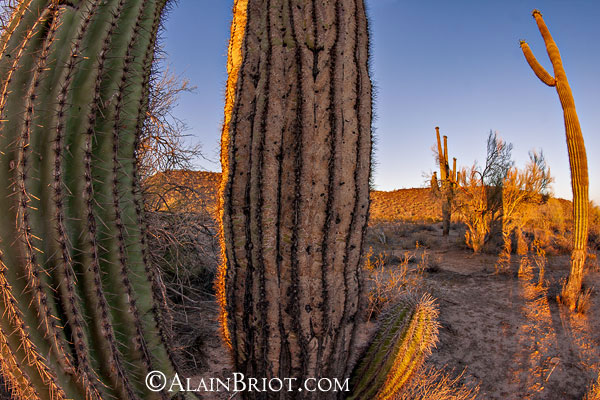 |
Comparison between 8 and 15 mm on a full frame DSLR
These two photographs were taken from the same exact location.
I did not move and did not change any settings between the two captures.
The only thing I did was zoom in from 8 mm to 15 mm.
3 – Why this lens
When I purchased this lens I planned to use it to create rectangular fisheye images. I had a Sigma 12-24 mm lens which created a flat horizon and I was curious to see the possibilities offered by a lens that distorted the horizon and gave a fisheye look to the photographs. However, after a couple of shoots I quickly grew tired of tilted horizons. I simply did not like it and to remedy what I saw as a problem I ended up straightening the horizon in Photoshop with the warp function. The only way to get a straight horizon was to place the horizon in the center of the image, an approach that severely restricts compositional creativity.
This was a counter productive and time consuming approach. It was simpler to use the Sigma 12-24 or the 28 or 38 on my medium format system and get a straight horizon immediately. However, having invested in this lens I did not want to see it go to waste. This is when I decided to try the 8 mm setting to get a fully circular image on a full frame 35mm.
I had not tried this before in part because I intended the 8 mm setting to be used on a reduced frame, APS-C, 35mm, such as the Canon 70D for example. I like these cameras because the tiltable LCD screens allows me to position the camera low to the ground and yet see the image on the LCD by tilting the screen upwards, a feature not available on full frame 35mm cameras.
At first my attempts at creating circular images were spotty. I would take one or two out of curiosity, without trying to fully explore the compositional possibilities offered by the lens. It was only after seeing my initial results and getting positive feedback from my audience that I decided to push further. The images you see in this essay are the results of my creative explorations so far.

The Canon 8-15 mm
The lens comes with a lens cap and lens shade.
The lens shade must be removed when taking circular images to prevent vignetting.
Link to this lens on Amazon.com
4 – Exaggeration
When using this lens distortion and exaggeration are the name of the game. The lens distorts regardless of the zoom setting so it is not about distorting or not, it is about distorting as much and as far as you can. In the horizontal direction you will get a curved horizon at both 8 mm and 15 mm unless you place the horizon smack in the center of the image. In the vertical direction you will also get distorted objects on each side of the frame unless they are placed in the middle of the image.
But as I said, when using this lens, distortion is the name of the game. I purchased it because I wanted to distort the elements I include in my photographs. As such, it works like a charm. It is particularly impressive at 8 mm because the distortion takes place over the entire image circle.
When working with this lens, just when you think you have gone too far you realize you got it right. For me there is no such thing as slight distortion, especially when working at the widest zoom setting, 8 mm. Instead, composition is best approached by incorporating the distortions into the composition.
I use these distortions in my compositions, letting the image curve until it follows the circular image borders, creating curves where in nature I see straight lines. I like the curvaceous quality the lens gives to both nearby and distant elements.

Pool house entrance, Blackstone Country Club
Here the overhead harbor is made to curve along the edges of the image.
In this photograph and in the next one, this effect is achieved by getting closer and closer to the subject
until the distortion follows the edge of the circular image.
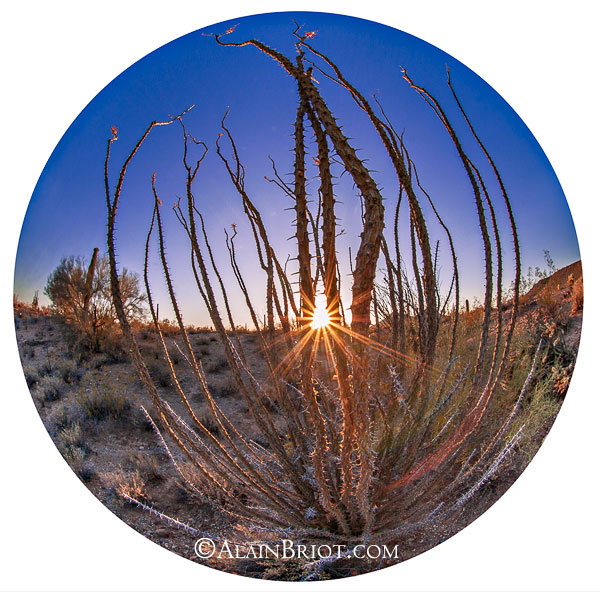
Ocotillo, Blackstone, Arizona
Here the Ocotillo branches are made to curve along the edges of the image.
I got within inches of the plant to create this effect.
5 – Branches
I like to photograph branches by going underneath a tree and shooting up into the sky. This allows me to fill the frame with branches, small and large, and create an intricate, web-like composition of branches.

Palo Verde, Blackstone, Arizona
6 – Slot Canyons
This lens is ideal in slot canyons and in narrow canyons where space is at a premium and where lenses never seem to be wide enough. I know this first hand. My work is in part about expressing space and to this end I have used lenses up to 12 mm lens in these canyons, the widest lens you can use without getting corner vignetting on a full frame 35mm. I have also used equally wide lenses on other formats including medium format up to 28 mm and 4×5 up to 47 mm.
I have also used stitching to widen the amount of area I can capture in one frame. Stitching images is in fact a staple of my workflow because it allows me to expand virtually infinitely the amount of space I can capture and represent in one image.
However the Canon 8-15 gives me yet another way to represent space, this time by creating circular images in which elements are distorted along the round borders of the image. As such this lens becomes part of my wide angle arsenal, yet another tool I can use to create exciting compositions that are rarely seen and that allow me to express my vision of space and beauty in the landscape.

Antelope Canyon, Arizona
7 – Sun star
I like to include the sun as an element in the photograph. Doing so increases the dynamic qualities of the images while adding a dash of color and energy. This is best done by depicting the sun as a sun star, something which is achieved by closing the lens to the smallest f-stop and shooting through an element to diffract and reduce the brightness of the sun.
With the Canon 8-15 doing so is easy because the wide coverage of the lens reduces the sun to its smallest size. The visual quality of the star, which is a function of the quality of the diaphragm construction and of the number of blades, is also very nice, with multiple branches and a very nice look overall.
Depending on what the image composition calls for, I place the sun star in a variety of locations in the image, anywhere from smack in the center, to off to the side to all the way to the border of the image. The three images below provide examples of these three different approaches.

Sunset through Mesquite Branches

Cholla Sun Star

Palo Verde Sunset
8 – Getting yourself in the photograph (or not)
Not getting yourself or your shadow in the image is challenging to say the least. The lens is so wide that one has to be particular vigilant in order not to do this. However, on the other hand, the lens offers an easy way of being in the photo, in whole or in part, either by including parts of your body or including your shadow when the sun is behind you.

Office door
The shadow is myself. That’s one way to get into the photograph!
9 – Getting a white background
Circular photographs come out with a black background on a horizontal frame. If you want to get a white background, like I do, you need to use the Elliptical Marquee selection tool in Photoshop.
The process is simple. Start by selecting the Elliptical Marquee selection tool in Photoshop. With this tool selected hold down the shift key to get a perfect circle. Then select the inside of the image, invert the selection, set the background color to white, press delete and voila! After doing this I crop the photograph to a square format to give equal borders all around the image.
10 – More photographs
Additional photographs that I created with this lens are available in the Fisheye Photographs Online Gallery on my site.
11 – More about expressing a Personal Photographic Vision
As mentioned in the introduction to this essay, expressing a personal artistic and photographic vision is the focus of my current research. This research will culminate with the publication of the Personal Vision Mastery Workshop on DVD this Summer. This tutorial will be the 7th in the Mastery Workshops on DVD series.
Detailed information about this upcoming tutorial release is available at this link
A pre-announcement list is also available. Joining this list is simple: simply email me at
[email protected] with the word Vision in the subject line and you will be immediately added to the list. You will receive advanced notification and will be able to take advantage of the pre-announcement price when this new tutorial is published.
12 – About Alain Briot
I create fine art photographs, teach workshops and offer DVD tutorials on composition, image conversion, optimization, printing and marketing. I am the author of Mastering Landscape Photography, Mastering Photographic Composition, Creativity and Personal Style, Marketing Fine Art Photography and How Photographs are sold. All 4 books are available in eBook format on my website at this link: http://beautiful-landscape.com/Ebooks-Books-1-2-3.html
Printed books Link
eBooks link
You can find more information about my work, writings and tutorials as well as subscribe to my Free Monthly Newsletter on my website at http://www.beautiful-landscape.com
You will receive 40 free eBooks immediately after subscribing.
I welcome your comments on this essay as well as on my other essays. You can contact me via email at [email protected].
Alain Briot
Vistancia, Arizona,
June 2014


Elevate Your Vision


Read this story and all the best stories on The Luminous Landscape
The author has made this story available to Luminous Landscape members only. Upgrade to get instant access to this story and other benefits available only to members.
Why choose us?
Luminous-Landscape is a membership site. Our website contains over 5300 articles on almost every topic, camera, lens and printer you can imagine. Our membership model is simple, just $2 a month ($24.00 USD a year). This $24 gains you access to a wealth of information including all our past and future video tutorials on such topics as Lightroom, Capture One, Printing, file management and dozens of interviews and travel videos.
- New Articles every few days
- All original content found nowhere else on the web
- No Pop Up Google Sense ads – Our advertisers are photo related
- Download/stream video to any device
- NEW videos monthly
- Top well-known photographer contributors
- Posts from industry leaders
- Speciality Photography Workshops
- Mobile device scalable
- Exclusive video interviews
- Special vendor offers for members
- Hands On Product reviews
- FREE – User Forum. One of the most read user forums on the internet
- Access to our community Buy and Sell pages; for members only.
You may also like


