


A First Look and Appraisal
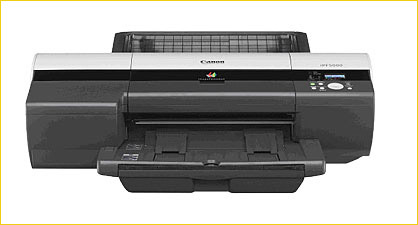
In May, 2006 Canon began shipping theiPF5000printer. This is a 12 ink, pigment-based, 17″ carriage photographic printer capable of printing in 16 bit mode. It is physically large, moderately priced (for what it does), and, as will be seen, surpasses just about every other fine-art inkjet printer yet available, in terms of both image quality and convenience of features.
This review is based on three weeks of almost daily use of the iPF5000. By way of background, over the past 10 years I have been using a range of Epson printers, including, most recently, the Pro 5500, 4000, and 4800 models. These, especially the currentEpson Pro 4800model, will be my points of comparison.
You’ll notice that this review in fact makes extensive comparison’s with theEpson 4800. The reason for this is that the iPF5000 is so directly targeted at the 4800 that not to do so would miss the clear challenge that Canon has thrown down. (Do you think that the model numbering of this new printer was accidental?)
__________________________________________________________________________
Some Background
Since 1994, when the firstEpson Photoprinter was introduced, andIrisprints gave us the silly namegiclee, we have seen more advances in the technology of colour printing than in the entire previous century. Inkjet prints have gone from being ephemeral – fading and discolouring in a matter of months in some cases, to now having estimated life spans without noticeable fading, of more than 100 years, longer than any previously known colour print technology. C prints usingFuji Crystal Archive, andCibachrome / Ilfochrome, much vaunted in the past for their longevity, are lucky to reach half that value.
Part of this advance in technology was due to the introduction of the latest generation of pigment-based inks possessing a colour gamut comparable to that of dye-based inks. Epson’s current K3 ink set as used in theEpson 4800has, till now, been the pinnacle of the revolution in fine art inkjet printing. That printer (and its larger siblings) provide an 8 ink system; cyan, magenta, yellow, light cyan, light magenta and three different blacks – photo black, matte black, light black, and light light black. This adds up to nine inks, not eight. The reason is that either glossy (photo) black or matte black can be used at any one time. And therein lies a tale, which we’ll get to shortly.
A Short Digression
At the risk of boring some readers I’d like to comment on how Epson got itself into the pickle of needing to switch inks on the 4800 (and the 7800 and 9800 printers, for that matter).
The 4800’s predecessor, the 4000, was only on the market for a brief time, but it captured many photographers’ interest. It had eight ink slots, used pigment inks, and had three different blacks, all of which were housed at the same time. But, glossy prints suffered from bronzing. This was largely solved with K3 inks, but this needed the new 4800 model to use them. When the 4800 came out, it used the same 8 ink chassis, except that Epson dropped the ability to house both glossy and matte black ink at the same time, and added a Light / Light black instead.
The good news was the addition of this third black ink effectively eliminated bronzing (along with reformulated colour inks), and also increased the printer’s ability to produce very neutral B&W prints. The bad news was that now it was necessary to swap black ink cartridges every time paper types were changed between matte and glossy. This is both expensive (about $75 each time ($150 round trip)) and time consuming.
As we’ll now see, Canon has directly targeted this weak-spot in the Epson 4800’s nature.
Epson deserves credit for almost single handedly moving desktop fine art printing for photographers from hobbyist toy to professional tool. Yes, HP and Canon have had some decent printers, but in this market segment none used pigment-based inks. HP has been able to develop long lasting dye-based inks, (but only when used with their proprietary glossy and luster finish swellable media papers), and has not had anything like the market penetration of Epson among fine art photographers.
In the Epson line the Pro 4800 model has been one of the most popular among photographers. The larger 7800 and 9800 models are floor-standing rather than desktop, and larger than most people have room for at home or in a small studio. The 4800 can print up to 17″ wide by almost any length, on sheet paper or rolls, and this meets the needs of most photographers. While the K3 pigment inks are also available in the smaller Epson 2400 model, for anyone doing any serious volume of printing the dramatically higher ink costs with the 2400, due to the use of very small cartridges, means that the 4800 model, though it costs more initially, is actually a better value long term.
It’s also worth noting that printers larger than these 17″ models do not have sheet fed paper trays, and therefore are less practical when sheet paper is predominantly used.
__________________________________________________________________________
Canon Enters the Fray
Canon, being the 800 pound gorilla of the photographic industry, seems to have now made a corporate commitment not to allow Epson’s virtual monopoly on professional wide carriage photographic printers to go unchallenged. With the iPF5000 they have taken aim squarely at the Epson 4800, accurately targeting all of that printer’s flaws, and in some ways surpassing its well recognized first-rate image quality.
To produce a brand new high-end printer is no small feat, even for a company as large as Canon. It requires the design of news heads, and especially a family of new inks. The level of precision of manufacturing is also exceptionally high. Though it looks straightforward when standing in front of the machine as it chums out prints, the technology going on behind the scenes is considerable.
Specs and Features
Though they are available in detail on theCanon web site, let’s look at some of the printer’s most salient features and specifications so as to properly set the stage.
This printer is big. Really big. And heavy. Some 90 pounds in fact. And it comes delivered in a huge carton that is attached to a wooden palette. If you’re going to pick this up from your dealer, bring a friend (maybe two), and make sure that the dealer removes it from the palette first, or you’ll need a forklift. Bring a minivan or pick-up truck. Better yet, just have it delivered!

Canon iPF 5000 in background
with Epson 4800 in foreground, and Epson 2200 to the side
Set-up is straightforward once you have a large enough surface prepared. There are two connections possible to your computer, either USB-2 or Ethernet. The printer comes with a built in Ethernet card, but there is no Firewire. There is a card slot for an optional Firewire board. Interestingly, Epson provides Firewire along with USB-2, and charges extra for Ethernet. Frankly, I think Canon’s approach makes more sense, since the advantage of having LAN connectivity outweighs having two forms of otherwise essentially interchangeable high speed serial connections. (A LAN connection is very handy when more than a single computer is serving one printer).
Driver software is provided for both Windows XP and Mac OS X and, curiously, OS 9. (Don’t tell anyone in Japan that OS 9 was discontinued several years ago. Or at least that there are only a few dozen people left in the world using it).
Installation is straightforward. There are some additional programs provided, but all except one, the 12 bit plug-in, will not be discussed here. More on the plug-in shortly.
The iPF5000 carries a suggested retail price in the US of $1,995, with the roll paper adaptor costing an extra $250.
Paper Handling
Paper handling is versatile, There is a front loading paper holder that can manage stacks of paper from 8X10″ to 17X22″. Very heavy paper may also be fed singly from the front, and regular paper singly from the top, as well as from the optional 17″ roll paper holder. Annoyingly, the printer won’t let you load thinner papers from the front position.
Thecassettepaper holder is versatile, but unlike the Epson’s tray holder, which is unaware of what size paper is loaded until one attempts to make a print, whenever the cassette tray on the iPF5000 is placed into the machine the front panel LCD insists that you tell it the type of paper and the size that has been loaded. This wouldn’t be a bad thing, since it’s quite easy to do, except that you also need to tell this to the printer driver. More on this issue shortly.
Inks
Inks come in 130 ML cartridges (each slightly larger than the Epson 4800’s 110ML cartridges). There are 12 of them; cyan, magenta, yellow, light cyan, light magenta, red, blue, green, glossy black, matte black, light black and light / light black. These are pigment inks, and are namedLucia, by Canon. Lucia meaninglight, in Latin.

These are all found in a doored compartment on the left front side of the printer. The set of inks that come with the printer are partial, used for priming the ink lines and getting you started. Even then, they appear to last for quite a while, though I don’t have enough mileage yet to know first hand what eventual ink costs will be on a per-print basis. Mark Segal, who wrote the definitiveTracking the Cost of Printing with an Epson 4000(and later the 4800) is buying an iPF5000, and so once he has some data accumulated we can expect to know the answer to this.
Inks cost US $75 a cartridge (MSRP). OK. Get out your calculator. (12 X 75 = $900). Yes, close to a thousand dollars for a complete set of inks, when local sales taxes are included.
Update:The figures below have been updated based on revised usage data. The original data published here within the first few hours was incorrect. I apologize for the error.
But, this needs to be seen in the proper context. Using figures for the large format W series Canon printers and luster type glossy paper, estimated ink costs work out to 37 cents US for a A3 sized print and 48 cents for an 11X17. This means that the the 1.56 liters of ink contained in the twelve 130ml cartridges in the printer would be able to produce some 2,500 A3 sized prints. So, assuming (as I do) production of about 100 such prints a month, that’s over two years years of printing on a set of cartridges.
Of course this isn’t the way it’s actually going to work, because some carts run out before others (the light magenta and yellows, for example) while other factors such as the subject matter printed will also play a role. Given all of this math (much of which can be quibbled over), I think it’s safe to say that buying ink cartridges is not going to be a major financial consideration for anyone that can afford to buy the printer in the first place. And for anyone doing so much printing that ink costs are a consideration, one would hope that revenue from the sale of prints made would be more than adequate to compensate.
Initial Ink Supply
As soon as the printer first appeared there was quite a bit of sillyness bandied about on some web sites and forums regarding the small initial ink set. Canon provides cartridges with the printer that have about half the usual amount of ink. This then drops by 20% when the printer is first activated. But these inks aren’t wasted, they simply are filling up the ink lines and will be available to be used eventually. The purchaser is still getting about $500 worth of ink with this $2,000 printer. And, even though I have made several dozen large prints over a three week period, both testing the printer and for some commercial clients, I have yet to see the ink levels drop appreciably.
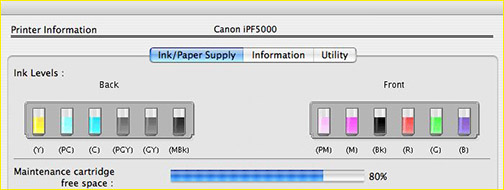
Ink levels with starter cartridges after making several dozen 11X17″ and 13X19″ prints
It’s important to note that all 12 cartridges are present at all times. This means that one can switch from printing on matte paper to glossy paper without changing black ink cartridges. Compared to the Epson 4800, this a big deal. The 4800 is a highly frustrating machine for this reason. Every time one changes black inks approximately $75 worth of ink is wasted, not to mention the 15 minutes of standing in front of the machine flipping levers that’s required.
TheImageprint Phatte Blacksystem is one solution when using the 4800, and if you need and use a RIP, a good one. But otherwise it is an expensive solution to an otherwise real and vexing problem. I believe that for many photographers whose clients require a mix of print types, the cost and hassle saving of not having to switch inks could alone be worth the trade-in losses of switching from a Epson 4800 to an iPF 5000.
One advantage that the Epson 4800 does have is that it can also take the larger 220ml cartridges, which means less attention needs to be paid to ink swapping, likely leading to lower ink costs.
Head Cleaning
Apparently the iPF 5000 knows when its heads needs cleaning, and does so itself. In fact, sometimes while it’s just sitting there idling the printer spontaneously decides to run a cleaning cycle, seemingly for no apparent reason. But there is a reason, and it is based on a series of factors including total time on, time idle, time sleeping, time with heads capped, time spent printing, or not printing. Based on an equation that takes all of these timing factors into account, the printer may decide to run one of a number of different cleaning cycles. The most common of these apparently uses only a very tiny amount of ink. In the order of picoliters.
There is the ability to manually run a cleaning cycle from the printer’s front panel, or from its utility software. But, I am told that the need to do this is very unlikely. The reason being that the design of the iPF5000 is such that it constantly sense all 30,720 individual nozzles, and is able to know when a cleaning cycle is needed. Or, if needs be, the printer can bypass a clogged nozzle in the middle of making a print.
Canon’s technical papers indicate that head clogging is extremely rare due to their using bubble jet technology. Though the number isn’t official, I am told that less than 10% of total ink usage will be attributable to head cleaning. Mark Segal, who has written extensively for this site on Epson ink usage and head cleaning, will be reporting in a forthcoming Up-Date on Epson 4800 printing costs, that the percentage of total ink used for cleaning ranges considerably up-ward of 17%, depending on machine usage
__________________________________________________________________________
Performance
Numbers, specs and competitive positioning are one thing, but more important is how the printer performs.
Gamut
This is where things start to get interesting on more than just a practical level. The addition of Red, Green and Blue inks is not unique. It’s been seen on some high-end commercial grade dye-ink printers for several years. But this is the first time that it’s available in a printer using pigmented inks. What these extra inks do is widen the printer’s gamut.
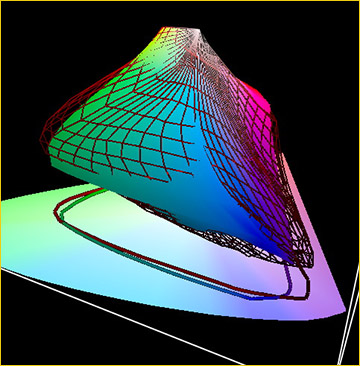
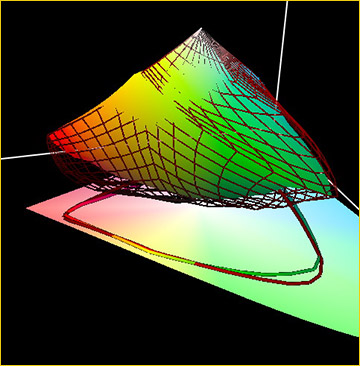
The gamut plots above tell the story. The solid plot is the Epson 4800 inkset, while the wireframe outline is that of the iPF5000. While there are several areas where the Epson has a somewhat wider gamut than the Canon, such as the light yellows, light blues, and light reds, in most of the rest, especially with saturated colours, the iPF5000 offers a wider gamut. This is of more than academic interest, and can be clearly seen in some prints. It is especially noticeable in the blues.
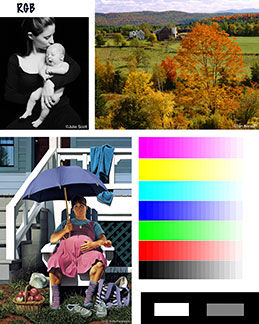
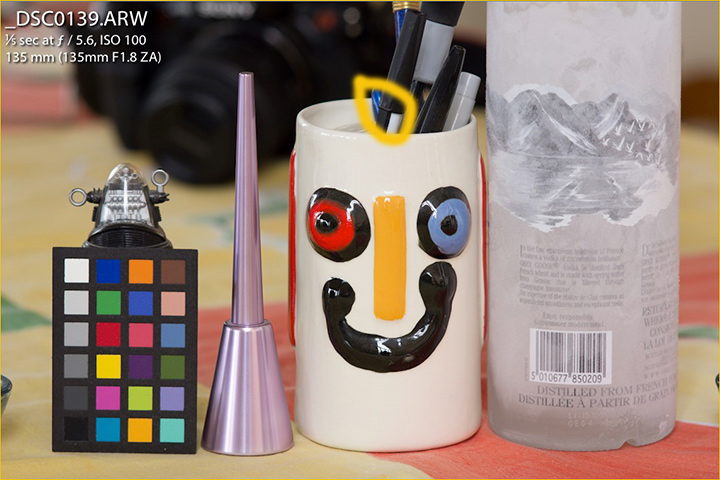
The test image above is one that I use when doing printer, ink and paper evaluations. It tells me a lot, both subjectively and objectively.
When I printed this chart for the first time on the iPF5000 I was knocked over by the blue gradient. I have never seen an inkjet print where this actually reproduced as blue. Every printer that I’ve ever used has reproduced this gradient as some shade of purple. With the new Canon printer it is a strong, saturated and very accurate blue.
In Photoshop the far left of the blue gradient measuresR=0, G=0 and B=255.

I wondered how it would be possible to show on the web what the difference looked like. If I scanned the prints there’d be all kinds of pitfalls in trying to achieve accurate reproduction. Then, as I was measuring the results inBabelColorI realized that along with numerical readings from the spectrophotometer, the program also reproduces on screen a patch of the color being read. Via screen capture, these are seen in the illustration immediately above.
Now, reading these patches again in Photoshop, we get the following:
Epson 4800:R=58, G=42 and B=149
Canon iPF5000:R=0, G=44 and B=177
One doesn’t have to be much of a colour scientist to see that the Epson has a large red component in its blue reproduction, while the Canon has none.
The other colour gradients don’t show as dramatic improvements as does blue. In fact when it comes to reproducing red, the Epson in fact appears to have a slight edge.
A Note of Caution:The above gamut plots were performed with aGetag Macbeth Eye Onespectrophotometer,ColorThink, andBabelColorsoftware. The paper profiled wasInnova F-Type Gloss UltraSmooth, using Photo Black ink. Results on other papers and with other testing methodologies may produce different results.
Gray Scale
The other area where the Canon surpasses the Epson is in grayscale range. The gray gradient shown on this test image has 20 segments. The Epson has trouble differentiating between the two very darkest segments, while the Canon clearly shows a distinct separation in the darkest tones.
This additional shadow differentiation is clearly visible as well in the test image’s upper left panel, the one of the mother and child. In the Epson print the woman’s body, clothed in a black leotard against a black background, is barely distinguishable. On the Canon print her entire body can be clearly seen. Quite stunning performance.
DMax
A measurement of the difference in dMax between the two printers also tells the tale. OnInnova FibaPrint, a new glossy fiber-based paper, the Epson 4800 measured a Dmax of 2.22. The Canon measured 2.5, the highest reading I’ve ever seen. This difference can actually be seen when the prints are held up side-by-side. This is not simply a spec difference, but an observable one.
On matte paper this difference is not to be seen though. UsingEpson Enhanced Mattepaper I measured an identical Dmax of 1.64 with both printers.
__________________________________________________________________________
Drivers and 16 Bit Printing
The standard printer driver is fairly straightforward, and not all that different from anything else you may already be used to. It has it’s frustrations though, which will be discussed shortly. But what sets the iPF 5000 apart is its 16 bit driver.
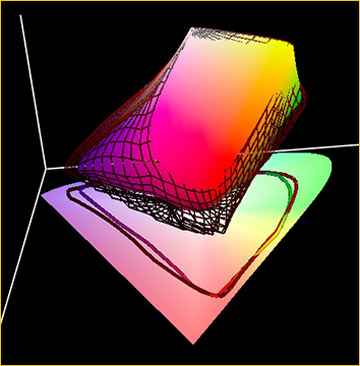
This is a Photoshop plug-in that processes the image in 16 bit mode and then sends it to the printer as 12 bit data. The net of this is to expand the dynamic range of the reproduced image, and surprisingly also the gamut.
The gamut plot above compares profiles which I made forInnova Fibaprint Ultra Smooth(a matte paper), in both 8 bit and 16 bit mode. I discovered early on that one actually needs to have different profiles for the regular OS level driver and the special 16 bit driver.
The 16 bit driver is invoked from theFile / Exportmenu in Photoshop. It may also be invoked from within Canon’s DPP raw processing software.
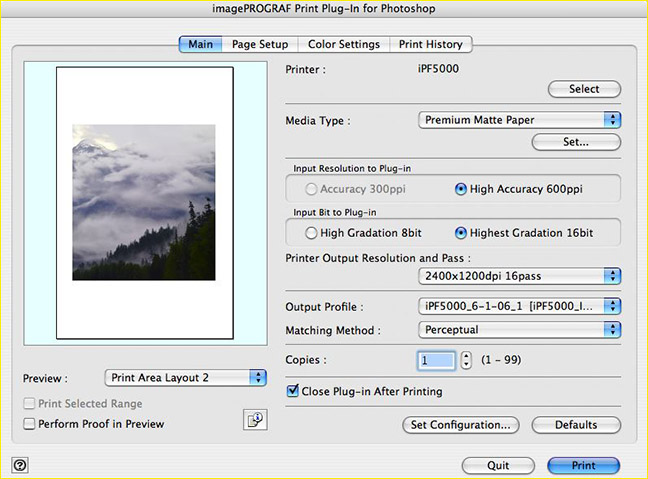
In many ways this driver works more like a RIP than a printer driver. It bypasses not only Photoshop’s printer dialogs but also the operating system’s. I won’t describe all of its functions. That’s a job for Canon’s manual writers, but I will touch on some of the more salient features.
TheMainscreen tab allows setting the paper type, input resolution, output resolution, output profile, and a few other basic settings. Once the profile is selected you can also soft-proof on screen with the button in the lower left corner, but the preview is so small that this is not really a substitute for soft proofing in Photoshop.
The second tab,Page Setup, not only lets you set paper size, but allows one to also resize and position the image from setting boxes as well as visually. Given the convenience and quality of output from this driver it’s hard to imagine why anyone would use the standard printer driver, especially when printing from within Photoshop. As will be seen it even is a bit faster overall than the standard printer driver.
The third tab isColor Settings, which is likely to be unused by anyone that is working with a colour managed workflow, and therefore redundant for most users.Print Historyis the fourth tab, which allows both recalling the settings used for previously made prints as well as placing printing data on the print itself. There are far too many functions to cover in this initial review, but many commercial printing operations will likely find these to be of value.
A Standard Driver Gottcha
The standard printer driver is quite similar to that which anyone used to an Epson printer has been using. Because printing with a standard driver is a combination of what’s provided by the printer maker and what’s provided by the operating system, these tend to be somewhat alike between manufacturers.
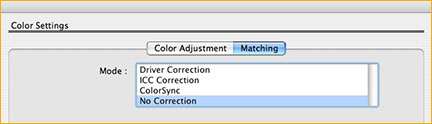
But there is a small gottcha in the Canon driver which you may not notice. When you print from within Photoshop the proper setting when one is using a printer profile isPrint With Preview, and then underColor Handling–Let Photoshop Determine Colors. Normally that’s it.
But with the Canon driver after selectingPrint, and then selecting theMainwindow, one also needs to select theSetbutton underColor Mode, and once there,No Correction. Note that this setting is sticky, and once you have made a print with it set the first time, it should stay that way permanently. (I hope).
This is not an issue when using the 16 Bit Export Module, which I suggest as the far preferable way of printing with this program, at least from within Photoshop.
Timing Tests
The following timings were derived testing the iPF 5000 on a 17″ Macbook Pro with 2GB of RAM. Timing started whenPrintwas pressed, and ended when the paper was ejected from the printer. All prints were made at the printer’s highest resolution setting (16 pass). The image was a 169MB file at 600PPI, with 1200X2400 output resolution on 11X17″ paper.
– Standard printer driver = 4 minutes and 4 seconds.
– 16 Bit Export Driver = 3 minutes and 2 seconds. (To this one needs to add the 42 seconds that it takes the driver to ingest this file, for a total time of 3 minutes and 44 seconds, somewhat faster than the standard 8 bit driver).
– Epson 4800 = 4 minutes and 30 seconds
These timings are not to be taken as indicative of overall performance. They are only relevant to my work and the papers and files that I use, but they do give some indication of the relative speed of these two printers. The bottom line is that the Canon is somewhat faster than the Epson, but not by a really compelling amount.
But, this is when the printer is being used at its highest quality settings. If lower quality is acceptable the iPF5000 is a real speed demon. And many of the lower quality settings don’t reduce image appearance all that much. These settings are worth playing with if you need output speed.
Sound Level
The iPF5000 is subjectively somewhat quieter than the Epson 4800. Curious to see how much quieter, I measured the SPL at a distance of 1 meter from each printer. Using a digital sound level meter the Epson measured with an average of 62 db, A weighted, while printing. The Canon measured 60 db during the first part of its print cycle, and then 56 db during the second part. The reason for this is that there is a fan running at the beginning of making each print, but this cuts out at about the half way point. The fan noise is created by the vacuum mechanism which holds the paper in place, but which then lets up as the paper moves through the feed mechanism. But in any event the iPF5000 is quite a bit quieter than the Epson 4800, a not insignificant issue when used in a home or small studio environment.
__________________________________________________________________________
Heads
The heads (two of them) on the iPF 5000 are user interchangeable. The ones on the Epson 4800 aren’t. This is a good news / bad news situation. Whereas the heads on the Epson are designed to last effectively for the life of the printer (however long that may be), the Canon heads are intended to eventually require replacement, at a cost of approximately $600 per head (there are two).
This is not as serious an issue as would first appear. According to available information, results from their W series printers, which were released last year, and which use the same head technology as the iPF 5000, show that average head life works out to be approximately 11,500 A3 sized prints (11X17″), with 20% ink coverage per color. How long it will take to make some 11,000 prints will obviously vary by individual. I make an average of 50 – 75 11X17″ and 13X19″ prints monthly. Assuming worst case, say 100 prints / month, that works out to 110 months – some 9 years. Since I expect the printer to essentially be obsolete in three years at most, and even assuming that the 11,000 odd print number is optimistic, it still means that for all but the heaviest commercial users head replacement cost will simply be a non-issue.
I was curious about whether or not Canon’s printer heads changed characteristics as they aged. I have been assured that this was not the case. Apparently the only part that is subject to wearing out is the heater associated with each nozzle. These eventually cease to function, but when they do it is a binary situation. They either work, or they don’t. Since the printer automatically bypasses problematic nozzles, it’s only when enough of them have failed that the head reports that it needs to be replaced, which, as we’ve seen, will likely not be for a long time.
__________________________________________________________________________
Paper Handling
Since I am constantly changing back and forth between sheet fed and roll paper, the fact that the Canon allows the roll paper to remain loaded when printing from the cassette is a real plus. The physical location of my printer, with a low shelf above it, makes handling roll paper a bit of an annoyance, so only having to do this occasionally is appreciated. Even for someone with easy access to the roll paper holder this is bound to be seen as a plus. And, when combined with not having to switch between matte and photo black inks, both workflow and productivity are significantly enhanced. With the iPF5000 switching from printing on a roll of matte paper to a sheet of glossy paper simply is a matter of making the appropriate on-screen settings. With the Epson 4800 it requires charging ink cartridges, and loading and unloading paper. Quite a time and money saver.
I also found that after making many dozens of prints on different types of papers via the cassette tray, there was never once a misfeed. This has not been my experience with the Epson 4800, where misfeeds are commonplace – at least with the two samples of this printer that I’ve owned, as well as the 4000 before it, and the 5500 before that.
__________________________________________________________________________
The Big Issue
There isa spanner in the works, as the saying goes, and that’s the whole issue of printer settings, both from the unit’s front panel and its driver software. The essence of the problem is as follows. The iPF 5000 wants to know what size paper is loaded, in each possible feed, and what its characteristics are. For example, it needs to know if it’s a matte or glossy paper so that it can choose to use the photo black or matte black cartridge, as appropriate. It also needs to know where the paper is coming from; the roll holder, the top feed, the front feed, or the cassette.
For these reasons whenever you load new paper into the machine you need to tell it via front panel settings what size and type of paper it is. Then, when you go to print you need to similarly tell the driver the same information, and also which of the possible paper paths is going to be used.
In a likely attempt to make this simpler Canon provides a piece of utility software called theMedia Configuration Tool. As far as I can tell (again the HTML documentation is simply awful) this software is supposed to allow one to create or download a “characteristic profile” for a given type of media, the idea being that if you are going to be putting Somerset Velvet 13X19″ paper in the casette tray you should be able to create such an identifaction.
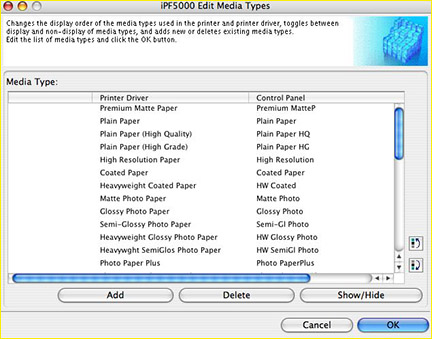
The problem is that it simply doesn’t do what it looks like it should, or at least what it would be nice if it did, if it did anything at all, which it doesn’t.
The first thing I tried to do is use theAddfunction, to define a new paper type. No luck. It just doesn’t work. Then I tried to find a way to edit one of the existing paper descriptions, but I couldn’t find a way to do this either.
When one is done doing all of these things, which the software doesn’t appear able to do, then one can (supposedly) upload this information to the printer and have a named description appear on the front panel. That’s the theory. For now it appears to be only theory because I can’t get it to work.
What does work is picking a paper type from Canon’s built in list, both on the printer’s LCD panel and in the driver software. This is fine, as far as it goes, but it doesn’t go very far. The reason being that Canon works on the assumption that you’ll be using their branded papers. But without the ability to either edit these configuration profiles or add new ones of ones own, there is really no way to know if the settings that are designated for a particular paper are similar to or useful with one of the better known papers that are in common use, such as those from Arches, Hahnemuhle, Moab, Crane or Epson.
None of this renders the printer unusable. Just incredibly annoying, particularly when one is changing paper type frequently. It also means that the printer is constantly flashing warning lights at the user, advising that the paper size is wrong, or the media is wrong, even when they don’t appear to be.
This is something that Canon needs to fix ASAP. Please!
Nag, Nag, Nag
The nagging from the front panel, telling you that the paper is the wrong size or the wrong type has two solutions. The first is to diligently set the front panel every time the paper is changed, telling it the paper type and the paper size. The second alternative is to simply press the buttons, and then ignore the flashing warnings, because it’s the settings in the printer driver that really control what the printer is going to do.
Clearly these have to be set properly, because if the wrong type of paper is set, the printer won’t know which black ink to use. So telling it matte vs glossy is important. Telling it the right size is also necessary, for the obvious reasons. The real issue is that you are expected to do it twice, from the control panel and from the driver, or else it flashes a warning light that something is wrong. But, unless the mismatch is serious, it won’t refuse to print, it’ll just nag. Nag, nag, nag.
__________________________________________________________________________
Minor Annoyances
Like any new product, the iPF5000 has its annoyances. All of these seem related to firmware and so are easily amenable to rapid fixes. Hopefully Canon will address them before too long.
– When the printer goes into sleep (power saving) mode, occasionally it will not wake up when a file is sent to it. The solution is to lightly touch the Power button on the printer. This is enough to rouse the printer from its slumber. This does not happen all the time though.
– When new paper is loaded into the cassette tray and a first print is made, the printers LCD panel occasionally complains that the paper is the wrong size, even when it isn’t. The next print generates no such complaint, so this appears to simply be a nag.
– Canon calls the place where stacks of printing paper are loaded acassette. They call the place where single sheets are loaded at the top of the printer thetray. Sorry Canon, but the rest of the world doesn’t call a vertical slot designed for one sheet of paper atray. I can live withcassettefor what others call atray, but please don’t call aslotatray. OK?
– If you accidentally tell the printer to print from thetray, thinking thattraymeanscassette, whencassetteactually meanstray, andtraymeans single top feed, the printer seems to get stuck, and refuses to do anything until you actually make a print from thetray(err,slot).
There is a solution. Just press and holdStop / Ejecton the top panel for more than a second. Obvious, but I spent hours trying to figure out a solution. Better documentation anyone?
__________________________________________________________________________
Pleasures
The first time I made a print with the iPF 5000 I was more than pleasantly pleased to see that the actual file name of the image being printed is displayed on the printers LCD. This is not a big deal, really, but simply a sign that Canon’s engineers have been paying attention to some input from users.
It should be noted that the print’s file name is what’s displayed on the printer’s LCD when the Export Module is used. When the regular printer driver is used it’s the computer or user name that’s displayed.
__________________________________________________________________________
B&W Printing
There is aMonochromeprint setting in both the standard driver as well as the 16 Bit Export Driver. I tried to find information about it in the HTML manual, but was unable to. Maybe it’s there. Maybe not. But since the HTML manual has no index, it’s hard to say.
It could be that Monochrome mode uses just one, or two, or three or more inks. But until Canon lifts the documentation kimono there’s no way of knowing. In any event, I made several prints in Monochrome mode and again in colour mode, and if anything saw better results when printing normally with all inks.
These prints were very neutral. Since I usually tone my B&W prints with a slightly warm or cool tone, absolutely neutrality is less important to me in my B&W prints than it is for some, so I’ll leave this topic for others who have a horse in that race, to debate the fine points.
__________________________________________________________________________
General Print Quality Impressions
Some initial comments on the web about print quality suggested that prints from the iPF 5000 had something less than full continuous tone quality. I’m not sure where that came from but I can assure you that this isdefinitely not the case. I have looked at prints under both a high quality 3X Schneider loup as well as a 10X loupe. With the naked eye prints are definitely continuous tone, just as you’d expect them to be. Under a 3X loupe the dithering pattern is just visible. Under a 10X loupe it is clearly visible just as it is on every inkjet printer.
The screen patterns and dithering used by Canon are different, of course, from those seen on an Epson print. Not better. Not worse. Just different. But to the naked eye they simply aren’t there.
There is a bit of gloss differential on prints made using glossy and semi-matte papers. I see the same thing on such prints from an Epson 4800. The problem is that the pigment particles are encapsulated in a resin which has a glossy finish. On areas of the print that do not receive any or much ink, such as extreme highlights, the finish of the paper is allowed to show through. The only solution is the one that Epson has used in some of its consumer grade printers like the R1800 model, which uses agloss optimizercartridge.
In any event, whether from a Canon or Epson printer, I really don’t regard gloss differential as that big a deal, since when viewed normally this is not visible. It takes holding the print at an angle to the light before it is visible. For those that do find it to be a problem, a protective spray coating is all that’s needed to eliminate it. (or stick with printing on matter papers).
I have not tried many different glossy papers yet, but thus far have not seen any appreciable bronzing, though a few observers say that they can see a small amount on the most glossy papers when the light is just right.
Similarly metamerism is not something that I have noticed yet, but I reserve final opinion until I have done further testing and printing with a wider variety of papers.
Otherwise there isn’t much to add about general print quality from the Canon beyond what has been reported elsewhere here regarding dMax and gamut. Prints from the iPF5000 are about as good as it gets with today’s technologies.
__________________________________________________________________________
The Manual
I won’t mince words. The Canon’s documentation is dreadful. There is a large set-up instruction sheet and modest sized printer set-up and trouble shooting guide, Otherwise the only manual is an HTML file.
This is problematic for several reasons. Firstly, there is no index, and because it HTML in numerous small files, it’s not searchable. If Canon had taken the 30 minutes necessary to create a PDF, at least they would have been able to create an Index. But as an HTML file this isn’t possible.
Secondly, it is poorly laid out, inconsistent in its presentation, confusing, and incomplete. Did I mention that it doesn’t have an Index?
Though there is a rich opportunity for me to lambaste Canon for this truly poor documentation, I’ll resist further attempts at ironic humour, and simply say that the company needs to make the production of a clearly written, comprehensive and properly indexed manual a priority – preferably a printed one. They should also not neglect to send one to every early purchaser of an iPF5000 that had to suffer through this first release.
__________________________________________________________________________
Conclusion
I vote for products with my wallet. If it’s something that I need, and that will enhance my productivity, or final print quality, it generally finds a permanent home in my office. In the case of the iPF 5000 it wasn’t too many days into my initial testing before I decided that this printer would be taking up residencechez moi.
Does the Canon have flaws. Yes, a few, and some of them quite annoying ones. Does it produces excellent prints and have productivity advantages. Yes it does – in spades.
If you do not currently own a printer of this type, then I would regard the decision to purchase as a fairly straightforward one. The Canon iPF 5000 offers a combination of image quality and productivity advantages that are quite compelling. If you own a previous generation printer of this general size and capability then only you can answer the question of budget and need, based on your own circumstances.
Though I have criticized numerous aspects of this printer’s behaviour, the reality is that these are annoyances more than deal breakers. And, hopefully, if Canon is really serious about becoming a major player in the high-end fine art printing marketplace, these will be fixed in short order via firmware and software upgrades.
A final note regarding the important issue of ink permanence. As this is being written (June, 2006),Henry Wilhelmis conducting image permanence testing on the ipF5000 inks. His comments are as follows…
“A review of preliminary test data indicates that prints made with the Lucia pigmented inks and select Canon photo and fine art papers will have WIR Display Permanence Ratings in excess of 100 years for color images and significantly beyond that for monochrome images.”
Michael Reichmann
June, 2006
__________________________________________________________________________
When the Canon iPF 5000 started shipping last month, a couple of early reports indicated that prints were not as continuous tone as those from Epson’s 4800. This caused a lot of concern among potential owners.
When I received my review sample of the printer I saw no such problem, and when showing prints to a number of very knowledgeable observers not one of us could see anything except photographic smoothness and continuity. Maybe not better, but certainly no worse than the Epson 4800, or any other printer.
This was a puzzle, because otherwise competent observers were clearly seeing different things.
Today I discovered the reason. I visited a dealer who had an iPF5000 on display, and who had seen the problem on their printer; a very fine texture on prints that should have been continuous tone. They contacted Canon, a technical rep dropped over, and he simply ran a head alignment routine. Duhhh!
(A personal aside – maybe if Canon had provided a competent user manual, early users as well as this dealer might have been able to figure the problem out for themselves.)
In any event, end of issue.
That’s it folks. If anyone tells you that a Canon iPF 5000 can’t print continuous tone, tell them to run an auto head align routine. It’s found on the font panel underMain Menu / Adjust Printer / Auto Head Adj / Standard Adj.
– – – – –
I also met today withJohn Pannozzo, the head ofColorByte Software, the publishers of theImageprint RIP. John reports that now that Imageprint is shipping for the Epson 2400, the company has turned its attention to the Canon iPF 5000. If things go as planned we should see Imageprint for the Canon within 60 – 90 days. No word on an upgrade path for current Imageprint owners, but when asked about it John just smiled. Read into this what you will.
John also told me that if all goes well it is their intention to completely bypass Canon’s user interface as well as their drivers. My observation – if Canon doesn’t get off the stick and fix its user interface for the iPF 5000, and fast, one of two things will happen. Firstly sales of an otherwise excellent printer will suffer, and secondly, if Imageprint for the 5000 ships before Canon comes up with a fix, ColorByte could well sell one copy of Imageprint for every 5000 out there.
Who’s going to win the race?
– – – – –
Monochrome Printing Update
(June 28, ’06)
As I continue to work with the iPF5000 I discover new things. The latest is the method for getting the most neutral monochrome prints.
This is done using the 16 bit Export Driver and then selectingAuto Monochromeinstead of a standard printer profile. The results are truely excellent.
This would be a pretty terrific find, but I missed the ability apply toning to the image. Doing so in Photoshop or Lightroom is fine, but unless the toning is moderately strong, with this printer there isn’t a neutral base to start from.
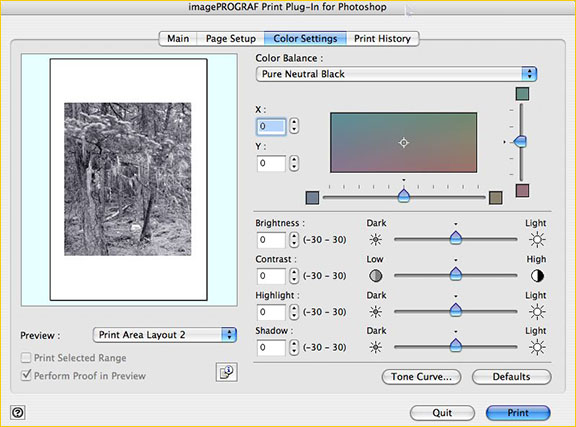
Out of curiosity, at one point I looked at theColor Settingstab in theExport Module. When working in colour with profiles this seemed to me to be redundant. But, what I discovered was that whenAuto Monochromemode was selected a whole new control panel is revealed.
There are three choice offered under theColor Balancedrop down;Pure Neutral Black.Cool BlackandWarm Black. In addition you have three different ways of adjusting toning – by entering numbers in their dialogs, by moving the sliders, or by dragging the center point in the warm / cool box. By the way, Warm and Cool black are simply -36 and +36 respectively in the slider settings.
There are also four sliders beneath forBrightness, Contrast, Highlights and Shadows. These do the job, but, as I’ve complained about before, the soft proofing preview window is too small for these to be of much use. One is simply better off doing a proper monochrome conversion in Photoshop or Lightroom.
The toning control is excellent though, and the presets will be found to be appealing by most photographers. The only thing missing is a split toning capability.
Well done Canon! Now if you could just find someone with a few days to spare who could document this and about 99 other things that this printer can do, we’d all be better off.
__________________________________________________________________________
Consistancy – June 29, 2006
Andrew Rodneyand I conducted a small experiment over the past few days. I printed out a target containing 918 colour patches, using two different iPF 5000 printers. These were sent to Andrew and measured by him for consistency. The results were not that impressive. They can be read about on this site’s Discussion Forumhere.
But, this is too limited a sample (just two data points) to draw any firm conclusions from, other than that more testing of more different copies of this printer, and of the same printer over a period of time, need to be done so that users and potential users can learn whether Canon’s new printer can truly compete with the Epson 4800.
__________________________________________________________________________


Elevate Your Vision


Read this story and all the best stories on The Luminous Landscape
The author has made this story available to Luminous Landscape members only. Upgrade to get instant access to this story and other benefits available only to members.
Why choose us?
Luminous-Landscape is a membership site. Our website contains over 5300 articles on almost every topic, camera, lens and printer you can imagine. Our membership model is simple, just $2 a month ($24.00 USD a year). This $24 gains you access to a wealth of information including all our past and future video tutorials on such topics as Lightroom, Capture One, Printing, file management and dozens of interviews and travel videos.
- New Articles every few days
- All original content found nowhere else on the web
- No Pop Up Google Sense ads – Our advertisers are photo related
- Download/stream video to any device
- NEW videos monthly
- Top well-known photographer contributors
- Posts from industry leaders
- Speciality Photography Workshops
- Mobile device scalable
- Exclusive video interviews
- Special vendor offers for members
- Hands On Product reviews
- FREE – User Forum. One of the most read user forums on the internet
- Access to our community Buy and Sell pages; for members only.
You may also like


