


Adjusting to a New Reality
One thing that the huge amount of correspondence that I’ve received regarding myD30review (Nov. 2000) has made clear to me is that many folks unfamiliar with digital image processing seem to regard output from digital camera as somehow equivalent to aPolaroid;i.e. an end unto itself.
By this, I mean that they expect that what comes out of the camerawillbe (or at leastshouldbe) the final image. This is definitely not the case, and let’s see why.
A digital file is as much a negative (in the image source sense) as is a piece of film. No one expects a negative to be the final image and so neither should digital camera owners. The file produced by the camera is like a music score that needs to be "played" for it have have any substance or interpretation.
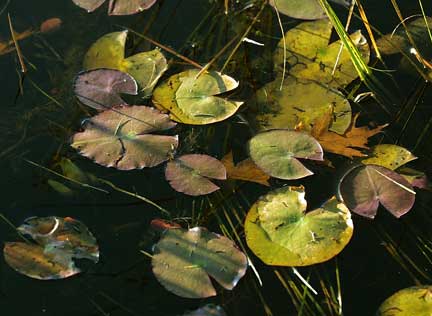
Muskoka Lilies, October 2000, Muskoka, Ontario
Photographed with Canon D30 at ISO 100. 1/125th sec @ f/3.5 with a Canon 70~200mm f/2.8L lens. RAW Mode.
Playing the Score
I prefer to work with RAW mode files from the D30. This means that they have had no white balance or sharpening applied. They represent the raw image as seen by the camera’s imaging chip with no pre-processing applied. (JPG files have some form of white balance as selected by the user and also a predetermined amount of Unsharp Masking.)
Lets look at both of these items, because there is a lot of misunderstanding associated with them.
White Balance
The human eye has a wonderful ability to adjust to varying light conditions. Not only do our eyes have autofocus and auto-exposure, but we have automatic colour balance built into our brains.
Film and imaging chips are not so lucky. With film, to accommodate the range of colour temperatures found from sunrise to sunset, indoors, under fluorescent lights and all of the other non-standard lighting we find ourselves under we have three choice. Use a colour correcting filter to alter the colour balance. Use a film that is more appropriate for the lighting condition (tungsten Vs. daylight) or adjust the image in the darkroom or during digital processing.
Digital cameras have an adjustment called "White Balance". With theD30, when shooting in one of the JPG modes the camera will apply "Auto White Balance" or one of several preset options. You can also optionally record your own white balance and apply it to subsequent images.
If you shoot in RAW mode then no white balance is applied. You have the option of applying one of the preset values when converting the image to a TIFF file for import into PhotoShop, but my preference is to do this after the fact once the image is in PhotoShop. I’ll explain why shortly.
Unsharp Masking
Otherwise known assharpening. Both are unfortunate terms because they are misleading to the person who does not understand what they do.
This has nothing to do with resolution. It has to do with the fact that all digital imaging processes (whether in scanners or cameras) needs to have edge contrast enhanced. That’s whatUnsharp Maskingdoes. A digital file without any Unsharp Masking is pretty mushy and not terribly useful. The trick is to do the Unsharp Masking properly. If this is a new topic for you I suggest that you read my article titledInstant PhotoShopfor a better understand of this and other digital image processing concepts and techniques.
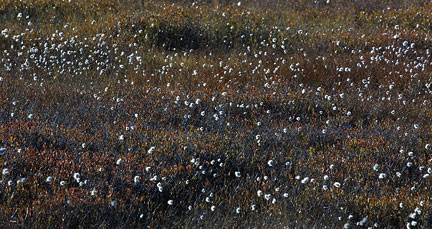
Fall Puffs, October 2000, Muskoka, Ontario
Photographed with Canon D30 at ISO 100. 1/180th sec @ f/5.6 with a Canon 70~200mm f/2.8L lens. RAW Mode.
Traditional & Digital Image Controls
All darkroom and digital imaging workers use much the same controls. These include adjusting brightness, contrast and doing burning and dodging. When working in colour overall colour balance can be controlled from within PhotoShop. Even individual colours can be controled in terms of saturation, intensity and balance.
It’s important to understand that there is no supervisor standing over your shoulder insisting that things look a certain way. Your creative judgment and taste is the final arbiter. The only arbiter.
It’s also worth remembering that every time a processing step is applied to a digital image it is slightly degraded. This is why I do all sharpening and color balance in PhotoShop and why I useAdjustment Layers; explained in my article titledInstant PhotoShop.
Cropping and Print Size
Many people regard the shape of the camera’s film (or chip) as somehow being sacrosanct. It isn’t. Crop your images so that they best exhibit the subject matter and your interpretation, not because Canon or Kodak decided to make them a certain shape.
As for print size, some images want to be small. Some want to be larger. Make a print and live with it for a while. It’ll tell you what size it wants to be.


Elevate Your Vision


Read this story and all the best stories on The Luminous Landscape
The author has made this story available to Luminous Landscape members only. Upgrade to get instant access to this story and other benefits available only to members.
Why choose us?
Luminous-Landscape is a membership site. Our website contains over 5300 articles on almost every topic, camera, lens and printer you can imagine. Our membership model is simple, just $2 a month ($24.00 USD a year). This $24 gains you access to a wealth of information including all our past and future video tutorials on such topics as Lightroom, Capture One, Printing, file management and dozens of interviews and travel videos.
- New Articles every few days
- All original content found nowhere else on the web
- No Pop Up Google Sense ads – Our advertisers are photo related
- Download/stream video to any device
- NEW videos monthly
- Top well-known photographer contributors
- Posts from industry leaders
- Speciality Photography Workshops
- Mobile device scalable
- Exclusive video interviews
- Special vendor offers for members
- Hands On Product reviews
- FREE – User Forum. One of the most read user forums on the internet
- Access to our community Buy and Sell pages; for members only.
You may also like


