by
Alain Briot

February 19th: raw converters update –> scroll to section 23
February 19th: moiré update –> scroll to section 9
1 – Introduction: why the Fuji X100S
I don’t purchase cameras very often, but when I do I have good reasons why. At the most I purchase one per year and then not every year. So why did I purchase the Fuji X100s? Essentially for three reasons, the first aesthetic, the second technical, and the third practical, in no particular order. The camera looks good. I like its retro look. When dressed nicely, wearing city clothes rather than field clothes, it doesn’t detract or say ‘photographer.’ In other words it is classy and elegant. This is important when photographing at social events and other venues that I visit for pleasure rather than for work. Second, the camera has professional features, is pleasant to use (with the caveats covered below) and delivers excellent image quality. Third, the camera is light and compact and the fixed lens and built in flash mean that I am not tempted to carry extra lenses or a separate flash unit. In other words it is a self contained unit. As such it doesn’t require a camera bag and instead can be carried on the shoulder, around the neck or even in a pocket. In short, the Fuji X100s fits the bill for a camera that I can take with me pretty much everywhere, without being impended by its presence, while being able to create quality images.
I also don’t write camera reviews very often, but when I do they are extensive. In this review I will address the areas that I find important about this camera. I make no claims to cover every feature of the camera or to provide an in-depth technical analysis. Such is not my style. Instead, what I offer is a personal review of this camera, based on my experience using it in real-life situations. This review is organized according to my personal discovery of the specific camera features that I consider to be important. For the record I purchased this camera at retail price with my own money. I have no relationship with Fuji whatsoever besides buying their cameras and films (when I still used film). I did however get the Jtec quick release plates that I review in Section 21 and 22 for free. These were given to me by Ted Johnson, co-founder of Jtec, during the Fine Art Digital Summit in Page in 2013. Ted attended the Summit and paid full price for the Summit registration fee.
I also want to mention that this is not a review of a new camera, the X100s being available for some time already. Instead, this is a review of a recent camera that I acquired in December 2013 and that I enjoy using. This is also a long term review. It spans over a month during which I used the camera to photograph a wide variety of subjects in widely different conditions.
Finally, to complement this review, I am providing you with full-size files of photographs taken with the Fuji X100s. The link where you can download these files is at the end of this essay. The usual caveat does apply, namely that these files are for your personal use only for the purpose of evaluating the capabilities of this camera. They are not to be sold or used for any commercial purpose, be it as prints, digital files or other.
2 – Hybrid electronic and optical viewfinder
I like having both. I like the optical viewfinder because it is similar to the one found in Leica cameras in that it shows you more than what the sensor will record. Having a wider frame of view enables me to make composition decisions based on how much I want to include and exclude and not just based on what I see in the viewfinder. This is an advantage compared to DSLR’s which in the best case scenario show you 98% or so of the image captured by the sensor. Seeing more gives me additional options for composition and provides me with creative freedom.
 |
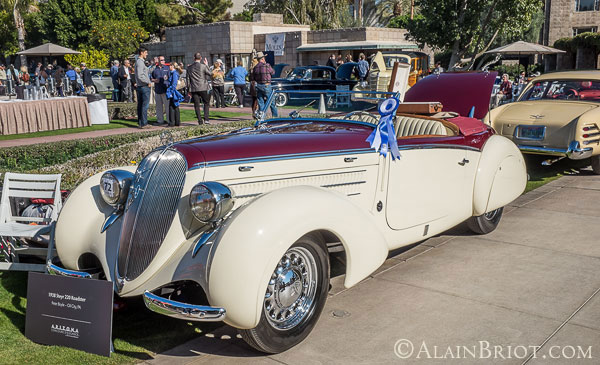
2014 Arizona Concours d’Elegance, Arizona Biltmore
ISO 200, f7.1, 1/950 sec
I like the electronic viewfinder (EVF) because after taking the photograph the image captured by the camera is shown in the viewfinder. You control how long the capture is shown through the camera’s shooting menu, anywhere from 0.5” to constant. I set it to 1.5” because this works fine for me. It gives me enough time to look at the image but not so long that I miss the next shot.
I also like the fact that I can see the histogram in the EVF. Unfortunately this option is not available in the optical viewfinder. I wish it was because when shooting it forces me to alternate between optical and EVF just to see the histogram.
Update – 2/14/14: the histogram is actually accessible in the optical viewfinder (OVF), however finding the correct setup to display it defeated me until several readers pointed the intricacies of the process. Here goes:
To see the Histogram in the Optical viewfinder do the following menu commands:
1 – Tool menu 2 > OVF Power Save Mode > off
2 – Camera menu 3 > Disp. custom setting > OVF > Histogram > check
3 – Press the disp/back button on the back of the camera if the histogram is not visible in the viewfinder after completing these menu commands.
3 – Camera menu
The camera menu system is deep and complex and takes time to get used to. This is not uncommon with digital cameras. For ease of use I much prefer the simple menu featured on my Phase One digital back. While the functions offered on the digital back are far less numerous, they feature the essential: ISO, histogram, magnifier, format and a few other functions, which is all I need.
4 – Ergonomics
This is a small, lightweight camera. The controls are easy to reach and the camera feels good to me. However I do have small hands so the camera size may or may not work for you. It does take time to get used, or re-acquainted as the case might be, to turning knobs and dials located on the lens and on top of the camera. If you have been using cameras on which you set pretty much everything by turning a wheel or a dial on the back of the camera, like I have, you will have to learn a different way of operating a camera. This is as close as it gets to using a digital version of a traditional film camera!
5 – Color balance
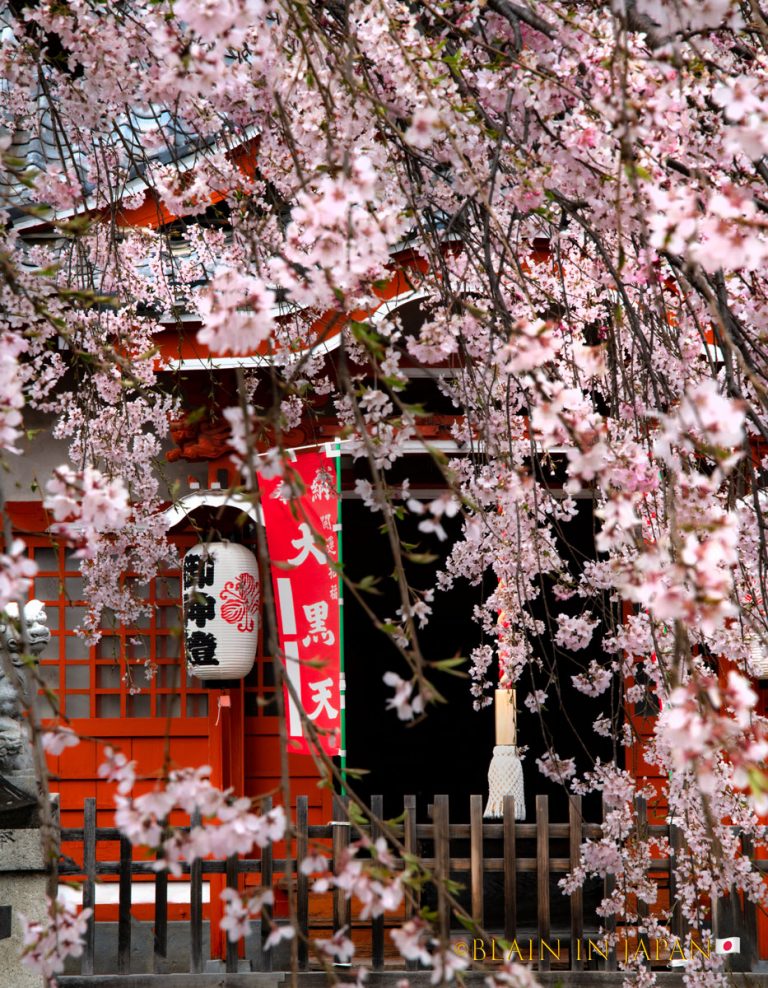
I make it a habit to set the color balance to auto. I do this for all my cameras. With many of them I have to make significant color adjustments when I shoot indoors, especially under tungsten or neon lighting. The X100s doesn’t have that problem. There may be lighting situations that defeat its auto white balance accuracy, but so far I have not found one. It is just excellent. The sample photographs in this essay were all shot in auto white balance mode and none needed significant color correction during raw conversion.
Barrett Jackson car auction 2014
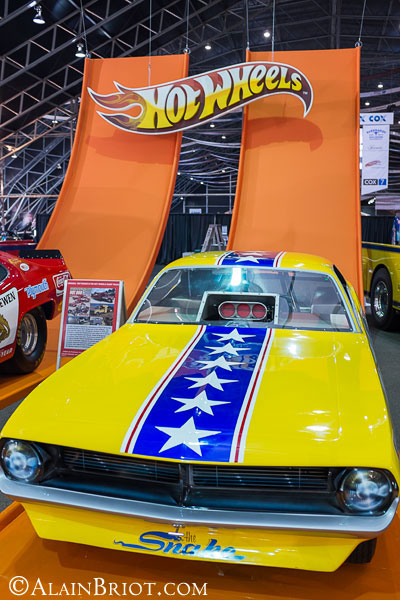 |
The Snake, Barrett-Jackson auction 2014
ISO 250, f2.8, 1/30 sec
This photograph was taken indoors, under artificial lighting with the color balance set to auto.
The color was perfect without any need for color correction.
6 – Auto ISO selection
There is something to be said for the auto-ISO option. I like it a lot. When it is selected it lets the camera decide which ISO setting to use automatically based on ambient lighting. Fuji gives you the option of selecting both the maximum ISO you want to use, from 200 to 6400, and the slowest shutter speed you want to use. Once these variables are set, when shooting in low light conditions the camera will automatically select a shutter speed no slower than the slowest speed you pre-selected, and increase the ISO no further than the highest ISO you selected. This gives you control over camera shake caused by shutter speeds that are too low, and over image noise caused by ISO settings that are too high.
Auto ISO selection gives you the freedom to shoot in quick-changing light conditions without having to worry about resetting your ISO. This means you can give full attention to shooting and composition. This is a very helpful feature when photographing at car shows for example, something that I do every year in January.
7 – High ISO Setting
The Fuji X100s offers a high ISO setting of 25600. When a manufacturer offers such a high setting it is tempting to ask how good it is or if is it usable at all? Usefulness hinges on two things: noise and dynamic range. Noise because noise levels define whether high ISO settings provide enough detail or if the noise level makes this ISO setting useless. Dynamic range because as the ISO increases the dynamic range is reduced until the small dynamic range creates images that exhibit an overly high level of contrast and an overly reduced color palette.
I wondered about both so I did some test shots at ISO 25600 in low light conditions because this is when a high ISO setting is most likely to be used. These tests were made in Jpeg mode because the high ISO setting is only available when shooting in Jpeg Fine format. When shooting in Raw the highest ISO setting is 6400. Below are test photographs that show a small figurine photographed at ISO 25600.
 |
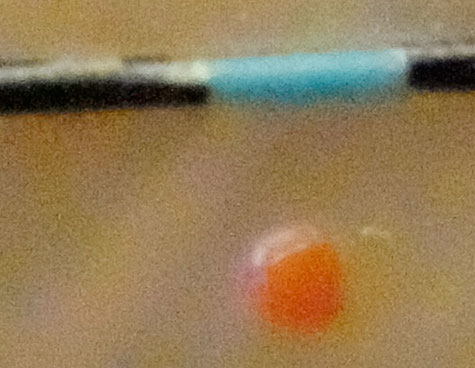 |
ISO 25600 Test. At left, the full image exhibiting the higher contrast typical of a high ISO capture.
At right, a crop at 100% showing the noise generated by the ISO 25600 setting.
ISO 25600, f/11, 1/180 sec
I found the ISO 25600 photographs to have far less noise than I was expecting and to be surprisingly usable for such a high ISO setting. When photographed in good light the noise is very acceptable and when photographed in low light the noise can be substantially reduced in ACR and I expect in other raw converters as well.
The dynamic range isn’t too bad either. Obviously it is nowhere close to what it is at ISO 200, the base ISO for this camera and therefore the one that provides the largest dynamic range, but it is usable. One does have to live with shadows that cannot be fully opened and with highlights that are overly bright. Personally, this is not my cup of tea, but it might work for you if your style lends itself to this look.
A problem that can’t be fixed however is the jpeg compression that the 25600 ISO setting brings with it. In fact, I found the jpeg artifacts to be more of a problem than the noise level. The fact that you are shooting in jpeg mode at that ISO setting also means that the exposure and the color balance must be as precise as possible because fixing either in post processing is challenging. The problem is compounded by the fact that while calculating the correct exposure is essentially a matter of taking the time to do so, setting the proper color balance is rather challenging, if it can be done at all. Interestingly this is not as much of a problem when shooting in jpeg fine mode at ISO 200 (see section 17 below for more on this).
In the end, the artifacts and the post processing rigidity of the jpeg format mean that, for me, the ISO 25600 setting is something to keep in mind for those instances where there is no other way to get a photograph. Otherwise, it is more realistic to plan on using the 6400 ISO setting for low light conditions because it can be used in RAW format and because the noise level is lower.
8 – Lens based f-stop settings and dial-based speed and exposure correction settings
Old school is what comes to mind the first time I used these settings. I should say the first time I looked for these settings because it had been a long time since I last used a 35mm camera that had lens and dial settings, and so at first I tried to set f-stop and exposure correction using the wheel based controls on the back of the camera. When these did not work I had to go to the manual for help only to learn that I needed to use this camera like . . . a camera!
9 – Anti-aliasing filter and moiré
The X100s does not have an anti aliasing filter. This makes the photographs taken with this camera sharper because this filter notoriously softens images. However, it supposedly makes it possible to get a moiré effect when photographing certain subjects. That may be. However I have not noticed any moiré in my images even though I photographed a wide range of subjects. Even if this surfaces in a couple of images, I have to say that, for me, this is not a problem.
Update – 2/19/14:
Another reason for the lack of moiré is the non-bayer arrangement of the X100s Xtrans sensor. This alternative arrangement helps prevent moiré effects because it does not feature the repetitive pattern used on RGB-arrangement sensors. See section 20 for more on sensor matrix pattern arrangements.
10 – Creative modes
The camera features several ‘creative’ image visualization modes. I say visualization because if you shoot in raw, which I do, these modes only affect the in-camera jpeg while the raw file itself can be adjusted to whatever you want when you process the file in the raw converter.
The creative options include recreating the look of different types of Fuji Films: Provia, Velvia, Astia and several Fuji color negative films. It also includes black and white, sepia and color toning options. The most interesting feature in regard to visualization is that one of these options is selected, the simulated look is visible in the OVF. Therefore, if you select black and white for example, you see the scene in black and white in the EVF. If you select sepia, green toning, one of the Fuji film options, or any other option you see these simulated looks in your viewfinder. This is of great help in regard to visualizing how the scene or the subject you are photographing will look in black and white, or sepia, or other. While this visualization can be done with filters held in front of your eye, seeing them in the OVF is both faster, simpler and more interactive. Basically, you see it, you shoot it. This is much faster than having to hold the filter in front of your eye, put the filter away, pick up the camera, compose the scene the same way you did when looking at it with the filter, and finally shoot it.
 |
2014 Concours d’Elegance, Arizona Biltmore, Scottsdale
ISO 200, f16, 1/210 sec
11 – Lens
The lens is a fixed Fujinon f2, 23 mm lens, the equivalent of a 35 mm lens on a full frame 35 mm camera. The lens is fast enough to allow shooting in low light conditions. To me a 35 mm (or equivalent) is the perfect lens for a rangefinder camera. When I photographed with Leicas I used a 40 mm with the CL and a 35 mm with M series cameras. I purchased a 90 mm Summicron, a beautiful lens, but while I enjoyed having it I rarely used it when photographing. To me the 40 or 35 mm lens is the ideal lens. Even though Leicas have interchangeable lenses, in practice I never changed lenses when photographing with them.
I mention this because for me the X100s is closer to a Leica M than to any other camera. It feels a little like an M, except for the weight, the solidity of a brass and metal camera, the shutter release sound and other aspects that make a Leica what it is.
 |
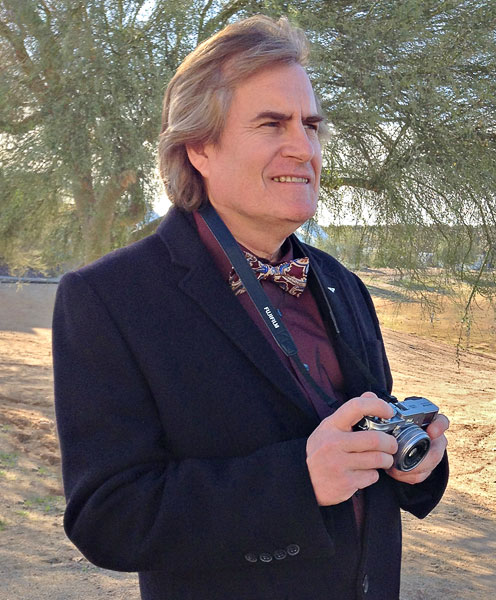 |
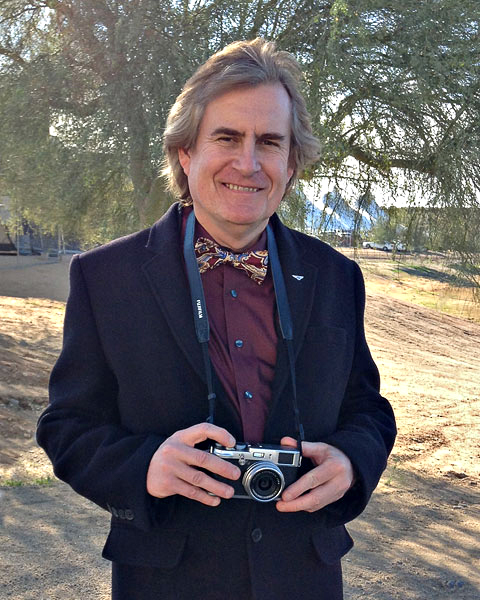
Photographing with the Fuji X100s
Photographs by Natalie Briot
12 – Battery life
The battery is small. Fuji says it will last for about 350 photographs. In practice I found that I can take more than 350 photographs on a fully charged battery. However, when shooting with the camera all day long, you cannot expect the battery to last all day. In fact, if you shoot continuously, it will most likely last half a day or so.
The battery also does not give you a warning before it dies. Certainly, if you keep an eye on the little battery icon you will see that there is only 1 bar left. However, if you don’t there is no blinking light warning like on many other cameras.
For this reason, to be safe it is necessary to carry at least one spare battery. I carry two, which means I can go a full day without having to recharge batteries. Battery life is highly dependent on LCD use, and when I work all day I spend time reviewing my work as we all do. I don’t want to have to monitor my LCD use just to save the battery.
The battery charger is similar to the Canon G series charger except that the Canon charger plugs directly into the electrical outlet while the Fuji charger comes with a 6 foot electrical cord. This cord is removable but there is no adapter to make the Fuji charger plug directly into the outlet. This means I have to carry a cord that does nothing for me except take up space in my camera bag.
Update – 2/14/14: Several readers pointed out that an easy fix to the cord problem is to replace the cord with an apple plug adapter:
 |
 |
Apple power plug adapter
Another solution is to use a Wasabi charger for the Fuji X100s. I have not used one myself but these have a plug instead of a cord. They also come with a car charger and several other adapters:
 Wasabi plug adapter. Click here to see this adapter on Amazon.com

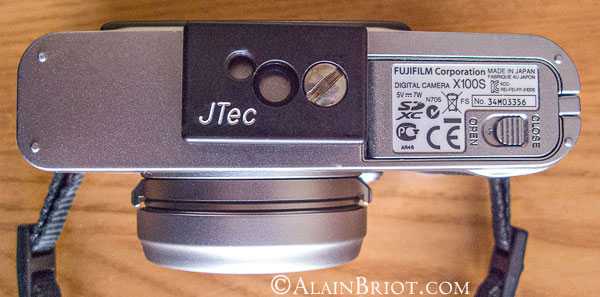
13 – Battery insertion problem
The battery can be inserted in the battery compartment four different ways, of which only 1 way will power the camera. It is interesting to note that I inserted the battery the correct way the first time I used the camera. However, I inserted it the wrong way after I recharged the battery for the first time. The camera did now power up and I had no idea why. It is only after doing an online search for this problem that I found a thread mentioning that the battery can go in 4 different ways. How do you know which is the right way? By aligning the orange stripe, or the arrows printed on the battery, with the orange catch in the battery compartment. Why did Fuji not think of preventing this problem by making it possible to insert the battery only the proper way? No idea.
14 – Vision
Because this review is being published in the midst of a series of essays on Vision, it is appropriate to address vision in the context of this review and explain how it influenced me to purchase this camera.
Vision in this instance refers to finding the ideal camera for social events. I like to dress up to some extent when not in the field and attend social events. When worn on the body, instead of in a bag, a camera becomes part of one’s attire, a visible element that has as much importance, if not more, than a watch, a piece of jewelry, shoes, scarf, tie or other visible detail. The problem with cameras is that they are not just ‘jewelry’ they also need to work. This means that function and appearance must both be present, a feat that is hard to achieve. It is relatively easy to find a camera that does what you want, from a technical perspective, or that looks good, from a fashion perspective. However, finding a camera that can do both is challenging. For me, the X100s does the trick. Not perfectly, but close enough. A digital Leica M3 would be take it up another notch in regards to looks, and a digital medium format camera would provide far higher image quality, from a technical standpoint. However, since the first is not available and the other is far too cumbersome to qualify as fashionable, one has to compromise. The X100s isn’t a bad compromise at all, at least until something along the lines of the dream camera I just described, a camera that combines the retro look of the Leica M3 with the image quality of a Phase One IQ280, becomes available.
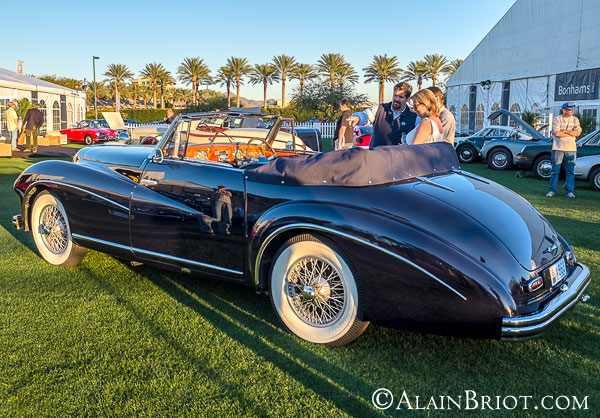 |
1950 Delahaye 135M Cabriolet Atlas
Bonhams Scottsdale car auction
ISO 200, f5.6, 1/180 sec
15 – A fixed prime lens
Sometimes you are better off with some kind of equipment limitation, for example a fixed focal lens, because the limitation of not having a bag full of gear makes you look for ways of making creative pictures rather than hope that your massive gear bag will cover all possibilities. Having too many possibilities distracts and confuses you, even though you believe you are ready for everything.
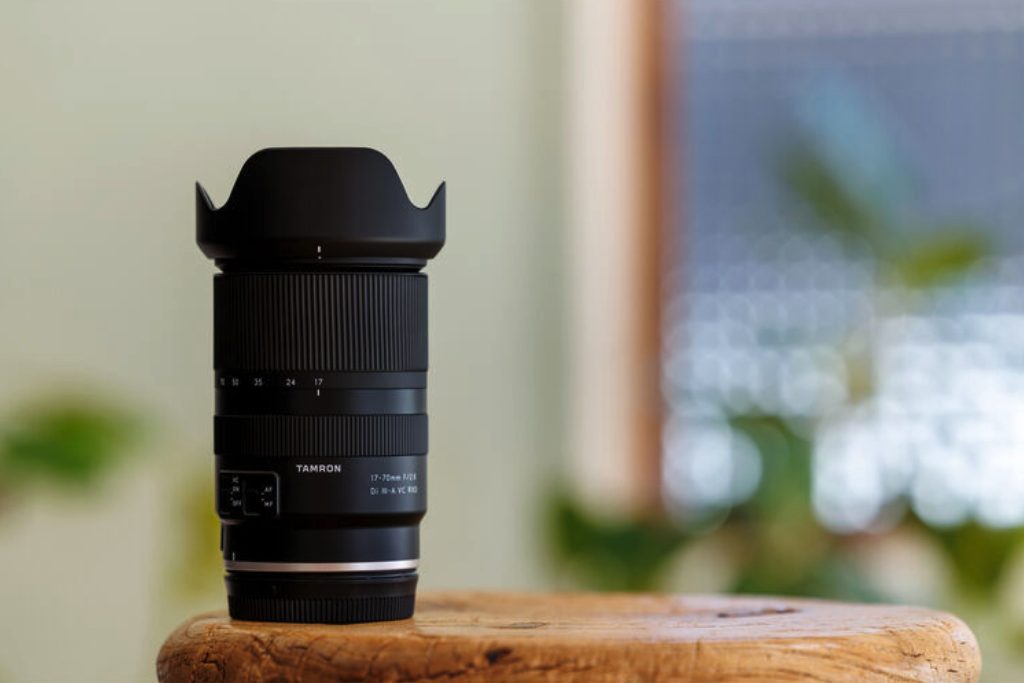
16 – Accessorizing
A number of accessories are available for this camera. I don’t accessorize my cameras so I did not pay much attention to those. The only accessory I considered is a lens shade because the camera does not come with one. However, using a lens shade on the X100s will partly obstruct the viewfinder. This is a problem. Since I did not experience flare or other optical problems coming from the lack of a lens shade, I decided not to use one.
17 – Jpeg fine mode
During one of my car shoots I inadvertently left the camera set to Jpeg fine mode. I intended to shoot in raw, as I always do, but forgot to reset the camera after doing the ISO 25600 test described above.
The results were surprisingly good. So good that when I initially processed the images, I believed I was working with raw files. I imported the jpegs in Lightroom, believing they were raw files, and processed them like I do with Raw files. I was able to open the shadows, reduce the highlight and do color correction the way I normally do. It was only the next time I picked up the camera that I realized it was still set to jpeg mode.
While I would not intentionally shoot in jpeg fine mode instead of Raw, it is good to know that the outcome can be excellent. The image below was shot in jpeg fine mode and is one of my favorite car photographs from this year. A large part of the image quality is due to the ISO being set at 200. Image quality would have been much lower if it had been set higher, as we saw with the high ISO test earlier on.
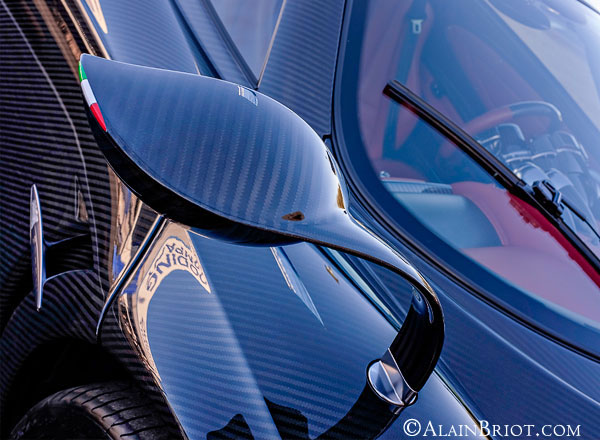 |
Pagani Huayra
ISO 200, f8, 1/50 sec
Jpeg fine mode at full sensor resolution

Fuji X100s full resolution size (raw file and jpeg fine L 3:2 settings)
18 – Is the Fuji X100s better than a Leica M?
In some reviews the Fuji X100s is hailed as a ‘Leica replacement’ or as ‘better than a Leica.’ Is it? In my opinion it is not. The only thing better than a Leica is another, better Leica. Leicas are so specific, so typified, so unique that they have no direct competitors. I have used Leica since 1985, first with a CL then later with various models, the M7 being the last one I used. I have not acquired a digital Leica essentially because I prefer to use medium format cameras and DSLR’s for my specialty which is landscape photography. I just don’t take enough ’other’ types of photographs to justify purchasing one, although the latest models, either the M or the M Monochrome, are tempting enough that I may soon succumb to temptation.
To go back to the point I was making, the Fuji X100s is not a Leica. On the one hand this is an advantage. The X100s is lighter, less expensive and less conspicuous than a Leica. It has an optical and an electronic viewfinder, delivers high quality images but it has a fixed lens and a menu interface that only a non-photographer software engineer can love. On the other hand the Leica is heavier, more expensive and more conspicuous. It has only an optical finder, but it is simpler and more intuitive to use, has interchangeable lenses and offers superlative optical and image quality. The trade offs are significant, and in the end you get what you pay for. However, if you look at the roughly $11,000 dollar difference, the cost of a Leica with a lens being on average roughly $12,000 and the Fuji being roughly $1000, the value offered by the Fuji X100s is solid. It certainly offers a very good entry point to the world of rangefinder photography, with the added bonus of a TTL OVF. The combination of old school looks and current technology, of light weight and versatility, of high quality at an affordable price is definitely hard to beat.
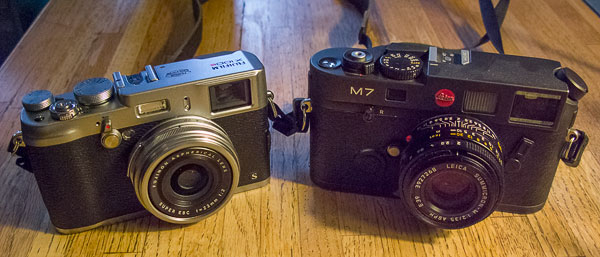 |
Fuji X100s and Leica M7
I used an M7 for this photo because I do not have a Leica M. However, the size of the M is comparable to the M7
For comparison purposes below is the price of a Fuji X100s and a Leica M with a 35mm f2 Summicron on Amazon.com. Prices for the Fuji are pretty much the same everywhere. The Leica can be found at a lower price depending on where you order it from. At the time of this review its availability was limited and price was therefore higher. When more readily available, the price of the Leica is about $1000 lower.
You Can Order The Fuji X100s HERE

Comparative pricing of the Fuji X100s and the Leica M with 35 f2 lens on Amazon.com as of January 2014
The Leica M price is somewhat inflated. It is possible to find it around $7000.
19 – ISO Tests
One of the X100s features that I found intriguing is the ISO 6400 setting, in part because it can be used in Raw format and second because the noise level is very acceptable. To test this I did a short shoot photographing the same subject in Raw format at ISO 200 and 6400 to be able to compare the image quality at both ISO settings.
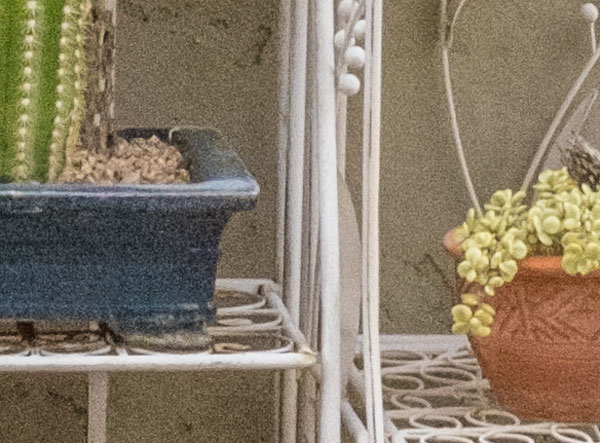 |
ISO 6400 100% crop
 |
ISO 200 100% crop
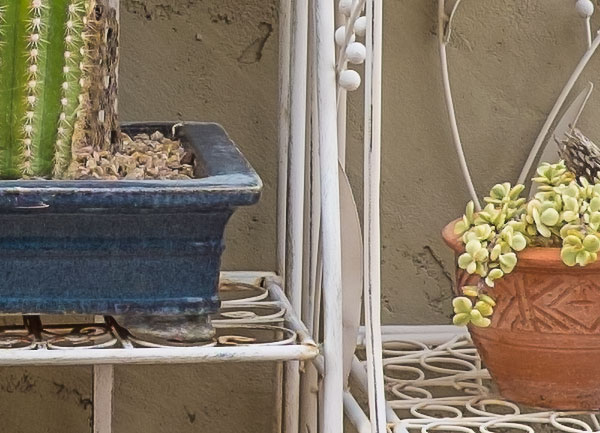
 |
Full photograph at ISO 200
The result of this test shows that ISO 6400 in Raw format is quite usable, as long as we accept the fact that noise will be present. However, this noise is fine and surprisingly fine and acceptable for such a high ISO. With noise removal, it can be reduced substantially, as shown in the example below in which I reduced the noise in Lightroom:
And of course this means that lower ISO settings are even more usable, because they will have less noise.

Lightroom noise reduction settings
 |
100% crop of the ISO 6400 photograph with noise reduction applied
Photograph taken in low light at ISO 6400
20 – Fuji X100s and landscapes
I am not planning to use the X100s as my primary camera for landscape work. While I do plan to use it when doing landscapes, I plan to do so mainly as a secondary camera. As such it will be used mostly hand held, my Hasselblad V with Phase one Back being the primary camera and the one used on a tripod.
My landscape tests did not start out very well. I did my first test shooting in regular jpeg mode at ISO 200. This was an accident. I had inadvertently left the camera set to jpeg standard mode after completing other tests. The results were less than satisfying. These photographs exhibited high contrast that could not be corrected properly in Photoshop together with a lack of color saturation. I tried to convert them to black and white only to expose a severe posterization problem.
 |
 |
Posterization problems in jpeg normal mode at ISO 200 The full image
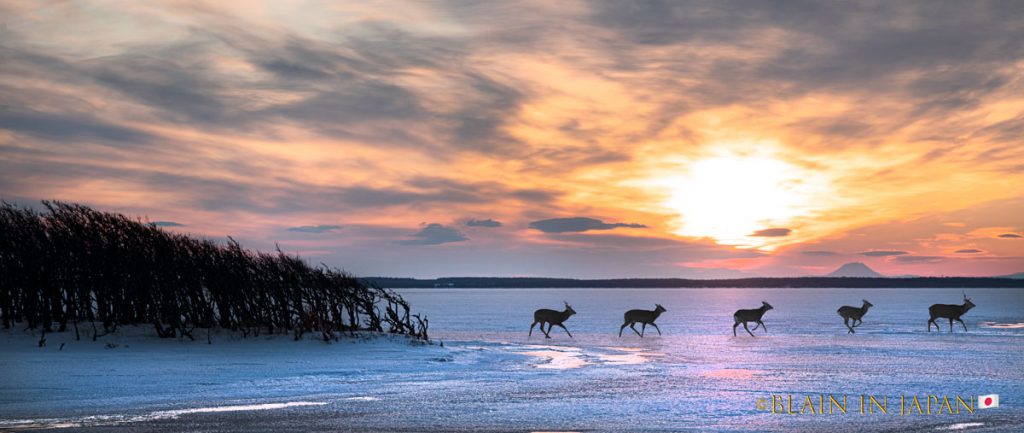
My second test went better. This time I made sure I was shooting in Raw format at ISO 200. This photograph was taken at sunset and a significant amount of post processing was applied in Photoshop using a variety of adjustment layers. I used the same process as for my Phase One files, however I had to adapt this process to the Fuji X100s files. The reason this adaptation was required is because the Fuji files are significantly more limited in their ability to withstand the color and contrast adjustments that I routinely make to my files. While it is possible to obtain satisfactory results, I had to tone down my normal adjustment approach. I also had to stop short of what I would have done had I worked with Phase One files. While the result is satisfying, it would have been more satisfying with Phase One files, and this from both an artistic and a technical standpoint.
However, the positive aspect of this shoot is that I was able to capture the scene handheld and within a very short time. This scene was captured no more than 10 minutes from my house within the Blackstone Country Club. We went there after a busy day at “the office,” and we arrived with only 15 minutes available until the light was gone. I had not photographed this location before, therefore I could not rely on pre-existing knowledge of the scene. However, I was able to park the car, crawl under a fence, find an appropriate saguaro, try different compositions, make decisions about distance and foreground, then capture 40 to 50 frames, all this while the light was at its peak.
Had I used my medium format digital system, I could not have captured this image. I would not have had enough time to crawl under the fence with my camera bag, find the proper saguaro, unpack, set up the tripod and attach the camera to it, and finally make lens, composition and exposure setting decisions. However, with the Fuji X100s, I did not need a bag, did not need a tripod, I could run around unencumbered by camera and trip bags, and I could try multiple compositions until I found the strongest one. In other words I had maximum speed, mobility and creative freedom. The technical and artistic limitations imposed by the camera must therefore be weighted against the possibility to capture the image in the first place because without this camera this image would simply not exist.
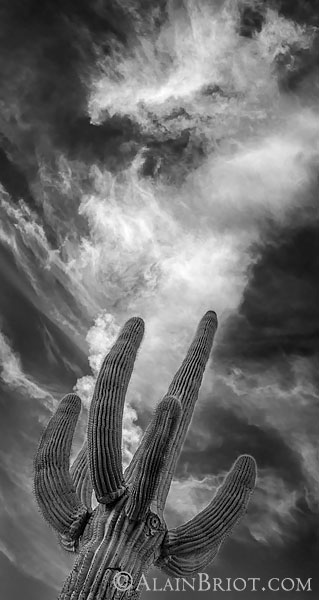
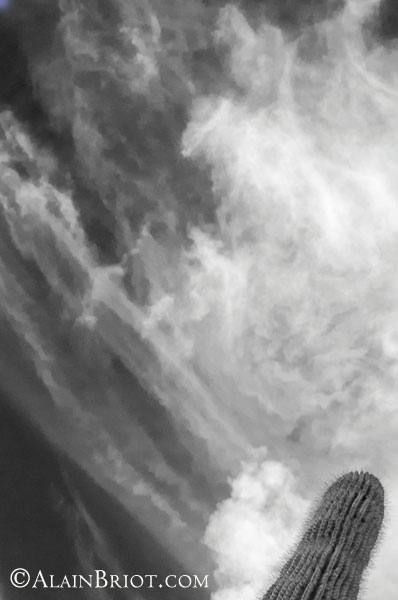
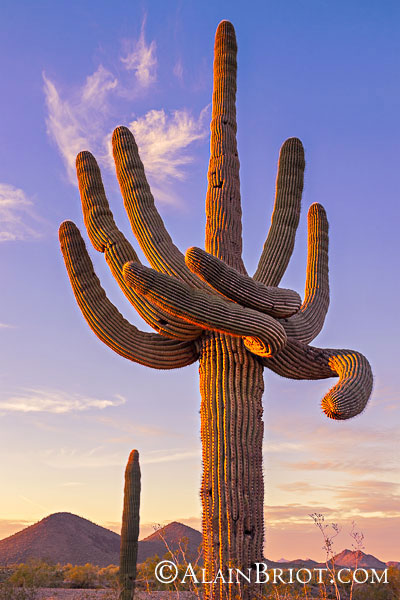 |
January Sunset, Blackstone Country Club, Arizona
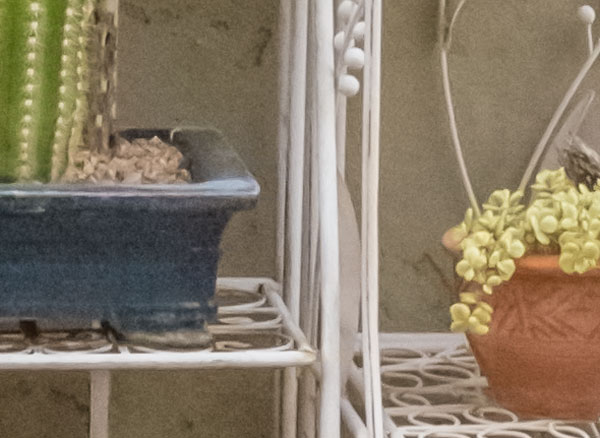
I also did a black and white image that same evening at the same location. Something I noticed after completing the processing, is the strange look of the clouds. This look is not unlike the posterized look I got when shooting in regular jpeg mode (see above). When I first saw this posterization, I thought it was due to the jpeg setting. I now wonder if it is not a feature of the camera itself, feature that is more pronounced when shooting in jpeg mode but also present when shooting in Raw format. Converting the image to black and white further accentuates this look, probably because color variation helps hide this phenomena while black and white accentuate it.
While it does give a painterly quality to the image by reducing the amount of detail, I don’t particularly like it. I much prefer having the choice to give a painterly look to the image myself if I want to rather than have the camera give that look without my control. This aspect of image quality also demonstrates the limitations of this camera when it comes to image quality. This phenomena is something I have never seen on images captured with my Phase One digital back for example, or even with Canon DSLR’s
 |
 |
The full image A crop showing the strange ‘painterly’ look of the clouds
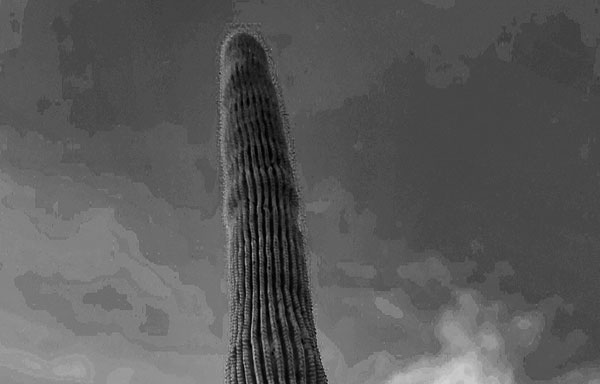
Technically this problem is not exactly posterization. This is just the word I am using to describe this effect for lack of a more specific term. The bottom line is that in X100s photographs, clouds don’t have the detailed quality they have when photographed with a digital back, or even with a DSLR. The best way to show the difference is to take the same photo with the X100s and a DSLR or digital back. This is exactly what I did. The results are below.
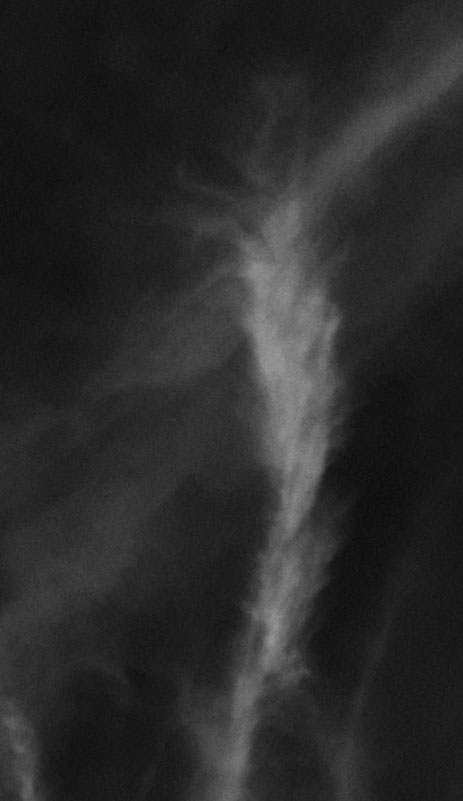 |
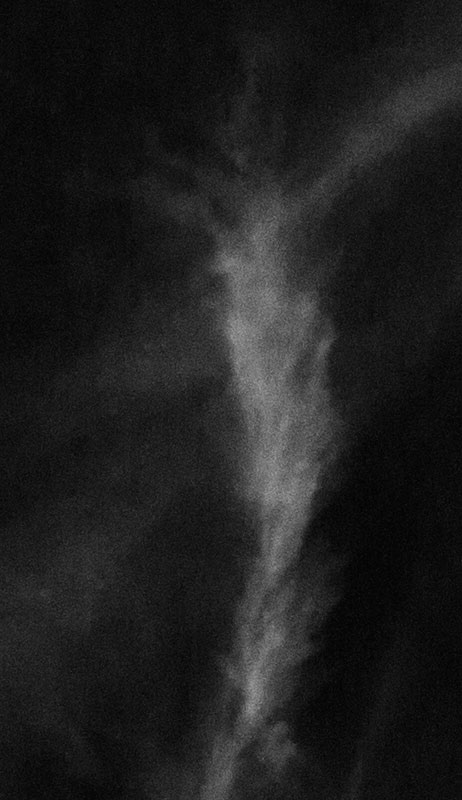 |
Fuji X100s Canon 60D
Both photographs taken at ISO 200, f16, 1/250sec. 100% crops
A zoom lens set at 23mm was used on the 60D to give the same angle of view as the Fuji X100s
I used the 60D for this comparison because it has approximately the same resolution as the X100s
This test shows that the look of the clouds is different on the X100s and the Canon 60D. I believe that this look is due to the matrix used on the X100s sensor. The majority of digital cameras use a sensor with a Bayer matrix. The sensor in the Fuji X series cameras does not use a Bayer matrix. Instead, it uses a different matrix whose pixels are arranged in rows of three colors (see below). This technology is inspired by the irregular distribution of silver halide crystals on film. The goal is to recreate the look of film. A second interesting conclusion from this test is that the X100s files have far less noise than Canon 60D files
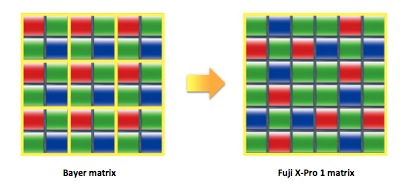 sensor matrix patterns
Courtesy DXO.com
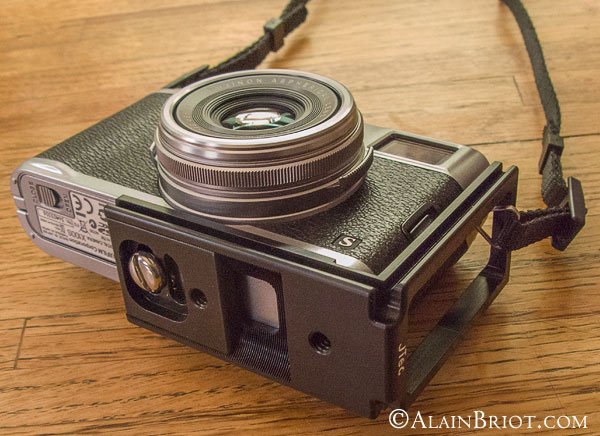
21 – Mounting plate
The subject of landscapes brings about the subject of camera mounting plates, also called quick release plates. When I do landscapes I use the lowest ISO setting to get the largest dynamic range and the lowest noise level. I also use a small f-stop to maximize sharpness throughout the image using hyperfocal focusing. When photographing at sunrise or sunset this means that the shutter speed will be very slow, often several seconds, requiring the use of a tripod. Because this is a situation I encounter frequently, I use quick release plates on all my cameras to make attaching the camera to the tripod quick and easy.
The problem with the X100s is that the mounting area for the quick release plate is very small. In addition, the mounting screw is located right next to the battery and SD card door. This means a very small mounting plate has to be used. I found the solution by using a Jtec quick release plate (www.jtec-online.com). This was the only quick release plate I had available that allowed me to open the battery-SD card door without removing the plate. Jtec manufactures small and lightweight plates, making them very appropriate for the Fuji X100s. These plates provide an elegant, convenient and rock solid tripod mounting option. Small strips of skid-free material are positioned on the side of the plate that faces the camera creating a strong grip and protecting the camera from scratches. The plate mounting screw can be tied and untied with a regular screwdriver or, when necessary, with a key or a coin.
 |
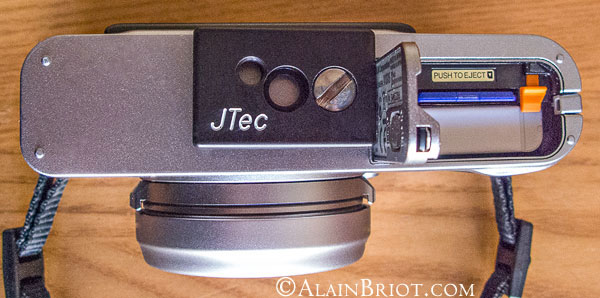 |
The JTec quick release mounting plate with battery door closed (left) and open (right)
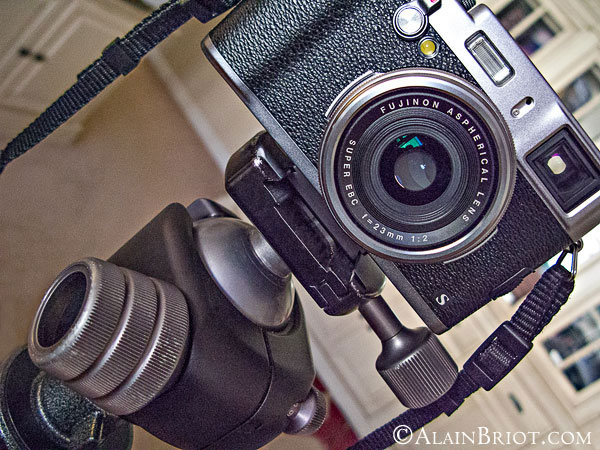 |
The X100s mounted on a ballhead using the Jtec quick release mounting plate
22 – What, no L bracket ?
An L bracket is considered essential gear for landscape photography because using one allows you to use the camera in vertical or horizontal position simply by attaching the camera from the L-bracket bottom quick release or side quick release. This is more convenient than having to tilt the camera to the side with the ballhead. It keeps vertical and horizontal compositions in the same optical axis and it prevents accidental tilting or falling by keeping the weight of the camera centered on the tripod. It also makes it easier to set vertical compositions perfectly vertical because an L bracket gives you a lot of room for vertical adjustments while tilting the camera from the ballhead limits vertical adjustments.
I have L brackets on all the cameras I use for landscape work. On cameras I use for people, cars and other subjects I photograph hand-held, I don’t use a quick release plate at all. I chose to go half way with the X100s, by deciding to use a quick release plate but not an L-bracket. My reasoning is simple: while I use the X100s on a tripod occasionally, I don’t do this often enough to justify the extra weight and extra volume that an L plate with generate. For those few instances in which I want to do a vertical landscape composition, tilting the camera with the ballhead works just fine. The X100s is light, therefore chances that the weight of the camera will cause the tripod to tilt are minimal. The advantage of this approach is that it keeps the camera virtually the same, the presence of the Jtec plate being almost unnoticeable. However, if you prefer to use an L plate, Jtec does offer an L bracket that fits the X100s.
 |
The Jtec Standard L bracket mounted on the X100s
This plate allows access to the battery and SD card door as well as to the focusing modes switch
23 – Raw converter update
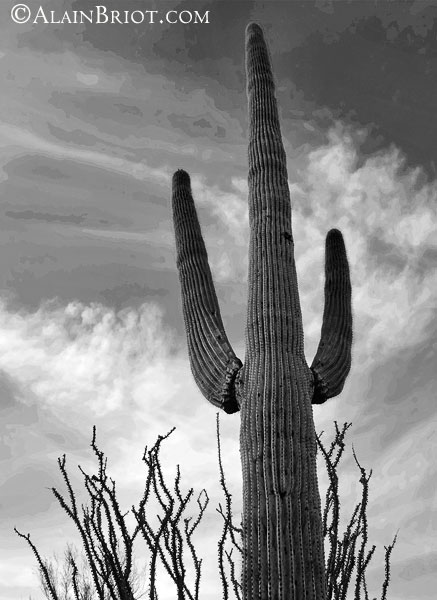
A number of readers pointed out that the ‘painterly’ look of X100s files was due to how the raw processor handles Fuji Raw files. They suggested trying Iridient and Capture One 7 as they may deliver conversions that do not exhibit this painterly look.
I did exactly that, processing the same file I used for my previous tests, the cloud photograph, both in Iridient Developer 2.3.3 and in Capture One 7. The results are below:
 |
 |
Iridient Developer 2.3.3 raw conversion Capture One 7 raw conversion
Of the two, the Iridient conversion is the smoothest. The capture One shows a more grainy image. These differences may be real or they may be due to my lack of experience using these two converters. I normally use Lightroom and this one my first attempt at using Iridient and Capture One 7.
All the test images were converted as color images and turned into black and white in Photoshop CC. I tried to keep the same level of contrast, and the same look, in all images.
Update – 2/19/14:
While these tests were interesting to conduct, the best results, which are those obtained with Iridient, are not different enough from those obtained in Lightroom to justify changing my raw converter and giving up the other advantages offered by Lightroom. Another reason for continuing to use Lightroom is that I heard Adobe will be introducing an upgrade that will make it possible to process Fuji in-camera variants in Lightroom. These variants provide users with the possibility of giving Fuji film looks to raw captures and include presets for Fuji Velvia, Fuji Provia, Fuji color negative and more.
You can perform your own tests using the Raw files supplied on my site. The image I used is DSF1049. It is available for download on my site. Download instructions are below:
24- Full size Raw files
As I mentioned in the introduction, to complement this review, I am providing you with full-size files of photographs taken with the Fuji X100s. The usual caveat does apply, namely that these files are for your personal use only for the purpose of evaluating the capabilities of this camera. They are not to be sold, or used for any commercial purpose, be it as prints, digital files or other.
These files are made available at no cost to subscribers of my free monthly newsletter. To download these files simply subscribe at http://beautiful-landscape.com/Newsletter-Subscription-Page.html
You will receive the username and password to access the download page right away over email. You will also be able to download 40 free eBooks immediately after subscribing. The files available for free download include the following:
1 – ISO 25600 Jpeg fine capture – DSF0611.JPG – figurine close up photograph
2 – ISO 6500 Raw capture – DSF0621.RAF – low light night photograph
3 – ISO 1600 Raw capture – DSF0371.RAF – artificial light indoor car show photograph
4 – ISO 200 Raw capture – DSF0429.RAF – high contrast outdoor car show photograph contrast
5 – ISO 200 Raw capture – DSF0968.RAF- Saguaro landscape photograph
6 – ISO 200 Jpeg normal capture – DSF0820.JPG – Saguaro landscape photograph
7 – ISO 200 Raw capture – DSF1049.RAF – clouds test photograph
8– ISO 200 Canon 60D Raw capture – MG_5156.CR2 – clouds test photograph
All the files are in the original capture format, as they were recorded by the camera, without any modification made to them. I selected a variety of different shooting situations to provide you with as much information as possible about the capabilities of this camera.
You Can Order The Fuji X100s HERE
25 – Conclusion
I originally purchased this camera because of the reasons mentioned in the introduction, namely that it is an elegant camera with a pleasing retro look which is practical, lightweight and able to create quality images handheld.
However, as I worked with it something surprising happened. I started creating images I was excited about. I had ideas for images I did not have before. I started finding excitement in subjects I previously considered mundane, or for which I had no vision.
The simplicity of the camera did that. The X100s is a simple camera with a fixed lens that makes me focus on taking photographs rather than on what gear I am going to use. It brings me back to thinking about photographs, instead of thinking about my equipment. It renews my vision and focuses my attention on the image rather than on the gear. Small and lightweight, I forget I am carrying it until I want to make a photograph. The camera is almost transparent. It lets the photograph come through and the vision free to express itself, renewed and fresh. As such it fosters a return to the fundamentals, to what photography is about.
26 – About Alain Briot
I create fine art photographs, teach workshops and offer DVD tutorials on composition, image conversion, optimization, printing and marketing. I am the author of Mastering Landscape Photography, Mastering Photographic Composition, Creativity and Personal Style and Marketing Fine Art Photography and How Photographs are Sold. All 4 books are available in eBook format on my website at this link: http://beautiful-landscape.com/Ebooks-Books-1-2-3.html
 |
 |
 |
 |
You can find more information about my work, writings and tutorials as well as subscribe to my Free Monthly Newsletter on my website at http://www.beautiful-landscape.com. You will receive 40 free eBooks immediately after subscribing.
I welcome your comments on this essay as well as on my other essays. You can reach me directly by emailing me at [email protected]
Alain Briot
Arizona
February 2014
27 – Camera photographs from Fuji

Front view

Rear view

Top view
Copyright © Fuji
Published February 13, 2014

Elevate Your Vision


Read this story and all the best stories on The Luminous Landscape
The author has made this story available to Luminous Landscape members only. Upgrade to get instant access to this story and other benefits available only to members.
Why choose us?
Luminous-Landscape is a membership site. Our website contains over 5300 articles on almost every topic, camera, lens and printer you can imagine. Our membership model is simple, just $2 a month ($24.00 USD a year). This $24 gains you access to a wealth of information including all our past and future video tutorials on such topics as Lightroom, Capture One, Printing, file management and dozens of interviews and travel videos.
- New Articles every few days
- All original content found nowhere else on the web
- No Pop Up Google Sense ads – Our advertisers are photo related
- Download/stream video to any device
- NEW videos monthly
- Top well-known photographer contributors
- Posts from industry leaders
- Speciality Photography Workshops
- Mobile device scalable
- Exclusive video interviews
- Special vendor offers for members
- Hands On Product reviews
- FREE – User Forum. One of the most read user forums on the internet
- Access to our community Buy and Sell pages; for members only.
You may also like