Getting Plugged In
The Imaging Factory is an online publisher of Photoshop plug-in programs. These are utilities that work from insidePhotoshop(and other compatible programs) to provide features and enhancements not available directly from Photoshop.
All programs are available for download and may be tested for 30 days without charge. Upon purchase you are provided with an unlock code which makes the program permanent. Each of these programs is available for both PC and Mac platforms.
Programs are unzipped after downloading and copied into Photoshop’s plug-Ins sub-directory. The next time Photoshop is loaded they are available under theFiltermenu. Each download in accompanied by a brief Read-Me file explaining the program’s operation.
Unsharp Mask Pro
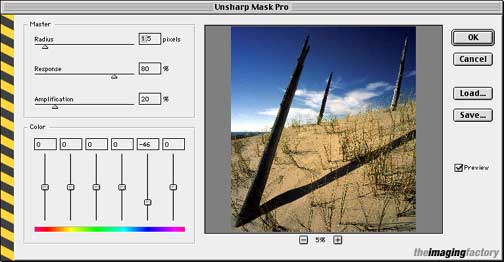
There are many ways to skin the unsharp masking cat, andUnsharp Mask Prois yet another one. The preview image may be enlarged up to 100% (actual pixels), and scrolled at that magnification to show every part of the image. The preview may be turned on and off to judge the effect that the selected sharpening setting are going to have.
There is an ability to save and load sharpening settings, so if you develop a set for a particular type of image it’s easy to return to them in future.
Instead of Photoshop’sAMOUNT,RADIUSandTHRESHOLD, it usesRADIUS, RESPONSEandAMPLIFICATION. The documentation doesn’t do a good job of describing what these each are about, but the following was explained to me by the publisher…
Our USM plugin is build with some Pre-Press background. There are basicallythree distinct USM applications which require a different approach.
1) Default press printing and desktop printing, requires the well known USM where a small soft edge (of appr. 1 pixel width) is created near contrast differences.
2) black & white and newspaper printing, which requires a little larger, but very hard edge (1 to 3 pixels).
3) web publishing and photoviewing which usually requires contrast enhancement accomplished by applying very little usm with a very large “edge”.
Our USM engine allows you the flexibility to apply all types of USM. RADIUS determines the edge of the USM. It controls the same variable as PS RADIUS, but as opposed to Photoshop, our USM allows you to exactly define the number of pixels of the edge. 2 pixels means 2 pixels. (try PS you’ll discover some amazing discrepancy there).
RESPONSE would be equal to THRESHOLD except that our threshold contains a function which makes the USM operate more smoothly, especially where noise is concerned. We therefore like to “speak” of response, as in how sensitive the filter is to noisy contrast differences.
AMPLIFICATION is the powerful operator that allows one to introduce extremely “hard” edges which are so desperately needed in B&W and newspaper print.
There are 2 basic settings to start from: RADIUS 1 to 2, RESPONSE at 80, and AMPLIFICATION as desired for most printing jobs, RADIUS 30+, RESPONSE at 50, and AMPLIFICATION as desired at the lower end of the scale for contrast enhancement. Another good rule of thumb is (which works for any USM): keep the RADIUS a little larger than the noise & unwanted artifacts in your image, that waythe noise will not be enhanced.
More to the point, how does it work? Quite nicely, actually. The programs real strength lies in the fact that while it does its sharpening on the Luminance channel, it also gives you access to sharpeningand de-sharpeningin six different colour channels. This means that, using the above image as an example, I can sharpen the entire image but then pull down the sharpening effect that’s applied to the sky. As you see the slider above the blue part of the spectrum is below the center line.
Similarly, by reducing the yellow and red channel appropriately you can sharpen a portrait while keeping the skin tones smooth and natural. This feature alone makesUnsharp Mask Proa worthwhile investment.
My only real complaint is that the documentation doesn’t provide enough advise on how best to take advantage of the program’s features, something that I hope the publisher will address.
Noise Reduction Pro
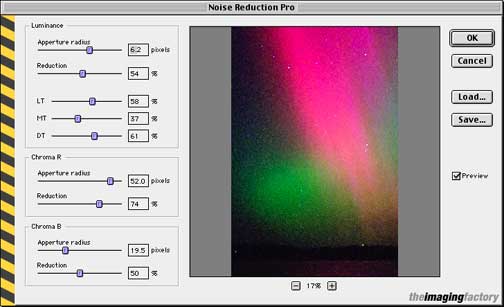
Noise is a fact of life in images from digital cameras, particularly when shots are taken at high ISOs or with very long exposures. There are a number of specialized programs available andNoise Reduction Pro(NRP) now joins the field. Frankly, I have little experience with this type of software. But I was very impressed with what NRP can do.
There are a number of unfamiliar controls, but as the documentation suggests, “To quickly asses the best setting, move all sliders to their maximum position, and then, working from the top slider to the bottom slider, move them to just above the value where the noise seems to reappear“.
I tested the program with an aurora photograph taken with my Canon D30. It was a long exposure, and the image was quite noisy. Following the instructions above, even before reading the rest of the providedRead-Mefile, I was able to make a very noticeable improvement in the image.
If noisy digital images are a problem for you you should download and test NRP. Compare it to other programs designed for this purpose. You may find it to be just the ticket to cleaner and less noisy images.
Convert To B&W Pro
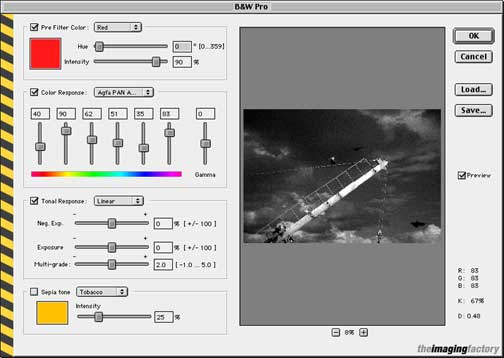
There has been a huge resurgence of interest in B&W photography during the past year or two and digital image processing technology has been a significant factor in this. I have written about this in my essayB&W Revivaland elsewhere on this site.
This plug-in directly addresses the needs of anyone interested in shooting with colour, either film or digital, and who then wants to optimize their image for B&W printing. The best way for doing this till now has been by using Photoshop’sChannel Mixer, and my tutorialBetter B&W Using Channel Mixerexplains how this is done.
Convert To B&Wautomates this process and allows for some sophisticated alternative selections as well.
The top section of the screen capture that you see provides the ability to choose any of six “colour filters” â�� Red, Orange, Yellow, Green Cyan, Blue and Magenta â�� just as if you were shooting B&W film and using one of these on the lens to control tonalities. You can use theHuecontrol to vary the filter colour through the entire spectrum and then can use theIntensitycontrol to vary this parameter from 0 to 100%. Lots of control, and more than Photoshop’sChannel Mixerprovides.
The next section provides the ability to either control the gamma of each of the aforementioned colour channels or to use “canned” tonality selections that match certain popular B&W films, such asTri-X,FP4,T-Max,APXand a few others.
The third section gives you a range of controls that will be familiar to traditional B&R darkroom workers, including the ability to simulate the paper grade filter, as if one were printing with Ilford Multi-Grade paper. Frankly, this is a bit hokey, but some people might enjoy it.
The bottom section, titledSepia Tone, allows you to apply a tonality to the image, much as can be done usingDuotones. It’s less flexible than using Duotones, but easier to use for the novice.
Overall this is a handy utility and can make monochrome conversion convenient and simple, even for the sophisticated user.
Conclusion
These are well designed programs that do what they say they will. I do have two complaints though. Each of these programs is US $99.00. This is, I feel, too high a price for what they offer.
My second issue with them is that the provided documentation offers nowhere near enough information on how best to take advantage of what they can each do.
But, since these programs are available for download and testing without charge for 30 days, give them a try and see how the fit into your workflow and assist you withyourdigital image processing needs.
Read this story and all the best stories on The Luminous Landscape
The author has made this story available to Luminous Landscape members only. Upgrade to get instant access to this story and other benefits available only to members.
Why choose us?
Luminous-Landscape is a membership site. Our website contains over 5300 articles on almost every topic, camera, lens and printer you can imagine. Our membership model is simple, just $2 a month ($24.00 USD a year). This $24 gains you access to a wealth of information including all our past and future video tutorials on such topics as Lightroom, Capture One, Printing, file management and dozens of interviews and travel videos.
- New Articles every few days
- All original content found nowhere else on the web
- No Pop Up Google Sense ads – Our advertisers are photo related
- Download/stream video to any device
- NEW videos monthly
- Top well-known photographer contributors
- Posts from industry leaders
- Speciality Photography Workshops
- Mobile device scalable
- Exclusive video interviews
- Special vendor offers for members
- Hands On Product reviews
- FREE – User Forum. One of the most read user forums on the internet
- Access to our community Buy and Sell pages; for members only.


