


When Phase One announced their newIQ seriesof medium format backs in January, 2011,the specswere very exciting. This was what we’d been waiting for – a large high quality screen, touch control, and much more. There was even Live View, though this was not available in the first release, which I reviewedherein February.
Now, in early August, Live View is available as part ofFirmware update V1.33 for the IQ180. A firmware updated for other IQ backs will follow.
This report consits of two seperate opinions – Michael Reichmann’s and Mark Dubovoy’s. First, Michael’s.
So, So
How is Live View on the IQ 180 back? In a couple of words –so, so. It works, but I’m not sure that many IQ back owners are going to find it all that useful.
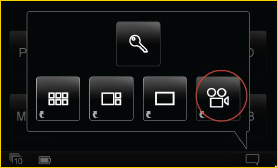
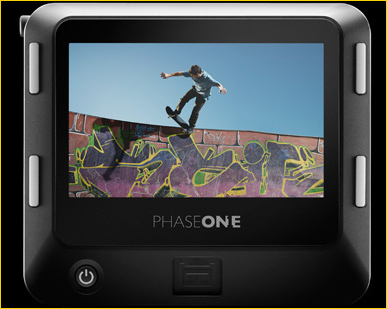
Fig. 1
Caveats
The first thing to be aware of is that LV is intended primarily for use on a technical or view camera. It can, of course, also be used on a Phase One DF, Mamiya, or any other SLR style camera that an IQ back can attach to, most interestingly with a T/S lens for check focus across the field. Be aware though that the camera can not be moving and neither can the subject. A tripod is essential.
Illuminations is also a constraint. The IQ back’s sensor size and high sensitivity means that there is a limited range of illumination that is usable in LV mode. Of course you have to open the lens’ shutter just as if you were viewing on a ground glass, but you will find that you have to stop the lens down quite a bit, use the Live View exposure control (see below) or even use a neutral density filter in front of the camera’s lens to bring the exposure within a usable range. More in this in a while.
Controls
There is now a new icon on the main screen that looks like a movie camera (I wish!). See Figure #1 above. Tap it and the back goes into Live View.
Because the IQ backs use a CCD sensor rather than a CMOS device, this isn’t the Live View that you may be used to from your DSLR or pocket camera. CCD’s are arguably superior in image quality, but they aren’t designed with either video or LV in mind. That Phase One has been able to coax Live View out of a large and power hungry CCD device is extraordinary, and their enginnering team deserves kudos for even trying to do so.
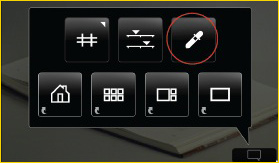
Fig #2
Tapping the lower right corner context menu bring up three new icons for Live View, as seen in Figure #2 above. The eye dropper is for setting white balance. In LV the back does not take its white balance from the main settings, but needs to have it set by tapping on the screen, on a neutral area, while in LV mode. This is not just a nicety. The image really looks poor unless properly balanced.
The center icon slows two sliders, which when tapped will appear at the bottom of the LV image. These control frame rate (1 to 4 FPS) and LV exposure. The third icon, at the top left, will superimpose a grid on the Live View image for compositional purposes.
Focus Mask, one of the great, even invaluable features of IQ backs, is not available in Live View. 🙁
Viewing Issues
Exposure is the first issue. If you set the camera with its lens wide open for focusing, then in daylight you will have to add an ND filter to the lens. This will then require that the ND filter be removed for shooting.
If you are willing to stop the lens down (f/32 or f/45) you can do without an ND filter even in bright daylight, but of course the ability to use the camera for focusing goes out the window.
The frame rate slider similarly giveth and taketh away. At a slow refresh rate image quality is increased, but everything becomes very slow to work with. At a faster frame rate composing and focusing become easier, but image quality is reduced – the opposite of what’s really needed.
Double tapping magnifies the screen to 100%, just as with image review, and one can go as high as 400%. But, I still find that accurate focusing is far from easy, and becomes a frustrating exercise in tapping, setting sliders, the aperture ring, and maybe adding or removing an ND filter from the lens.
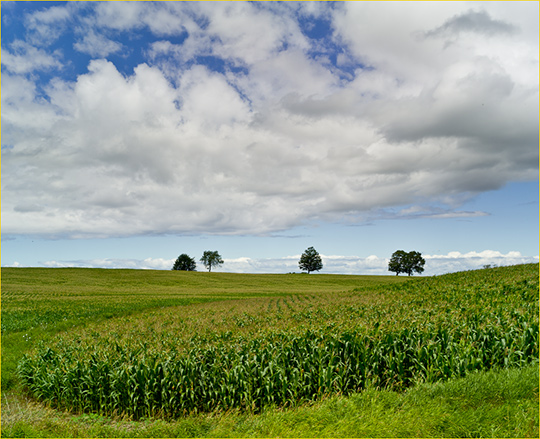
Corn and Sky. Clearview, Ontario. July, 2011
Alpa STC with 43mm Apo-Digitar and IQ180 @ ISO 100
Battery Life
Phase One backs use a “sleeping architecture” in which the sensor and various CPUs are powered down most of the time, and are only activated during the moment of exposure. This is in so-called “Normal Latency” mode, which is used when the back is attached to an DSR style camera body.
This mode can also be used when a back is attached to a technical camera, but it requires the use of a “two-shot” cable, one that wakes the back up a moment before the shutter is released. My preference, because I find these cables a nuisance to use, not to mention somewhat fragile and expensive, it to put the back into “Zero Latency” mode. This keeps the sensor and control curcuits powered up all the time at the expense of battery life. I find this trade off worthwhile since it only needs a single cable between the lens and the back, and I can use a simple mechnical cable release or my index finger to trigger the shutter.
When in Live View Mode the back is also put into continious Zero Latency mode, and this places a huge drain on the battery, not to mention heating up the back when used for a long period of time.
My tests showed that a relatively new freshly charged 2500 mAh battery lasted about 30 minutes of continuous Live View. It will obviously last longer with intermittent use, which will likely be the case for most users. Nevertheless I would recommend a pocket-full of batteries if a long day of LV shooting is planned.
I would also be concerned about heat issues. At an ambient temperature of 21C (70F) after 30 minutes of use I found my IQ180 to be quite warm. Nothing to worry about mechanically, but likely to affect long exposure and high ISO images. (I did not test this myself. Let me know the results if you do.)
Who Is It For?
My sense is that the usefulness of Live View on IQ backs will limited. Issues relating to aperture setting and the need for ND filters in outdoor situations will be a turn-off for many. Indoors the situation is less problematic, but then in most cases indoors actual tethering is possible and so on-back Live View becomes much less important.
Even in the most benign circumstances I found trying to focus with Live View frustrating, time consuming, and not terribly accurate. On myAlpa STCwith HPF lens rings and a Leica laser rangefinder I can focus with an accuracy of 1/32nd of an inch in seconds. Futzing with on-screen focusing simply doesn’t compare in either time efficiency or accuracy.
The only real use I can find for the current implementation of Live View on IQ backs is for accurate framing. I usually use eitherViewfinder Pro on my iPhone or accessory-shoe mounted optical viewfinders with my Alpa. These get me quickly and easily to 90%+ accurate framing. It then only takes a test shot or two to get complete accuracy. With LV I can now achieve this on the IQ180’s screen, which is nice, but not a major convenience or efficiency enhancer.
Needless to say, your mileage may vary. Depending on the type of shooting that you do you may find the IQ back’s new Live View capability more or less valuable than I do. But since it costs nothing except a few minutes to download and install the latest firmware, why not give it a try?
by Mark Dubovoy
I have been working with Live View for a few weeks.
My take on it is that it does not offer much for SLR users unless they are on a tripod using tilt/shift lenses.
The focus mask tool is so good, that SLR users will most likely rely on autofocus or manual focusing through the viewfinder and the focus mask tool. Again, the only exception could be the use of tilt/shift lenses on a tripod, where viewing the image on the screen at high magnification could be quite helpful.
On the other hand, Live View is a great new tool for those working with view cameras and technical cameras. There are basically two kinds of circumstances in which these cameras are used: In the studio and outdoors. Let’s examine them one at a time:
IN THE STUDIO
In the studio, where the light levels can be controlled, the issue of sensor saturation goes away and the need for neutral density filters goes away.
As the size of the groundglass has gone from 8×10 (or even larger) to 4×5 and now to Medium Format size, focusing on the groundglass while using camera movements such as tilt and swing has become increasingly more difficult to do. This problem is compounded by the fact that the movements themselves are much more critical with the smaller sensor size.
I have found that for this application Live View with the image set at 100 % does a terrific job. Much better than trying to focus on the groundglass with a loupe.
Although one could argue that one can shoot tethered and view the image on a computer screen, to me, seeing the image right on the back without having to take one’s attention away from the camera works much better.
OUTDOORS
Outdoors one cannot control the light level, and unfortunately the sensor can easily be saturated. Since for focusing one usually needs a larger aperture, the use of neutral density filters becomes a necessity. I personally recommend getting a a variable ND filter with neutral density from about 2X to 8X for this application.
The necessary ND filter is a new pain in the ass in the field. I do not like it, but until we have Medium Format CMOS sensors, there is no other viable solution to the problem of sensor saturation. If you want to use Live View in the field, you have to live with this additional hassle.
To ameliorate the hassle just a little, I decided to purchase one filter (77mm) that is bigger than what any of my lenses need, and to use step up rings. I also purchased some generic 77 mm lens caps, so I can leave the step up rings attached to all my lenses all the time. This system simplifies mounting and un-mounting the ND filter.
I also feel that given the high light levels in the field, the use of a hood, focusing cloth or focusing bellows is mandatory. If the light is bright, it is extremely hard to do accurate focusing without such a device. While this may sound like a big pain in the ass to some, it is standard fare for view/technical camera users.
I have been using the ALPA focusing bellows with my IQ 180 from the beginning. Even prior to Live View I found that I could work much better with the back using the bellows to view the screen.
For framing the image, LiveView is a “no brainer”. I have now ditched my viewfinders. It is much better to be able to frame directly off the sensor – although sometimes I do carry a viewfinder with a custom mask for all my lenses in my pocket which I bring up to my eye as an aide in deciding which lens to use and how to frame the image prior to mounting the camera on the tripod.
I found that focusing outdoors essentially “works as advertised”. It is truly excellent with some objects, but a bit more difficult with others. Because of the slight time lag between moving the focusing ring and the screen updating, in the beginning I found a few instances where I was not quite 100% confident that I was at the right spot, but with a bit of practice I feel very confident now.
It is important to note that there is a quality slider that the user sets. Unfortunately, the higher the quality the slower the screen frame rate (the screen frame rate varies between 1 and 4 times per second, depending on quality). I found a happy medium between quality and refresh rate right around 2 frames per second. I have found no situation in which I needed to change that setting.
When I look at the files on my computer, focus is dead on. As far as I can tell, focus looks as good as using a Leica laser rangefinder with the ALPA HPF rings, which in the past has proven to be superior to a groundglass.
Speaking of the laser rangefinder, in terms of convenience, I can see instances where using the laser rangefinder might be quicker and easier. On the other hand, I think that with some practice one can “get in the groove”, use Live View all the time and live happily ever after without having to carry a laser rangefinder.
Besides framing and focusing, there is a third thing that for me is extremely important: Depth of field. In this regard, LiveView is a smashing success. For the first time ever, I can clearly see the depth of field as I close the aperture down without my image going dark. This is a bonanza for view/technical camera users in the field.
The biggest negative I see is battery consumption. Using the screen on the IQ backs all the time obviously drains the batteries much quicker than what we are used to. I would recommend having at least twice the number of batteries versus what one might have required for a day of shooting in the past.
Another worry I had with Live View was sensor temperature. It is well known that heat can produce more noise and degrade image quality. So, rather than speculate, I asked Claus Mølgaard, PhaseOne’s Chief Technical Officer for the answer. Here is what he has to say:
“Running Live View for times of about 5 minutes at a time and using exposure times of less than a second will not impact image quality. If you use short exposure times, i.e. 1/60 sec then you can pretty much run Live View continuously without impacting image quality. The impact on image quality from using Live View for longer periods of time is quite equivalent to using Zero Latency for longer periods of time. “
In other words, the impact on image quality is essentially non-existent. Still, I would always opt to try to keep the back at the lowest possible temperature when doing long exposures, i.e. 30 seconds or longer. A short wait between turning off LiveView after final focus and releasing the shutter is all that is needed.
I must mention that there will be a key additional enhancement to LiveView in a future firmware upgrade. Unfortunately, I am not at liberty to talk about it at this point, but I believe it will make the tool much more effective and far easier to use outdoors.
So, my bottom line is that in the studio LiveView is great, period.
Outdoors in the field, it is great for framing and it works extremely well for focusing and depth of field evaluation, but it requires some effort and practice to get there. It also requires ND filtration, which is an additional pain.
Sometime in the future we will have MF CMOS sensors which will allow very fast frame rates in LiveView without the need for ND filter. Also, sometime in the future we might get a live histogram, automatic “expose to the right” exposures and all kinds of other wishes; but for now, this is as good as it gets.
In my view, the positives definitely outweigh the negatives, and I am using the tool for every exposure I make with my technical cameras.
July, 2011


Elevate Your Vision


Read this story and all the best stories on The Luminous Landscape
The author has made this story available to Luminous Landscape members only. Upgrade to get instant access to this story and other benefits available only to members.
Why choose us?
Luminous-Landscape is a membership site. Our website contains over 5300 articles on almost every topic, camera, lens and printer you can imagine. Our membership model is simple, just $2 a month ($24.00 USD a year). This $24 gains you access to a wealth of information including all our past and future video tutorials on such topics as Lightroom, Capture One, Printing, file management and dozens of interviews and travel videos.
- New Articles every few days
- All original content found nowhere else on the web
- No Pop Up Google Sense ads – Our advertisers are photo related
- Download/stream video to any device
- NEW videos monthly
- Top well-known photographer contributors
- Posts from industry leaders
- Speciality Photography Workshops
- Mobile device scalable
- Exclusive video interviews
- Special vendor offers for members
- Hands On Product reviews
- FREE – User Forum. One of the most read user forums on the internet
- Access to our community Buy and Sell pages; for members only.
You may also like


