


How many times have you been photographing a scene and no matter what you do or how long you wait, there is always someone in the scene. The same thing can be said about city streets, highways and any number of different busy landscapes. Obviously, you can’t shut the streets down or get people out of the way by asking nicely.
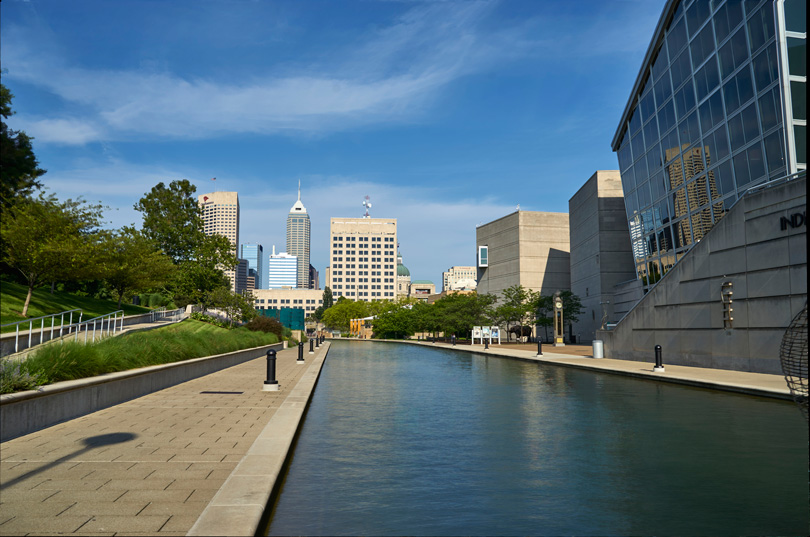
This is a technique ‘for clearing the area’. My examples show a highway that always has cars on it shot from an overpass and a very busy canal walk in Indianapolis. In both cases I composed and locked down my shot with a tripod. All images have to be made with the same exposure. Next I locked down the exposure and shot the image using manual settings on the camera. Once that was done, I did my test exposures and was ready to shoot the multiple images needed for this technique.

The key is to make sure everything in the shot is moved out of the area it occupies in a previous exposure. Sometimes this means being patient, especially if some subjects are standing still. Many times I take a lot more exposures than are needed and select a grouping after I open them in my RAW processor.
I use Capture One primarily for my image processing. I select the images I want to use in the image stack and pick one. I make any needed adjustments and then copy and paste those adjustments to all selected images. I then process the images. Typically I’d process to ProPhoto 100% 360 PPI. For this demo, especially so you could have files to try this with, I processed to JPEGs at 10 inches long edge. I set the process recipe to ‘open the images’ in Photoshop. You can do the same in Lightroom if that is your RAW processor of choice.

Once all the images are done, I go to the FILE menu and select AUTOMATE > PHOTOMERGE.

Uncheck the blend box and select all open files, then click OK. Photoshop will now align these images and put each image into a layer.

This is now a different part. Select all layers by clicking on the top layer and shift click on the bottom layer. Go to the layers panel and in the top upper right is a little four-lined icon with an arrow next to it. Click it and pull down to CONVERT SMART OBJECT. Photoshop will create a smart object.

Now go to the LAYERS menu and pull down to SMART OBJECTS > STACK MODE >and select MEDIAN. Photoshop will now do its thing. Photoshop will magically look at each layer and determine the differences in the layers and blend over the differences using the other layers. If you have shot the image correctly, you’ll get an image without cars, people or other moving objects.

This technique is great and, I must say, fun to use. You can take busy city streets, parks, intersections and so on and magically make anything that is moving through the image disappear. I have started a project going to busy highways and intersections and parks and showing them without cars or people.
When complete you can flatten the layers and save to your desired format.

Here is another set up I did of the Canal Walk in Indianapolis. There are always people on the walk. As you can see after performing the procedure above all the people go away. Think of all the places you can use this technique.

Give it a try. I have included two sets of files that you can download and do yourself. Once you see how easy it is you’ll be applying this technique to all sorts of situations.
This short video will show you just how easy this technique is.
Here are the sample files so you can try it.
Set 1 – Highway 91 Meg
Set 2 – Indianapolis Canal Walk 95 Meg
Have fun!


Elevate Your Vision


Read this story and all the best stories on The Luminous Landscape
The author has made this story available to Luminous Landscape members only. Upgrade to get instant access to this story and other benefits available only to members.
Why choose us?
Luminous-Landscape is a membership site. Our website contains over 5300 articles on almost every topic, camera, lens and printer you can imagine. Our membership model is simple, just $2 a month ($24.00 USD a year). This $24 gains you access to a wealth of information including all our past and future video tutorials on such topics as Lightroom, Capture One, Printing, file management and dozens of interviews and travel videos.
- New Articles every few days
- All original content found nowhere else on the web
- No Pop Up Google Sense ads – Our advertisers are photo related
- Download/stream video to any device
- NEW videos monthly
- Top well-known photographer contributors
- Posts from industry leaders
- Speciality Photography Workshops
- Mobile device scalable
- Exclusive video interviews
- Special vendor offers for members
- Hands On Product reviews
- FREE – User Forum. One of the most read user forums on the internet
- Access to our community Buy and Sell pages; for members only.
You may also like