


The current state of the art of the various “formats” of digital capture range from the tiny little sensors in camera phones to MF sensors that are the same physical dimensions of 645 film capture (about 42mm x 56mm). 645 is, in fact, the smallest of the medium formats from the film era. But, that’s the upper end, scale wise, for digital capture. And as has been pointed out numerous times by numerous authorities, for the foreseeable future we are not likely to see sensor sizes in larger formats than this, mostly for two reasons. The first and primary one is expense. The current MF backs are outrageously expensive already. The second reason is that the image quality of current MF digital backs, both in terms of resolution and tonal scale, is for all practical purposes, equivalent to large format film capture. So, just as there was no widespread need during the film era for 16” x 20” or larger sheet film cameras, there is no compelling need now for larger sensors and more megapixels than the current crop of MF backs offer.
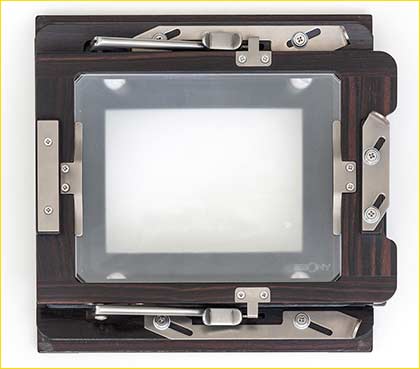
 Rear frame of the SW45 with the MultiStitch mask inserted, on the left, and with the standard 4×5 ground glass shown on the right.
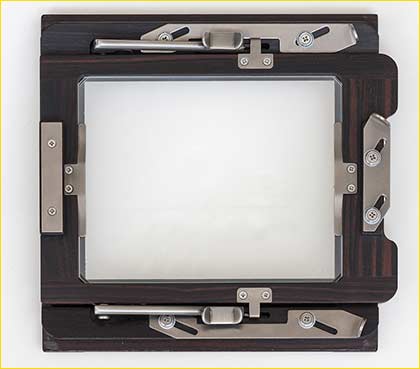
Once the rebate areas are accounted for, 4×5 is approximately 90mm x 120mm.
A 36mm x 48mm MF back with MultiStitch produces a 66mm x 90mm frame.
All well and good. However photography is not entirely about resolution and tonal scale. Large format view cameras allowed the photographer to control perspective and depth of field in ways that conventional camera designs could not. It’s hard to envision state of the art architectural or still life photography without the use of lens movements. Tilt-shift lenses on DSLRs and technical cameras fitted with MF digital backs have filled the void left by the view camera. The big question, however, is: How well have they filled the void? Currently, Canon is the only DSLR manufacturer with an adequate range of tilt-shift lenses to begin to emulate what a photographer could accomplish with a typical 4×5 view camera kit. And, let’s face it, at 22MP, the highest resolution of any current Canon DSLR, 4×5 quality in terms of resolution and tonal scale isn’t quite attainable. (There are rumors of a huge megapixel Canon in the works, but it’s not here yet.) Nikon has a 36MP camera in the D800, but is sorely lacking in a well-implemented range of TS lenses. Once in MF territory, you can truly match or excel 4×5 quality provided you are prepared to take out a second mortgage on your home to pay for the gear and you don’t care one whit about the financier’s mantra, ROI. (return on investment.)
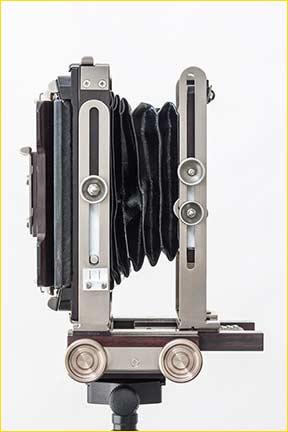
Side view with the MultiStitch mask inserted. The mask shows the capture area and repositions the camera’s ground glass in the plane of the sensor.
It inserts just like a film holder. On an SW45 the MultiStitch increases extension by approximately 10mm, which is more than usual due to the thicker wooden construction of the camera components.
As good as digital capture and the experience of digital imaging has become, there is a yearning, and a deep one, within certain niches of the industry, for a form of digital capture that truly parallels the results and experience of large format, film-based, view camera photography. The pursuit of that goal is what a simple and clever new MF stitching plate is all about, which is aptly namedMultiStitch. It is the brain child of a New York-based photographer, who goes by the nickname Myko. Myko is a commercial shooter with 30 years experience, shooting primarily large-format for most of his career. He felt the transition to digital severely limited his creative options. He describes his goals thusly, “As a photographer I still strive to produce images with the camera, not the computer. The small chip sizes fundamentally alter product and architectural imaging. I developed MultiStitch to address the shortcomings I encountered in my own transition to digital. In short, I wanted to continue to work in large format while being forced to work digitally to satisfy my clients. Using MultiStitch, I shoot interiors with my 4×5 camera and my wide-angle lenses. I use a 10 year old 16MP digital back and an 8 year old 12.8MP DSLR to produce images for my clients. Before MultiStitch I had to buy new gear as it came out just to keep up with the demand for larger files.” Myko’s MultiStitch concept is simple: The rear frame of a 4×5 view camera is square and rotates 90º for horizontal and vertical compositions. So, if you make a plate, to which an MF back could be mounted off center, and you make it dual-sided so that an MF back can be mounted to both sides of the plate, you’ll have a set-up capable of making two diagonally-opposed captures on each side of the plate by flipping it 180º, which with a 36mm x 48mm MF back, for example, would produce a stitched composite image that’s 66mm x 90mm once the 6mm frame overlap of the 4 stitches is accounted for. This format is larger than 6x9cm film and smaller than 4×5. With a 40MP back, your composite capture is around 125MP. An older back, such as the Phase One P25 at 22MP (which, by the way, can be purchased used on eBay for around $3K) produces files about half that of the P45–around 65MP. And this is where the allure of the MultiStitch really lies: For an investment of around $5000 one could re-purpose a conventional view camera kit for digital capture with a MultiStitch plate and a used MF back of a couple generations ago. Quite an enticing proposition for anyone who loves view camera photography.
Using an MF digital back on a conventional view camera poses several challenges to the hardware design. A 4×5 view camera was originally designed for a larger format, lower resolution medium. Tolerances for lens and film plane alignment and lens performance are quite different between the media of film and digital capture. Focusing accuracy is also critical. Can a 4X loupe on a conventional ground glass allow enough focusing accuracy for a 40, 60, or 80MP MF back? The 4 captures have to be stitched together in post. How well does the photomerge tool in Photoshop perform this task? Is standalone stitching software, such as PT Gui, superior to Photoshop? And what’s the best workflow for a succession of digital captures with an extreme wide angle lens when each capture requires a corresponding LCC capture and subsequent adjustment? How tolerant are the high resolution MF backs, with their tiny photosites, to extreme lens movements when light is striking the sensor at very oblique angles? The MultiStitch back is a simple device, with no moving parts, whose performance is quick and easy to judge. However, the vast range of equipment it can be used with and the post-production tools employed to make the best use of the device present a complex array of choices with many factors to evaluate. This initial review is part one of what will be a two part review. I’ve tested many aspects of the MultiStitch, but I’m only approaching the middle phase of a complete and thorough evaluation of how far this device goes toward making true large format digital capture practical. I plan to continue testing over the next few months with a wide range of lenses and, hopefully, 2 to 3 different MF backs. In the meantime, I’m offering some preliminary observations of what I feel is an exciting and promising new device.
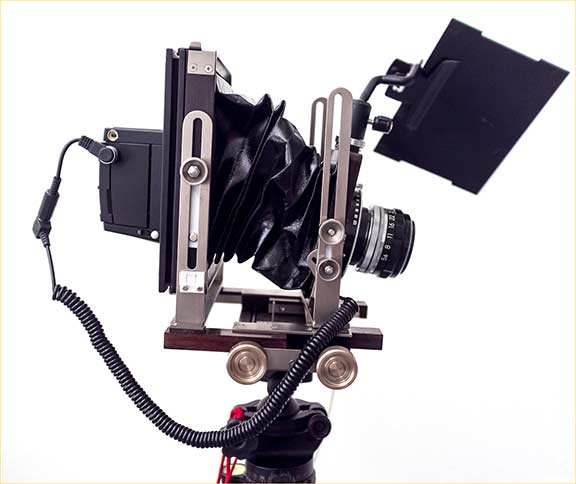
Rear view of the camera with MultiStitch plate attached.
The circular element on the lower left of the plate is an air vent designed to relieve bellows pressure during focusing.
The P45 back is positioned to capture the upper right quadrant of the 4-capture stitched composition, which will form the lower left quadrant of the composition.
As with any manual camera configuration, the back is connected to the camera lens via a sync cable attached to the PC nipple on the lens.
First, let’s begin with some basic information. MultiStitch MF plates are constructed of aircraft-grade aluminum with a non-reflective, black anodized finish and are available for the following view camera platforms: Sinar, Cambo, Horseman, and Ebony with stainless steel MF mounts for Mamiya and Hasselblad V (universal) for sensors in sizes 24×36, 36×36, 33×44, and 36×48. To determine the resolution in MP of the stitched capture for these various formats, the formula is 4X the sensor MP x .85, which accounts for the constant 6mm of overlap between captures. For a 39MP P45 back it is 39x4x.85= 132.6MP. (In practice, I’ve found the stitched files to work out to more like 125-130MB. Because of the slop factor in the plate positioning on the rear frame, coupled with stitching adjustments, the result is a stitched frame that isn’t a perfect rectangle, which then has to be cropped slightly.) You can determine the dimensions of the stitched format by doubling the height and length of the sensor format and then subtract 6mm from each dimension. For a 36×48 sensor the formula is 36×2 = 72 – 6 = 66 and 48×2= 96 – 6 = 90. To give you an idea of the practicality of lens focal lengths for 66×90 format, using the diagonal measure rule, a normal lens would be 112mm. There are also MultiStitch plates for FF Canon and Nikon DSLRs. However, due to the mount and mirror box accommodations for DSLRs on a view camera, wide angle photography isn’t possible due to the added flange distance to the sensor. MF backs are where the real action is because the added flange distance is quite minimal. Currently MultiStitch plates are only available directly from Myko, though he is in negotiation with potential retail partners. His website is multistitch.com. Email inquiries can be directed to [email protected], or you can call Myko @ 212-564-3837. My testing to date has been exclusively with an Ebony SW45 view camera and a Phase One P45 back, for the sole reason that this is the 4×5 view camera and MF back I own and am familiar with. The retail price of a MultiStitch plate for an Ebony is $1645, which is the most expensive due to the thickness of the plate. An Ebony SW45 is a very compact, lightweight field camera originally designed for architectural photography with 4×5 film and extreme wide angle lenses. There are no geared movements, except for focus. It is, in many ways, an ideal camera to test with because it sits squarely in the middle range of 4×5 construction precision. It lacks the geared, micrometer movements of the studio monorail cameras, but offers a very high level of precision for a wooden field camera.
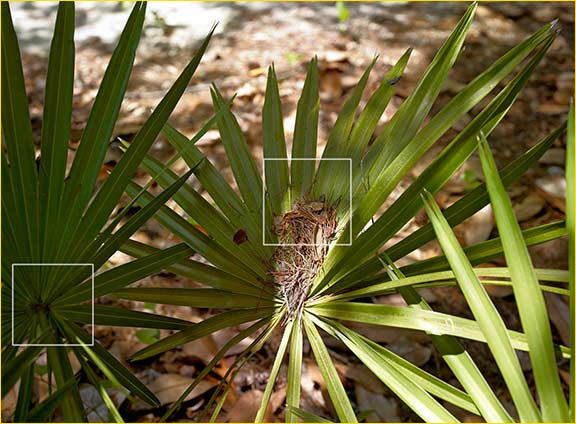
This photo of palmetto fronds was taken with a 135mm El Nikkor enlarging lens fitted in a copal press shutter.
Enlarging lenses make great digital lenses and can be purchased used for under $100 typically.
In this detail, a relatively wide aperture of f11 was used to throw the background out of focus.
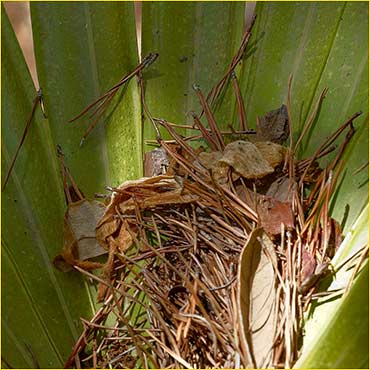
I focused on the clump of debris in the white rectangle near the center of the frame. See the full resolution crop above.
Resolution is outstanding and this is after I down-rezzed the file by 50%. That’s right. I threw half the resolution away.
This example roughly approximates the resolution one would get from a 22MP back with the MultiStitch.
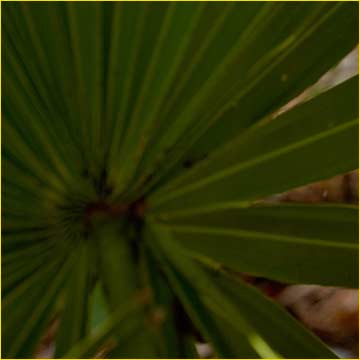
The 100% crop on the left, of a frond slightly closer to the camera by about 4” or so, is slightly out of focus.
At this level of resolution, even very slight variances in focus are easily discernible when viewed at 100%.
Now, on to evaluation, let’s begin with a critical factor–focusing. Each Multistitch comes with a focusing mask, which is also a spacer that repositions the ground glass in the plane of the sensor. Because the Multistitch is dual-sided, it increases the flange distance from lens to sensor. The spacer comes in two pieces, so that tape shims can be placed between the two layers to fine tune the system to your specific MF back. The beauty of this approach is that you use the camera’s ground glass for focusing. With a 36mm x 48mm MF back, you get a generous 66mm x 90mm frame, which is of sufficient scale for any experienced view camera photographer to compose accurately using unaided human vision. Focusing, using a standard 4X loupe directly on the ground glass, is reasonably accurate and verifiable with the MF back’s LCD in magnify mode. Will you be able to focus accurately in extremely poor light and with extreme wide angle lenses? I’ll answer that question this way: An experienced view camera photographer will be able to do so the vast majority of the time, but both the experience and the accuracy of the process will not be as easy or as foolproof as a DSLR with live view. But, then shooting 4×5 film with the same lens and view camera would not be as easy as live view on a DSLR either. I think the fair evaluation is to state that focusing is comparable between 4×5 film and MF digital capture using a MultiStitch. It will, at least, be a good evaluation of how spoiled you may have become with live view, for which no other manual focusing experience really compares. I should also state that when you pixel peep the stitched files, which at their full resolution, will be about 380MB in 8-bit when using a 40MP MF back, you will be able to see a number of critical image details in the files. For instance, if you are focused closer than infinity, you will see a sharpness differential between the exact plane of focus and all points behind and forward of that plane. In other words, the resolution is so high you can perceive on the computer screen the slight variations in the allegedly sharp “depth of field” of the lens even when you have stopped down considerably. If lens movements are employed, you will see a sharpness differential between the center and the edges. A degree of lens movement which would have been considered a normal amount of rise or fall or shift with 4×5 film will yield a digital capture that shows a discernible sharpness difference at the extreme corners. To see this in a print, you would need to make a mural-sized print and examine it at close range. If you shot 4×5 film, drum-scanned it, and printed the scan at similar scale you would see similar anomalies. The point is that at this level of resolution, every conceivable “flaw” in the system is visible if you look for it. My advice is not to over evaluate 100% screen views of files with this much resolution. If you were to do this with scanned, large format film files all the detail would look soft and corrupted by huge clumps of silver molecules (film grain), but large format film files print beautifully even when the prints are several feet across. It’s also important to remember this: Lens performance is always at its peak when you use only the center of the lens’ coverage, however moving the lens off axis relative to the film or sensor is done because the photographer has a higher priority than perfect edge sharpness–control of perspective and/or control of depth of field.
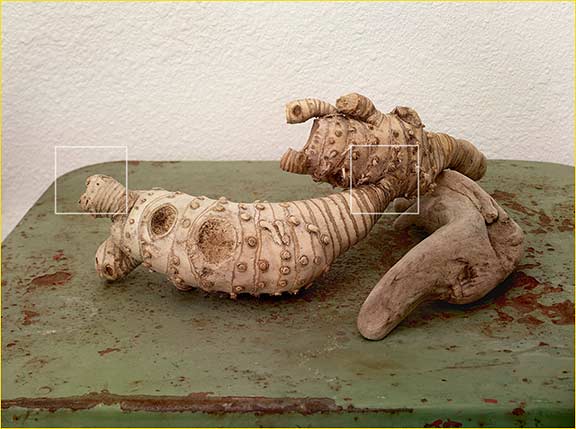
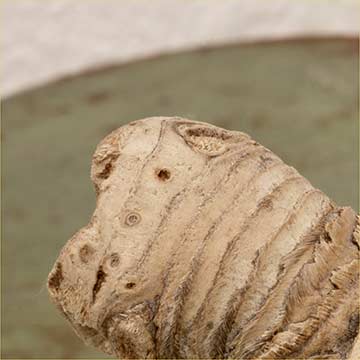
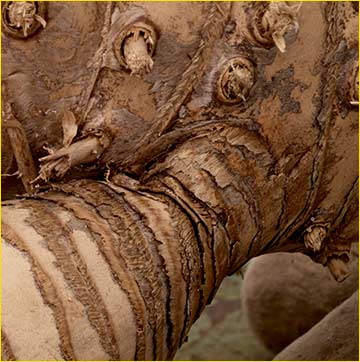
This detail of a dried root fragment from a coconut palm and a piece of driftwood on an old table surface was also taken with the El Nikkor 135mm lens at f22.5. Fall, tilt, and swing were all employed. Fall to control perspective and tilt and swing in combination to extend depth of field on the primary subject. A photo of the configuration of the camera is shown below. Note that the camera is actually a few degrees off plumb because when it was kept plumb vignetting occurred due to the thickness of the MultiStitch plate, in combination with the extreme lens movements employed. So, the amount of fall was lessened and the camera was tilted slightly to maintain a comparable composition. This vignetting problem will be incurred more readily than usual with the SW45 because of the thickness of the plate. Two 100% crops are shown below. In this case, no sharpening has been applied. This is the resolution straight off the sensor.
Another critical evaluation pertains to the process, and inherent limitations, of stitched captures. Most photographers are quite familiar with the process of stitching as it’s a common practice these days used to create panoramas or to obtain a wider field of view with a tilt-shift lens. Stitching is an effective, reliable way to combine multiple captures into a single, composite frame. It doesn’t work for all subjects, however. Portraits, sporting events–literally any subject that’s moving around while the captures are being made–will not likely yield an acceptable result and this includes landscapes when the wind is blowing or the light is changing rapidly. Stitching is good for still life; architecture, particularly interiors; and static landscapes. The capture process with a MultiStitch requires 60 to 90 seconds to complete, assuming the exposures are short–fractions of a second. It isn’t advisable to try to speed up the process because after the first 2 captures, you now have to detach the MF back, flip the plate around, re-attach the back, and make 2 additional captures to complete the process. Attaching and detaching an MF back in the field should be done carefully and precisely to avoid excess dust accumulating on the sensor and to avoid accidentally dropping the back or not securing it correctly on the MultiStitch plate. So, as a general rule of thumb, you need to use this system for subjects that will cooperate with a capture time requiring a couple minutes to complete. And there are some other requirements for stitching. You’ll need a rock solid tripod and head, for obvious reasons: You’ll be touching and fiddling with the camera during a succession of exposures. Nothing can move during that process, which also means that the surface supporting the tripod needs to be rock solid too. White Balance should be preset, rather than left in auto mode. Otherwise, slight variations in the “as shot” color balance will be present in the 4 captures. You can fix this in post, but it will require a needless extra step. Finally, any capture made with a view camera will have no exposure data, other than ISO, tagged to the file. There will be no record of aperture or shutter speed embedded in the file. So, you will need a methodical bracket sequence to be sure that the files you’re stitching together all have the same exposure. If you bracket in 1/4 or 1/2 stop increments, you may have difficulty discerning these exposure differences by merely observing the files on screen. For this reason, random and erratic exposure brackets during the capture sequence will leave you with an array of similar looking, but slightly varied files to sort through. Also, the mechanical shutters in view camera lenses have timed exposure settings down to 1 sec only. Longer exposures will need to be timed with a stopwatch. If you want your exposures to be truly identical, you’ll need to be careful and precise with your bulb exposures.
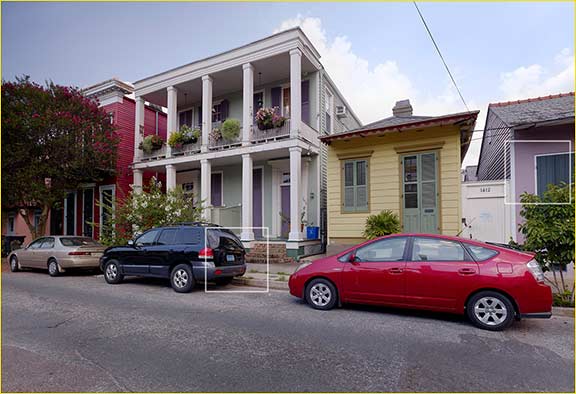
This street view in the Marigny neighborhood, just outside the French Quarter of New Orleans was taken with a Schneider 47mm Digitar at f16. This lens is the equivalent of a 20mm lens on a FF DSLR. No movements were employed because the lens barely covers the 66×90 format and therefore movements are not even possible. Due to the extreme wide angle view of the lens, LCC captures were made for each component of the 4 capture stitch. With this workflow, extreme wide angle lenses will require a total of 8 captures. Without LCC corrections applied during raw conversion vignetting is extreme and there will be color crossover to contend with, as well. Two full crop details are shown below.
Once you’ve got the 4 captures, which will make up the stitched composition, you’ll need to convert them with identical adjustments made to all 4 images, with the exception of lens cast calibrations (LCCs), which will have to be individually applied, then you stitch the 4 captures together. The photomerge tool in Photoshop is the simple way to do it, and my experience is that this produces great results most of the time. PT Gui, standalone stitching software available for both Mac OSX and Windows platforms, offers more control and could yield better results in situations where elements within the frame are moving. I should point out that LCC captures, while mandatory for extreme wide angles, could also be necessary for normal and longer lenses, if extreme movements have been employed. With that in mind, I should mention that Lightroom 4, for all its many wonderful features, does not incorporate lens cast calibrations in its lens correction module. You’ll need Capture One Pro for that. It’s what I use for any capture made with a Phase One back. C1Pro is built around the specific needs of the Phase backs. Though I can’t speak from first hand experience, I think the proprietary raw converters for other MF backs offer similar advantages over the processing tools provided in Lightroom.
To sum up the experience of using Multistitch with a view camera, as compared to single captures with an MF back on an SLR or single captures with a DSLR, there are pluses and minuses. The workflow with MultiStitch will be more complex both during capture and in post-production and there will be limitations to the types of subjects and situations conducive to stitching. On the plus side, the resolution is extraordinary and you’ll have the control over perspective and depth of field that only a view camera can offer. And you’ll be able to achieve this with older MF backs that some would consider obsolete. MF digital is a niche market to begin with and that means MultiStitch is a niche within a niche. It is admittedly, not for everyone, but neither is view camera photography. Though I haven’t had the opportunity yet to check out all the potential applications of MultiStitch, there are some I’ve thought about that are quite intriguing. One application is as a scanner surrogate for large format film. If you’ve got a good Graphiclite or Macbeth light box, simply tape a 4×5 or 8×10 negative or transparency to it, use a good macro lens on your 4×5, and in combination with any MF back of 40MP or more, you should get a great digital conversion with ample resolution for even 8×10 film. Admittedly, the set-up will be somewhat time consuming and negatives will require a reversal of values in Photoshop and will present challenges during raw conversion. But, quality scanners that can do justice to LF film are rare and expensive and a digital copy camera could be a great alternative. Another intriguing application is that many Phase One backs offer Sensor + technology, a proprietary term for pixel binning, whereby at high ISOs individual RGB sites are combined with the consequence of reducing noise and resolution simultaneously. Binning is the only effective way to achieve good high ISO performance from CCD sensors. The consequential loss of resolution renders this technology as something of a last resort option. But, with MultiStitch and say a P65+ back, you’ve got resolution to spare and the high ISOs could be of great benefit in low light and will mitigate the negative impact of slow lenses and excessively long exposures inherent in view camera photography.
In summary, if you were a committed view camera photographer during the film era and have found DSLR photography lacking,MultiStitch is a product worth checking out. And an opportunity to do so is coming soon.Mykowill be participating in the upcomingPDN PhotoPlus International Conference and Expo in New Yorkat theJacob Javits Center on October 24-27, at booth number361. Take my advice and take advantage of a hands on opportunity to experience the MultiStitch plate on a view camera.
October, 2012
Richard Sexton
Richard Sexton is a fine art and media photographer whose work has been exhibited and published worldwide.
For additional information about his work, please visit:www.richardsextonstudio.com.
Special thanks to Dave Gallagher of Capture Integration for the generous loan of a Schneider 47mm Digitar lens used in this review.


Elevate Your Vision


You may also like


