By Michael Reichmann (updated article by Jon Swindall)
Understanding What Makes Light Behave
Why does water sometimes look like a mirror when you’re trying to photograph what’s beneath the surface? And how do some photographers make blue skies look so dramatically deep while keeping clouds bright white?
The answer lies in understanding polarized light and how a simple filter can give you control over reflections and contrast that post-processing simply can’t replicate.
Think of regular sunlight as waves vibrating in every direction as they travel toward your camera. Now imagine a microscopic fence with parallel slats that only lets light waves oscillating in one specific direction pass through, blocking all the others.
That’s essentially what happens when sunlight bounces off water, glass, or even wet leaves – it becomes organized in predictable ways.
A polarizing filter gives you the power to either block that organized light or let it through. By rotating your polarizer, you’re choosing which orientation of light waves gets blocked. Rotate it one way and reflections disappear. Rotate it another way and they come back full strength.

Why Your Camera Needs a Circular Polarizer
Here’s something that still trips up photographers: there are two types of polarizers, and using the wrong one can disable your camera’s autofocus and metering systems.
Linear polarizers were the original design and work perfectly for the polarizing effect. But modern cameras have a problem with them. Your DSLR or mirrorless camera uses beam-splitters and semi-silvered mirrors for autofocus and exposure metering – and these internal systems get confused by linearly polarized light. You’ll see symptoms like a completely black viewfinder or autofocus that hunts endlessly.
Circular polarizers solve this elegantly. They’re actually two-stage filters: a linear polarizing layer does the main work, followed by a quarter-wave plate that “spins” the light into circular polarization. Your camera’s internal systems treat circularly polarized light just like normal unpolarized light, so everything functions normally.
The visual effects are identical – both types will cut reflections and darken skies equally well. But unless you’re using a fully manual camera, you’ll need the circular version for reliable operation.

Taming Reflections: Where Polarizers Truly Shine
This is where I’ve found polarizers most useful in my work. Light reflecting off non-metallic surfaces – water, glass, painted surfaces, even waxy leaves – becomes partially polarized. At certain angles, that reflected light is almost completely polarized in one direction.
Orient your polarizer perpendicular to that glare, and you can nearly eliminate the reflection. Suddenly, instead of photographing the sky’s reflection on a lake, you’re seeing the rocks on the bottom. Instead of your own reflection in a store window, you’re capturing the display inside.

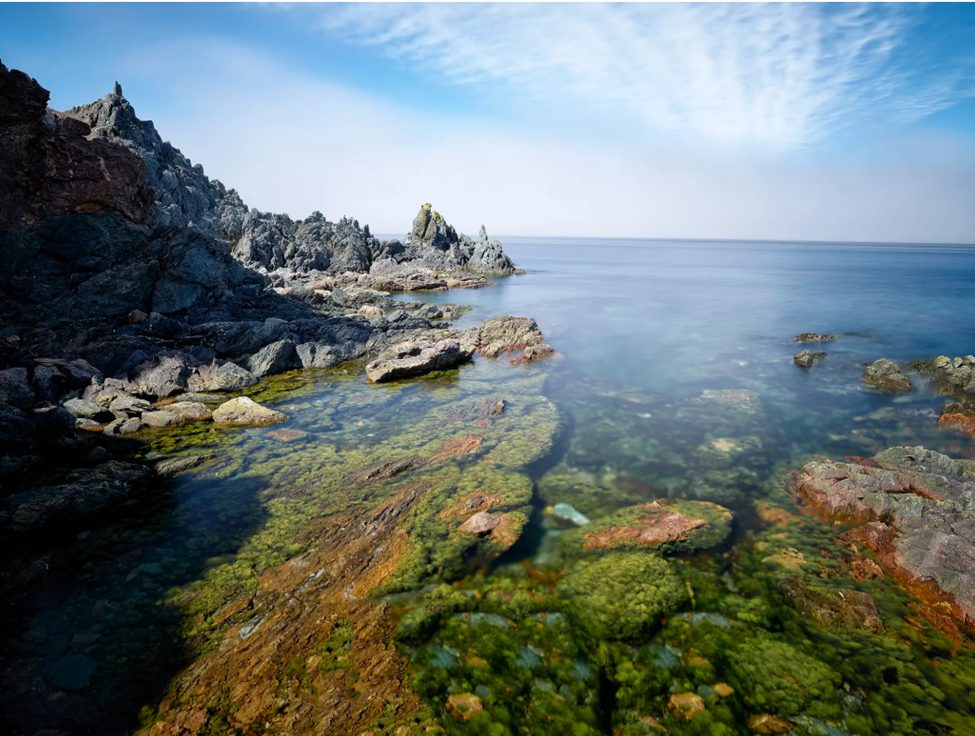
Photographed with a Pentax 645NII and Pentax (67) 200mm f/4 lens on Provia 100F — Polarizer
Look at this shot from the Yucatan by Michael Reichmann. The polarizer removed reflections and glare from the water’s surface while increasing saturation of the colors beneath. That remarkable color comes from run-off from the surrounding mangrove swamp near the estuary in Celestún, Mexico. Without the polarizer, you’d be looking at sky reflection instead of this underwater palette.
The key is watching and dialing to taste. Rotate the filter while looking through your viewfinder or live view. You’ll see reflections strengthen and weaken as you turn. Find the sweet spot where unwanted glare disappears.
One important limitation: this only works on non-metallic surfaces. Chrome bumpers, mirrors, and polished metal produce unpolarized reflections that a polarizer won’t touch.
Transforming Blue Skies: The 90-Degree Rule
Scattered sunlight – the light that makes our sky blue – is partially polarized. The effect is strongest at about 90 degrees from the sun’s position. Point your camera perpendicular to the sun, and a polarizer can dramatically deepen that blue sky while leaving white clouds unchanged.
Here’s an old trick to use: make an “L” with your thumb and index finger. Point your index finger at the sun, and your thumb shows you the direction where sky polarization is strongest. That’s where your polarizer will have maximum impact.
But here’s where it gets interesting with wide-angle lenses. The polarization angle varies continuously with the angle from the sun. With a lens wider than about 28mm, the sky will be unevenly polarized. Some photographers say don’t use polarizers with ultra-wides. Nonsense. If you like the effect, use it.
This Monument Valley shot shows the effect – to a fault. Michael Reichmann used a polarizing filter with a wide angle lens equivalent to about 24mm. The part of the sky at 90 degrees to the sun is heavily darkened while the area closer to the sun’s position is much less polarized.

The Color Saturation Secret
Beyond sky and water, polarizers enhance color saturation across your entire image by removing the thin layer of polarized glare that sits on most surfaces, washing out their true colors.
Wet leaves after rain are perfect examples. Without a polarizer, you’re photographing bright white highlights bouncing off waxy leaf surfaces. With a polarizer, you cut through to the rich green underneath. The same principle works on distant mountains, autumn foliage, and even portraits where you want to reduce skin shine.
The Light Loss Reality
Every polarizer reduces light entering your lens – typically by 1.5 to 2 stops. Your camera’s auto-exposure compensates, but this means slower shutter speeds or higher ISOs.
In bright daylight, this is rarely a problem. In fact, the light reduction works as a mild neutral density effect, helping you achieve slightly longer exposures for motion blur or allowing wider apertures without overexposure.
But in dim conditions – twilight, indoors, or when shooting fast action – that 2-stop loss becomes significant. Remember to remove the polarizer when you need those extra stops.

Wide Angles and Filter Thickness
There’s a second issue with polarizers and very wide-angle lenses beyond the uneven sky effect. By their nature, polarizers are thick filters because they have a double ring – one that mounts to the lens and another that rotates. If your lens is wider than about 24mm, used at small apertures, the edge of the ring can cause vignetting at the corners. The solution is buying a “thin” polarizer. B+W and Heliopan make excellent ones, though they’re even more expensive. While we’re discussing brands – even though polarizers are the most expensive filter you’ll likely buy, it’s worth purchasing a top brand rather than a cheap one. Store-brand polarizing filters often “separate” after several years of harsh field use.

Previewing with Sunglasses
The easiest way to preview polarization effects is wearing polarized sunglasses. Just remember to tilt your head from side to side to change the angle of polarization. If you feel like a bird searching for food, simply take the sunglasses off and hold them in front of you as you rotate them.
Polarizers and Your Phone
Smartphone photography has evolved tremendously, and polarizers can enhance phone images just as dramatically as DSLR shots. The challenge is attachment – phones don’t have filter threads.
Companies like Sandmarc make excellent circular polarizers specifically for iPhones. They come with secure clips that fit over your phone’s camera system, though note that they won’t cover the ultra-wide lens if you’re using that focal length.
The attachment is solid, and you can rotate the filter just like on a traditional camera. Watch your phone’s screen as you turn it – reflections will disappear and reappear, skies will deepen and lighten. It’s the same physics, just scaled down.
For a DIY approach, polarized sunglasses work in a pinch. Hold one lens in front of your phone’s camera and rotate until you see the effect you want. It’s awkward to compose this way, but it works for eliminating glare on water or glass.
Using Polarizers with Rangefinder Cameras
Since it’s necessary to visually “tune” a polarizing filter, some people believe it’s impossible to use one with a rangefinder camera. Not so. If you have a polarizer with markings around the rim, simply hold the filter in front of you while pointing at the subject and note the angle of the mark. If it’s at 11 o’clock at maximum polarization, put the filter on the camera and turn it so the mark is again at 11 o’clock.
Heliopan polarizers work well for this because they have continuous numerical marks around the periphery, making this technique quite simple.
When to Use (and Lose) the Polarizer
Perfect Situations:
- Bright outdoor scenes with prominent skies and clouds
- Any shot involving water where you want to control reflections
- Landscape photography in hazy conditions (polarizers cut atmospheric scatter)
- Shooting through glass or other transparent surfaces
- Colorful foliage, especially when wet
Skip It When:
- Light is already limited (indoors, twilight, night)
- Shooting ultra-wide scenes where sky unevenness would be obvious
- You’re capturing fast action and need every bit of shutter speed
- The subject involves metallic reflections you can’t control anyway
Stitched Panoramics: A Word of Caution
As nice as it would be to use a polarizer when producing stitched panoramics, this is a bad idea. Each panel will be unevenly polarized and the skies will never match up properly in post-processing.

Controlling Costs
Polarizing filters are expensive, and circular polarizers even more so. But you really need one to fit every lens in your arsenal, which can get pricey.
One approach is buying a single polarizer of the largest size you need, then using step-down rings to fit it to smaller lenses. This can be finicky in the field when you’re working in a hurry or in cold, wet conditions. For this reason, the best solution I’ve found is using a comprehensive filter system like Lee’s. This allows you to buy one set of filters of all types and use adapters for each filter size needed. Lee makes a large circular polarizer that attaches to the front of their Foundation Kit – one polarizing filter that works with all your lenses.
Exposure Control
If your camera has TTL metering, compensation for the filter will be automatic. On a manually metered camera, you’ll need to open up about 1.5 stops – though the exact amount depends on the degree of polarization.
For this reason, try to bracket critical shots taken with a polarizer, even if the camera has TTL metering. In this circumstance, as in many others, the right exposure isn’t necessarily the best exposure.
Getting Started
If you’re new to polarizers, start simple. Mount one on your camera and spend an afternoon photographing scenes with water, glass, or skies. Rotate the filter and watch what changes. The effects are immediate and obvious.
For experienced photographers, consider creative possibilities beyond the obvious applications. Portrait photographers use polarizers to control skin shine. Architectural photographers rely on them for shooting through reflective building facades.
On Reflection
A polarizing filter is the most productive accessory a photographer can have in the kit, second only to a decent tripod and head. The science may be complex, but the results speak for themselves: clearer water, richer skies, and colors that pop off the sensor.
Don’t leave home without one.
Have thoughts or experiences to share about using polarizing filters? Head over to our forum: https://forum.luminous-landscape.com/index.php?topic=144867.0 to join the discussion and connect with fellow photographers.


Elevate Your Vision


Read this story and all the best stories on The Luminous Landscape
The author has made this story available to Luminous Landscape members only. Upgrade to get instant access to this story and other benefits available only to members.
Why choose us?
Luminous-Landscape is a membership site. Our website contains over 5300 articles on almost every topic, camera, lens and printer you can imagine. Our membership model is simple, just $2 a month ($24.00 USD a year). This $24 gains you access to a wealth of information including all our past and future video tutorials on such topics as Lightroom, Capture One, Printing, file management and dozens of interviews and travel videos.
- New Articles every few days
- All original content found nowhere else on the web
- No Pop Up Google Sense ads – Our advertisers are photo related
- Download/stream video to any device
- NEW videos monthly
- Top well-known photographer contributors
- Posts from industry leaders
- Speciality Photography Workshops
- Mobile device scalable
- Exclusive video interviews
- Special vendor offers for members
- Hands On Product reviews
- FREE – User Forum. One of the most read user forums on the internet
- Access to our community Buy and Sell pages; for members only.
You may also like