Terry A. McDonald, luxBorealis.com
Is it really possible to turn cropped files, no larger than 1500 pixels, into a decent 11×14” you can be proud of? When I started testing, that was my quest, but which app would produce the best results—Lightroom, ON1 Resize, or Topaz PhotoAI—and would the results be worth it? Surprise, surprise, up-scaling could be easier than I thought. Read on!
Introduction
We all run into it at times—photographing small birds too far away to fill the frame. Even with high-pixel cameras like the 45MP Canon, the 46MP Nikon, and the 61MP Sony, it can be difficult to get close enough, and telephotos only reach so far. If you have a 600mm or an 800mm, you are likely fine, but for many of us, big glass like that costs as much as a car down payment and is simply out of financial reach.
Yet, what do you do when you have a 300mm or 400mm, and can’t get closer? You crop and, when needed, you up-scale.
For online use, up-scaling is rarely needed as image sizes are typically smaller than 1500px. But, if your image is destined for a photo book or a print, then a resolution of 300 pixels per inch is needed. An 8×10” needs 2400x3000px, while an 11×14” requires 3300x4200px. You could use fewer pixels per inch, say 240ppi or 200ppi, but the quality of the print suffers.

Up-scaling and Resampling
To be clear, ‘up-rezzing’ or up-scaling actually increases the pixel dimensions of images. In Affinity Photo and Photoshop, it’s called ‘resampling’ since the original pixels are being ‘sampled’ to add more pixels to the image based on the original pixels. Although both AP and Ps have a number of methods for resampling, neither app is designed for large-scale up-rezzing; e.g. by 2x. However, modern up-scaling apps such as Super Resolution in Lightroom, ON1 Resize and Topaz PhotoAI use the power of AI to preserve areas that are meant to be smooth and maintain realistic fine details of fur, feather and foliage.
I tested these three AI methods for up-scaling, alongside traditional resampling using Affinity Photo’s Lanczos 3 method. I tested a fifth, quick and dirty method, but more on that later. I decided not to test Luminar Neo or Photoshop as I couldn’t justify purchasing them for a test like this. Furthermore, as I am using Topaz PhotoAI, I didn’t see the need to test Topaz GigapixelAI at this time.
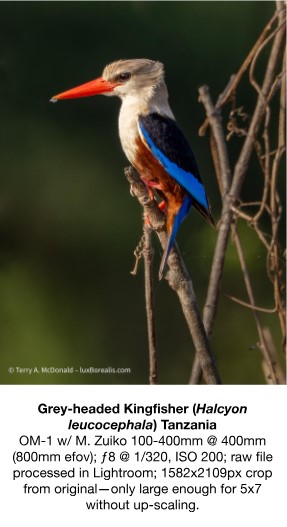
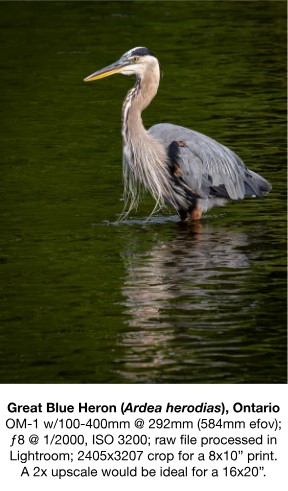
OM-1 w/100-400mm @ 400mm (800mm efov); ƒ8 @ 1/320, ISO 1600; raw file processed in Lightroom; 2129x2838px crop from original, without up-scaling, only large enough for a 7×9½“ print.
Methods
Initial Processing
Each file was processed in Lightroom in my usual way—to re-create the vision I had when I made the photograph in the field. To me, this is a critical step and my goal with every photo I spend the time editing. The raw file from the camera is fundamentally a digital negative that provides all the information captured, but none of the emotion and creativity.
As a photographer—a visual artist—my job is to breathe life back into the raw file by applying basic edits, including Exposure, Contrast, Black and White points, balancing Shadows and Highlights, and adjusting Colour Temperature, Tint, Vibrance and Saturation. Slight tweaks of Texture and Clarity may be used in conjunction with Adjustment Masks which are used to shape the light. I will also use the Remove tool (without Generative AI—see below) to clean up an image from distracting spots or foliage that I could not remove before making the photograph.
Note: I could shoot in JPEG and forgo the editing, using the files SOOC (Straight Out Of the Camera), but JPEGs have been sharpened and compressed, two destructive processes making up-scaling a mine-field of artefact hazards. Additionally, I have yet to meet a SOOC image that wouldn’t benefit from at least some editing, and editing is best done with a raw file.
My editing is done using the digital equivalents of the same tools I had available to me in the wet darkroom. I feel strongly that photographs should not be manipulated in artificial ways that fundamentally change the original scene or subject. Edited photographs must maintain their authenticity. To this end, I do not add features or change backgrounds as is now possible with many ‘push-button’ generative AI apps. In fact, I specifically choose treatments that do not include any form of generative AI. To distinguish the difference, I suggest reading my recent article Navigating the AI Juggernaut.
Photos used for Testing
I specifically chose photos that have significant crops and portray fine details that must be preserved—feather and fur always work well.
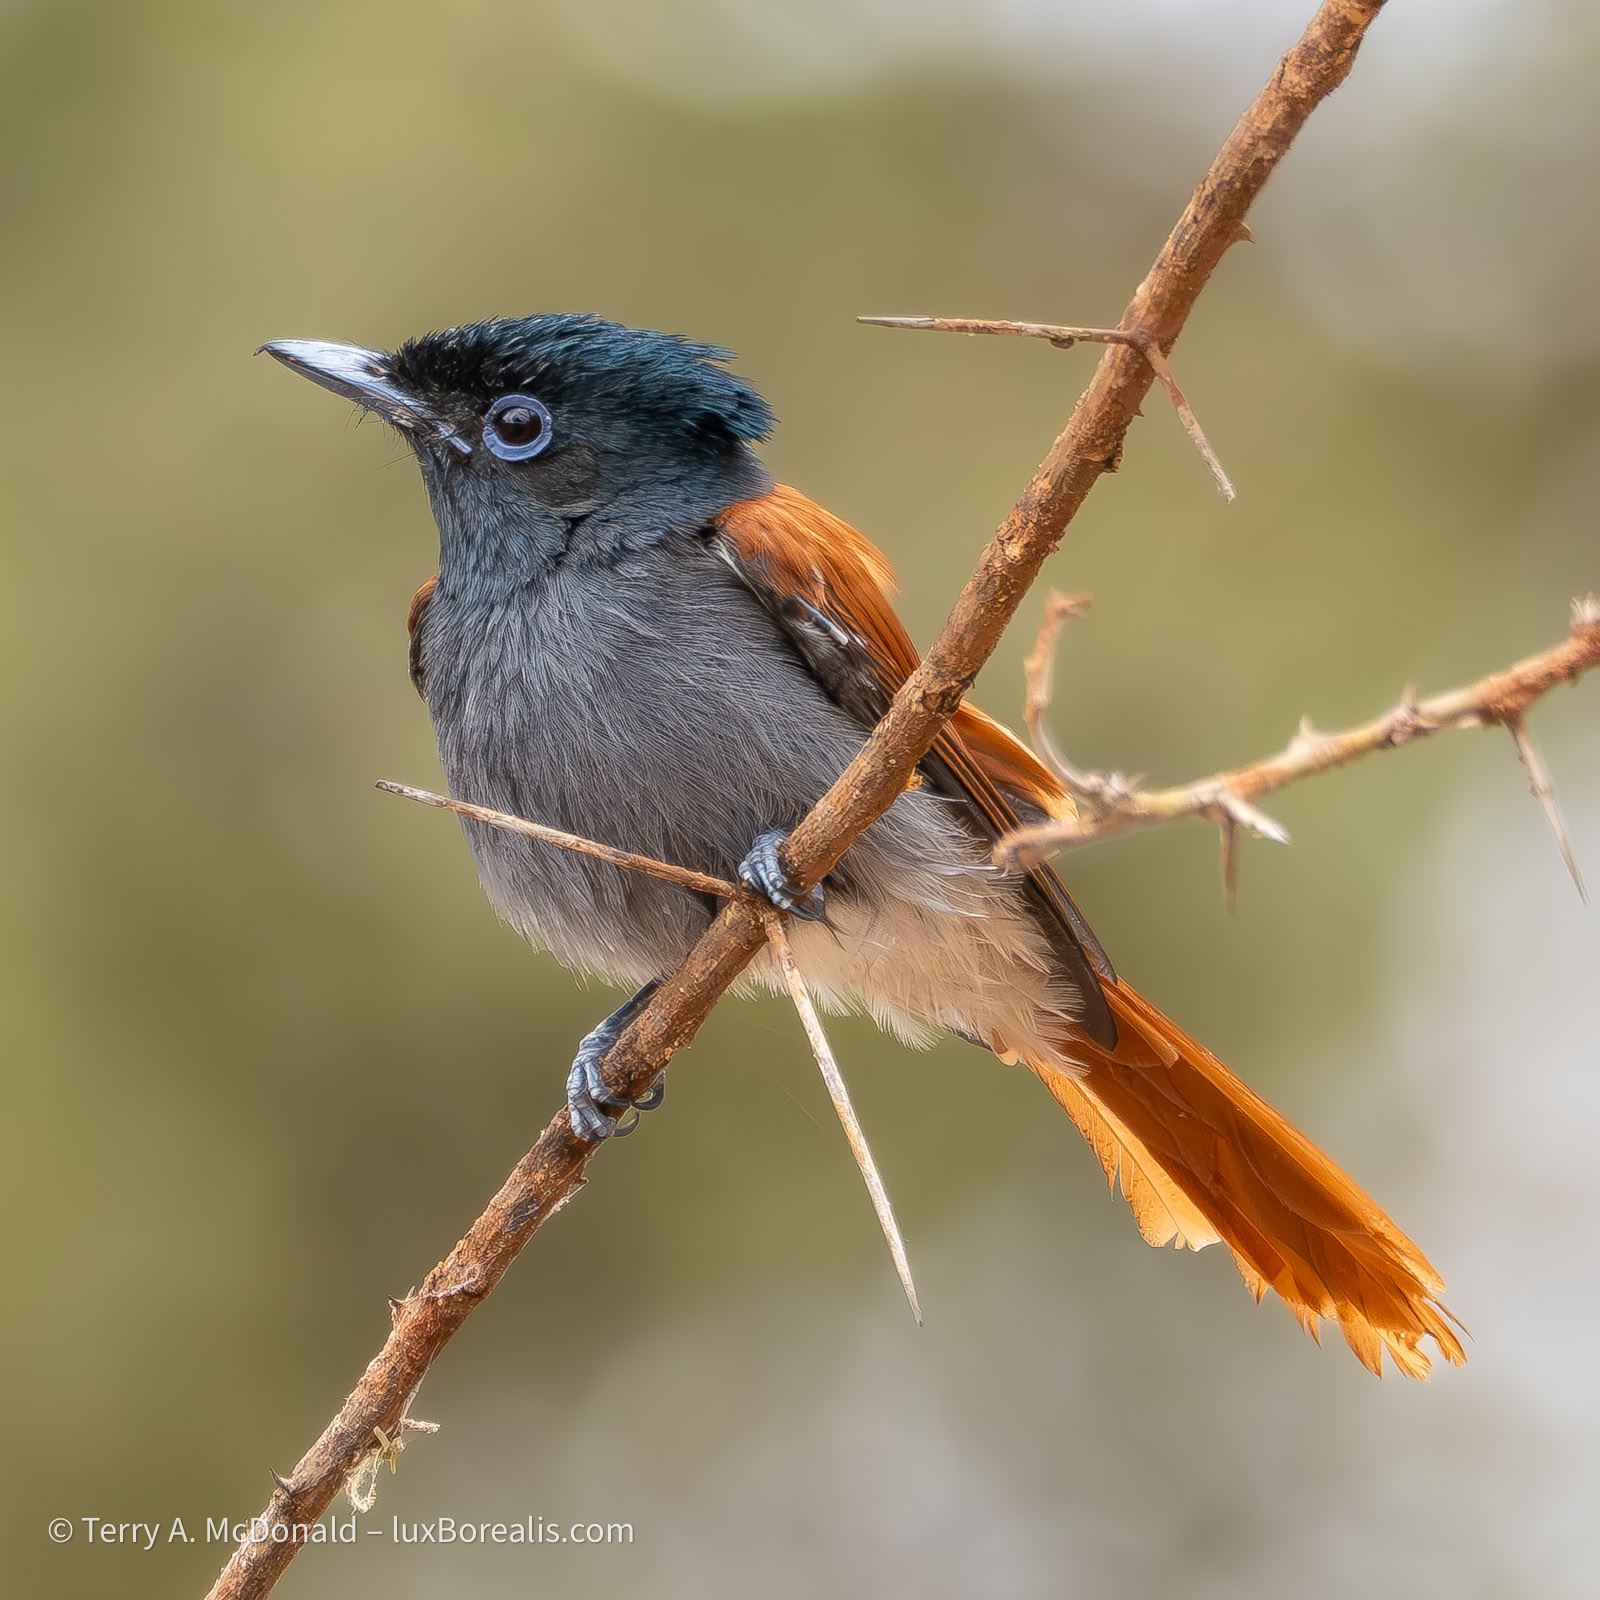
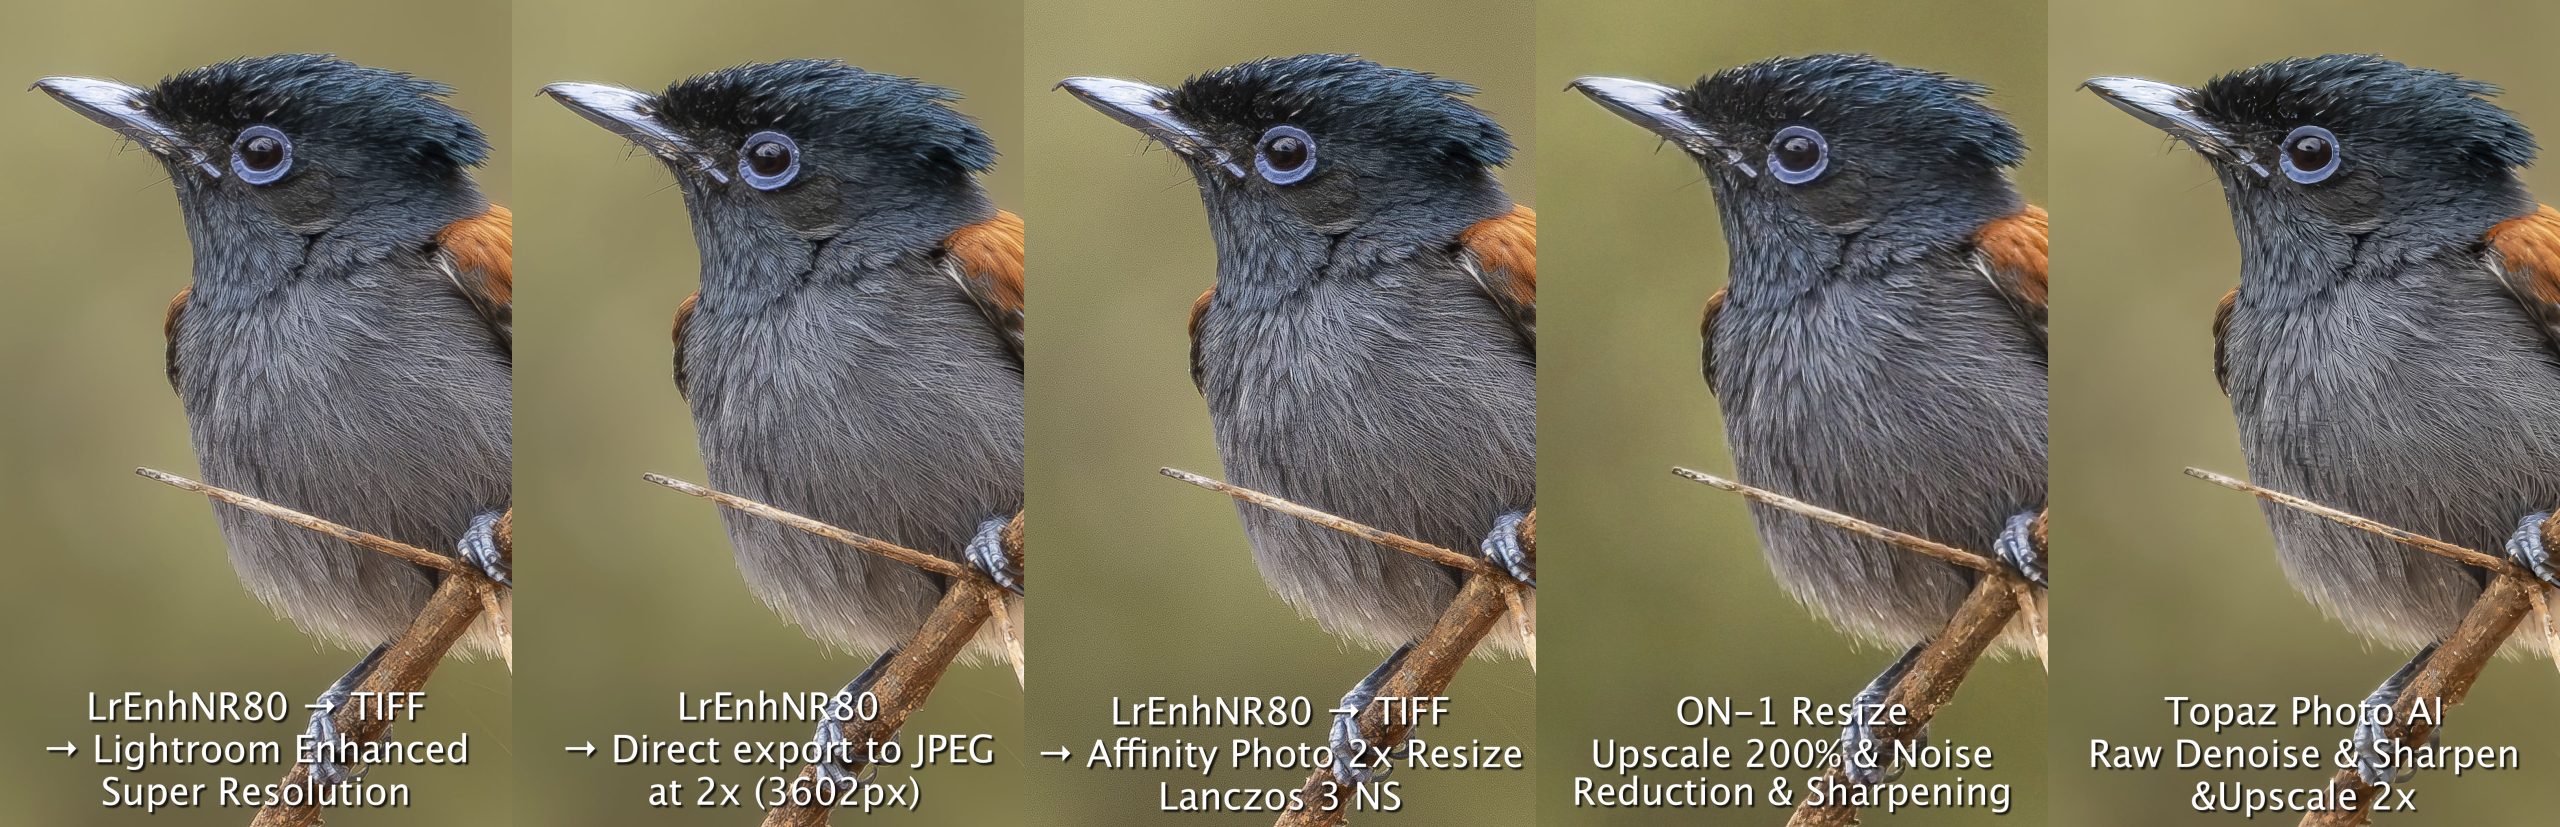
A. African Paradise Flycatcher: 1801x1801px crop (6×6”); 400mm; ƒ8 @ 1/640; ISO 1600. Lightroom Enhanced Noise Reduction at 80. I’ve learned that aggressive use of NR removes any pixellation of the smooth background. The resulting file can then have fairly aggressive Detail Sharpening added setting of 100 combined with an increase in Detail to 50 to enhance feather detail, Finally, Masking is adjusted to around 35 to eliminate any background and edge sharpening artefacts. If the image still looked a little ’crunchy’, I reduce the Detail Sharpening and may reduce Texture to –20. Using this combination maintains exquisite and natural-looking feather detail.
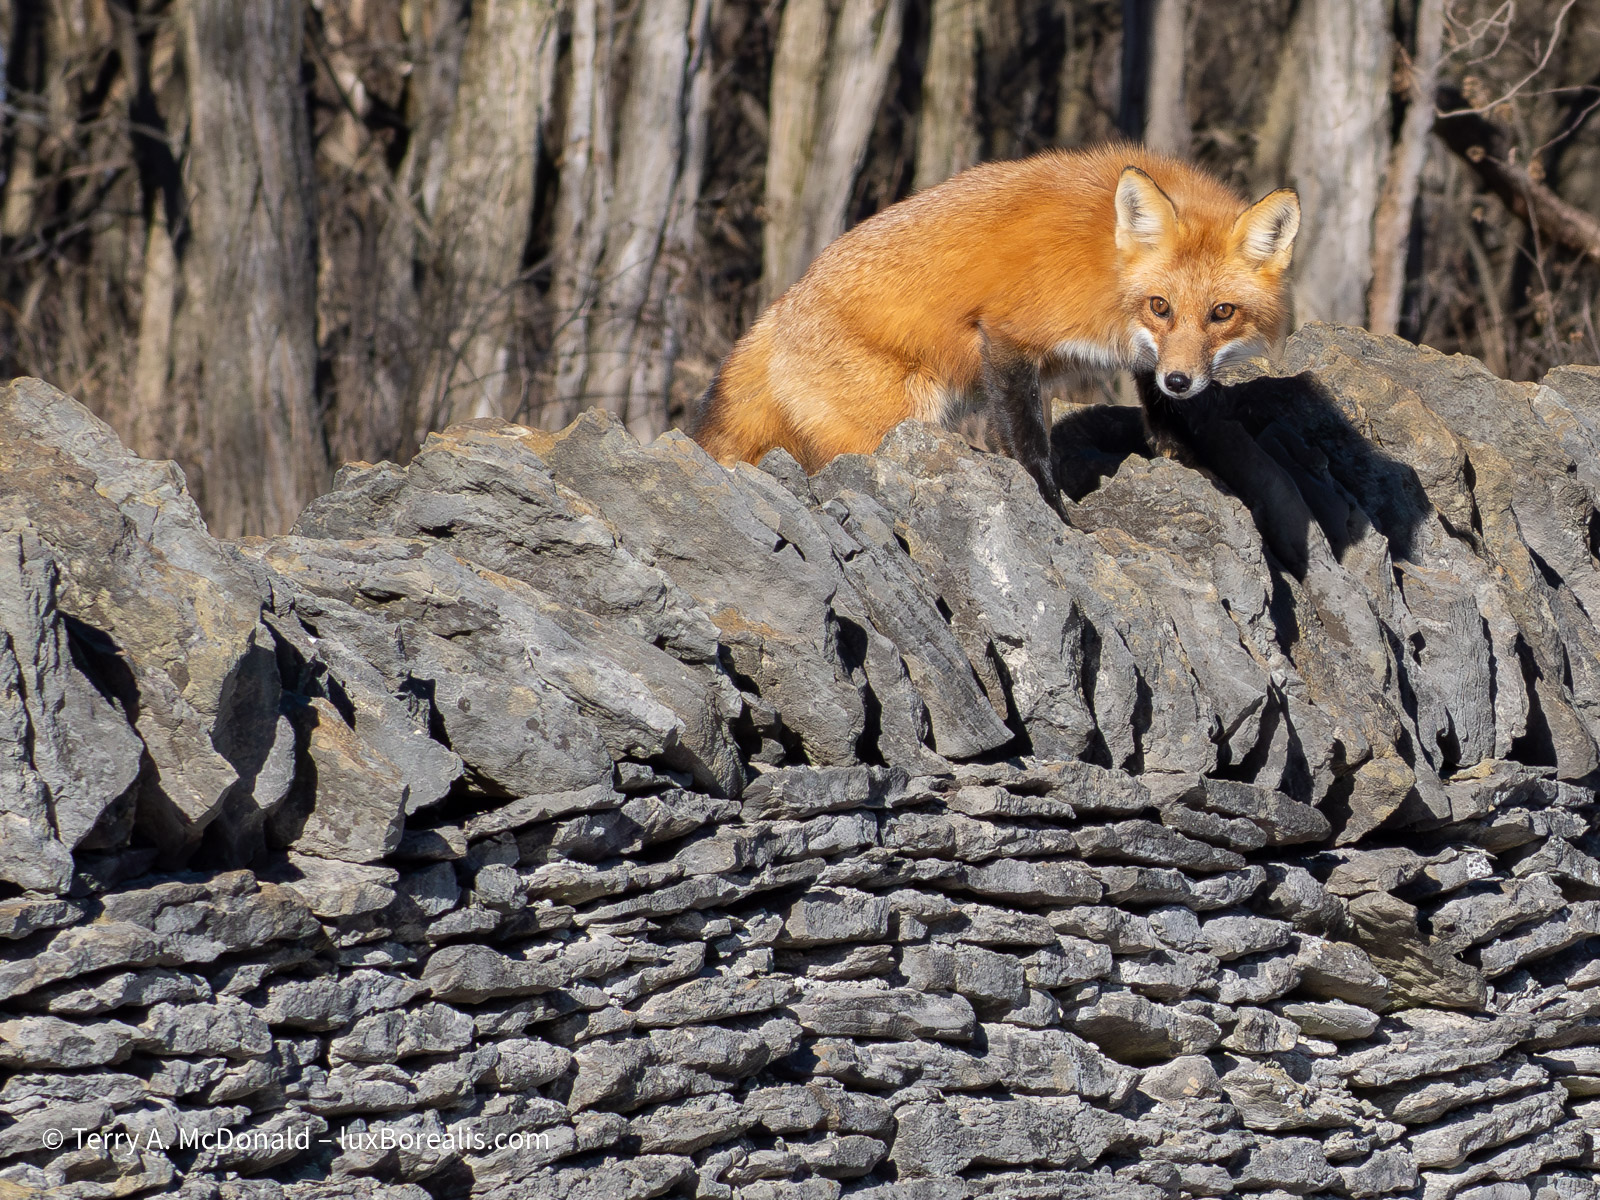
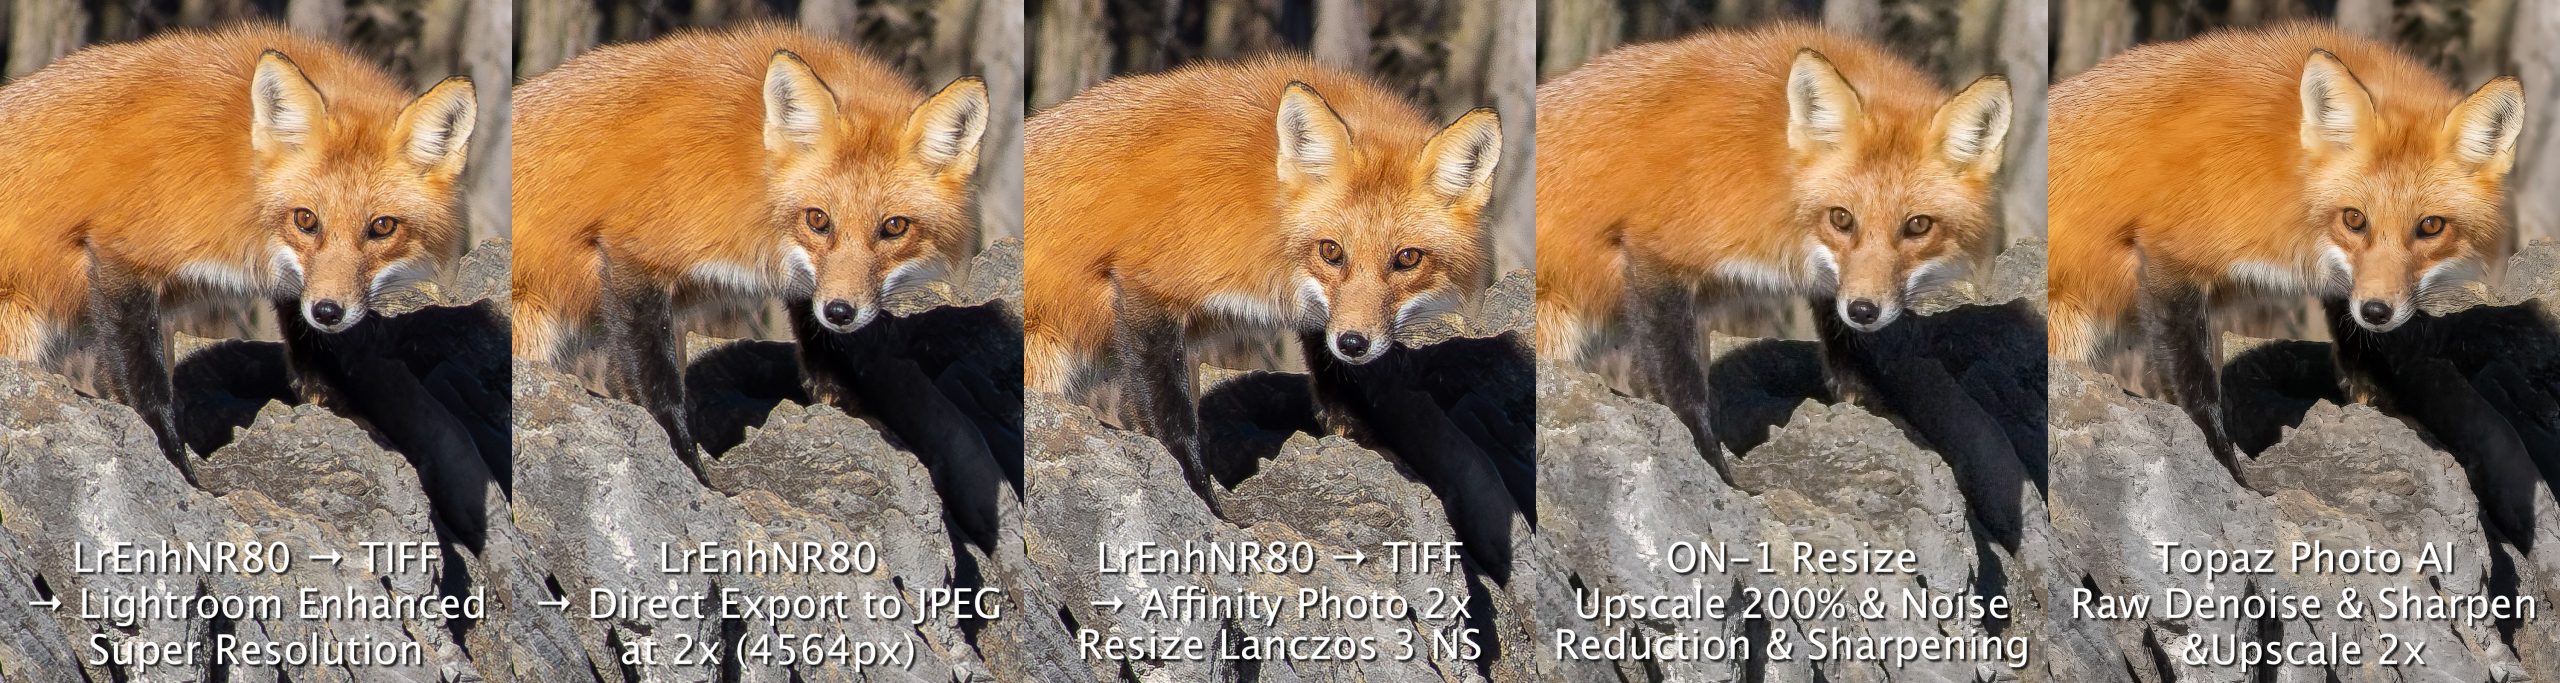
B. Red Fox and Stone Wall: 2281x1711px crop (approx. 7×5½”); 100mm; ƒ8 @ 1/1250; ISO 800. This was nothing short of a quick grab shot as the fox suddenly appeared while we were driving and didn’t hang around! There wasn’t even time to zoom. The OM-1 immediately locked focus and exposure and the shot was made. However, now I have a cropped photo that could use some upscaling. Processing was similar to that described above.
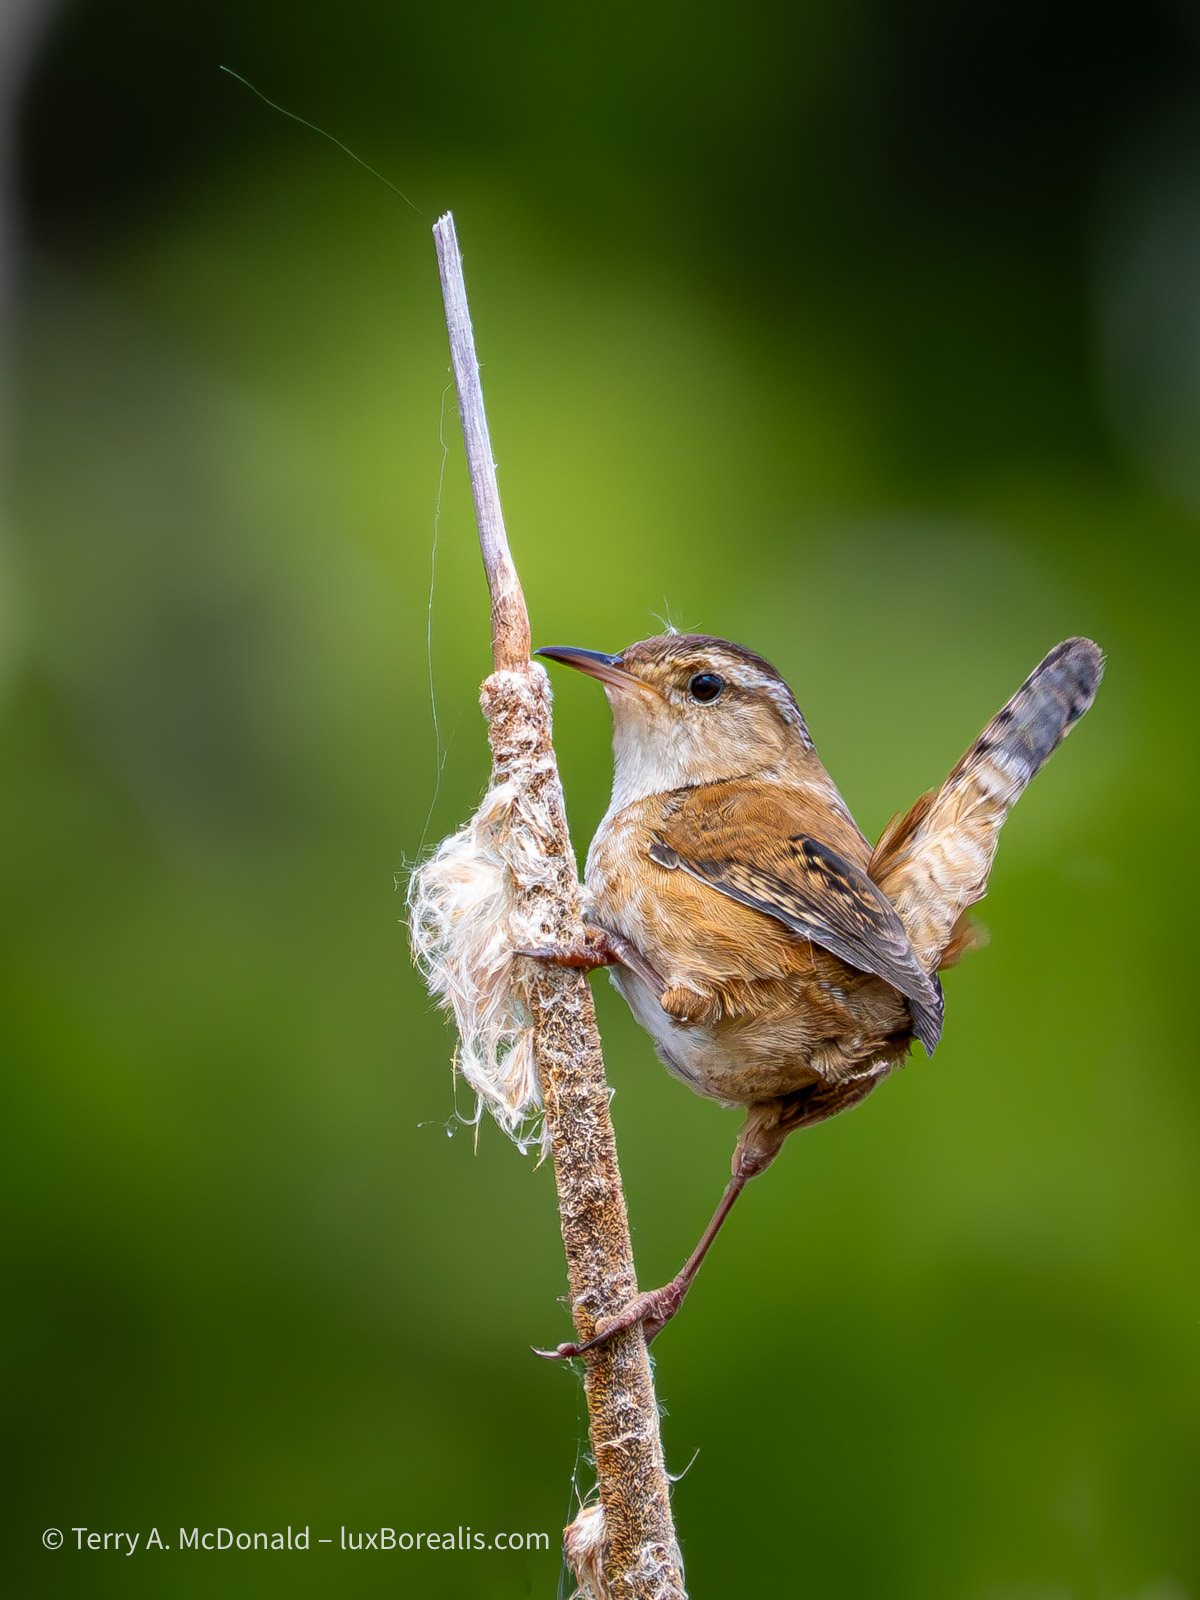
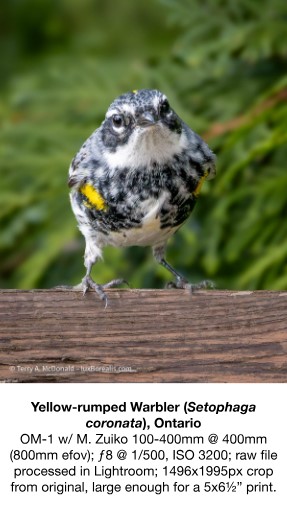
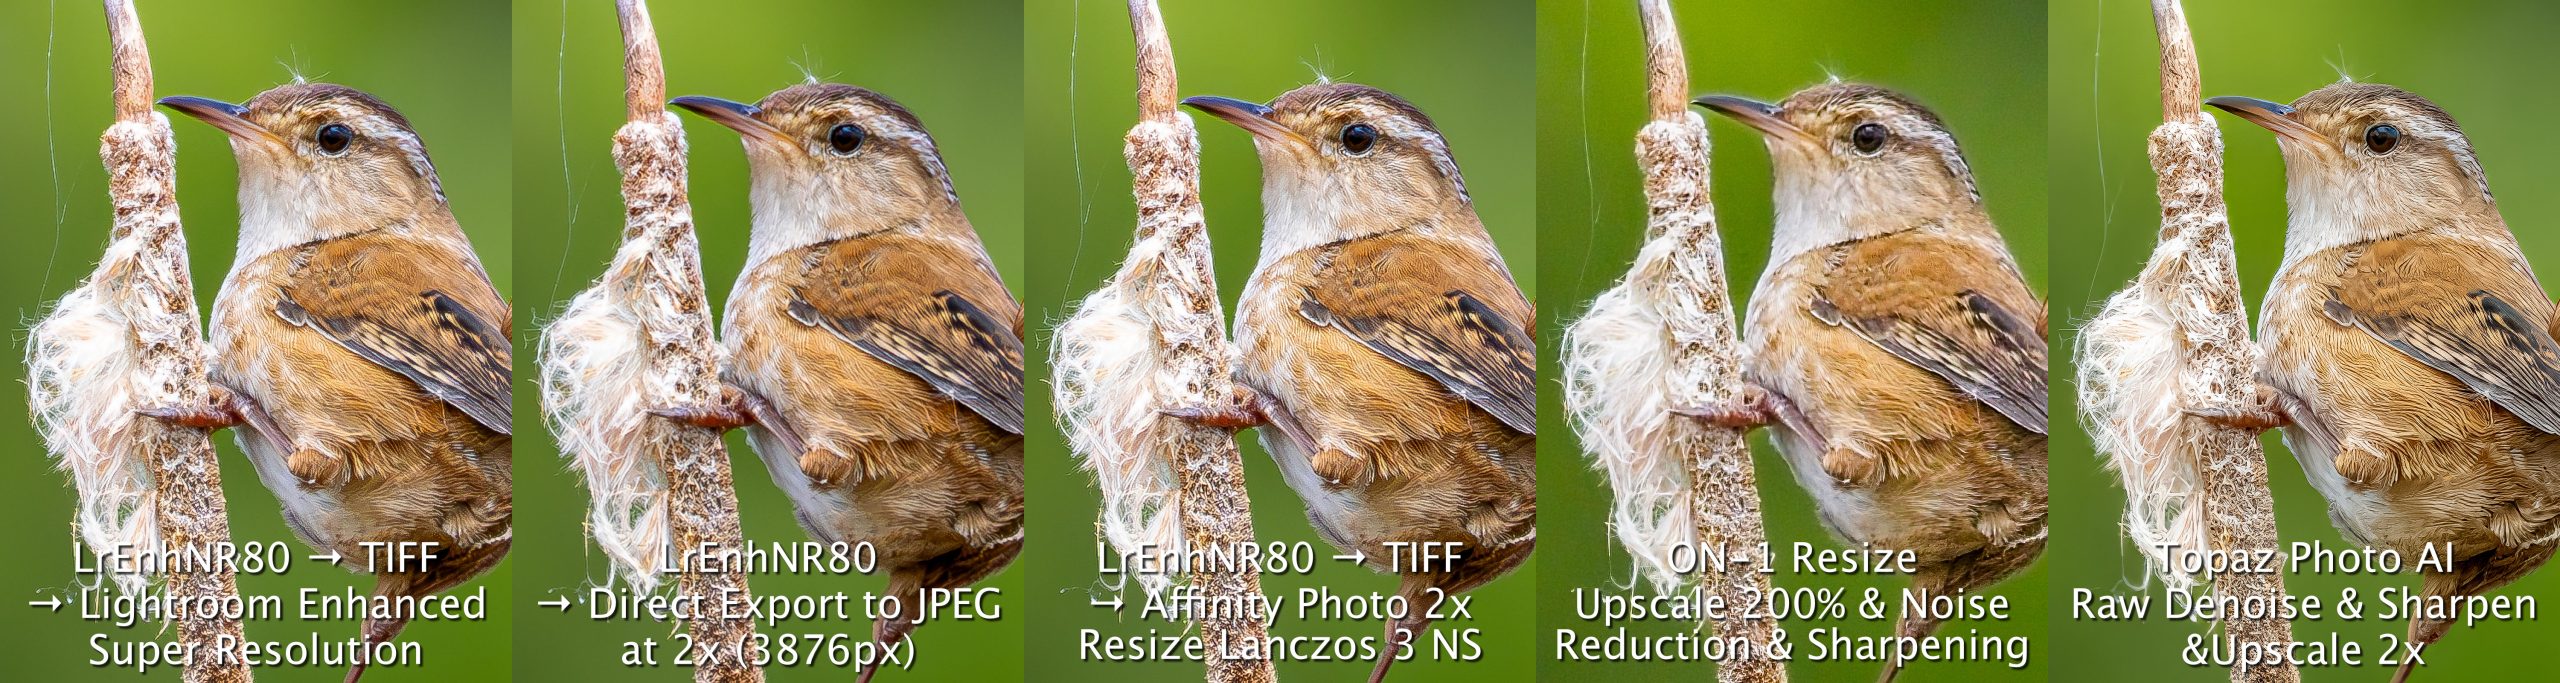
C. Marsh Wren: 1454x1938px crop (approx. 5×6½“); 400mm; ƒ8 @ 1/2500; ISO 3200. Shooting from a canoe demands higher shutter speeds, which means higher ISOs. Despite that, both Lightroom and Topaz produced sharp, clean images. Even fine details of the spider webs and cattail fluff are preserved using the noise reduction and sharpening described above.
Each of these three files produce fine art prints at their native resolutions that are sharp as a tack, but are too small.
Up-scaling/Resampling Methods
- For up-scaling, Lightroom has one unfortunate drawback: it will not allow two Enhancements to the same file. In other words, you cannot Noise Reduce a file then pass the DNG through Super Resolution. However, by exporting the DNG as a 16-bit TIFF, then be re-importing it, the file can then be Enhanced with Super Resolution.
- Affinity Photo: A 16-bit TIFF was exported from Lightroom and imported into Affinity Photo. Resize was selected using the Lanczos3NS method.
- ON-1 Resize (2023 v17.5.1): Starting from the raw ORF, I applied 60 Noise Reduction and Sharpening set to ’Print’ defaults. ’Print’ was chosen as that would be the natural end use of an up-scaled photo as for web use, up-scaling would not be needed. Visually comparing the different sharpening methods—High Pass, Progressive, and Unsharp Mask as well as those in the extensive drop down menu—I chose the default ’Progressive’ as it looked most appealing on-screen at 200%, though there was little difference between Progressive and Unsharp Mask. Note: I tried using a Lightroom Enhanced Noise Reduced image as a starting point for up-scaling, but the results were a bit on the harsh side.
- Of the four options, Topaz Photo AI (3.6.0) is the most straightforward to work with. The base ORF file is exported from Lightroom then opened in Topaz. You might ask: ‘Why not use the ‘File > Edit in Topaz’ command?’ Simple: Lightroom produces a TIFF, which is not the original. I found from previous testing (see Raw File Optimization) that Topaz does a superior job working from the original, unaltered ORF. Except for Detail Sharpening, any adjustments I made to the ORF in Lightroom are simply copied and pasted to the Topaz DNG. In Topaz, each option is then added in order: Raw Denoise (which is added by default to raw files), followed by Sharpening, followed by Upscale. It is helpful that sharpening can be limited to ’Subject’, as was done with the Flycatcher and Marsh Wren. Sharpening can also set it to ’All’ or, better yet, the user can ’paint in’ the area to be sharpened. I did this with the Fox photo, painting in the stone wall as well as the fox. The wall was sharp in the original and I wanted to maintain that crispness in the final. Unfortunately, the sharpness is ’all or nothing’ in that the amount of sharpening cannot be changed for the wall; I would have preferred the wall to be a little less sharp than the fox.
- For argument sake, I tried the least-desirable method of up-scaling—simply using Export and setting the size to twice the number of pixels to create a JPEG. In other words, no special AI up-scaling treatment other than whatever ‘engine’ Lightroom uses to re-size images on export.
Results
The African Paradise Flycatcher was up-scaled 2x to 3602x3602px, equivalent to a 12×12” print. Have a look at this series of 1300x2100px 100% crops from each of the up-scaled images. This composite is best viewed by clicking/tapping on the image to see it at its full size of 6500x2100px.
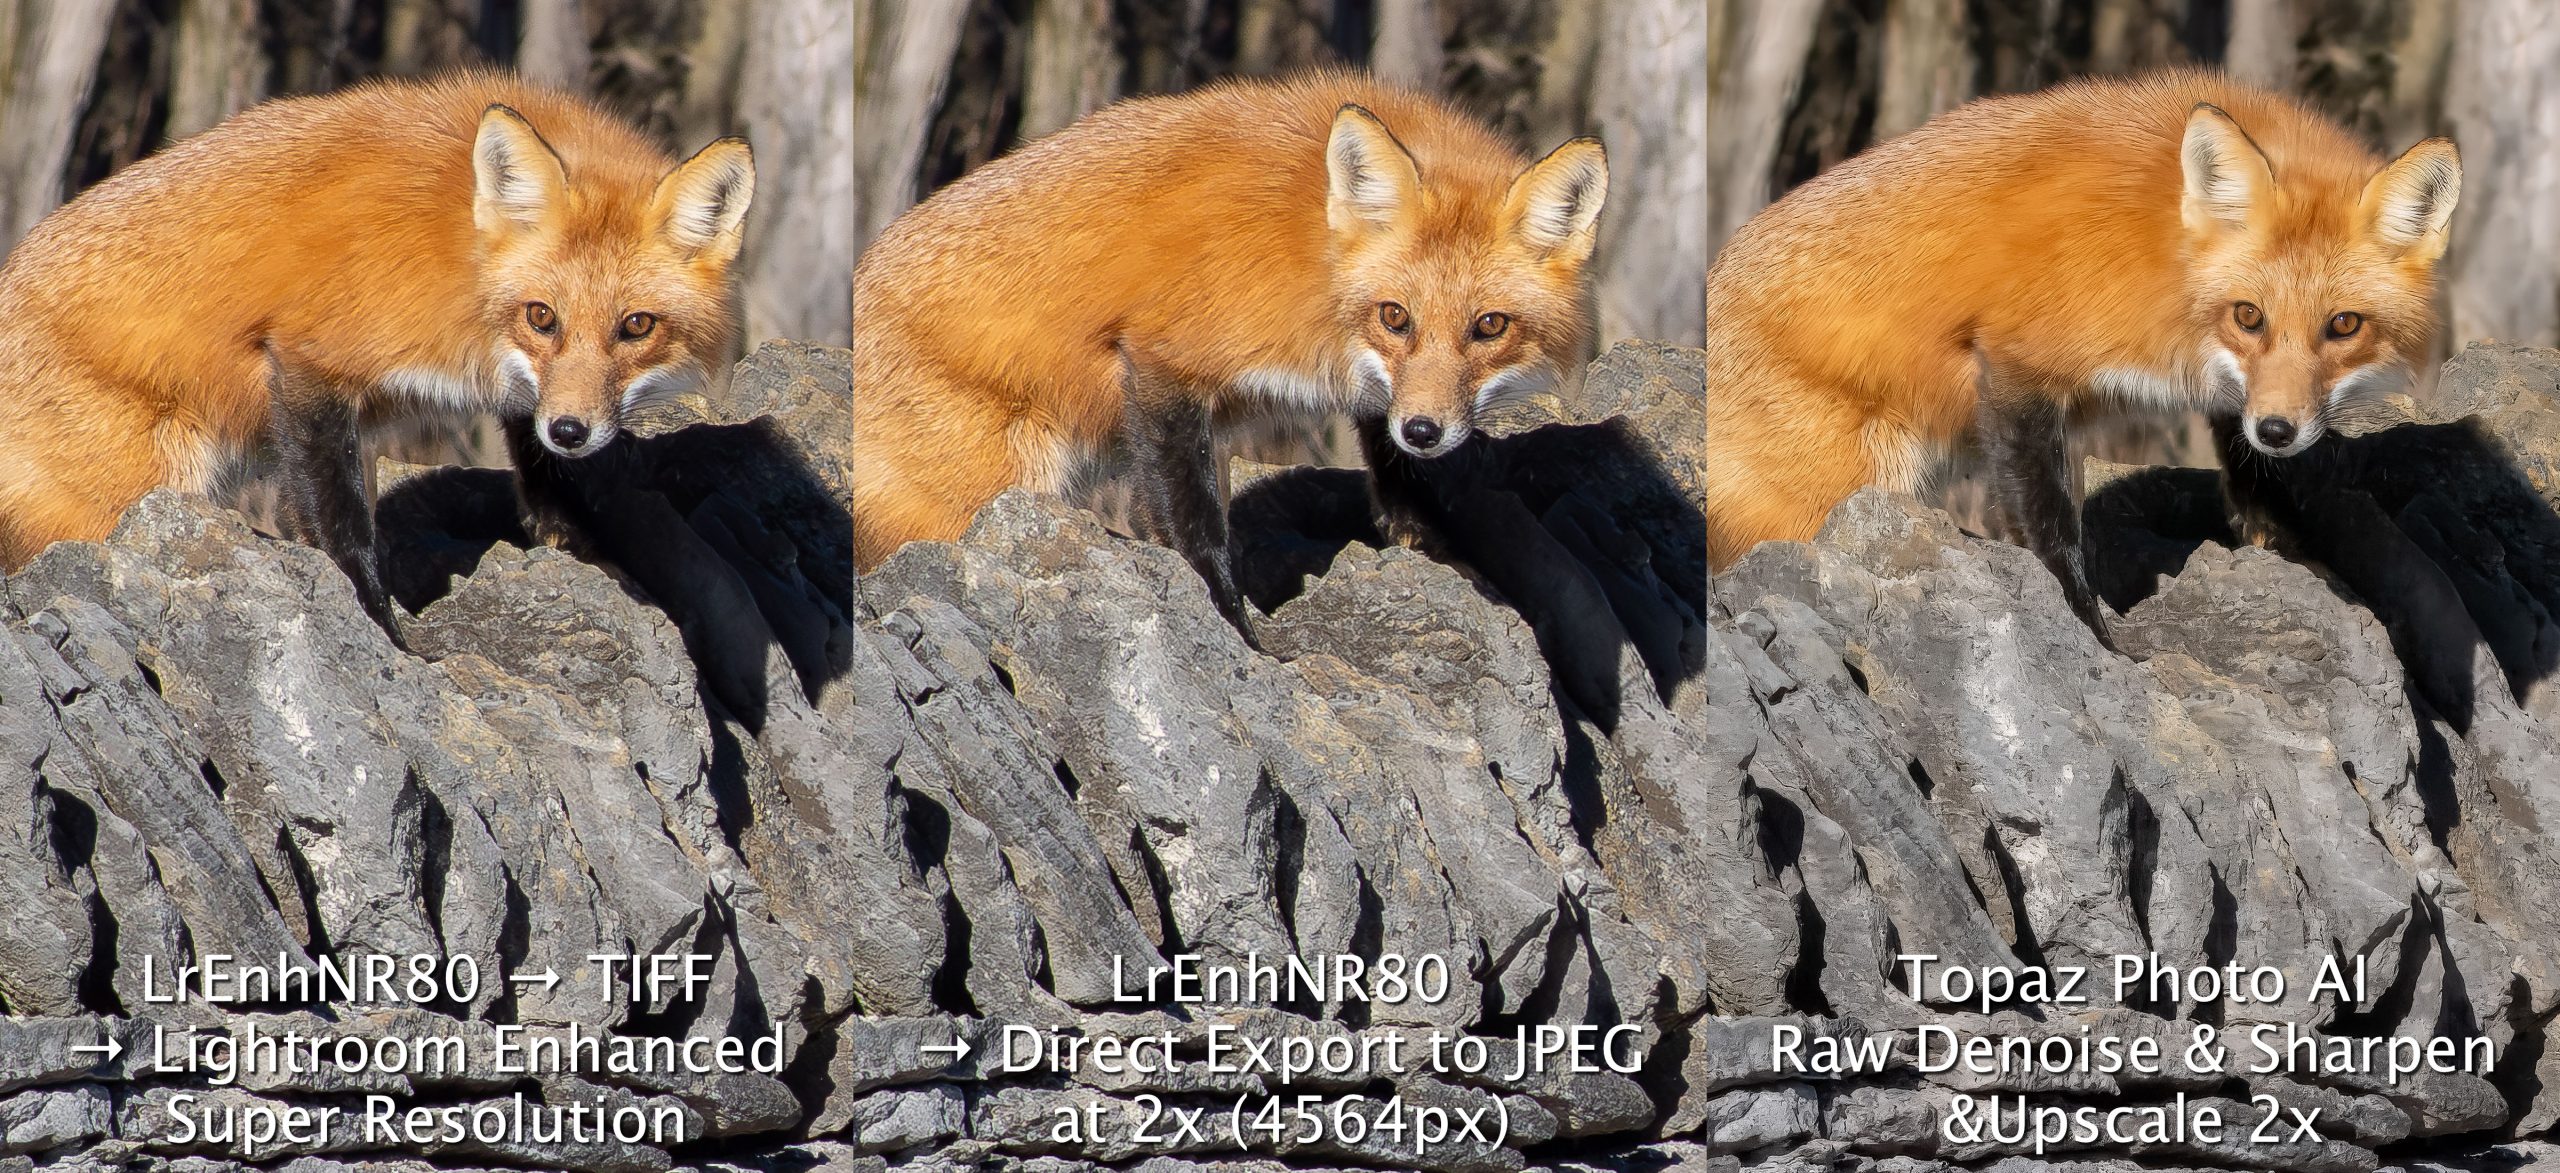
The Red Fox image was resized 2x to 4563x3422px, ideal for a 11×15” print. 1200x1600px sections of each file were cropped at 100% to produce this series. Click/tap to view at the composite at its full size of 6000x1600px.
The Marsh Wren was resized 2x to 2908×3876, for a 9½x13” print. Each 1200x1600px section was cropped at 100%. Click/tap to view at the full size of 6000x1600px.
Before reading on, take a good look at the test strips and decide which of the five up-scaling methods you think is ‘best’.
Analysis
The differences between any the methods of up-scaling are, for the most part, subtle. They generally have smooth areas where you would expect them—out of focus backgrounds—and details in the right places, particularly in the two bird photos. I expected to see more artefacts in the bird photos as they were shot at ISO 1600 and 3200. So, I was surprised to see more artefacts in the red fox photos, despite it being at ISO 800. So far, I cannot account for this as processing was similar enough for each.
I general terms, I noticed slightly more noise/grain in each of the Affinity Photo Lanczos 3 NS resizing. Features are sharp, but the additional patterning is less desirable.
The ON1 Resize images are generally good overall, but the quality of the details is variable between the three test images. Rather than having crisp edges to the details, they lack local contrast which makes them appear slightly ‘mushy’.
So the decision comes down to Lightroom vs Topaz. Both are excellent. In fact, if you only have Lightroom, there really isn’t a reason to buy Topaz just for up-scaling as Lightroom Super Resolution does an excellent job, however, it does require a TIFF to be made of the EnhancedNR DNG. This may seem like an extra step, except even the Topaz method requires the extra step of exporting the original ORF as described above. Remember, except for Detail Sharpening, any adjustments I made to the ORF in Lightroom are simply copied and pasted to the Topaz DNG.
If pressed, I’d have to grant a slight edge to Topaz. With each of the test images, the backgrounds are smoother and the fine details sharp with good local contrast. My one complaint is that the feather detail sometimes lacks micro-details, making them look too smooth, as if the feathers have been waxed. This is especially noticeable upon close examination of the neck and breast feathers of the Flycatcher. I tried both ’Standard v2’ and ’High fidelity v2’ Up-scaling, and neither unclumped the feathers.
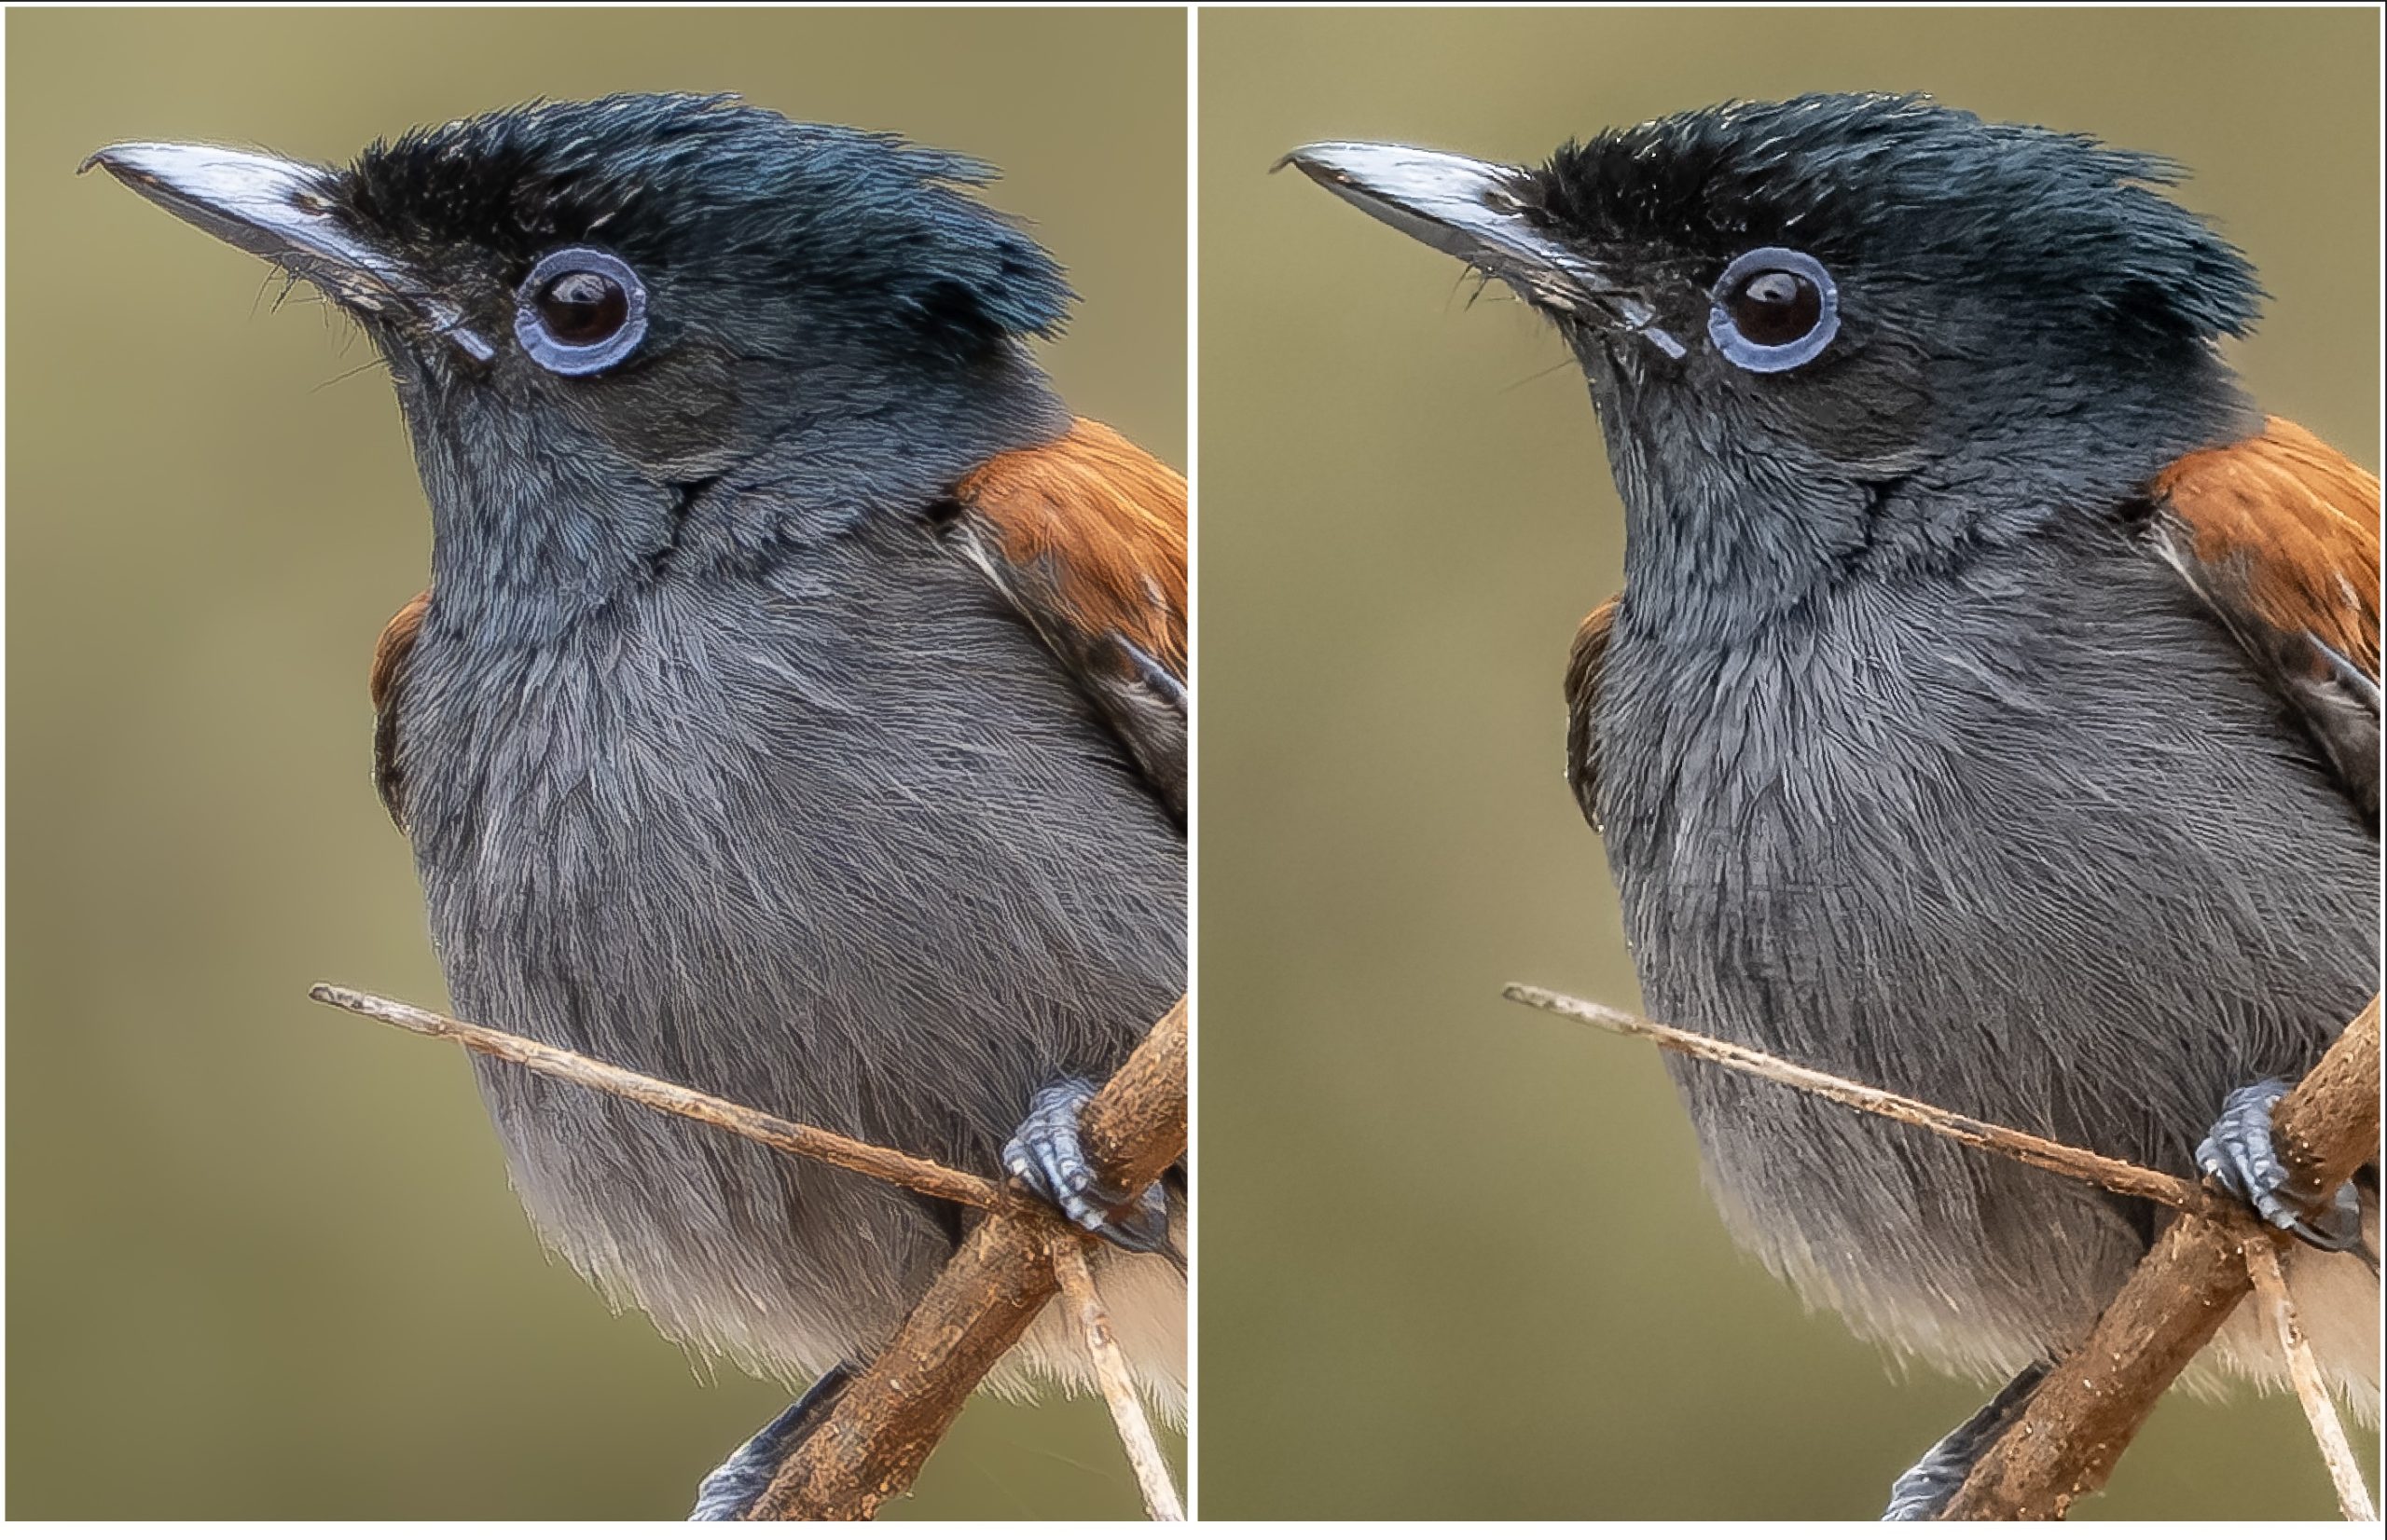
At normal viewing distance they both look excellent, with the feathers standing out a bit better on the Topaz version. However, upon closer examination, the feathers in the Topaz version appear clumped or ‘ropey’ and lack the micro-detail found in the Lightroom Enhanced NR version.
The Red Fox image also shows some interesting comparisons. In this case, the Topaz version produced remarkably fine detail in the fur. It also managed to maintain the detail of the whiskers below the jaw. Yet, there are areas where the details have become smudged, for example along the snout and in the smooth fur to the left of the left ear (the fox’s right ear). I also find the fur in the Topaz version to have an un-natural ’combed’ look of regularity compared to the more natural-looking irregularity in the Lightroom version. This is most apparent in the white trim fur to the left of the snout. However, the smoothness of the background and the fur detail in the right ear, face and whiskers is unparalleled in the Topaz image.
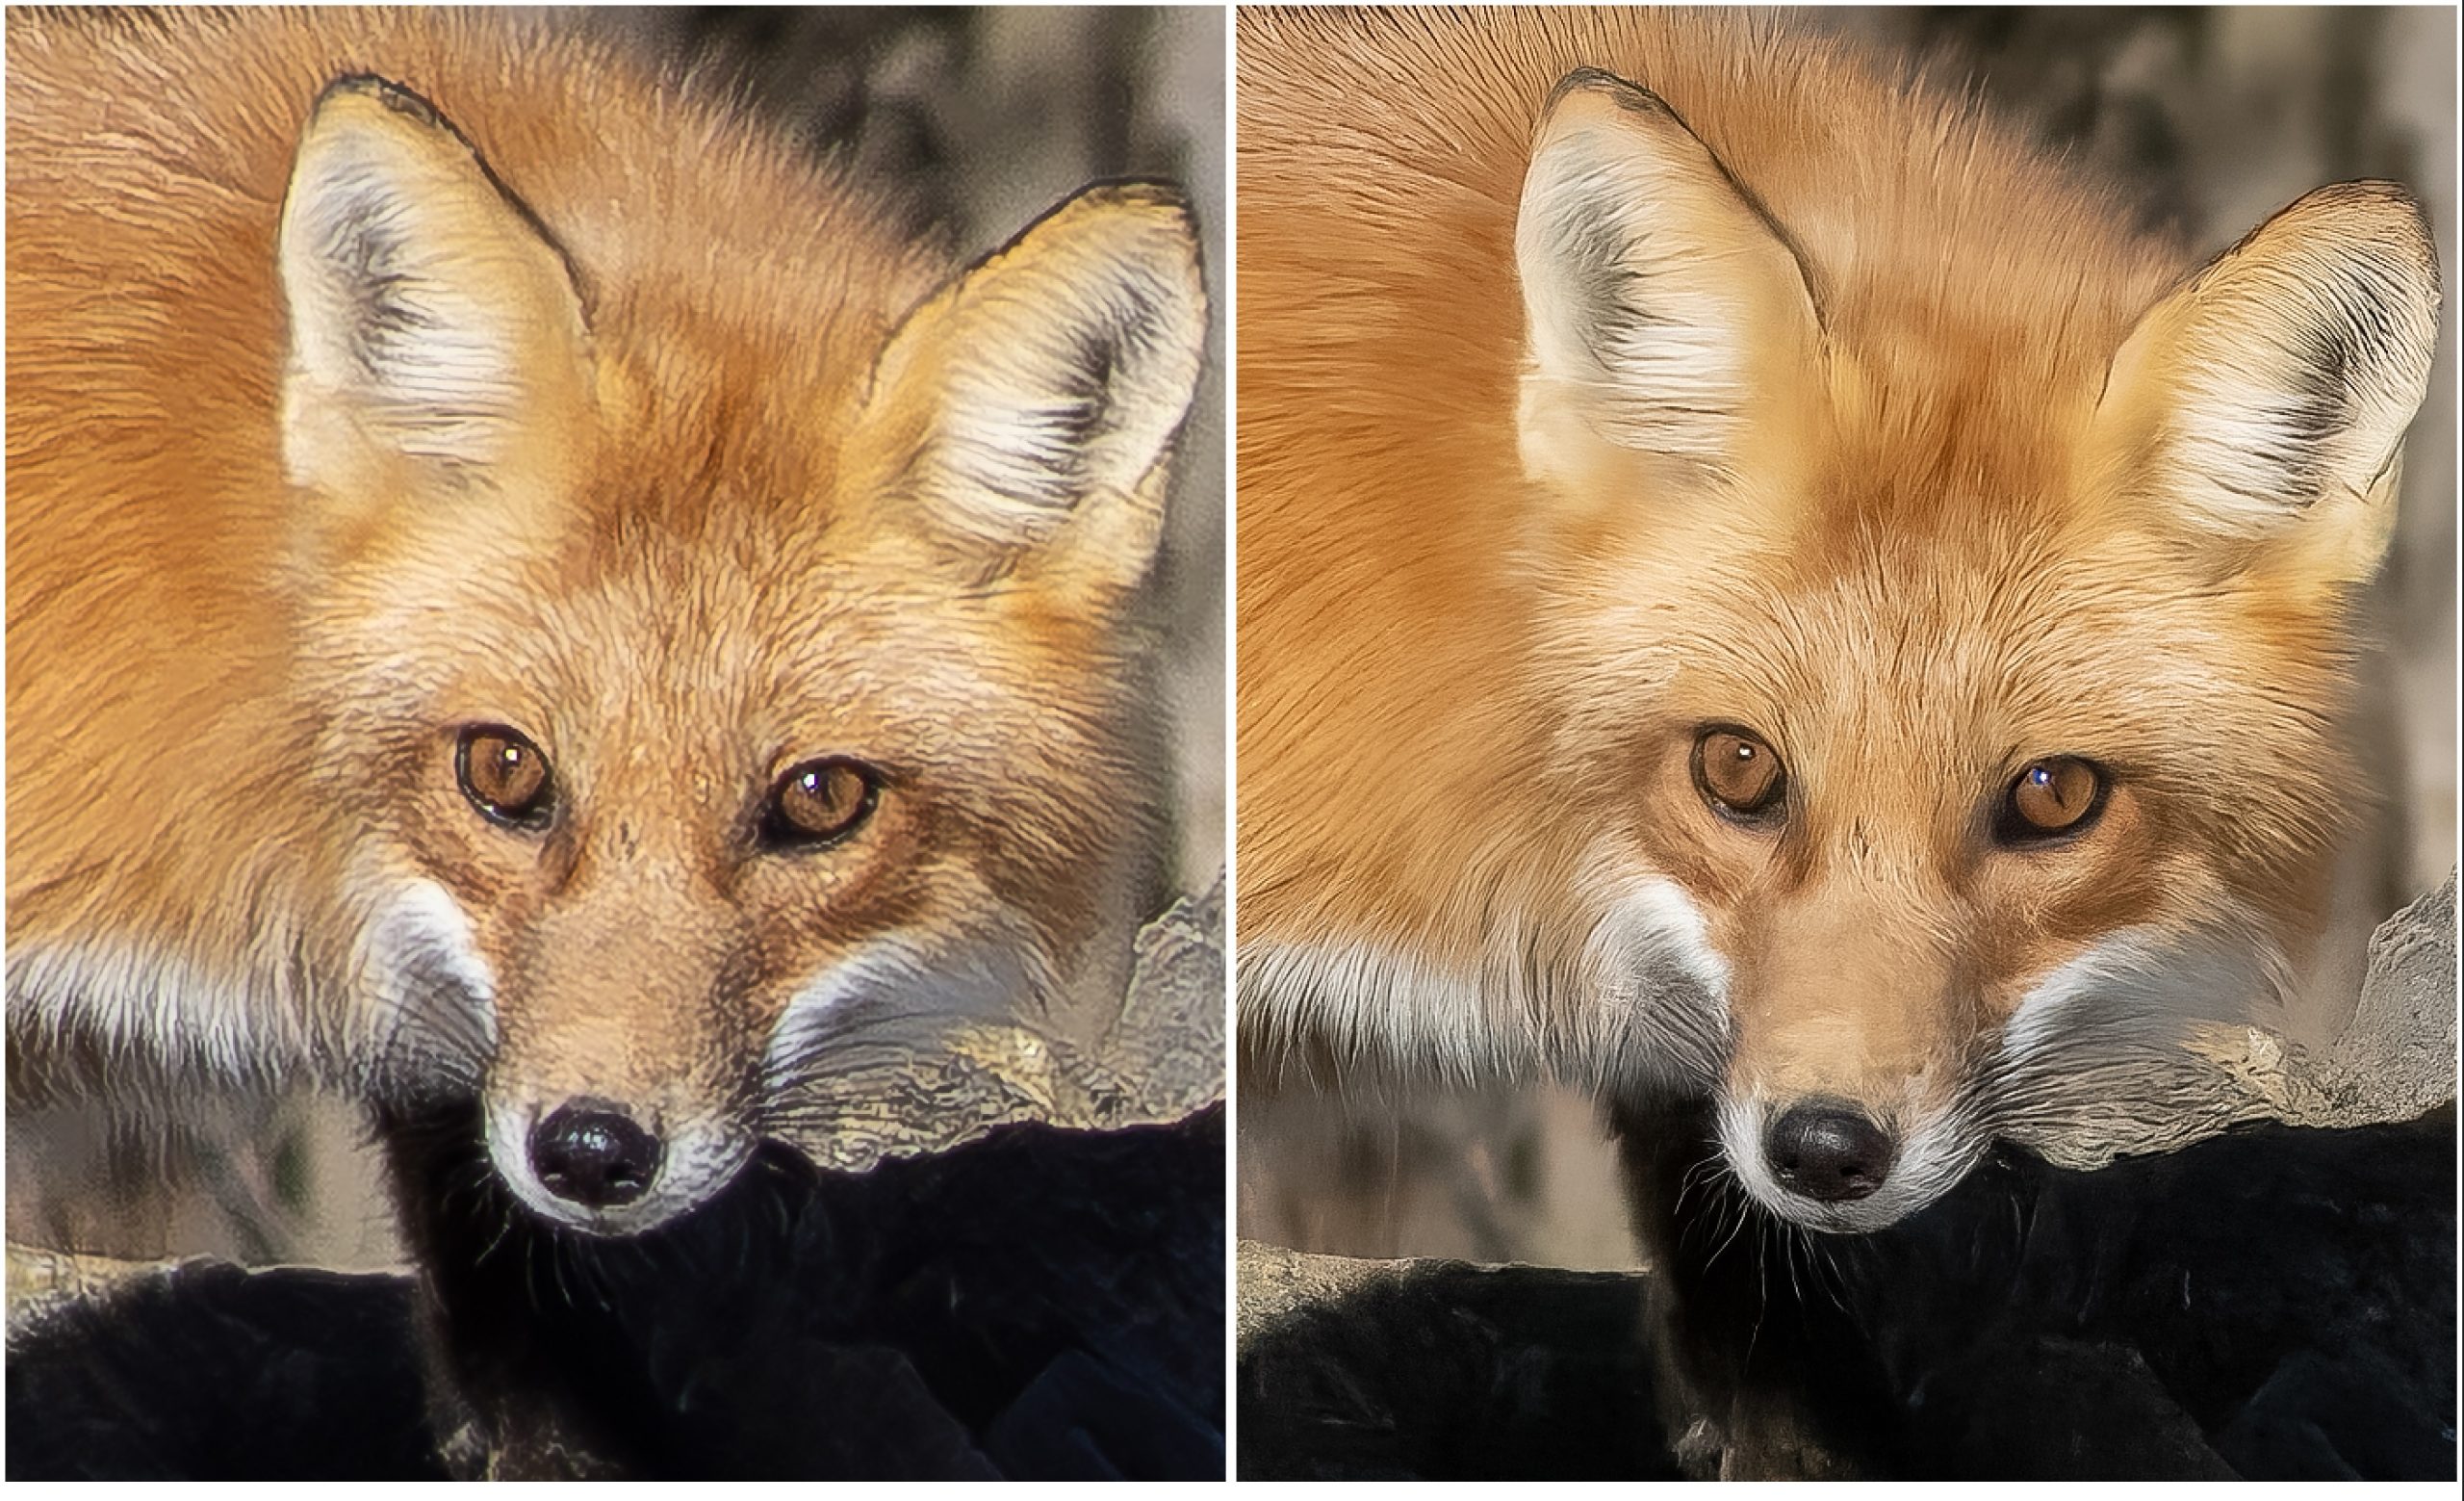
Not seen in this 200% crop are the rocks, which definitely look more natural in the Lightroom version than the Topaz version. Adding sharpening to the rocks in Topaz seemed to have made them more artificial-looking—like styrofoam movie props—compared to the Lightroom version. This can be seen in the 100% crop versions shown below.
So, while the Topaz has the initial appeal due to the fur detail, it may not pass the scrutiny of someone who is more attuned to what looks natural versus what looks artificial.
An Unexpected Surprise
The most unexpected and pleasantly surprising result came from the simple ‘Export’ from Lightroom. It produced startling good results given the quick-and-dirty method of choosing ‘JPEG’, then ‘Dimension > Custom’ and entering a pixel size double the original. And the resulting file is without any further sharpening or tweaking, just a straight JPEG export. No TIFF, no trip to another app and back, just a straight export.
Looking at the 100% crops shown below, the direct export of the Lightroom file is indistinguishable from the Super Resolution version. If you look back to the Flycatcher and Marsh Wren examples above, you will note the same—both versions are exceptional and definitely look better than the Affinity Photo resampling and the ON1 Resize version.
So, what about 4x Up-scaling?
First of all, when up-scaling by 4x, be aware of the huge file sizes produced by ON1 Resize and Topaz PhotoAI—each is over 1GB in size!! This slows everything down. Rendering and saving the files alone takes a couple of minutes on my M1 MacBook Pro. Even making JPEGs from within Lightroom takes much longer than I’m used to. However, in the case of Topaz PhotoAI, the wait is worth it.
4x up-scaling of the Flycatcher image took it from 1801px square to 7204px, large enough for a 24×24” print! Three versions were compared: the Lightroom Enhanced NR image resized during export to 7204 pixels (4x); an original ORF run through ON1 Resize using Photo Size of 400%, Noise Reduction and Sharpening; and an original ORF through Topaz PhotoAI, also using the app’s Raw Denoise and Sharpening, ending with an up-scale of 4x. All three look very good as you can see below.
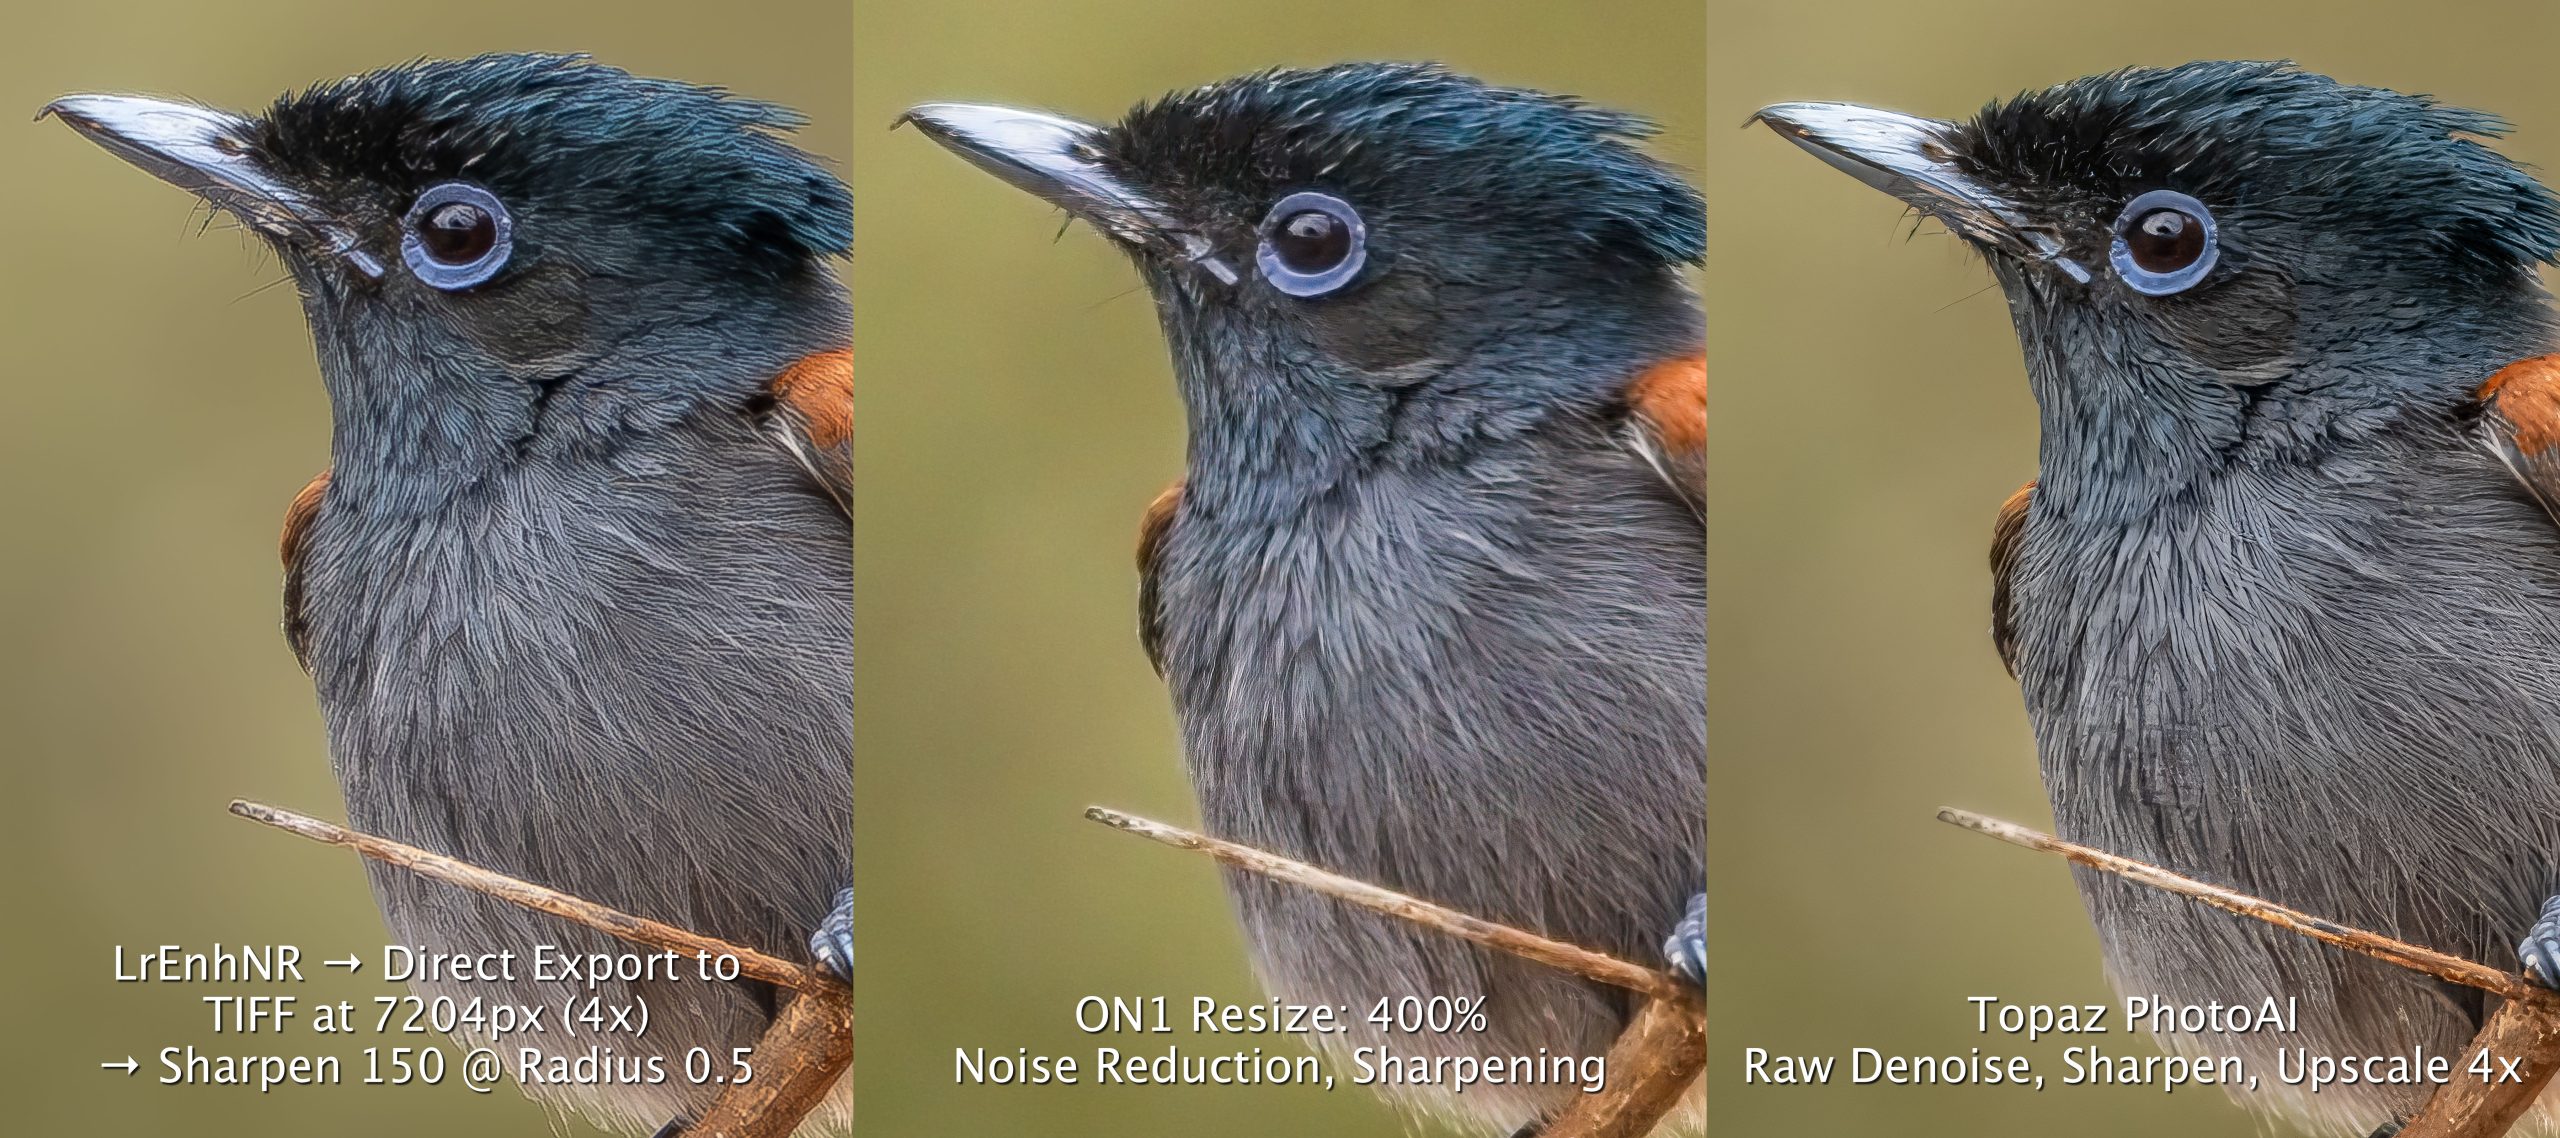
If you’re like me, it is the Topaz version that initially catches the eye as it appears more ‘crisp’ and finished. However, it is important to note that upon closer examination, it does not look completely natural. As was found in the 2x up-scale, the feathers lack micro-detail and now, up-scaled to 4x, resemble something made with clay or yarn.
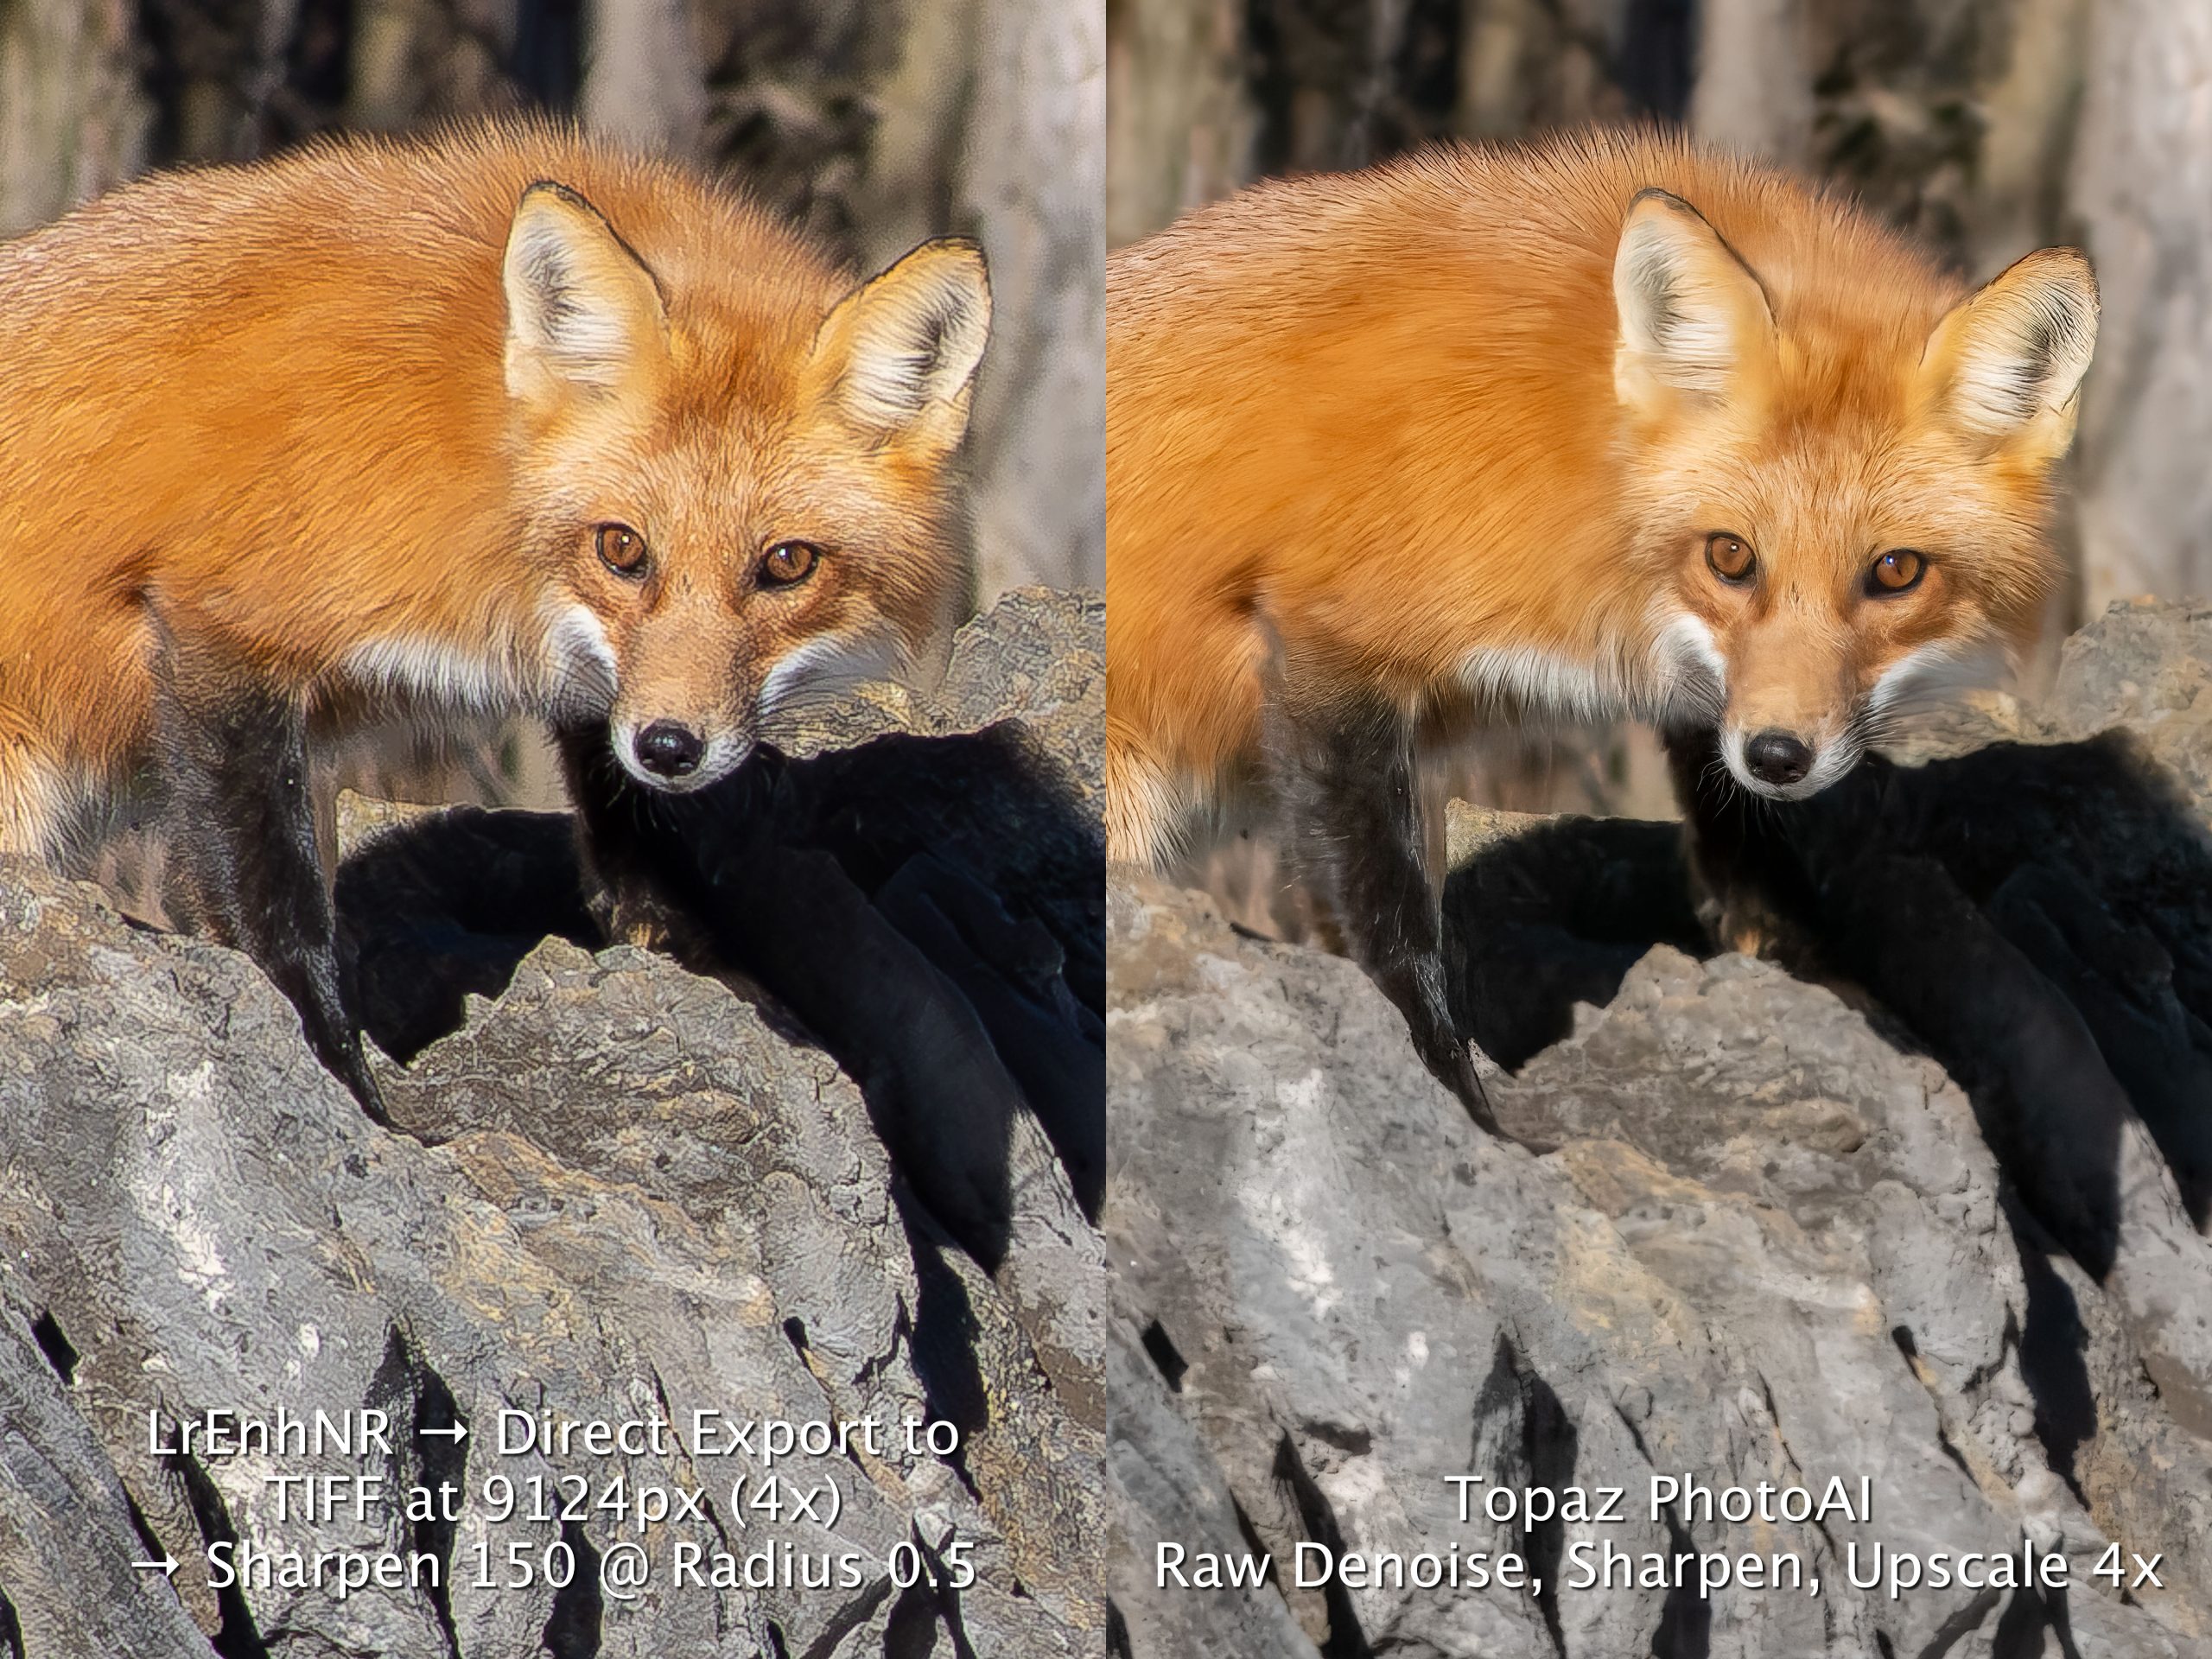
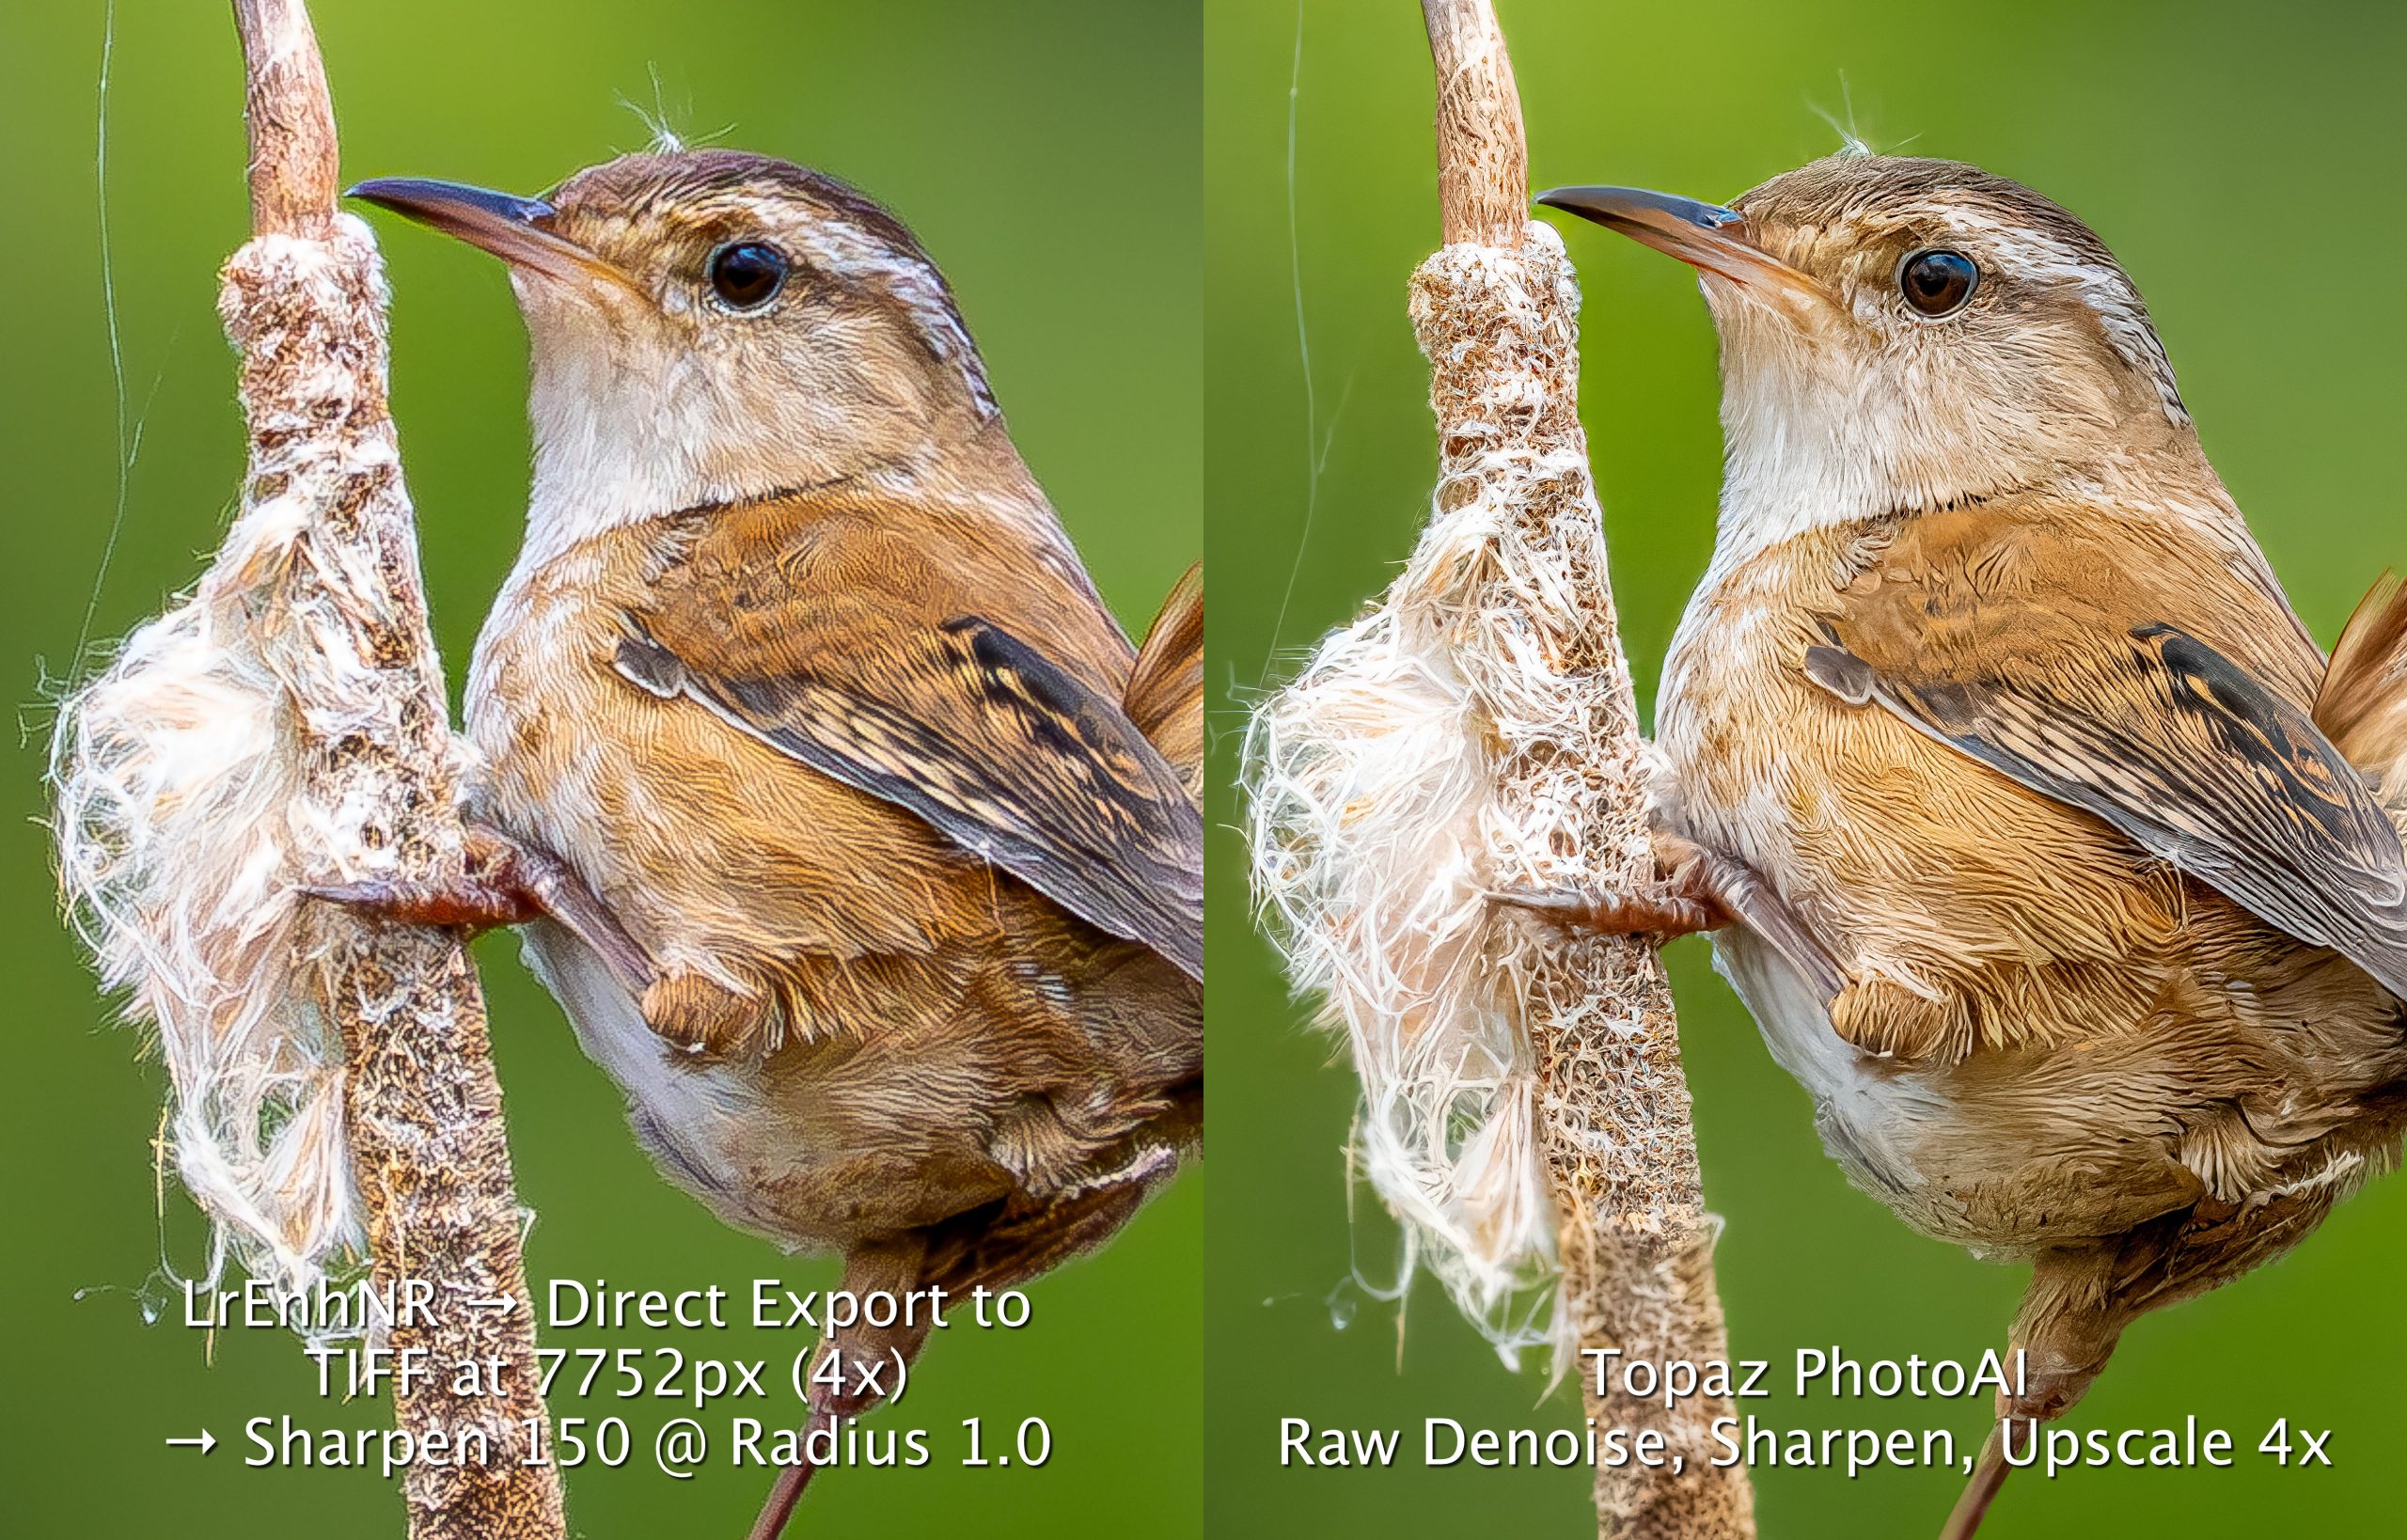
What blows me away is the quality that can extracted by thoughtful resizing of Lightroom files by simply using Export. At first, I exported the 1801px Lightroom Enhanced NR image as a JPEG using Dimension > Custom set to 7204px or 4x. It looked great except for the significant sharpening halos that appeared around the head and beak. To improve upon this, I exported it as a 7204px 16-bit TIFF with a much cleaner result.
The TIFF also meant I could add additional sharpening to create cleaner edges to the feathers. The trick was to do this without introducing a sharpening halo. I added maximum Detail Sharpening (150), which would normally ruin a good photo. But, by reducing the Radius to just 0.5 and adding a little Masking set to 16, I ended up with a superior result. To me, the feather detail looks more natural than the Topaz feather-clumping—and it was all done within Lightroom!!
I’ve always been a firm believer that Lightroom is far more powerful than a lot of photographers give it credit for. They quickly reach for Photoshop or another app to do something that can be done equally well right within Lightroom, with fewer steps and fewer trips in and out. Could this be yet another example? How well would the same technique work with the Fox and Marsh Wren?
So, what do you think?
If we weren’t comparing them side by side, it could go either way. However, both the Red Fox and the Marsh Wren appear nominally ‘better’ in the Topaz version. There are fewer sharpening artefacts in the Topaz version, specifically none of halos I see around the strands of spider web in the Lightroom version of Marsh Wren.
In the Red Fox photo, I prefer the definition within the eyes of the fox in the Lightroom version as well as the definition in the rocks. However, the fur details appear more smooth in the Topaz version. In fact, overall, the Topaz version appears smoother.
If I could combine the best of each version into one photo, the up-scaling would be indistinguishable from the original.
Conclusions and Discussion
Bottom Line: If you begin with a sharp photo, three of the five up-scaling methods produce excellent results: Lightroom Super Resolution, Lightroom direct Export, and Topaz PhotoAI. In fact, I would wager that if they weren’t side by side, you may have difficulty noticing that any of them have been up-scaled. I’m not saying one isn’t better than another, but rather, they are so close and of such good quality, that as a full-page image in a photo book or as a print hanging on the wall, viewers might not realize that any of them have been up-scaled. This is significant, as now we can be assured of high quality prints from relatively small crops.
With both the Lightroom and Topaz results, smooth areas are still smooth, not granulated, and the fine details of fur and feather were maintained where possible. The only differences are the variations of ‘natural-looking details’ in the Lightroom versions versus more ‘manicured details’ in the Topaz version. The most appealing version with come down to personal preference.
Perhaps, as I mentioned above, the two images could be imported, stacked and aligned, then the worst parts of each could be masked or erased, producing a photographs with the best of both worlds. Food for thought.
Workflow Differences
Of the three workflows, the easiest is the direct export from Lightroom. Three clicks and its done, barring the need for additional micro-sharpening as described above. Once the Enhanced NR work is done on a laptop or desktop, the rest can be completed using only an iPad, my preferred editing platform.
The next smoothest workflow is with Topaz PhotoAI. Masking areas to sharpen and each of the modules are far more intuitive to use than with ON1 Resize. I also appreciate the light mode grey user interface. I don’t like I’m looking down a dark corridor at my image. I see only three improvements:
- find a way of reducing the ‘clumping’ of feather details to maintain the micro-detail of the Lightroom versions.
- allow the user to dial in the amount of sharpening for different masks; e.g. Red Fox 100%, stone wall 50 to 75%;
- allow the use of Undo (Cmd/Ctrl+z) and Redo (Shift+Cmd/Ctrl+z) when adjusting slider values. This would allow me to toggle back and forth between two options without taking my eye off the screen.
ON1 Resize is good, but I think it suffers from building in too many options. There must be a dozen different presets and another dozen ways to sharpen an image, all of which cater to specific needs, but none of which does a better job than the Lightroom workflow or Topaz. Also, I don’t find the ON1Resize layer masking to be the least bit intuitive, unlike both Lightroom and Topaz. As well, I feel like I’m always having to click through modules and options far more than with Lightroom and Topaz.
Using Affinity Photo Lanczos3NS is a bust. While it maintains some fur and feather detail, it loses on smoothness where it is needed; e.g. out of focus backgrounds look granular. One could make an argument for a ’film effect’, but if you want grain, it is easy enough to add it in Lightroom (Effects > Grain).
So, overall, if you have Lightroom and learn how to tweak the sharpening of TIFF files, you are in business. If you want to up your game from a 9 to a 9½, then use Topaz. If you want a 10, use both, then colour match, stack and align them before masking out the less desirable areas of each image. It all depends on how much time you want to devote to perfecting your photograph. If it will be hanging on a wall for a few years, then it may be worth the extra time, that is, if you think people will actually notice the difference.
Addendum
The $64,000 Question: Why bother up-scaling 20MP M43 files when much larger 35mm sensors are available?
Good question. And one I get a lot. Bottom line: even with the top of the line 61mp Sony, the same shot using the same telephoto focal length would still need to up-scaled—and by a larger value! What a lot of people don’t realize, especially those using a 35mm sensor camera, is that when suing the same focal length telephoto, say a 400mm, a 20mp OM-1 puts more pixels on the subject than even the highest-pixel 35mm sensor!
That’s right, folks.! You heard it here first.
Let’s take the Marsh Wren photo as an example. It was spring and the bird was skittish. In my canoe, this was the absolute closest I could get. I did not want to jeopardize any nest-building or mate-attracting activities that were going on, so I kept my distance.
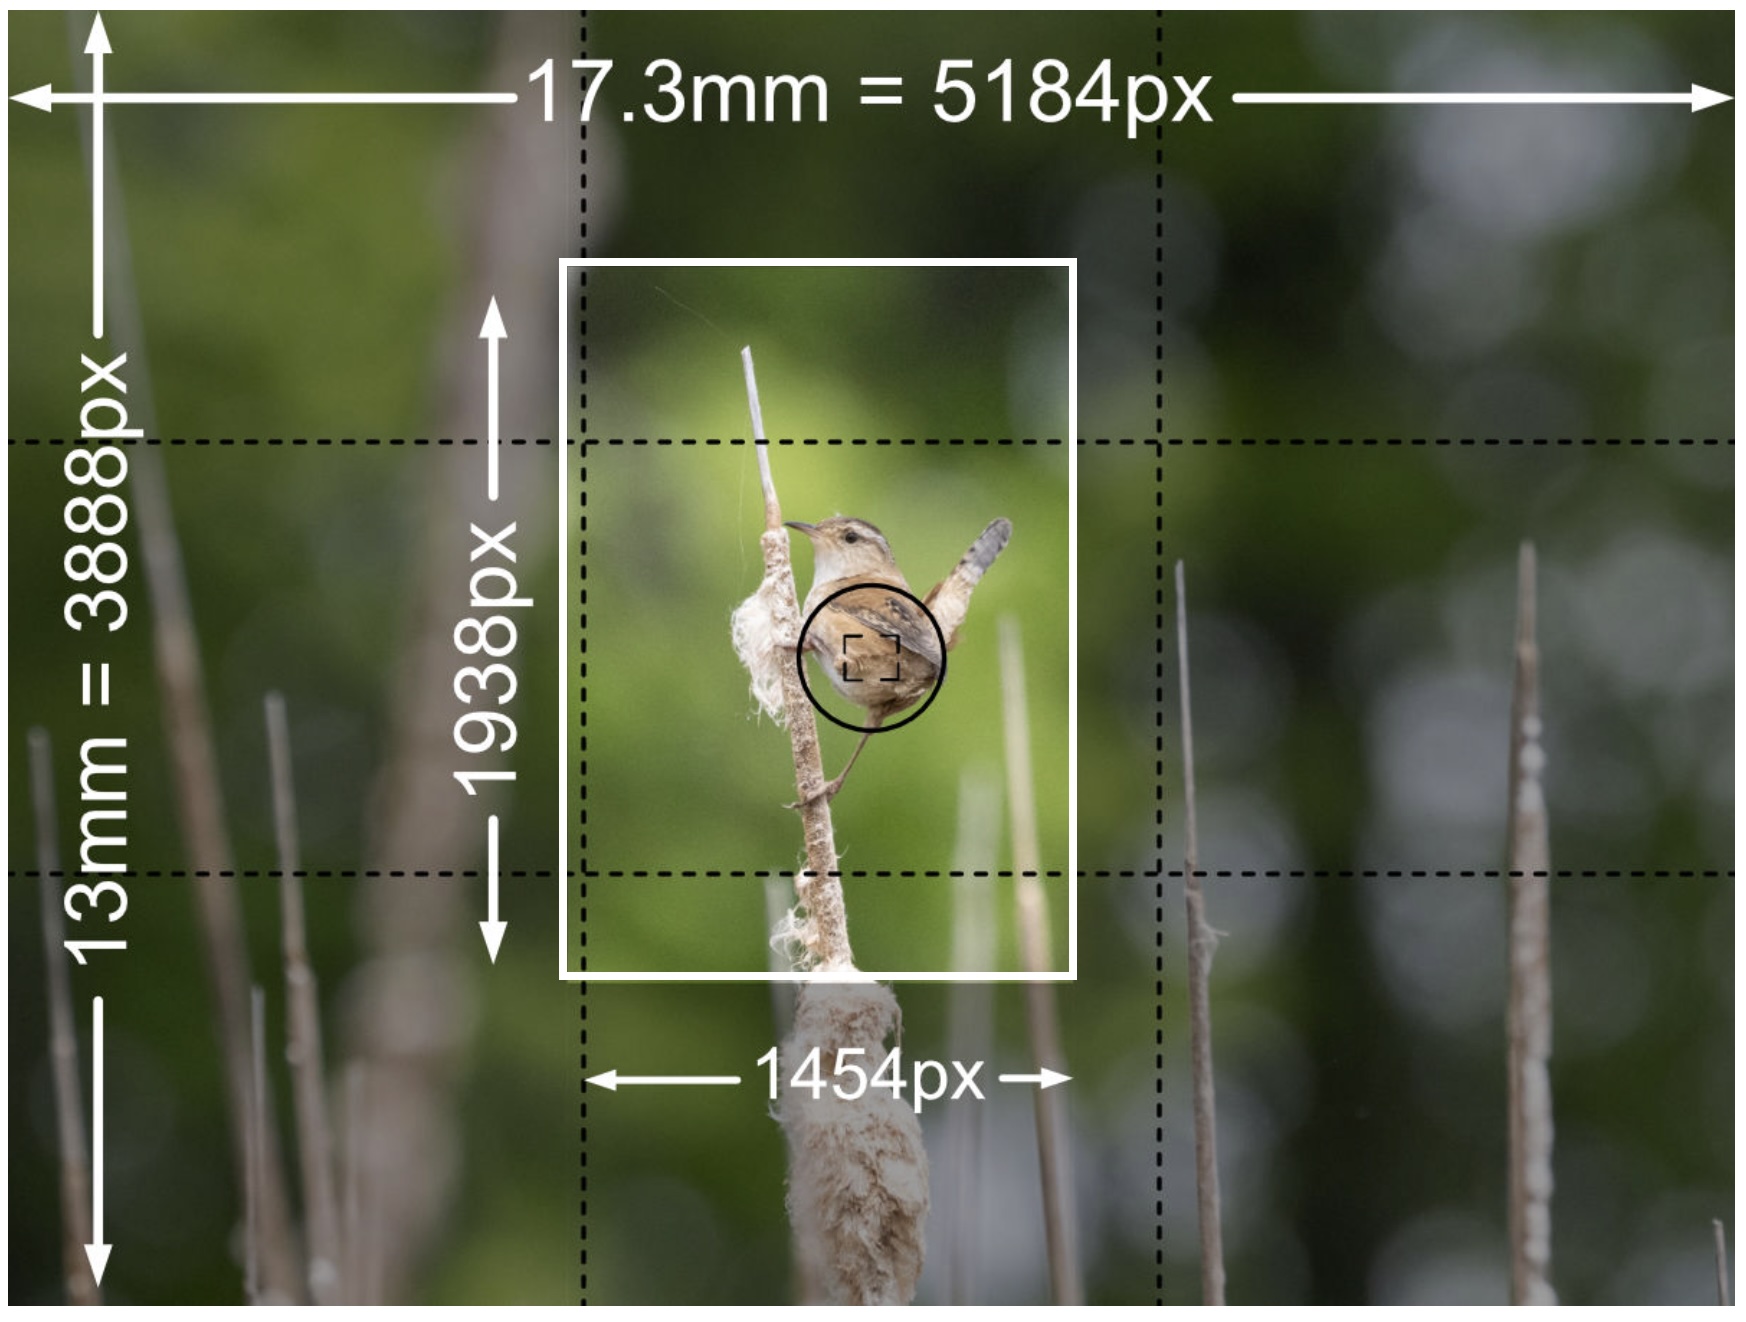
To the right is the original, unaltered, raw file as it looked through the viewfinder, showing the 1434x1938px final crop as presented in the photos above. This covers just 4.8mm x 6.47mm of the sensor area. At the same focal length, the area of any sensor covered by the subject is identical. So, when that same area of 4.8mm x 6.47mm is mapped onto the 61mp Sony sensor, it equates to only 1278×1722 pixels—or about 20% fewer pixels. With the 46mp Nikon or 45mp Canon, there would be even fewer pixels on the subject.
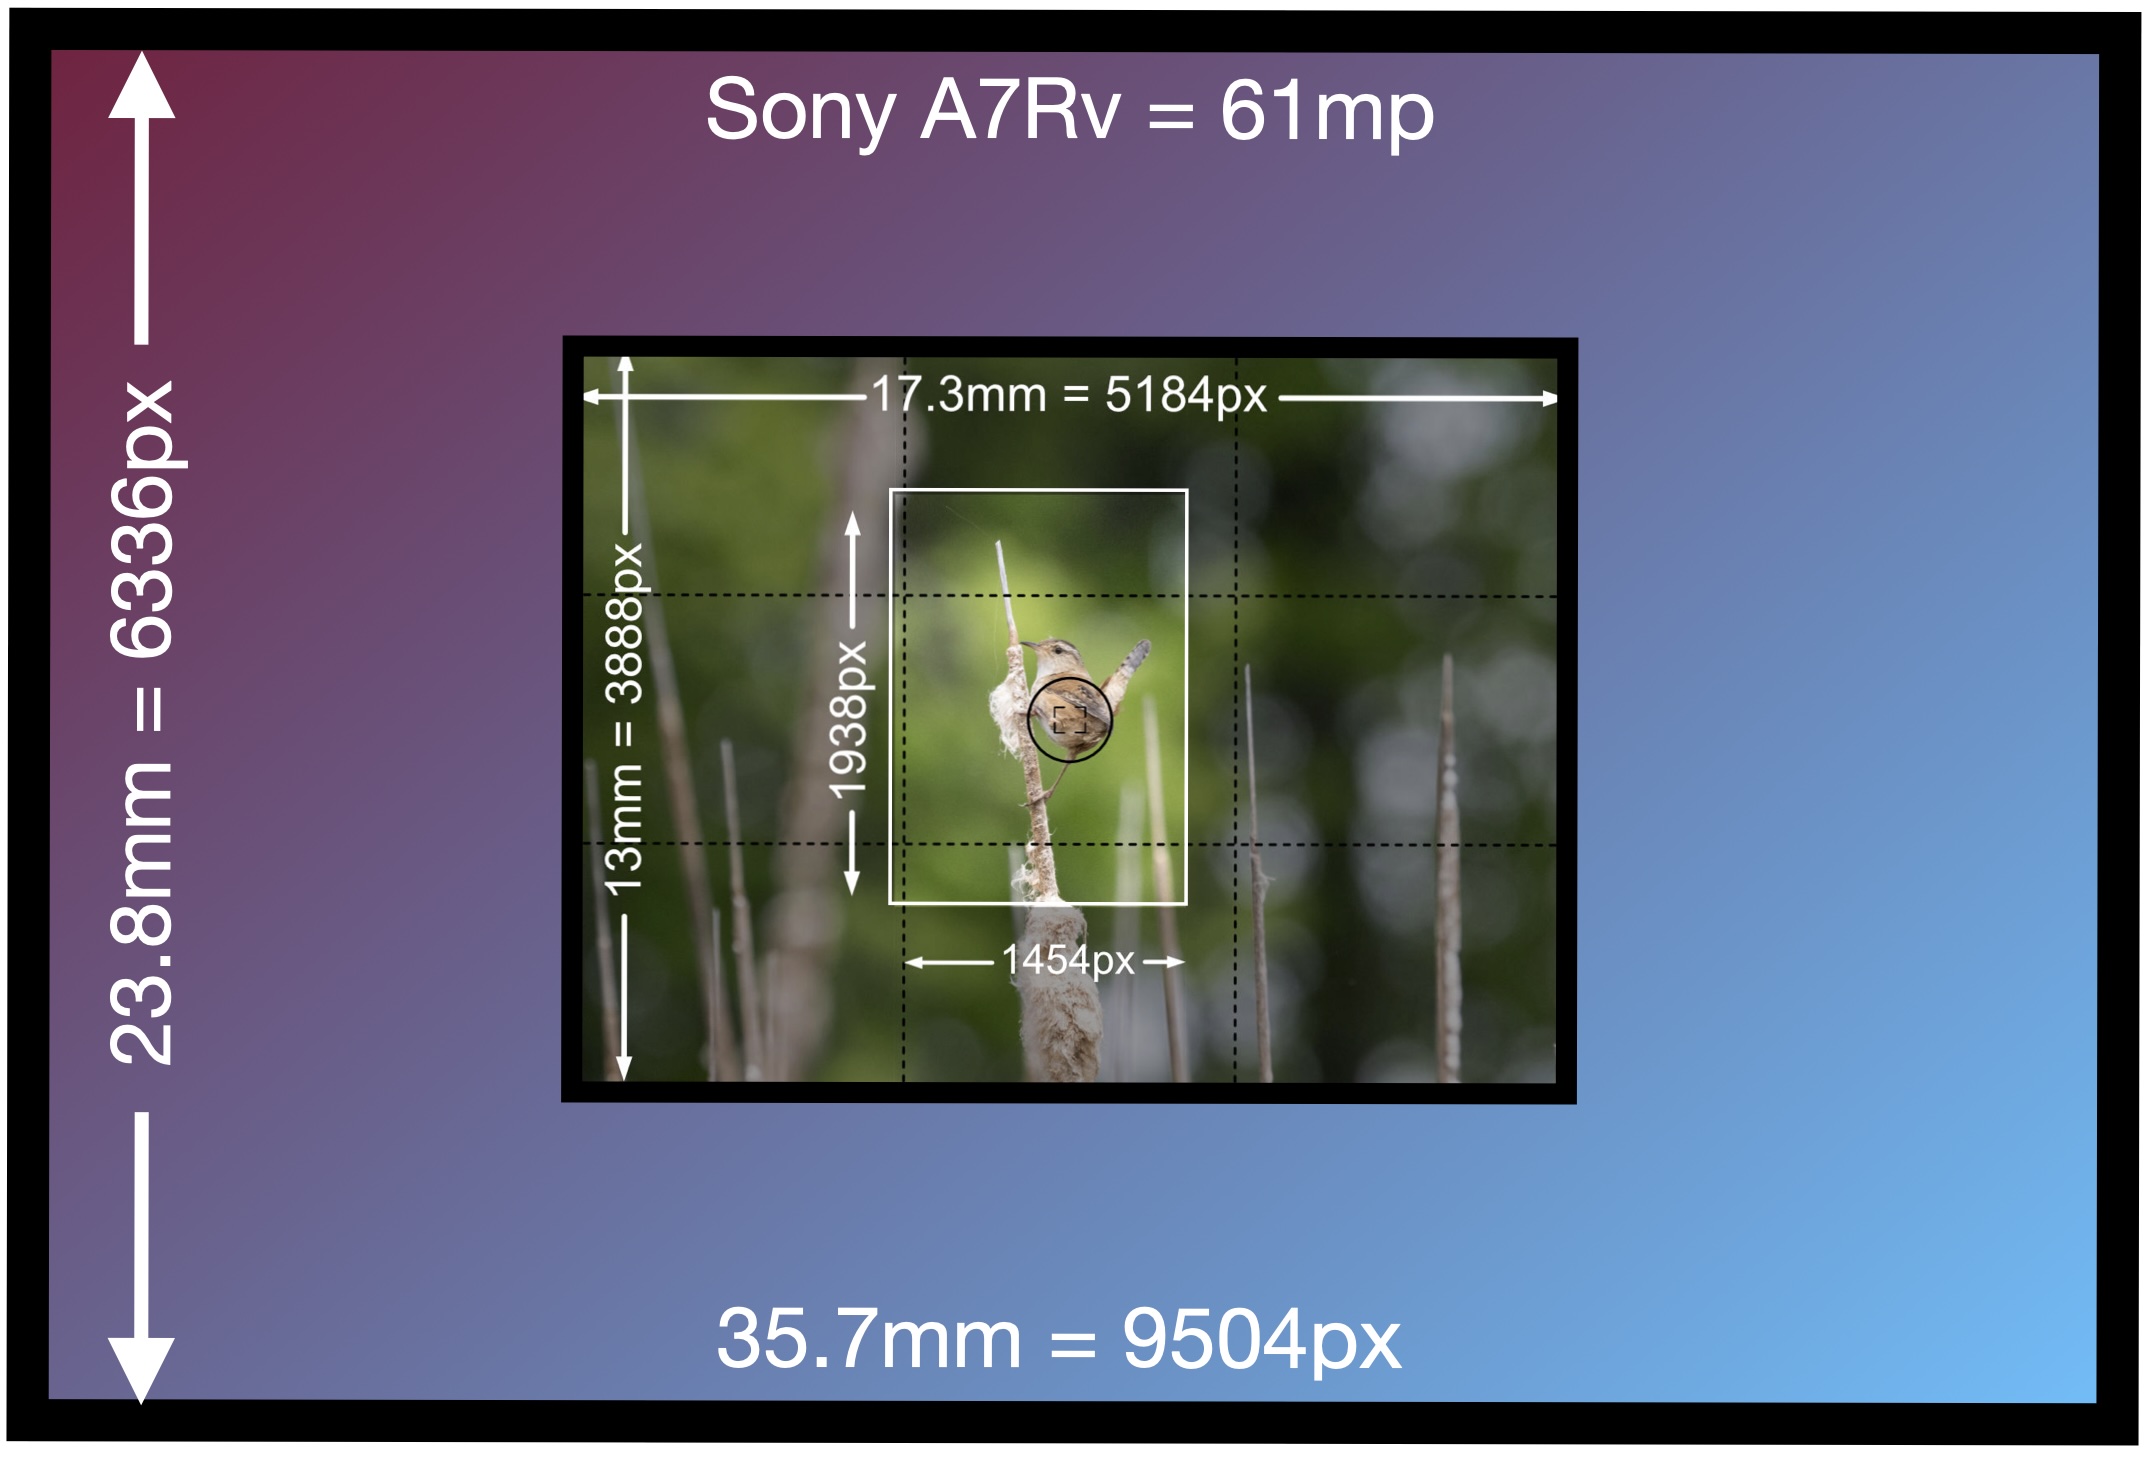
It’s not magic, it’s pixel density. While 35mm sensors have more pixels, the photo receptors are less densely packed. Since The OM-1 has more photo receptors per mm of sensor, it puts more pixels on magnified subjects, shot with both telephoto lenses and macro lenses.
Granted, if you can get closer with a 35mm sensor camera, you will get more pixels. But that is not the reality for any of these images nor is it the reality for a great many photographers who don’t have hours or days to track wildlife or sit in blinds for birds.
The question then becomes: if you can’t get closer, why not use a longer lens on a 35mm sensor camera? I would, if I could afford it. Remember, the M43 ’2x crop’ factor means that a 400mm lens on the OM-1 gives the same field of view as an 800m lens on a 35mm sensor camera. So, I would need an 800mm lens on the Sony to get the same framing as on the OM-1. Given my income, that’s not going to happen. The 61mp Sony A7Rv with a 400-800mm lens would cost about $9500 (CAD). My OM-1 with 100-400mm zoom (200-800mm equivalent field of view) is $5300—about the same cost as just the Sony camera body.
We are constantly bombarded with messaging that says 35mm sensors are better. ’Bigger is better’. They are, but at a cost. Spending $9500 to actually take advantage of that larger sensor is simply not the reality for a great many photographers. And, handholding the 100-400 with the OM-1’s industry-leading stabilization means more, sharp, ’keeper’ shots.
So, using a M43 sensor is no longer a trade off. When birds and wildlife are keeping their distance, up-scaling is and excellent alternative to buying big glass.


Elevate Your Vision


Read this story and all the best stories on The Luminous Landscape
The author has made this story available to Luminous Landscape members only. Upgrade to get instant access to this story and other benefits available only to members.
Why choose us?
Luminous-Landscape is a membership site. Our website contains over 5300 articles on almost every topic, camera, lens and printer you can imagine. Our membership model is simple, just $2 a month ($24.00 USD a year). This $24 gains you access to a wealth of information including all our past and future video tutorials on such topics as Lightroom, Capture One, Printing, file management and dozens of interviews and travel videos.
- New Articles every few days
- All original content found nowhere else on the web
- No Pop Up Google Sense ads – Our advertisers are photo related
- Download/stream video to any device
- NEW videos monthly
- Top well-known photographer contributors
- Posts from industry leaders
- Speciality Photography Workshops
- Mobile device scalable
- Exclusive video interviews
- Special vendor offers for members
- Hands On Product reviews
- FREE – User Forum. One of the most read user forums on the internet
- Access to our community Buy and Sell pages; for members only.
You may also like