Introduction
This is a printer many photographers have been waiting for: a machine which includes all the technological advances in head design, print algorithms and ink formulation of the 7900/9900, in a 17 inch configuration with a roll-holder. In the 4900, Epson has produced all of that and more. It is a desktop printer, but that said, Epson has stretched the concept of “desktop” to its likely limit – make no mistake about it – weighing-in at 115 pounds and occupying 5.6 square feet of table space, this baby is BIG.
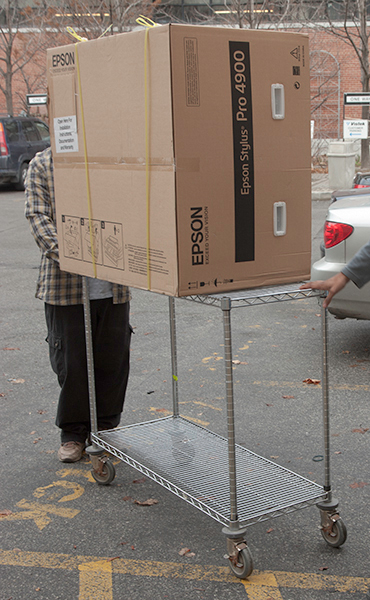
Figure 1. On the Cart
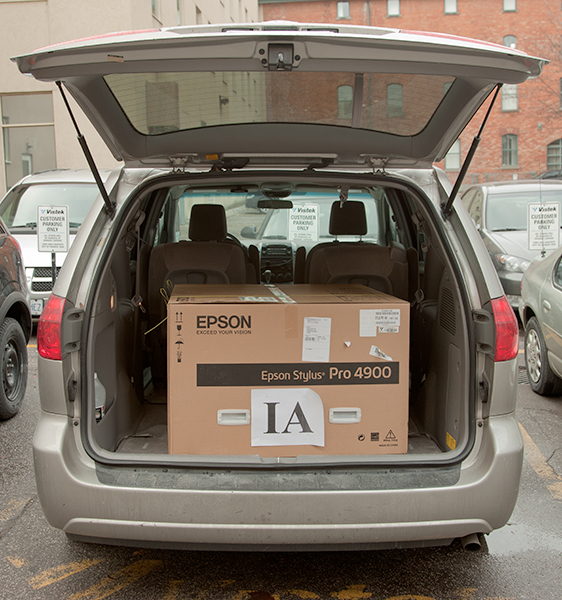
Figure 2. In My Trunk
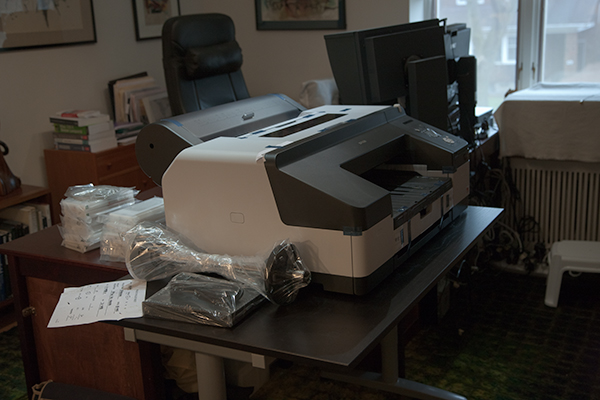
Figure 3. In the Office
As Epson advises to hang-on to the packaging “just in case”, I’ve done that too:
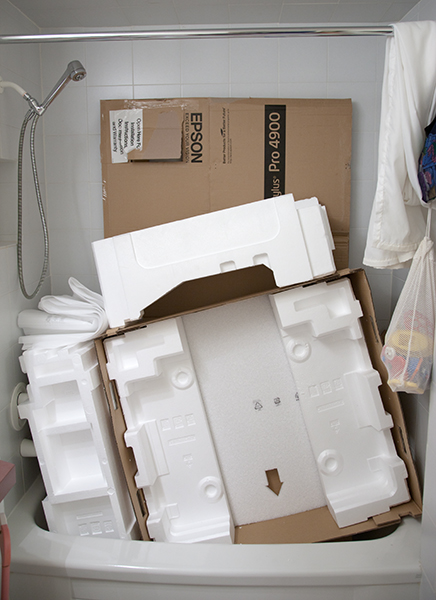
Figure 4. Hang-on to the Packaging
Yes, we have another bath/shower in the house.
OK it’s a big printer; with the logistics out of the way, what else should we do here? People with different objectives will be reading this article. Some may be thinking of up-grading from a 3800/3880, others may be in the pro printer market for the first time, others may be thinking of switching from another brand altogether. I can’t compare this printer with models from other manufacturers, because I haven’t used them. I can make several comparisons with my Epson 3800.
I shall focus here on the key questions that I think are of most interest to most people, based on discussions in web forums and elsewhere over the years:
– Is it easy enough to install and get operational?
– What improvements of colour print quality have there been over relevant comparators?
– What about Black and White print neutrality?
– How user-friendly is it?
– How is it on ink consumption and how much does it cost to make a print?
– How mechanically reliable is it?
This is an experience and analytical report based on eleven days of usage; it is not a regurgitation of features and specs available on Epson’s website, nor a “how to” manual on the printing process, but I do cover some “how-tos” where they are needed to explain important process points. I do not cover the spectro-proofing option, because I did not purchase it.
Installation
In a word – seamless; (my experience on my Mac Pro, using the USB cable directly connected to the computer. I did not try a LAN hook-up and I am off Windows, so I cannot report on those options.) Follow the instructions in the manual in the exact sequence of steps they provide, and it installs and works. The only heads-up I would add is that on Snow Leopard 10.6.4. I did need to re-start the computer for the printer to show-up in the Print and Fax folder of System Preferences, and this is necessary. Once the set-up is complete, it is ready to use. The set-up process takes its own time, because it must prime the delivery tubes with ink. Ah-hah! More about that in the Economics 101 course later-on.
Colour Print Quality
This is a very difficult subject to illustrate on a website, because to appreciate what’s said you really need to see the prints. Then there is the perennial issue of measurements for print quality versus visible print quality and which matters more to you. And then there are the various attributes of print quality, the major ones being detail rendition, colour gamut, colour accuracy (including gray), and smoothness of tonal gradations. I’ll move this discussion from the measurement stuff through to the visual impressions, comparing here the 4900 with the 3800.
This discussion can’t be handled without an excursion into printer profiling, because it is through the printer profiles that we measure the measurable, and these profiles happen to be a major determinant of print quality. If you are printing through Photoshop or Lightroom and letting these applications manage the colours (not the printer driver) you need to tell the colour management system which printer/paper profile to use. Every paper must have its own profile for the given printer model. Epson supplies a complete range of high quality profiles for all of its papers, and these are included in the driver software which we install when setting-up the printer for the first time.
People not using Epson papers must pop an appropriate profile into the operating system’s colour management system for the paper they are using. Normally, there are three ways to obtain these profiles: (i) from the paper manufacturer, (ii) you print a profiling target with no colour management and send it to a person who makes custom profiles, or (iii) same as (ii) but you are equipped to read the target and make the profile yourself. I’m in category (iii), I print on Ilford Gold Fibre Silk (IGFS), hence I generated my own profile to use this paper in the 4900.
But just out of curiosity I wanted to see whether I could get away with using my 3800 IGFS profile for printing in the 4900. As Figure 5 shows, I can’t. And this also demonstrates the fundamental importance of good, correct profiles for making good prints.
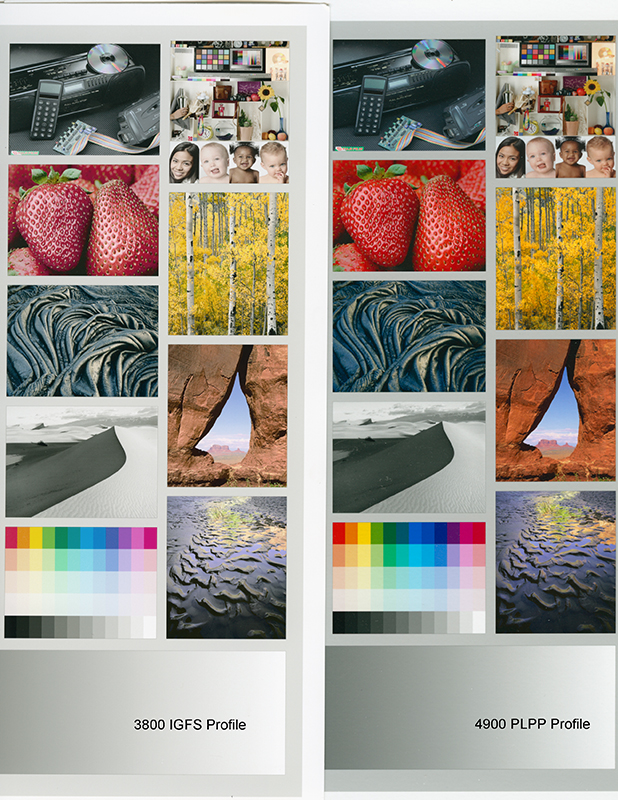
Figure 5. Wrong vs. Correct Profile – Bill Atkinson Printer Test Page (part)
The left side is the result of using the 3800 profile in the 4900 with IGFS. The right side is the result of using the 4900 Premium Luster profile. You can readily see how desaturated and washed-out the left-side images of Bill Atkinson’s printer test target look, compared with those on the right side. This demonstrates of course that the printing characteristics of the 4900 are very different from the 3800, as to be expected, given the new Ultrachrome HDR inkset and two additional colours.
The first step in creating a custom printer/paper profile is to print a file containing a target of patches provided with the profiling application, with all colour management off so that once measured, the printer’s native behaviour is characterized. This became problematic with Snow Leopard because Apple disabled the ability to turn off colour management in ColorSync. As a result, that combined with other factors caused Adobe to stop providing a “No Color Management” option in its PSCS5 Print dialog for both Mac and Windows versions. But Adobe has now produced a free downloadable application for printing these targets in a manner replicating the result of the former No Color Management option. Using this application is very easy: you select the profiling target image in TIFF format, make several settings in Page Set-Up (printer, paper size and orientation) and then click Print. This pulls up the Epson driver, which allows you to make the necessary driver settings and then you click Print. The profile targets print correctly for measurement and profile creation.
I use the discontinued, but still excellent, X-Rite Pulse Elite spectrophotometer and software for making paper profiles. The good news for Pulse Elite owners is that even though X-Rite does not support it, the DTP-20 and the Pulse Elite profile-making application both work fine on Mac OSX 10.6.4. The best target in this package is a two-sheet 729 patch target, which is ample for generating highly satisfactory printer profiles. With custom profiles in hand for the same paper and both printers, these profiles can be read in ColorThink Pro for providing measurements that are useful for comparing the relative capabilities of the printers. The first and most informative data are the gamut volume measurements, shown in Figure 6.
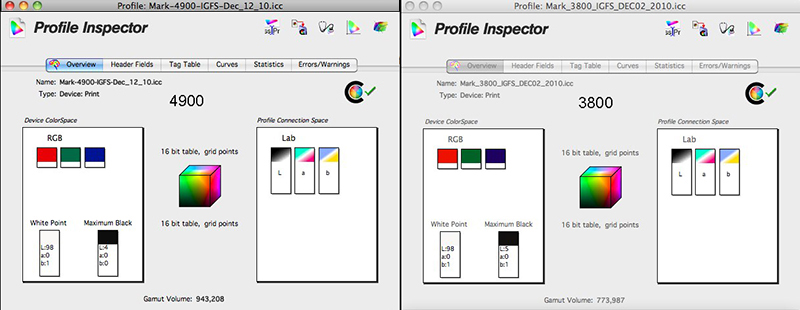
Figure 6. IGFS Gamut Data: Epson 4900 vs. Epson 3800
The gamut volume of the 4900 profile is 943,208 versus 773,987 for the 3800 profile, an improvement of about 22%. This means that the 4900 is capable of producing more saturated hues. As well the DMax and neutrality for the 4900 profile is slightly better at L*4, a*0 and b*0, versus L*5, a*0 and b*1 for the 3800, though in these latter respects the differences would not be noticeable in prints.
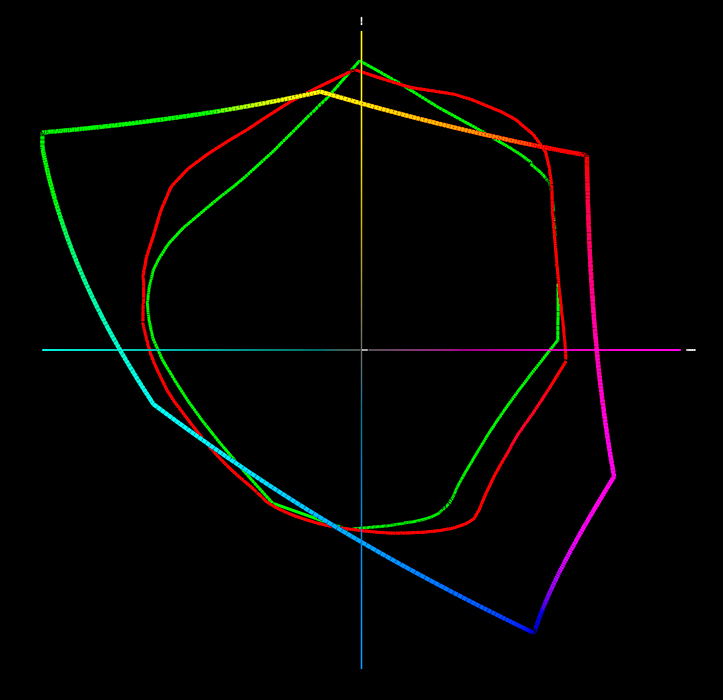
Figure 7. Gamut Map: ARGB(98), Epson 4900, Epson 3800
Figure 7 compares the gamut shapes of ARGB(98) (multi-coloured), the 4900 (red) and 3800 (green) profiles. Here one can see that the 4900 gamut largely exceeds that of the 3800 (though they are very close for some parts of the spectrum) and therefore fills more of the ARGB(98) gamut – actually exceeding it in the yellow and part of the blue areas of the spectrum. This demonstrates yet again the wisdom of doing one’s image editing in wide-gamut colour spaces, because as the printers improve, these files will be able to deliver all the colour the printers can reproduce.
I considered it also useful to compare gamut volumes between the 4900 and 3800 printers for Epson’s own Premium Luster paper (PLPP) profiles, hence I unbundled them from the driver package and had them also analyzed in ColorThink Pro. The results are shown in Figure 8.
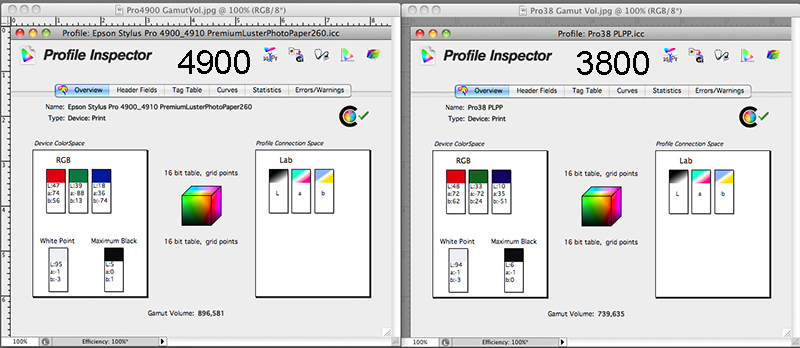
Figure 8. Premium Luster Gamut Volumes, Epson 4900 vs 3800
Here again, the 4900 gamut volume at 896,581 exceeds that of the 3800 at 739,635, a difference of about 21%, and for both, the gamut of both printers on IGFS paper is somewhat larger than it is on PLPP. DMax at L*5 (4900) and L*6 (3800) is also one notch below that of IGFS, while still showing the 4900 with slightly greater DMax than the 3800 on PLPP too.
The last comparative gamut plot I show here of general interest to colour management is one which compares my NEC PA271W display with the Epson 4900 (red) and the ARGB(98) colour working space (Figure 9). Observe how the display gamut and ARGB(98) are quite closely matched (as they are meant to be), and how the 4900 printer gamut exceeds both in part of the spectrum. The significance of this little demonstration is that with the steady improvement of Epson’s printer gamut, the case for using a wide-gamut display is strengthened.
Figure 9. Gamut Map: NECPA271W, ARGB(98) and Epson 4900
So having seen these measurements, the next question is what they mean, comparatively, between the printers in “real-world prints”. Well, the answer is “not much”, but that answer may depend on the images being compared. It also means that the Epson 3800 reached such a high standard of print quality that we weren’t likely to see earth-shattering, in-your-face advances per new model release since then – and indeed I did not. Here is where readers will have to take my word for it, because you cannot see the prints over the internet.
I studied the Atkinson printer target test page as printed in both the 4900 and 3800, and I made a comparison print in both printers with their respective IGFS profiles of a colourful scene with lots of punch and tonal range, shot last Fall in Letchworth State Park, South of Rochester New York (Figure 10).

Figure 10. Letchworth State Park, New York, October 2010; co. Mark D Segal
The usefulness of the Atkinson printer test page is that it tests for everything – gamut, wide saturation variances across the colour spectrum, smoothness of tonal gradations, DMax, the works. The usefulness of the Letchworth image is that it is a fair-weather shot without exaggerated saturation, a large variety of hues, considerable micro-detail and deep shadow areas. Looking at these images side-by-side, I would have easily confused them had I not written their source identities on the back of the prints. That said, I did observe a slightly more accurate sky-blue rendition in the 4900 print, but it isn’t a “knock-me-over” difference. This doesn’t mean, however, that “real-world” image quality differences between these two printers would never occur; given images heavily weighted with hues which challenge the gamut limits of a 3800, they should look better on a 4900.
The tests and observations I report here also attest to the consistency of the printer/paper profiling process and its outcomes between the two printers, which I was happy to see, because that is what colour management is supposed to do – facilitate the production of consistent, predictable and repeatable results across devices.
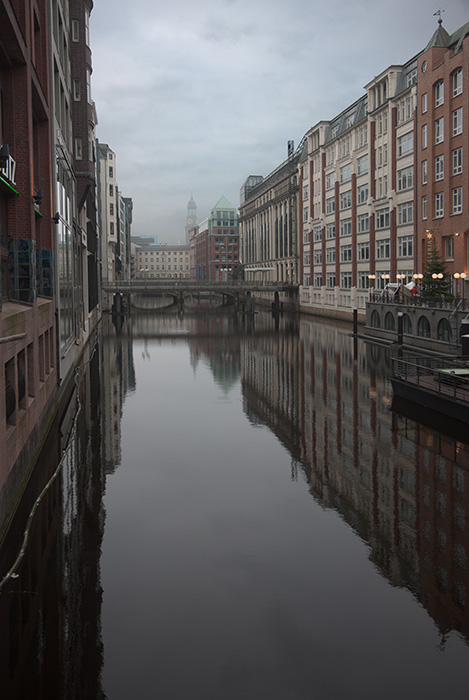
Figure 11. Hamburg, November 2010, co. Mark D Segal
The subtlety of tonal rendition from the 4900 is impressive. The print of Figure 11 is particularly revealing in terms of the smoothness of the tonal gradations in the canal and the sky, and the very refined treatment it rendered of the subtle hue shifts in a generally grayish sky.
Finally, the printer’s rendition of shadow detail, at least on IGFS paper, is remarkably good. To put it in numbers, tonal transition over the range of L*4 to L*8, for example, is clearly visible on paper, meaning that the printer is rendering fine distinctions of very dark tones. This will be better observed on display in relation to the following discussion of grayscale (B&W) printing.
Black and White in the 4900 – How do You Like Your Neutrals?
There are essentially two ways of printing a grayscale image in Epson professional printers: (i) convert it to grayscale in Lightroom or Photoshop, and send the result to print as a normal RGB image in the usual way (Photoshop Manages Color), or (ii) use the Epson driver’s ABW mode to print an image in grayscale which has or has not been converted to grayscale in Photoshop or Lightroom. In this mode, the Epson driver manages the grayscale conversion. Softproofing it is not possible, as there are no ABW profiles for the 4900 of the type that Eric Chan created for the 3800. Nonetheless, I tried both approaches and measured the outcomes directly off the paper with my DTP-20 spectrophotometer, reading the results into the “Color Scratchpad” of ColorShop X. (This application also shipped with the Pulse Elite package, but unlike the profiling software, it is not OSX Snow Leopard compliant and never will be, so I had to fire-up the older Windows XP computer for this exercise. No matter.)
I went about examining the printer’s B&W qualities with two kinds of images – a purpose-built neutral gray eleven step scale from paper white to black (developed by pre-press colour management consultant Terry Wyse [wyseconsul@mac.com]) and the image in Figure 12, which I had converted to grayscale with a B&W Adjustment Layer in Photoshop CS5.
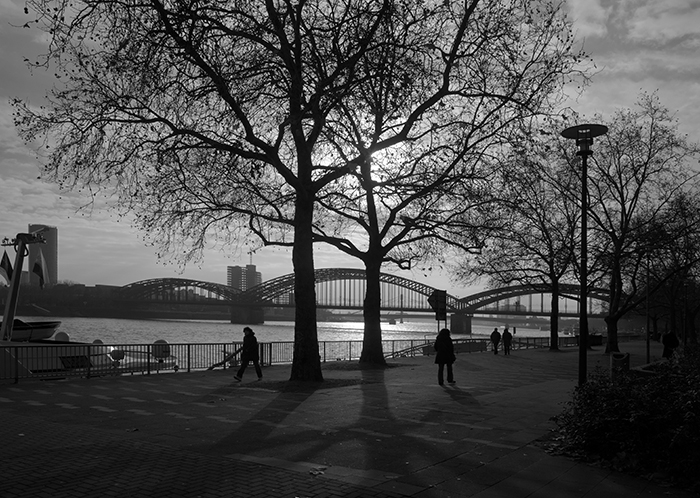
Figure 12. Koeln, November 2010, co. Mark D Segal
What one sees clearly from the numbers is that – at least in these trials – there is no “dead-on” neutral. For images to print as absolute neutral grayscale, at any value of L*, the values of a* and b* should both be 0. (I’m measuring in L*a*b*, which allows a separation of luminosity (L) from colour (a* – the green-magenta axis, and b* – the blue-yellow axis). As there are 128~127 levels on either side of 0 in the a* and b* channels, a value of + or –1 in either of these channels signifies only about 8/10ths of 1% off neutral. Negative values indicate colour shift to the cooler hues (green or blue) and positive values to the warmer ones (magenta or yellow). Such small hue shifts off neutral would be imperceptible to the human eye unless copies of the same image with slightly different hue bias were compared side by side.
Let’s start with Terry’s grayscale strip. The measured values of the eleven patches in this strip are shown in Figure 13.
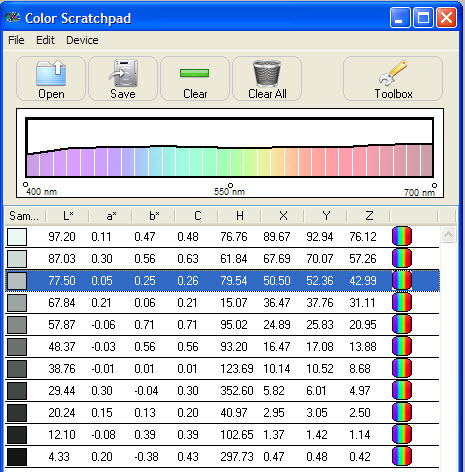
Figure 13. Grayscale Wedge Readings
You may observe here that most of the a* and b* values are less than half a level off neutral. The brightest patch at the top of the list is the paper white, which as you can see from the numbers is not neutral. In fact according to Ilford specifications it is a wee-bit green-yellow. As the opacity of the ink increases, the influence of the paper tone diminishes until it becomes insignificant; Terry’s research indicates this happens slightly above the mid-tones. These results show that on the whole, for all intents and purposes, neutrality is well preserved printing B&W on IGFS paper in the 4900.
I now re-examine this finding in a “real-world” image (Figure 12). I selected 7 points ranging from what I found to be the brightest highlights and darkest darks in the Koeln image and measured them with my DTP-20. This is not an exact science because I couldn’t lay the instrument on the exact same points in each image without going to a lot of elaborate handwork I didn’t think necessary for the present purpose, which is to measure for neutrality. Figure 14 shows the results, the Epson ABW driver (“neutral” setting) on the left and Photoshop Color Management (PCM) on the right.
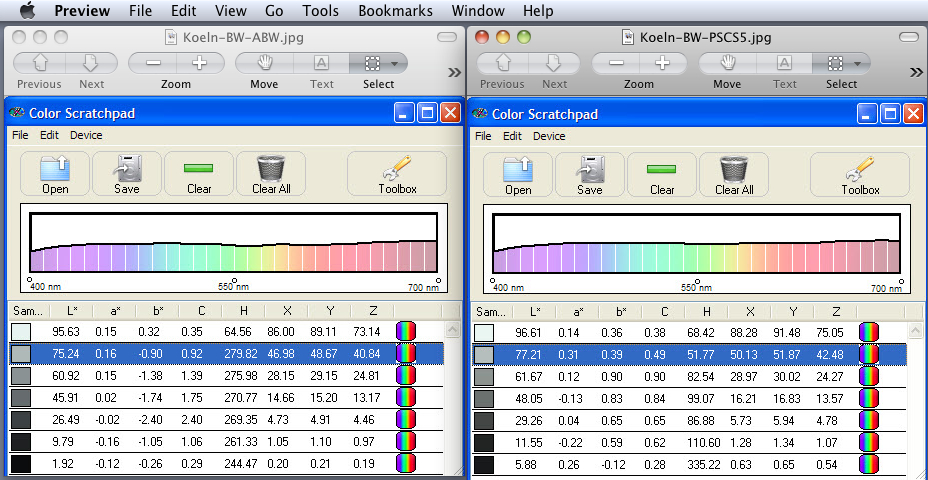
Figure 14. Epson ABW Mode (left) vs. PSCS5 Manages B&W (right) – Fig. 12 Readings
Interestingly, in both images the a* channel is generally more neutral than the b* channel. The b* channel results are more neutral (closer to 0) in the PCM treatment than in the ABW treatment – the latter being slightly more biased to blue than the former is to yellow. Looked at individually, both these images could pass for fine B&W prints; looked at side by side, the ABW print looks a trifle cooler than the PCM print, as the numbers confirm it should. Another interesting observation here is that the maximum black reading in the ABW print is blacker than that for the PCM print – 1.92 versus 5.88. Looking at the prints side by side, and given the presence of a white margin between them, the difference of black tone at these very dark levels is imperceptible. I find the overall “look” of these images is very similar, there being slightly livelier tonality of the sidewalk in the PCM print. The ABW driver allows us to produce many variants, which I have not done, but as I mentioned above, without softproofing it is hard to know exactly what will emerge from each one, despite the fact that Epson does provide a canned visual reference image in the ABW interface to provide feedback on the impact of varying the ABW presets and custom toning tools.
Summing-up on B&W, the results produced “out of the box” are very close to neutral. Probably, by testing compensatory adjustments, one could print “dead-neutral” grayscale, for those who find they must do so, but the impact of the papers’ non-neutrality showing through part of the tone scale will always be a challenge. Most of the time, anyhow, I slightly tone my B&W images, hence for me, totally accurate neutrality is usually unimportant. I’m satisfied that the grayscale performance of the 4900, from maximum black through the tonal range, is very good indeed.
How user-friendly is it?
In a nutshell – very, but there are a few things I should point out. User-friendliness has two key aspects – the hardware and the software. Most of what matters with the hardware is paper handling, printing speed and ink clogs, while the software side focuses on the printer driver and the application through which we print. I print from Photoshop or Lightroom. I do not use a RIP.
Turning to the hardware side, my first recommendation to any one buying this printer is to read the manual. It sounds trite and I remember hearing some time ago that “real men don’t read manuals”, but you’ll save time and aggravation reading it anyhow, as straightforward as most of the printer’s functionality is; this printer has many customizable features – in particular, the paper settings and paper feeding must be done correctly for the printer to operate efficiently.
It has four paper feeds, the cassette tray, the front feed, the rear feed and the roll holder. The rear feed is actually on top of the printer, but the paper does feed-in from behind the print head. I’ve not experienced issues loading paper through any of the feeds, with the exception of the rear feed. Before discussing that one – a comment on the cassette feed. It is important to not exceed the recommended paper thickness limit for this feed of 0.27mm. Just to see how disobedient I could be and get away with it, I loaded a sheet of IGFS, thickness 0.315mm, in the cassette tray. The printer processed it and I thought I was happy until I noticed a very thin, feint scratch from about half way down the sheet to the end. Wondering whether this was a paper defect or damage passing through the printer, I inspected another sheet very closely, saw nothing, repeated this transgression and I was punished again. OK, the manual is right – don’t exceed the paper thickness limit for the cassette unless you like scratched prints.
The rear feed mechanism deserves special mention, because the manual is not quite clear enough about exactly how the paper needs to be loaded into this feed. First, it’s important to not make the guides fit so snugly against the edges of the paper that they impede smooth movement of the paper during its positioning phase. Second, these same guides should not be more than a trifle away from the paper edge, so that skewing won’t happen: the operative guideline here is “snug but smooth”. Third – and this is really critical – you need to push the paper down into the feed (passing over the gray-white plastic bars at its bottom) firmly and decisively until you hear a click. If you don’t do it this way, four times out of five you will get skew or loading error messages and you need to repeat. You won’t find this in the printed manual that ships with the printer. You heard it here first. The importance of this feed mechanism and using it properly is simply due to the fact that most papers thicker than Epson Premium Luster will need to use either the front feed or this rear-feed, the latter being more convenient when loaded correctly. The front feed is meant primarily for much thicker media.
Now, a performance difference between this top/rear feed on the 4900 and that on the 3800, is that on the 3800, you load the sheet(s) by simply placing it (them) in the stand. It is only after you click PRINT that the 3800 grabs the paper and pulls it into position. If it doesn’t like how it did this, it returns and error message, you pass the paper through the printer and start over. The top/rear feed of the 4900 is one sheet at a time, and it does all the positioning (apart from moving the paper to the start of the area to be printed) BEFORE you click PRINT. Once this positioning succeeds (the LED says READY) and you click PRINT, the paper pulls to where the printing should begin and starts printing without fail. So as long as the initial loading is done correctly and the READY indicator shows, you know you are home-free.
I have not yet loaded a roll of paper and printed with it in my printer; however I participated in this process with a colleague who has one of these printers, and it worked very well, feeding, printing and cutting.
While on the subject of roll paper: Firstly, it can be more expensive than sheets on a per print basis accounting the price of the roll relative to the number of prints of a given size it will accommodate – I won’t bore you with case-specific arithmetic – but check this for your favorite paper options and domestic pricing. It is true, for example, with IGFS in Toronto. If you don’t NEED to use roll paper, you may find it cheaper to use sheets. Secondly, of course, for printing panoramas, roll paper is indispensible. Thirdly, roll paper is the only way to make borderless prints on all four edges in a 4900.
For papers of IGFS caliper, I find that by setting the paper thickness to “4” and the platen gap to “Wide”, there are no head-strikes and the print quality is fine. This may well apply to a range of other similar papers.
Contrary to one report in the Discussion Forum, I have seen no pizza-wheel marks at all on any of the paper I’ve pulled through this printer.
There is an annoyance – caused by user error – when the printer thinks it isn’t being fed with what I think it’s being fed, as I believe I told it in the Print set-up. In the LED menu on the printer, at the very least I need to tell the printer whether to expect roll or sheet (and this is sticky until I change it). Then in the driver settings worked from my monitor (print set-up) I need to select my paper type accordingly. If the printer is set to using sheets, and on my computer in the driver by accident I select a roll format in the paper size menu, I shall invariably get an error message when I hit PRINT, because the printer gets confused about what it is supposed to be printing on. This happened to me several times, because a paper selection I made in the 13*19 size group turned out to apply to roll paper rather than the sheet paper I had loaded into the printer and the printer was set to expect. Once I took care to insure that these settings are coherent between the printer itself and the paper size choice from the drop-down in the driver settings on my computer monitor, all was well. Both settings are easy to make.
This kind of thing – and indeed about everything else you need to know before printing – is easy to verify in the Summary tab (Figure 15) of the driver set-up on one’s monitor. When printing from Photoshop, it is accessed by clicking Print Settings (purple arrow) in the Adobe Print dialog, which brings up the Epson driver, where in the drop-down menu underneath “Paper Size” (blue arrow) one accesses the Summary tab. I normally look this over before I commit to print. Notice I’ve pointed (red arrows) to the places where consistency really affects outcomes: the paper/paper size selection, and the Color Mode (in particular – Epson driver color management is OFF, when I’ve specified “Photoshop Manages Colors” in the Adobe portion of the Print dialog). Printing from Lightroom provides similar access to the settings in the Epson driver.
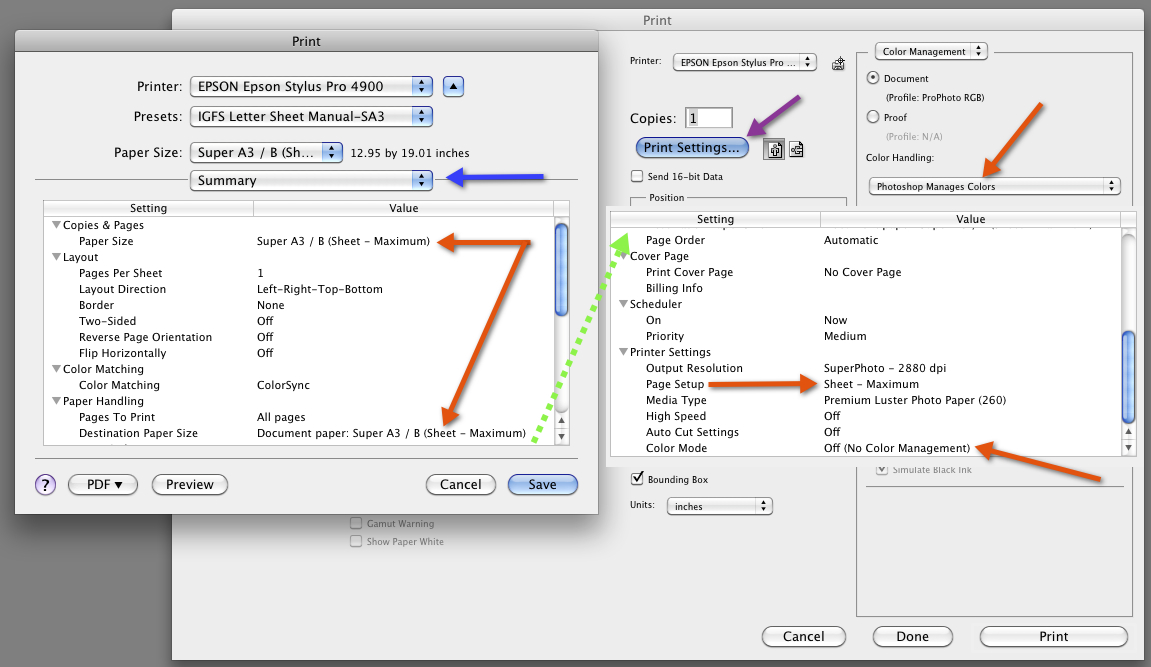
Figure 15. Summary Tab, Epson Driver
One major advantage of printing from Lightroom, amongst others, is that the profile one selects for Lightroom color management remains sticky, whereas in the Photoshop Print dialog, it does not. For each new document it is necessary to verify and most often reset to the correct profile for the paper/printer combination being used. This is an Adobe Photoshop issue, not an Epson issue.
Integration between the Photoshop dialog and the Epson driver dialog is on the whole good, but there several of these consistency items which one does well to verify before printing.
I’ll mention one more I consider important – and that is an old friend called “print centering”. It can happen that the Adobe Print dialog tells you centering is checked, but when the print emerges from the printer, it isn’t, the usual case being that a landscape (portrait) print may have a larger margin on the right (bottom) than on the opposite side. So what’s going on? For the 4900, as it was for the 3800/4800/4000 before it, has a standard lower margin of 0.56 inches, while the default margins for the three other sides are considerably less – 0.12 inches. Depending on the choice of paper size, even margins may or may not have been present in the centering calculation.
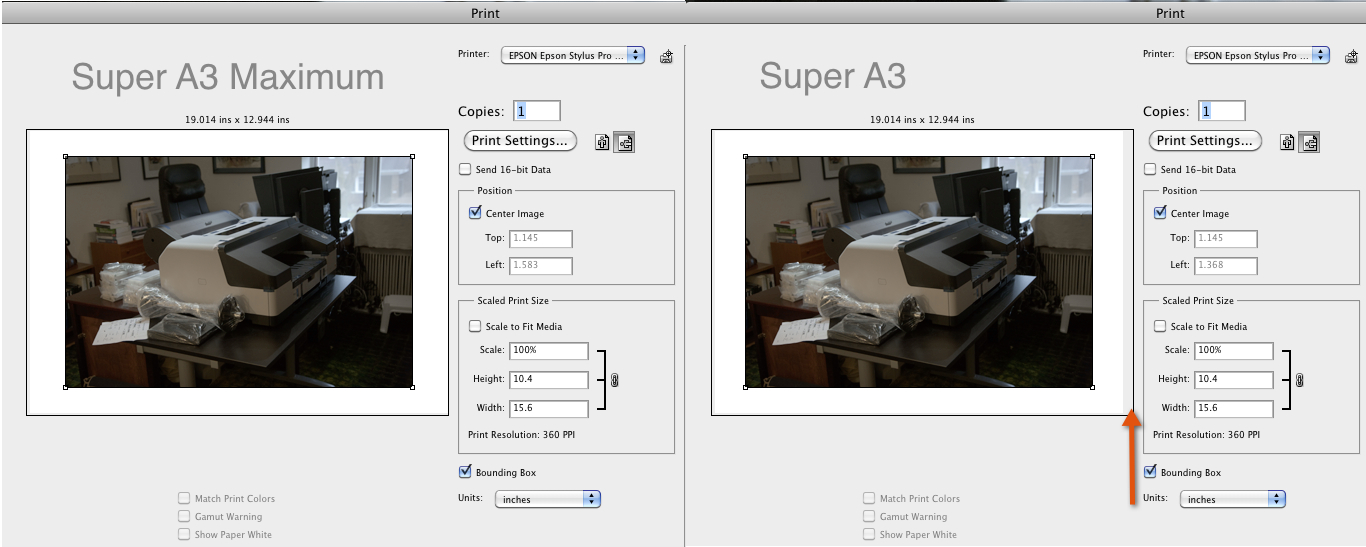
Figure 16. Print Centering; (left centered; right not centered)
In Figure 16 left, the print will come out centered, because the selection of the “Super A3 Maximum” in the Epson driver has uniform borders of 0.12 inches on all four sides. However, the selection of “Super A3” has three borders 0.12 inches and one border 0.56 inches. The red arrow (Figure 16, right side) shows how this throws print centering off in the Photoshop Print dialog (and then in the printed image), even though “Center Image” is checked. It is a good feature that Epson included context pop-up notes for papers listed in the Paper Size menu (Figure 17) showing the sizes of the margins – they pop-up in yellow boxes while you hover the cursor over the specific paper choices (right-side menu fly-out, Figure 17).
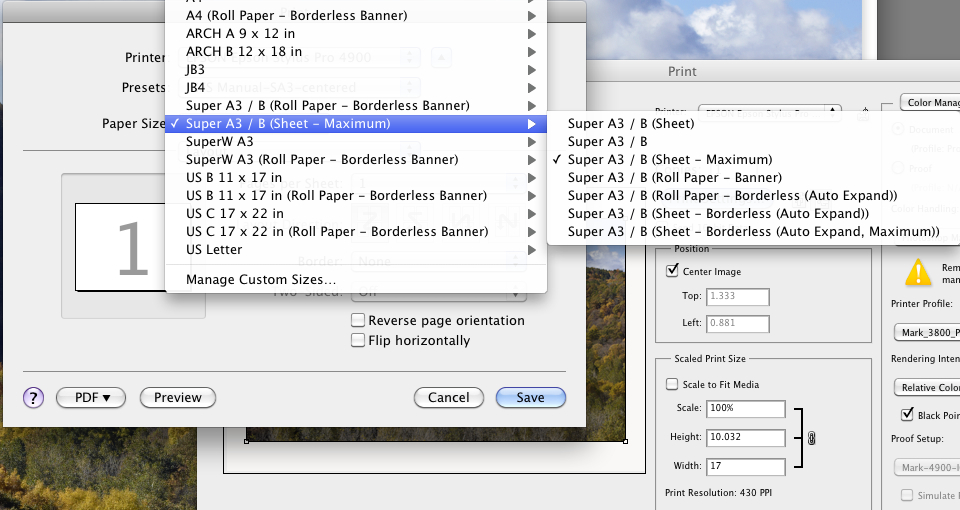
Figure 17. Paper Settings for Sheets
Apart from making a paper selection having even margins in the Paper Size dialog of the Epson driver, another way of avoiding this problem is to create a custom paper preset in the Epson driver, specifying even margins on opposite sides, and then calling upon that paper preset for printing. This is easy to do.
Lest the foregoing pointers lead you to believe that wrapping your head around using this printer is difficult, trust me – it isn’t; and I’m not one who likes futzing around with a lot of stuff just to make a print, (possible appearances to the contrary)! It all becomes reasonably routine and works smoothly once you know those major things to look for and adjust. The surest way of having correct settings is to create custom presets in the Epson driver. Epson makes it very easy to do this. Make all of your selections in each menu of the driver, test them with a print, and once you are satisfied that they do what you want them to do, you can save them as a Preset with a custom name you give it. You can of course include your custom paper preset in the overall driver preset. The manual provides clear instructions for making presets. Whenever you need to print with the same parameters, call-up the appropriate preset. Once some up-front setting work is done, the Epson driver facilitates a rather self-managing print process; however back in the Photoshop Print dialog it remains essential to check that the correct printer/paper profile is loaded for each document printed. I really wish Adobe would amend this by making the printer/paper profile sticky until the user changes it, rather than reverting between each document to some other unwanted printer/paper profile.
Turning to print speed – this machine is fast. I print at 2880 dpi with High Speed OFF, following Epson’s recommendation for maximizing print quality. I timed a 13*19 inch sheet going through my 3800 and 4900 printers, the printed height (landscape image) on each sheet being 11 inches. The 4900 took 30.3 seconds per linear inch, while the 3800 took 47.8 seconds, making the 4900 about 37% faster.
Printing an 11*15.5 inch area with these settings takes less than 8 minutes in a 4900 and over 12 minutes in a 3800.
One of the more heavily trafficked areas of discussion about inkjet printers is clogging – and Epsons in particular. All pigment ink printers develop clogged nozzles. What differs between inkjet technologies is how these clogs are dealt with. For example, Canon provides spare nozzles in their IPF series print heads; once enough of them clog, the user buys new print heads. Each print head is priced in the range of USD 430~500 depending on the printer model and purchase outlet. HP’s Z2100/Z3100 series printheads are also consumables, one per colour, a set of six costing in the range of $300. Epson’s approach is different. The printhead is a high percentage of the value of the printer and not a consumable. When nozzles clog, you spend the money on ink for cleaning them, rather than on replacing printheads. I have no idea which approach ends-up costing consumers less money over the long-haul, but we do know that nozzle clogs are a fact of life for all printers using pigmented inks and dealing with them isn’t free no matter what the printer.
Epson has clearly expended considerable effort over the past decade to improve on clogging and the results are rewarding. I’ve been using Epson pigment ink printers since the 2000P back in 1999/2000, graduating through models to the 4000, the 4800, the 3800 and now the 4900. I don’t remember having to deal much with clogged nozzles on the 2000P. My 4000 was dreadful in this regard, the 4800 was a major improvement, but it still clogged quite a bit more frequently than I considered reasonable especially as it got older, and then there was a major improvement with the 3800. That printer hardly ever clogs – even when left unused for a couple of weeks. In fact, most of the relatively few clogging incidents I’ve experienced with a 3800 happened immediately AFTER the printer itself initiated an automatic cleaning cycle. And there is no way to turn this bad behaviour off in the 3800.
Enter the 4900 and holding my breath. Major caveat here: it is far too early to say anything of predictive value about the long-term clog performance of this printer. It’s too new, and clogging behaviour needs to be observed over time. My experience so far is this: immediately after the printer was fully charged and I went to make a print, I got a clog warning and prompted for cleaning. This I had to see for myself before deciding anything, so I printed a nozzle check sheet, and the result is what you see in Figure 18.
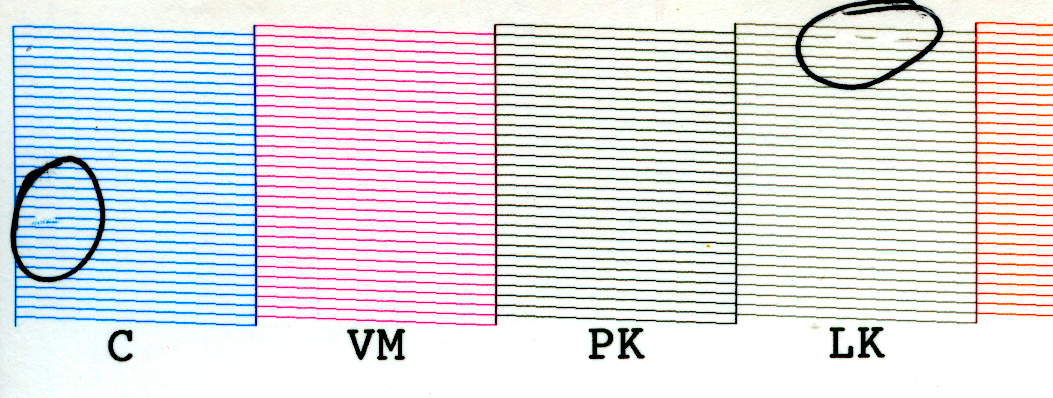
Figure 18. Nozzle Gaps
You’ll notice in Figure 18 that there are three breaks in the nozzle check pattern (areas of occurrence circled in black). I seriously doubt these three breaks would affect visible print quality one iota, but because the printer is new, and because I am looking hard at print quality, I ran a cleaning cycle. Then I ran another nozzle check sheet and all was fine. Nozzle check sheets only consume 0.1 ~ 0.2 ml of ink. Then, thinking back to my experience with the 3800, I entered the Epson driver through the Printer Setup menu (on the printer itself) and turned-off “Auto Nozzle Check” as explained on page 123 of the Manual (gotta read that manual) – yes, thank goodness in this printer one can do that. Then, before each time I use the printer, which has been about every other day since I bought it, I run a nozzle check sheet. There has been zero evidence of any clogs since that first experience after charge-up. I wonder whether that was a clog – perhaps it was some minor debris or trapped air hanging-over from the charging process; I don’t know. Anyhow, the very limited experience to date is excellent and I hope it keeps up. Epson indicates they have improved this printhead by using clog-repellant materials.
Printer Economics 101
My readers know that I pay somewhat detailed attention to this. That’s because I’m a photographer who indulges in this costly passion on the proceeds of a life in economics, not because I think everyone else obsesses over this question; but many are interested in the cost of printing, so the analytical information is here for your enjoyment.
My numeraire is Canadian dollars (CAD) because that’s what I pay with, but much to the chagrin of our exporters and tourism industries, it’s within a hair’s breadth of parity with the US dollar; as well prices on Epson products are similar enough in the two countries for the CAD data to still be useful for our US audience. If you aren’t in Canada you may need to adjust values a bit, but you’ll get the picture from what follows.
There are three basic determinants of printing cost: the cost of the machine, the cost of consumables (ink, paper and maintenance tank) and throughput over its economic life.
Cost of the machine: I paid CAD 2374, plus sales taxes, totaling CAD 2683. Now, depending on where you buy the printer and/or what trade shows you visit(ed) where there is/was an Epson booth, there is/was a Golden Ticket available – one per printer – which entitles the Ticket holder to a USD 500 mail-in rebate, reducing the printer price to about CAD 2183 in my case. I mailed my Ticket and supporting documentation to Epson on December 12 th , and it will take many weeks for the money to come, but I’m counting my chickens before they hatch and deducted it from the investment cost. If you buy it without such a ticket, add it back.
Attributable to the investment cost is a portion of the start-up ink (included in the price) used to prime the lines. Now here’s where things get a bit murky, because some of this ink remains in the lines and will be used for making prints, therefore a consumable, not an overhead, whereas some of it also appears to go straight into the primary maintenance tank, thereby included in overhead. It isn’t possible to allocate between them, because Epson Pro Graphics Tech Support cannot tell me the capacity of the primary maintenance tank where some of the charge-up ink goes; so even though I know the rough percentage of the primary tank consumed on first charge-up from a picture of its status in the Status Monitor, I don’t know the capacity to which I can apply this percentage in order to derive the waste in milliliters of ink. Hence to be conservative, I allocate all of the charge-up ink as an overhead and consider the remainder a consumable. When I deduct the replacement value of that remainder from the printer price, I am down to the value of the machine itself, but with an unknown amount of ink in the lines.
Another little crinkle is that the machine holds 11 inks, but we may use 10 at a time, as one is the variation between matte black and photo black. Based on my three years’ use of the 3800, I never switched to matte black because I stopped using matte papers, so projecting the same forward I do my arithmetic on the basis of ten inks. Obviously, this may not be suitable for everyone. Anyhow, just so you’ll know, that’s the basis here.
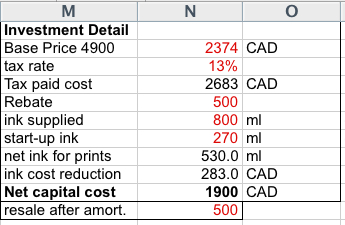
Figure 19. Investment Detail
Immediately after charge-up before I started printing, I captured the ink data from the Printer Status Monitor.
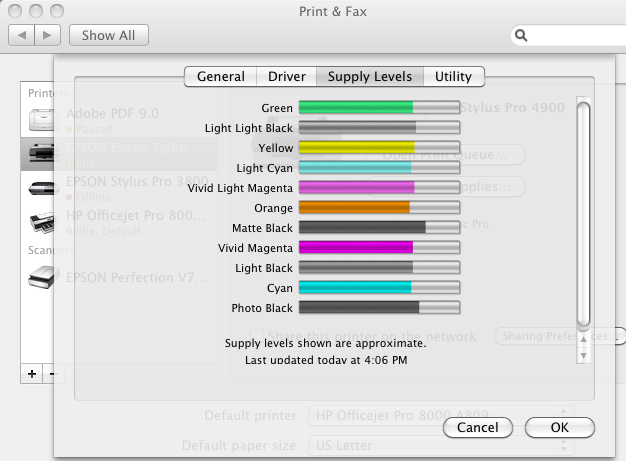
Figure 20. Ink Consumption for Initial Charge-Up
Epson provides 80 ml of ink per cartridge with the printer (replacement cartridges are 200 ml each). Eyeballing the initial consumption for 10 inks in Figure 20, I’ve allocated 270 ml of the initial 800 ml to charge-up, leaving a net amount of 530 ml for making prints (plus the unknown amount in the tubes). Valued at replacement cost per ml for the 200 ml cartridges, (Figure 21), CAD 283 can be deducted from the Base Price after rebate to arrive at a Net Capital Cost of CAD 1900 for the machine itself (Figure 19).

Figure 21. Consumables
Then I assume that after 3 years the machine can be sold for CAD 500 (shot in the dark – I have no idea, but all this stuff depreciates markedly), which at a 4% consumer rate of interest per year (commercial rates should be higher) has a present value of CAD 443, leaving a net residual capital cost of CAD 1457. Now you see why you need an economist to do this – how else could you convince yourself and your spouse that a $2700 printer really only costs about half that! 🙂 Then, to finish this story, amortized over 36 months at the same 4% discount rate, monthly amortization is CAD 43. Higher interest rates would yield higher amortization cost.
As in my previous articles on this subject, I use a standardized print (SP) metric of 54 square inches (SQIN), being 6*9 inches on a US letter sized sheet. Divide the number of SP made per month into this amortization value and the machine cost per SP is determined, as shown in Figure 22. This is easily expanded for larger print sizes, shown further below.
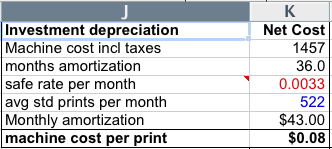
Figure 22. Net Investment Cost and Amortization
Turning to consumables, the prices of the paper and ink cartridges are straightforward, but the amount of ink used per print, and the amount of ink consumed in machine cleaning are not. Turning to the latter first, in the days of the Epson 4000 and 4800 it was easily determined from data on nozzle check sheets before and after cleaning. Epson stopped providing that information (no comment), hence it is for now indeterminate until we can do some forensic accounting after many months of use. Based on past experience, I recommend adding about 20% to ink used for prints in order to account for cleaning and other maintenance, but I have no 4900-specific basis for saying that this is a correct estimate.
Fortunately we’re in better shape estimating ink usage for prints, because Epson does provide this information print per print for the 10 most recent jobs in the Job History tab of the Printer Status menu (printer LCD). However, not all prints are created equal. Lighter prints use less ink than darker prints. Therefore, to compute a representative average use of ink per SQIN, I selected what I think is a representative group of 30 images, printed them, verified ink consumption and ink coverage dimensions print-by-print, and averaged the data, resulting in an estimated average 0.0105 ml ink per SQIN, shown in Figure 23.
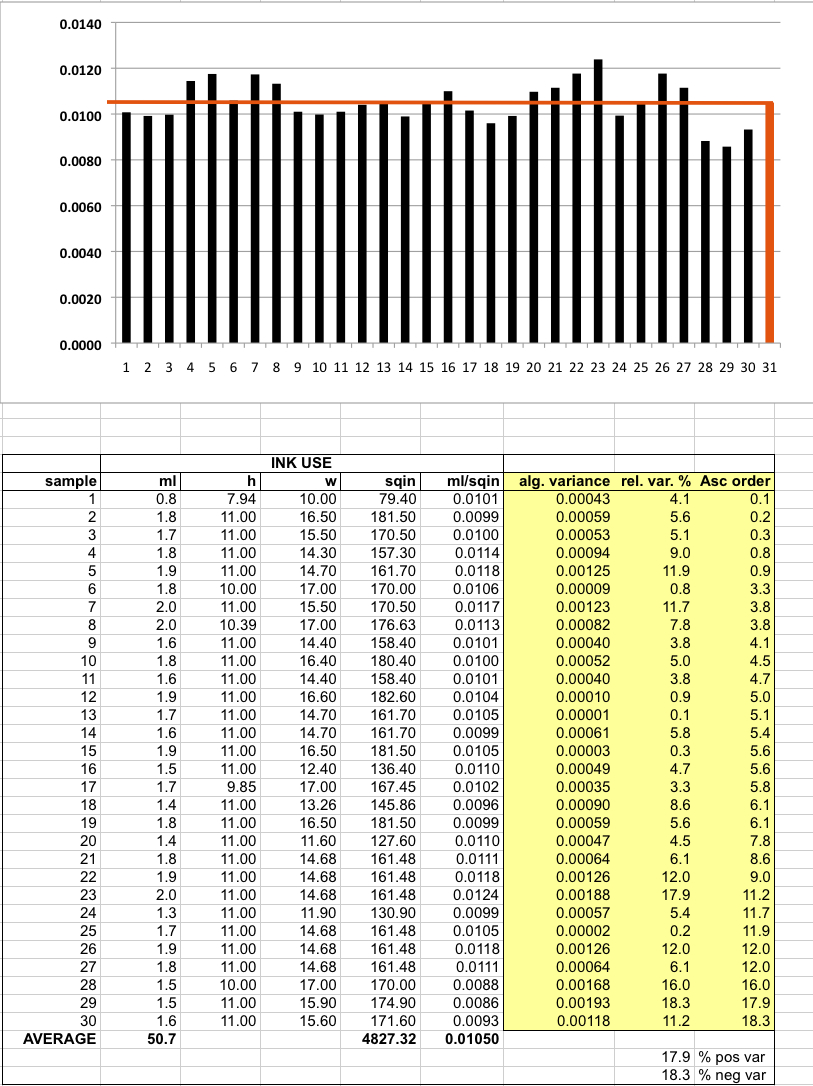
Figure 23. Ink Usage
You can see from this data that on the whole the variances around the average are not usually large, but in my sample they occasionally reached toward +/- 18% or so of the average.
Pulling all this data together, the summary of printing costs I expect from my 4900 going forward are as shown in Figure 24.

Figure 24. Cost Summary
Much as I’ve seen in previous exercises of this kind, the big-ticket cost of printing isn’t either the printer or the ink, it’s the paper (using good quality professional printing paper). That of course won’t stop most of the commotion on web forums over the price of ink, but of course the fact remains that ml per ml, good wine is a helluva lot cheaper! (If only we could print with Chardonnay). Finally, I should mention that based on my aggregated data to date, the 4900 uses about 13% less ink per SQIN than did my 3800, suggesting that the 4900 may turn out to be a more economical user of ink. As well, because it uses larger cartridges, at CAD 0.53/ml its ink cost is considerably less than what I’ve been paying for 3800 ink (CAD 0.77/ml). Taking both factors into account, the 4900 should print an SP for about 24 cents less cost of ink than a 3800. At this rate, once you’ve printed about 1800 Super A3 prints, the machine itself isFREE– now tell that to your spouse!
Is the Printer Robust?
Time will tell. This is an important question to those who intend to make heavy use of it over a long time period. All I can say from looking at whatever little of its movements I can see, the overall build quality looks to be very robust. The printer prints quietly with a minimum of vibration as the head moves back and forth across the paper, and there is nothing I can see or use on this printer which looks flimsy.
Summary Comment:
If you own a printer as recent as the 3800/3880, upgrading to the 4900 may not seem necessary for print quality improvement alone. However, if you want that extra 20% of gamut, a roll-holder, the higher print speeds, more ink economy, a desktop solution and a 17 inch width, this printer should fill the bill and then some.
Mark D Segal
Toronto, December, 2010
You May Also Enjoy...
The Present State of Mirrorless Part III: Where to go if you’re looking to switch systems or add mirrorless for the first time.
FacebookTweet Mirrorless options have proliferated in the past year, and trends have become clearer. Canon and Nikon have shown their initial hands and Leica’s L
