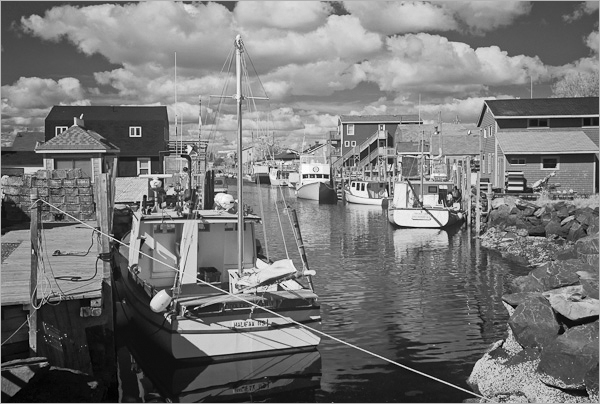
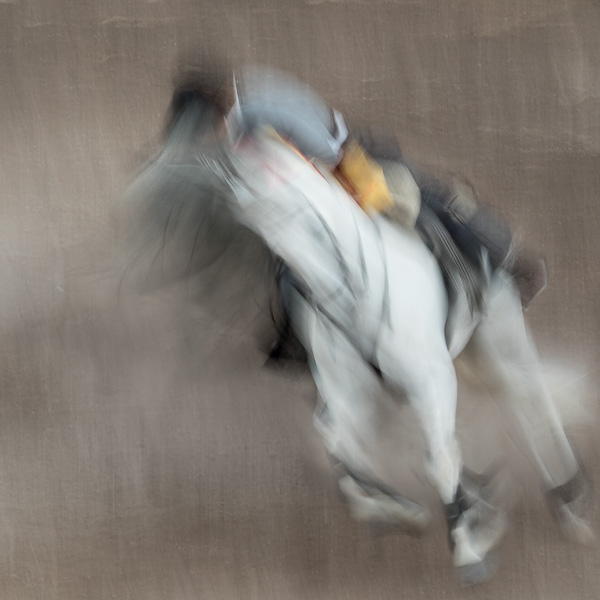
Fisherman’s Cove, Eastern Passage, Nova Scotia.
Leica M8, ISO 320, 28 mm f/2.8 Elmarit ASPH at f/4.8 and 1/90 sec.
A visually opaque Leitz Infa-Red filter was used.
Shortly after the Leica M8 was introduced, it was realized that the camera had “excess infra-red sensitivity”. The symptom usually cited was that some dark fabrics photograph as brown or purple. Some – including Leica – tried to minimize the effect, suggesting that the problem would be encountered rarely, and could be removed in post-processing. Soon, however, Leica realized they had a “problem” and offered every owner of an M8 two infra-red blocking filters. I my own view, the problem was far from “minimal”; it seemed that everyone I photographed was wearing purple! But there is a silver lining: the Leica M8 can be used quite successfully as an infra-red (IR) camera. I don’t believe I ever read this or saw this cited, but in my experience, the camera even meters properly with a visually opaque IR filter over the lens! And being a rangefinder camera, that opaque filter does not adversely affect framing.
With the M9 now much sought after as an improvement on the M8 for general photography, perhaps it’s time for those with an interest in infra-red photography to consider buying a good used M8.
I have tried infra-red film photography from time to time over the past 55 years or so – mostly without success. The big problem was trying to guess the right exposure. The second problem was trying to guess the right focus. The first IR films I used had very delicate emulsions and were easily damaged in processing. The few exposures that did result in printable images were somewhat ‘flarey’ and indistinct. I have kept no images from my earlier attempts at IR photography.
I started playing with the M8 and IR indoors one evening. I just happened to have an old Leitz infra-red filter, and with digital imaging, what’s to lose? I noticed with surprise that the meter was suggesting that hand-holdable exposures should be possible – this in a room illuminated by a single 100 watt incandescent light bullb! Sure enough it was true: a quite recognizable purplish, flarey image showed up on the review screen. The meter was right! The next day was overcast but I wanted to try a noontime streetscape anyway. The meter was suggesting essentially the same exposure as for indoors the previous evening. The meter was right again! No wonder getting the exposure right in the past was so problematic. Light that I thought was way too dim was quite bright enough, and what I thought should be much more than adequate was in fact marginal!
Once a sunny day came along, I tried again. Better, but for hand-held photos, f-numbers like 4 and 5.6 were going to be needed. Getting the focus right would be important. Old lenses from the 1950s often had red dots or “R” characters on the focusing scale where infinity infra-red focus should lie. A suggestion I had often read was to experiment, but expect somewhere around the 5.6 mark on the depth-of-field scale to be about right. The first experiments with a 35/2 Summicron from around 1980 seemed to work surprisingly well. After a little experimentation I settled on putting the infinity symbol on the focusing scale opposite about where an f/4.8 depth-of-field mark would be – roughly half way between 4 and 5.6.
The image on the camera’s review screen was purpleish, somewhat dim, flarey and, when viewed on the camera at maximum magnification, rather soft. However, when the DNG files were viewed converted to black and white via Lightroom or Photoshop, the images were surprisingly well-exposed and sharp. By experimenting with such things as colour temperature adjustment and variation in the colour mix used in the conversion to B&W, tonal characteristics and apparent graininess of the image could be changed, but the standard default settings seemed to work well. On the whole the final IR images were much better than I expected, and certainly much better than I had ever achieved previously.
I quickly learned not to place too much reliance on the image as it appeared on the camera’s review screen. The camera’s meter could be relied upon to give the right exposure with subsequent adjustment available in Lightroom or Photoshop on converting the DNG file. The red image layer generally receives the greatest exposure, The blue layer the next, and the green layer receives noticeably less. This obviously explains the purpleish tone to the colour image displayed on the review screen. But this diversity of effective exposures (among the image layers) provides a limited high dynamic range (HDR) capability. Even in situations where the red image layer is clipped, the blue layer provides detail. And in extreme over-exposed areas the green layer can help fill in detail. The over-exposed red layer serves to provide shadow detail, albeit at some cost in terms of resolution and graininess. Indeed my early IR photos showed better shadow detail than the equivalent full colour images taken under the same conditions. I do not understand why the image on the review screen seems prone to flarey halos while the real image shows very little of this effect. Perhaps it’s an artifact of Leica’s JPEG engine – which on the M8 is poor in comparison with almost any other camera. (I never use the M8 JPEG files except for general image search purposes. The M9 is much improved.)
The image at the start of this article was taken with a Leica 28/2.8 ASPH lens at f/4.8, ISO 320, 1/90 sec with the infinity mark on the focusing scale again roughly opposite the f/4.8 depth-of-field marker.
At this stage I was able to obtain quite reasonable images but I was still largely guessing about focus. I wanted to be able to use other lenses, especially longer lenses. I tried a couple of times to do in-door focus tests using flash illumination. The flash illumination worked after some further experimentation, but my attempts to determine precise focus point was inconclusive. Clearly a good, comprehensive out-door test was called for.
With the help of fellow photographer Kevin Doubleday, we undertook a test of 22 lenses (from 12 mm focal length to 135 mm) at Fisherman’s Cove – the subject of the above photograph. Some buildings 8.5 km in the distance were used as the target for focus. The results are summarized in the table below. As a quick general guide, if in doubt, use the f/4 depth of field mark as your infinity focus marker for lenses of 50 mm focal length and less. This worked for 12 of the 18 such lenses. And the other 6 were not far off. No such generality could be made for the longer lenses.
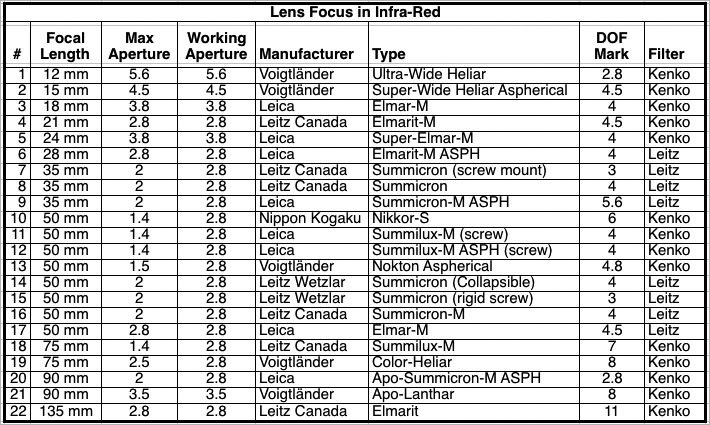
I recorded further detail, but the above table will be enough for most. Get yourself a visually opaque IR filter, trust the M8 meter for exposure and use the indicated depth of field marker as the focus index for IR purposes. Incidentally, in the few cases where the lenses that did have infra-red focus marks, my data indicated a slightly different result.
A typical focusing and depth of field scale looks something like this:
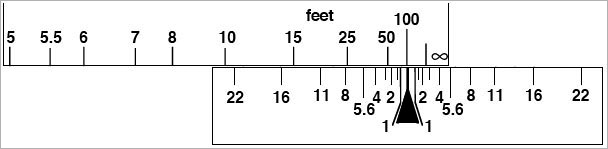
For a lens where use of the f/4 depth of field marker is indicated, the lens is properly focused at infinity when the lens is adjusted to look as shown above. It is not obvious, but the depth of field markers are arranged according to a linear scale: the f/8 marker is twice as far from the focus index marker as is the f/4 mark, and the f/4 mark is twice as far from the index marker as the f/2 mark. The f/3 marker – if there was one – would be half way between the f/2 and f/4 markers. Half way between the f/4 and f/5.6 markers would correspond to f/4.8 etc.
To focus at a distance closer than infinity, use the camera’s rangefinder to determine the approximate distance. Then adjust the lens to put that distance opposite the IR infinity focus point (typically the f/4 DOF marker, for example).
The tests involved lenses from three manufacturers (Voigtlander, Leica and Nikon) and there is one associated general comment. All the Voigtlander lenses seemed to require an extra half-stop exposure, but the camera’s meter nevertheless yielded the correct exposure. Two of the Leica lenses also behaved this way.
Three of the Leica lenses seemed to give images that were slightly dark, using the camera’s meter. I don’t know why, but an extra half stop over the meter indication would have been appropriate. This correction is nevertheless well within the exposure latitude and can be corrected in Lightroom or Photoshop.
I used two IR filters: and old Leitz 39 mm filter probably dating from around 1960, and a 62 mm Kenko R72 filter probably made around five years ago. I do not know their respective characteristics, but there were slightly different in character. The Kenko filter required an extra half-stop of exposure, produced a more neutral coloured image on the M8’s review screen, and gave more exposure in the green image layer. Final black and white images were not significantly influenced by the choice of filter, however. The 62 mm filter is not large enough for use with the 12 and 15 mm lenses. I simply held the filter in front of the lens during exposure. The corners of the images were unfiltered as a result, but the procedure served to determine correct focus for the central part of the image.
In a subsequent test I did determine that the optimal focus setting did depend upon the choice of filter, but the correction was small. If the Leitz filter called for using the f/4 mark for infinity focus, the Kenko R72 filter would be best at approximately f/4.7.
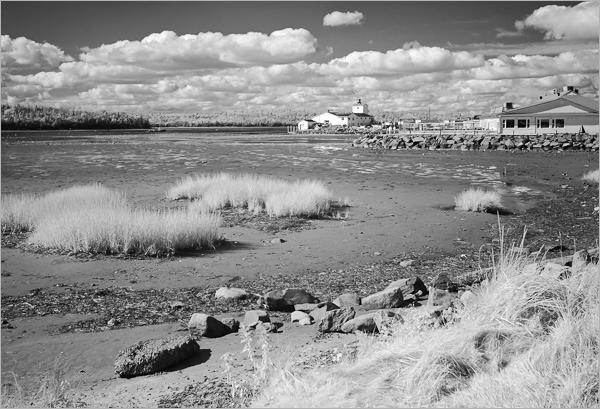
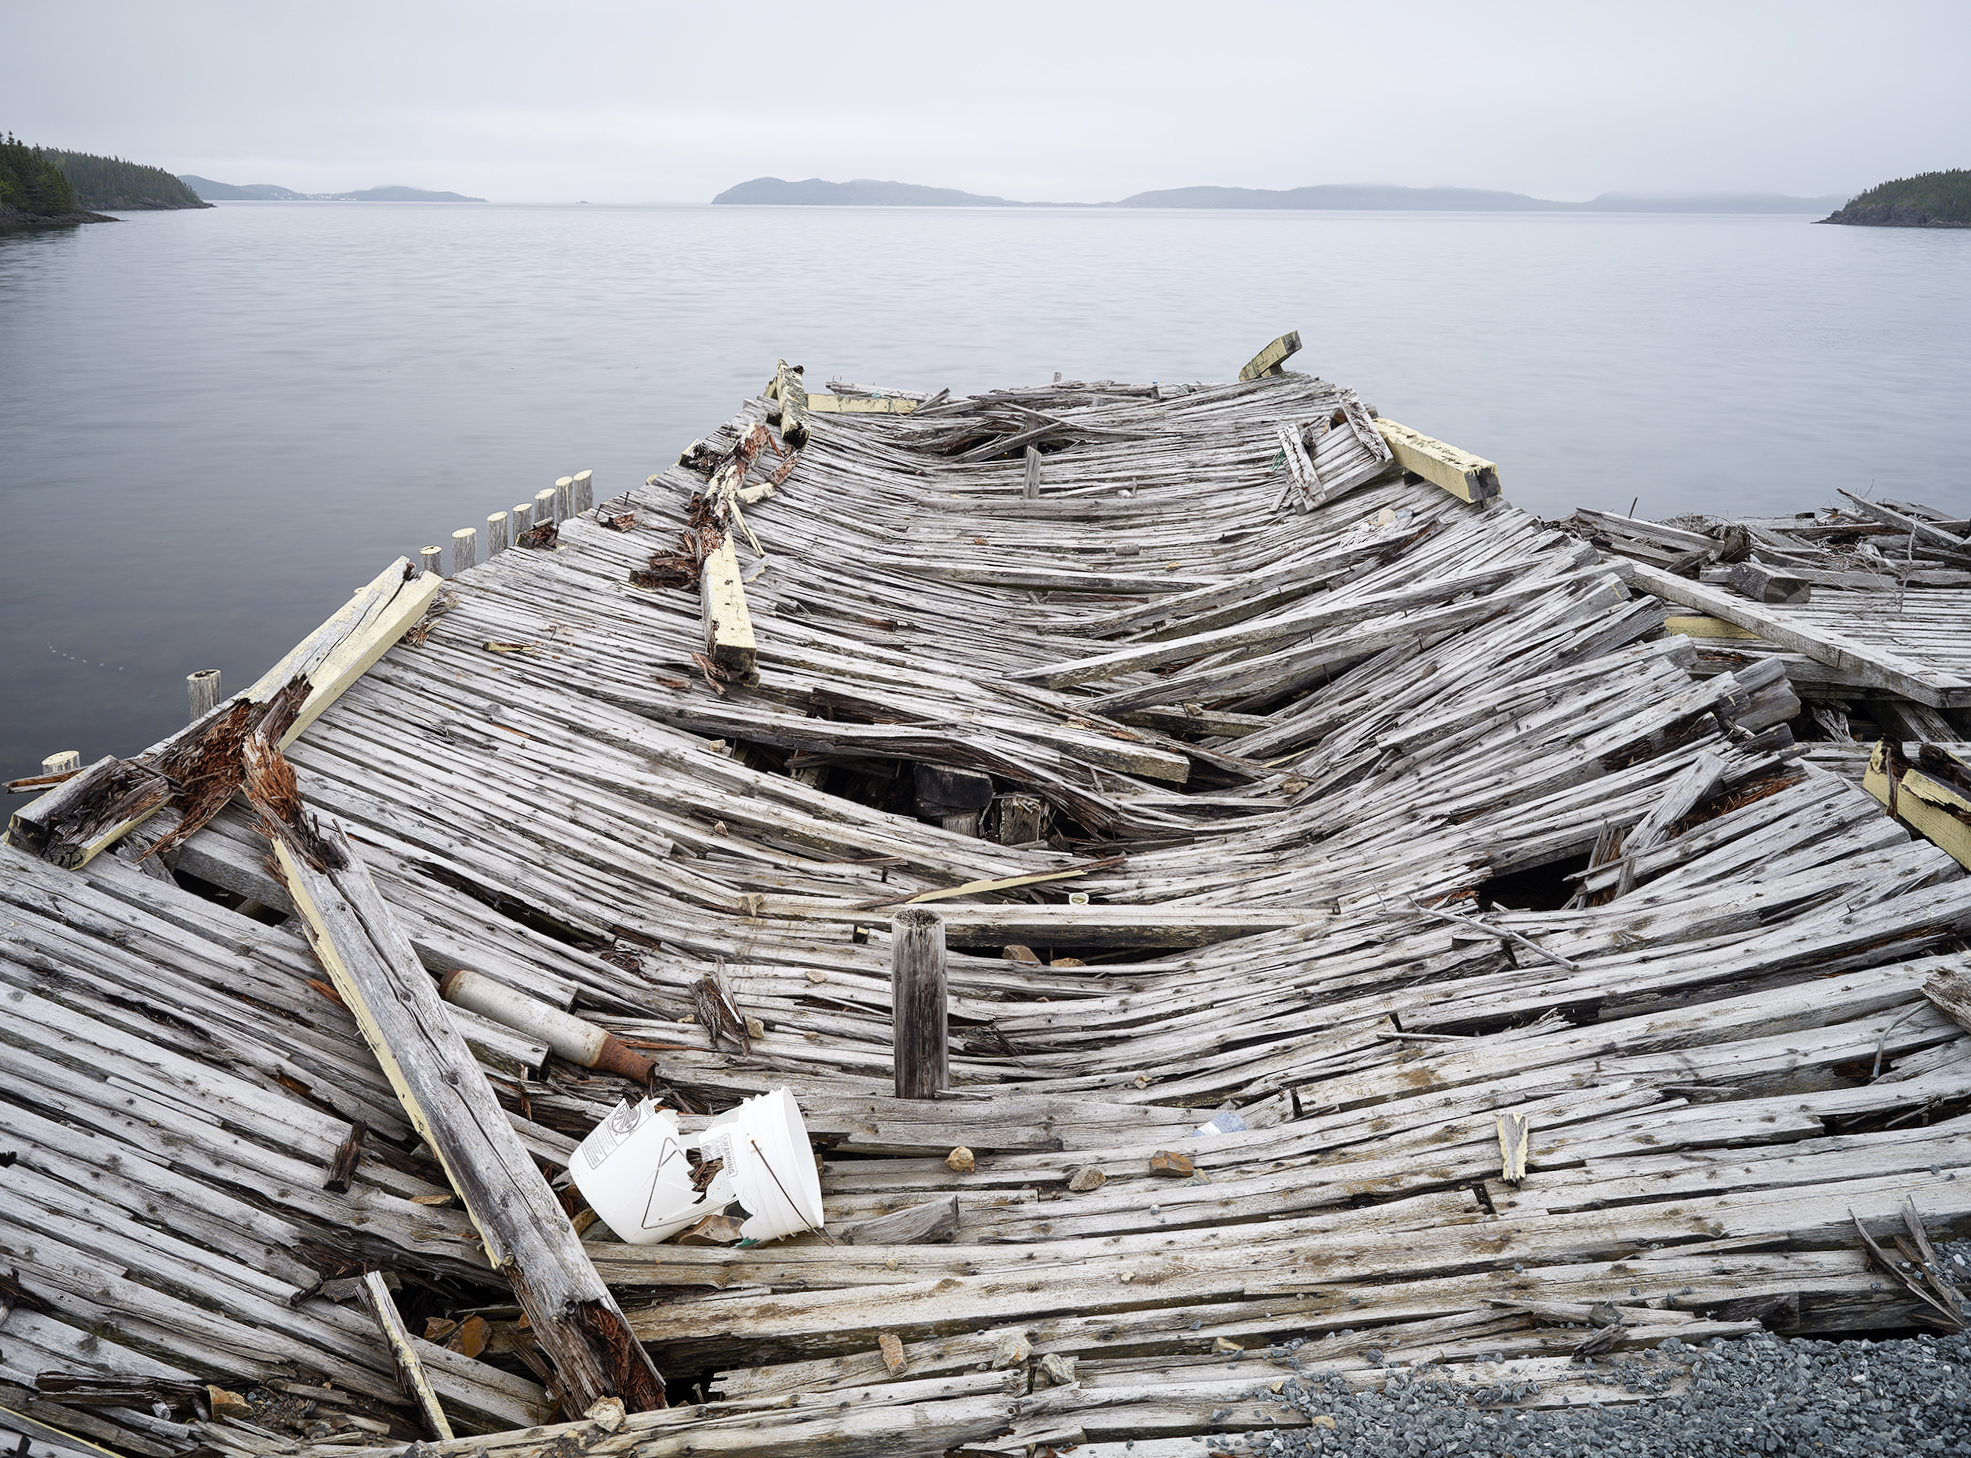
Low Tide at Eastern Passage.
Leica M8, ISO 320, 28 mm Elmarit ASPH at f/5.6, 1/45 sec.
In subsequent IR photography I learned a few refinements. Overall sharpness of the final result is influenced by the ISO setting used. Image detail rivals that in colour images (by the same camera) if the IR photos are taken at ISO 160. At ISO 640, the IR images seem to be distinctly soft. I confess I don’t fully understand why. Small text that is readable in a colour image at ISO 640, may not even be recognizable as text in an ISO 640 IR image. Also the colour aberration correction adjustments in Lightroom or Photoshop do affect image sharpness. The required corrections bear no relationship to those appropriate for normal colour photography. How a lens performs in the IR has little relation to its performance in the visible spectrum. By way of example, I found the IR performance of the current Leica 35/2 ASPH to be inferior to the older non-aspherical version dating from around 1980. The main issue is that the newer lens shows major curvature of field in the infra-red. Stopped down to f/8 or so, all the lenses tested have proven to produce excellent results.
If 10 megapixels is not sufficient for your IR images, you can, of course, use your Leica M9. It is indeed less sensitive to IR than the M8, but only by a factor of 30 or so. Thus if the M8 gives good results at f/5.6 and 1/60 sec, The M9 will need an exposure time of 1/2 sec at the same aperture. The M9 would be difficult to use for IR photography hand-held, but should be useable for static scenes if used on a tripod. The M9 meter does respond to IR, but the indicated exposure is far from correct.
The bottom line here is that the Leica M8 can be used for infra-red photography. It is not as sensitive as cameras that have had the IR absorbing filter removed, but on the other hand, it has the remarkable feature of metering correctly at infra-red. Or at least mine does. The M8 offers a utility in IR photography that is not possible with IR film, or with other digital cameras, converted or otherwise. Use of a tripod or monopod is certainly advisable but hand-held exposures are possible. Correction for IR focus is a necessity, but at least we now have the data for a range of lenses. Even in-door hand-held exposures are possible under tungsten lighting, although I cannot say I have explored this fully. It would be interesting to investigate IR photography of well-lit, staged entertainment event.
September, 2010
____________________________________________________________________________________
Harold Merklinger is a highly regarded scientist and author. He retired in 2001 as Director-General of the Defence Research Establishment Atlantic in Dartmouth Nova Scotia, doing sonar research for the Canadian Navy and Air Force. He has written two short technical books on photography and numerous articles for Shutterbug, View Camera, and Photo Techniques. He is a regular contributor to The Luminous Landscape.

Elevate Your Vision


Read this story and all the best stories on The Luminous Landscape
The author has made this story available to Luminous Landscape members only. Upgrade to get instant access to this story and other benefits available only to members.
Why choose us?
Luminous-Landscape is a membership site. Our website contains over 5300 articles on almost every topic, camera, lens and printer you can imagine. Our membership model is simple, just $2 a month ($24.00 USD a year). This $24 gains you access to a wealth of information including all our past and future video tutorials on such topics as Lightroom, Capture One, Printing, file management and dozens of interviews and travel videos.
- New Articles every few days
- All original content found nowhere else on the web
- No Pop Up Google Sense ads – Our advertisers are photo related
- Download/stream video to any device
- NEW videos monthly
- Top well-known photographer contributors
- Posts from industry leaders
- Speciality Photography Workshops
- Mobile device scalable
- Exclusive video interviews
- Special vendor offers for members
- Hands On Product reviews
- FREE – User Forum. One of the most read user forums on the internet
- Access to our community Buy and Sell pages; for members only.
You may also like