


It really is “new”. At the time I tested this printer there were only three machines operating in the USA and none in Canada. Large format professional printers are marvels of state-of-the-art engineering and manufacturing, so unsurprisingly, supply can run behind demand. Fortunately, I was given access to one of them, and that permitted me to provide you with this timely review (Figure 1).
Epson has issued a succession of new printer models over the past decade each one offering some distinctive features, technical and/or operational upgrades and pricing attractive to different interests in the printing market. Focusing on the 24” ~ 44” photographers and service bureaux markets for the SureColor machines over the past eight years, the 24” P6000/44” P8000 series was introduced in 2015, now discontinued, followed by the 24” P7500/44” P9500 series, introduced 2019 and current, followed by the most current 24” P7370/44” P9370 models with initial availability this year. (The P20570 is a 64” model using the same inkset as the P7500/P9500 series.)
So, if I print photos or want to get into printing photos, the immediate questions that arise every time a new model appears is “should I renew?” or “is now the time to jump in and buy my first professional large format printer?” [I won’t spend our time on the more fundamental question of “why print”, because if you’re reading this you’ve already answered that one to your satisfaction.]
I own an SC-P6000: Should I up-grade to the SC-P7370 (or the SC-P7570)?
For those owning a P6000, the changes between that model and the P7570 or P7370 are substantial:
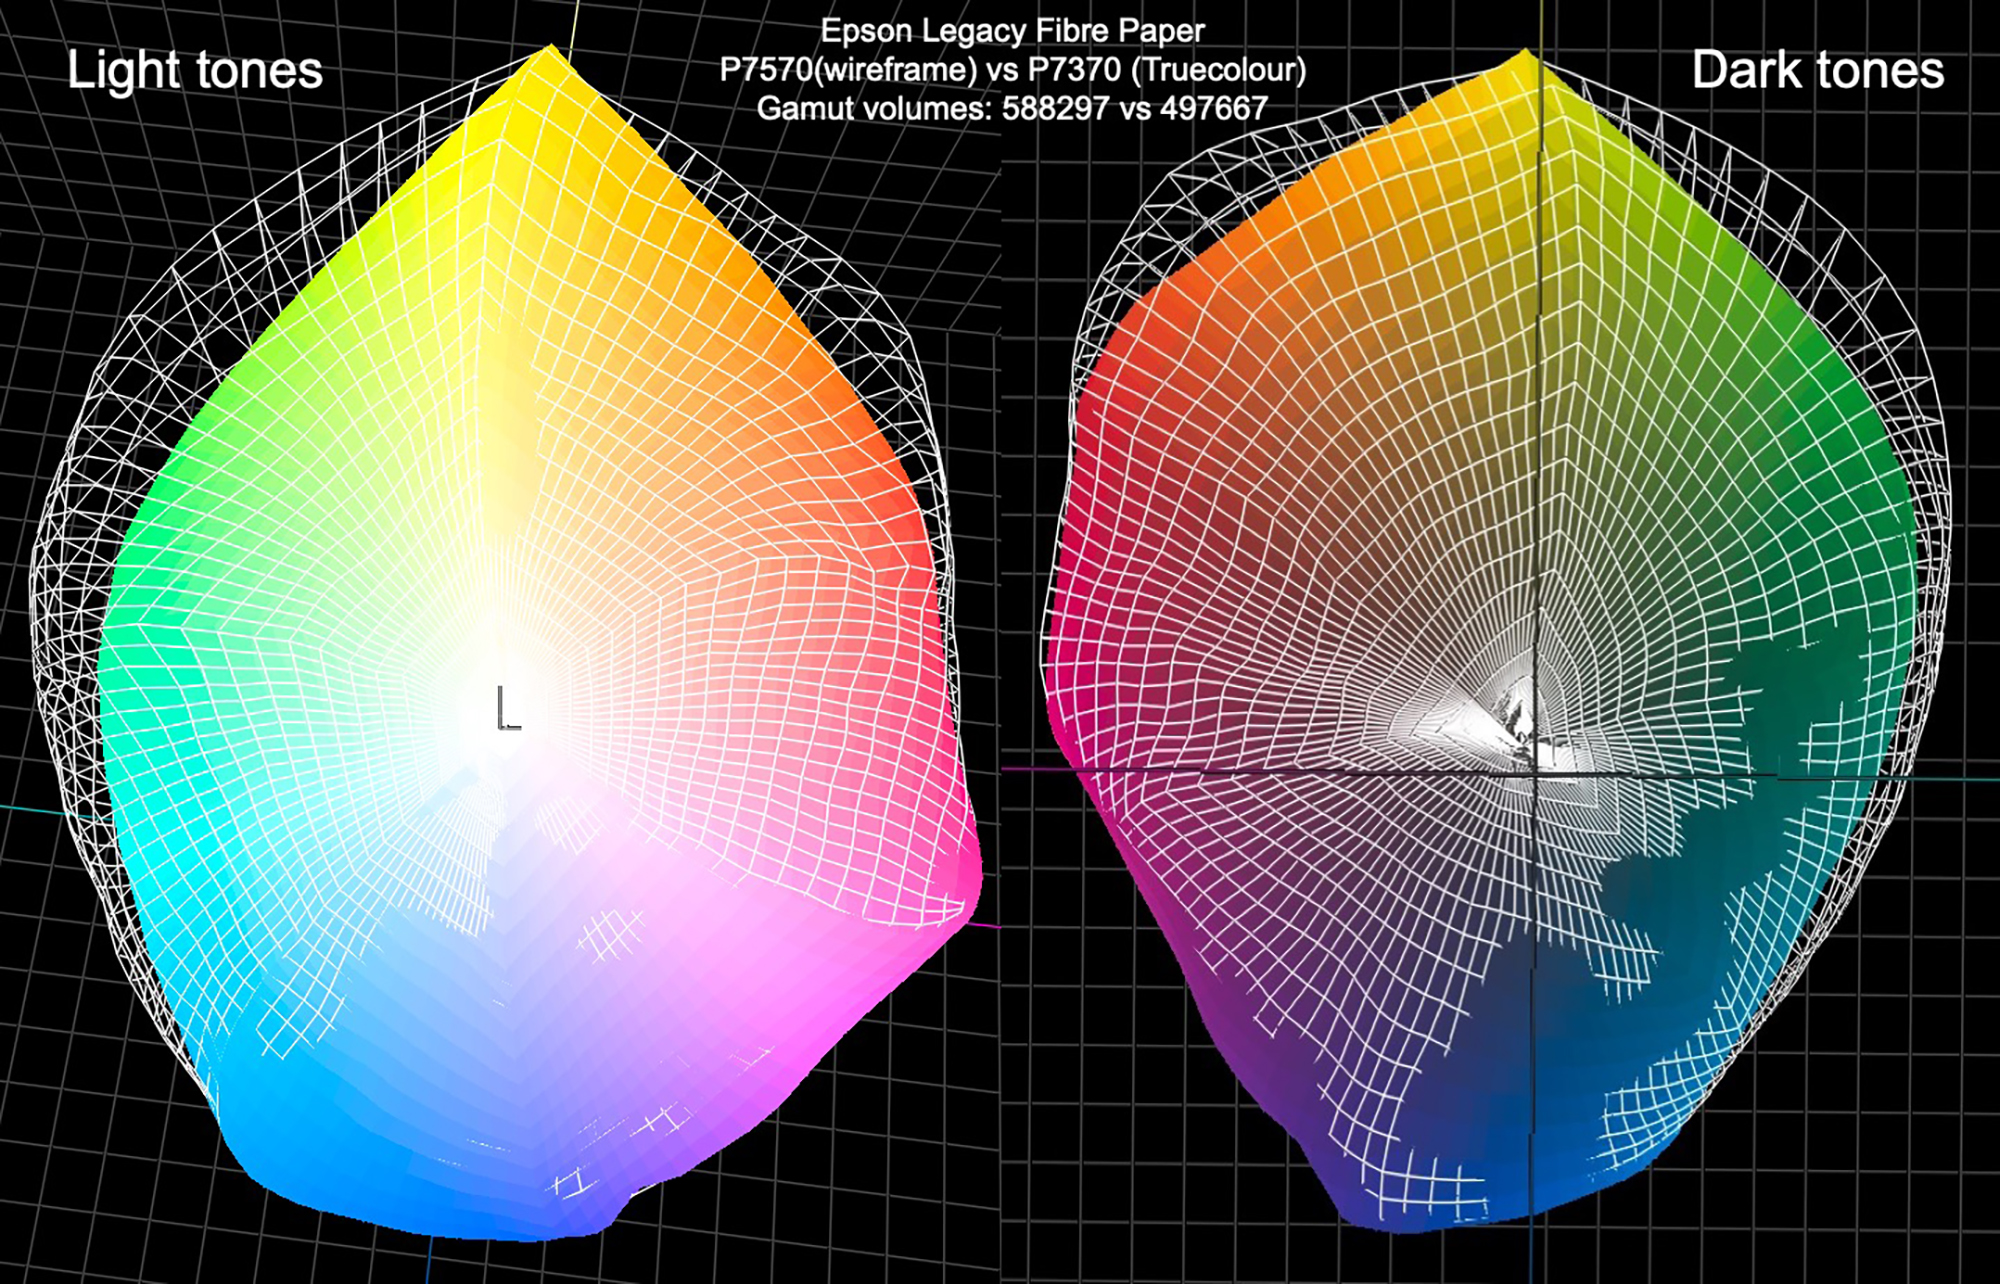
- The P6000 has 8 inks, the P7570 12 inks and the P7370 10 inks. The number and types of inks influence device gamuts (range of printable colours). In essence, especially for non-matte papers, more inks may provide wider printing gamut and possibly superior tone gradation. The difference between the P7570 and P7370 inksets is that the former has Orange and Green, whereas the latter does not. Both have Violet, which extends Blue gamut, most noticeable in the dark blues.
- The P7370/7570 eliminate time and ink wasting switches between Photo and Matte Black inks ; each now has its own channel. No more switching.
- According to Epson’s information, the P7370/9370 generation prints up to 2.5x faster than the P6000/8000 generation. I timed the P7370 and it’s FAST (more below).
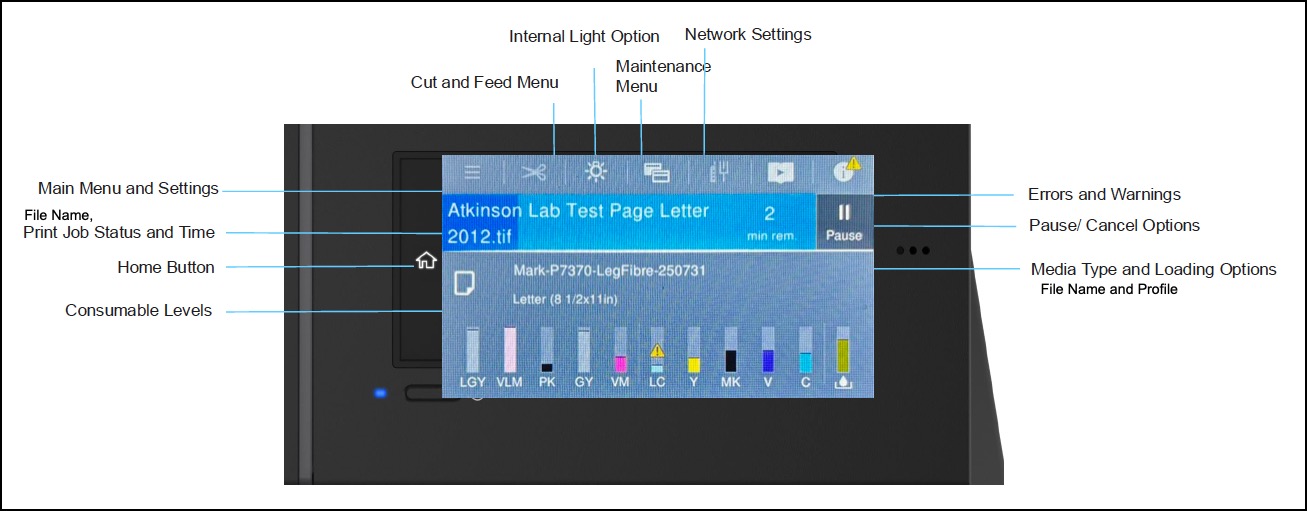
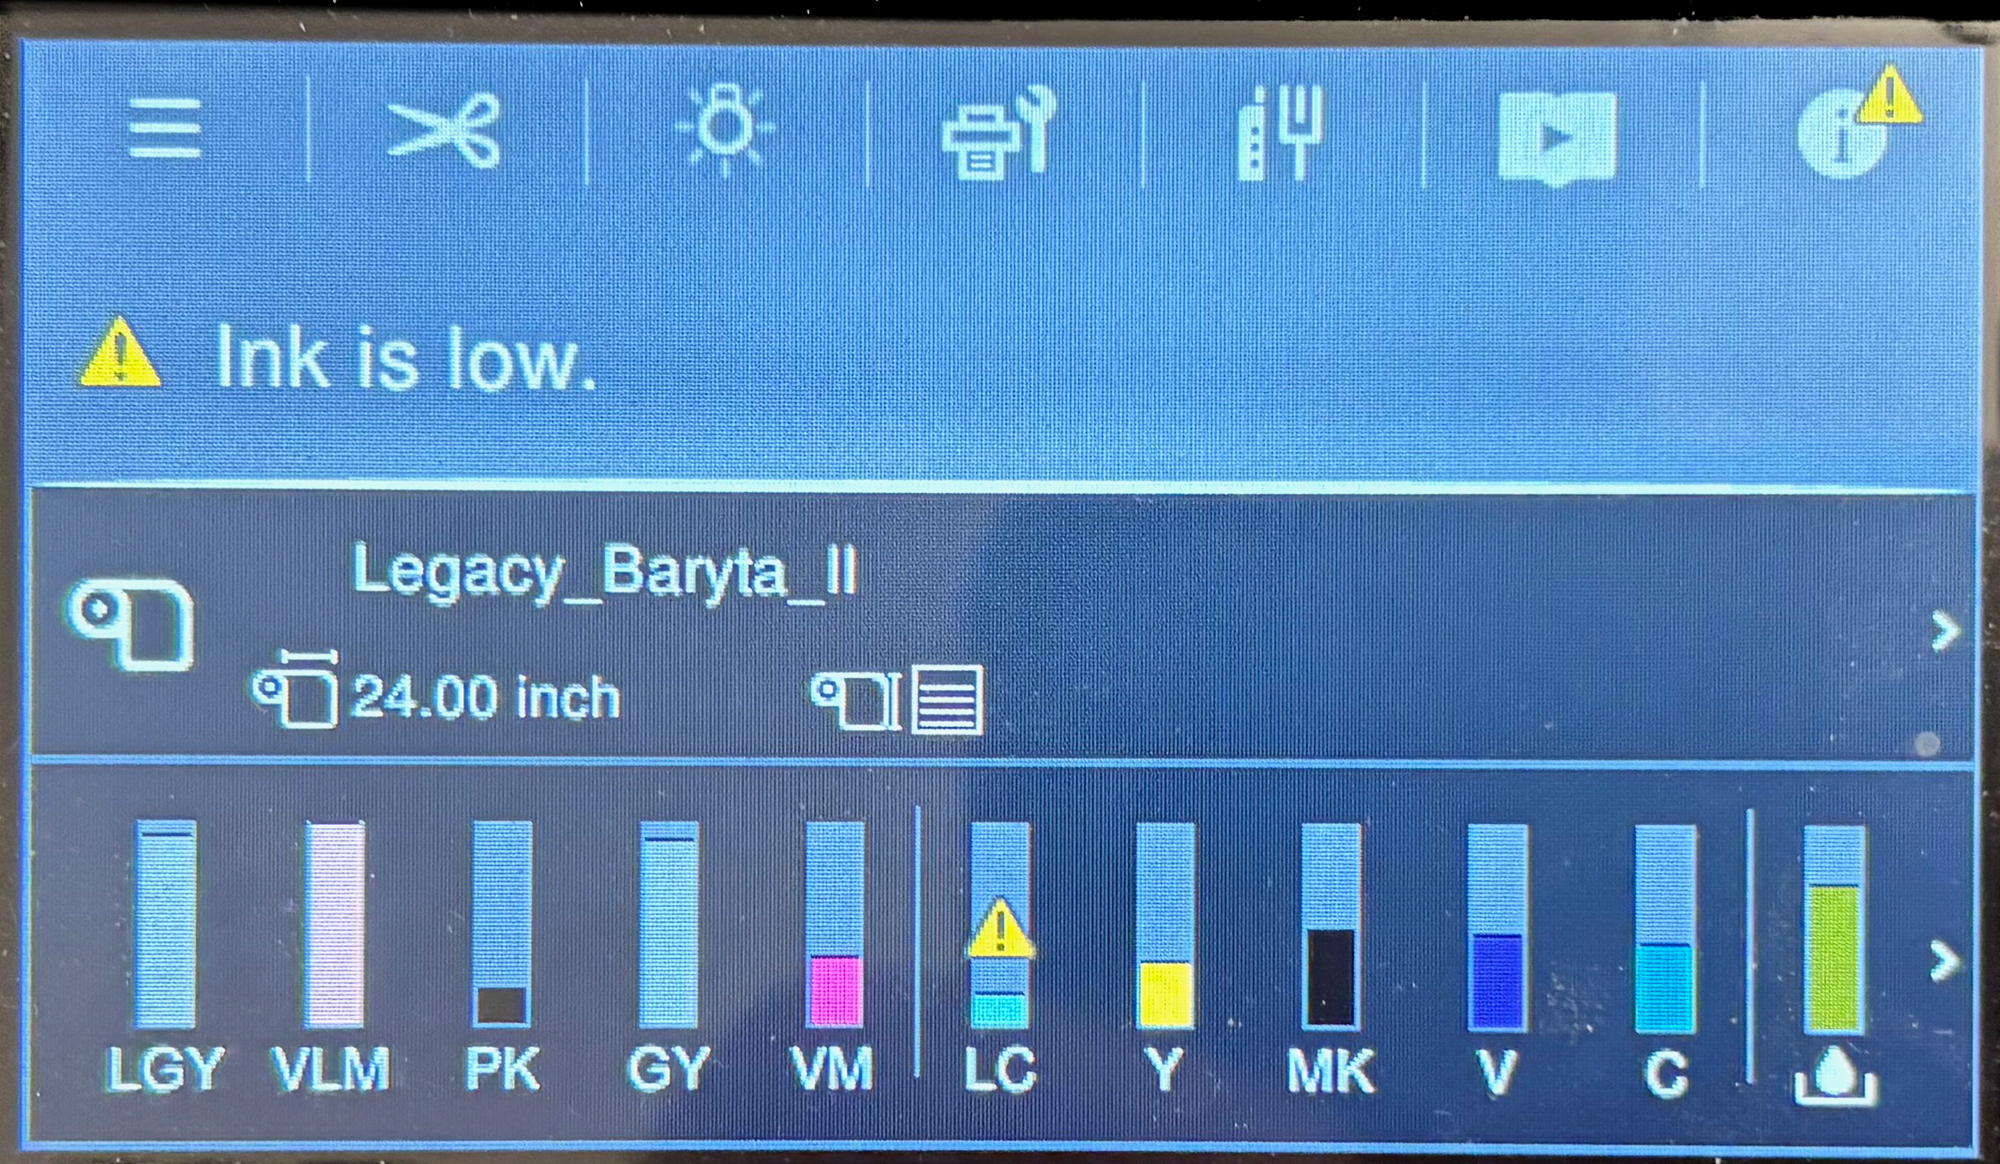
- The new models have a more ergonomic touch- screen (increased size, more intuitive), providing the user with a lot of useful information at one glance (Figure 2, courtesy Epson America, edited: M. Segal).
- The P7370/9370 offer the option of using an Enhanced Black Overcoat (BEO) which provides subtly deeper Black in the lower quartertones when used with gloss and some near-gloss media. I tested this for the SC-P5370 printer, there named “Carbon Black Mode.
- The new models provide for automated nozzle-checking and head cleaning, as well user-accessible cleaning around the print head and the print head cap (reduces the need for service calls).
- There is improved media handling I’ll discuss further below; most interesting, there is a single straight-through feeder for stiff sheets, poster board, et. al.), no space being required behind the printer for media to exit the printer; this means the printer can be stood against a wall to save space.
- These models use the Epson Media Installer (EMI), which I reviewed in my P5370 review, and I’ll be discussing further below. It provides for convenient usage of third-party media in the Epson printer models that support it and easy up-date of media settings. Epson Cloud Solution PORT is for monitoring printer job history and cost estimation, of particular interest to establishments using multiple printers in the current Epson line-up (Please see Annex 2 for my discussion of this software, reproduced from the SC-P5370 review.)
The above list of improvements relative to the P6000/P8000 models provides you with the main feature differences that could inform your decision whether it is worthwhile to upgrade from a P6000/P8000 to a P7570/P7370/P9570/P9370 model. Should you decide to do so or will be purchasing a large format printer for the first time, the next distinction of interest is whether to buy the P7570/P9570 or the P7370/P9370 models. There is a much more limited number of distinctions relevant to that decision – in fact just two operationally significant ones: the price difference and the different number of inks (Ultrachrome Pro 10 versus Ultrachrome Pro 12 inks). For the 12 ink set, Orange and Green were developed for pre-press proofing markets, but good for photography, though may not be needed.
The importance of the price difference largely depends on whether you take a short or a long view of the cost of owning a printer. The short view is simply the difference between the up-front payment for the two models. The long view is how that difference matters to unit costs over an extended period of ownership and usage. I’ll briefly look at both.
(1) Purchase prices: In the US, absent rebates and discounts, the MSRP for the P7570 is $4495, and for the P7370 $3595, a difference of $900. This doesn’t seem like a very large difference, depending on one’s view of the value-added for the costlier model. But for very budget-constrained situations, as many exist these days, it could be meaningful.
(2) The longer-term view: Dealing with the longer-term, one is making projections which depend on assumptions and the one sure thing about the future is that we don’t really know what will happen. Regardless, let’s assume one expects to keep the printer for 8 years. Hence, the annual price difference (absent interest rates) is 900/8 = $112.50 per year (I wish I could buy one week of groceries for that amount). Let’s assume the printer makes as little as 10 prints per week, or 520 per year. The machinery cost difference per print is $0.22, or if one printed twice that many the cost difference per print is $0.11.
Oh – but you may argue that with 12 inks instead of 10, there could be a difference of ink cost per print. I don’t know whether a 12-ink machine uses more ink than a 10-ink machine to make the same print, it could be just a different color mixture using about the same number of milliliters, or maybe it’s a bit more. But in the context of the total cost of making a print it’s a second-order issue, because ink isn’t the big deal in printing costs – it’s the paper. I’ve done some reasonably careful work on this (in Canadian dollars) for my Epson SC-P5000, which is a 10-ink machine. I have no history of ink costs per print on these new models, but I think it’s safe to port the Epson P5000 experience into this discussion.
My total cost for a 17×22 inch print is CAD 14.82 (about USD 10.80), of which the maintenance tank about $0.15, machine capital cost $0.76, ink $2.61 and paper $11.30. So yes, for me paper is over 4x the cost of ink.! Hence, whether the ink cost per print is a bit more or a bit less between these models, it hardly matters.
You may be wondering how this could be when all the complaints one reads about printing cost is focused on ink. Well two things about that: (i) the focus is misinformed, and (ii) each one of these prints uses little ink. My Epson SC-P5000 uses about 1.9 thousandths of a liter (1.9 milliliters) per square foot of printing. We’re getting an incredible technology bargain on colour print costs these days compared with the real costs of alternative processes from yesteryear, not to speak of the huge quality and longevity advantages of today’s inkjet printing. (By the way, “inkjet” sounds kind of commonplace and industrial, so the label you’ll see in the high-end galleries and exhibitions for these works is “Archival Pigment Print”. When you ask them what that is, they’ll tell you it’s model XXXX Epson or Canon professional printers.) Amen.
OK, commercial considerations behind us, let us now focus on what you really want to know: how good are the prints and are these machines user-friendly?
I’m focusing this discussion mainly on the SC-P7370 (SC-P7300 in Europe), with some comparisons to the SC-P7570 (SC-P7500 in Europe), very largely the same machine except for the 10 vs 12 inks, and of course the footprint.
The inkset difference can create a gamut difference. Recall we said above more inks (and other factors about how they are used) generally could mean wider maximum gamut, though the SC-P5000 challenges that generality. The big question is whether it really matters to the rendition of our photographs, and that in turn depends on the colour range of the photos. We’re going to have a rather careful look at this. Right now.
The printable gamut depends not only on the inkset (P7370 inks are the same as P5370 and P900/P700 inks), but more importantly on the paper. Gloss/semi-gloss papers reflect much more light than matte papers, the ink stratification properties are different and matte papers allow “dot gain”, resulting in much wider gamut for the former than the latter.
We can compare different printers for the same paper, or different papers for the same printer. I do both, with extensive reliance on ColorThink 4, a wonderful piece of software for visualizing these differences. For now, let’s just note the technical differences, but not get excited about them until I show how they play out against real-world photographs.
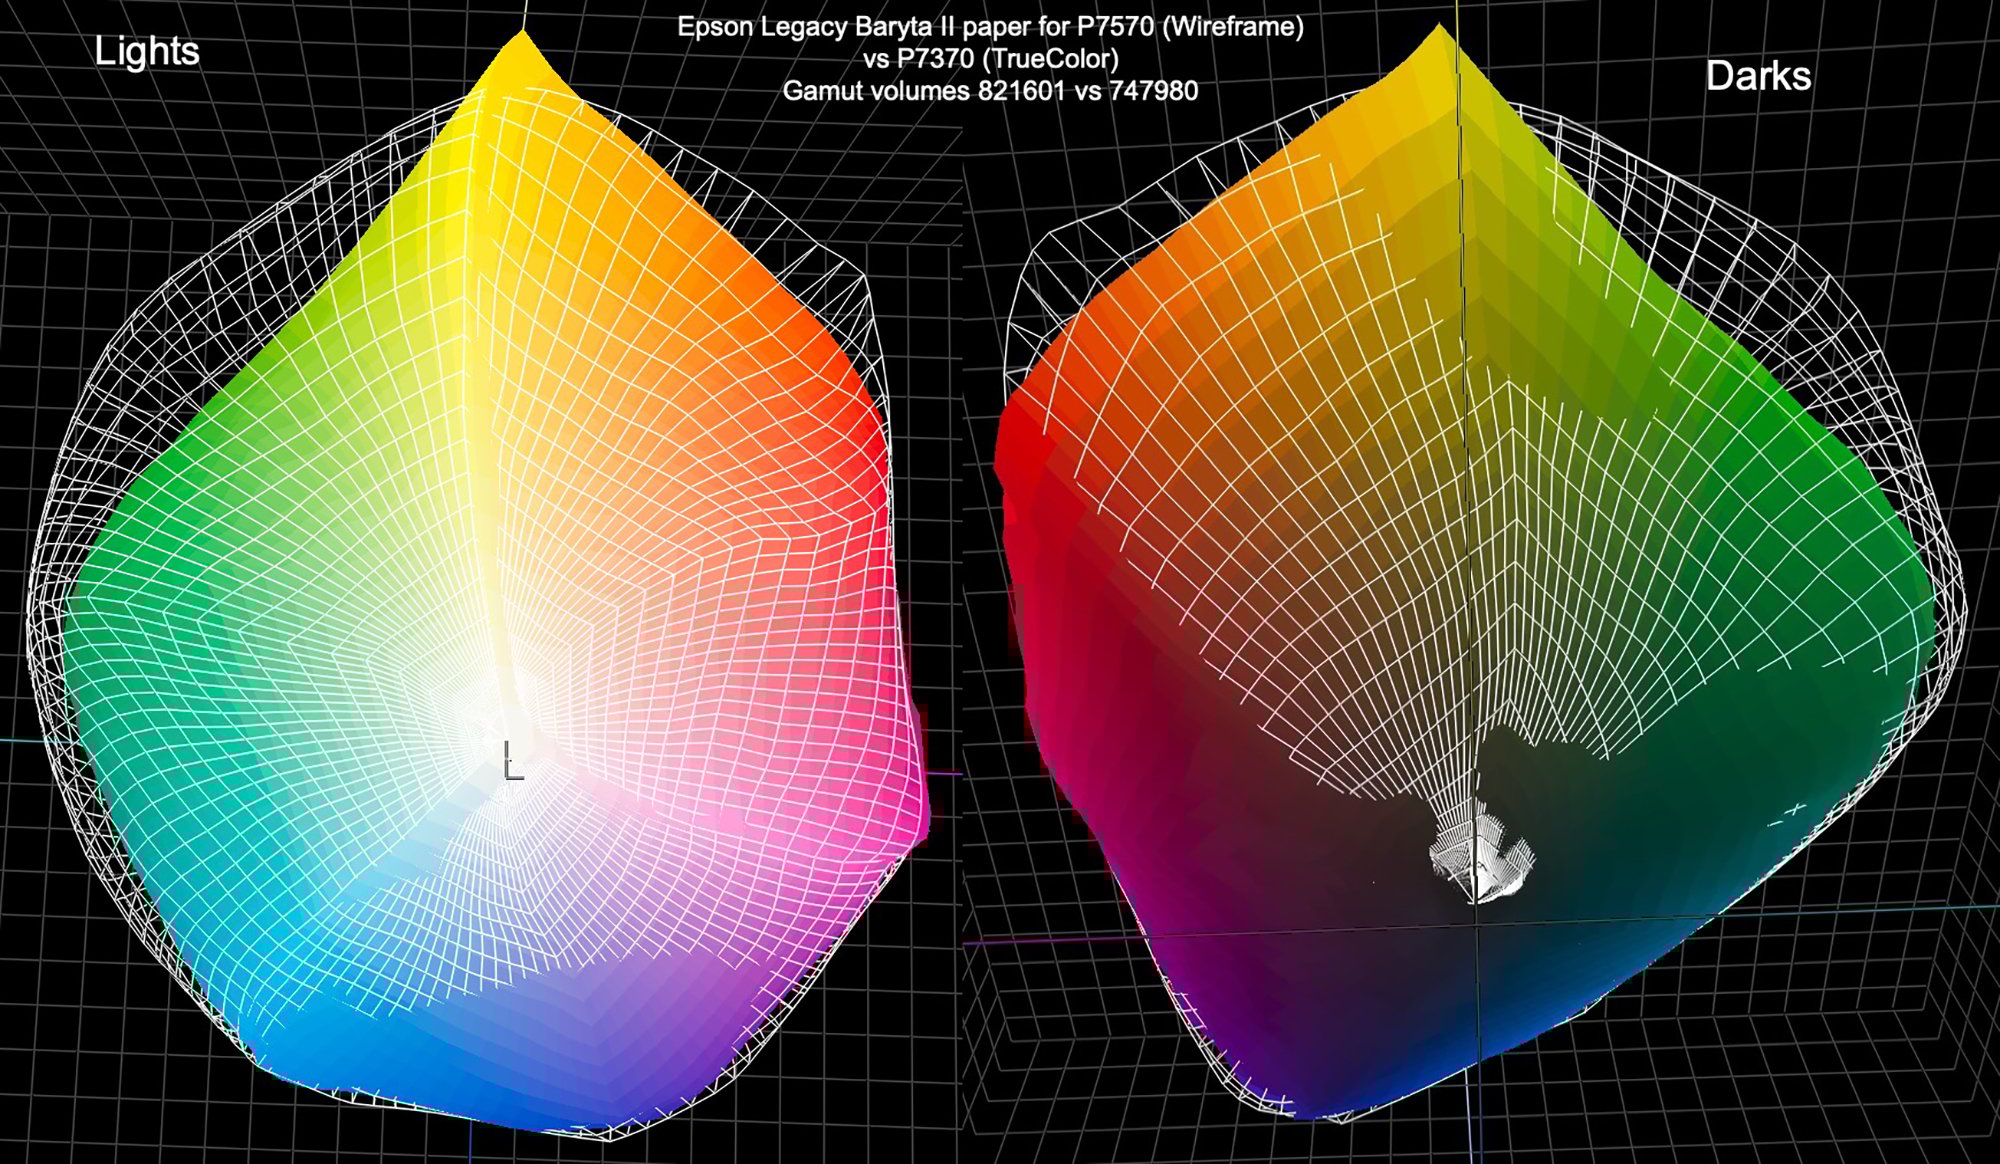
Different printers (P7570 vs P7370), same paper [Epson Legacy Fibre (matte); or Epson Legacy Baryta II (“luster”) ].
Figures 3 and 4 show that for both papers, the gamut volume is indeed wider in the orange and green areas for the P7570 compared with the P7370. This is expected because the P7570 has orange and green inks, whereas the P7370 does not. This by no means implies the P7370 can’t print orange and green – indeed it does and very well, but with somewhat less maximum saturation than the P7570 is capable of with the same paper.
Different Papers (Legacy Fibre (matte); Epson Legacy Baryta II (“semi-gloss”)), same printer [Epson P7570 or P7370]
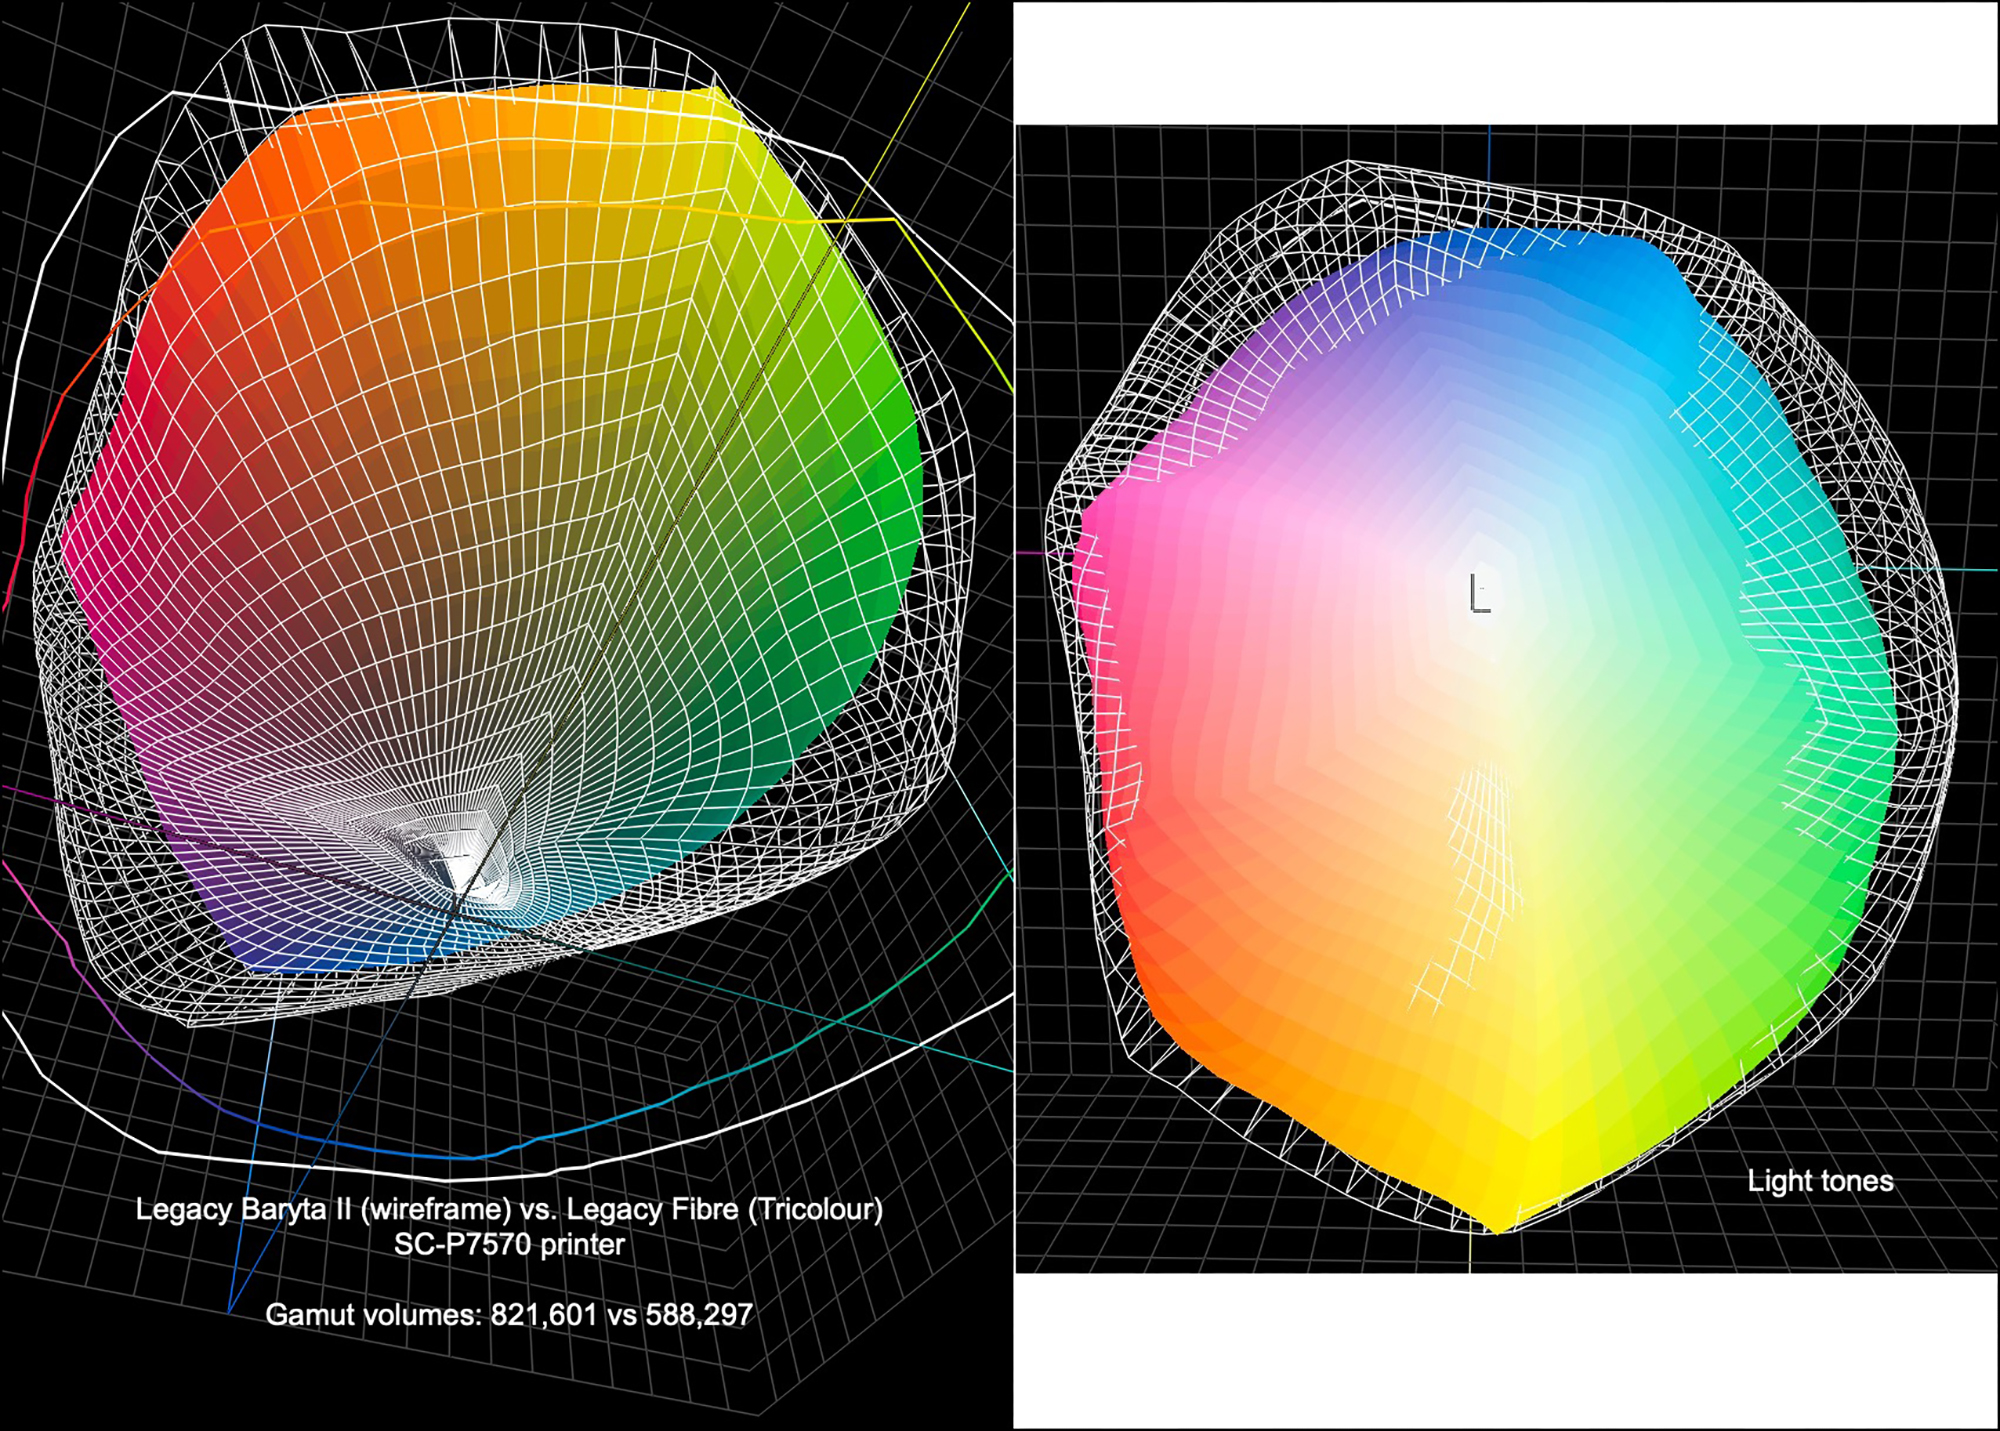
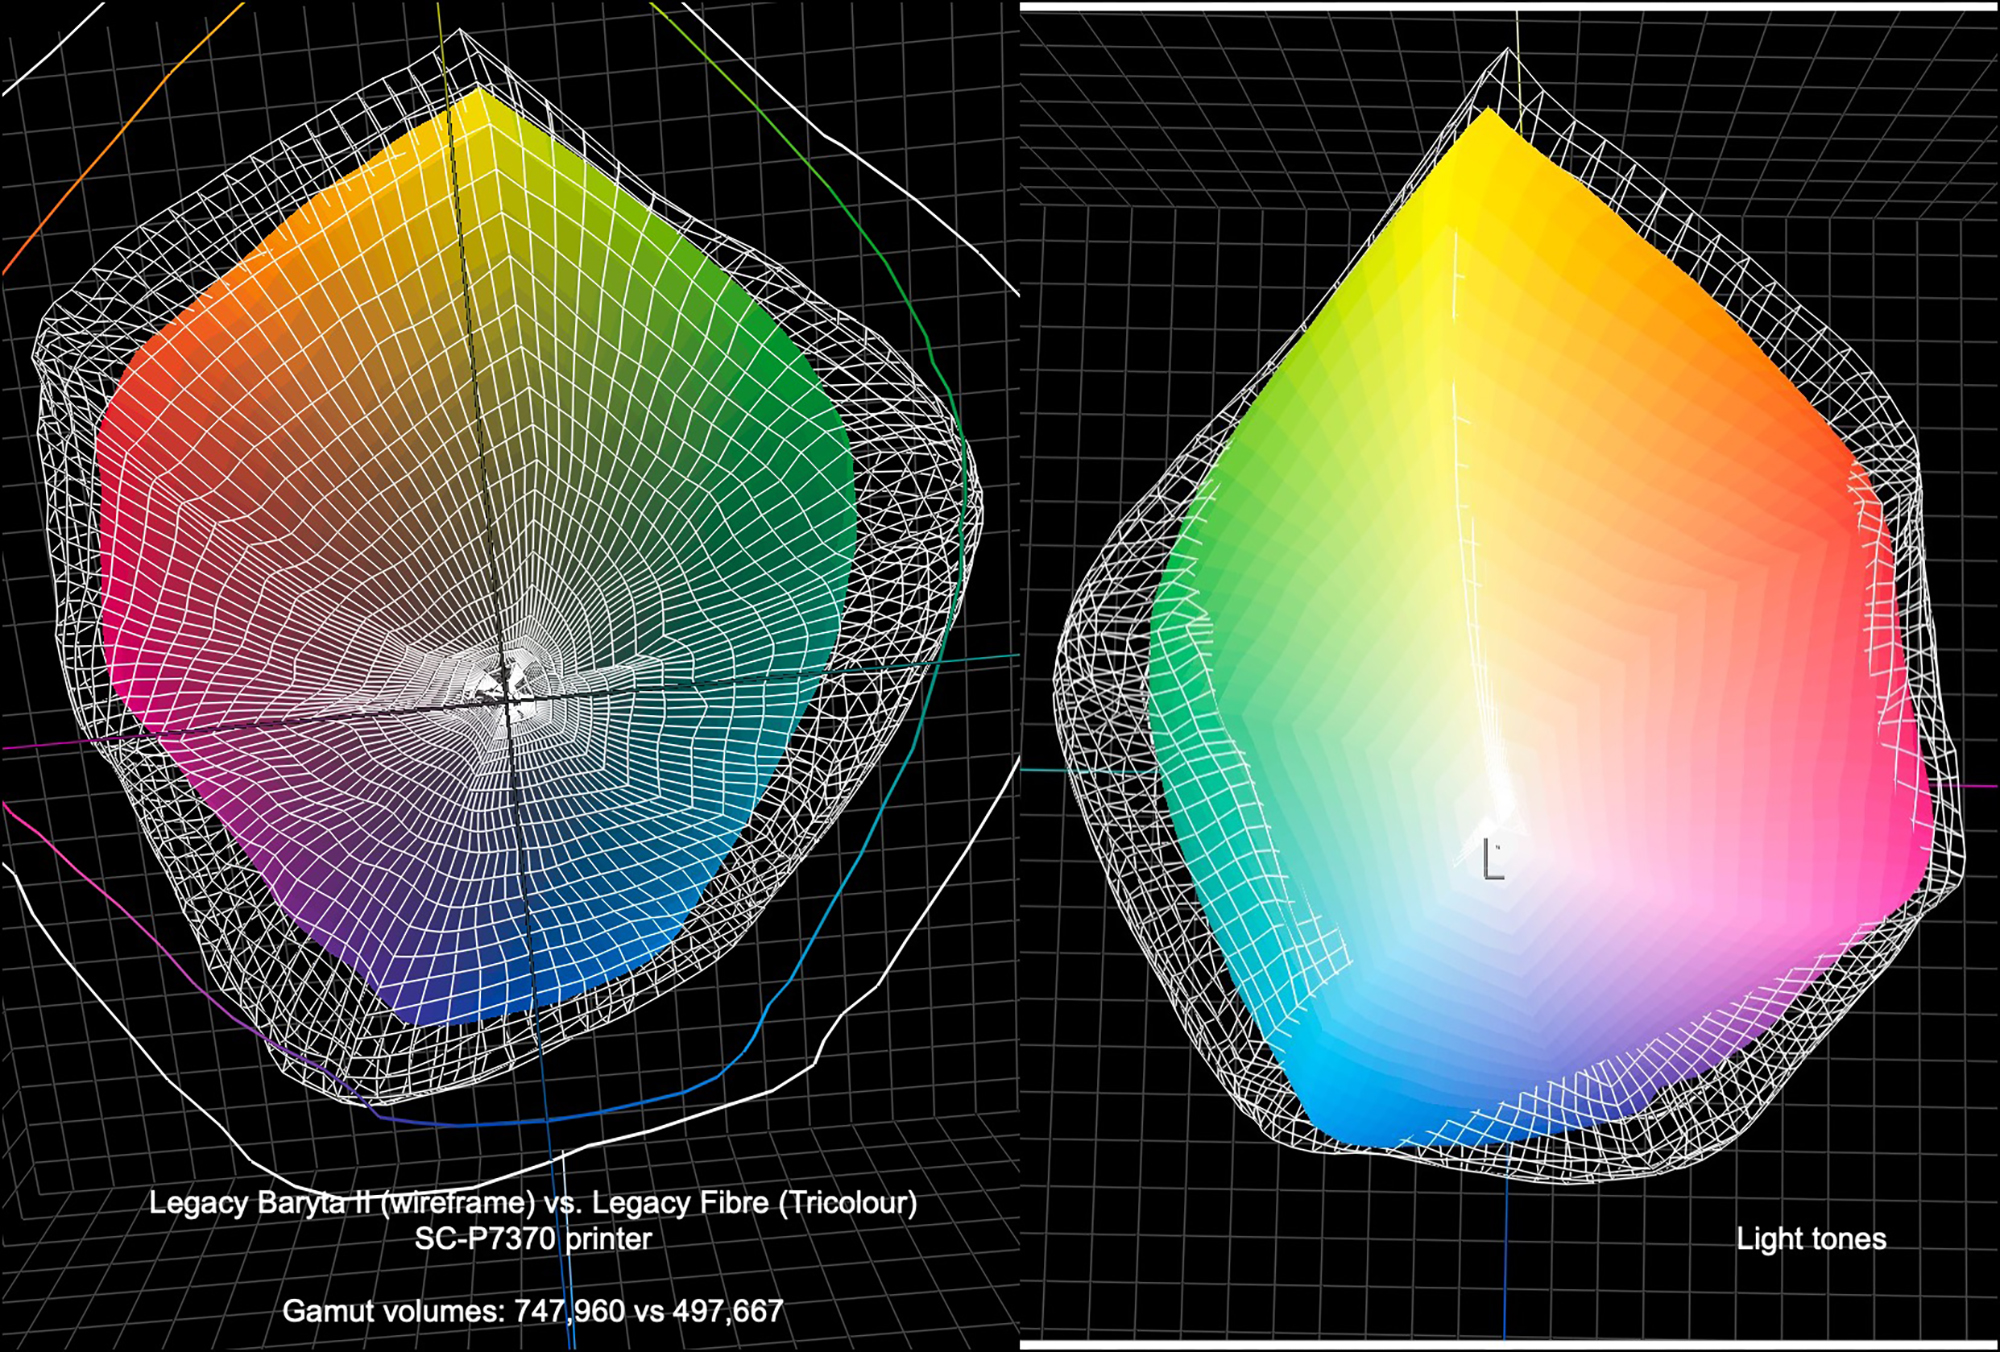
For both printers one can see the superior gamut of Legacy Baryta II versus Legacy Fibre, particularly for the darker colours, but much less so for most of the lighter colours.
The important question emerging from these comparisons is what they mean when applied to real world photos.
One can examine this in ColorThink 4 by importing photos to the application where they are broken down into all their unique colours, represented as dots. One then shows these dots against the backdrop of the selected printer/paper profile 3D gamut map and rotates the map to show at maximum all those dots that fall outside the background profile gamut. The fewer that do so the better. I selected some photos ranging from those that can be considered as “ordinary” – not needing extraordinarily high gamut printing capability, to those that are more intense colour-wise and do challenge device gamuts (A “device gamut” is a printer/paper combination). This provides as objective a representation of printer gamut capability as I can provide over the Internet, but of course doesn’t fully replace seeing the same photo printed in the different printers. For that experience you will have to take my word for it, or arrange a demo at your nearest dealer who has both machines set-up and working.
I’ll re-iterate: just because a colour or colour range spills over a gamut boundary doesn’t mean they would not be sufficiently reproduced in a print to look satisfactory. It only means that those colours which are out of gamut (OOG) will be collapsed to the gamut boundary. With Relative Colorimetric Rendering Intent, the other colours will remain unaffected. With Perceptual Rendering Intent the other colours will be shifted in some relationship to the colours that have been forced to the gamut boundary, to provide what some may consider a more pleasing overall tone and colour distribution in the printed photo. The only way to know which of these Rendering Intents to select before printing the photo is to preview them photo by photo using the softproof feature of your image editing application and selecting the one you prefer.
In Figure 7, and all remaining such figures, the left side shows the subject photo. The center portion shows that photo’s unique colours as analyzed in ColorThink 4. The right portion shows the overlays of the colours on three device profiles featuring Epson Legacy Baryta II papers. As a benchmark, I selected the Epson SC-P5000 printer. Although now a discontinued printer with very few remaining for sale in North America, despite its being an eight-year-old model and “only” 10 inks, it has the widest gamut printing capability of any SureColor printer I’ve worked with. So, I thought it useful for purposes of benchmarking and historical continuity to display its performance with respect to gamut along with the newest models. You will see that the somewhat lower gamut volumes of the current devices don’t have remarkable impacts on colour appearance in prints, save for the most extreme cases, where the perceptual differences nonetheless remain small.
I think it’s also important to consider that where gamut seems to be lacking, by moderately adjusting brightness and individual colour saturation controls one can create a perception of more saturation than actually exists by the numbers.
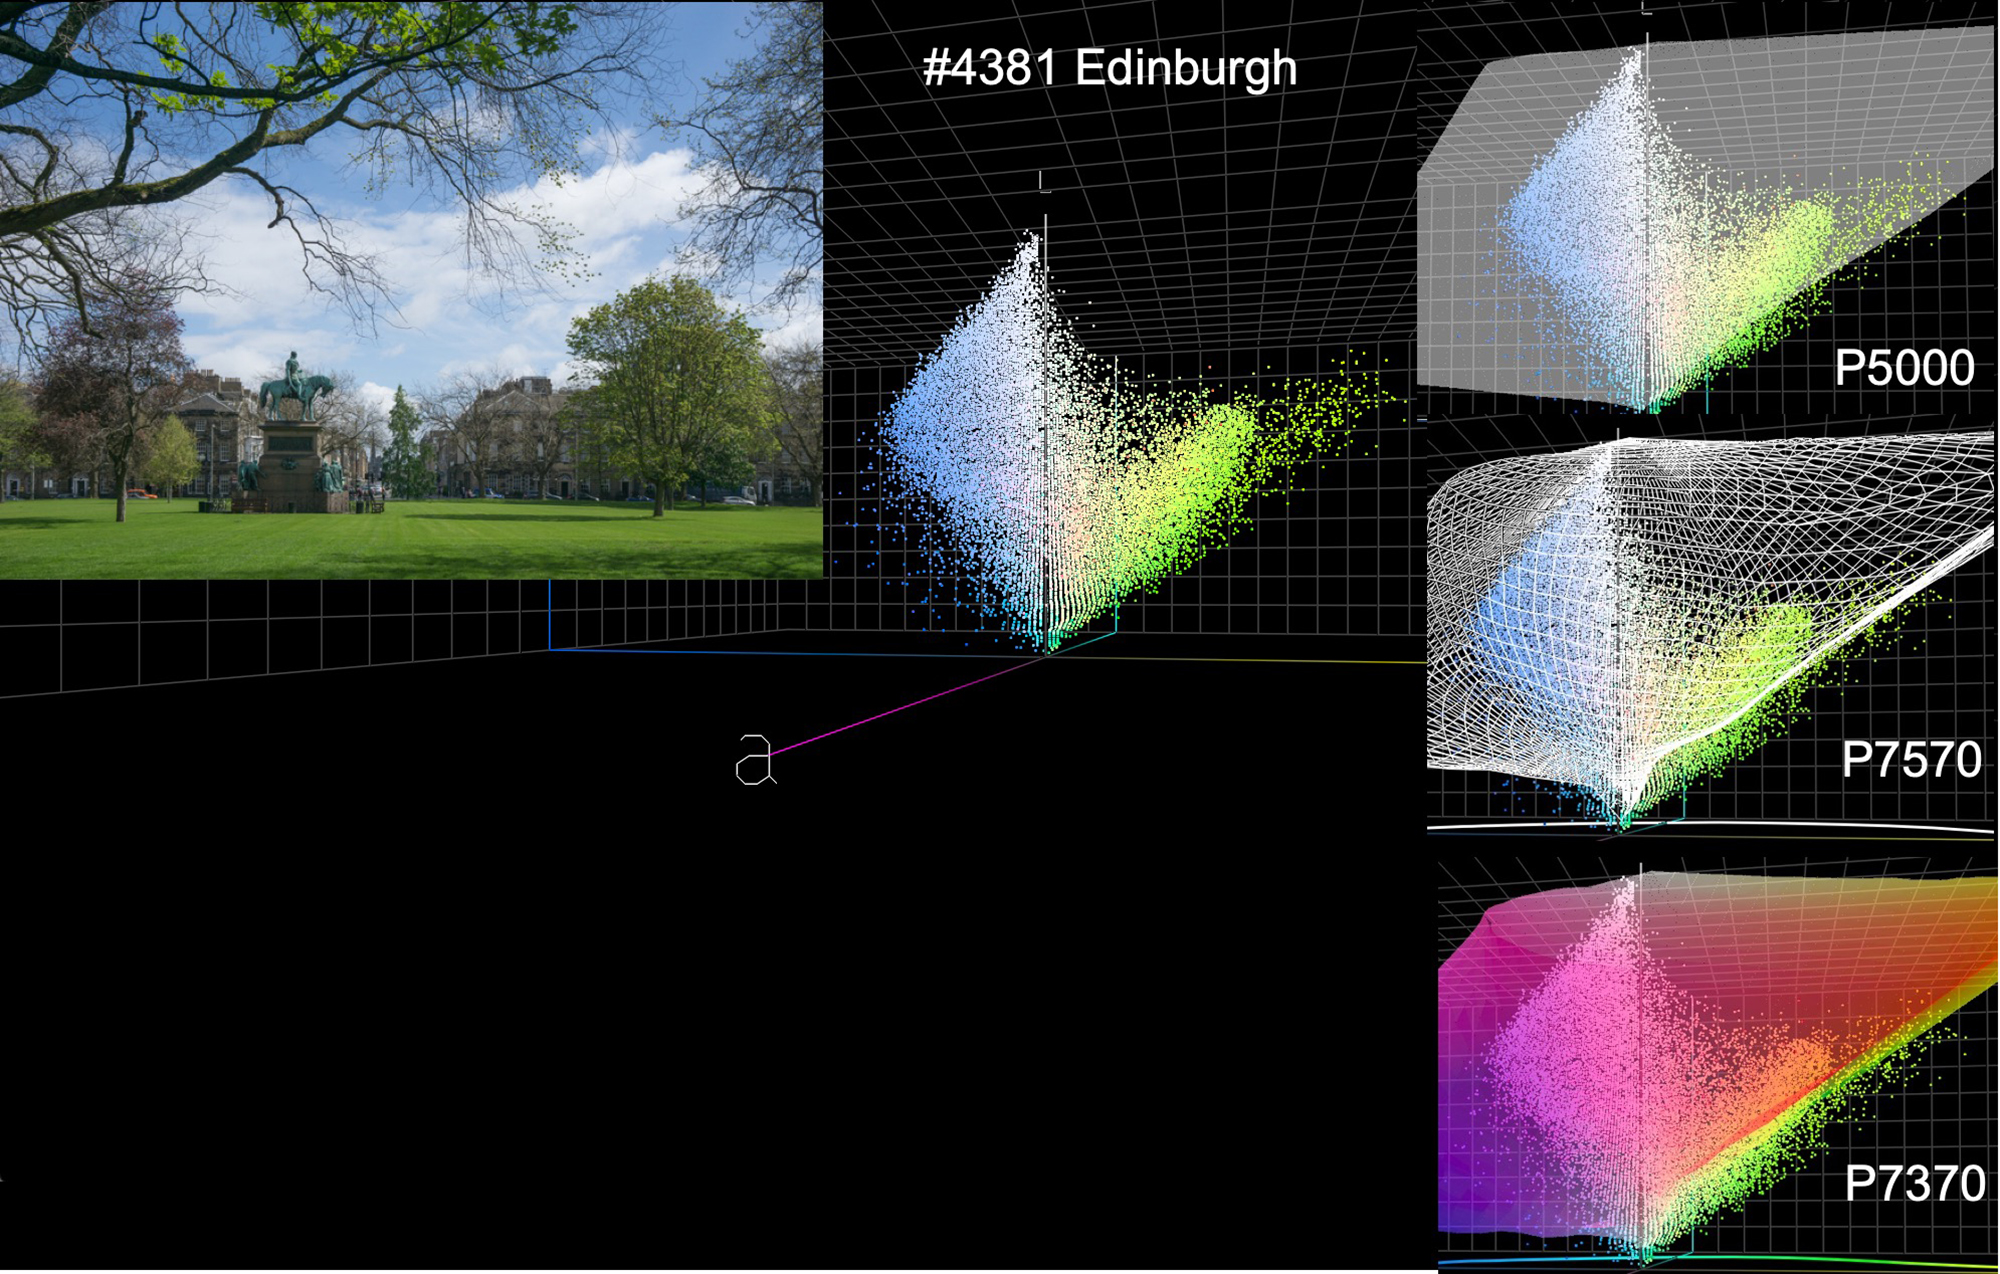
In Figure 7, observe that only intense lime-green exhibits some OOG shades, least for the P5000, a bit more for the P7570 and a bit more again for the P7370. These graphical differences are not large enough to make a remarkable difference in print appearance.
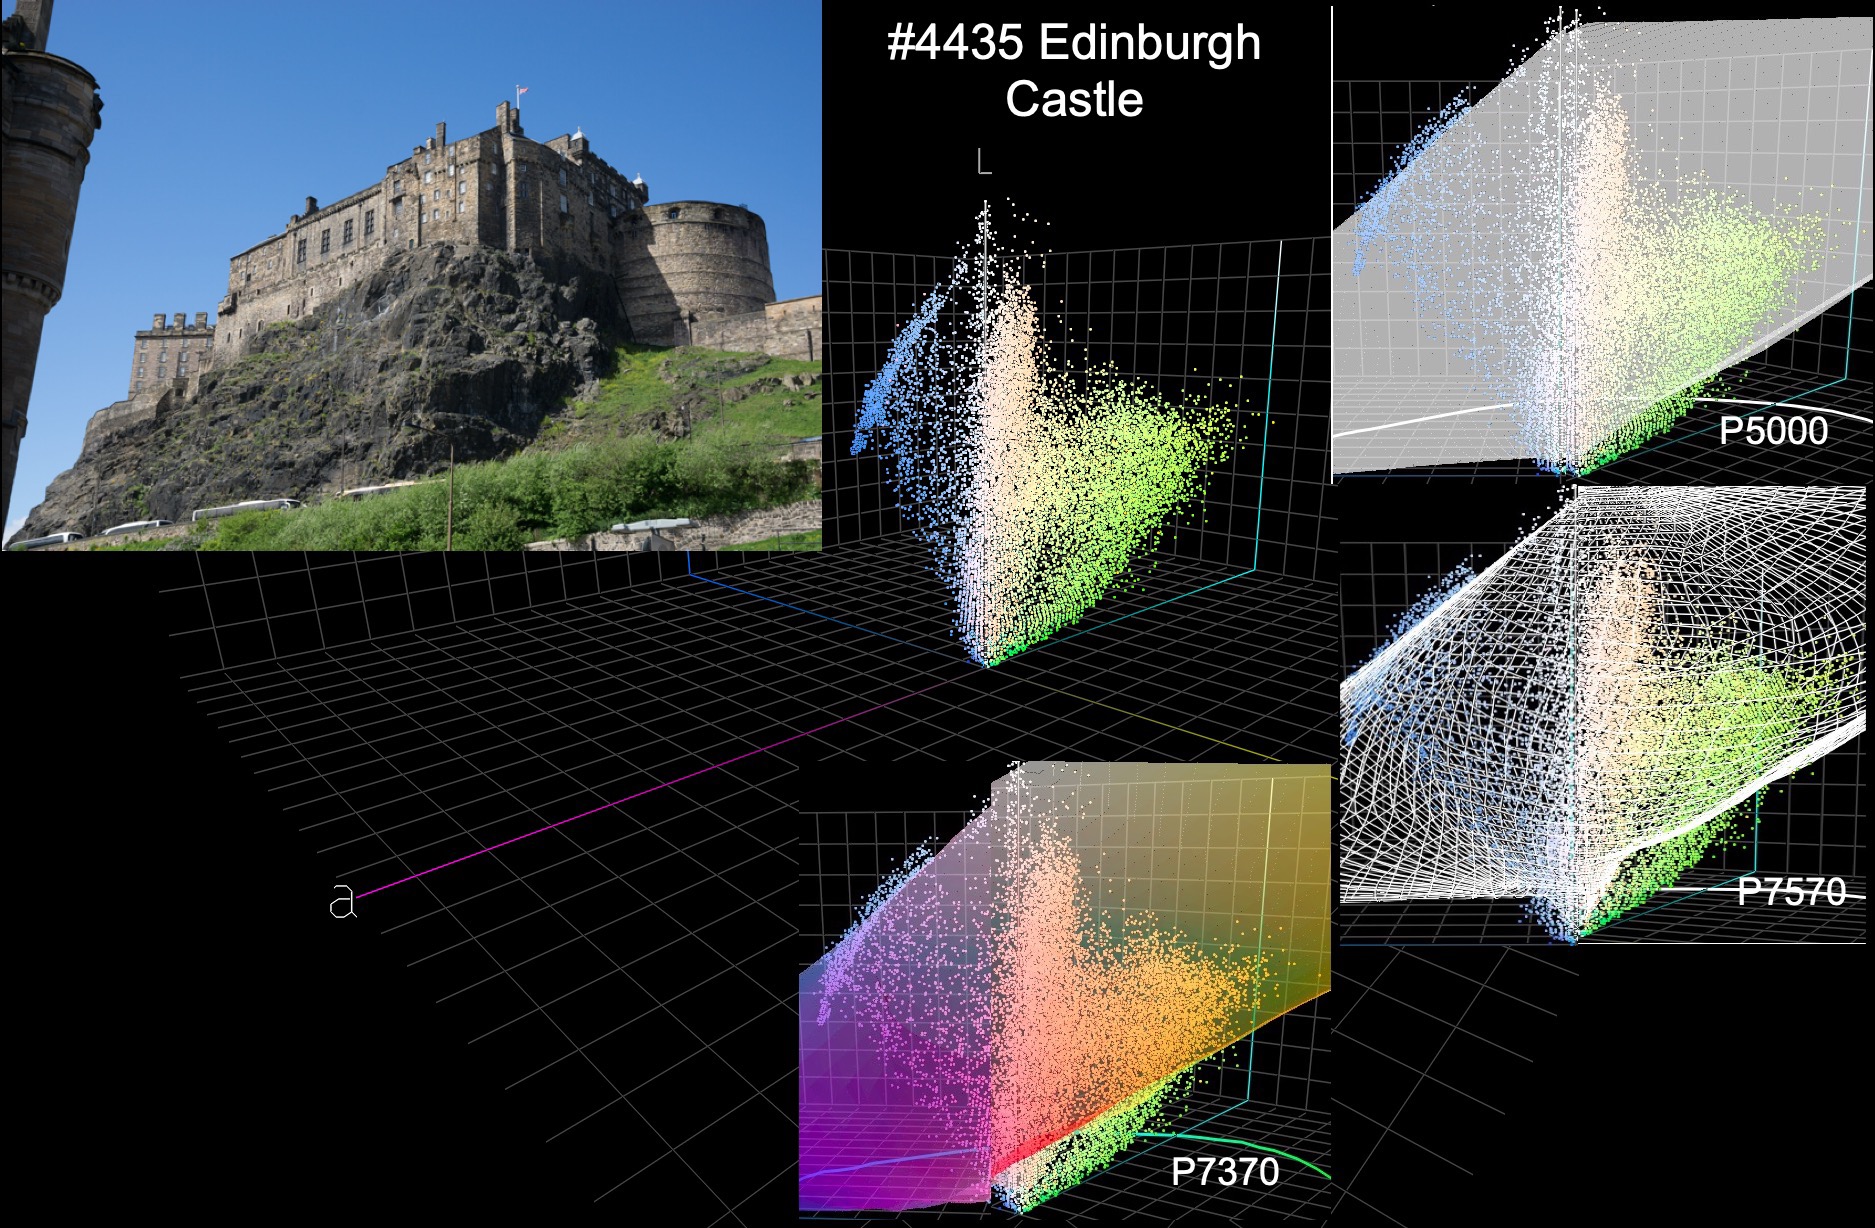
The Edinburgh castle photo (Figure 8) exhibits similar gamut range for lime green as in Figure 7; but there is a bit of OOG Blue, hardly different between the three devices.
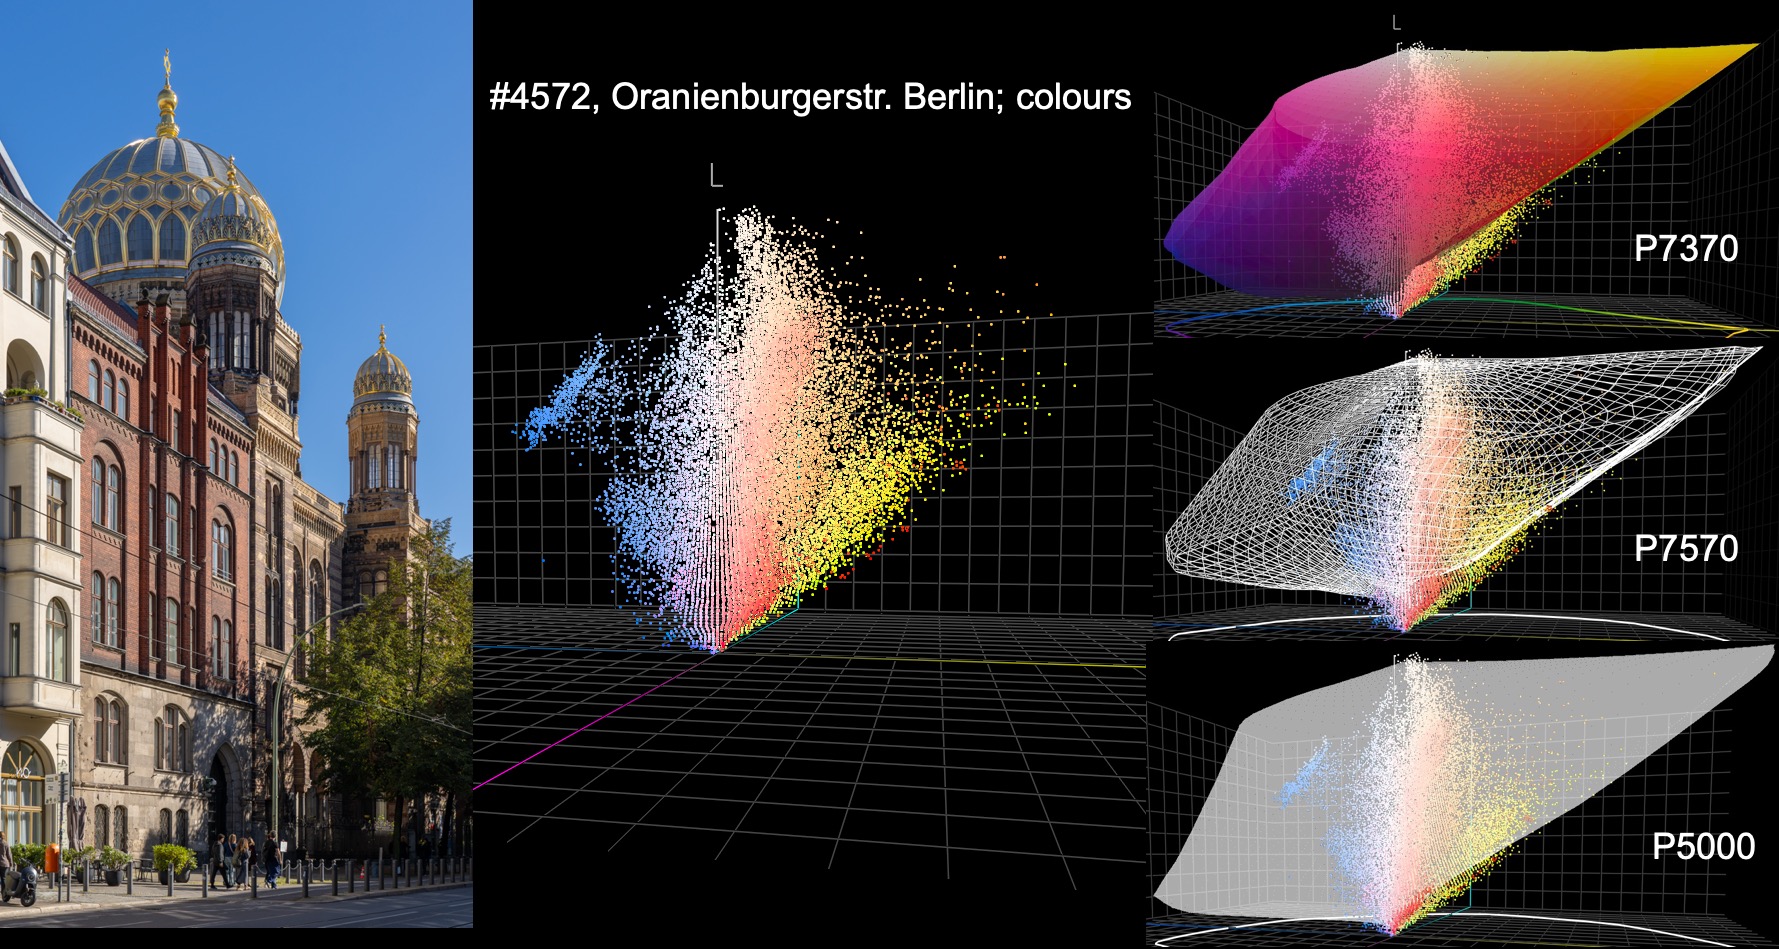
In Figure 9, a tame photo of a slightly colorful street scene in Berlin, we observe that all three printers have a bit of a gamut limitation with deep-shade Orange and Yellow, the P5000 showing the least, the P7570 a little more, and the P7370 just a tad more again, the absence of the Orange ink of its P7570 sibling making little difference.
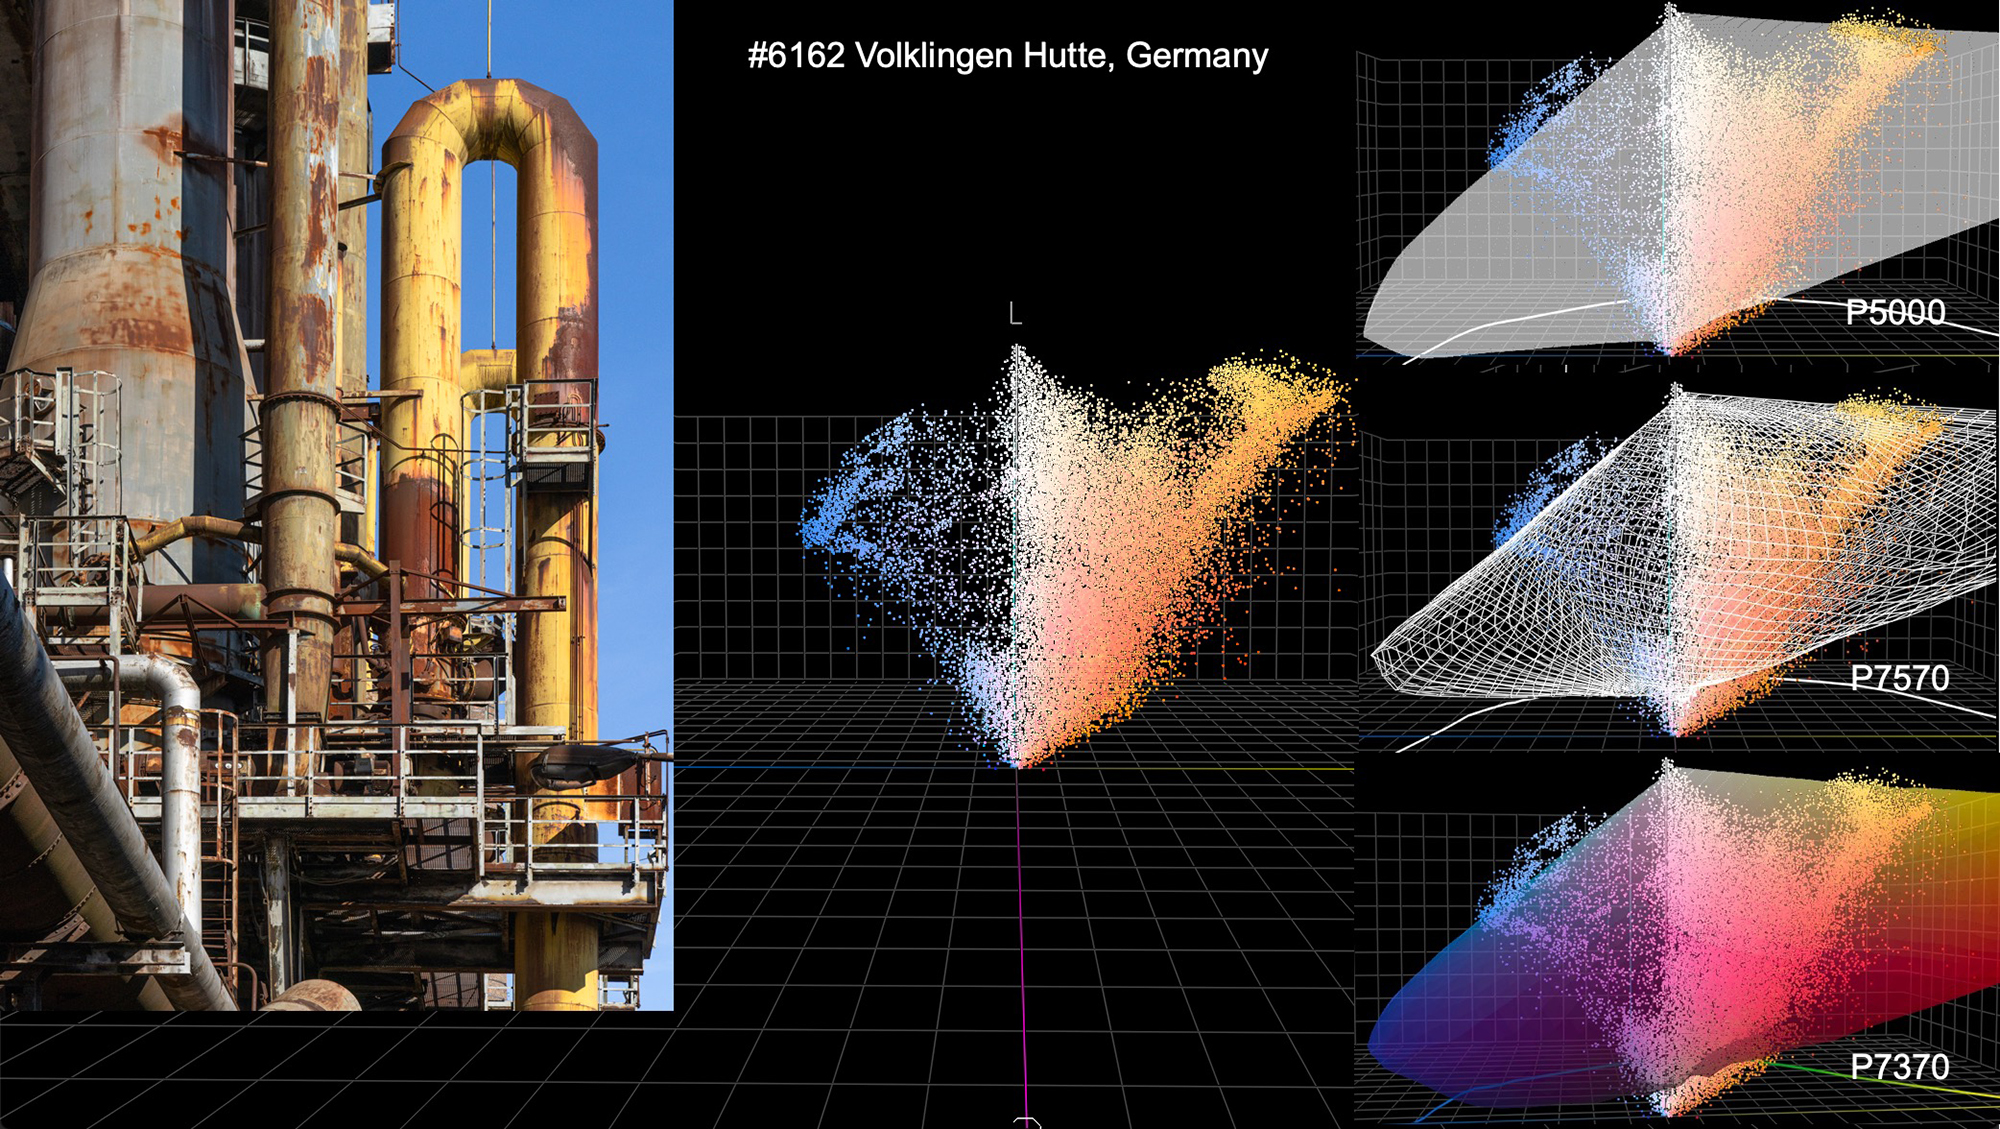
In Figure 10 the colour palette becomes just a little more aggressive, there being some OOG Orange, and Blue. The Blue clipping is about the same in all three, the Orange clipping just a tad more in the P7370 than for the P7570, the difference being really small.
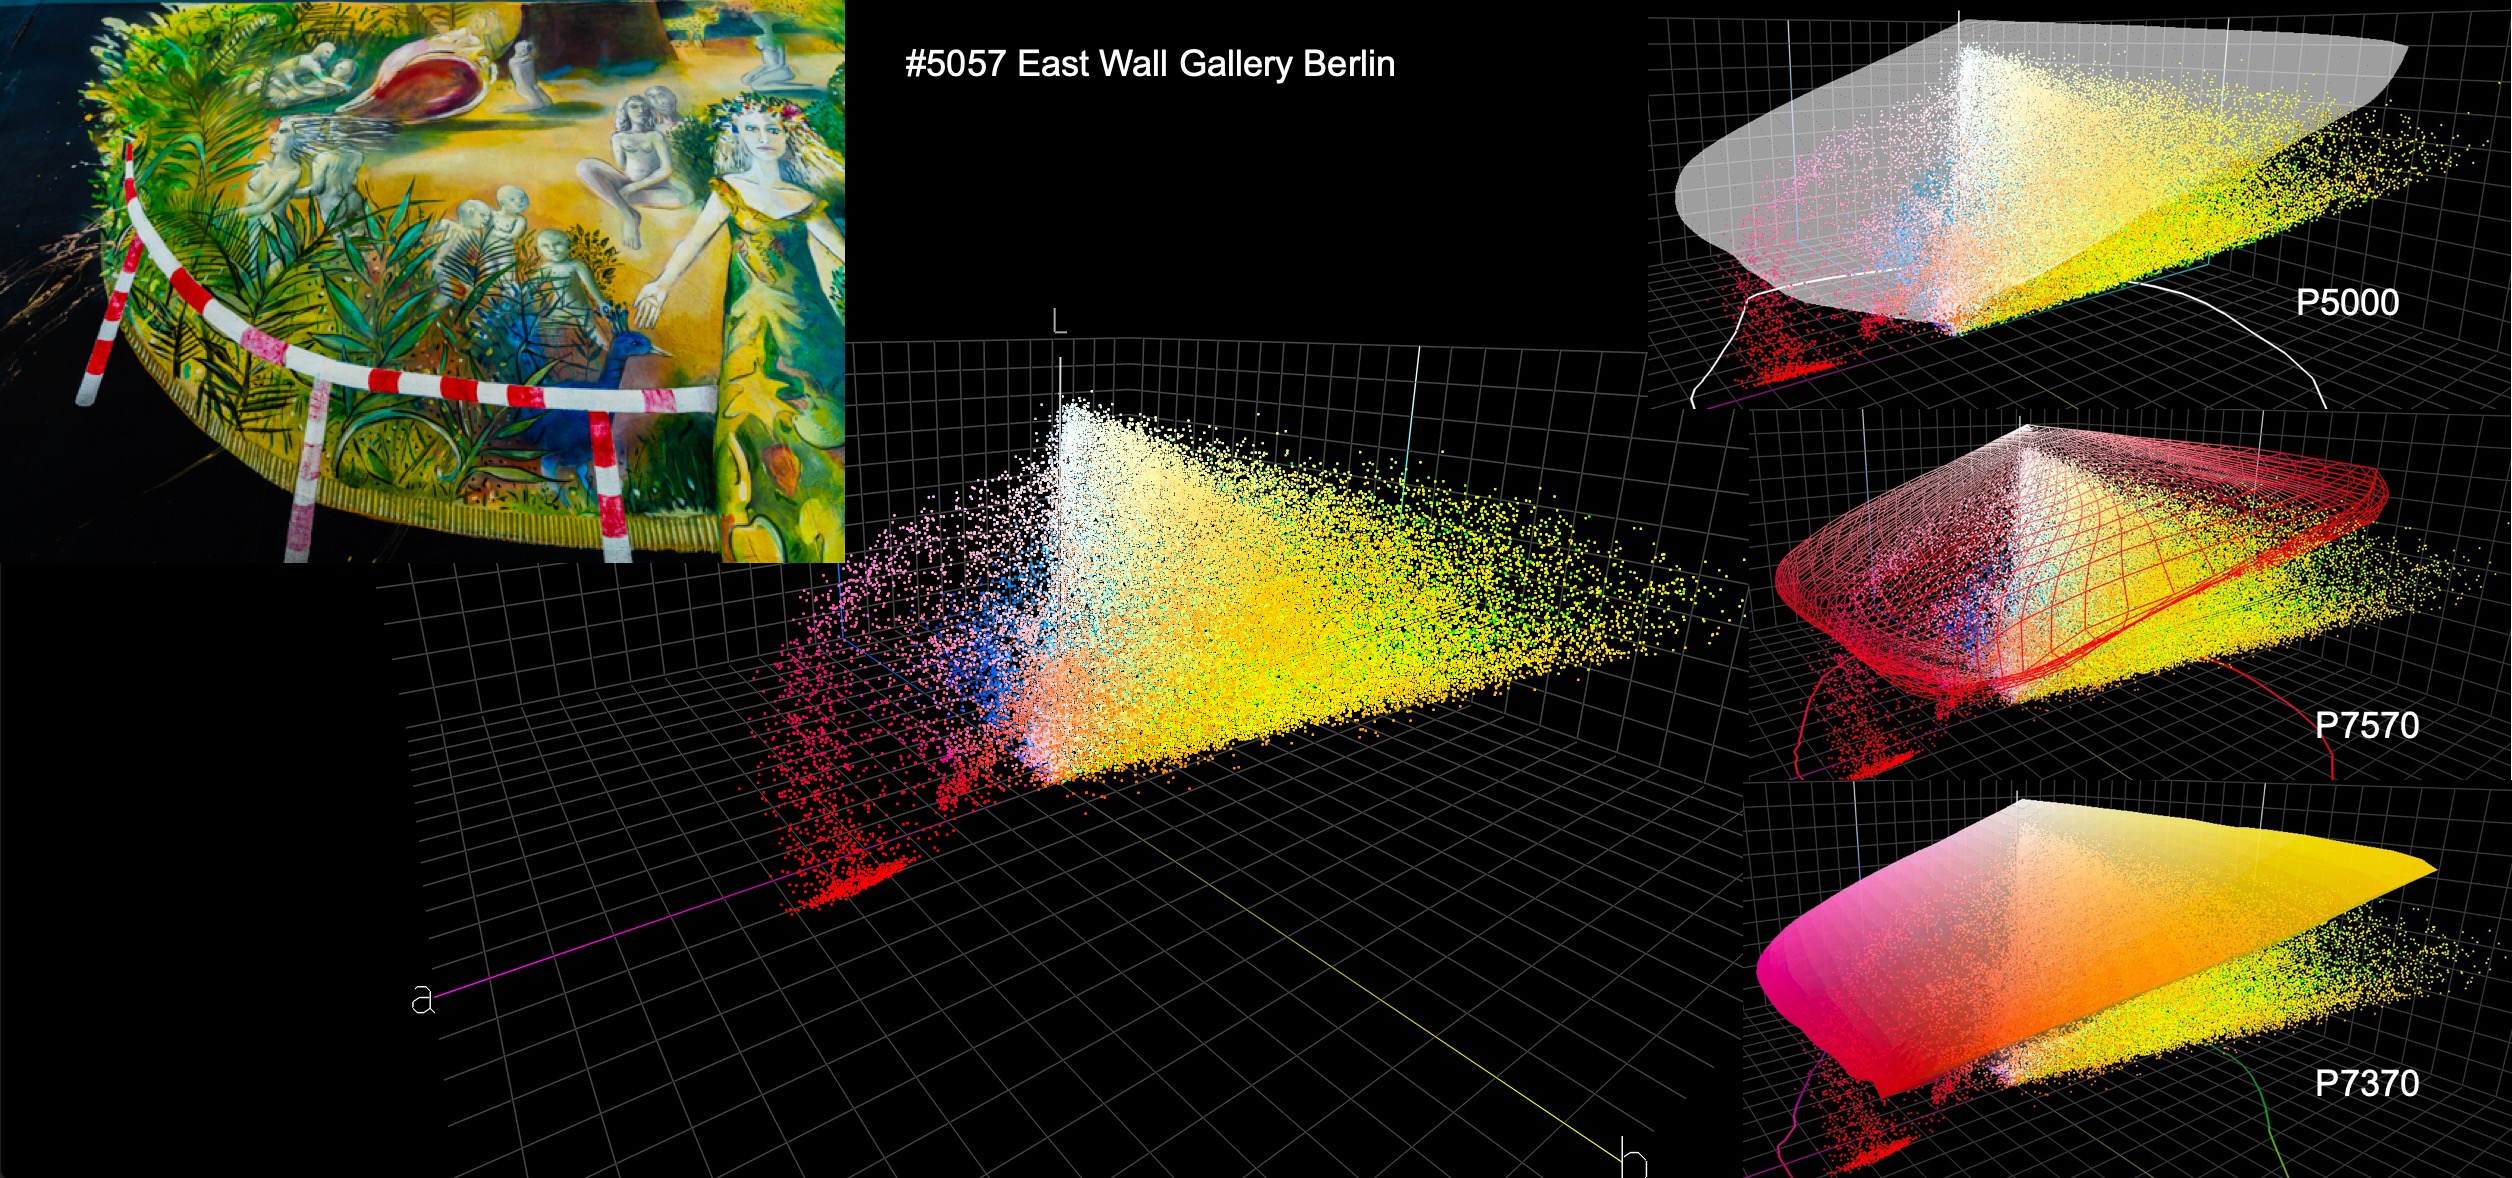

Mural art is often highly saturated. I selected the photos in Figures 11 and 12 as cases in point, emphasizing highly saturated Orange, Yellow and Green in Figure 11, and Orange, Red and Lime Green in Figure 12. All three printers in both photos show substantial amounts of OOG Red, Orange, Yellow and a certain amount of Green. The interesting point is that the differences between the three printers are not large, and the prints are all fine.

Colour doesn’t dazzle too much more than shown in the photo of Figure 13. Here the big OOG story is Violet, Purple and Blue. The P5000 has no Violet ink, but the P7570 and P7370 do. Nonetheless it’s remarkable that the extent of OOG colours in these areas is similar, the P7370 showing a tad more bright Green and Yellow OOG, but not remarkable enough to make a difference in the printed output.
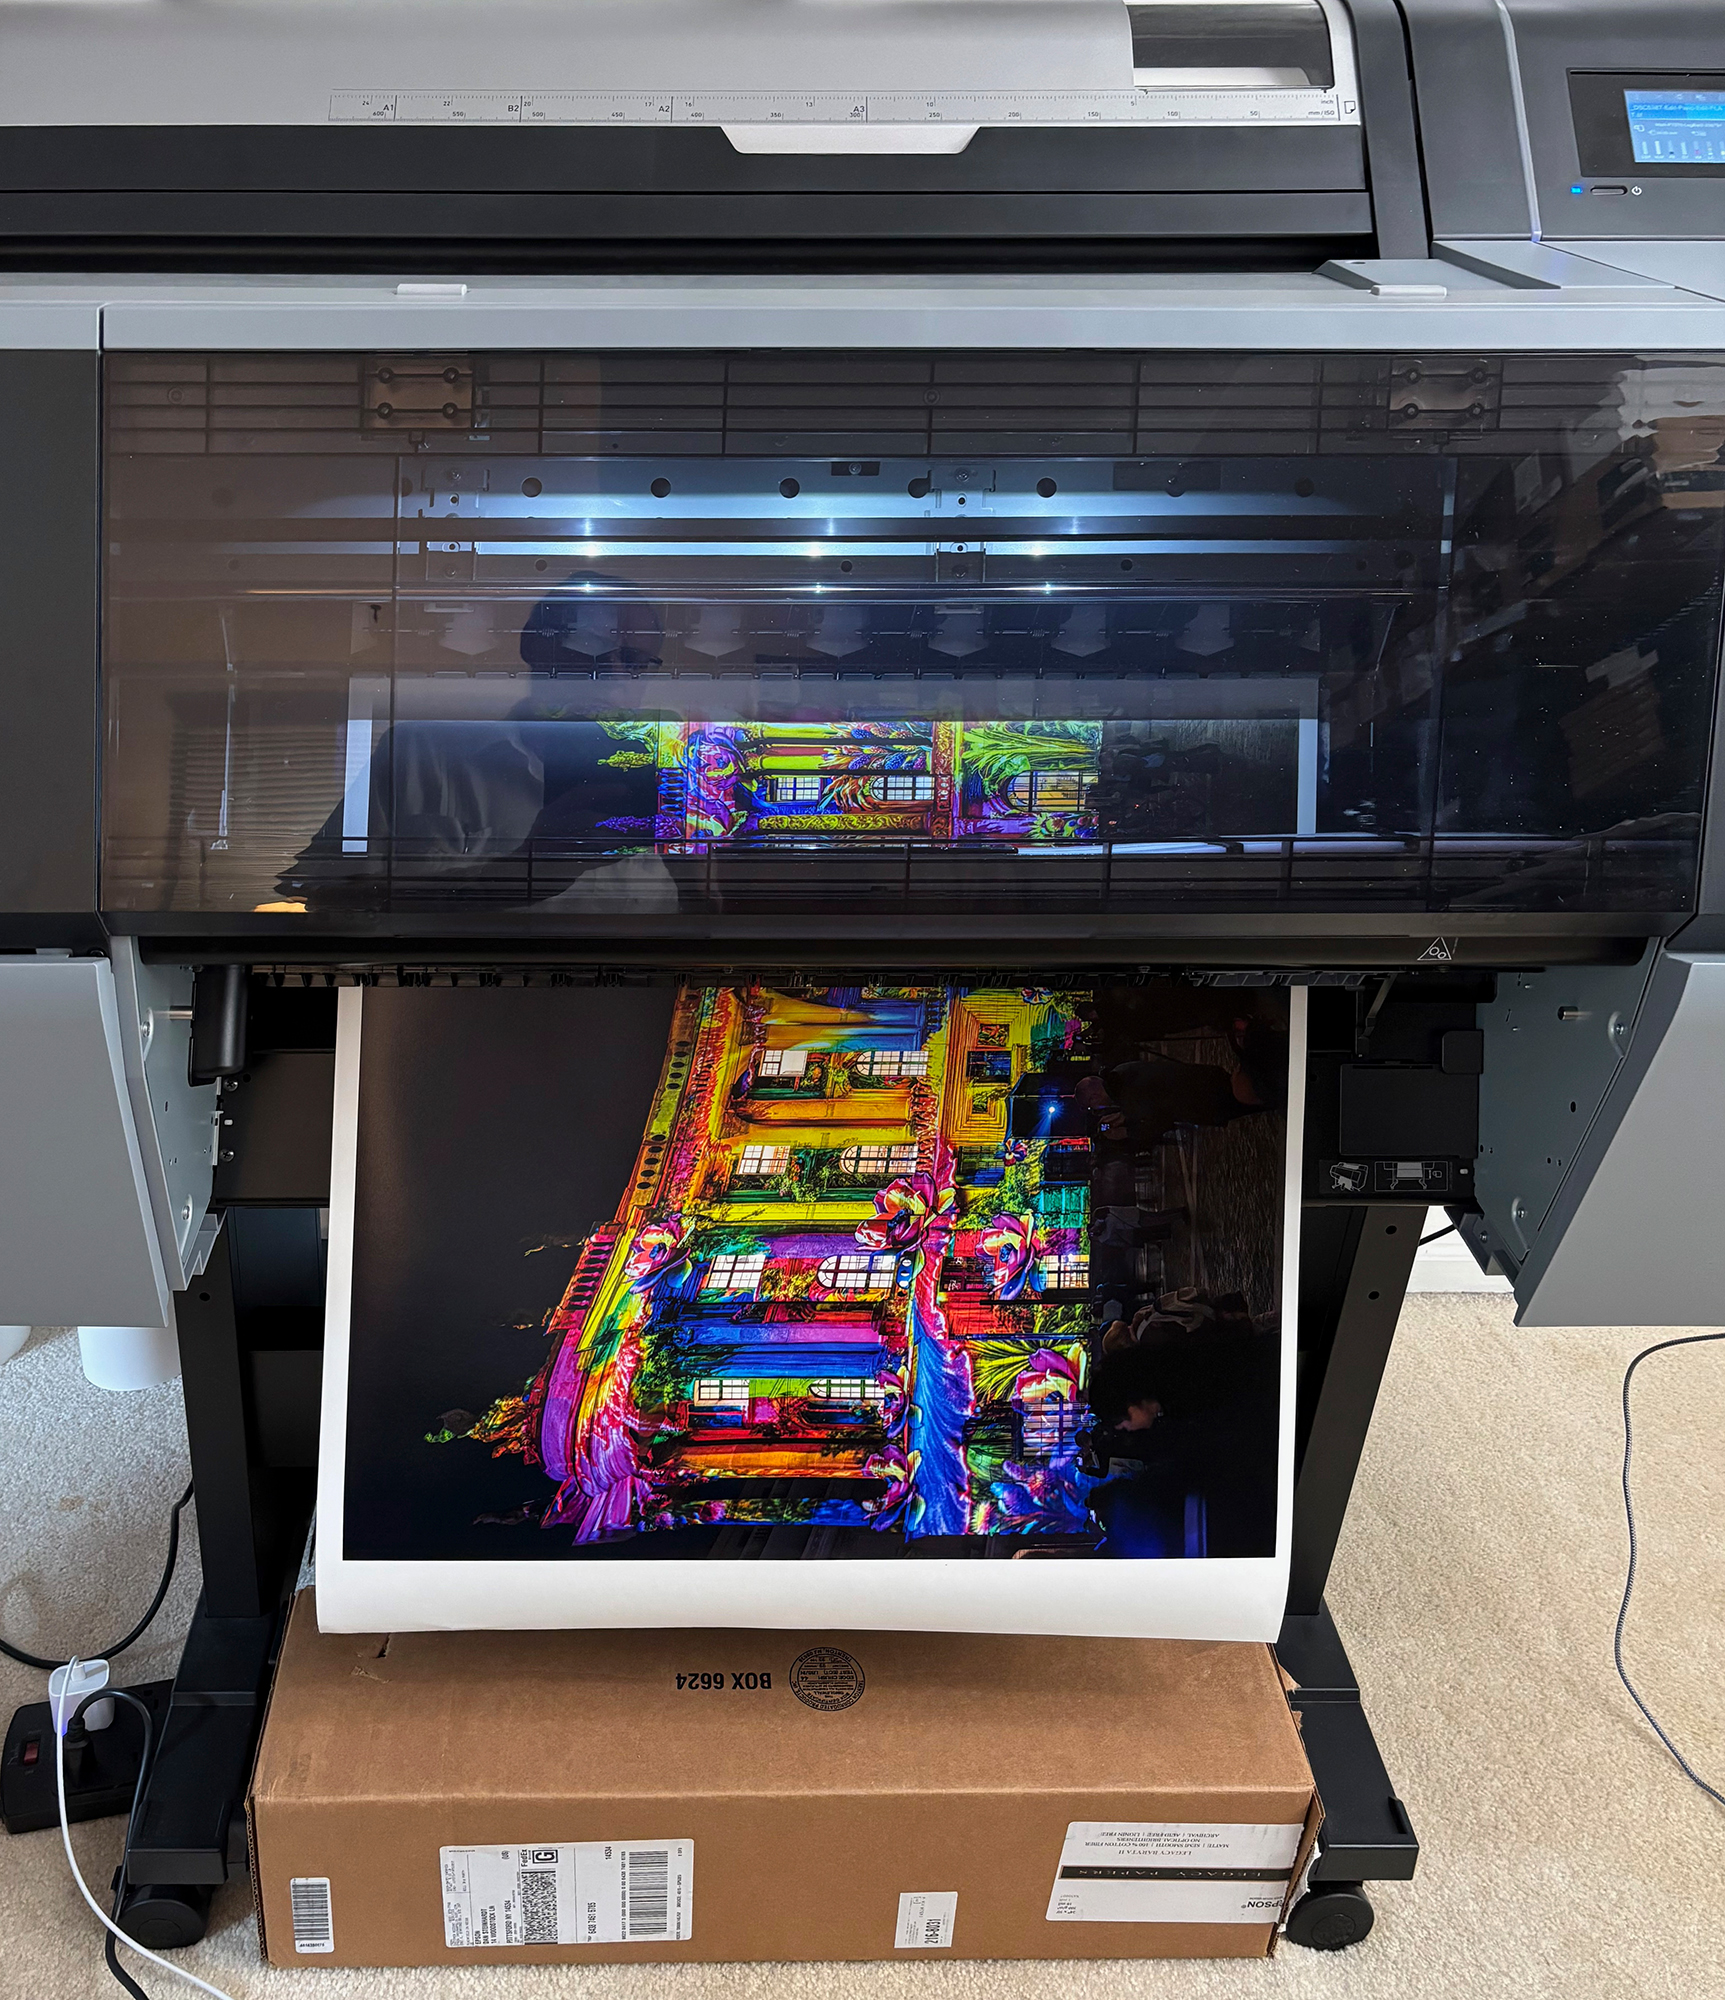
We printed this photo 24 inches high and 4 feet wide in the P7570 and P7370 on Legacy Baryta II, and just for fun, in the P7570 on Epson Metallic Glossy. Comparing the three prints, we noticed only that the foreground band of people in near darkness across the bottom had a bit less punch in the P7370 rendition than in the other two. But we made these prints without adjusting any colours or tones for the different printers. Once the P7370 version is given a bit of a Brightness and Clarity tweak to that bottom area in Lightroom, under softproof for the P7370 profile, the print would be just about indistinguishable from the P7570 rendition. The metallic glossy version is in a dazzle-class by itself.
Now, at this point I should mention we used Black Enhanced Overcoat and the highest quality driver setting. As such this very large print required only 9.5 minutes to print, or just under 1.2 minutes per square foot. One appreciates the engineering watching such photographs emerge from the printer – and so quickly.
I did not prepare a similar set of illustrations for matte paper, because we know from the start that matte paper is, relatively speaking, gamut-compromised anyhow, so one should expect roughly the same comparative performance with proportionately more OOG colour from matte comparisons of this kind.
So, what does one conclude? My conclusions are that to force remarkable differences in the appearance of highly saturated colours between these printers we need even more exceptional photos than what I used here, and I’ve presented quite a range. Nonetheless, yes, in an ultimate sense you can’t go wrong buying the most gamut capable model on the market; but ask yourself how much you’ll need it for the work you do, compared with the additional investment. It’s a fine judgment call. Either model makes stunning prints.
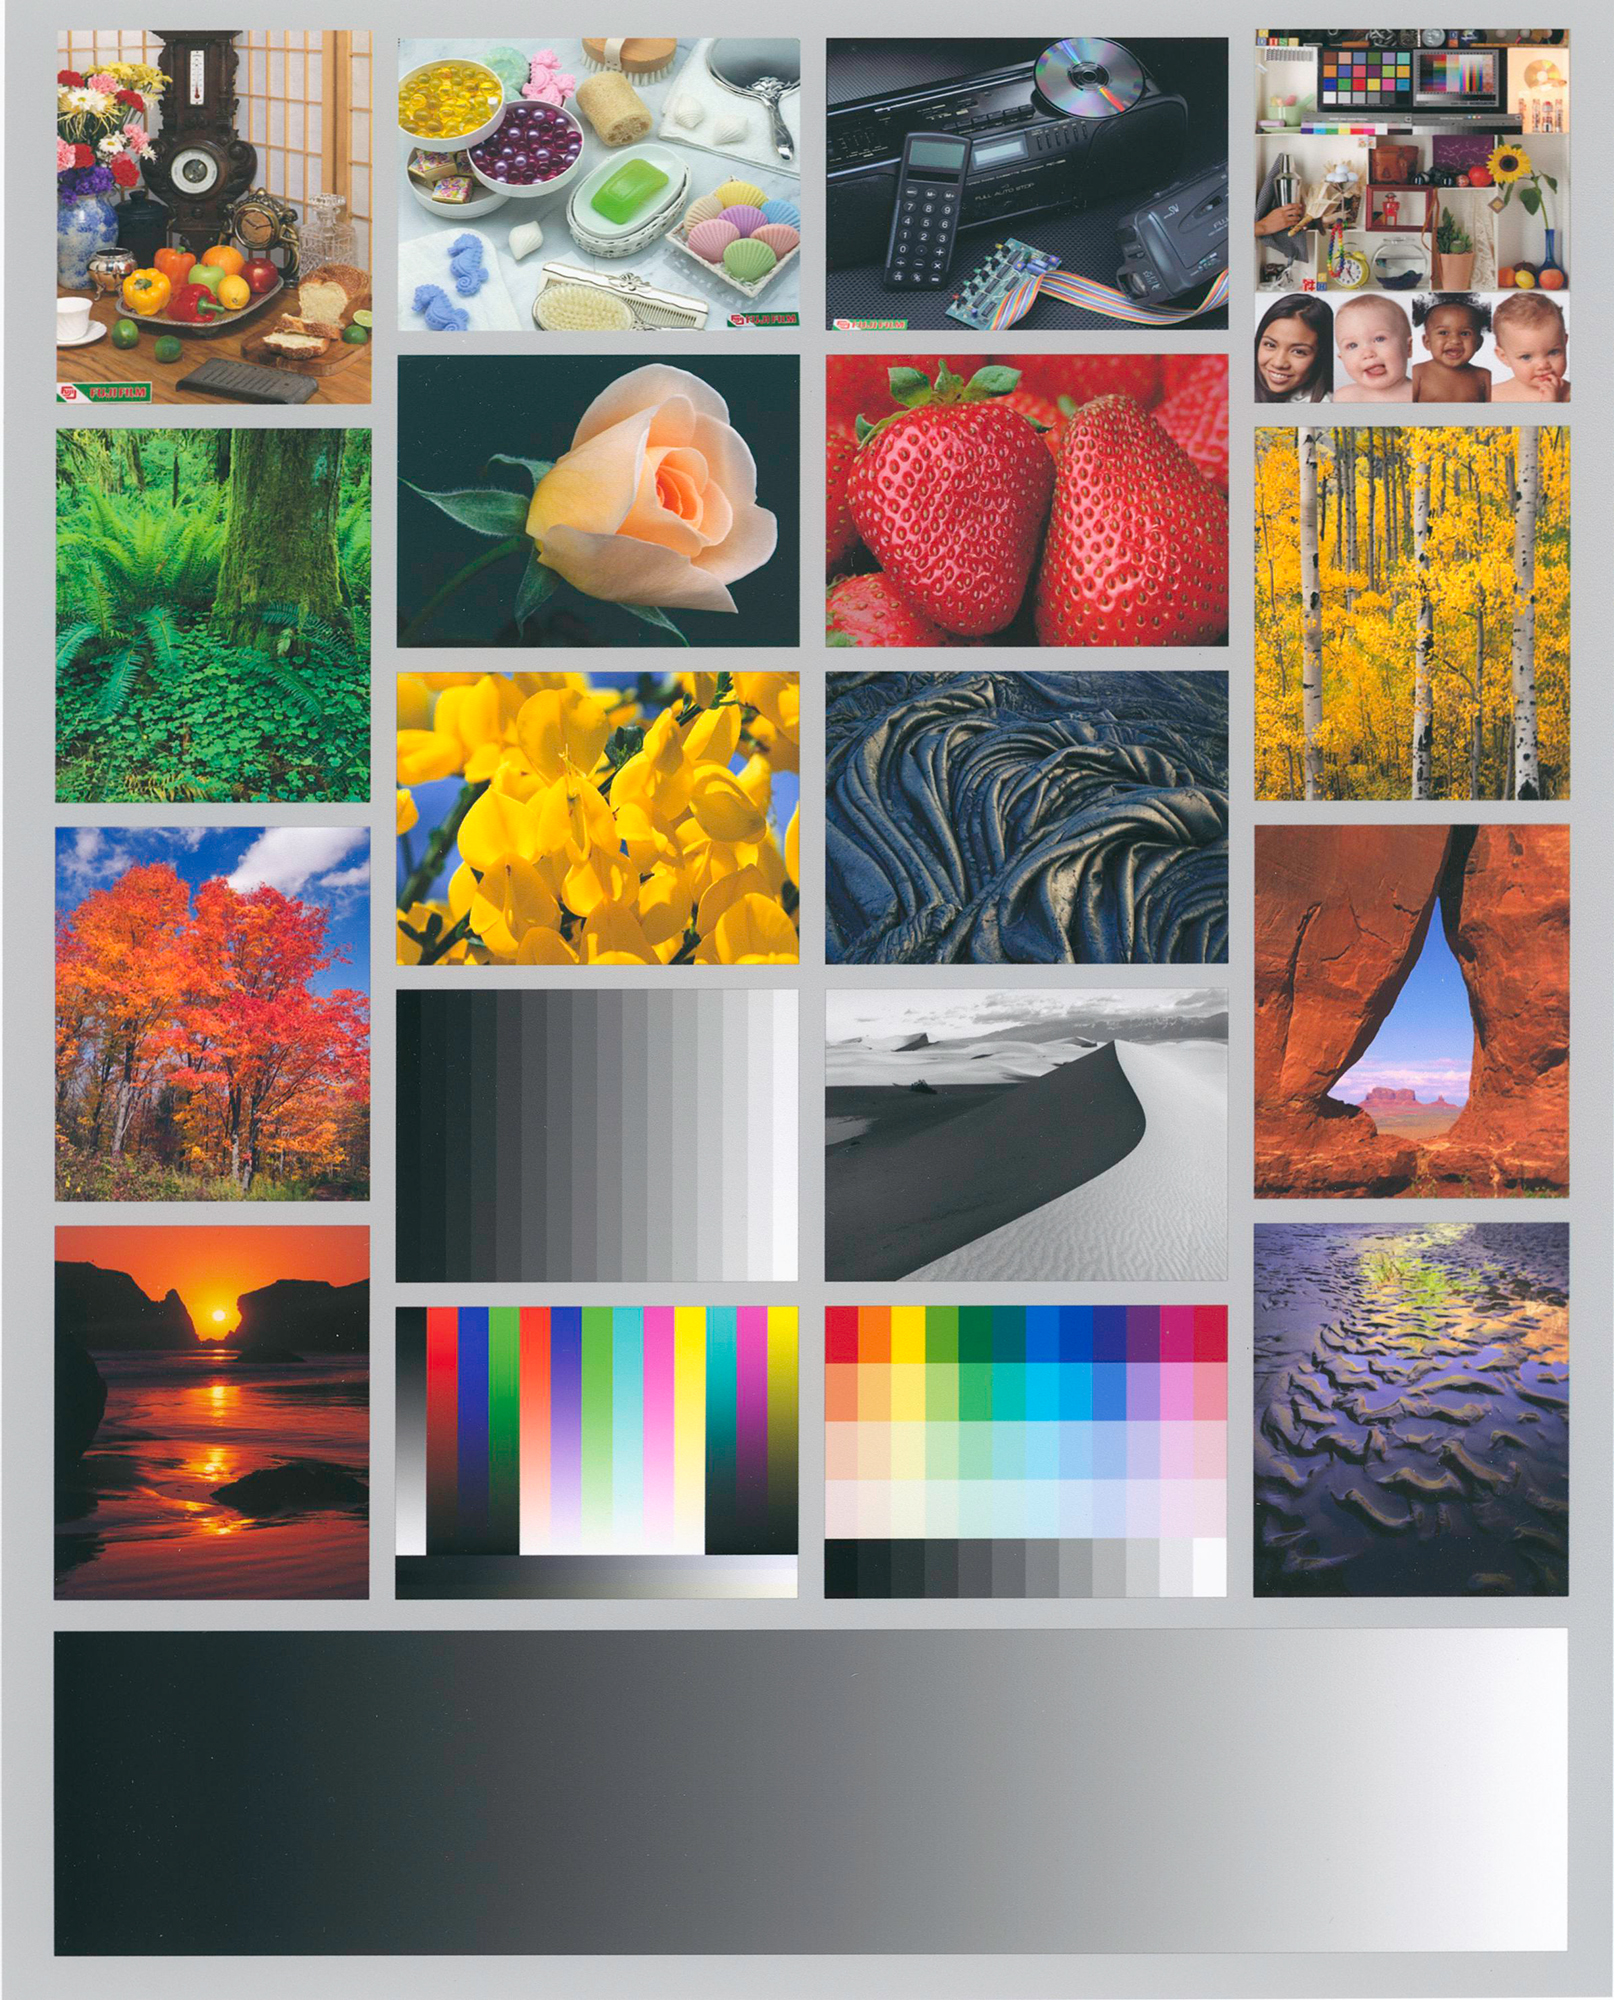
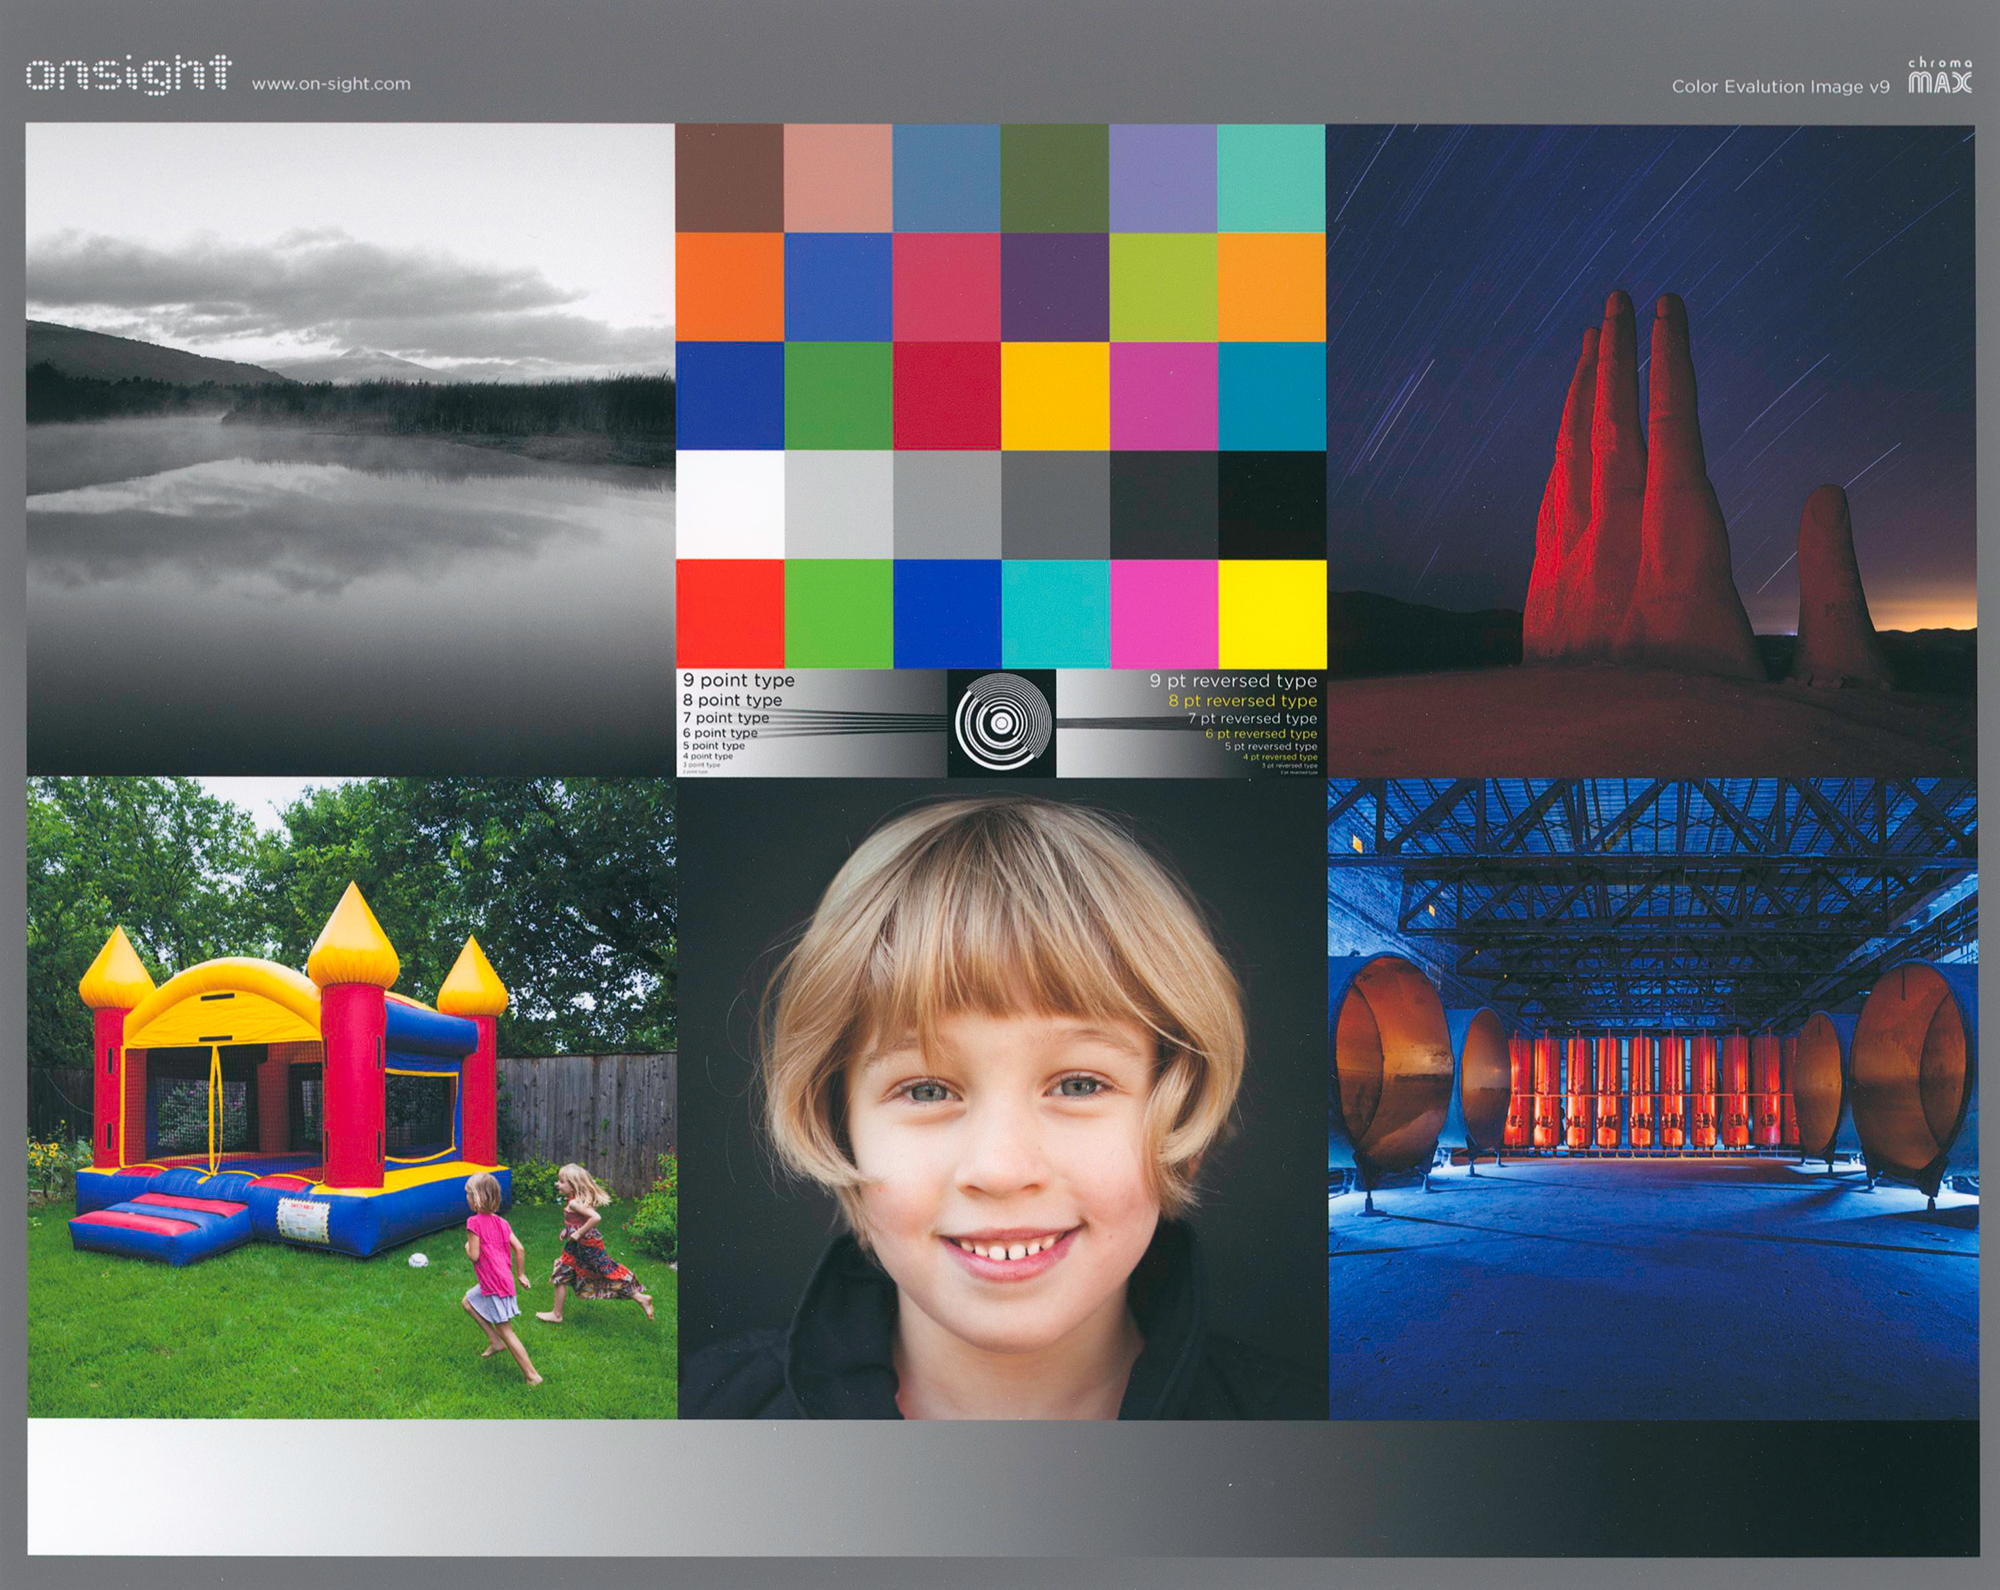
The P7370 (and the P7570) also reproduce fine image detail well, as you may observe from examination of the printer evaluation images in Annex 1 (scans of prints).
Printing Accuracy
The next print quality criterion we can test objectively is how accurately the printing system replicates colour values in the image file. After doing all the tone and colour editing in our image editing application, using a properly profiled and softproofed display, we want the resulting photo file values to be reproduced as accurately as possible in the print so that the displayed image and the printed image look acceptably similar. To measure that I use the same suite of patch tests that I developed and have used in previous printer and paper reviews on LuLa and PhotoPXL, where the method and procedures were explained. This part of the work is confined to the one printer under review here: the SC-P7370. I tested for one PK and one MK paper, being Epson Legacy Baryta II and Epson Legacy Fibre respectively, and for both the Epson (OEM) profiles and my custom (Mark) profiles.
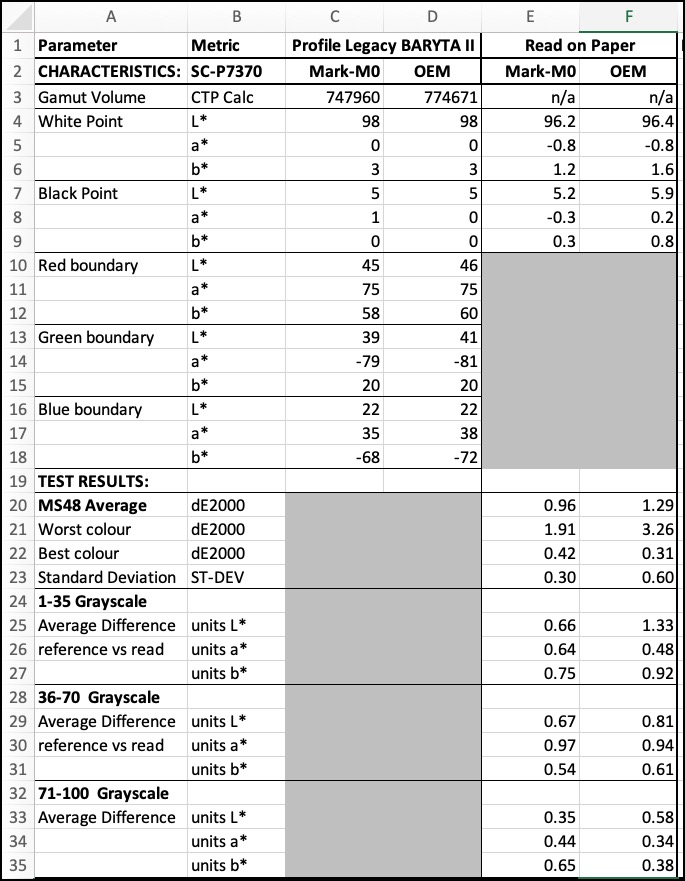
The custom profile tests came out well (Figure 14-“Mark” column). The 48-patch test (34 colours and 14 grayscale) has an average dE(2000) of only 0.96 relative to the reference values of the patch chart, the “worst” colour registering dE(2000) of 1.91, and the Standard Deviation from the average only 0.3. Most of these dE(2000) values are below the threshold at which the differences would be bothersome to the “standard observer” (remember the calculation of a dE value is a mathematical representation of a “sensation” arising from perceived colour differences, the “E” part representing the German word “Empfindung”, meaning “sensation” or “perception”. I found information (augmented after the semi-colons with my descriptions) about how to relate the scale of dE(2000) values to the extent of the “Empfindung”:
0-1: Imperceptible, therefore non-disturbing color difference to the human eye.
1-3: Perceptible color difference with close observation; minimally disturbing.
3-5: Obvious color difference; therefore, more disturbing.
5-10: Significant color difference; therefore, even more disturbing.
10+: Very significant color difference;……will send you to the shrink (that’s not official).
Well, OK, it’s sort of “nerdy” stuff, but if your printing system were systematically returning dE values of 3 or more, you’d see it and you likely wouldn’t be happy. So I test for that.
The Grayscale data in Figure 14 isn’t dE values; rather it’s simple arithmetic value differences, averaged, and they are all small, in respect of both Luminance and Hue variations from the reference values. This means the printing system is delivering nice perceptibly neutral Blacks and Greys with good tonal gradation up the scale.
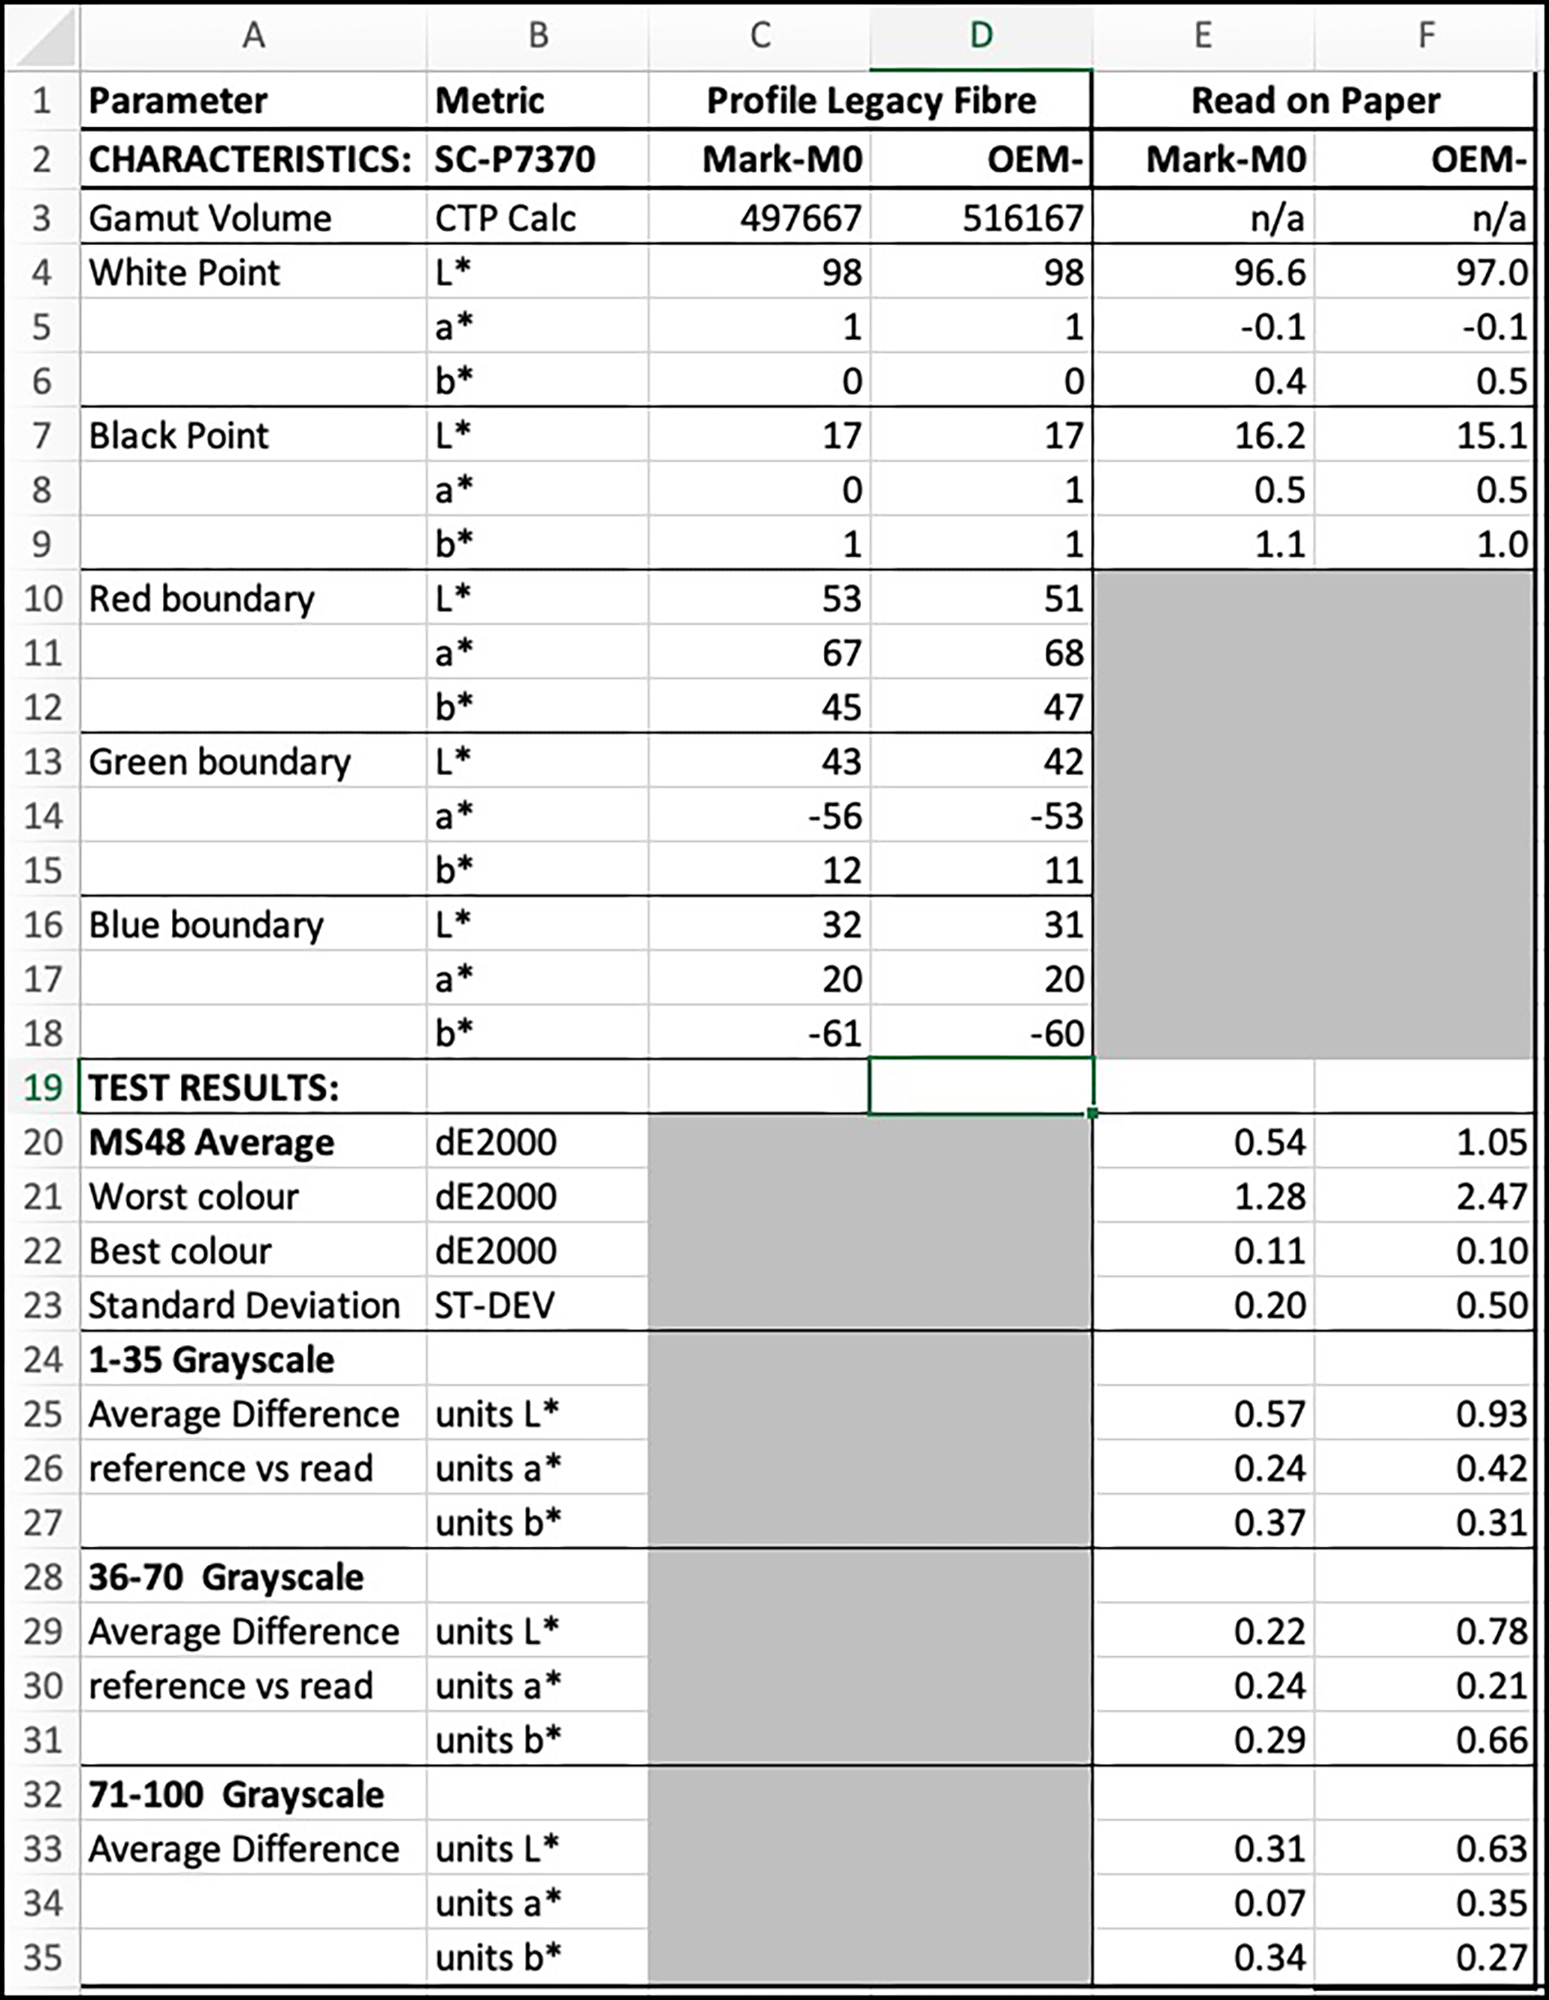
For Epson Legacy Fibre paper (Figure 15), the results were even better. The overall average dE(2000) for the 48-patch test is only 0.54, the worst colour value being 1.28 and the best 0.11 with a Standard Deviation from the average of 0.2. The Grayscale tests all have average dE(2000) results of well below 1.0 in each of the L*, a* and b* channels, meaning that above the threshold of Black, which is 17 for this printer/paper combination, the tonal gradation should be fine. When printing normal photographs, Relative Colorimetric or Perceptual Rendering Intent would remap OOG Blacks (shades too dark to be printed) into gamut starting at L*17.
In both sets of tests, OOG patches are excluded from the dE calculations because the purpose is to measure the accuracy of rendering colours that the printer can reproduce without the need for Rendering Intent to force colours to the gamut boundary – then we would be confusing the measurements with what Rendering Intents do, and such result are by definition not accurate because the device can’t reproduce those colours accurately.
The results for Epson’s Legacy Baryta II profile (Figure 14-OEM column) are less accurate than those for the custom profile, which is normal, but based on the “Empfindung” scale above, still within the acceptable range for high quality printing. The OEM results for Legacy Fibre (Figure 15-OEM column) are also very good, albeit as expected a bit below the accuracy of custom profiling; however, also within the acceptable range for high quality printing.
This data indicates that provided one prepares one’s photos properly, using good colour management practices, one can be assured that the printer will print them correctly with tone and colour emerging as expected; for OOG colours one depends on the Rendering Intent (in the image editing application) to do a good enough job of remapping them.
I turn now to the more important practicalities of using the printer. There are four items of particular interest:
1. Loading the paper,
2. Installing and using the Epson driver,
3. The role and use of Epson Media Installer (EMI), and
4. Printer set-up and maintenance.
1. Loading the paper.
There’s almost nothing to it. For sheets (minimum size US Letter), place the sheet in the feeder and follow the instructions on the LCD for selecting the Media Type and paper size. This is explained quite well in the Epson User Guide. This is the place to introduce an important operational concept of these recently issued SC-P family of printer models:
The Hand-shake Concept:

The trouble-free operation of your printing will be greatly assisted by making sure that certain paper settings made on the printer’s LCD are the same as the ones made in the printer driver settings. The driver and the printer communicate with each other to check the consistency of these settings in both places. According to the Epson User Guide, if they are the same, the paper settings on the LCD take priority. If they differ, the ones you made in the driver (see below) take priority. To avoid all possible confusion, make sure they are the same in both places. The EMI will be very helpful for assuring this consistency (discussed below), especially when it comes to using third-party media and custom profiles.
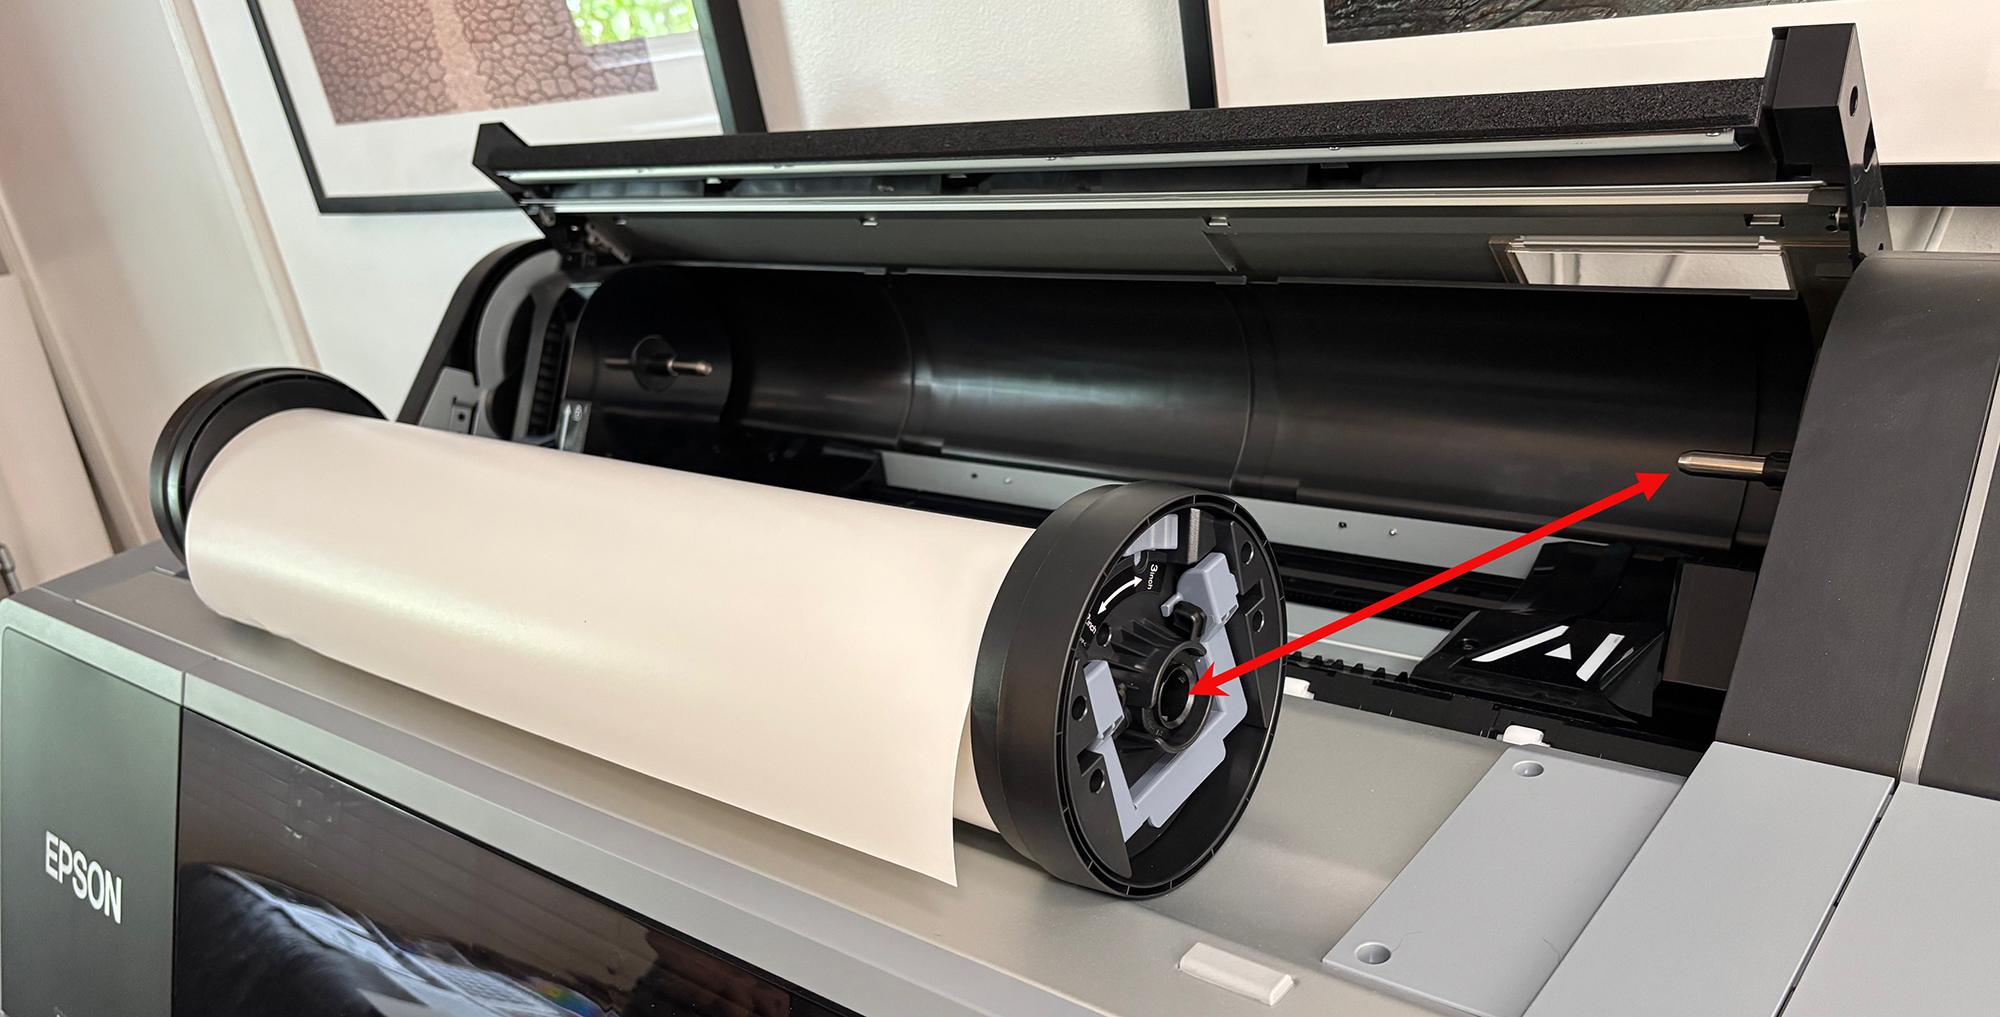
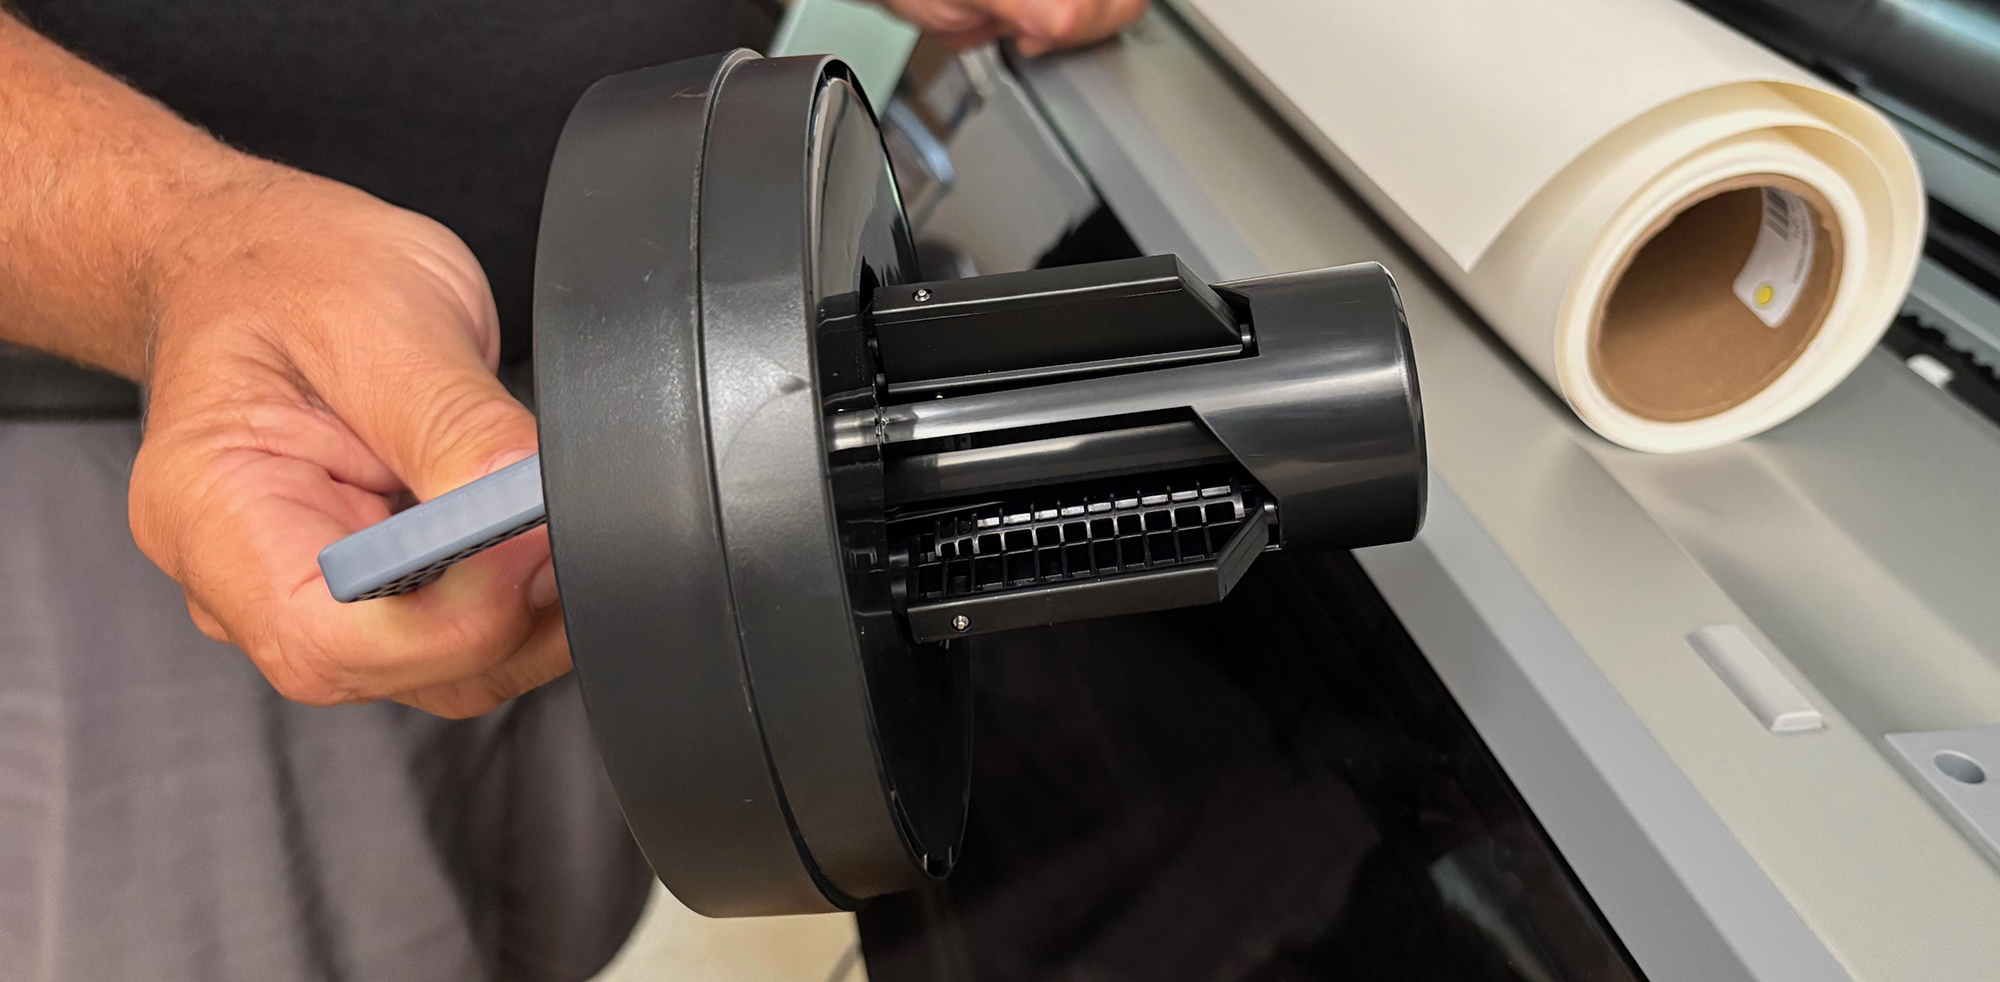
Back to loading paper, now rolls. Epson has considerably improved the hardware for loading rolls into the printer. Attaching the roll has become an easier and more elegant operation, (Figures 17 and 18). There is no longer a rod and cone arrangement. One places the newly designed end pieces into the roll core and then fits the assembly into the prongs of the width-adjustable roll bay, and that’s it. Oh yes, close the cover.
Then follow the prompts on the printer’s LCD screen for selecting the Media Type and roll width. If we’ve selected a 24” roll of Epson Legacy Baryta II for example, the LCD screen will look like this (Figure 19):
We aren’t quite finished yet, because now, to respect the needs of the handshake and the quality we want, some settings remain to be made in the printer driver, to which I now turn.
2. Installing and using the Epson Driver
As this article is a review, not a user manual, I shall confine this section to underscoring what’s essential to print successfully.
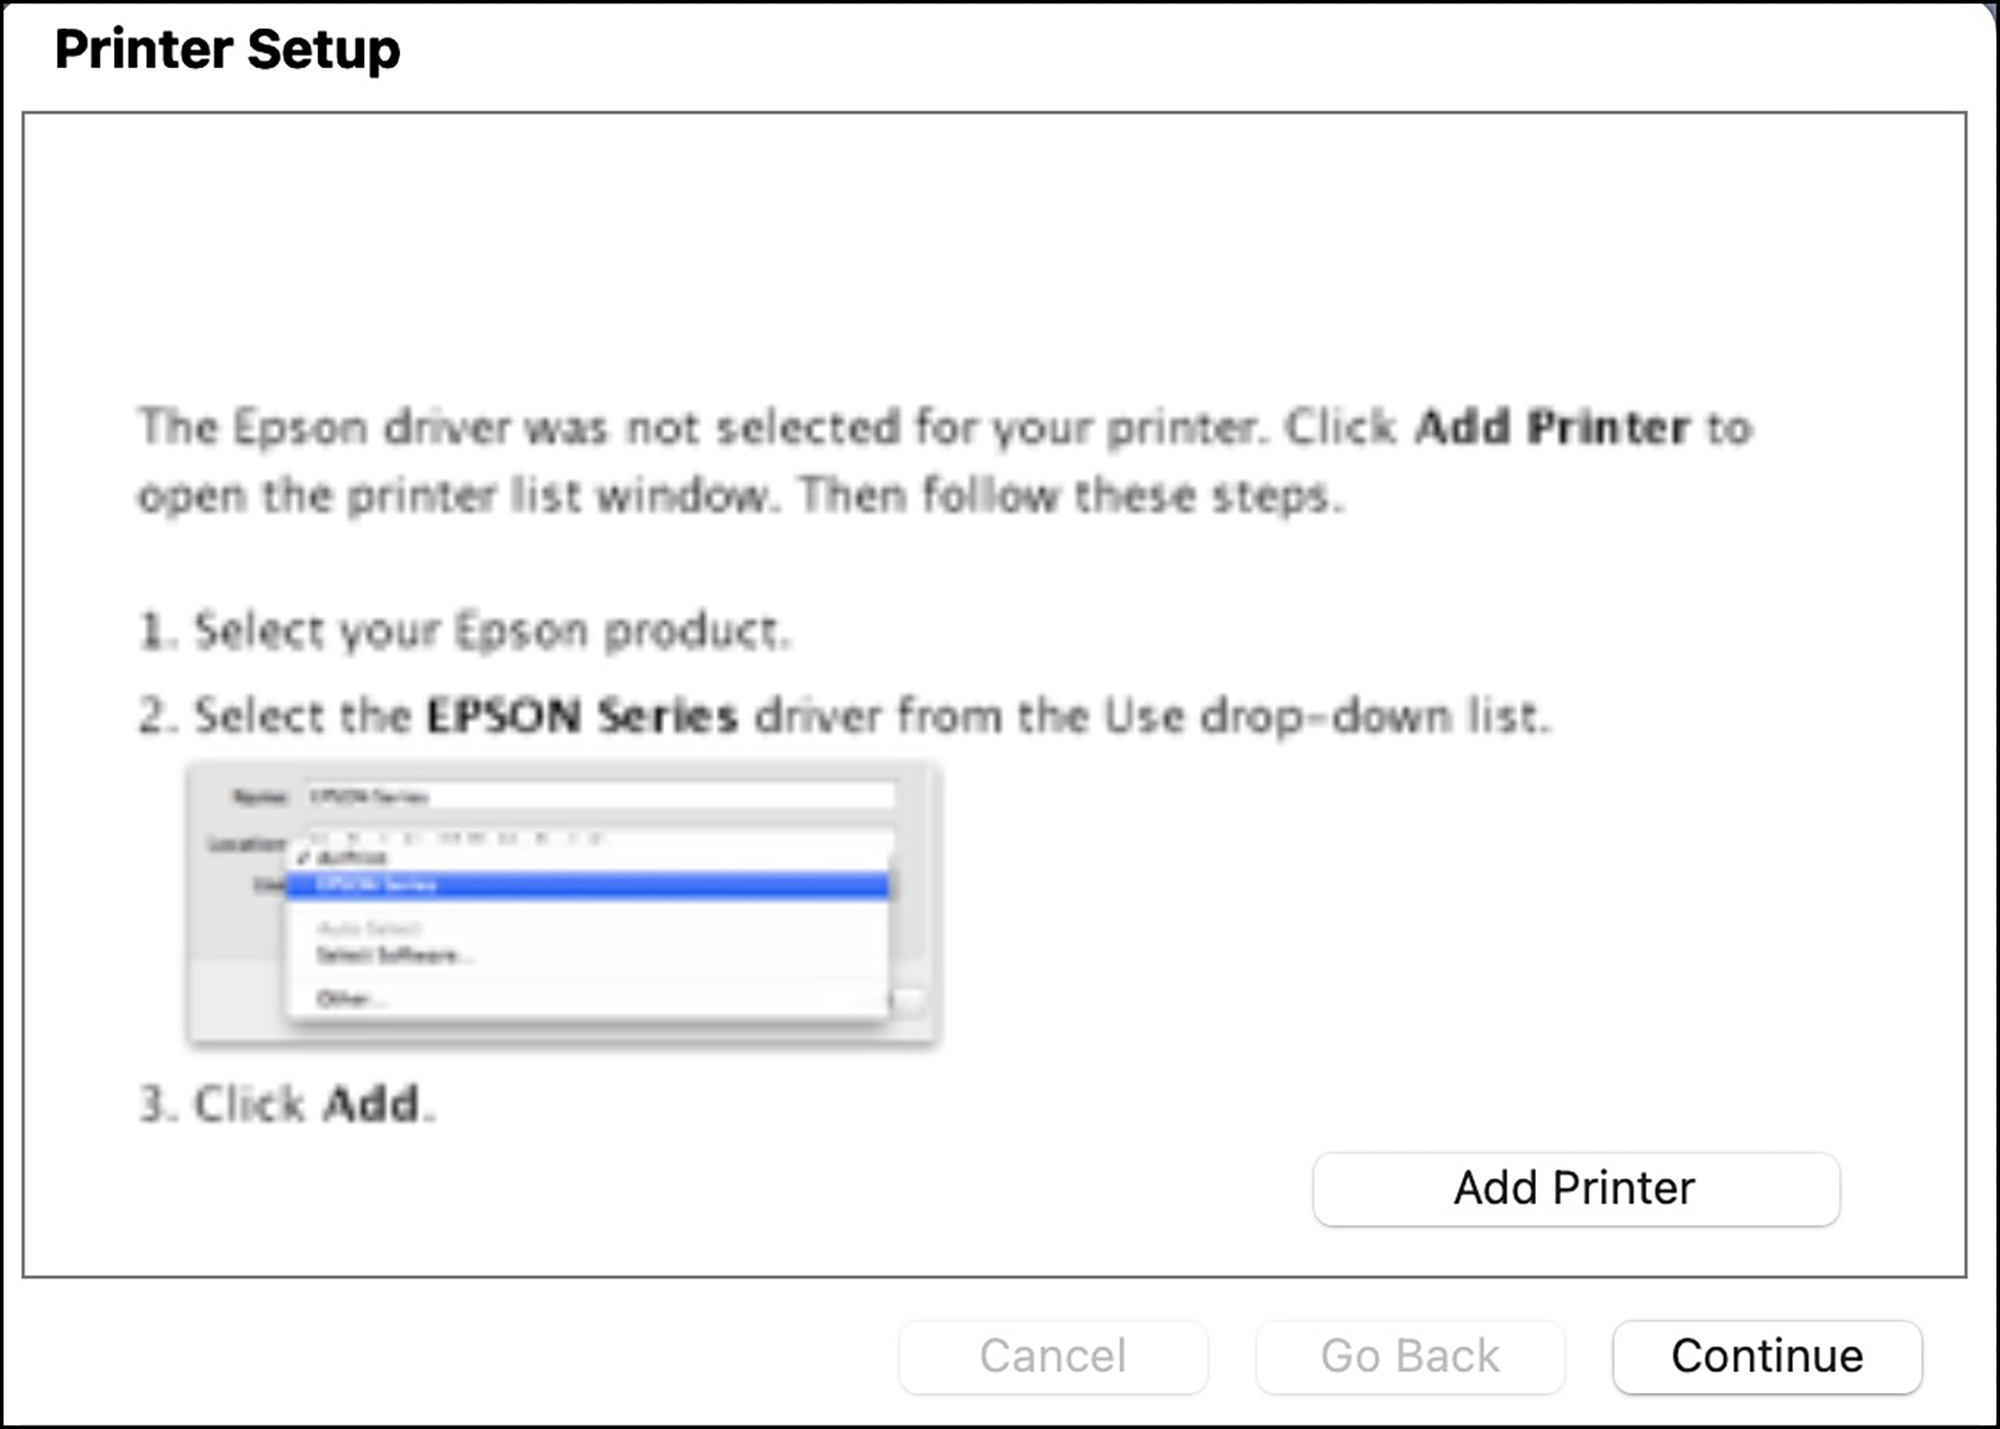
Unfortunately, the User Guide says nothing about driver installation. However, when you take delivery of the printer and want to start using it, you will likely be asked, on screen prompt, to install the printer to the operating system and install (from the Epson website) the current driver version specified for your operating system. The typical sequence starts as shown in Figure 20, and you make a choice as shown in Figures 21 and 22, here assuming you will be operating the printer via USB connection, but be aware, that is not the only possible configuration.
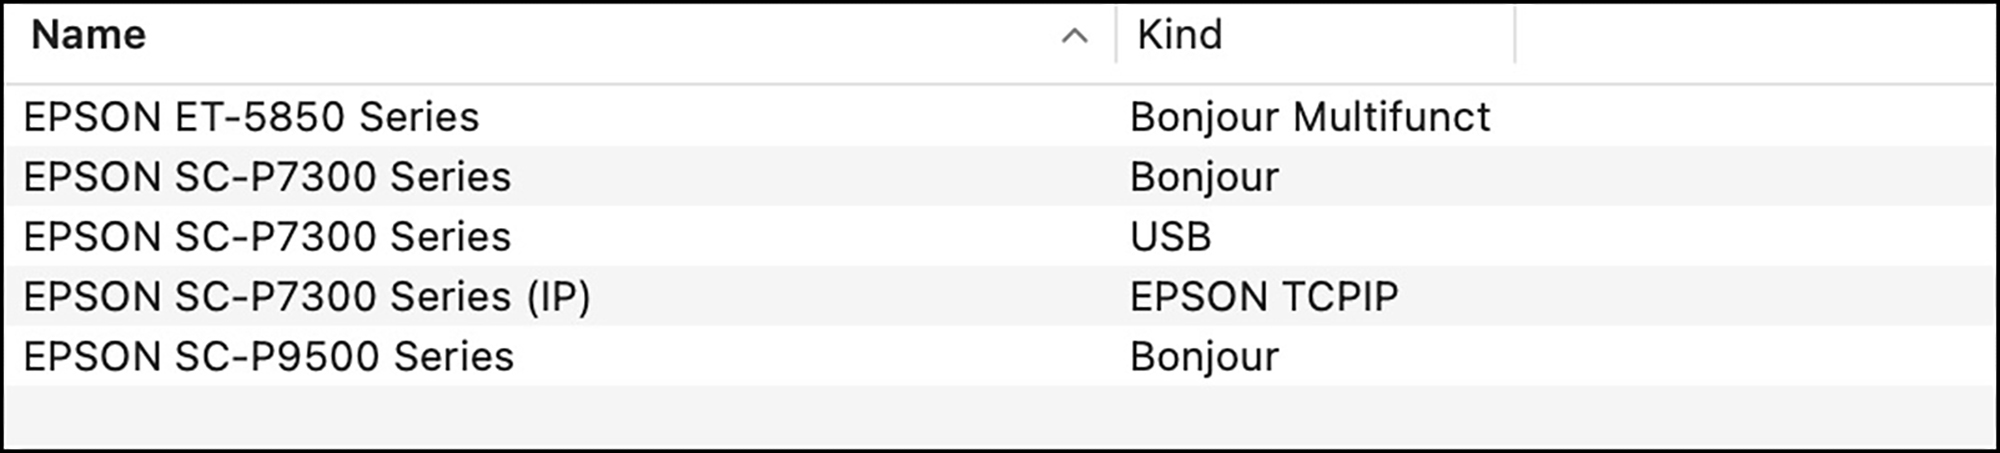
“Bonjour” is Apple’s zero-configuration networking option. TCPIP refers to the TCP/IP (Transmission Control Protocol/Internet Protocol), a standard protocol suite used for network communication. Both are for operating the printer over a network. The one thing you absolutely want to avoid is using “Airprint” if you see it as an option or installed already. Airprint is Apple technology that enables wireless printing from iOS and macOS devices without requiring the installation of drivers or additional software. It is a very limited piece of software that will deprive you of important options for using the printer.
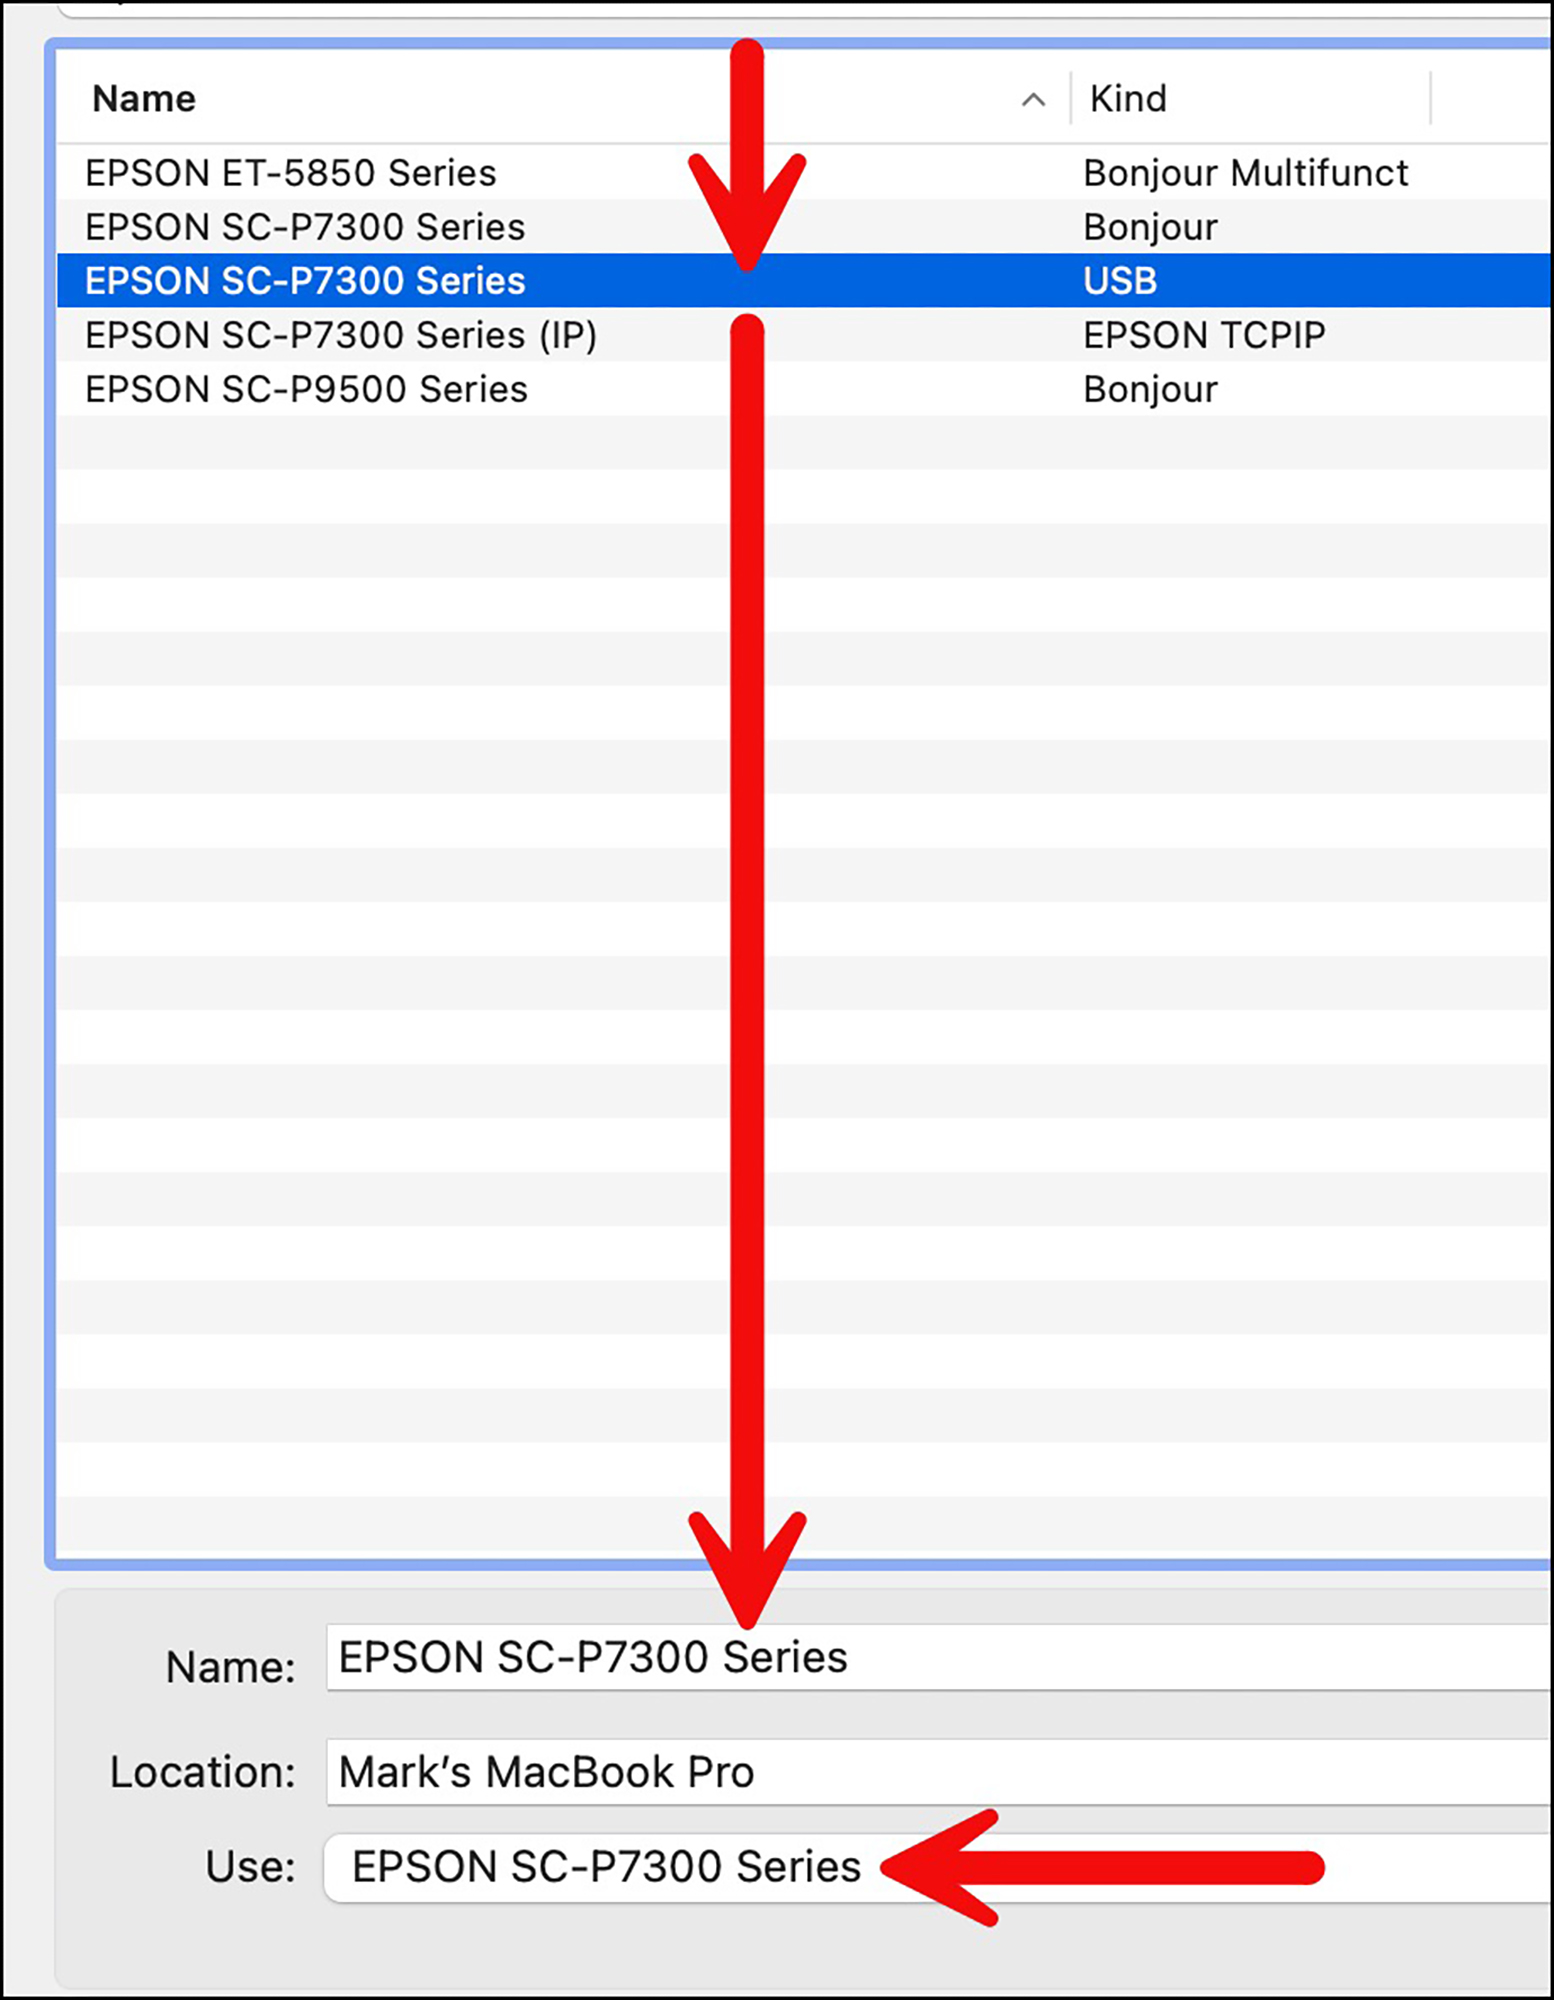
I find in my environment the most reliable way to print is via USB cable (Ethernet is equally reliable), so in Figure 22 I’ve selected USB, making sure “Series” shows in both the “Name” pane and the “Use” pane of the connection interface.
Having properly installed the driver and loaded the paper, the next step is selecting the driver settings to be used for printing. As usual, there are options – quite a few of them. I’ll explain the key ones.
(a) Cohering the paper settings:
Let’s assume that we had loaded into the printer a sheet of US Letter size and made that selection on the printer LCD, and we intend that the print should be centered on the sheet. Working through the image editing application (say Lightroom or Photoshop) using Page Setup we reach the Epson driver, wherein we can migrate to the correct page setup choice (Figure 23).
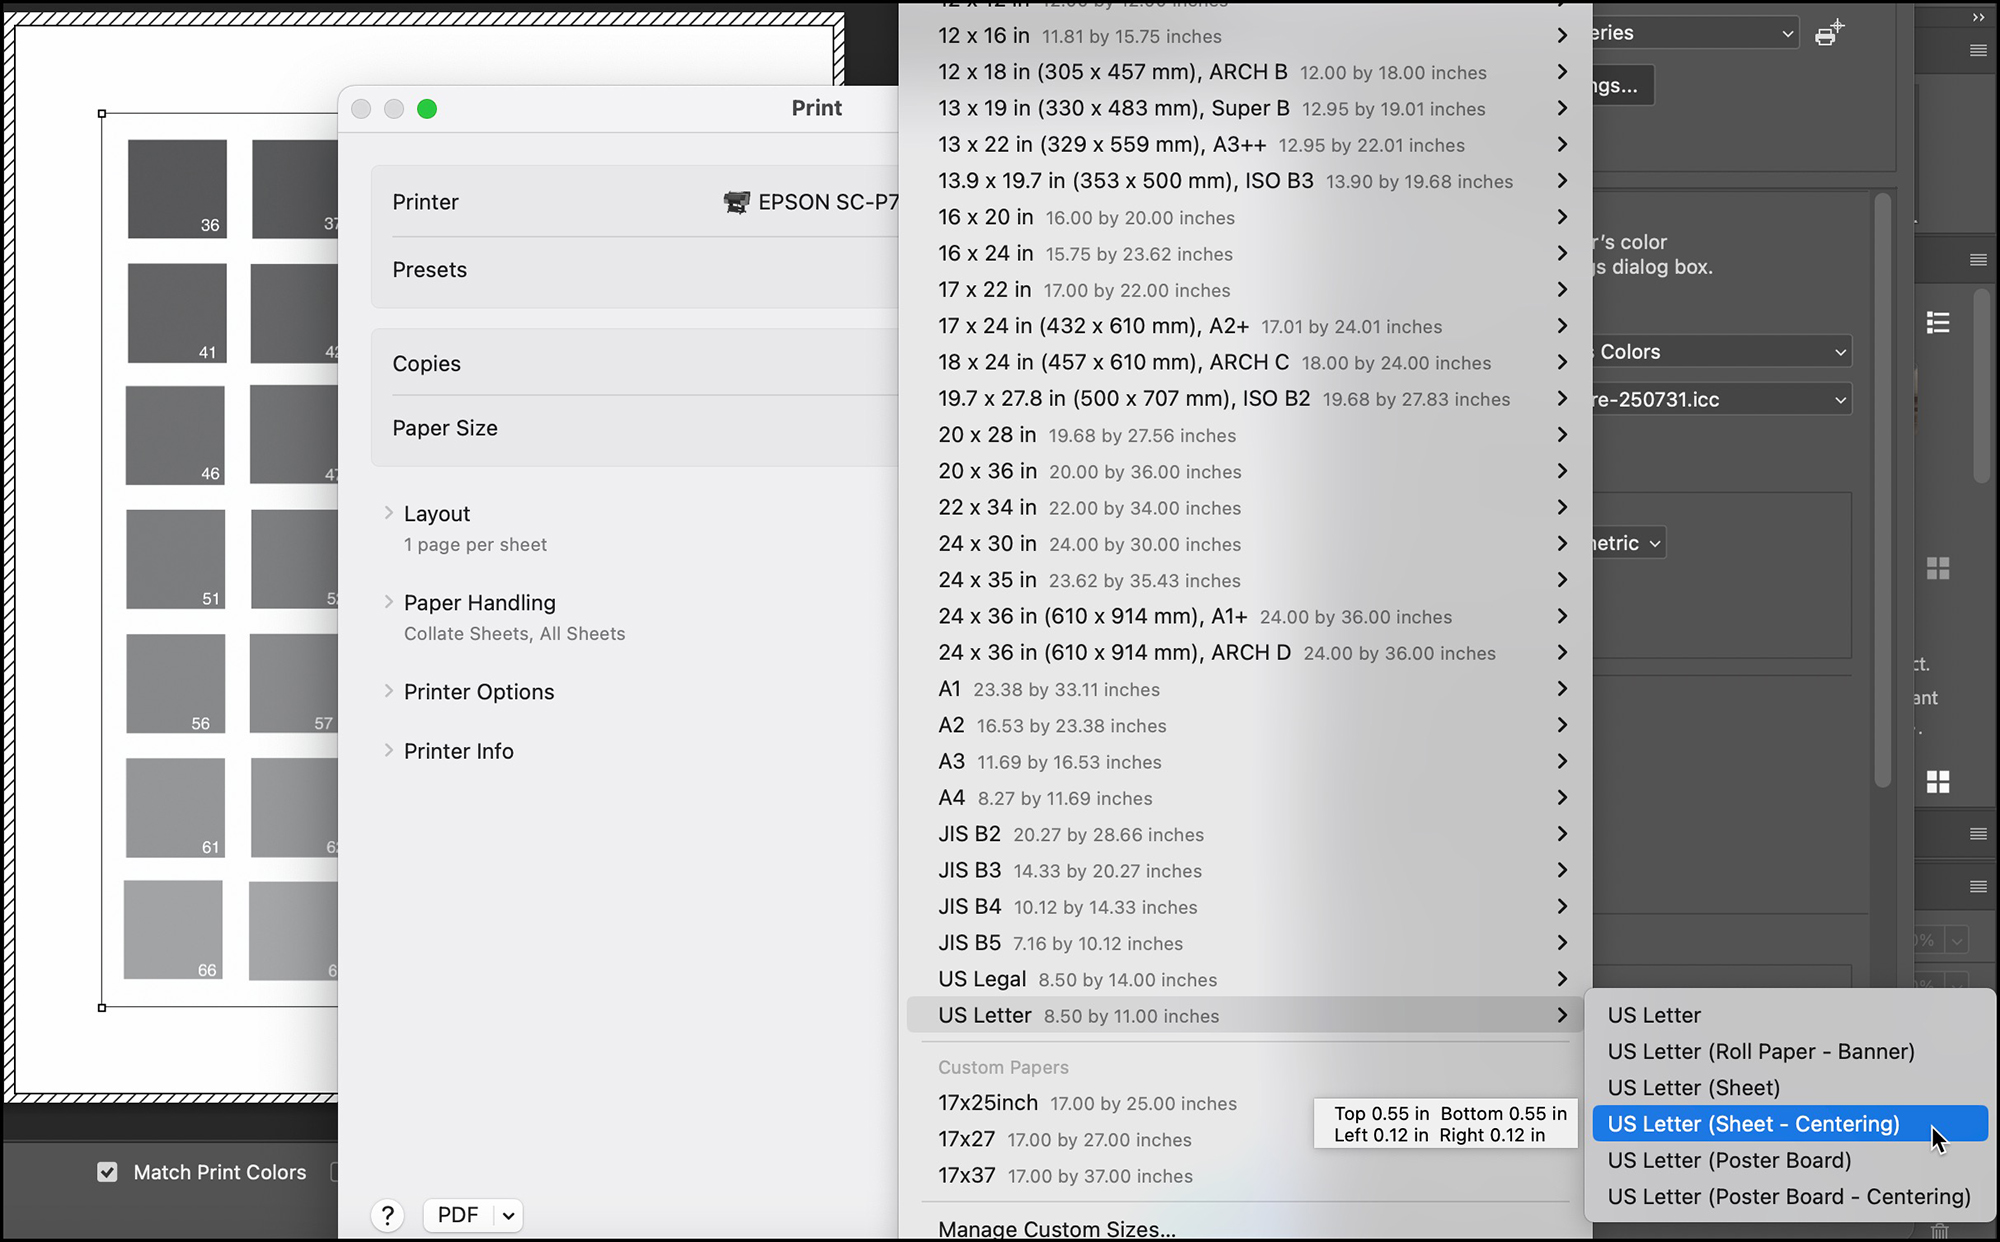
The list in Figure 23 will also include any custom paper sizes you may have created and saved.
(An aside: while on the mention of custom paper sizes, if you are printing, e.g., a horizontal (landscape) panorama from roll paper, it is best to create a custom paper size in the Epson driver, which you access by clicking on “Manage Custom Sizes” (bottom row in Figure 23). Then for “Width” you always select the width of the roll you are using in the printer, e.g. 24” for the P7370. Then for “Length” you enter the width of the photograph you are printing – for example if it happens to be 4 feet wide like my Humboldt Law Faculty print seen above, you will enter 48”. You’d specify whether it is to be borderless printing, or with a border, in which latter case you need to enter the width of the borders and adjust your image size (in the image editing application) to fit the paper accordingly. Then you would give this paper preset a name (I would simply call it 24×48) and save it. It will then appear in the list above. Then make sure you have “Landscape” selected in the image editing application Print dialog interface.)
OK, so we’ve finished selecting the correct, coherent paper size setting in the Epson driver, we can now turn to selecting the correct Media Type (Figure 24).
Let us assume I had created a custom Media Type in EMI (see below) called “Mark-P7370-LegFibre-250731”, which is just my custom profile for Epson Legacy Fibre paper married to all the other pre-existing Epson settings for that paper. I used EMI properly so that this Media Type now appears in the Media Type list that gets revealed when setting Media Type in the Epson driver.
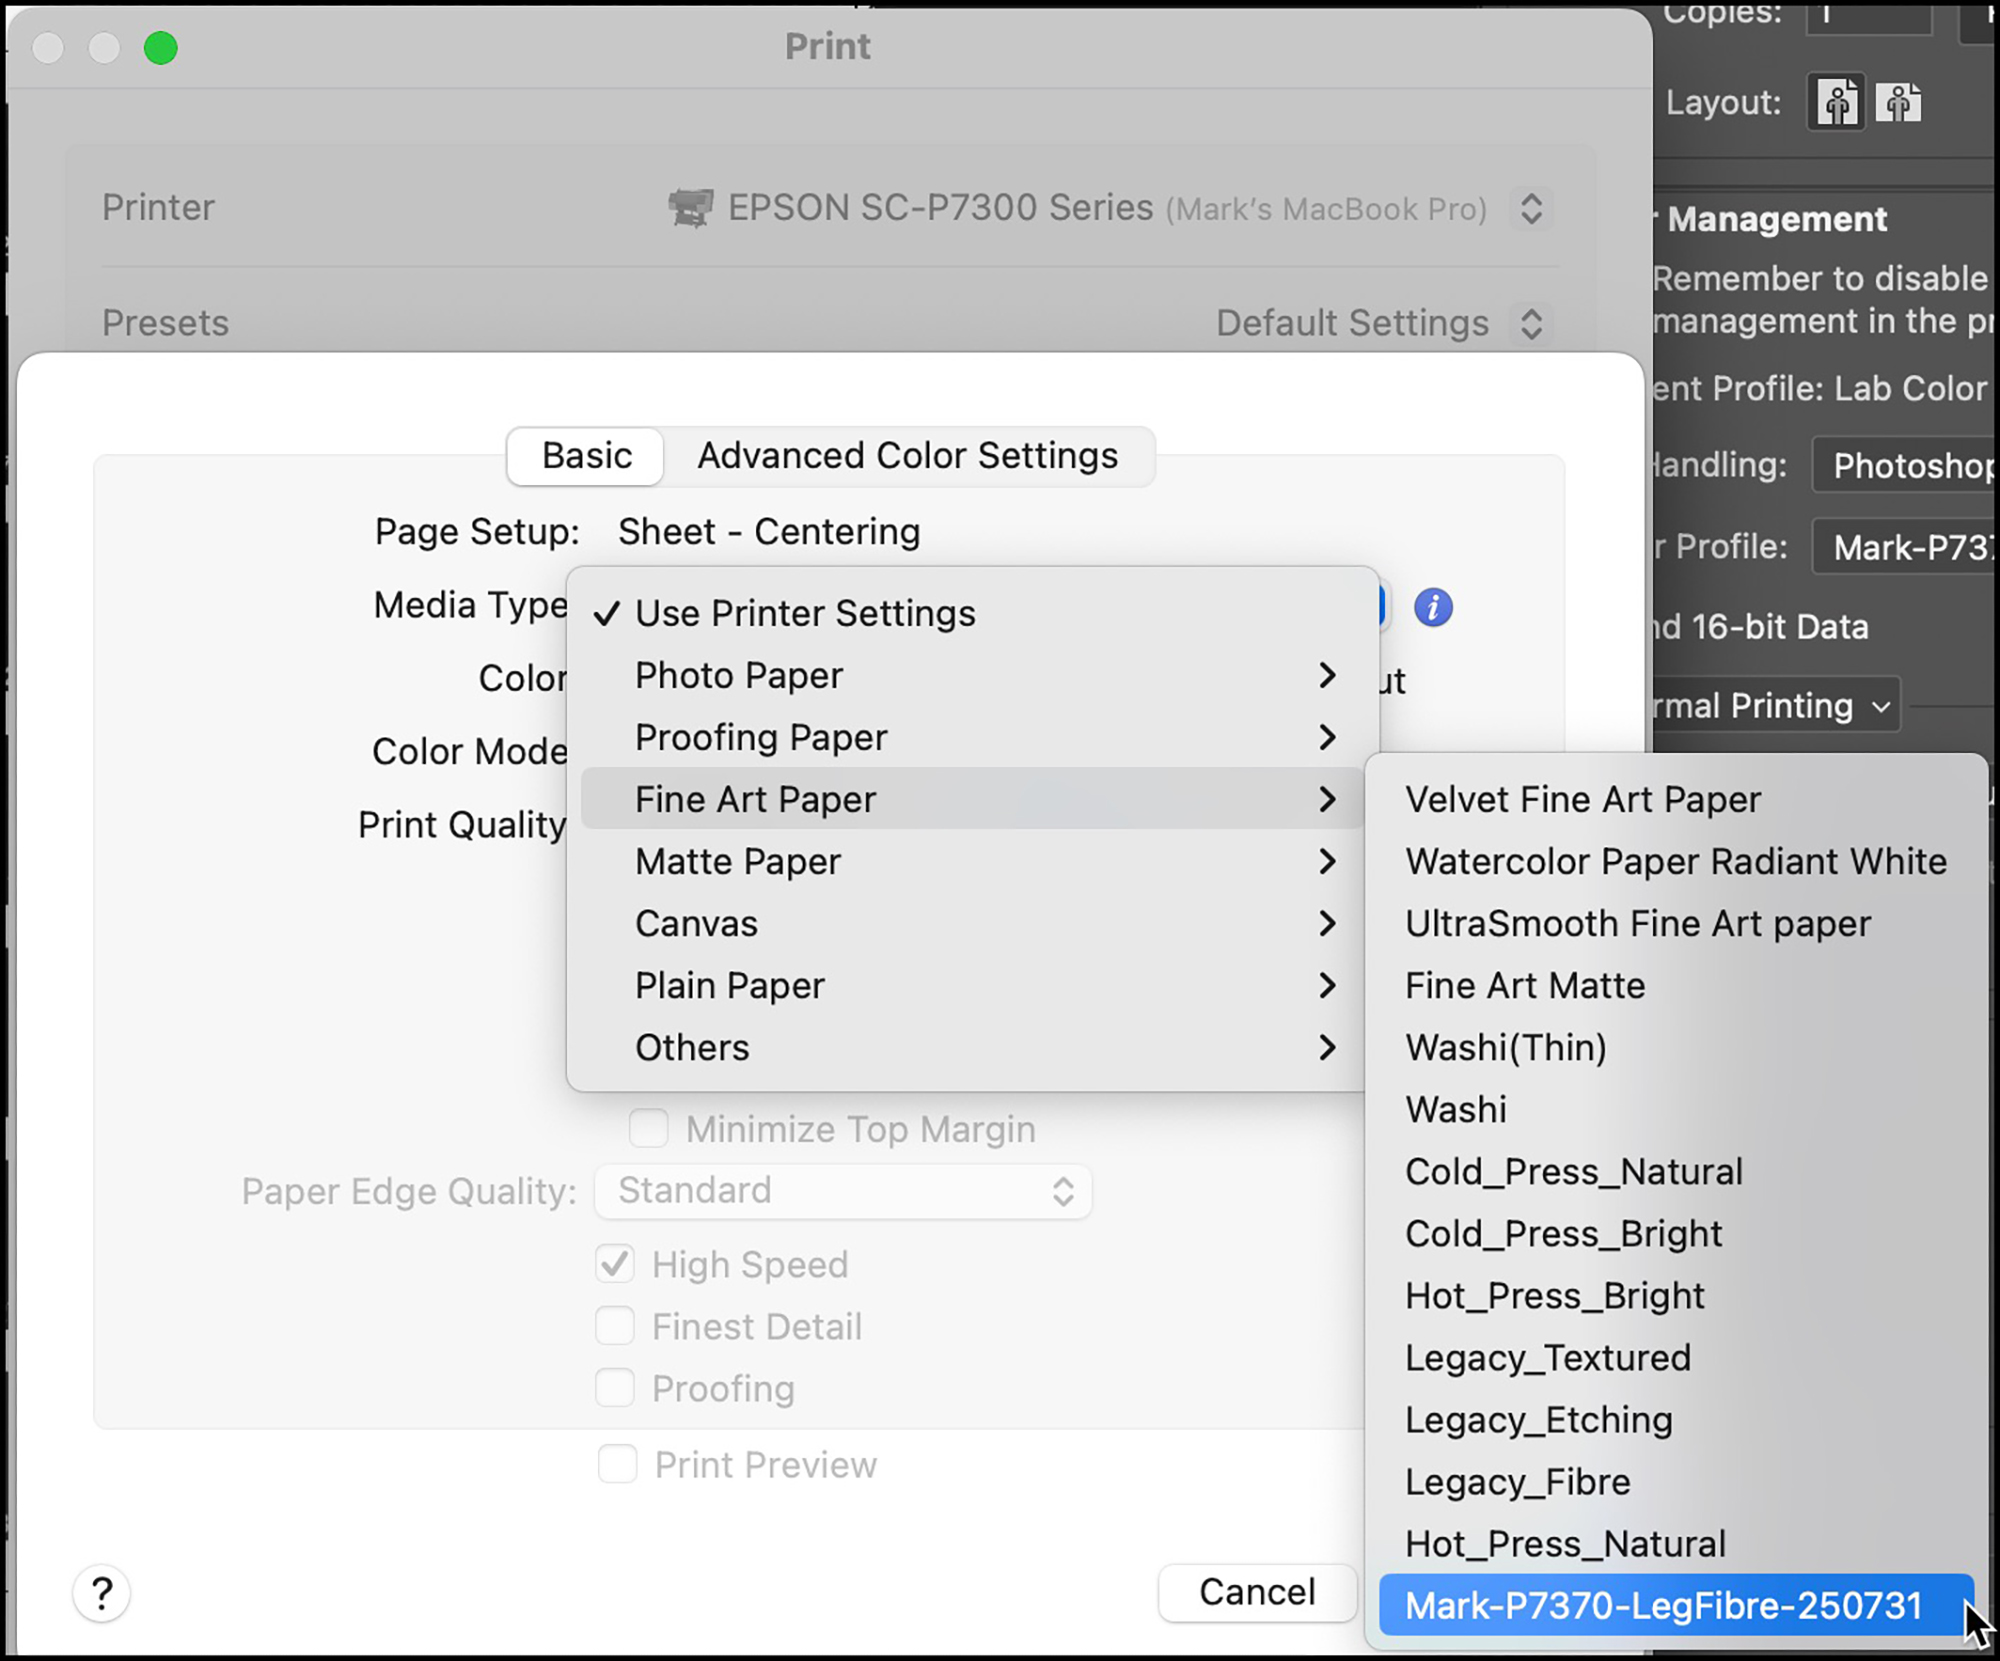
Note that upon opening the Media Type pull-down for accessing the options, one of them is called “Use Printer Settings” (see the top of the options list in Figure 24). It may be fine, but I haven’t been able to do enough testing to ascertain how reliable it is. I have worked extensively with the very similar driver for the SC-P5370 and discovered that there is a stability issue with driver settings from one print to the next, such that for certainty I do the complete setting routine for each print on both the LCD and in the driver, and not rely on this shortcut. The “Use Printer Settings” convenience appears appealing and by now it may be fine, but for the time being my druthers are to avoid it unless you’ve tested thoroughly that it really does what it says all the time. So, in the example of Figure 24, as I’m printing with Epson Legacy Fibre and I like my custom profile, I select the Media Type option shown in blue.
Paper, paper size and Media Type set in both the LCD and the Epson driver, we have confidence that when it comes to print the handshake will work. So, let us now turn to the Print Quality settings in the driver (Figure 25).
We’re in the Basic panel of Figure 25, where the top line confirms we’re working with sheet and centering. If this is not what was intended, it’s necessary to revert to Page Setup and fix it in both LCD and Page Setup in the driver.
The next pane down for Media Type should show the one we just selected above. If it shows something different, open the drop-down and make the correct selection.
Because we are printing from an image editing application using an ICC profile-based (color-managed) workflow, (not “Printer Manages Color”) the “Color” pane should say “Color” but be grayed-out. The other choice it offers when “Printer Manages Color” is the ABW mode (Advanced Black and White), which I have reviewed previously and found to be useful for providing a slightly deeper Maximum Black and slightly more hue neutrality than printing in B&W using the ICC profile route, neither of which may be all that noticeable in many prints, but could be in some.
Likewise, in the next pane down, “Color Mode”, because we are managing color through the printing application, not the driver, it should indicate “Off (No Color Management)” and be grayed-out. It means there will be no color management from the printer.
The “Print Quality Pane” has five notches, and both a slider and a pulldown menu one can use to migrate between the center one rightward. For this printer, the first two from the left are not available.
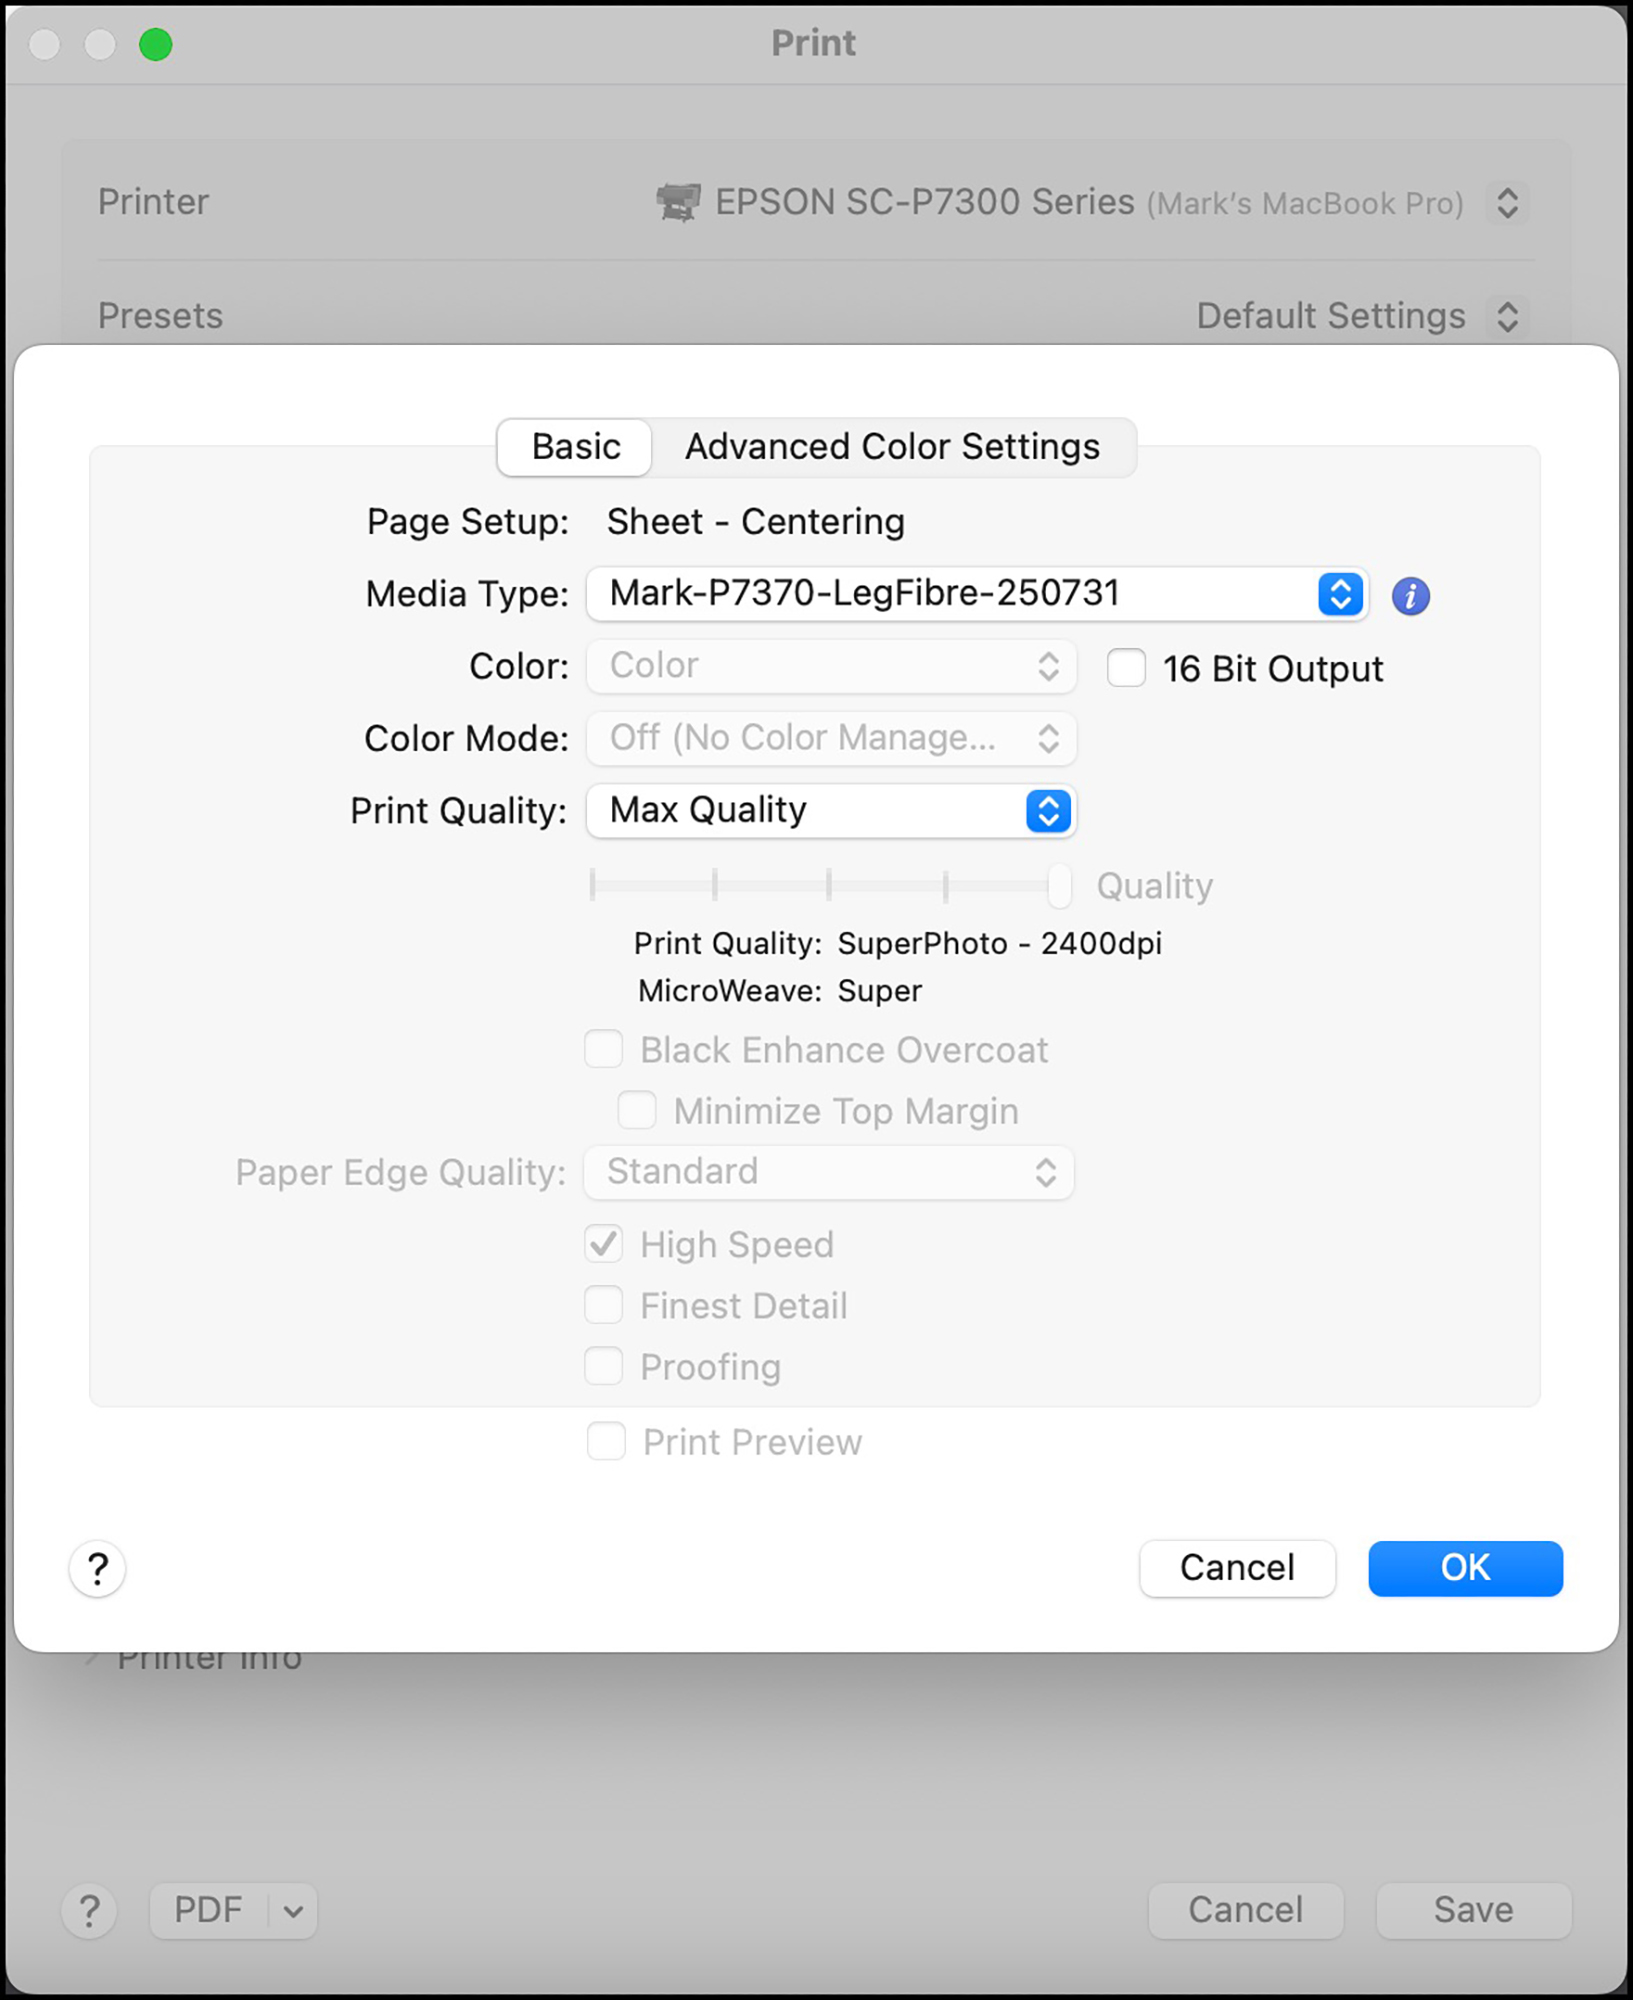
The center setting is called “Quality”. It offers “Photo” quality 1200 dpi printing and Microweave “On”. For this printer, that setting is akin to draft quality printing and prints very quickly. I don’t see this added speed as an advantage because this printer works so quickly even with the highest quality settings that yet faster doesn’t seem all that compelling. It’s good for a very speedy test, not a final high-quality product. But I prefer to do my testing under softproof on my colour-managed and profiled display, hence would not be using this setting.
The next setting to the right is “High Quality”. It offers “SuperPhoto” quality at 2400 dpi along with Super Microweave. This setting produces exhibition quality prints, but depending on the photo, there may still be a bit of extra “punch” in fine element rendition using the Max Quality setting to the far right. This setting also opens the possibility of selecting BEO, (Black Enhance Overcoat) which may provide subtly deeper dark shade rendition on gloss and some near-gloss papers.
As in previous models, the “High Speed Option” simply provides for two-directional printing, meaning that the print head lays ink on the forward and backward passes. It makes no difference to quality (except for some specialty media), but halves the printing time.
“Finest detail” is mainly useful for printing vector graphics sharply. There’s discussion about its usefulness for standard photographs.
Once all these necessary settings in the printer driver are made the final settings to deal with are in the Print panel of the image editing application (e.g. Photoshop, Figure 26).
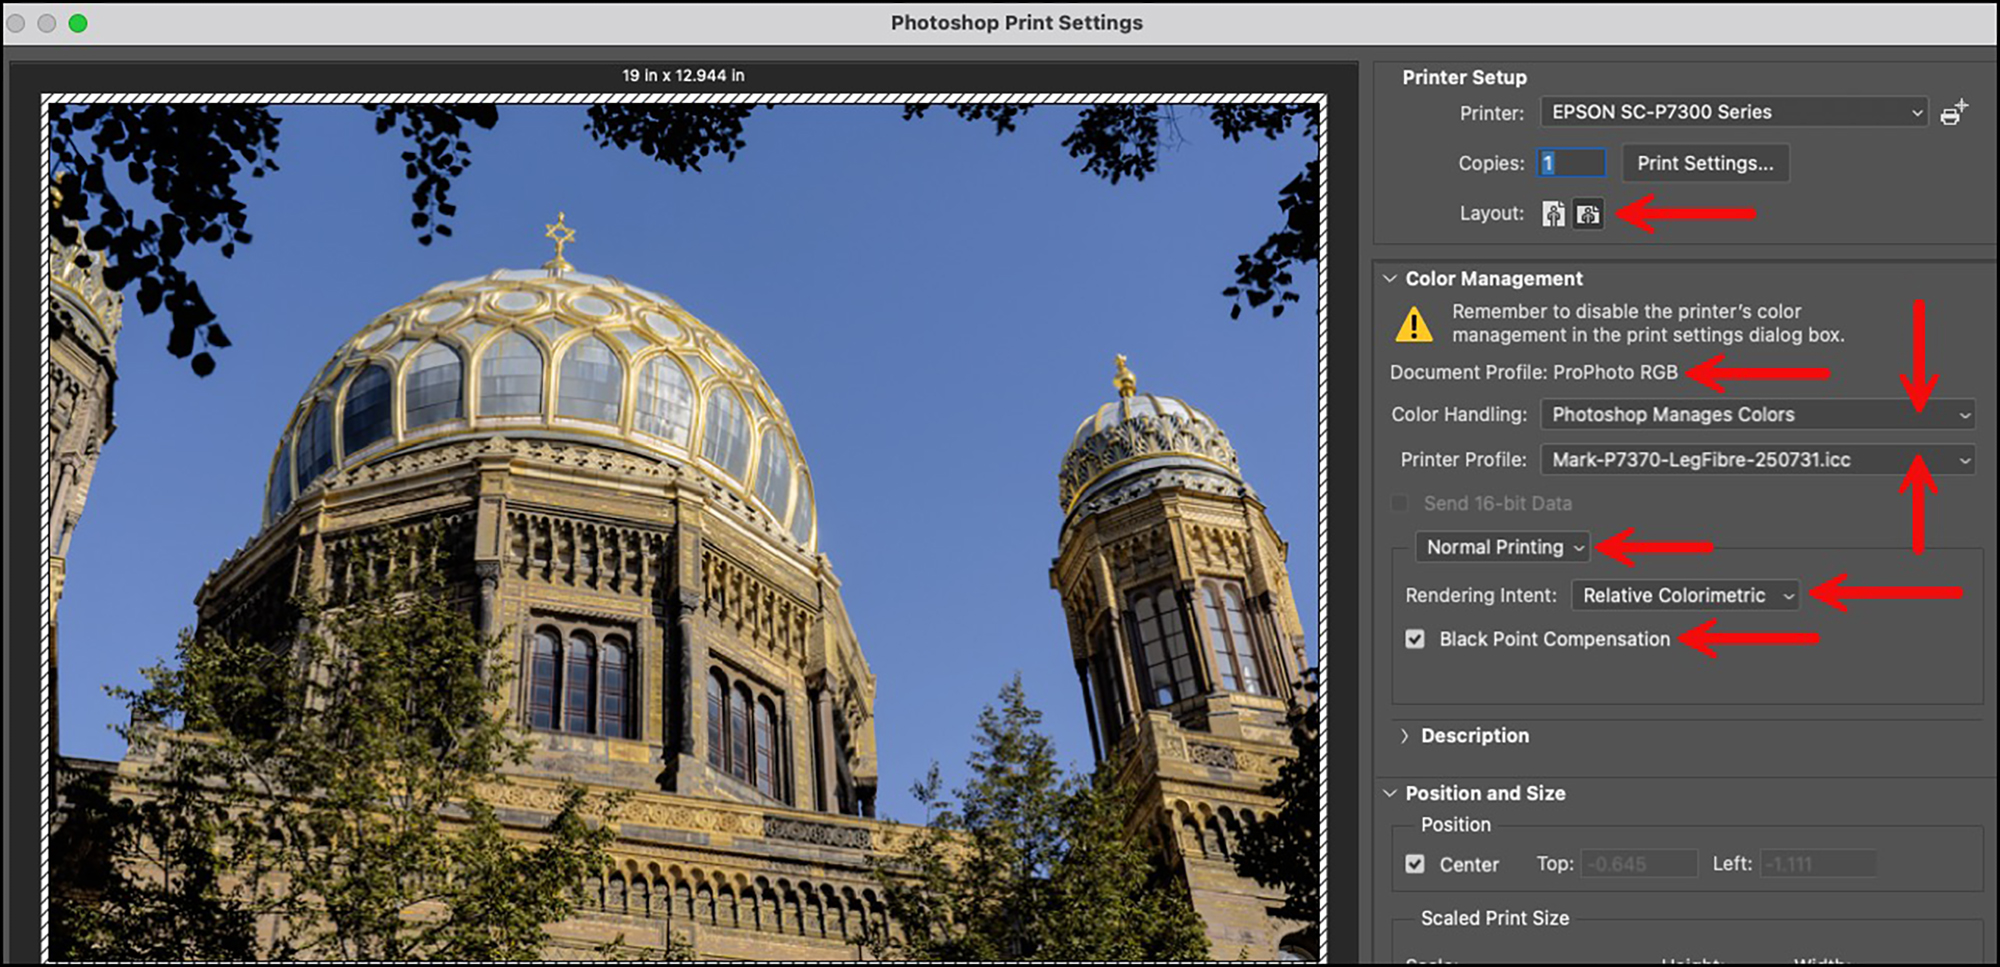
Going down the list in the right side of Figure 26, these are the important settings:
- Layout should correspond with that of the photo;
- The document profile should be the colour space in which the photo was edited;
- Color Handling: should be “Photoshop Manages Colors” for best results;
- Printer Profile: must be the same one set in the Printer driver;
- Usual printing mode: “Normal”
- Rendering Intent: Use either Relative or Perceptual to taste;
- Black Point Compensation: should be usually active.
You are now ready to click “Print”.
An easier printing option that places most of the essential settings we’ve been through above in one convenient interface is to use Epson Print Layout (EPL). I reviewed EPL in the context of my review of the Epson SC-P5370 printer. It works as well with the SC-P7370. Nothing has changed and I recommend it now as I did then. For reminders, Figure 27 shows the EPL user interface.
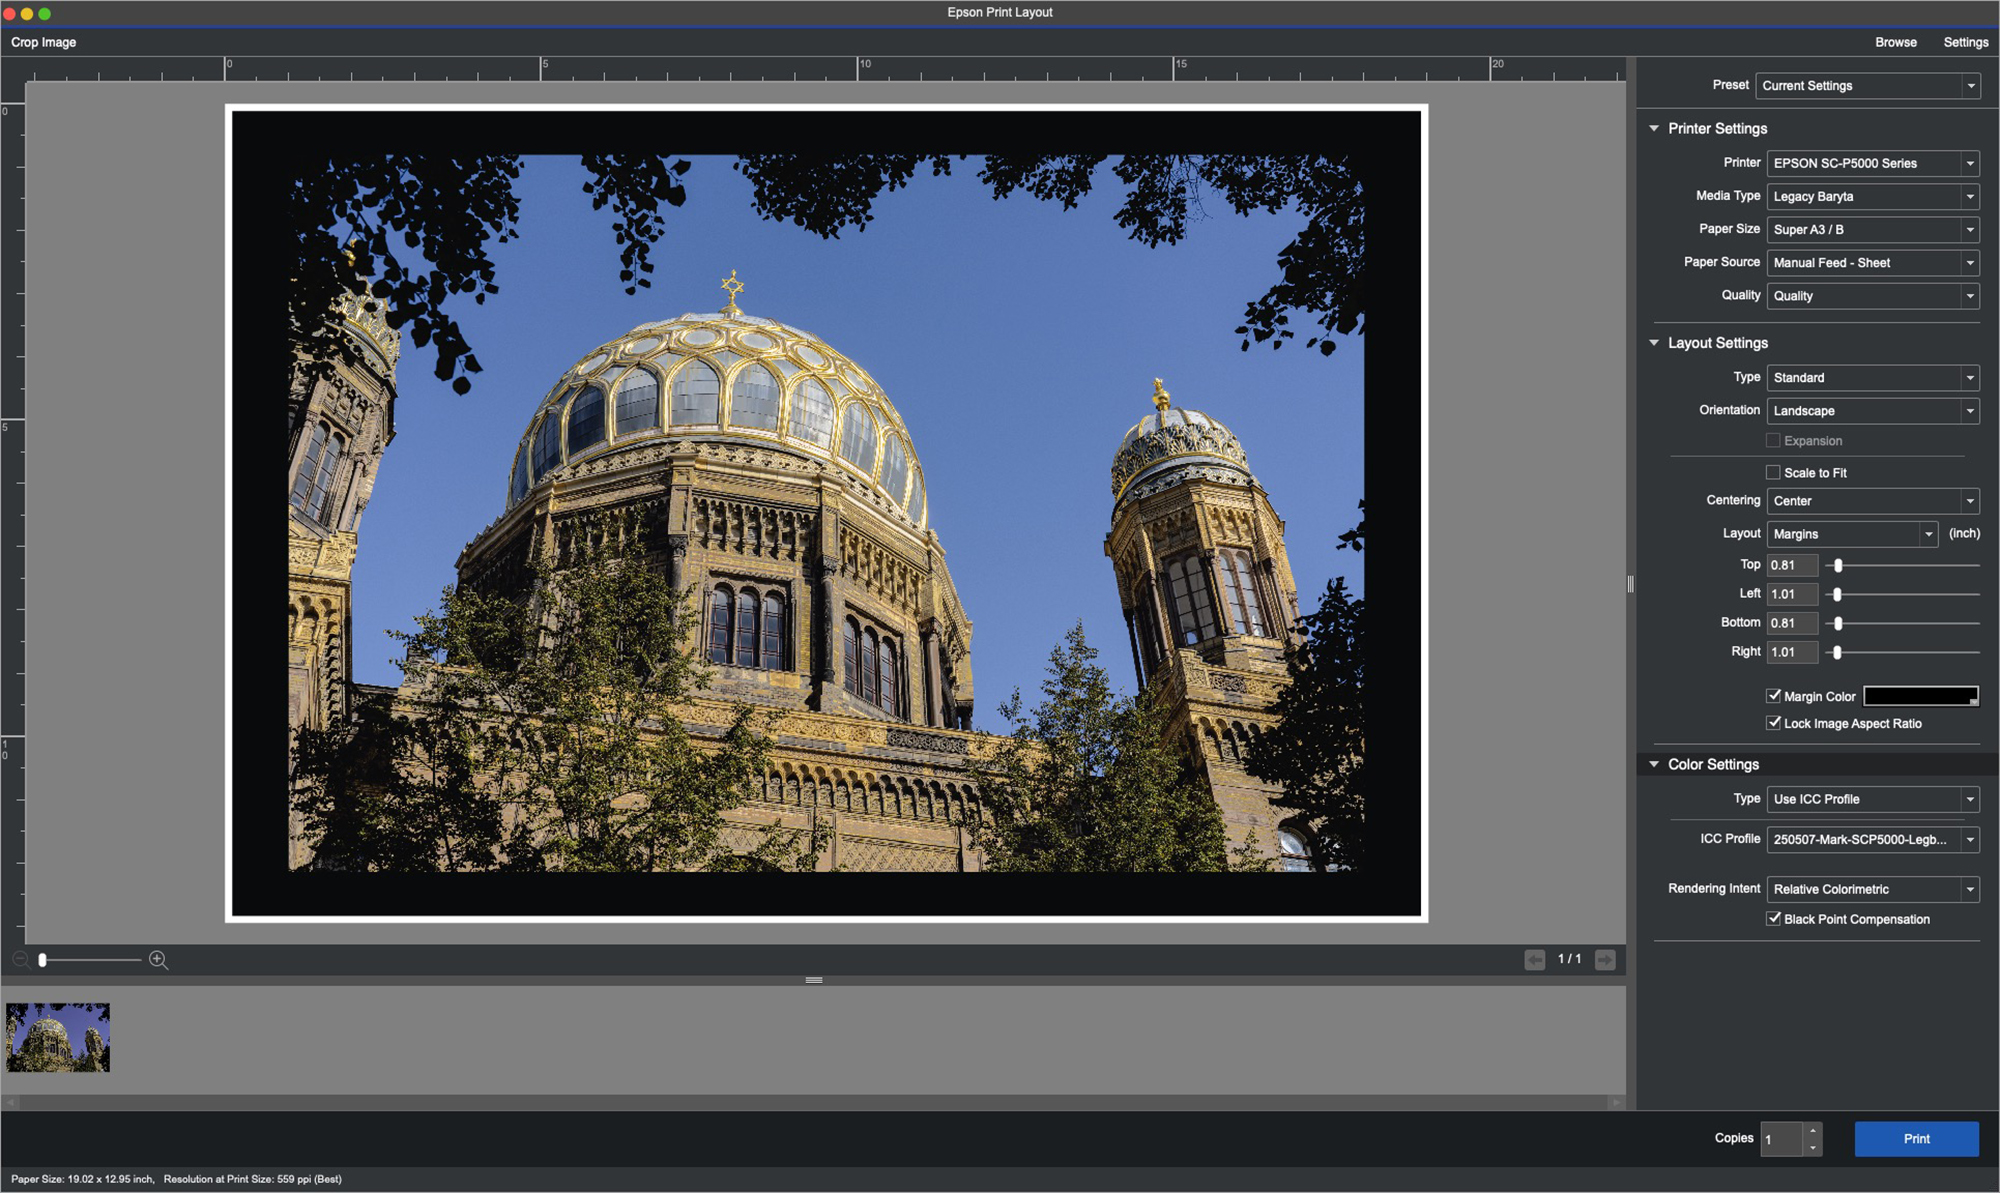
(photo: Neue Synagoge, Berlin, © Mark D Segal)
As you scroll down the controls in the right-side panel, you will notice that this application brings together all the key settings that would otherwise need to be made separately in the printer driver directly and in Photoshop. This app does access the driver, does not access Photoshop, and is altogether an easy and convenient “all-in-one” approach – but the settings on the printer LCD still need to be made consistently and independently. EPL is also recommended in some situations where bugs in either Adobe or Apple applications interfere with correct colour rendition.
3. Epson Media Installer (EMI)
By now you’ve seen me refer to EMI in several places above, so let’s examine this animal and its usefulness. (Don’t worry, on a Mac it’s a bit of a lumbering beast but it doesn’t bite and does become our friend.)
The main purpose of it is to facilitate the use of third-party media and custom profiles in a manner that helps assure easier and less error-prone (from wrong settings) printing. It introduces two new kinds of files you’ve never heard of before (unless you’ve already used it) – EMX and emyv2. These files contain data on all the “mechanical” parameters of the paper and its associated ICC profile for your printer. The difference between them is that only Epson can edit EMX files, but others can create and edit emyv2 files. The key strategy in using this application is that unless you want to print with Epson-determined paper characteristics and profile, you will use a relevant EMX file to create a new emyv2 file that you will configure to retain all the Epson settings you want to keep, as well as those you wish to change.
Some third-party paper makers have already created emyv2 files for their papers and they will be following suit for this new printer model. You will be able to download and install into EMI their emyv2 files, but note in this case, unless you modify an emyv2 to include a custom profile, you will be using their canned profile for the paper in hand.
I present the following brief run-through for configuring key functions of the application. As well, see Epson Support pages here: https://epson.com/Support/epsonmediainstaller.
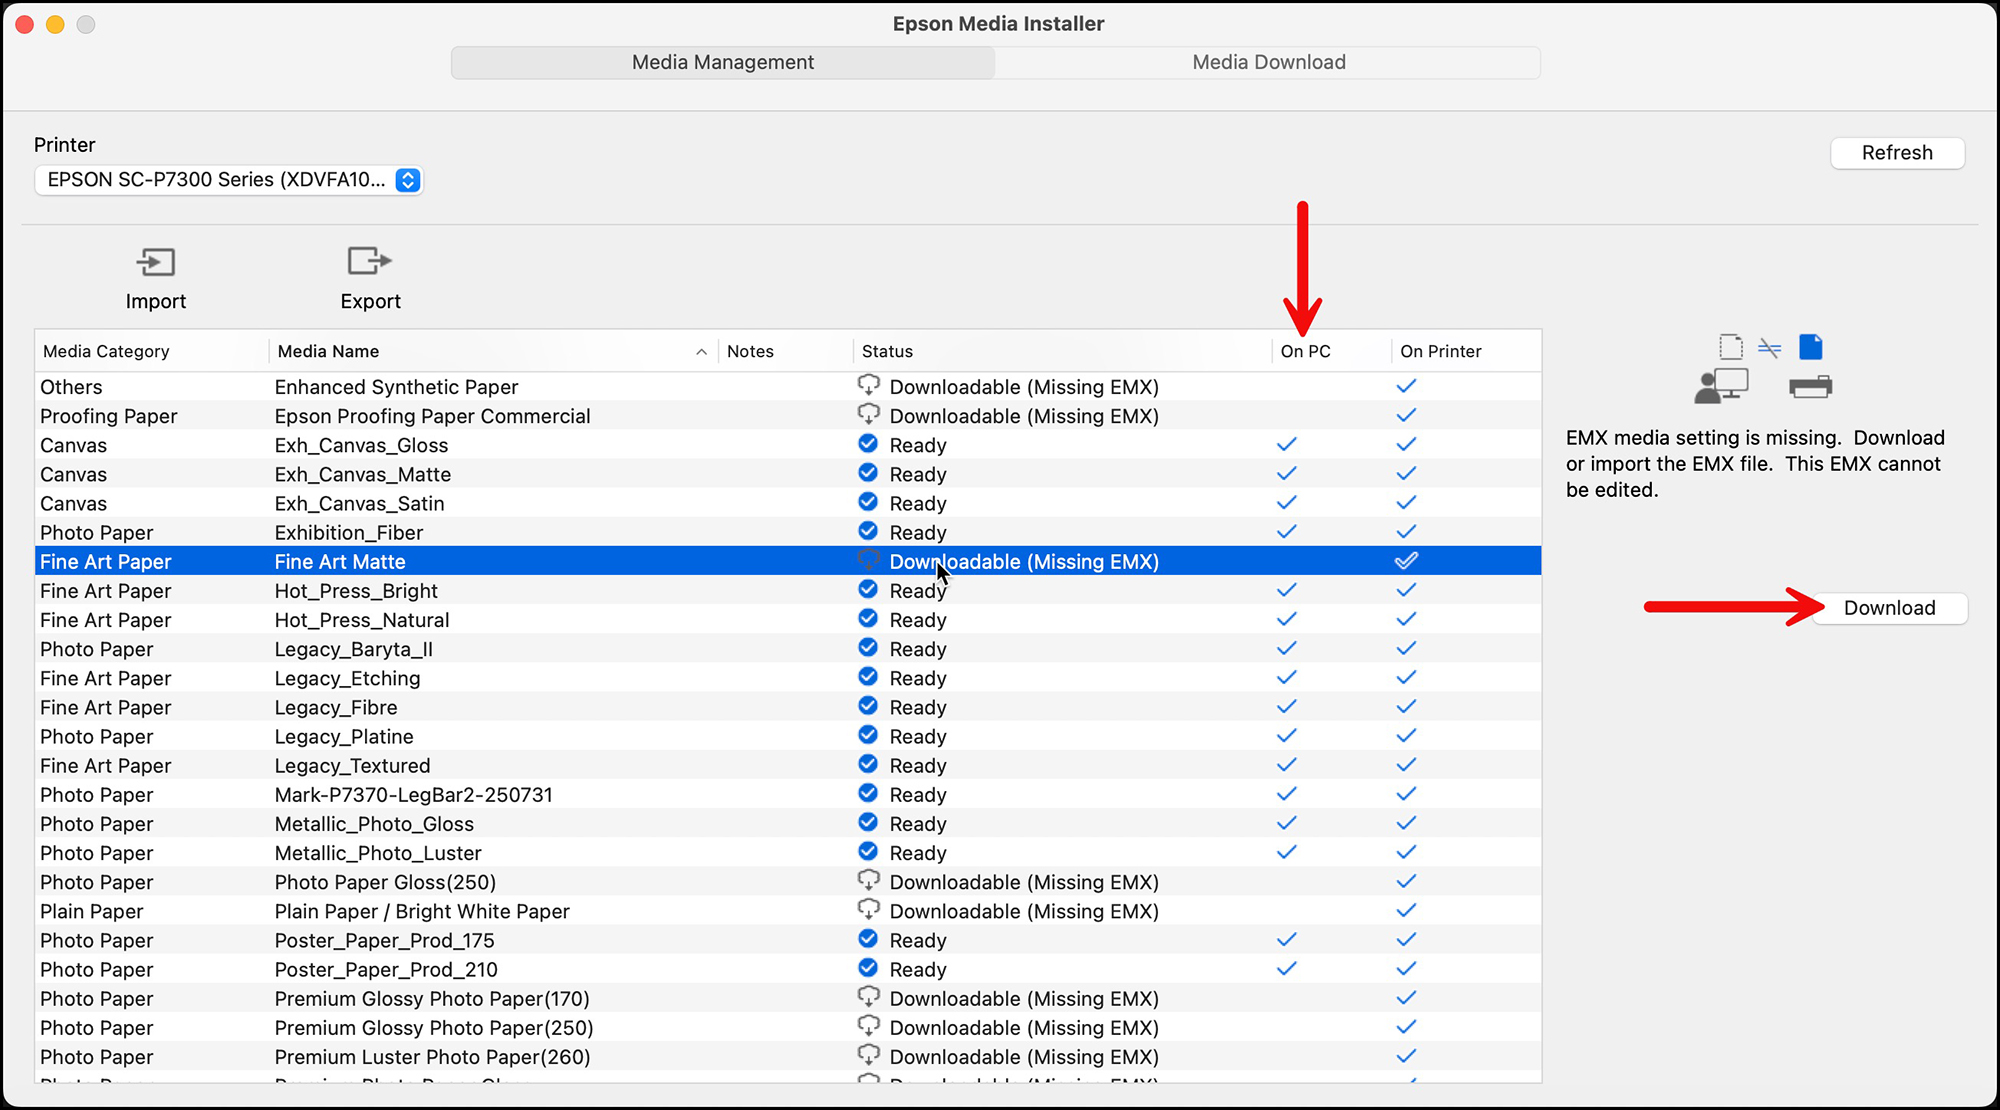
Case 1: A paper you need is not yet downloaded to the computer, but exists in the printer (Figure 28):
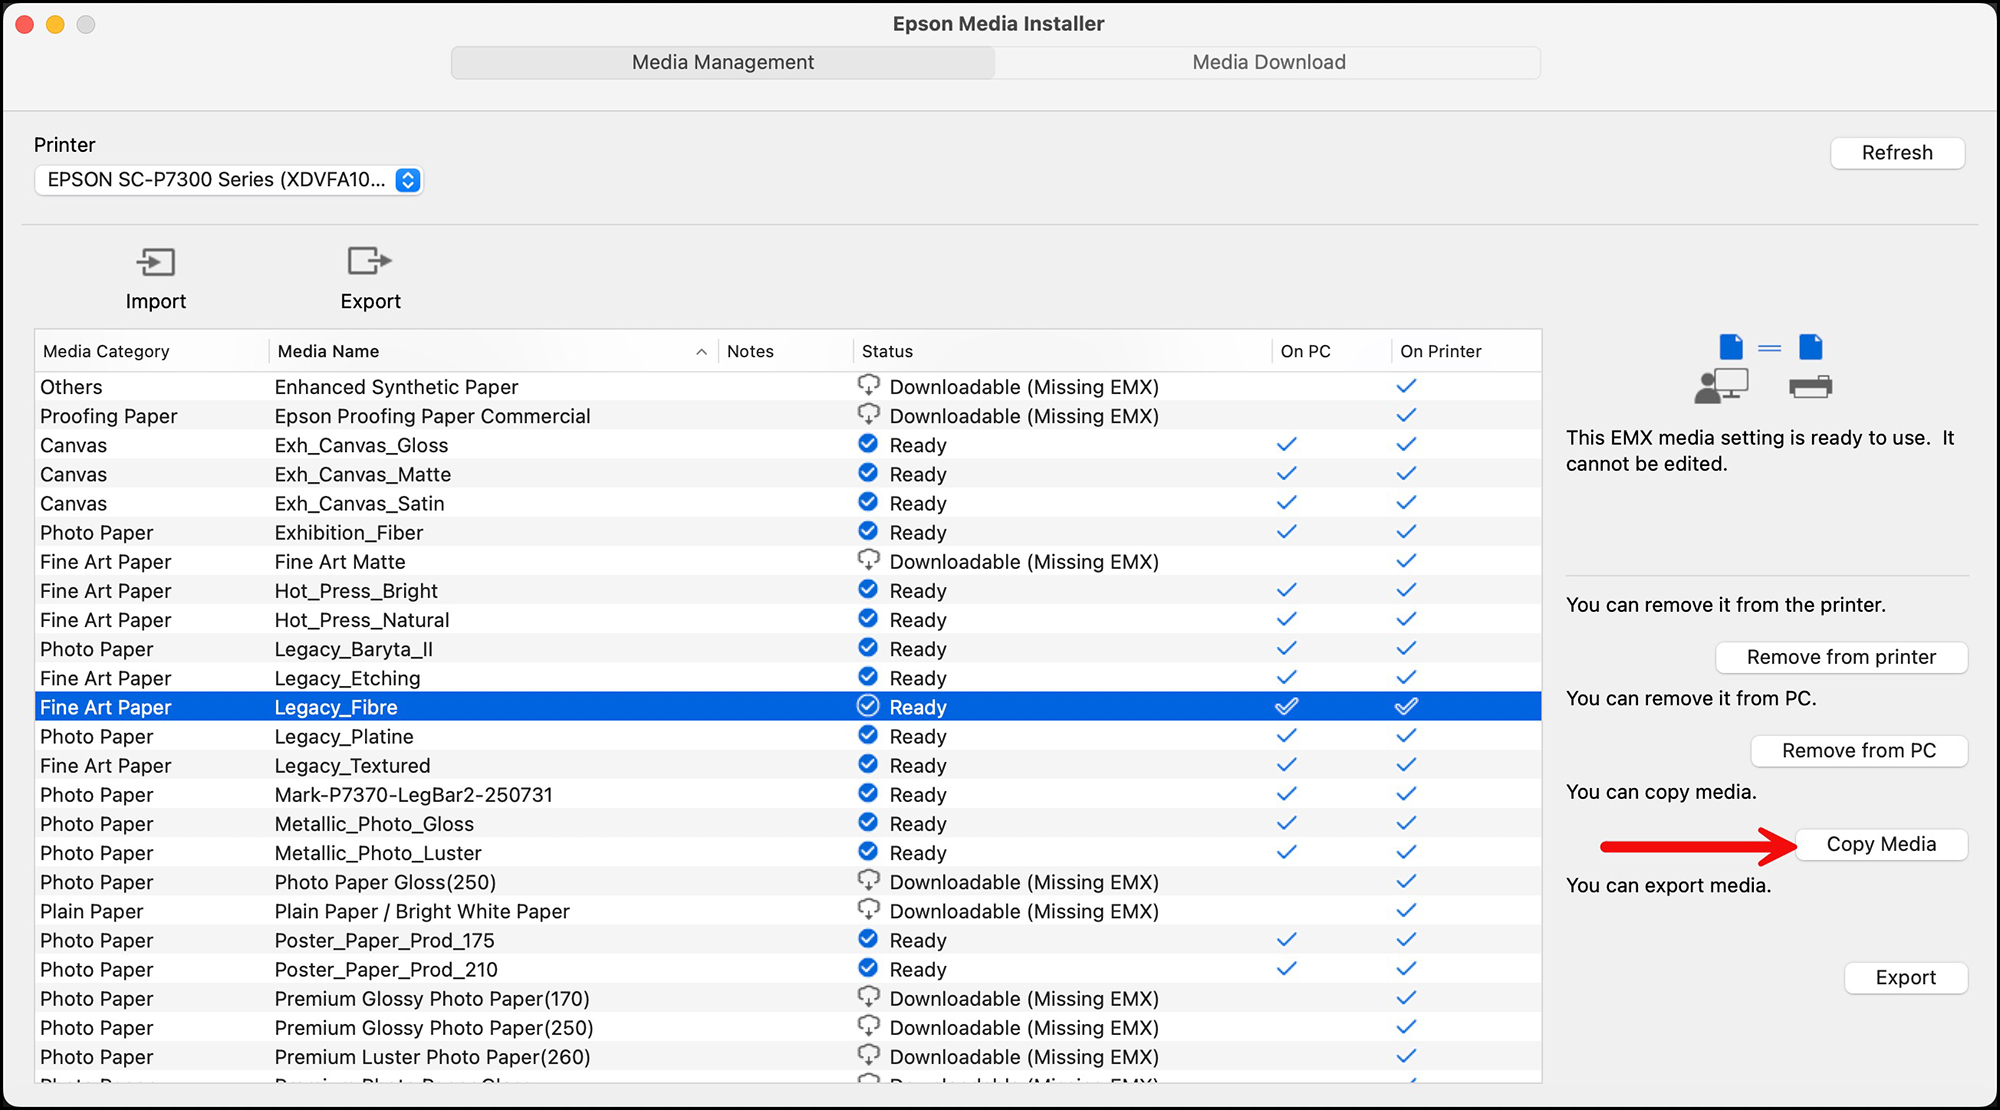
Case 2: The paper is recognized in both the computer and printer, but I want to associate a custom profile to it; first copy the existing EMX Media Type (e.g. Legacy Fibre paper, Figure 29.
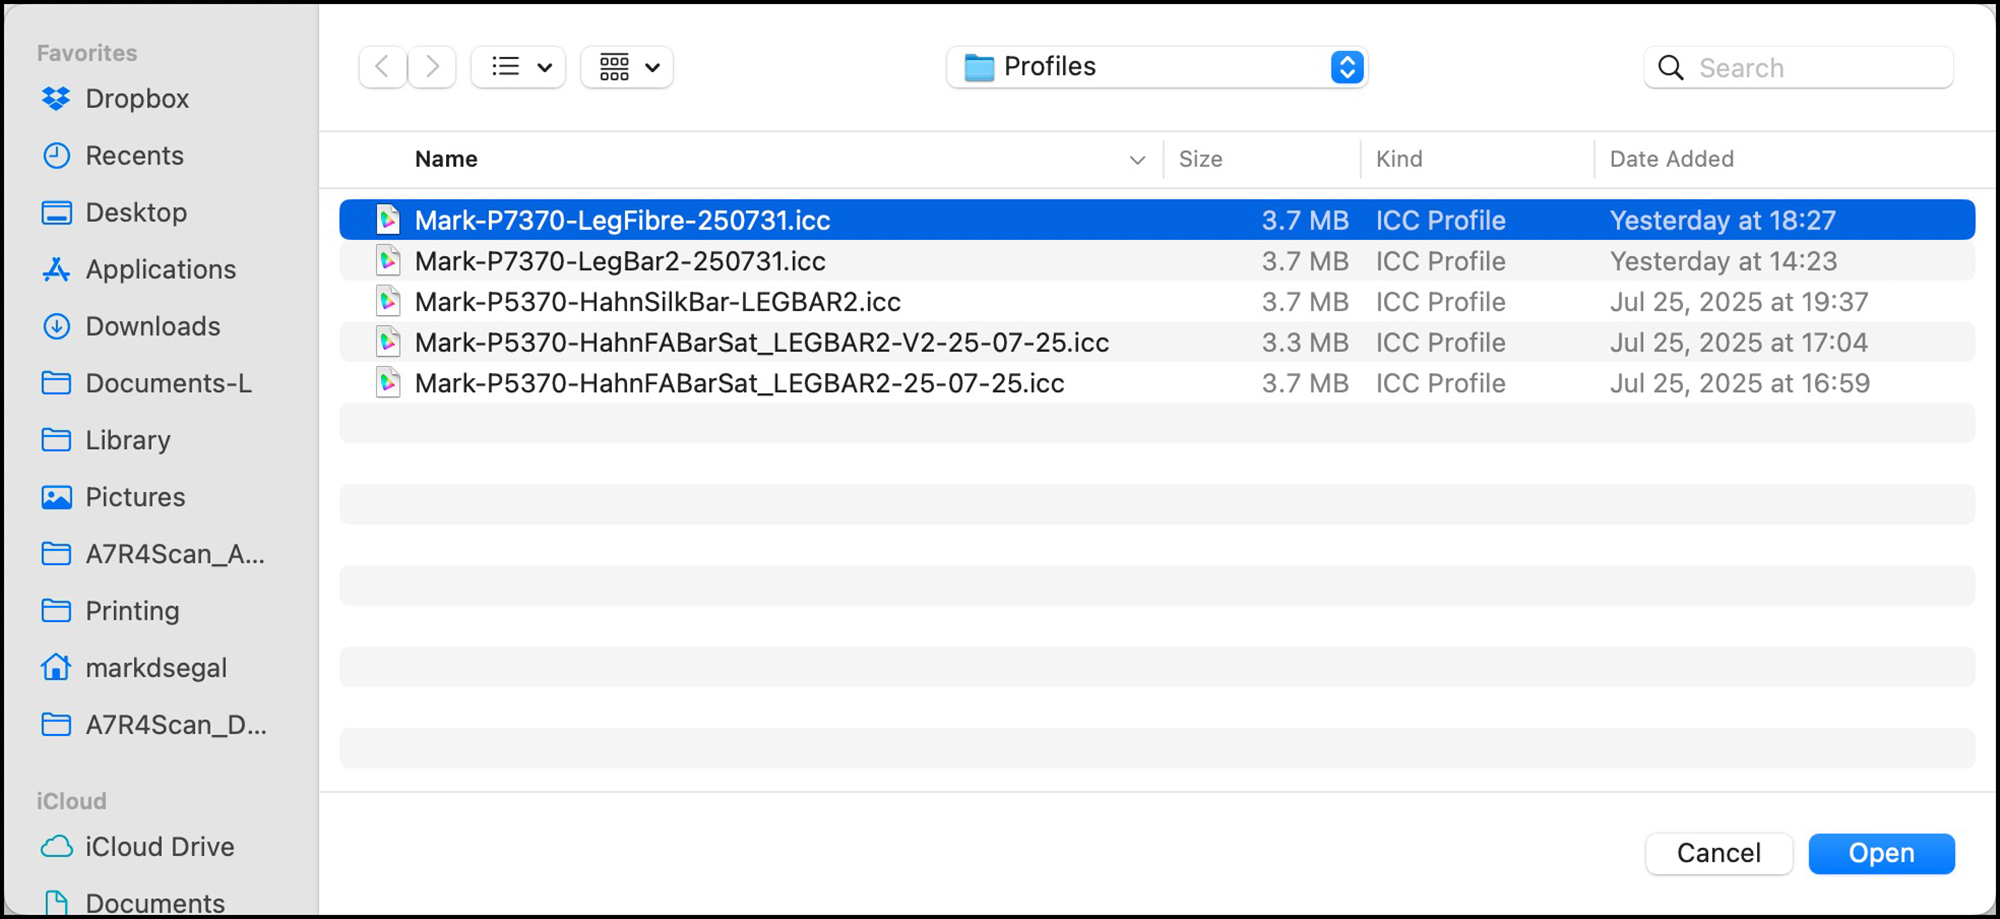
Second, fetch the new profile you wish to associate with the Media Type (Figure 30):
Third, rename the Media copy to something you will recognize later. I just give it the name of the custom profile I am associating with the paper type, because my profile name has all the information I need to know about what it is (Figure 31).
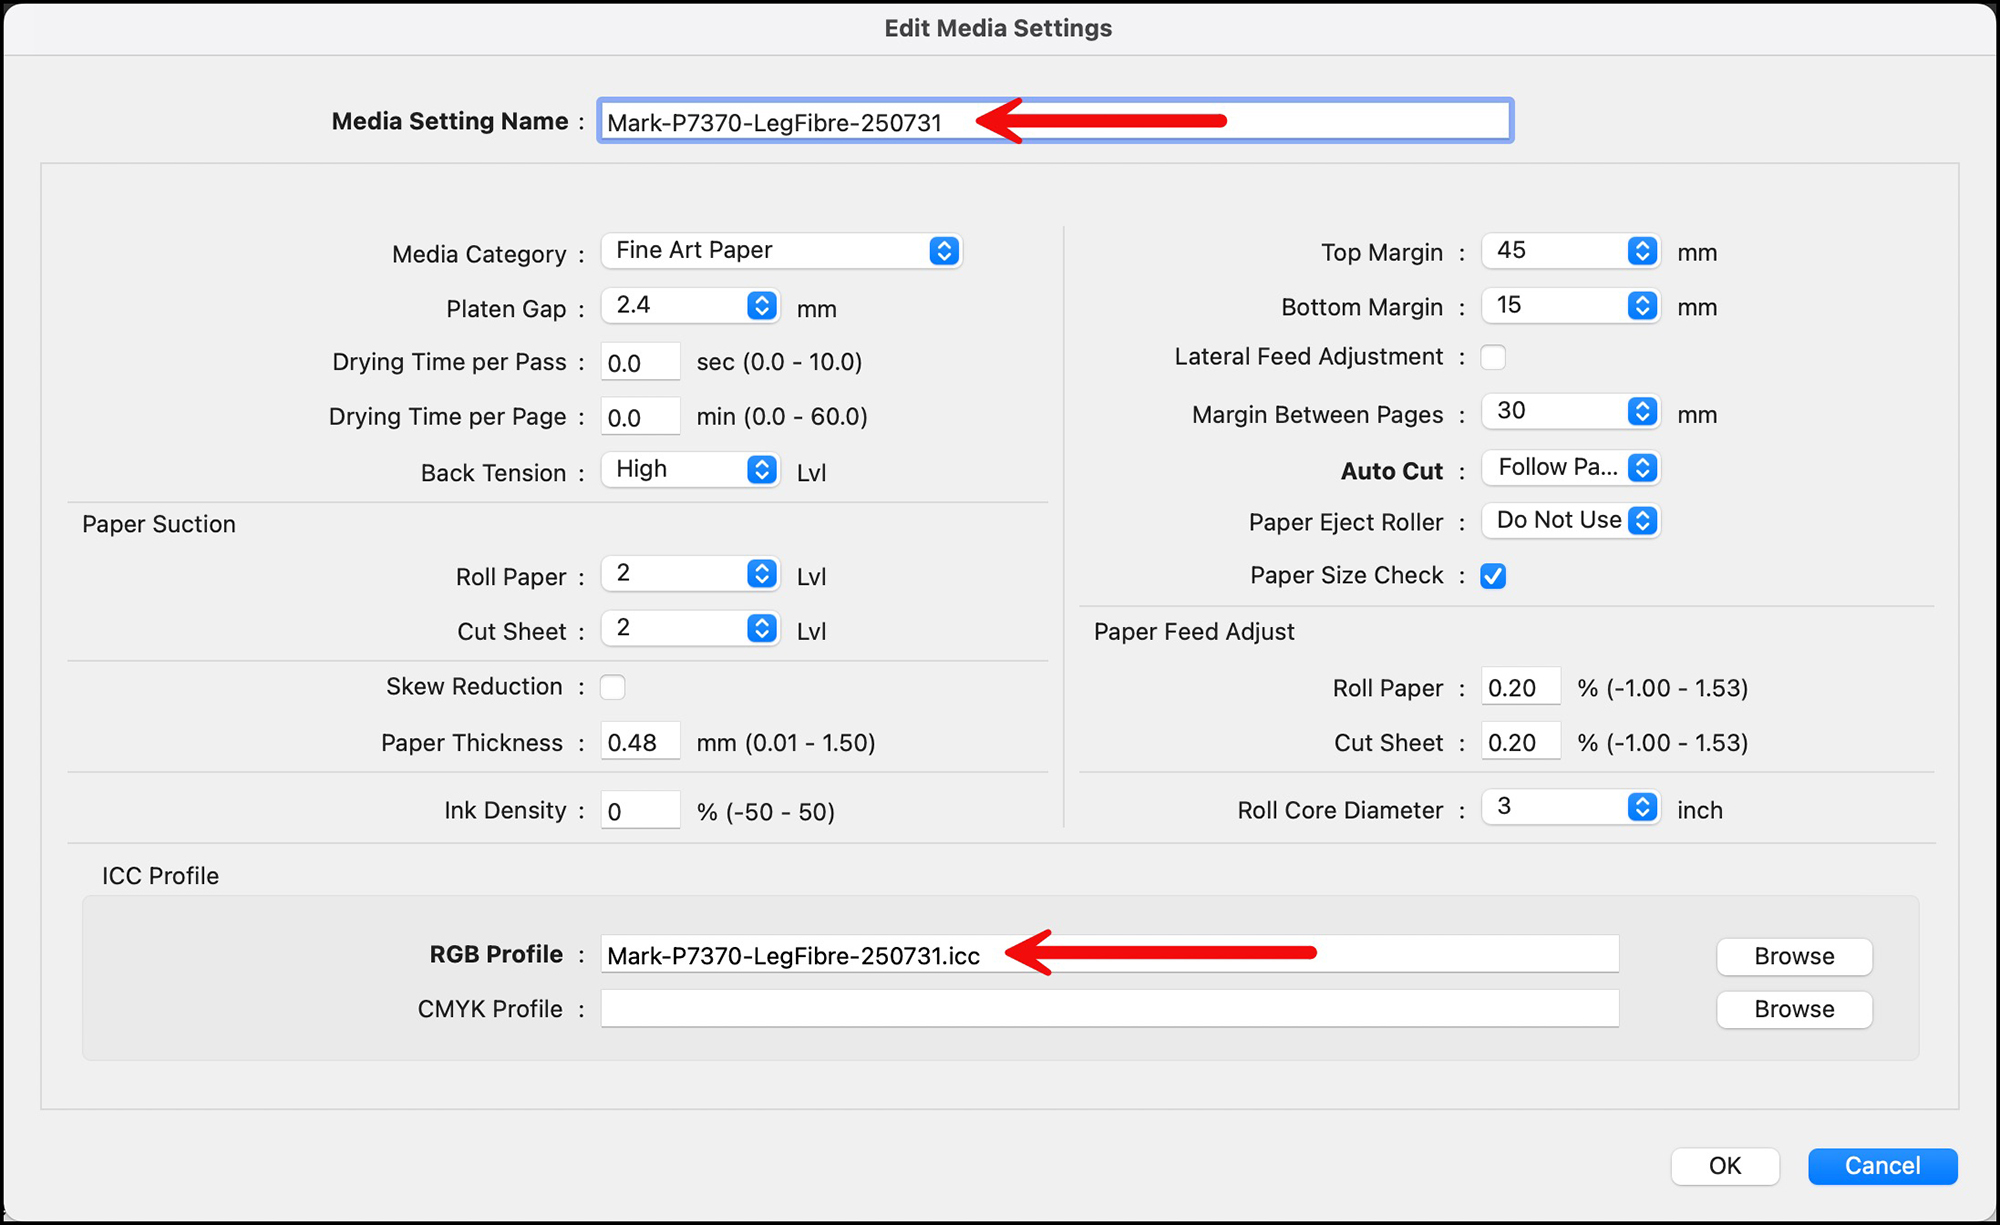
(Also note the paper parameters available for editing.)
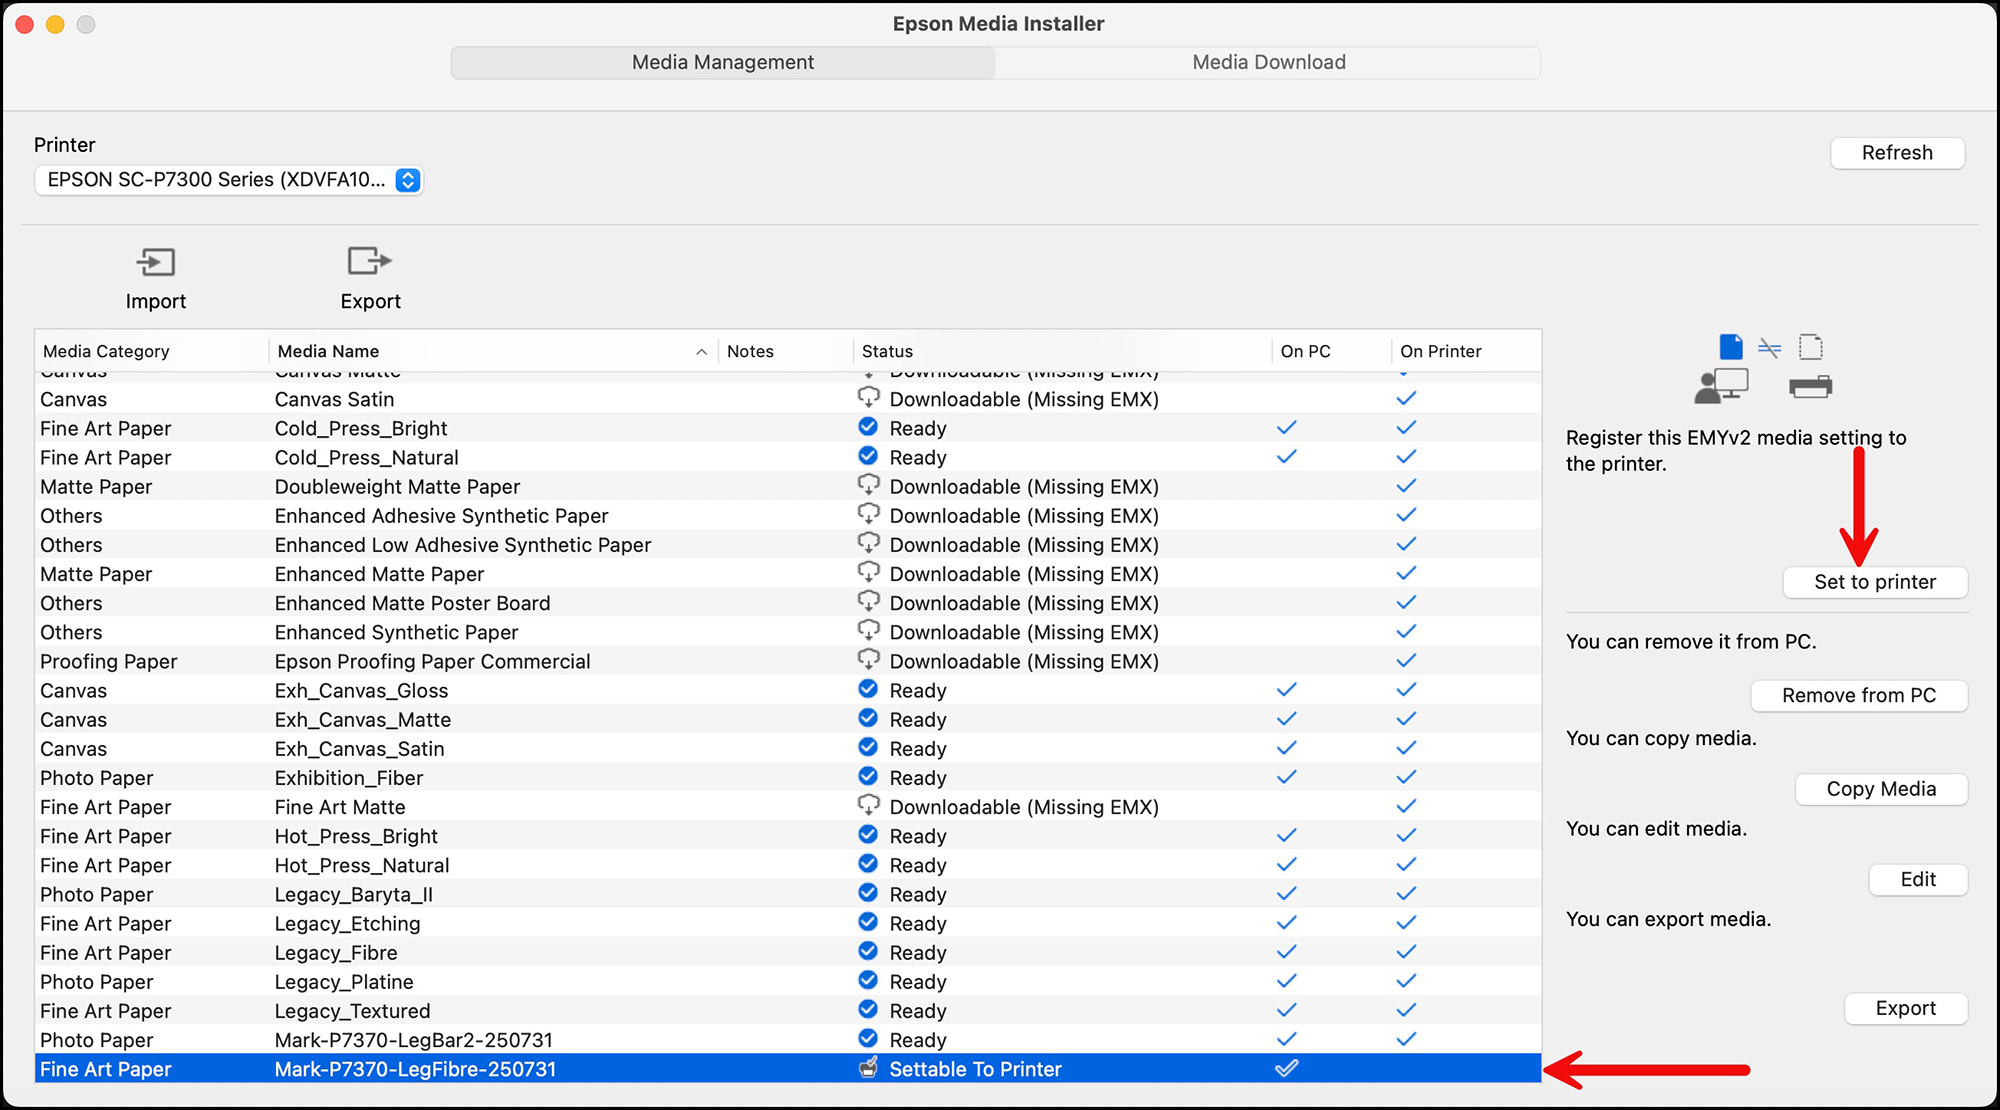
Fourth, Set the new Media Type to the Printer (Figure 32):
Having done so, the interface will show checkmarks for the new emyv2 Media Type set in both the printer and the computer (Figure 33).
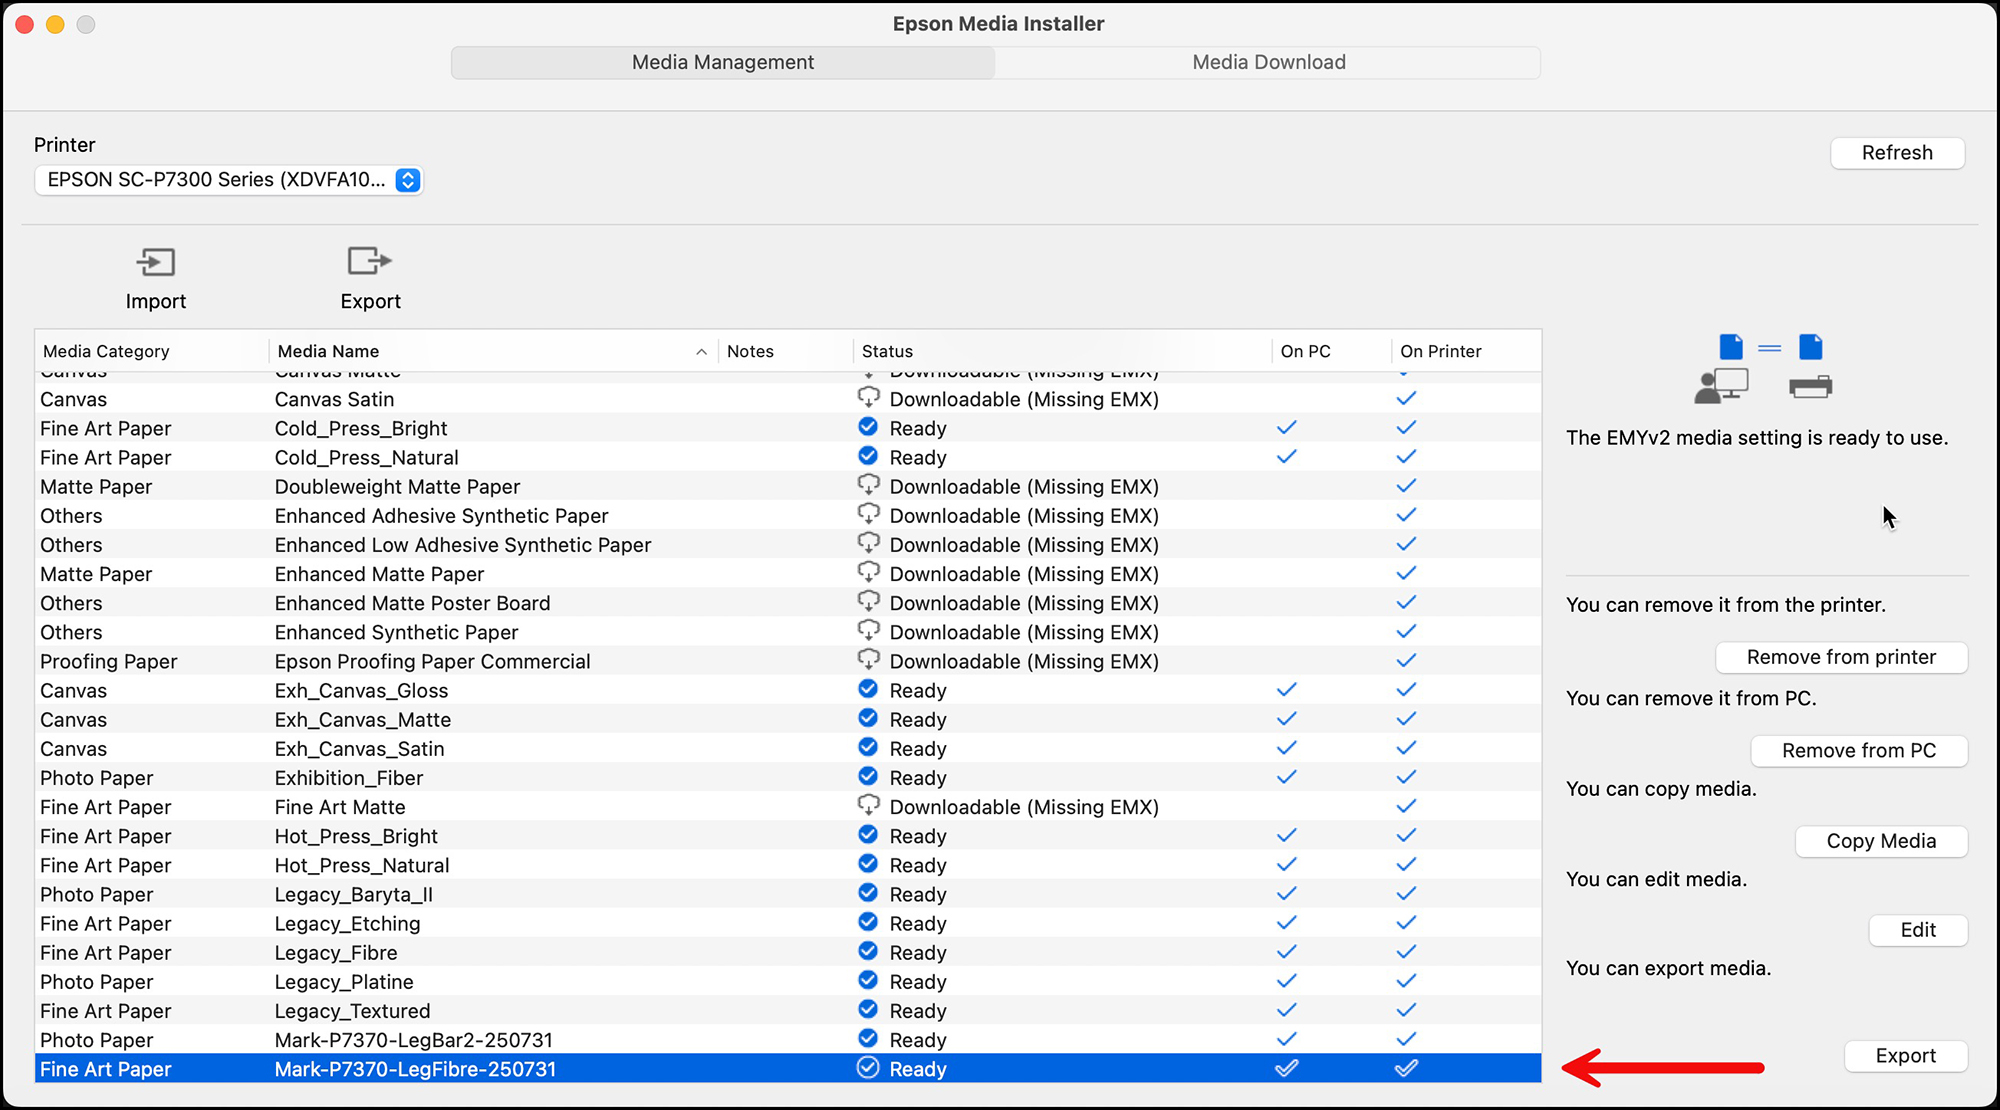
The new Media Type will be now available in the lists accessible from the printer LCD and the computer, assuring that the paper settings and profile will be coherently selected.
Case 3. Importing a Third-party paper
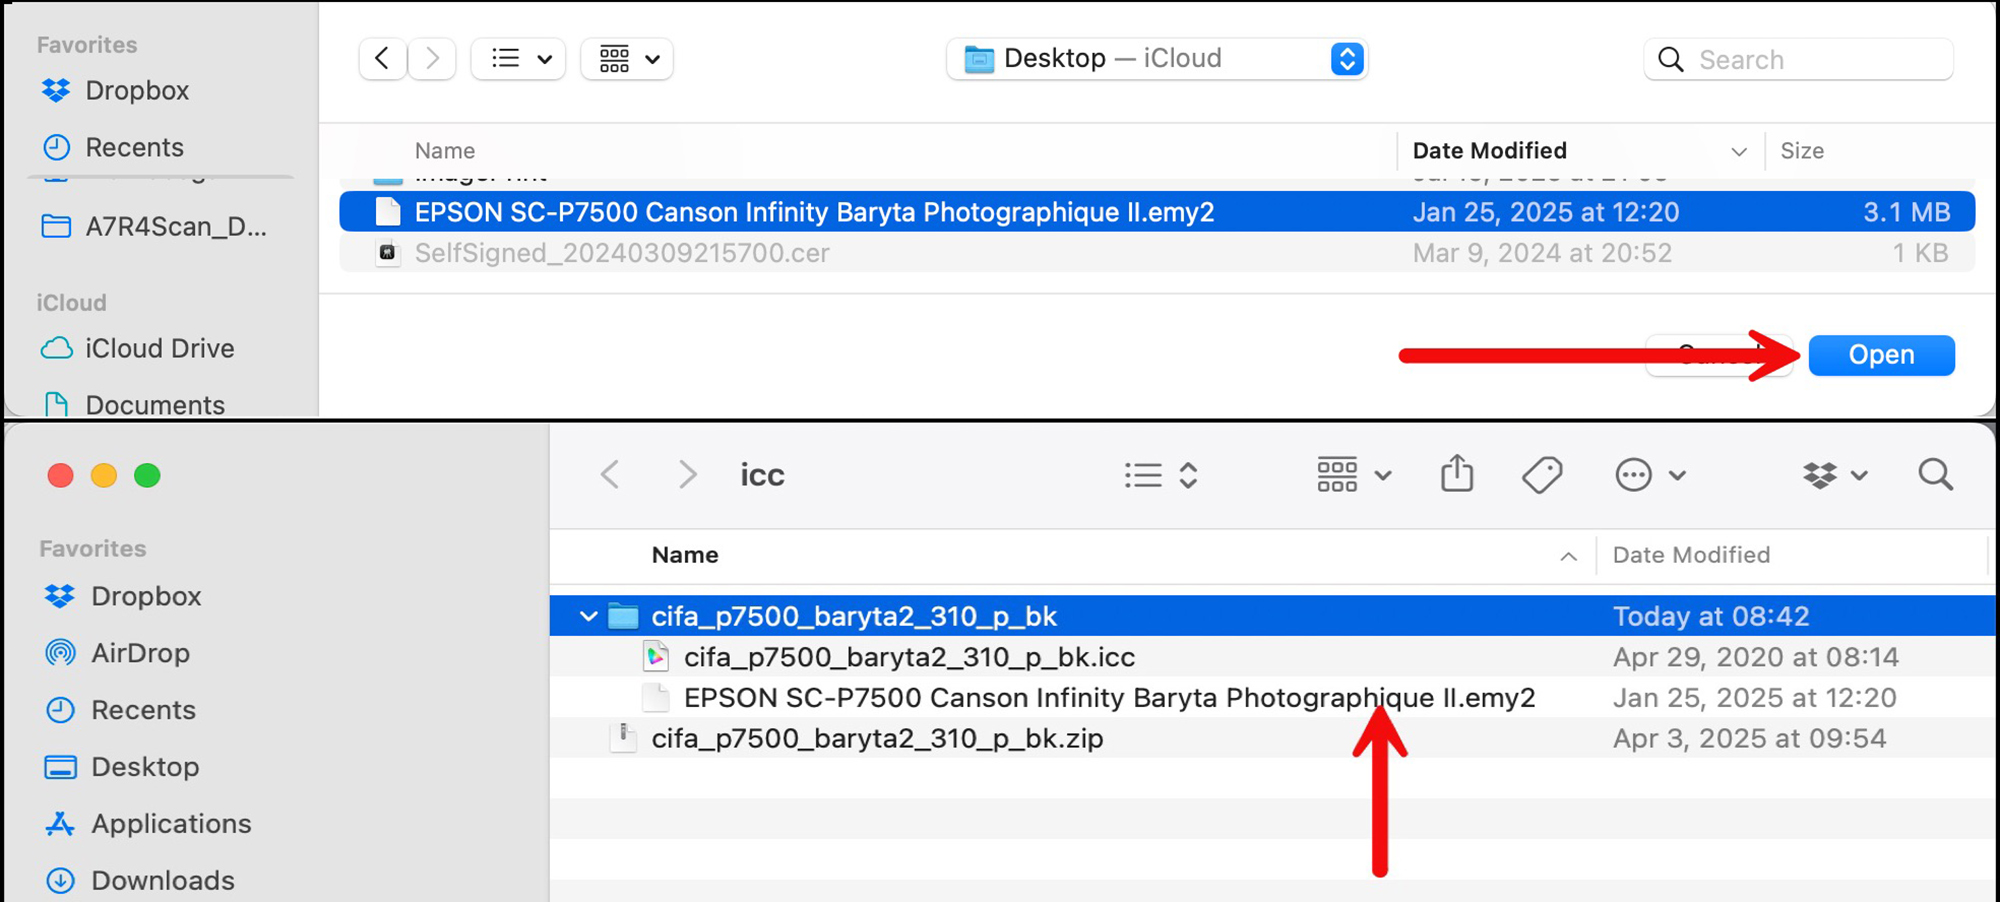
Canson Infinity, for example, has made emyv2 files for their inkjet papers. If you wish to use this paper in the P7370/P7570 etc. printers, you’ll download their profile package (Figure 34) and install it using EMI, making sure their ICC profile or your custom profile are installed with it.
4. Printer Set-Up and Maintenance
Epson provides a well-documented downloadable PDF set-up guide on its Support website, laying out the procedure. The printer is very nicely engineered to set-up easily, and everything needed is “in the box”. The only problem is that, as you can imagine, this is a heavy machine and requires several people to lift the printer onto its stand. The stand is an easy assembly of several pieces, and the printer is held onto it with two wingnuts. That’s it. For those with space issues, please read the dimensions provided on the Epson spec sheet; also note the printer is designed to be positioned against a wall. It does not need space behind the printer for paper egress or ejection – it all happens in front. Recall, this printer can print on stiff media such as poster board, as there is straight pass-through – the media does not get bent or curled in printing.
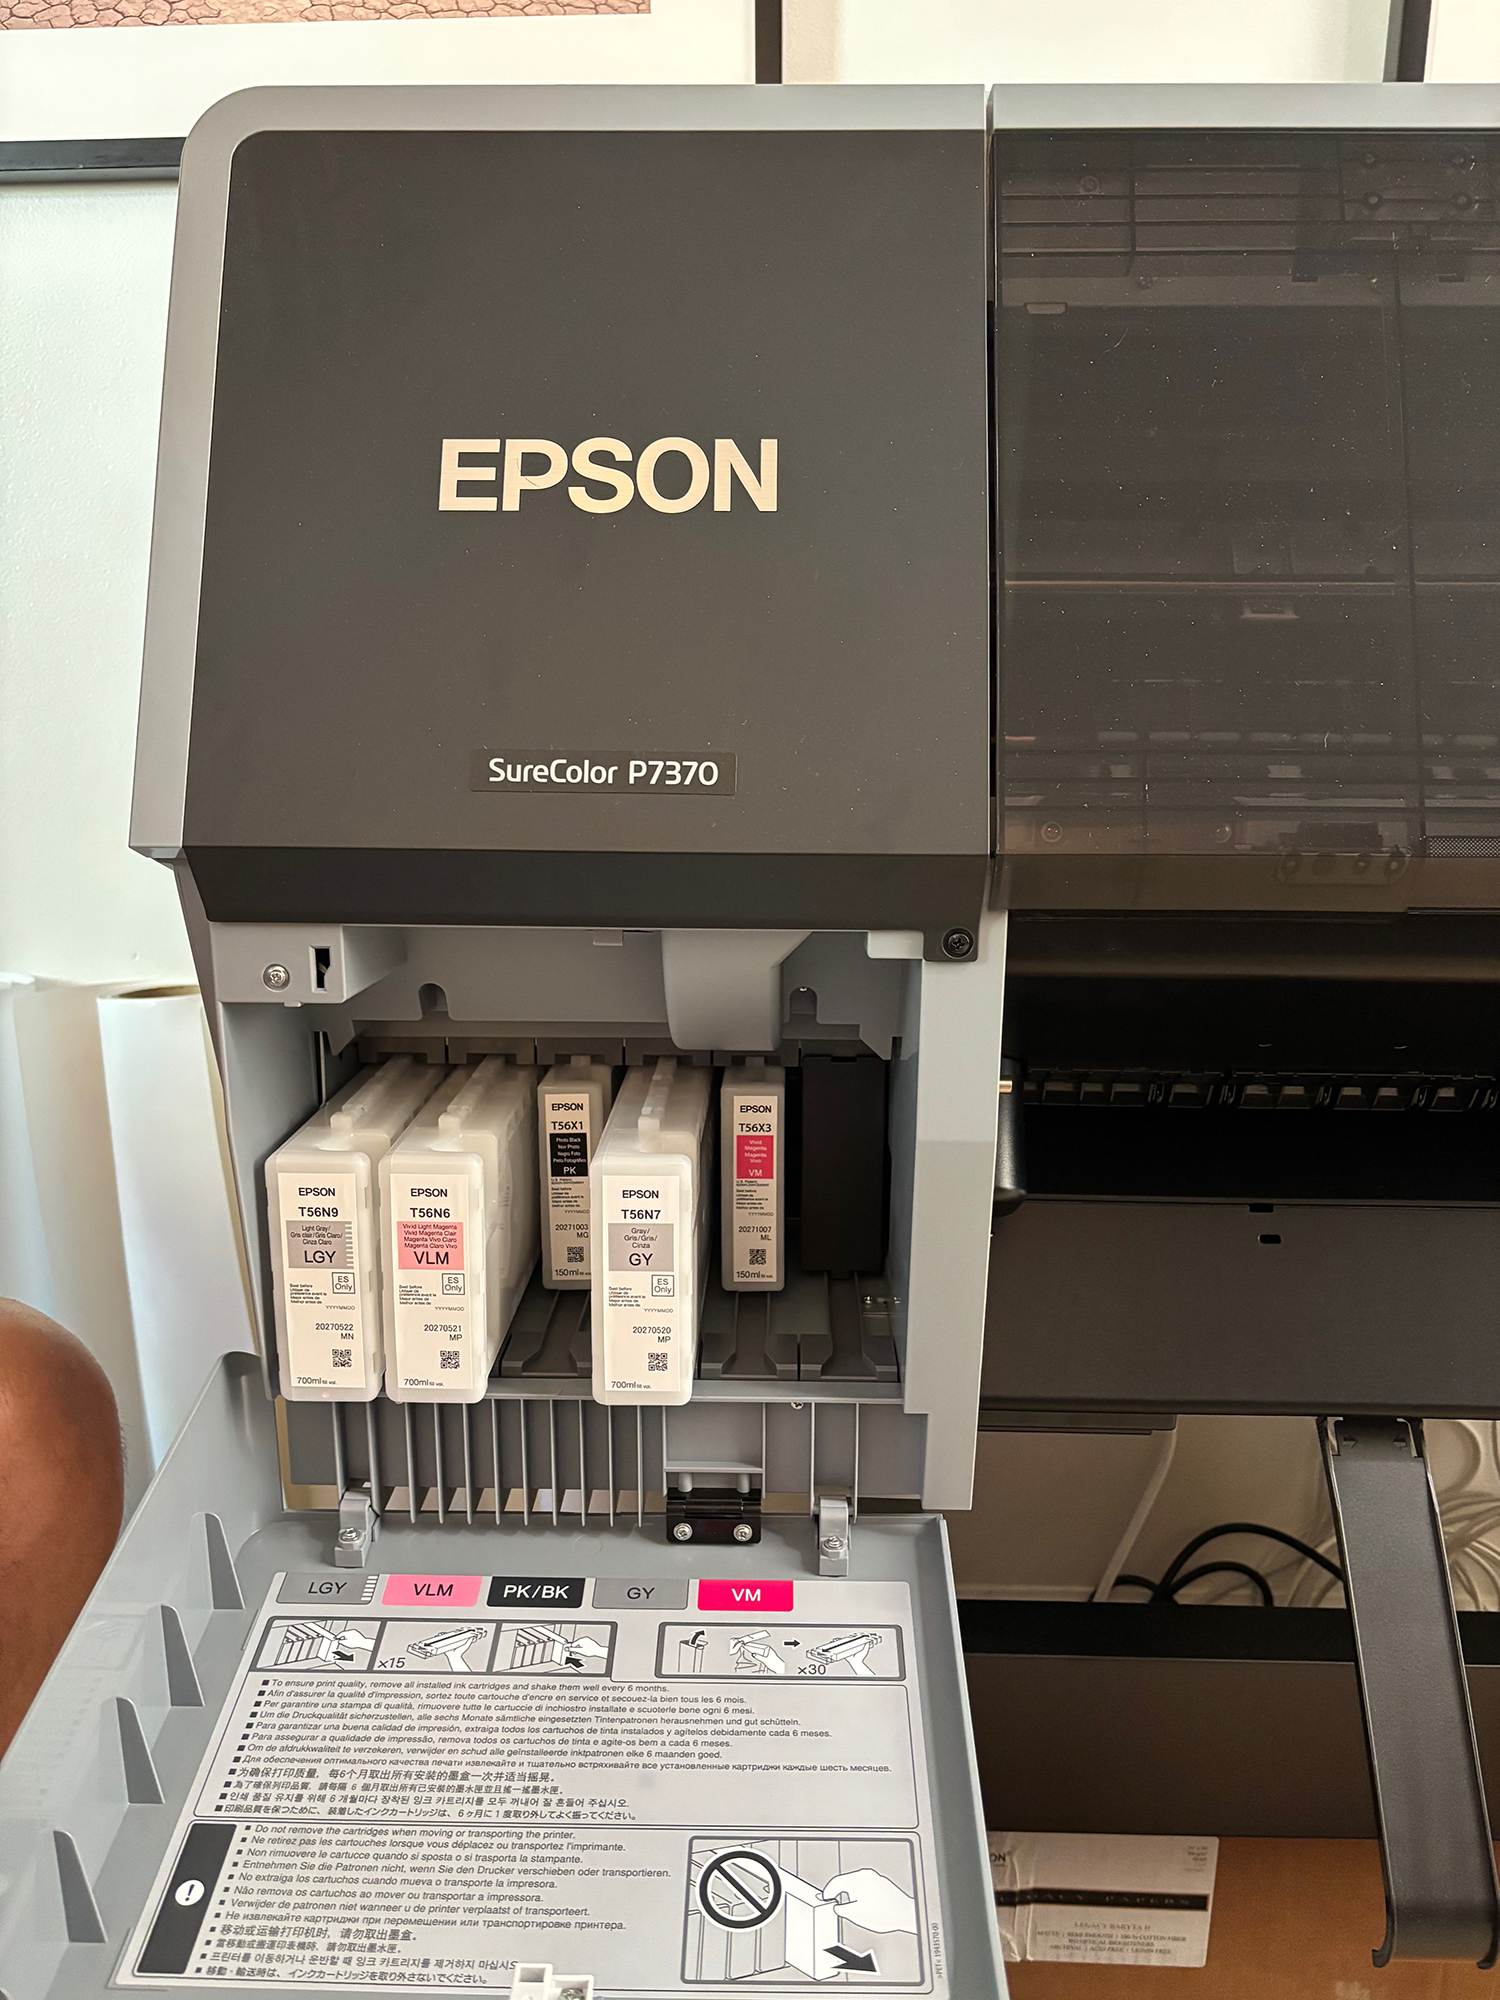
The printer’s ink bays are designed so that even though different sizes of ink cartridge are available, one does not need to buy the same ink volume for all the colours (Figure 35).
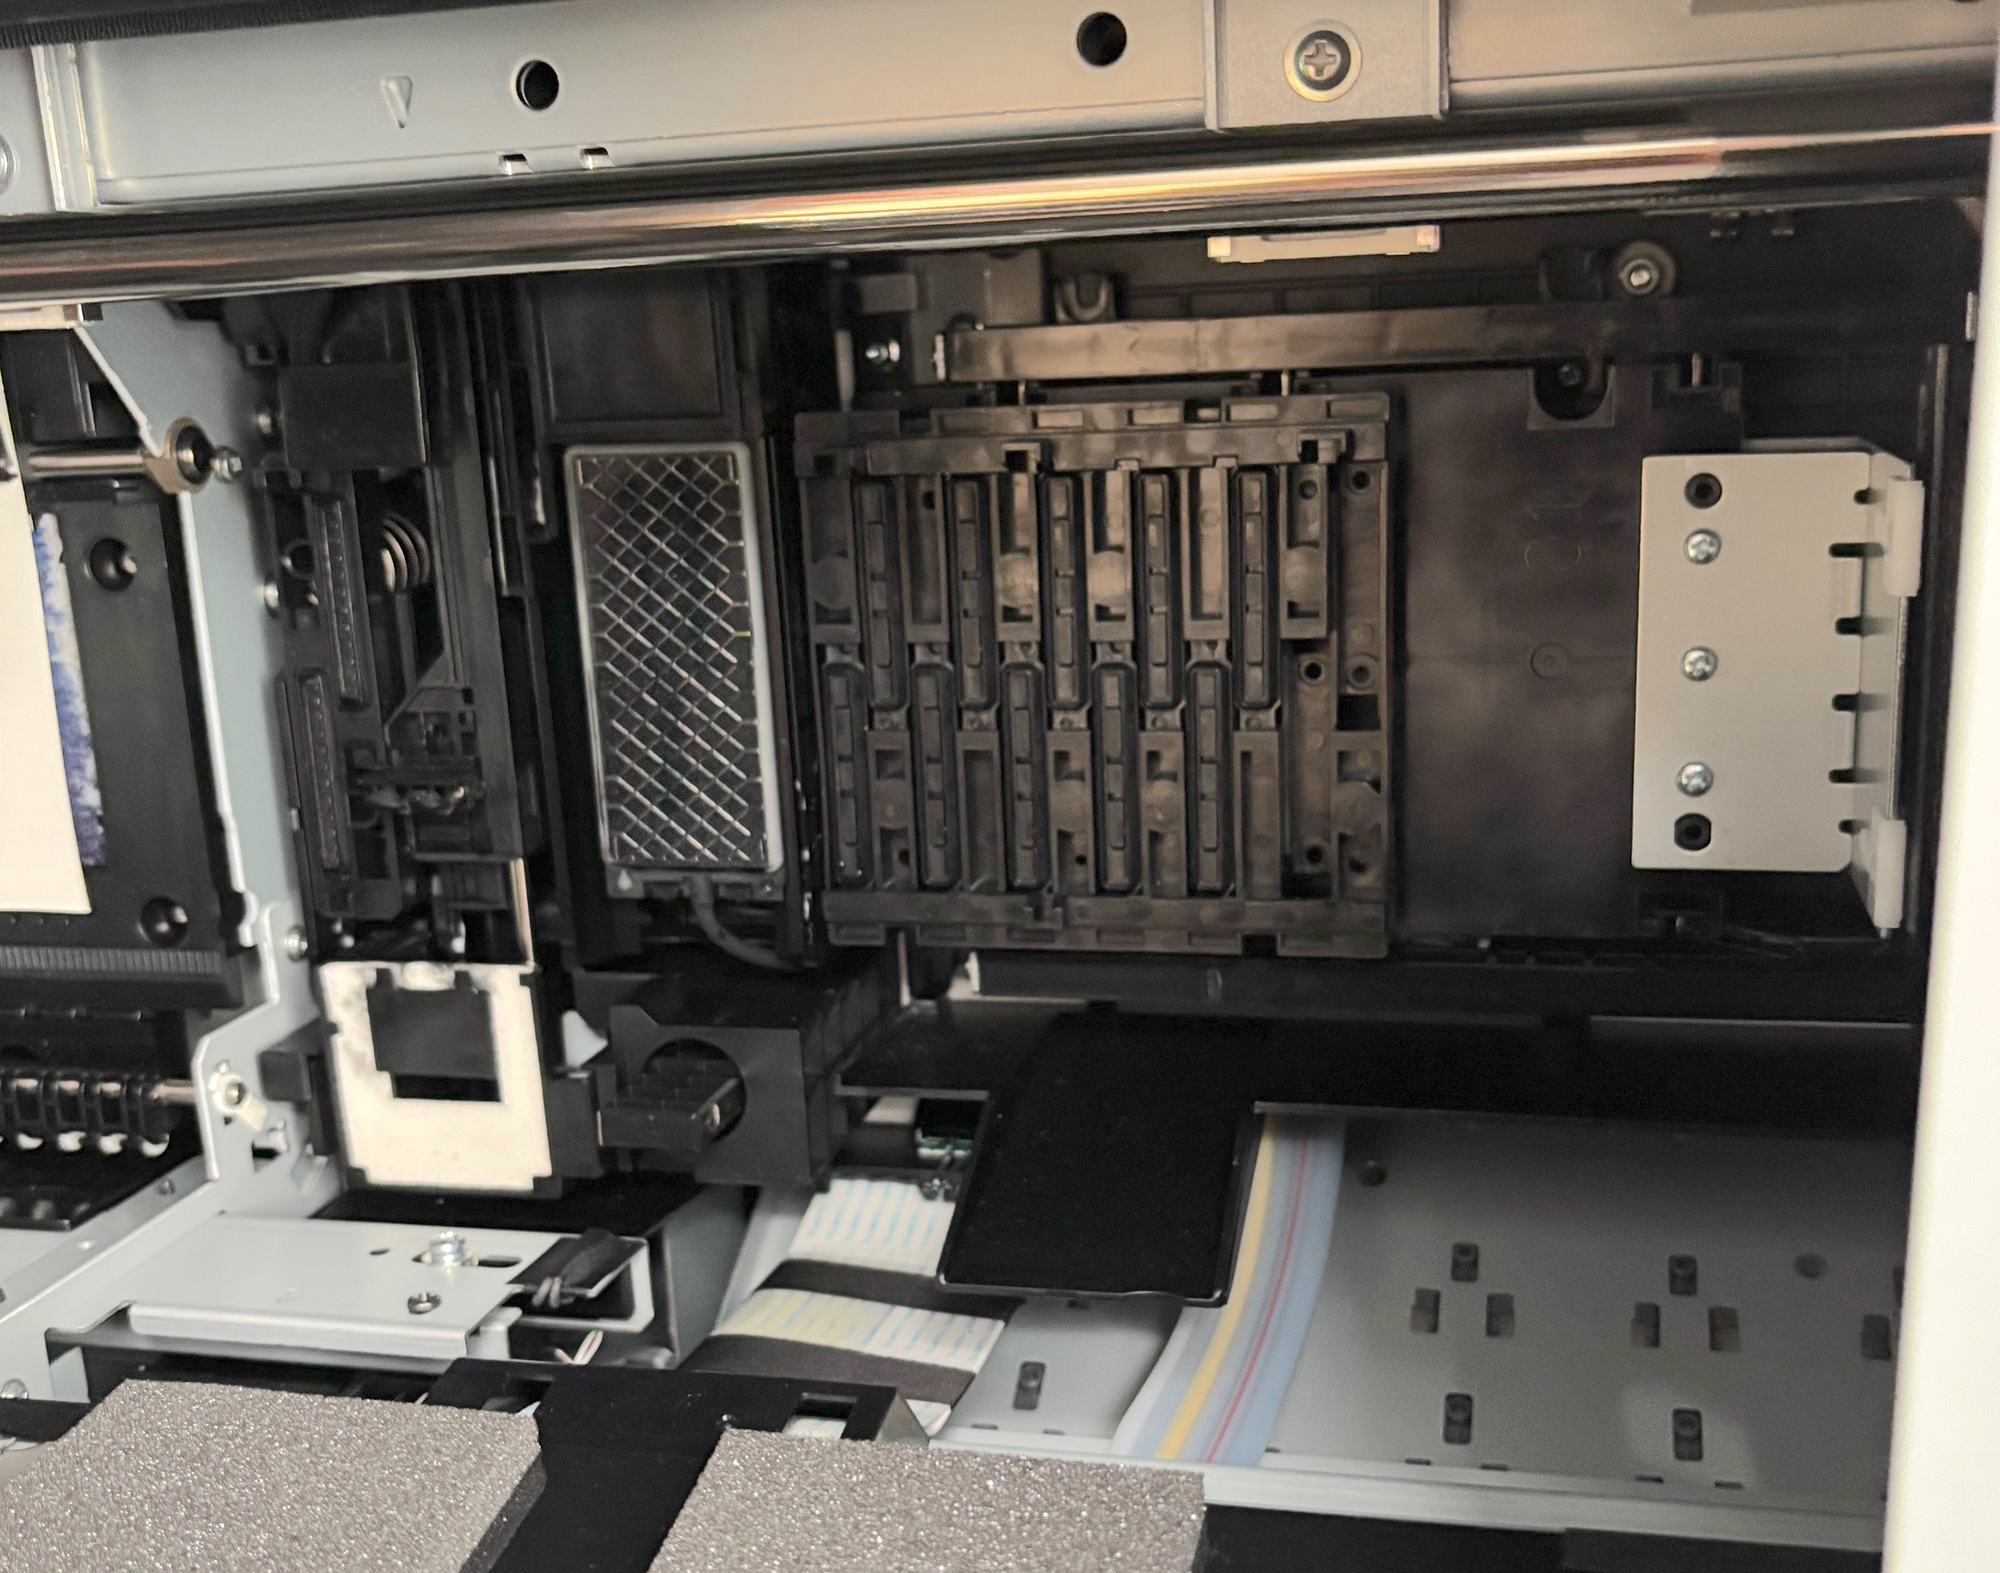
With these new models, Epson has provided some user-managed cleaning options that on older models required a service call. From the front of the printer one can access the print head and the capping station and clean around them with small plastic padded paddles designed for this purpose (Figure 36).
Finally – a nice touch: the print path lights-up as the paper passes through so you can see what’s happening (Figure 37).
This is for your enlightened printing!
Wrapping up, I like this printer. The design is well thought-out, the foot-print reasonable, some user-accessible maintenance is helpful, the prints are gorgeous whether colour or grayscale, ease of use with both the LCD and the driver is much improved – all the more so with Epson Print Layout at hand, printing is swift, smooth and quiet, and the EMI system makes it all the more amenable to using a wide variety of media with confidence. I recommend it.
Mark D Segal
Toronto, August, 2025
Annex 1
Reproductions of Printer Evaluation Images for the SC-P7370
As part of my printer testing procedure, I print several well-known standard printer evaluation pages to complement the data analyses with recognizable images that allow the reader to readily assess print quality to the extent feasible over the Internet. Please understand these are scans of the actual prints, so as close an approximation to what they look like as I could make; I have no control over their appearance on your display with its own brightness, colour temperature and contrast settings.
(A) Epson SC-P7370, Epson Legacy Baryta II paper
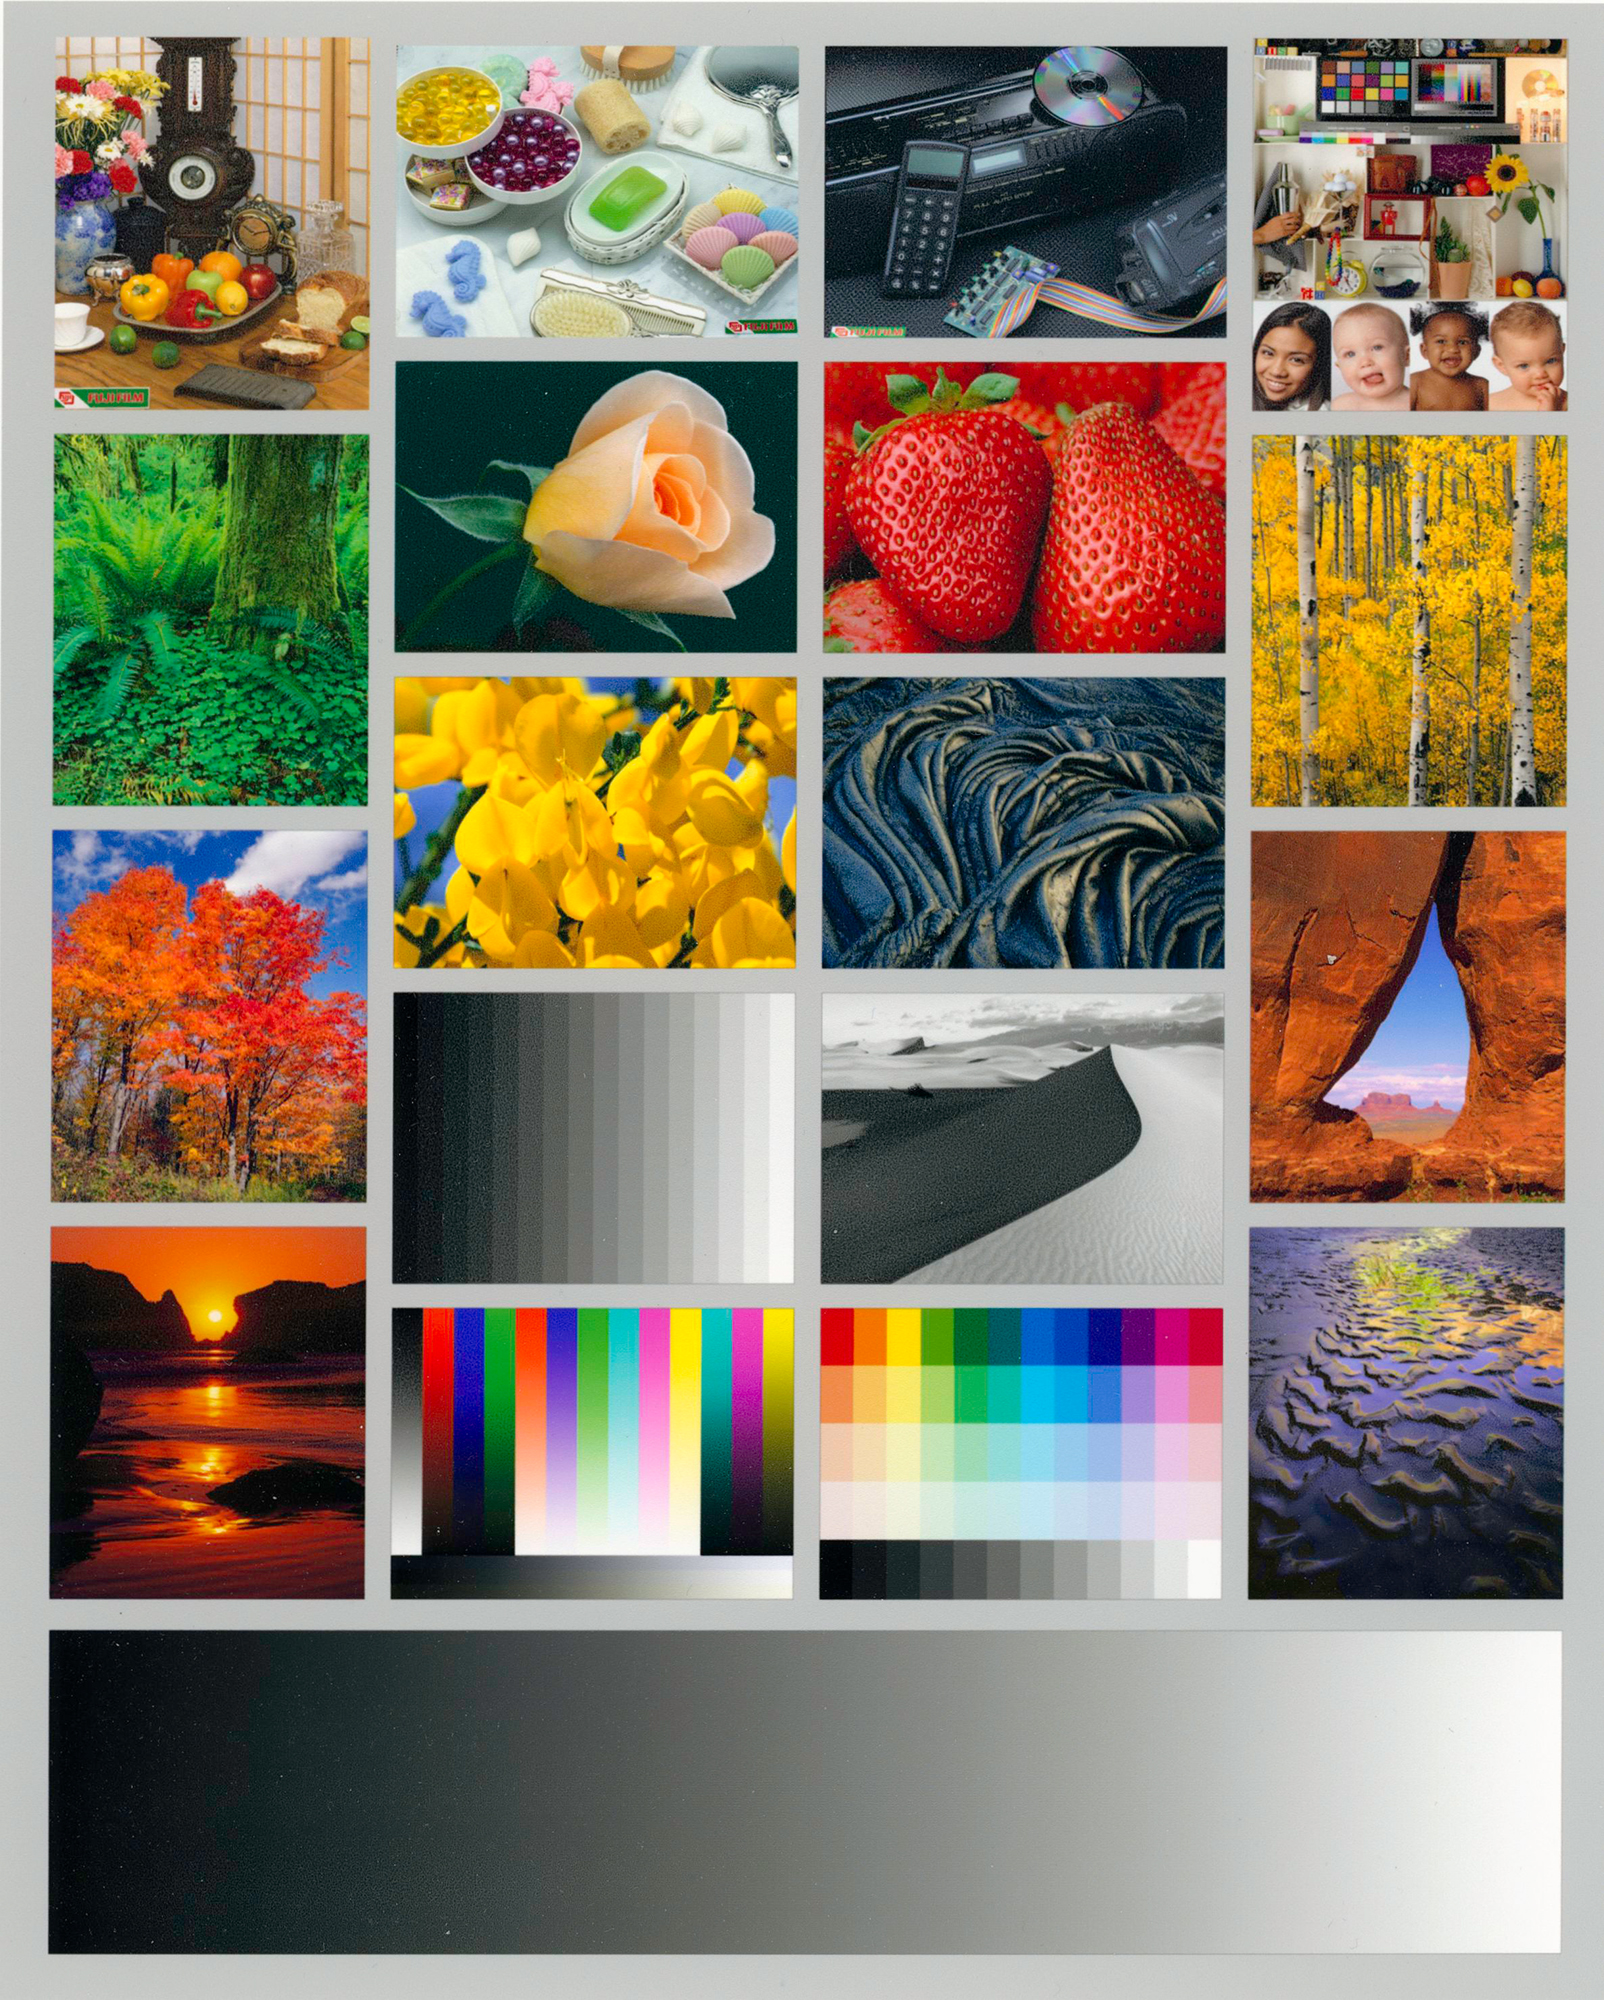
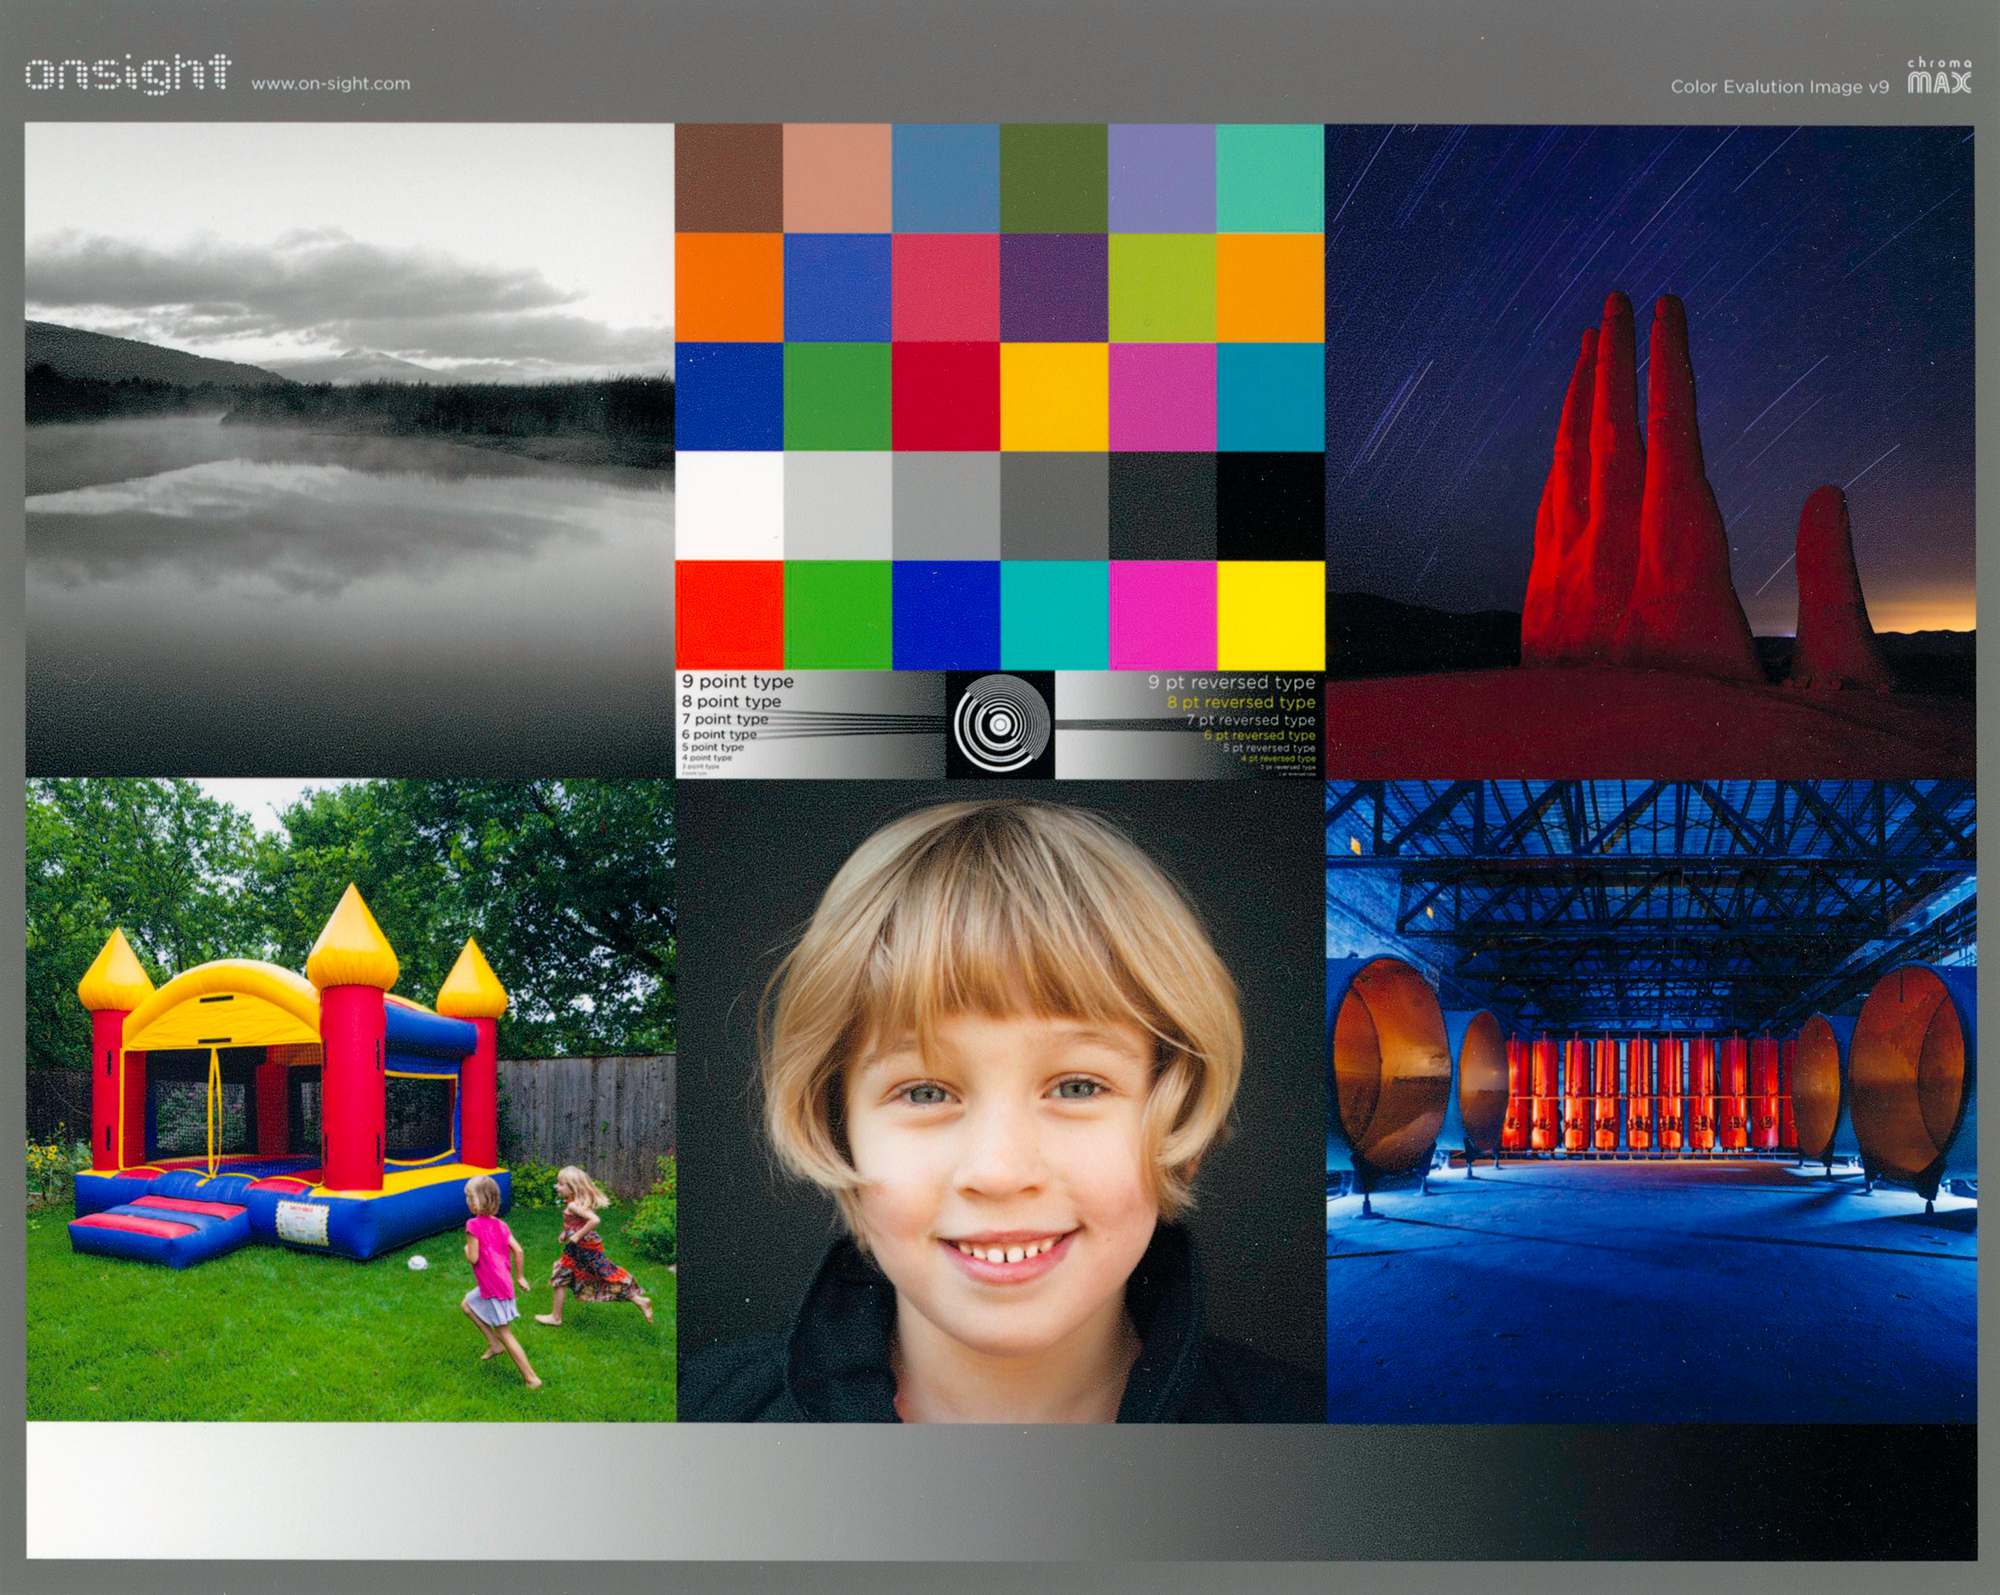


(B) Epson SC-P7370; Epson Legacy Fibre Paper
Annex 2
Epson Cloud Solution PORT
(Reproduced from my 2024 article on the SC-P5370 printer)
Everyone who’s heard of this application, please raise your hands. No-one? Oh, OK, well let’s go to it. This application was designed to manage and coordinate fleets of printers in places like service bureaux, etc., but you and I can still find it useful for retrieving a wealth of useful information about our printer’s performance. Epson Cloud Solution PORT (EP) is a cloud-based printer management service that’s free of charge to users of the supported Epson professional printers, including the P5370 (and P7370, etc). To use it, you need to make sure the printer accesses the internet (WiFI or Ethernet). If you don’t have one already, you need to create an account with Epson (free) and have the serial number of your printer handy. You sign in with Epson here: https://epson.com/cloud-solution-port-remote-monitoring-system.
For the remainder of the discussion about this software please visit this link: https://photopxl.com/epson-cloud-solution-port/, which I wrote for the Epson SC-P5370, but applies likewise to the SC-P7370 and other recent models.


Elevate Your Vision


Read this story and all the best stories on The Luminous Landscape
The author has made this story available to Luminous Landscape members only. Upgrade to get instant access to this story and other benefits available only to members.
Why choose us?
Luminous-Landscape is a membership site. Our website contains over 5300 articles on almost every topic, camera, lens and printer you can imagine. Our membership model is simple, just $2 a month ($24.00 USD a year). This $24 gains you access to a wealth of information including all our past and future video tutorials on such topics as Lightroom, Capture One, Printing, file management and dozens of interviews and travel videos.
- New Articles every few days
- All original content found nowhere else on the web
- No Pop Up Google Sense ads – Our advertisers are photo related
- Download/stream video to any device
- NEW videos monthly
- Top well-known photographer contributors
- Posts from industry leaders
- Speciality Photography Workshops
- Mobile device scalable
- Exclusive video interviews
- Special vendor offers for members
- Hands On Product reviews
- FREE – User Forum. One of the most read user forums on the internet
- Access to our community Buy and Sell pages; for members only.
You may also like