


By: Carl Schofield
Notwithstanding the Gray Balancer, which 2100 owners get and 2200 owners don’t, this new printer from Epson is able to produce very neutral monochrome prints with little effort‚ far better than those from any previous inkjet printer.
The follow article by Carl Schofield discussesone methodof achieving optimum B&W performance.
Photorealistic
I recently purchased theEpson Stylus Photo 2200printer with the intent of using it primarily for color printing. I also have anEpson Stylus Photo 1270printer that is dedicated to B&W printing, usingMIS VM Hextonecarbon pigment inks and Paul Roark’s workflow and adjustment curves.
The 2200 was also supposedly very capable of producing excellent B&W prints with theUltrachromeinks, so I decided to make some comparison prints with both printers. I routinely useEpson’s Archival Matte(akaEnhanced Matte) paper for B&W prints with the 1270, so this was the paper I chose to use for my tests with the 2200 (with the optionalMatte Blackink installed).
Since I did not have any custom printer profiles for the 2200 I first tried using the cannedEpson Enhanced Matte_MKprofile, printing via the usualNCA(No Color Adjustment) method where the profile is selected underPrint Space,andNo Color Adjustmentis selected underColor Managementoptions. The resulting prints were relatively neutral, although they had a slight warm tone. However, I also noticed that these prints had dark, muddy looking shadow areas with little detail. A print of a 21 step grayscale wedge confirmed that there was no separation of tones in the 95-100% region where deep shadows would fall.
I was somewhat disappointed with these results, but subsequently read some comments by Andrew Rodney and Jeff Schewe in the DPR printing forum that indicated that the non-linear behavior of the Epson 2200 printer driver could be minimized by using thePhotorealisticoption withColor Controlsselected underColor Management. Using this setting results in some reduction of the color gamut, but for B&W printing this is actually quite advantageous. So I abandoned the NCA printing method in favor of the printer color management approach using thePhotorealisticsetting. The resulting prints showed a dramatic improvement in shadow detail and the 21 step grayscale wedge now exhibited good linearity with much improved tonal separation * .
The overall appearance of the prints and grayscale wedge is now more neutral (no warm tone) as well, with no evidence of any color crossovers. Prints made using this printing method appear to be well balanced for daylight or 5000K fluorescent lighting. Under tungsten lighting they take on a slight purple cast, similar to that of a selenium toned silver print. This is a result of metamerism, but I do not consider the color shift strong enough to be objectionable. In daylight the 2200 prints are essentially indistinguishable from prints made using a neutral curve with the VM inks in my 1270 printer. I will probably continue to use my 1270/VM inks for B&W printing, but should the 1270 develop an unrecoverable "clog from hell" it will be retired and I would then have no reservations about using the 2200 for both B&W and color work.
Epson 2200 B&W Workflow
Here are my recommendations and workflow for producing neutral grayscale prints with the Epson 2200 on Epson Archival Matte paper using the optional Matte Black ink. I use a Mac running OS X and Adobe Photoshop 7, so you may have to modify the workflow somewhat for your particular operating system.
1.Open an image in Photoshop and convert if necessary to your current RGB working space (I use ColorMatch RGB ).
2.Transform the image to a neutral monochrome using the channel mixer or any other method you prefer, but be sure to keep the image in RGB mode.
3.Perform the usual curves, levels, and sharpening adjustments that are required.
4.If you work with 16 bit image files it is not necessary to convert to 8 bit for printing unless you need to do some work with adjustment layers first.
5.Set image size and resolution (240-360 ppi is probably optimal for Epson printers) and then selectFile>Page Setupto select the Epson 2200 printer, set paper size, and orientation.
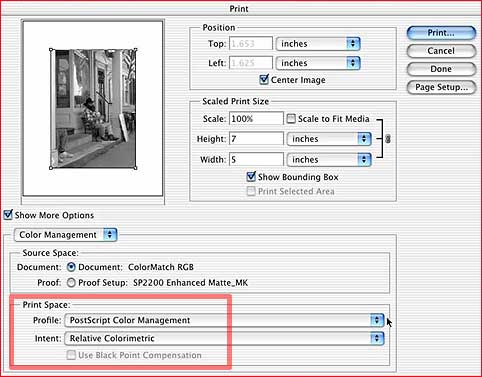
6.Next selectFile>Print with Preview, as shown below. CheckShow More Optionsand then selectColor Managementfrom the popup menu.Document Source Spaceshould be your RGB working space. For profile selectPostscript Color Management(Printer Color Managementon the PC) and for intent selectRelative Colorimetric. By default, use black point is unchecked.
7.Click thePrintbutton and move on to the next dialog shown below.
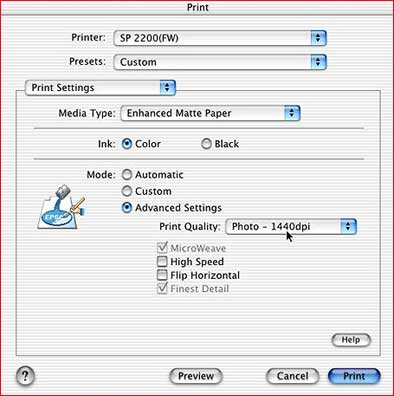
8.In the Print dialog window be sure the SP 2200 is selected if you have more than one printer attached to your computer.
9.SelectPrint Settingsfrom the 3rd popup menu,Enhanced Matte PaperforMedia Type, check color, and for mode checkAdvancedand select either 1440 or 2880 for print quality.
10.Be sure thatHigh SpeedandFlip Horizontalareunchecked.
11.Again from the 3rd popup menu, selectColor Managementand move on to the last dialog below.
12.UnderColor ManagementcheckColor Controls, selectGamma 1.8, andMode Photorealistic. Leave all sliders at 0.
13.Finally, click thePrintbutton and you should soon be rewarded with a beautiful grayscale print.

© 2002 Carl Schofield
Carl Schofield is a retired research scientist from Cornell University and since retirement has been pursuing a lifelong interest in photography as a hobby. Examples of my work can be foundhere.
*Martin Wesley, moderator of the B&W Print list, made some comparative density measurements for 21 step grayscale wedges printed on EAM from my 2200 with both the matte black ink and photo black ink. He also made similar measurements for wedges printed on EAM with the 1270 and VM inks. The density measurements and his comments are availablehere.
Related Articles
The Missing Windows Profile Mystery Solved
Velvet Fine Art Paper‚ A First Look
Another Opinion on the 2200, Including Mac Issues & Ink Usage Costs
A Review and Commentary on the Missing Gray Balancer
Making Beer – the Epson Download and how to use a Kodak Gray Scale


Elevate Your Vision


Read this story and all the best stories on The Luminous Landscape
The author has made this story available to Luminous Landscape members only. Upgrade to get instant access to this story and other benefits available only to members.
Why choose us?
Luminous-Landscape is a membership site. Our website contains over 5300 articles on almost every topic, camera, lens and printer you can imagine. Our membership model is simple, just $2 a month ($24.00 USD a year). This $24 gains you access to a wealth of information including all our past and future video tutorials on such topics as Lightroom, Capture One, Printing, file management and dozens of interviews and travel videos.
- New Articles every few days
- All original content found nowhere else on the web
- No Pop Up Google Sense ads – Our advertisers are photo related
- Download/stream video to any device
- NEW videos monthly
- Top well-known photographer contributors
- Posts from industry leaders
- Speciality Photography Workshops
- Mobile device scalable
- Exclusive video interviews
- Special vendor offers for members
- Hands On Product reviews
- FREE – User Forum. One of the most read user forums on the internet
- Access to our community Buy and Sell pages; for members only.
You may also like


