


By Michael Reichmann
“Astronomy compels the soul to look upwards
and leads us from this world to another.”
Plato
“If this was easy anyone could do it.”
M. Reichmann

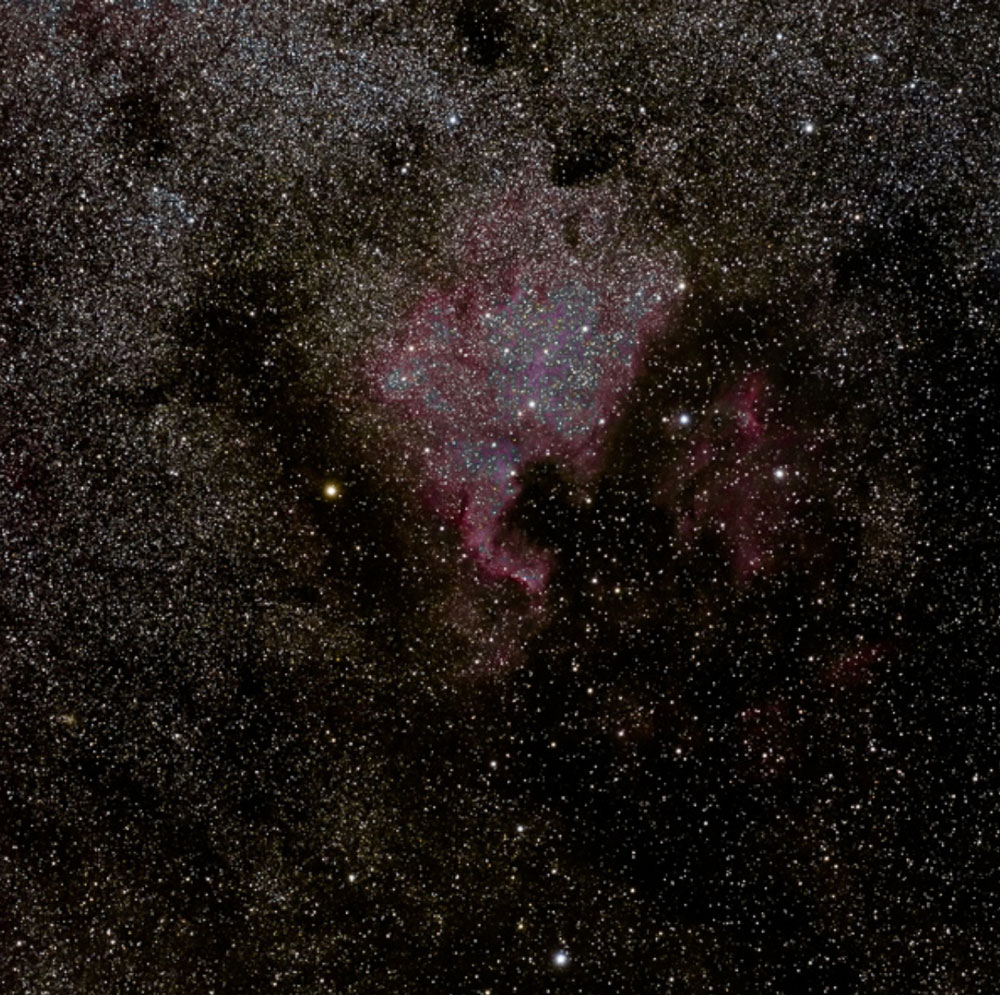
NGC 7000 / The North American Nebula
Pentax 645z with 300mm f/5.6 lens @ f/8
Vixen SXD2 mount with Starbook 10.
Post processing with Nebulosity3 and Lightroom.
40 Light frames at 30 seconds each, with 40 Dark frames and 10 Flat frames
I have been keenly interested in astronomy since I was a child. I relish dark sky environments where I can see the Milky Way from horizon to horizon. Simply looking at the stars with the naked eye is enough, but through binoculars, and especially a telescope it’s a thrill.
Back in the mid ’90s when I had my country house on Lake Muskoka, in north-central Ontario, I had a Meade 8″ SCT scope and even bought an early SBIG CCD astro photography camera with tri-colour filter wheel. This was before DSLRs came on the scene. But while I enjoyed visual observing, I failed to master astro-imaging. It was just too much complex gear, lots of power cords and accessories, and set-up and tear down were a drag. Add to that the mosquitoes in the spring, the overcast or rainy nights in summer, the nights with a mostly full moon, and the cold winds off the lake in winter, and eventually I called it quits without ever mastering it. (Astro shooting with film was a whole other thing, and best left to the real afficinados).
But in Autumn 2014, with reasonably dark skies at my country place in farmland near Creemore, Ontario, I was bitten by the astrophotography bug again (with almost no mosquitoes biting this time). I was fascinated to see if my new medium format Pentax 645z could be used for this, because of its extremely high image quality, large file sizes and first-rate high ISO noise capability.
Not wanting to spend too much before seeing how things would work out, I purchased the small and inexpensive iOptron Skytracker and wrote about that experience. I also wrote about the making of one of my first images of the Andromeda galaxy with that rig on my Phlog.

A Note to The Reader
This article details my initial experience purchasing, setting up and learning to do astrophotography with a specific selection of equipment. These include the Pentax 645z, Vixen SXD2 equatorial mount, and a range of lenses, accessories and software.
I will be writing about using regular digital cameras and lenses, up to 400mm, not telescope per-se, not specialized astro-CCD cameras.
It is very unlikely that your needs, interests and budget will be the same as mine. But, the general discussion will apply to just about any DSLR, equatorial mount, and lenses. So if this interests you, read on and don’t be deterred by the discussion of specific products. 80% of the techniques in this article apply to the general art, not to specific gear.
A Bigger and Better Mount
The little Skytracker worked remarkably well, even though the size and weight of the Pentax 645z was just about at the limit of that rig. It will continue to be what I use when I travel, because the whole thing fits in a small bag that can go in my suitcase – assuming that I’m already traveling with my camera and large tripod for other work.
But I was hooked on the astrophotography, and wanted to put together a more sophisticated rig so that I could produce higher quality astro images. In other words, just as we all do when we are learning and exploring some new aspect of photography, I wanted equipment such that I would be the limiting factor, not the gear. This is a lesson that I had learned the hard way many times over the years.
This didn’t mean simply buying the most expensive equipment. In astronomy, as in everything else, there is high-end gear that can make a Mercedes seem like a modest expense. No. That’s not the route to take. Rather, I wanted to put together a system without too many mistakes that would be reasonably priced, yet not limit me as my experience grew and I became more demanding. It also had to be small and light enough to transport in the trunk of my car, lift and carry to a viewing site, and not be too complex to set-up and run such that I would find myself spending more time futzing than viewing and shooting—a pitfall that I had been warned about by those further up the learning curve than I.
I spent several days exploring the universe of larger and better astophotography mounts online. It was clear from my reading that for serious astrophotography a proper mount would be the cornerstone. I planned to use my Pentax 645z attached to “something“, either a suitable scope or lens, but a high quality mount was the first order of business.

My research lead me to the Vixen SXD2, which I purchased from KW Telescope in Kitchener, Ontario. This mount is available from dealers all around the world, but I mention the dealer I chose (even though it was a 2 hour drive away) because I believe that with the complexity of astro gear, especially for newcomers, having someone with whom you can discuss your needs and ask questions of afterward, outweighs any small cost savings that buying mail order might have. Brian at KW has been an excellent source of advice.

The SXD2 comes with a very solid purpose-built aluminum tripod which forms part of the mount’s Polar Alignment mechanism. It also comes with the Starbook 10, a very sophisticated self-contained GO-TO control unit.
What’s a GO-TO you may ask? It is common these days for even inexpensive all-in-one scopes to have a hand controller which can drive the mount or scope to accurately point at any object in the night sky. These usually have one or two lines of text on a monochrome LCD strip, and are pretty straightforward in use, not to mention very handy for anyone not intimately familiar with the night sky.
But for astrophotography much more is usually needed, in particular a laptop computer which can help guide and find things and even run your camera. Back in the ’90s when I first tried astrophotography this was part of what ultimately wore me down; too many devices, too many power cords and plugs and things to put on tables or chairs, and manage – without bumping into them in the dark.
The Starbook 10 goes a long way toward solving this, and is the main reason why this system appealed to me. It has a relatively large colour LCD screen and contains a database of nearly a quarter million celestial objects. Once the mount and scope/camera is set up on location, just select what you want to see or photograph by name, and the Starbook controls the whole thing, driving the scope, and if you wish, with an accessory board installed, can even run a camera and autoguider. No computer is needed when you’re out in the dark and the cold. Just the mount and the hand-held controller, which can do everything that a computer can when it comes to most people’s astro imaging needs.
I can not stress enough how, after my experience of a decade earlier with multiple devices, a computer, and specialized software needed in the field, I was driven to find an “all-in-one” solution. The Vixen SXD2 with Starbook 10 is to my knowledge the only such system, that with an accessory board installed can be used for GOTO scope control, camera control, and also autoguiding, all with a small hand-held unit that features a very good colour screen and live interactive skymap. No computer needed, no third party imaging and guiding software needed, and a minimum of cables and fussy set-up.
If I had a permanent or semi-permanent viewing site this would not necessarily be my first choice. But as a peripatetic astro-photographer, alternating between my house in the country and other dark sky sites, I knew that anything other than a self-contained system such as this would because a source of frustration rather than a pleasure to use.
I’ll also mention that for the money – about $3,000 – this is a very good value as a general purpose German Equitorial GOTO mount. It also is one of the most popular mount systems currently sold in Japan.
You can read an online review of the SXD2 and Starbook 10 here.
If you click here you can download a 7 Megapixel JPG of the North American Nebula image above.
This is made available for your personal use only and may not be reproduced in any form
online or on any other media without expressed written permission.
You may make a print of any size for your own personal use.
© 2014 Michael Reichmann
The Pentax 645z Problem – Solved
UPDATE – 20 Nov, 2014
One of the problems that I found when doing astrophotography with the 645z is that there was no way to turn off long exposure noise reduction. This meant that when shooting several minute exposures one had to wait the same time again for the camera to shoot a dark frame. This made some forms of shooting slow and frustrating.
But not more than a week after this article was first published Ricoh / Pentax announced a firmware update that allows turning off long exposure noise reduction. Either Pentax is the fastest responding camera company in history, or I wasn’t the only person complaining about this limitation. Either way – thanks Pentax!
The text below was the original when the article was first published.
it is being retain below for the historical record.
I’ll first say that for normal photography, I find the Pentax 645z to be exceptional. There is a great deal to like, and not much to disparage.
For astronomical imaging, the image quality is there in spades, but there is an Achilles Heel. The problem is that while high ISO noise reduction can be turned off, long exposure noise reduction can’t. What this means is that on any exposure longer than 30 seconds the camera insists on doing noise reduction of the same length as the exposure, and this can’t be turned off.
You’ll read further in this article that there is a device (Vixen Advance Unit) for my mount that can act as an intervalometer and can take a series of images automatically. But, with this limitation it means that if I want to take five x five-minute exposures, instead of taking 25 minutes this will take 50 minutes.
This is enough time for sky conditions to change (clouds rolling in / moon rising) and so isn’t an ideal situation.
Lens or Scope

When I used the Pentax 645z with the Skytracker, I was totally impressed with the Pentax’s capabilities when doing astro-imaging. If I was going to get a scope then I knew that I would want to use it with this camera. But, most telescopes only have coverage suitable for APS-C sized sensors, and a few for Full Frame. Something with the ability to mount a camera as large as the Pentax 645 and cover its large sensor was rare, but not impossible to find. Indeed, in the days before digital, the Pentax 67 camera used to be one of the most popular cameras for astronomical photography. Pentax also had been a major player in the telescope world prior to its acquisition by Hoya, which terminated that business. Alas, with the exception of telescope eye-pieces, which Pentax still sells and which are highly regarded, their scope business no longer exists.

Vixen 380mm f/3.8 Astrograph
My research though turned up a brand new product, the Vixen VSD 380mm f/3.8 Astrograph. This lens just started to ship in the summer of 2014 to rave reviews from the astronomy press in both the US and UK. Incidently, the word “astrograph” is simply a designation for a lens / scope that is especially designed for astrophotography.
What made this optic so interesting for me is that it is designed to cover the Pentax 645’s image format, and Vixen even makes an adaptor for the 645D and 645Z cameras. There is a Pentax connection to this new lens as well, because Vixen bought some of Pentax’s designs and patents after Hoya’s divestiture of Pentax to Ricoh in 2011, and this lens is based on a Pentax design. At over USD $6,000, it is however a bit too rich for me at this stage, although I reserve the right to reconsider.

Pentax 6X7 400mm f/4
What I bought instead was a used Pentax SMC 67 400 mm F/4.0 MC for under $3,000 via eBay, from a dealer in Japan. Basic specs are pretty similar… the new VSD at 380mm f/3.8 and the 67 lens at 400mm f/4. But the differences are much greater than that, at least on paper. The VSD is purpose built for astro-photography. It has no diaphragm, and always operates wide open at f/3.8. It has a so-called flat field and is highly corrected, though it does not claim to be apochromatic.
The 400mm f/4 is a known entity. I owned one back in 2002 when I was still shooting film with a Pentax 67. My review is found here. This was one sweet lens for terrestrial photography.
As soon as it arrived I tested it thoroughly, and found that it is every bit as good as I had remembered. The lens is almost as good wide open as stopped down one stop to f/5.6. Sharpness holds strongly from corner to corner and is virtually as good at the edges as at the center.
One thing to consider is that the P400, as it’s known, was designed for the 6×7 format, which is considerably larger than 645’s film format. The Pentax 645z, nothwithstanding its moniker, has a sensor that is smaller than traditional 645. This means that the camera’s sensor is centered on the lens’ sweet spot, which goes a way to explaine why the lens performs so well on the 645z.
Until the 400mm arrived I had been shooting with my 300mm f/5.6 as my longest astro lens. This is what was used for the shot of The North American Nebula seen above, and if you download the 7MB JPG and look at it at 100% you’ll see that this lens performs very well in terms of field flatness and other potential optical flaws such as astigmatism, coma, and spherical aberration. I do use it stopped down to f/8, which though it cuts the light in half does improve performance considerably from wide open.
And, to share with you my thinking – by buying the 400mm f/4 P67 lens rather than the Vixen VSD optic, not only do I save more than $3,000 but I also have a first rate lens for terrestrial shooting with my Pentax 645z. Double duty. Another option that I considered is the Takahashi FSQ-85ED Astrograph Refractor, which is a 450mm f/5.3, covers 645 format, and costs under $4,000. This is a well respected astrograph, and at $3,000 less than the new Vixen VSD is well worth considering.

Takahashi FSQ-85ED 450mm f/5.3
Capturing Photons
A photon walks into a hotel. “Do you have any bags,” asks the bellman.
“No,” answers the photon – “I’m traveling light.”
Capturing the maximum number of photons possible is what this game is all about. When we look at the night sky with just our unaided eyes we can see plenty of bright stars, but none of the glorious colours that nebula display. Our eyes simply can’t capture enough photons to see in colour at such low levels of illumination.
Just as in regular photography, in astro imaging we face a trade-off between shutter speed, aperture and ISO. There are important differences though. In astro work shutter speeds are measured in many minutes rather than fractions of a second. As we know, accurate tracking by a polar-alligned equitorial mount is vital for images that show no streaking from the earth’s rotation. The longer the lens used, the tougher that job becomes.
That leaves aperture and ISO. In normal photography we can close down a stop or two to gain depth of field, and to improve lens performance. But each stop of reduced aperture means a doubling of exposure time. When dropping from 1/500 sec to 1/250 sec this may not matter, but when going from a 3 minute exposure to a 6 minute exposure it can make the difference between accurate tracking or not and the number of stacked images required.
Of course depth of field is meaningless in astro-imaging, but unless you are using a first-rate lens, stopping down at least one stop will definately improve image quality. Few lenses indeed are at their best wide open.
ISO can be increased, of course, but noise is a perennial enemy and high ISOs need to be used judiciously, depending – of course – on the camera. This, by the way, is one of the reasons why the Pentax 645z is so appealing for astro work. Shooting at ISO 1600 or 3200 produces highly usable images. And higher ISO is available if needed.
Aperture and Focal Length
Clearly, using a fast lens is important. All other things being equal, the faster the lens, the longer the exposure that can be taken, and this is the key to successful DSO (Deep Space Objects) photography. But fast aperture comes at a cost – literally and also in terms of size and weight. As with all aspects of photography, we have to deal with a series of trade-offs, and only through a process of research and experimentation can we arrive at an optimum balance of features, specs and performance. There’s no magic bullet.
I’ll conclude this section by answering the obvious question – why such short focal lengths? Why not a telescope with a focal length of 1,000mm, 2,000mm or more?
The answer is that for astrophotography, if deep space objects are the subject of interest, aperture is more desirable than focal length. For planetary shooting, a long focal length is more desirable, since who wants to see a tiny image of Saturn against a field of stars? But for nebula and the larger galaxies something in the 400mm to 600mm range is quite common, with aperture being the important consideration. As we’ve discussed, small apertures mean longer exposures, and the need for greater tracking precision.
Also large / fast scopes are big and heavy. The Vixen SXD2 mount can handle up to 50 lbs, but an 8″ scope with a focal of 2,000mm and an f/10 aperture can easily approach that weight, without camera. Also, the issue of precise tracking and guiding becomes critical, as will be discussed in this article. All in all, once one gets beyond roughly a 400mm f/4 instrument the whole nature of the game changes, and you’re into scopes and maybe specialized astro-cameras, tri-colour filter wheels and more.

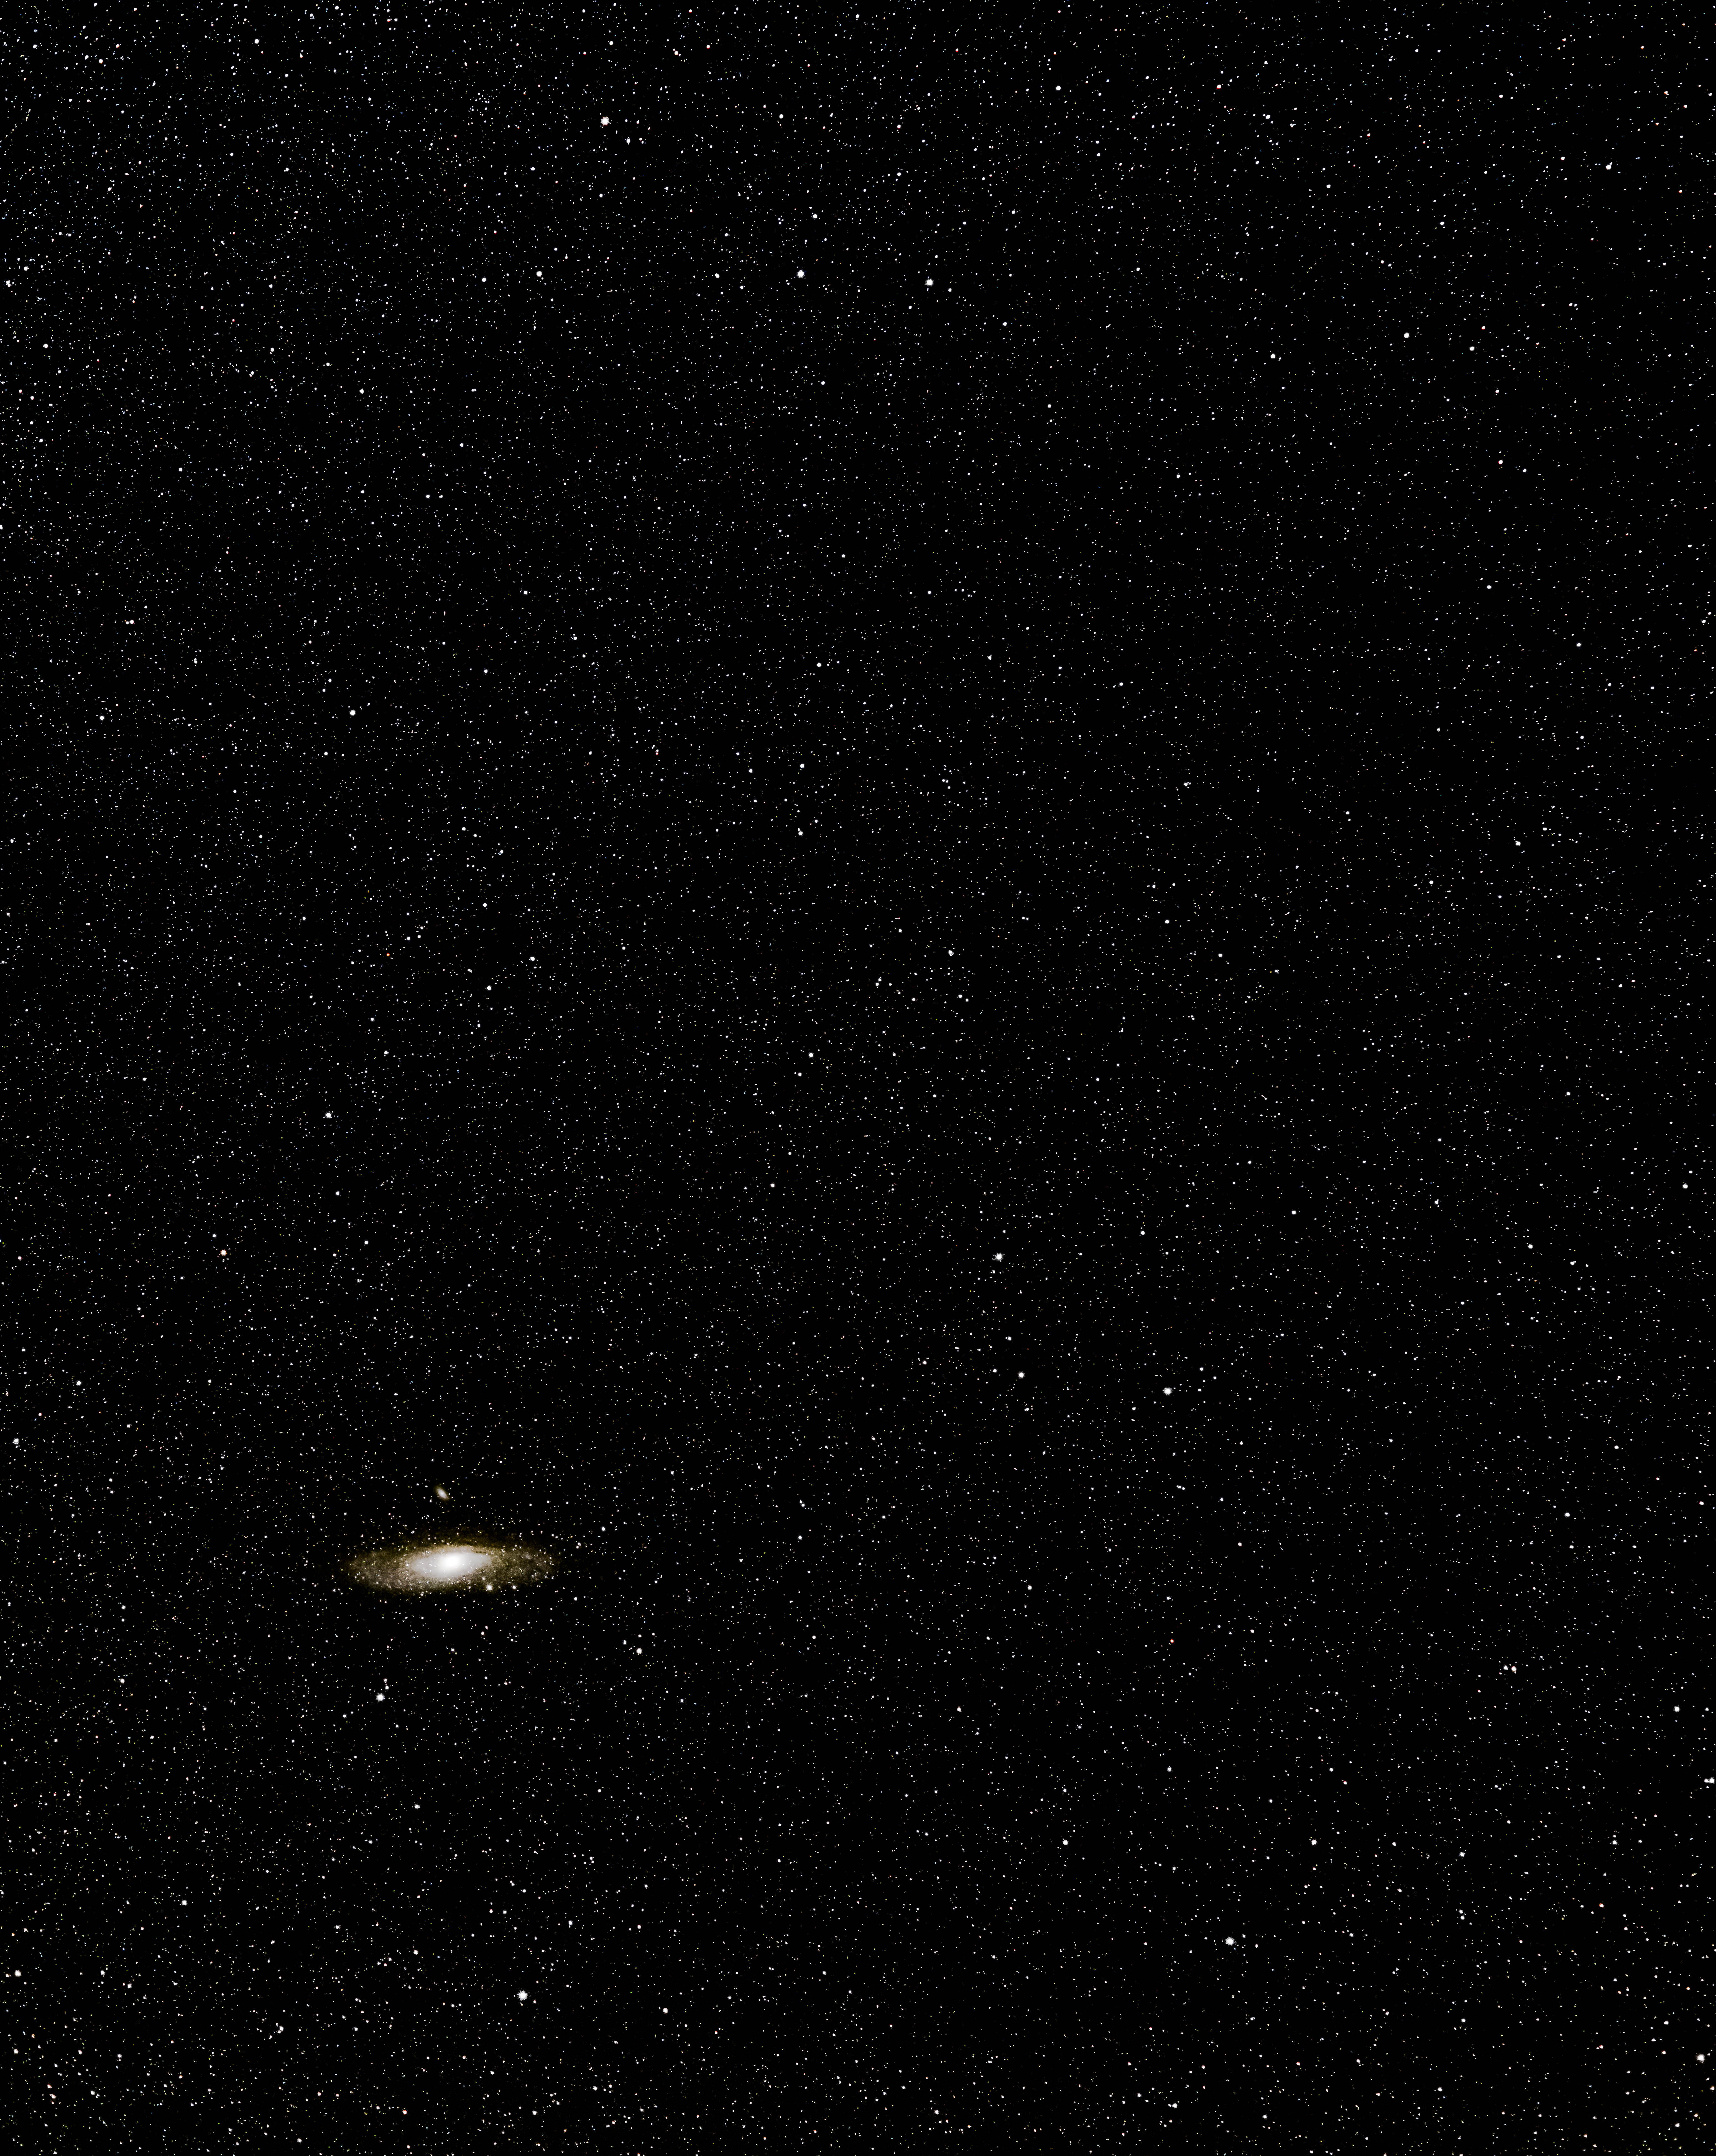
M31 – Andromeda – The Wide View
Pentax 645z with 120mm f/4 Macro (irony alert)
130 seconds @ f/5.6 @ ISO 12,800
Oh yes – let’s not forget shorter lenses. Everything from ultra-wides (Milky Way) to medium telephotos are suitable for stunning astro-photography, not just long / fast lenses or scopes. And the shorter the focal lengths, the more forgiving all parts of the chain are in terms of tracking.
Climbing The Learning Curve
“We choose to do these things, not because they are easy, but because they are hard.
Because that goal will serve to organize and measure the best of our energies and skills.”
– John F. Kennedy
I won’t sugar coat this. Even if you have a passing familiarity with astronomy and telescopes, using a mount like the SXD2 and doing astrophotography competently has a severe learning curve. Compared to putting a camera on a iOptron Skytracker it’s like the difference between using a point & shoot and mastering a DSLR. Actually, more so.

My set-up as of Oct 24, 2014
Vixen SXD2 mount with tripod and Skybook 10,
Celestron lead acid battery power supply.
Knobs, More Knobs & Accessories
When you first unpack a mount like the Vixen SXD2 you might be overwhelmed by the sheer unfamiliarity of it all, along with the number of knobs of unknown purpose. Not to mention the 100 page user manual – dense with information. Incidentally, the manual is very comprehensive and well written. Just dense – which means that you’ll want to read it over, then again, and again, then page by page as you become familiar with this device.
Don’t even think about taking the mount outdoors until you have spent at least 5 to 10 hours setting it up, balancing it, learning what everything does and why it does it. I’m a pretty technical guy, and when it comes to photography I have learned and become expert with a great many hardware and software systems. But, this is terra incognita, and slow but steady is the way to approach it.
There are several accessories that you’ll need in addition to a mount and your camera and len(s). One is the Vixen SX Accessory Plate. This allows you to mount several devices (such as cameras and finders) to it, and then attach them all to the mount itself. If you’re using an actual OTA (Optical Telescope Assembly) you won’t need this but will mount the scope to the SXD2 and then attach accessory finders and the camera directly to the scope itself. But for directly mounting a DSLR and lenses, this is a must.
You’ll also want a small finder scope. I bought a Celestron finder that costs about $100 and does the job well. It offers 9X magnification and has an illuminated reticule, which makes finding and centering objects simple when doing initial alignment each evening and when confirming that the GOTO has found and centered the desired object correctly. (More on this later).

Finally, you’ll want a power source. Everything in astronomy operates on 12 Volts. You can get an AC adaptor and run an extension cord back to the house, but based on my experience of the mid-’90s when I was tangled in wires, I bought a Celetron PowerTank 17, which can power your mount and all your devices all night on a single charge.

It has two 12V cigarette lighter type sockets, a red flashlight, a powerful multi-cell LED white flashlight. There’s even a built-in radio! But basically, it’s just a big lead-acid battery that will untether you from needing an AC power source. Doing viewing and imaging in a park or on a mountain-top becomes possible. It’s dorky looking, but does the job.
Aligning the Finder Scope and Camera

My Rig as of November 15, 2014
Pentax 645z with Pentax 67 400mm f/4
with Celestron RACI Illuminated 9×50 Finderscope (left of camera)
and Millicam CCD camera and autoguider scope (right of camera)
Blue band is part of Kendrick dew prevention system.
You’re going to be relying on the GOTO capabilities of your mount to find otherwise faint or invisible subjects such as nebulae and galaxies. But to get the GOTO properly set up (discussed below) you need to make sure that your camera and finder scope are looking exactly at the same thing. You can do this during the daytime. Point the finder scope at some distant light, such as one atop a cell phone tower. Turn on Live View with maximum magnification for manual focusing. Put the light in the center of the camera’s rear LCD, and then looking through the finder scope use the adjustment knobs on the scope to center the light between the reticule lines.
You should repeat this again at night using a bright star, which will be visible in Live View, but a daytime alignment should be sufficient. Just be sure to repeat it at the beginning of each evening’s session using a star, to be sure that your camera and finder scope are both actually pointing at what your scope thinks it is. Things can be knocked about a bit when packing and unpacking.
Polar Alignment / Equitorial Mounts and Imaging

As discussed in one of my earlier articles, it is of paramount importance to polar align your scope if you are going to do astrophotography. For casual observing a Go-To mount is all you need. If things drift a bit in the eyepiece, no big deal. But for imaging, your scope needs to exactly track the motion of the stars around the pole (Polaris). Astronomy’s old 500 Rule from the days of film said that to determine the shortest time that you can photograph celestial objects, 500 should be divided by the focal length of the lens. So a 400mm lens is only capable of about a 1 second exposure before the stars start streaking.
This means that you need to have what is called a Germain Equitorial Mount for your scope or camera. The Vixen SXD2 is such a mount. Most of the better mounts, such as the Vixen, have a built-in polar alignment scope. This is incorporated right into the body of the mount and is a necessity for imaging work.

Doing a precise polar alignment means setting up the scope so that one specific leg of the tripod’s three legs points toward the north. (True north, not magnetic north as shown on a compass). Your iPhone or similar device has lots of Apps that will show you a very accurate compass. There are also good astronomy apps, such as Redshift that will also show you a real-time view of the stars as well as your geographic location.
You will adjust the complicated-looking dials that surround the polar scope’s eyepiece (seen above), but once figured out you’ll see that it’s just the date and time of day, as well as your offset from the center of the time-zone that you’re in.

You first need to set your approximate latitude on the mount using the Azimuth adjustment knob, seen above. For example, Creemore, Ontario is at 44.3167 degrees North, which took just a second to discover online.
Then, once it is dark enough to view Polaris you sight through the polar scope built into the mount (seriously kinking your neck uness you use a low stool or folding chair) and try and find Polaris. (The eyepiece of the polar scope is seen just above the hand in the illustration above). This adjustment may take a bit of futzing, but you’ll get it soon enough, and if you’re observing from the same location on subsequent nights, it takes only a few minutes to repeat.
Next you set up the Starbook 10. This is just a matter of entering the exact longitude and latitude of where you are observing, as well as the exact time. This data is retained in memory when power is turned off, but the Starbook’s clock memory is worse than a $2 watch, so it’s worth checking to ensure that you’re within a minute or so of the correct time.
Now, with the mount set to its “Home” position as the manual describes, which has the scope or lens pointed to the west, you tell the scope to go to one, then two, or three, or four stars that are visible in the sky at the moment. Redshift on your phone, or the screen of the Starbook easily identifies these. Press GOTO and then look through the small finder scope next to your camera. The first star chosen likely isn’t exactly centered. Just use the buttons on the controller to move left, right and up and down until it is centered, and press Align each time. By the third star the controller should know exactly where it is, and therefore where everything in the sky is and how to track it as the night progresses.
That’s it. Once you know what you’re doing (admittedly it will take two or three evenings), this process takes less than ten minutes at the beginning of the evening, and it can be done while the sky darkens enough for astro imaging. The scope now is pointed accurately enough so that as the cosmos turns above your head, the mount itself stays pointed at Polaris. The camera or scope is now free to point anywhere in the sky, and just selecting an object from the lists of a quarter million objects and pressing GOTO is all it takes to put it in the center of the finder, and the camera – and keep it there.

The Starbook 10’s screen is in colour. This B&W illustration is from the User Manual.
Shooting and Exposure
So far, so good. You’ll likely be using an astronomy program such as Starry Night on your computer to explore the sky and to see what you might be interested in photographing. (There are several good home planetarium programs. Which one you choose isn’t that critical).
Now, there’s the issue of whether to make a single exposure or multiple ones. The experts offer conflicting opinions on this. Some say that stacking exposures only helps with signal to noise ratio, but that is not the majority opinion. Clearly stacked images does add exposure, but there’s a “but” when it comes to deep sky objects (DSO). The problem is that DSOs are very faint, and unlike with brighter stars there is not a constant steam of photons arriving on your sensor. There may be a few photons arriving every few minutes and chances are that you will miss most of them with a short exposure.
If your mount’s tracking is really well set, and your lens isn’t too long, you can likely make exposures of couple of minutes. The wider the lens, the longer until you see streaking. Even a super-well-polar-aligned mount won’t be perfect though, and some star movement will be seen at some point. This really becomes a matter of experimentation.
ISO is another factor. Some “experts” say that modern sensors are really ISO-less, and there’s no real point in setting anything else. It’s all electronic gain, which can be duplicated in post. Well, that used to be true, but some of the more recent Sony sourced sensors (such as used in the Pentax 645z) don’t follow this old rule. In any event, I somehow feel better in using a higher ISO, particularly with the Pentax 645z, which has such clean high ISO capability. I typically use ISO 3200 or 6400.
If you are not going to bother with dark frames and stacking (discussed below), just remember that if you are doing long in-camera exposures you need to have noise reduction turned on, and that means that the camera will automatically take a second exposure of the same length for noise reduction. As mentioned earlier, this can be inconvenient, particularly when the clouds are starting to roll in and you don’t want to stand around waiting for dark frame exposures that could be minutes long.
Stacking
Dark Frames
Before I talk about stacking images, we need to discuss “dark frames”. Long exposure and high ISO images have noise in them, and cameras have settings to do so-called dark frames to minimize these. But each dark frame exposure is the same length as the “light” exposure, which can make the process tedious, to say the least.
There is a solution. That is to take “dark frames” after you do all of the light frames. (This is assuming that you’re not doing them in-camera). Turn off automatic in-camera noise reduction (if you can), and shoot a sequence of light frames (astro images), and then afterwards do a matching series of dark frames, of the same length, but with the lens cap on. These can even be done later in the evening, after doing a number of different shots, and while you’re packing up. The only important factors are that the exposures be of the same duration and at the same temperature as when the shots were taken, since noise is both time and temperature dependant.
So, for example, let’s say that over the course of a couple of hours you shot ten 5 minute-long exposures. At the end of the shooting session, put on a lens cap and have the camera automatically shoot ten 5 minute dark frames with the lens cap on. You then use this series of dark frames while stacking in post processing, and in fact since dark frames are just time and temperature dependant, you can save them in a directory called something like DARKS_5minutes_0C and then use them any time you need dark frames that are to match light frames shot at 0C and for 5 minutes. Note that having the exact same number of dark frames as light frames isn’t a necessity, but since noise is random, having more is better than having less. These all get averaged out in any event.
Flat Frames
We’re not done yet. You also need some “flat frames”. These are exposures with the camera and the same lens, exposed so that the histogram shows between 50% and 75% of maximum exposure. Do keep the lens focused at infinity though, and keep the aperture used the same as for your light frames. I simply put a double folded white T-shirt over the lens, point at something bright, and fire off about 10 frames with about a +2 EV exposure.
These flat frames are then used to remove dust bunnies, vignetting and other lens / sensor anomalies. Temperature and length of exposure are not important, and so these can be shot in the early evening while you’re setting up, or even the next morning, so long as the lens hasn’t been removed and remains focused at infinity.
Bias Frames
Bias frames are used to compensate for the readout noise of the sensor. They are easy to create. You should shoot about 10 bias frames. Just set the camera to the ISO used, put a lens cap on, and set the camera to the highest shutter speed that it’s capable of. 10 frames will do it, and temperature doesn’t matter.
Since a sensor’s bias noise doesn’t change much over time, you can do these once and reuse them. So, for example, if you shoot astro images at ISO 1600, 3200, and 6400, sit down with your camera, fire off 10 frames at each ISO at 1/4000 sec (or wherever) and with the lens cap on. These can then be used for all future stacking.
Building Bias and Dark Libraries
Indeed, just as with building a library of Bias frames for a camera (each camera needs its own set), you can do the same for Darks. Bias frames can be done once, and doesn’t take more than about 15 minutes, and they can be reused at any time for any given ISO. Darks, on the other hand are dependant on both temperature and ISO.
My suggestion is that on overcast nights when observing or shooting isn’t possible, place your camera outside and let it cool for a half hour or so to the ambient temperature. Set the intervalometer to the maximum number of frames that you’re likely to ever shoot (say 40), and then have it run a series at each ISO and at major time increments. This will take a while, produce a lot of files, but it isn’t much work.
I would suggest doing this over time, likely about six months. If you shoot at temperatures from 20C down to -5C, then ideally you’d want to have a series at each 5C temperature increment and also at all of the major time intervals that you might use, say 1 minute, 3 minutes, 5 minutes and 10 minutes.
It sure beats doing this at the end of a long shooting night. With these libraries built all you need to do on a shooting evening is do some flats at the beginning of the evening. Flats, remember, vary with the lens, any dust spots, aperture, etc. On the other hand, you can even build a library of flats if you aren’t concerned about dust spot or will to deal with them afterward.
Astro Stacking Software
So – you’ve taken a series of “light frames” of one or more celestial subjects. Let’s say 5 frames each with an exposure of 5 minutes. As you’re packing up for the evening put the camera on a table outside (the ambient temperature must be about the same as when you did your “lights”), put the lens cap on, and now set the camera to shoot 5 or more “dark frames” of 5 minutes on its own. (More is even better)
You’ve already shot about “10 flat frames” earlier in the evening with a white T-shirt over the lens and with about a 75% to-the-right exposure, do about “10 flat frames”.
Later that evening, or even the next day you’ll have some processing to do. You’ll end up with 5 Lights of each subject taken, 5 or more Darks, your standard Bias frames, and 10 Flat frames all copied to your hard drive.
You must shoot in raw. If you shoot JPGs, these will bit 8 bit and will look like crap. Only raws will be in 16 bit and a large colour space. You therefore need to use your favourite raw processor to take the raw files (no adjustments yet) and save them as 16 bit TIFFs. Save each type of file, Lights, Darks, Bias and Flats to a separate named directory. Also, save them to your fastest hard drive. The coming steps are very disk intensive.
Next is when you’ll need a specialized bit of astrophotography software. There are quite a few, but most are for Windows. I’m a Mac user, and the one of the best for the Mac (and I’m told one of the best for Windows as well) is Nebulosity3. It costs $80.
There is good documentation on the Nebulosity3 web site and elsewhere on the web. It actually is a bit confounding the first time, but once you “get it” it’s quite straightforward to use. Most functions are completely automatic. It’s just a matter of knowing how to organize your images.
Though it’s almost 2 hours long, has poor audio, and likely will be as confusing for some as it is illuminating for others, there is a video on Youtube by Dr. Craig Stark, the man behind Nebulosity3, in which he runs through a workflow and also explains why certain things are done. I found watching it particularly interesting once I was already using Nebulosity3. It was much less intimidating then.
You will also definitely want to watch this video on Youtube. It’s 46 minutes long, and you’ll want to watch it a couple of times, making notes the second time, but it does cover all of the processing steps in Nebulosity3 in detail. Don’t be deterred. It’s not hard. Just a bit tedious.
And don’t feel that this software is the only one to use. There are a number of programs, many free, especially if you are a Windows user.
Post Processing
You have now used Nebulosity3 or a similar program and have stacked your lights, darks and flats. You have then aligned all the images so that your multiple exposures are properly registered with each other. You have also eliminated the images that have planes, meteors or satellites passing through them – or had the software do this automatically. A final 16 bit TIFF image is then saved and you now need to do some adjustments as well as creative work.
You can use any of the image processing programs that you’re most familiar with; Lightroom, Camera Raw, Capture One, Photoshop and others.
Photoshop, because it has Layers, will be very beneficial for doing tasks such as blending different exposures so that hot areas and dark areas can both be shown in the same image. Also, painting with overlay modes is very useful for bringing out fine detail in structures such as galaxy arms.
There are numerous online tutorials, but the best place to start is by putting an extreme S curve on your master file, opening up the top third and darkening the bottom third. You’ll be amazed at what is lurking in the final file.
Other Software
Because it has layers Photoshop is a very powerful tool. But there are some specialized Astronomy specific “Actions” for Photoshop that you should consider.
The most popular is Astronomy Tools Actions Set. This consists of 34 Actions specifically designed for astronomical image processing. You may not need or use all of them, but there are several very worthwhile actions and well worth the modest $29.95 for the complete set. Just be aware that this program reduces your files to 8 bit mode, so use it at the end of your image processing, and only when actually needed for a specific purpose,
The other is GradientXTerminator which is a Photoshop plug-in for smoothing out inevitable gradients.
And finally, there’s the problem of how to combine images of both faint and bright areas into a single subject using Layer Masks. This is nicely covered in the following Photoshop tutorial.

NGC 7000 / The North American Nebula
Left – Final stacked file fresh out of Nebulosity
Right – After Processing in Lightroom
File Volume
If you shoot with a high resolution camera, such as the Pentax 645z and its 50MP sensor, you know that it produces large files. Raws are about 70MB and TIFFs are some 300MB each. Since all of your files need to be rendered into TIFFs – lights, darks, flats and bias files, you will find that you generate a vast quality of files. In the case of the Pentax, one final image will produce some 50 GB of work files.
With Terabyte drives so inexpensive these days, this represents only about $5 worth of storage, but you quickly learn that file organization is necessary, and also that you don’t have to save everything.
Other Considerations
Periodic Error Correction (PEC)
A mount such as the SXD2 uses precision motors and gears to move the mounted camera or scope as it tracks. As precise as these are, there is still the possibility of slight errors as the gears go through a full rotation every 8 minutes.
The mount is calibrated for this at the factory, but if you wish, you can record a PEC (Periodic Error Correction) using the Starbook 10. Set the scope up pointed to a star and then look at it through a high power eyepiece. With PEC recording turned on, simply use the controllers direction keys to keep the star exactly centered. This takes 8 minutes, which is one full cycle of the gears. It’s tedious though, and I haven’t bothered since I use Auto Guiding instead.
If you have an autoguider though, you can use it to train the PEC. Very cool.
Auto Guiding
Once you want to make individual exposures of more than a few minutes, or want superior accuracy in tracking, you’ll want an autoguider. This is simply a small moderate-magnification scope with a CCD video camera attached. Mine uses a tiny Malicam Micro EX CCD video camera and short spotting scope.

Vixen Advance Unit

If you’re using a Vixen SXD2 mount you’ll also need to buy what Vixen calls an Advance Unit, which is an accessory plug-in board for the Starbook 10. Together these will cost about $1,000.
The Advance Unit has a jack into which the Mallincam is plugged and live video images from the camera are displayed right on the screen of the Starbook 10. The guide scope is pointed to a bright star nearby to what you’re observing or shooting. You tell the Starbook which star to track and from that point on, every fraction of a second, the unit detects any movement of the star being tracked due to aligment or mechanical errors in the mount, and it then signals the SXD2 mount to adjust its tracking to keep the star precicesly centered. With the star in the guide scope automatically held centered, your DSLRs image will be as well, and quite long exposures are possible.
Remember, though stacking of shorter exposures works, and is helpful, the best way to get great DSO images is by being able to take long exposures, and the best way to get long exposures is with auto-guiding. If your budget can handle it, it’s the way to go. (By the way, before CCD cameras, people used to do guiding manually, sitting with a pair of controls, staring through a guide scope and adjusting the tracking by eye and hand. Tedious – to say the least.)
Suggested Web Sites
The most popular site for judging the sky conditions is Clear Outside. The link is to the forecast for my observing location near Creemore, Ontario, as is the real-time embedded chart below.

There is also Cleardarkskies.com. This site provides an astronomy oriented weather forecast for many thousands of locations in the U.S., Canada and Mexico. You will find it to be a valuable tool for planning your observing.
There are two main astronomy discussion boards, AstronomyForum and StarGazersLounge. Both are very active and have boards that cover a wide range of topics.
Anecdote: One night recently I checked both weather / sky programs at sunset and saw that it was going to be overcast. But about an hour later I went outside to throw dinner on the BBQ and found the sky to be cloudless and crystal clear. So, as with all things, nothing beats the human eye and first hand experience.
The Most Important Ingredient
There is one more thing that you need. A dark sky site. As obvious as it sounds, unless you have a place from where you can observe that is safe and comfortable, and has dark skies, then no amount of gear is going to make a difference. One can do planetary and lunar viewing and imaging from within a city, but not deep sky, or at least not very well. There is simply too much light pollution, and the common wisdom is that the filters that are available to help out with this aren’t really all that effective.
I spend much of the warmer months at a house in the country, but by November I am back in the city, and some years go to points south. But my country place is less than a two hour drive away from where I live in Toronto, and if it isn’t too cold, or too snowy, and there is the promise of a couple of nights of clear skies, it’s likely going to be worth the drive.
A Closing Thought
If you come with me this far, you may be wondering why I have taken such a unique route to astrophotography – 645 medium format camera, at least one 67 telephoto lens, and the specialized Vixen mount with Starbook 10.
The answers, summarizing the points sprinkled above, are two-fold, maybe three-fold. I have always preferred medium format photography. All other things being equal, bigger is usually better, and I like making large prints for exhibition. Over the years I’ve shot with Hasselblad 6X6, Pentax 645 and 67, Contax 645 and Kodak and Phase One medium format backs. Now, in 2014 I am working with the new Pentax 645z, and loving it.
My Pentax 400mm f/4 lens, while not an astrograph per se, is truly excellent, and since it is designed to cover 6X7 format, digital 645 is just using the lens’ sweet spot. Results bear this out. The system gives 50 Megapixels at 400mm coverage, and the camera’s 33x44mm sensor gives me 500mm coverage with 30 Megapixels when cropped to full frame 35mm. If I really need to crop, 750mm coverage at 13 Megapixels resolution is at hand, more than many dedicated CCD cameras.
The Pentax 645z only let’s me down in one area, and that’s its inability to turn off long exposure noise reduction, making imaging sessions twice as long as necessary. But on the other hand, ending up with 50 Megapixel deep sky images is a pretty terrific reward. UPDATE: Now Fixed.
My experience in the mid-90’s with astrophotography and a computer was not a good one. But I am not ruling out going back to it at some point, because technology has moved quite a bit over the past decade and there are now systems that you can simply plonk down outside without critical alignment (important when it’s -10C outside) and then control with your computer from the warmth of indoors.
Who knows where this path will eventually lead me?
November, 2014


Elevate Your Vision


You may also like


