


By Frank H. Phillips — Digital Insect Photographer
Introduction: What is the Canon MP-E 65mm Macro Lens?
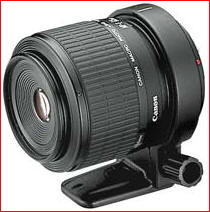
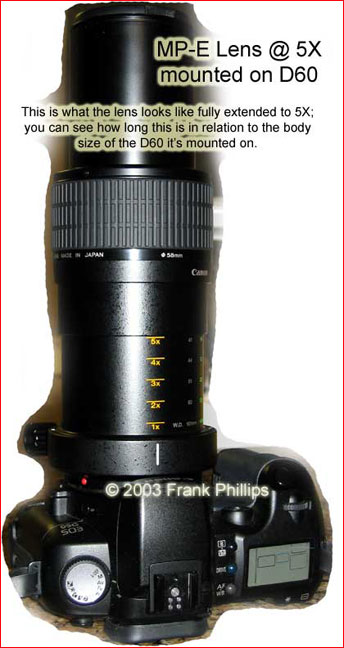
This is the most advanced macro lens in Canon’s lineup, and perhaps the most advanced macro lens of any available consumer-class macro lens. The main benefit of this lens is its ability to produce magnification up to 5 times lifesize, or a magnification ratio of 5:1 (magnification will be explained below). It is an exceptionally sturdy, firm, and well-constructed lens that comes with a tripod collar mount, which comes in very handy with stationary subject matter. If you care to see some of my work with this lens, please see myDigital Macro Insect Gallery.
This is a manual focus lens, despite being compatible only with Canon’s EOS series of autofocus cameras (including all of Canon’s digital SLRs). Being a dedicated macro lens, it cannot be used like a "normal" 65mm lens because it cannot focus more than a few centimeters away from the front element. Some people confuse the 1X – 5X designation with a zoom factor, like the zoom factor on zoom lenses (i.e. a 35-70 zoom lens is a 2X zoom lens). This is not a zoom lens; the 1X – 5X designation signifies that it can produce magnifications of full lifesize (1X) to five times lifesize (5X). Finally, it has a mounting ring on the front of the lens to hook up Canon’s macro flashes, the MR-14EX and the MT-24EX, which will be discussed in great detail later.
_______________________________________________________
Magnification: The Factors of True Macro Photography
Although many lens manufacturers (including Canon) tend to abuse the "macro" designation in a rather cavalier fashion, it is important to remember the difference between true macro photography and simple "close-up" photography; just because you took a picture of a flower up close doesn’t make it a macro shot.
The true definition of macro photography (also known as "photomacrography") is production of an image that is the same size (or larger) on the film plane as it is in real life (lifesize). Thus, if you photograph an insect that is 2 centimeters long at 1:1 (lifesize), it will take up 2 centimeters of space on the film plane (negative/positive film or digital sensor).
The most common way to increase magnification is to get the lens as far away from the film plane as possible, and there are many ways to do this, including extension tubes and bellows (those accordion-looking gizmos). This lens accomplishes that task simply by twisting the barrel, which moves the elements away from the film plane, creating the bellows effect. Extension tubes do the same thing (they’re nothing but hollow tubes with no lens elements), but it takes a large number of them stacked on top of each other to get high magnification. Having said that, extension tubes are far less expensive than the MP-E lens, and if you want higher magnification on your current 1:1 macro lens (like the Sigma 50mm, Sigma 105mm, or Canon 100mm) you should give this a try first.

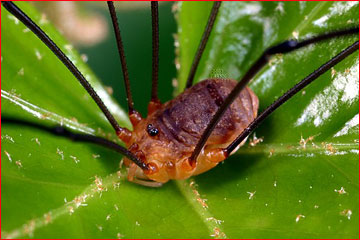
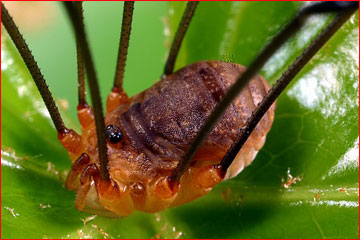
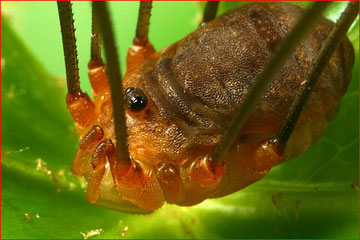
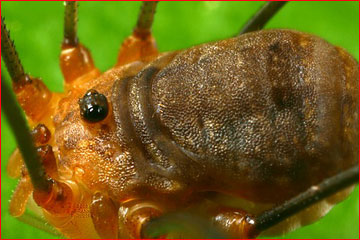
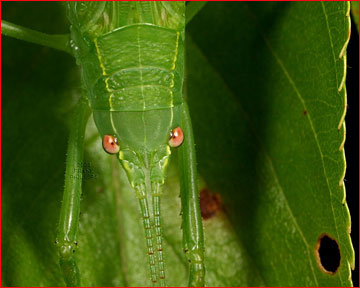
The photos of the Harvestman (a.k.a. "Daddy Longlegs") above appear to have been produced by "zooming in" on the arachnid…they were not. The effect was achieved simply by changing the magnification on the lens and then moving the lens until the insect came into sharp focus. For the first shot, I set the lens to 1X then moved the camera closer and closer until sharp focus, then I fired. For the second shot, I set the lens to 2X then moved the camera closer and closer until sharp focus, then I fired, and so forth all the way through 5X. In each and every case, I was within only a few centimeters of the insect.
As you can see, there is a tremendous difference between 1X and 5X. At lifesize, it’s hard to tell that this arachnid has two tiny eyes on top…they become apparent at 2X, and most pronounced at 4X and 5X. These are the kind of results you can expect from this lens once you’ve mastered its handling.
_______________________________________________________
Using the MP-E Lens
If you’ve ever held a rifle with a telescopic sight (a “scope”) on it, then you know that the higher the magnification, the more exaggerated your movements will be; if you don’t hold your breath, the crosshairs could move off-target and you’ll miss the shot. It’s the same with very long zoom lenses (try it with your 200mm or 300mm lens), but it’s especially pronounced with this lens. Shooting at 1X can be mastered quickly, but hand-holding this lens at 2X or higher can be quite a challenge. If you’re shooting a stationary subject, this is no problem if you use a tripod (and even some focusing rails). But if you’ve got a subject that changes position frequently, there’s no time to use a tripod, so you’ve got to hand-hold, and this is incredibly hard at 4X and 5X. Amazingly, all of the photos of the Harvestman above were hand-held.

Focusing Technique: There are two ways to focus this lens: frame the shot and then twist the barrel to focus (which changes magnification), or set the magnification where you want it and then position the camera to the correct focusing distance. I use the latter method 99% of the time because for me it’s easier, and because I can often remember where I had the magnification set when I made the shot (for documentation purposes). When I start shooting a subject, I typically set the lens to 2X, then put the lens close in front of the subject, then put my eye to the viewfinder (I often use Canon’s Angle Finder C accessory), then move forward and back until the subject is in sharp focus, then I fire. From there, I’ll experiment with more or less magnification, depending on the composition I want. Sometimes I’ll shoot an insect at 1X just to document it at lifesize, then see just how far I can go with magnification.

_______________________________________________________
Items to Contend With:
Depth of Field Issues:
There is a “natural law” in photography that the closer you get to a subject, the shallower the depth of field gets for any given aperture setting. For example, you can shoot your 200mm lens at f/4 of your son in the outfield during a baseball game and you’ll get plenty of depth. But if you photograph him after the game with your 50mm lens at f/4 from a distance of eight feet, the depth will be more shallow, even at the same aperture. Now imagine shooting an insect that is only 2 centimeters away from the front lens element…you’ll be lucky to get a few millimeters of depth in a shot like that, even at f/16.
Loss of Light:
When you increase magnification (by moving the elements further from the film plane) you also decrease the amount of light getting through. So whether you use extension tubes with a lens or the MP-E lens, as you increase magnification it will become harder and harder to see your subject through the viewfinder because of the light drop-off. Another side-effect of extension tubes is that they prevent "normal" focusing when used, just like the MP-E does not focus like a "regular" lens.
Working Distance:
Since the MP-E is a 65mm lens, you have to get very close to your subject, which can often present difficulties. For example, dragonflies are extremely skittish and it’s rare to be able to get close to one unless he’s eating. Another case is jumping spiders, because as the name implies, these little guys will literally jump onto the lens because it’s so close.
Metering Technique:
Having said that, I always shoot this lens at f/16, the smallest aperture setting available on this lens, in order to maximize depth of field. Next, I set my shutter speed to anywhere between 1/90 and 1/250 second, depending on my magnification level and the amount of wind; higher shutter speeds for high magnification or high wind. But how, you may ask, do I get away with simply setting my camera on full manual settings of my choice without even bothering to meter the shot? That’s where the macro flash comes in…read on.
_______________________________________________________
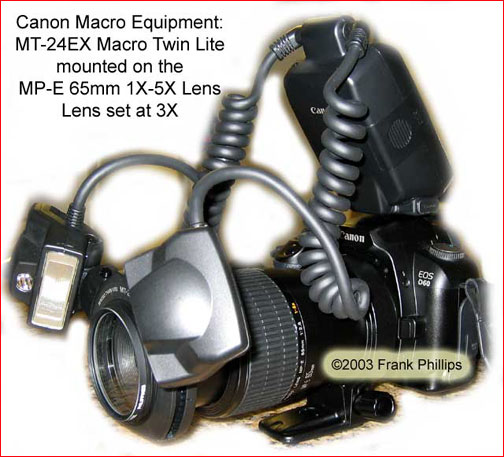
Accessory Macro Flash
The two most current macro flashes in Canon’s lineup are the MR-14EX Macro Ring Lite and the MT-24EX Macro Twin Lite. Both of these flashes are EX flashes, meaning that they are compatible with EOS cameras employing Canon’s E-TTL metering system. I have experience only with the MT-24 flash, so all of my comments here are based on that flash. Simply put, if you mount this flash on the front of the MP-E lens, you control almost 100% of the light on your subject, so metering is no longer an issue, except in cases where the subject or background can “fool” your metering system, such as the case of shooting a small bee climbing over a flower with a yellow center and white petals; in a case like this, the white and yellow will cause the shot to be underexposed, so you’ll have to compensate for that by about 1 or 1½ stops. But in most cases, the metering will be spot-on, so let the E-TTL do the work for you. All you do is set your camera to manual (whatever aperture and shutter speed you wish), set the MT-24 to E-TTL, and then fire away…the flash will do all the work for you.
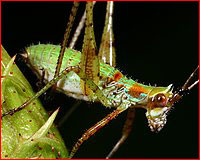
The one “drawback” to this technique is that the flash takes over the shot to such an extent that very little ambient light gets included in the shot, especially at small apertures like f/16, which produces a jet-black background on your shot, like the one above. Personally, I like this effect because it removes any distractions that might be in the background and lets you “focus” on the true content of the photograph.

_______________________________________________________
Physical Views of Lens and Flash
Text and Photographs © 2003 byFrank H Phillips, Birmingham, AL, USA


Elevate Your Vision


Read this story and all the best stories on The Luminous Landscape
The author has made this story available to Luminous Landscape members only. Upgrade to get instant access to this story and other benefits available only to members.
Why choose us?
Luminous-Landscape is a membership site. Our website contains over 5300 articles on almost every topic, camera, lens and printer you can imagine. Our membership model is simple, just $2 a month ($24.00 USD a year). This $24 gains you access to a wealth of information including all our past and future video tutorials on such topics as Lightroom, Capture One, Printing, file management and dozens of interviews and travel videos.
- New Articles every few days
- All original content found nowhere else on the web
- No Pop Up Google Sense ads – Our advertisers are photo related
- Download/stream video to any device
- NEW videos monthly
- Top well-known photographer contributors
- Posts from industry leaders
- Speciality Photography Workshops
- Mobile device scalable
- Exclusive video interviews
- Special vendor offers for members
- Hands On Product reviews
- FREE – User Forum. One of the most read user forums on the internet
- Access to our community Buy and Sell pages; for members only.
You may also like


