


Update: April 2000
With the advent of the Epson 1270/870 Photo printers and their associated archival inks and papers I have stopped using monochrome inks. Clickhereto read about my new procedure.
Update: October 2001
This article is now quite dated but I’m leaving it up for historical interest. For the latest on B&W printing with inkjet printers read my review of thePiezographysystem.
High quality inkjet printers such as thePhotoseries from Epson have revolutionized desktop printing. But for many photographers, particularly those who work in monochrome and who have migrated from traditional "wet" darkrooms, the use of color inks for B&W printing has been less than satisfactory.
This has now changed. Monochrome inks have recently become available which allow one to produce desktop inkjet prints that are astonishing in their tonality. This article looks at just how effective these new inks are in producing higher quality B&W prints.
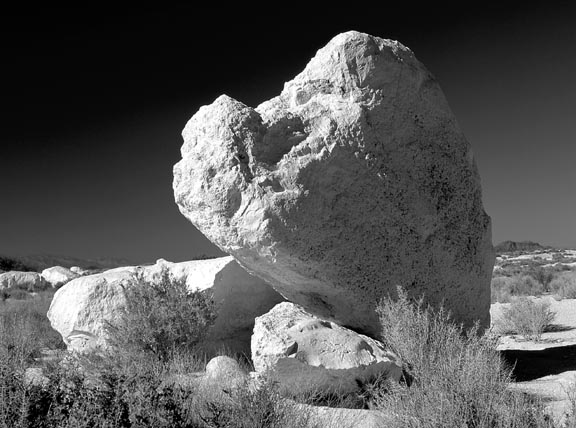 White Rock #2, Nevada 1997
Photographed with a Rollei 6008i and 90mm f/4.0 APO Schneider Makro Symmar on Fuji Provia 100. A polarizing filter was used. The 6X6 transparency was scanned with an Agfa Duoscan and the colour image was converted to Grayscale using Photoshop.
Introduction
I’ve been using Epson Photo inkjet printers for about 4 years as part of my desktop digital imaging system. For 30 years prior I have always had a darkroom, doing both colour printing (mostly Cibachrome / Ilfochrome) and B&W work. While I have become more than satisfied with the quality of my digital colour output, I’ve never been completely pleased with monochrome output using colour inks. While printing B&W images in colour mode produces infinitely better results that just using the Black ink, there was always a slight colour cast and a lack of smooth tonalities.
I recently (spring 1999) upgraded my printer from anEpson Photo EXto anEpson Photo 1200. The larger paper handling and improved printing rendition made the upgrade worthwhile but I was left with the question of what to do with my one year old EX. About the time that I made the upgrade I heard on-line about the availability of monochrome inks for B&W printing. This has turned out to be an excellent use for my old EX printer.
Monochrome Inks
The idea is a simple one. Replace the 5 colour inks in the colour cartridge with inks providing 5 shades of gray. (4 color printers such as the originalPhotowork similarly). The Black cartridge then provides 100% black while the others provide shades of gray at 15%, 25%, 45%, 50% and 75% respectively. What you end up with is a print with very smooth tonalities and no colour cast whatever.
MIS Associates Incis one of the leaders in this area with theirQuadtone Inks. Have a look at their web page for details on pre-filled ink cartridges, bulk inks for loading your own and other supplies. The printers that they currently support include the Epson 400/440/600/740/800/850/1520/Photo/EX and 1200. I’d suggest buying the pre-filled cartridges to begin with and then the bulk refills once you’re happy with with the results.
Making a Print
Making a print is quite simple. Justdon’tfollow the instructions provided by MIS. It may just be me, but I’ve found thattheir adviceto put Photoshop into RGB or CMYK mode to be wrong, and to produce very poor results. Simply leave the image in Grayscale mode and print as you would if there were colour inks in the printer. I find the results to be excellent.
So, how do these prints compare with those made by the same printer using colour inks?
I’ve tried preparing scans of prints made with both the colour and Quadtone inks to display here. Unfortunately the subtleties of shading and tonality simply don’t survive the scanning and compression processes of preparing a web image. You’ll just have to trust me on this one. If you have a spare Epson printer and would like to produce truly excellent B&W prints, do yourself a favour and check out Quadtone inks from MIS.
It’s worth keeping in mind that just as with colour digital work, once an image is they way you want it to appear the digital file can be reprinted at any time. This is not true with traditional wet darkroom techniques, where even experienced printers have difficulty making consistent prints, especially after some time has passed since the last printing session for that particular image.
Permanence
The perennial bugaboo of inkjet printing remains that of archival permanence. MIS claims that their Quadtone inks are archival (they also have archival colour inks), but as yet there have not appeared any authoritative independent tests. The Quadtone inks are pigment rather than dye based though, so they should last considerably longer than standard Epson colour inks. The weak link remains the paper, thoughPictoricoHigh White Gloss Filmmakes claims to have excellent archival characteristics. Please note that whileGenerationscolour pigment inks,reviewed herearenot compatible with Pictorico paper, MIS’s Quadtone inksare. The results are very beautiful, there is no smearing, and archival qualities of the combination should be excellent.
If you want your black and white prints to last 200 years then traditional processing using exacting archival techniques, including selenium or gold toning, will be needed. Early tests appear to show though that a Quadtone print on either a traditional watercolor paper such as Somerset cold pressed or Pictorico will last for 50-75. Good enough for me.
Shooting Colour and Then Making B&W
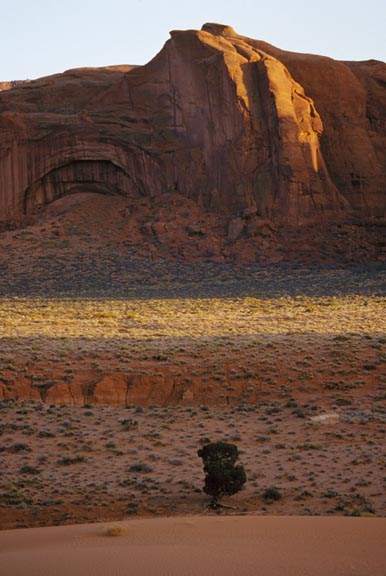
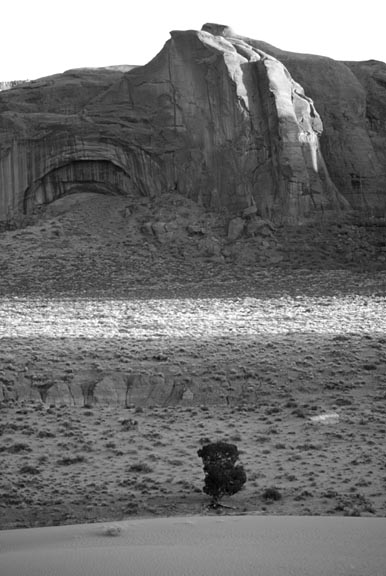
Lone Tree — Monument Valley, 1999
This photograph was taken with a Canon EOS 3 and 100~400mm IS L zoom lens on Provia 100. When I took the photograph I was originally captivated by the strong colour palette of the sand and rock. But, like with many images, there is more than one way to skin this particular cat. Did I shoot both transparency and B&W film? No. I did what I’ve been doing for the past several years since switching to digital image processing — I shot it in colour exclusively and converted to B&W in Photoshop. Read on.
There is a new controversy brewing and it has to do with shooting colour film exclusively and then making B&W digital prints. Years ago when I was a photojournalist and worked extensively in the TV and film industry I always had two separate camera bodies on hand, one to shoot colour and the other for black and white. More recently, as a fine-art landscape photographer, I always have brought an extra film back, sheet holders or body so that I could shoot both mediums, depending on what the subject matter required.
Today, I only shoot in colour. But, I still make B&W prints when the subject matter warrants. What makes this possible is the digital darkroom. Once a transparency has been scanned I use Photoshop to convert it to a monochrome Grayscale image. All of the controls of Photoshop are available, and as anyone who’s used both traditional wet and digital systems knows, Photoshop wins hands down every time.
Prints made using photographic printers such as the Epson Photo series produce excellent results in black and white, even when using standard colour inks. The printer driver blends the inks to produce a monochrome image on print. But, as noted in the article on Quadtone inks above, there are inevitably small colour casts and tonality issues. Quadtone inks change that.
The question that everyone wants to know is, what is lost in shooting colour film rather than black and white? In my opinion, very little. Even the use of B&W filters can be emulated after-the-fact through Photoshop. There’s a good article that touches on this in the September 1999 issue ofOutdoor Photographer. What you can do is use any of the Red, Blue or Green channels for your image, as well of course as the mono channel in LAB mode. After the fact filtering.
As for resolution, while it’s possible that the slowest B&W emulsions may have somewhat finer grain and higher resolving power than most mainstream color transparency films, if you use Kodachrome or Velvia ( and likely the new ultra-fine grain Provia F), you’ll never see the difference.


Elevate Your Vision


Read this story and all the best stories on The Luminous Landscape
The author has made this story available to Luminous Landscape members only. Upgrade to get instant access to this story and other benefits available only to members.
Why choose us?
Luminous-Landscape is a membership site. Our website contains over 5300 articles on almost every topic, camera, lens and printer you can imagine. Our membership model is simple, just $2 a month ($24.00 USD a year). This $24 gains you access to a wealth of information including all our past and future video tutorials on such topics as Lightroom, Capture One, Printing, file management and dozens of interviews and travel videos.
- New Articles every few days
- All original content found nowhere else on the web
- No Pop Up Google Sense ads – Our advertisers are photo related
- Download/stream video to any device
- NEW videos monthly
- Top well-known photographer contributors
- Posts from industry leaders
- Speciality Photography Workshops
- Mobile device scalable
- Exclusive video interviews
- Special vendor offers for members
- Hands On Product reviews
- FREE – User Forum. One of the most read user forums on the internet
- Access to our community Buy and Sell pages; for members only.
You may also like


