


By: Steve Kossack
A Photoshop Split ND Replacement

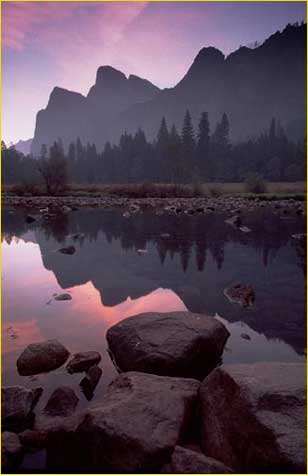
Gates of the Valley‚ Yosemite National Park 1999
I’ve been working digitally for several years now and I have never forgotten for a minute the reasons why. When I learned darkroom technique I was amazed at what could be done provided one had enough time and patience, not to mention skill.
Now I find of interest any technique that will allow me to do digitally the basic darkroom procedures that I came to know and loved doing. The fact that these are done so much more quickly and especially with a degree of accuracy that was never possible in the dark is just " gravy" to me. We won’t even mention not having to breath chemicals, though I am tempted sometimes to run a garden hose from the tailpipe of my automobile to my desktop for nostalgia’s sake.
I have read with great interest the articles on this site onGaussian BlurandContrast Masking. These are great tools and I use them frequently, but I’ve always wondered how to easily duplicate the effect of a split neutral density filter. While these most useful of filters are a must for anyone doing landscape photography, occasionally they aren’t available, or location logistics prevents their use.
Up until now I’ve used Layersin Photoshopto combine different exposures of the same scene. I shoot a separate exposure for the shadow, the mid-tones and the highlights. My success with these " composite" images has varied though. It’s almost like being in the darkroom again. I look at the exposures and say to myself, " Well…, maybe given enough time I can rescue this."
Until recently it’s been hard to find Photoshop articles and books just for us photographers. Prior to the recent explosion of digital cameras ( from point–and–shoots to SLRs to high–end 3-shot backs) it was usually graphic artists and pre-press technicians using Photoshop, not photographers.
Recently though I’ve been reading Martin Evening’sfine book titledAdobe Photoshop 6.0 for Photographers. Mr. Evening has a quick and simple solution for rescuing images that could have benefited from having a split neutral density filter applied.
Find yourself an exposure that has almost everything exposed properly save for the highlight or the shadow. In my example I’ve used one of my favorite images fromYosemite Valley. In the past I’ve always printed the under-exposed frame because I like the sky and reflection. This time I used the over-exposed one. It appears to have no sky detail, but dragging through it with the eyedropper tool in Photoshop and looking at the the InfoPaletteshowed that therewasinformation there!
Here’s what to do:
First, do everything needed for image correction as usual. For me this is cropping ( in this case perspective cropping to level the horizon a touch) andAdjustment Layersfor Curvesand Selective Color.
- Make a newAdjustment LayerforLevels. Pull the gamma slider (center) to darken or lighten the image so that the highlight or shadow area is closer to how you want it to appear. This is where I first saw the color in my sky.
- With theLevels Adjustment Layeractiveadd aLayer Maskusing the icon at the bottom of the pallet.
- Make sure that you’ve chosen the default setting for foreground and background color (W/B)
- Now grab theLinear Gradienttool and drag in the image where you want the original to be revealed. In this image it was the bottom two-thirds.
Remember, the direction that you drag, and whether Black or White is on top of the Palette will determine the area affected. You also can change the part of the image that you drag over and how much of the total area is masked or revealed, and change the opacity of the maskedAdjustment Layeritself.
Also feel free to experiment with using abrushinstead of (or in addition to) thegradient tool. Keep in mind thatthe dark areas of the image are a mask! It can be erased in any way that you want and that’s appropriate to the image.
This is just the jumping off point. Experimentation is what photography and Photoshop use in particular is all about. I hope that you find this technique useful.
Steve Kossack
All text and photographs on this page are Copyright‚© 1999 – 2001 by Steve Kossack


Elevate Your Vision


Read this story and all the best stories on The Luminous Landscape
The author has made this story available to Luminous Landscape members only. Upgrade to get instant access to this story and other benefits available only to members.
Why choose us?
Luminous-Landscape is a membership site. Our website contains over 5300 articles on almost every topic, camera, lens and printer you can imagine. Our membership model is simple, just $2 a month ($24.00 USD a year). This $24 gains you access to a wealth of information including all our past and future video tutorials on such topics as Lightroom, Capture One, Printing, file management and dozens of interviews and travel videos.
- New Articles every few days
- All original content found nowhere else on the web
- No Pop Up Google Sense ads – Our advertisers are photo related
- Download/stream video to any device
- NEW videos monthly
- Top well-known photographer contributors
- Posts from industry leaders
- Speciality Photography Workshops
- Mobile device scalable
- Exclusive video interviews
- Special vendor offers for members
- Hands On Product reviews
- FREE – User Forum. One of the most read user forums on the internet
- Access to our community Buy and Sell pages; for members only.
You may also like


