


by Alain Briot
1 – Introduction
Since version 1.0, DxO has been known as a RAW converter whose goal was delivering the finest image quality. DxO reaches this goal by providing profile-based lens correction and by using proprietary algorithms to convert the raw file, remove noise and create smooth and finely detailed conversions.
In version 5, which was released in December 2007, DxO continues to offer this approach through refinements in three main aspects of this exceptional raw converter: new built-in lens and camera profiles, a new approach to noise removal and an improved user interface. DxO 5 also offers a spotting tool.
________________________________________________________________
2 – Lens and Camera Profiles
In previous versions DxO asked the user to select the lens profile and to set the distance between the camera and the subject manually. Since version 4.0 this has been done automatically by the software. All you need to do is download the lens and camera profiles for the lenses and cameras that you use.
The DxO lens and camera profiles are free. You don’t have to pay extra for them no matter how many you need. The cost of all the profiles is included in the purchase price of DxO. You will not have to spend more money if you purchase a different camera, or a new lens, later on. Instead, you will be able to download the profiles for your new lenses and cameras from the DxO website. A profile downloading function, built into DxO 5, makes this process quick and easy.

Lens module selection screen. Selected modules are downloaded from the DXO website for free.

Camera body profiles selection screen. Selected profiles are downloaded from the DxO website.
The lens profiles describe the unique characteristics of each lens, together with their flaws. The profiles also tell the software how to correct these defects. The result is a conversion that takes into account the lens defects and that is optically more perfect than what the lens captured. Very few lenses deliver perfect optical quality, no matter how complex their design might be and no matter how expensive they are. Many lenses cause distortion, or exhibit chromatic aberration, blur and many other issues. DxO takes care of removing these problems by applying a lens profile to photographs taken with a specific lens.
All this is achieved in the background. You have nothing to do. If your lens and camera profiles are in the DxO library on your computer, DxO will apply these lens and camera profiles to all the photographs taken with them. A complete list of lenses and cameras supported by DxO 5 is available atDxO.com New lenses and cameras are added regularly.
________________________________________________________________
3 – A new approach to noise removal
Noise removal science is at the forefront of digital photography at the present time. It is being implemented in cameras, through the use of sensors that generate lower noise levels, and it is being implemented in Raw conversion software, through the use of various techniques.
In version 5 DxO uses a new approach to noise removal by extending the range of pixels from which noise levels are calculated. Traditionally, noise removal has been done by looking at the pixels that surround a given pixel in order to determine which pixels are noise and which pixels represent real objects. DxO 5 uses this approach but looks at far more pixels than in previous versions as well as in other raw converters.
By increasing the size of the sample area, DxO 5 is able to make decisions based on a larger amount of data. This results in more informed decisions, so to speak, and eventually in higher image quality. It also results in the need for more processing speed to run DxO 5 effectively, a trade off that is due to the higher demands placed on the CPU. In theory, the size of the sample area could be extended even further, but doing so would require even more processing power and would slow down the conversion speed too much.
________________________________________________________________
4 – A new interface
The DxO interface has been the source of difficulties for users since version 1. The functions were there and they were attractive, but making the best use of these functions was a challenge because they were buried within a maze of choices.
With version 5 DxO offers their best interface so far. The functions are still numerous, but using them is now a matter of training and no longer a matter of getting used to the interface.
First, the conversion process is broken down in 4 simple steps:Select, Prepare, Process and Review. Each step is quickly accessible through tabs at the top of the screen:

TheSelectarea is where you select which images you want to work on.
ThePreparearea is where you make color, contrast and other adjustments to your images.
TheProcessarea is where you process your image.
TheReviewarea is where you can review your conversions.
In the following pages I will explain in detail the specific functions offered by each of these 4 areas. What we will see is that the area where you will spend the most time is thePreparearea.
________________________________________________________________
5 – The Select area
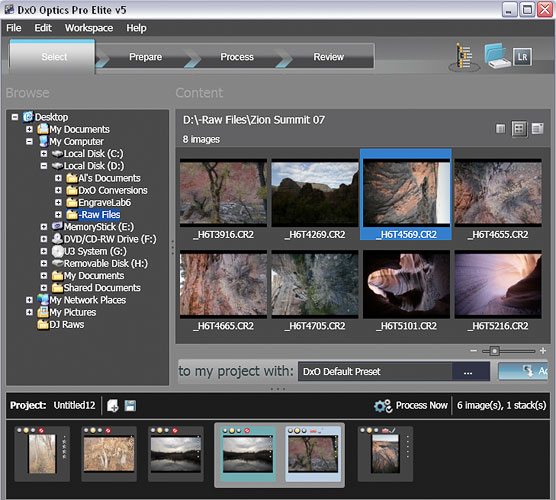
The Select area is where you choose which photograph you are going to work on.
You start this process by navigating to the folder where your Raw files are located on your hard drive or other storage device.
Once that folder is selected the photographs within it will appear on the content screen either as icons or as titles (your choice). Being visually oriented – I am a photographer and a visual artist after all — I prefer the icon view.
Once you decide which images you want to work on, you drag or double click on them so they are moved inside the area at the bottom of the screen. This area is called the Project area and each photograph placed in that area becomes part of a project.
You can give this project a name and save it. Or you can keep it as an untitled project. When I want to work fast I keep it untitled. When I am working on a project that I plan to come back to later I give it a name and save it.
Once in the project area the icon preview for your photographs changes. It now looks like this:

This new preview allows you to do a number of things, each of these being achieved by clicking on the icons around the photograph. Let’s look at what each of these icons mean, starting at bottom left and moving clockwise around the image.
The two blue arrows allow you to rotate the photograph right or left.
The large green dot at the top left means that this image is cleared for processing.
The two smaller dots to the right of the green dot turn orange and red, respectively, when clicked.
The orange dot indicates that the processing of this image is on hold.
The red dot indicates that this image will not be processed.
The checkmark icon indicates that a lens and camera profile are available for this image. If no profiles were available a red camera icon would be shown.
The 5 stars on the right side let you give a ranking to the photograph on a scale from 1 to 5, five stars being the highest ranking and one star being the lowest.
The red X at bottom right removes the image from the project area when clicked.
Finally the title (or file number) of the image is shown directly under the image.
________________________________________________________________
6 – The Prepare area

As I mentioned at the start of this tutorial, the Prepare area is where you will be spending the most time. This is because it is in this area that you will be making the color, contrast, cropping and other image adjustments that are going to directly affect the look of your converted image.
As we did for the Select area, let’s look at each of the features in this area individually, starting with the first item in the list on the right side of the screen (above) and proceeding downwards. This list is actually a stack of 9 drop-down palettes each one devoted to a specific function. Each of these palettes can be dragged out of the stack, moved to a different location within the stack, or removed all together.
You can open or close any of the 9 palettes to reveal their contents by clicking on the dark gray bar that shows the name of the palette. You can remove a palette from the stack and close it by clicking on the x icon at the top right corner of each palette. To bring a palette back into the stack simply click on the icon at the top right of the screen that shows this particular palette.
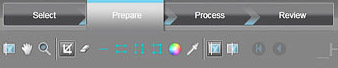
Below is the row of icons located at the top right side of the screen. From left to right: Move zoom, Histogram, Exif Edit, Preset Editor, Light, Color, Geometry, Detail and My Palette. It takes some time to learn which icon stand for which palette but once that is done it is very simple to open a specific palette using these icons. Plus, they look nice which is great.
![]()
Accessing the Prepare area
To access the Prepare area you click on the Prepare tab after you have completed your selections in the Select area. When you first open the Prepare area the main window is empty. To bring a photograph into this area you need to double click on one of the photographs in the Project area.
Once it is shown in the main window the selected photograph is ready for adjustment and optimization. Below we are going to look at each of the nine Prepare palettes available in DXO 5. We will use the order in which these palettes appear in the screen shot above.
A – The Move/Zoom palette

This is a very straightforward palette that allows you to enlarge or reduce the size of the screen image and navigate through the image. Image magnification settings are accessed via a slider and a drop down menu.
B – The Histogram palette

The histogram palette is also very straightforward. It shows the exposure level in all three channels in color. Clipping indicator buttons for highlight and shadows are available under the palette (not visible in this screen shot).
C – The Edit Exif palette
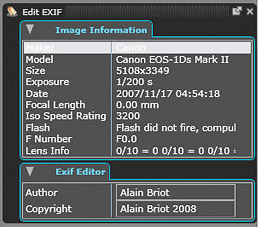
As its name indicates this palette allows you to view the image information of the photograph and edit the Exif data: author and copyright information related to the photograph.
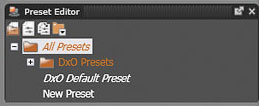
D – The Preset Editor palette
The preset palette lets you apply, create and save presets. A preset is a set of color, contrast, saturation and other adjustments made in the Prepare palette. These adjustments are made to an image and afterwards saved as a preset. I like to think of a preset as being a group of image adjustments that can be applied all at once instead of one at a time.
Presets are very practical when you need to apply the same adjustments to many photographs. By creating and saving a preset that contains all these adjustments, you save yourself a lot of time. Instead of doing the same task repeatedly, you do it once then apply it as many times as you need.
Presets are also practical when you need to save complex adjustments, or adjustments that you really like and want to use again later on. Instead of taking notes about what these adjustments consist of, or instead of taking the chance that you will remember what they are (or not) you can save these as a preset and have it ready to go whenever you want to use these adjustments again.
E – The Light Palette
We are now moving to tools that modify the appearance of the image.
Before we start please note that each of these tools –sliders for the most part—have default settings. As you make changes you will lose these default settings. If you wish to return to them all you need to do is click on the checkboxes on the right side of each slider or group of sliders. When you click the default settings will be automatically restored. These checkboxes are easy to see: they have a white background and the checkmarks are green. As soon as you move one of the sliders the corresponding check mark disappears indicating that you are no longer using the default settings. Clicking the checkbox will return the default settings immediately.
The Light palette offers one the most important set of adjustments in DxO 5. It starts with an exposure compensation adjustment (auto or manual). This adjusts the overall exposure of the image, either brightening or darkening it. As you make this adjustment, keep an eye on the histogram to make sure that you are not causing either the shadows or the highlights to be clipped. Clipping is one of the most damaging errors you can make in Raw conversion. Once an image is clipped, the data in the clipped area(s) is lost forever. It is therefore important to avoid clipping at all costs whenever possible.
The palette continues with DxO Lighting. A basic description of DxO Lighting is that it brightens the image as you move the slider, in conjunction with the three options available: slight, medium and strong. In practice DxO Lighting does much more than that. DxO Lighting is a smart adjustment tool that will brighten the image depending on the light level of each area, without clipping either the shadows or the highlights.
DXO Lighting also includes sliders for setting the black and white points as well as the gamma and contrast levels. Finally, a tone curve is available if you want to edit the curve directly instead of using the sliders.

Personally, I like to keep the overall contrast of the image on the soft side during the Raw conversion stage and later make final adjustments in Photoshop. The reason for this approach is that it is easy to increase contrast and saturation in Photoshop while it is difficult, and sometimes simply impossible, to reduce contrast and saturation. By starting with a low contrast, open shadows, detailed highlights and relatively a low saturation image, I keep my options open in regards to doing further work to the image after raw conversion. This enables me to express my vision for the image instead of having to worry about getting unrecoverable blocked out shadows, burned highlights or oversaturated areas.
F – The Color palette
The Color palette is the second step in getting the image to look the way you want prior to raw conversion. With the Light Palette these are the two most important palettes in regards to contrast and color quality adjustments.
The first sub-palette is the Raw white balance palette. It is very important to adjust color balance prior to raw conversion because at that time you are working on a single channel file.
A raw file is not a tri-color file. It has only one channel and therefore it is easy to adjust the color balance in a perfectly linear fashion. After conversion, color balance will have to be adjusted separately in the red, blue and green channels, something that is a lot more difficult.

In my opinion color balance is best adjusted with the color temperature and tint sliders. Think of the Color temperature slider as a blue to yellow slider, with yellow on the right and blue on the left. And think of the tint slider as a green to magenta slider, with green on the left and magenta on the right.
Color balance is best adjusted “to taste” by moving the sliders until you get a color balance which is pleasing to your eyes. There are no “right” or “wrong” numbers. It is what you like that matters.
If you get lost in the process, you can always return to where you started by selecting “As Shot” from the preset drop down menu. The presets also give you a second option for finding a pleasing color balance by simply trying all the presets –shade, tungsten, etc.—and seeing if there is one that gives you a pleasing color balance. You can also use the presets as a point of departure from which you make additional changes with the sliders.
The next color adjustment is Vibrancy. Vibrancy is a form of color saturation except that it does not saturate all the colors evenly. Instead, it saturates low saturation colors more than high saturation colors, resulting in adjustments that do not over saturate the image. It is a more delicate and subtle adjustment than the saturation adjustment.
Color Rendering: I like to leave the “As Shot” selected and the slider at the default setting.

Color Mode: with color mode I like to see what changes I get with the Styles and Saturation options. I often select the Low contrast or Med-low contrast option in the contrast drop down menu because this goes along with my desire to have a low contrast conversion with open shadows.
HSL can be a very useful adjustment tool. It stands for Hue, Saturation and Luminance which are the three sliders beneath it. It is very similar to Photoshop’s Hue, Saturation and Brightness.
Personally, out of the three (hue, saturation and luminance) I use the saturation slider almost exclusively. The hue slider is dangerous, so to speak, because it creates extreme color shifts. The luminance slider darkens or brightens the image overall in ways that I don’t personally like. I prefer to use the exposure slider for that.
The multi point color balance tool (below) is a tool that is specific to DxO in the sense that it is not found in other Raw converters to my knowledge. The way it works is simple. You start by clicking on the color circle next to the word “tool” at the top of the palette. You then click in the image, with this tool, onto an area where you want to adjust the color. A color wheel then comes up with a “handle” shaped light and a small ball that you grab with the mouse and move around until you find the color that you like.
You can do this for up to 4 different areas in the same image. For each new area a number appears on the photograph. That number corresponds to the numbers on the multi-point color balance palette. In the palette, under each number two squares get filled with color. The top square shows the original color while the bottom square show the modified color.
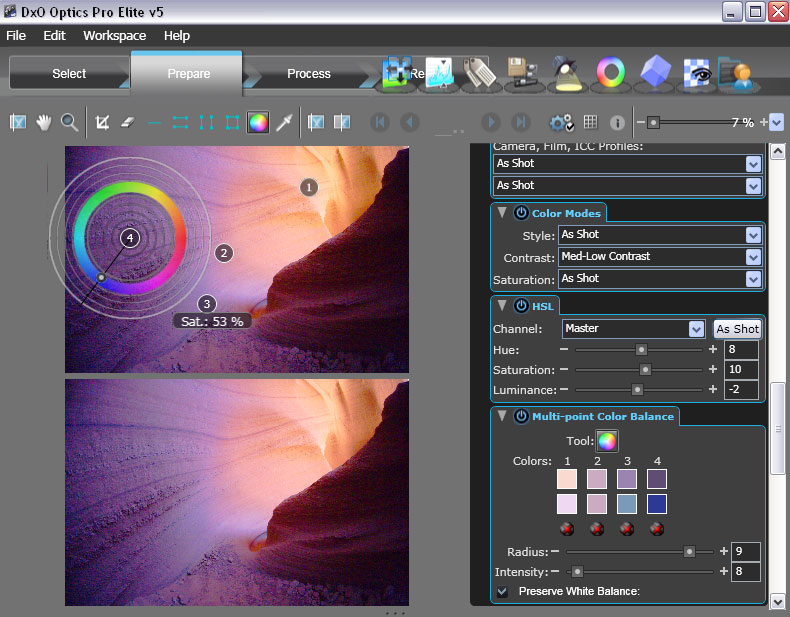
You can return to these selections at any time by selecting the color tool again and by clicking on any of the numbers on the photograph. You can delete the changes made to any of the 4 colors by clicking on the red X icon located under each square.
G – The Geometry palette
This is a very straightforward and easy adjustment palette. It offers two tools that I use on many of my images: the “Horizon” tool which is basically a leveling tool for those instances where the horizon is not level, and the cropping tool for those instances where you captured more image area than you need.
The third tool offered by the Geometry palette is the Keystoning adjustment tool located under the horizon slider. This tool allows you to correct the geometry of objects that have been either distorted by the lens and camera or whose shape is not to your liking. A typical situation where this tool is used is when you photograph tall buildings with the camera pointing upwards.
In such a situation the buildings on the photograph look as if they are tilted towards one another. You can use the keystoning tool to correct that. All you need to do is pick the one of the 3 tools that is best adapted for the job. In this case you would pick the vertical lines tool. You would draw with that tool along the vertical edges of the buildings that should be vertical but are currently tilted. The software will then straighten these lines so that they are both perfectly vertical.

The same process can be used with horizontal lines by using the horizontal lines tool, or with a 4-sided object by using the square tool. Each of these 3 tools have short but useful screen instructions that appear when you select them. You can also tilt the image plane up, down or sideways, as well as scale the image, using the 4 sliders located beneath the keystoning tools.
H – The Detail Palette
Detail is where you set the sharpening and noise removal for your conversion. Personally, I recommend either not sharpening your image at all in the raw converter, or sharpening it very little. It is much better to sharpen your photographs after they have been converted and after they have been upsized or downsized to a specific print size. I therefore personally set the Unsharp mask settings to 0 when I convert photographs.
Regarding noise, my decisions are made on the basis of the ISO at which I took the image. With a low ISO, or with a camera that generates little noise, I would set the sliders at zero or just above zero. With a high ISO, and/or a camera that generates a lot of noise, I may set the sliders to the middle or even all the way to the right side, depending on how bad the noise is.
The grey equalizer slider is also important. It allows you to neutralize the color of the noise left in the image and/or the color of the de-noised area. A certain amount of testing of these options set at different levels is sometimes necessary in order to fully understand what to expect
The dust adjustment is actually a dust tool removal, an eraser brush that you pick up at the top of the screen in the tool bar. It is the eraser-shaped tool below:
Personally I prefer to clone dust out in Photoshop but this tool will let you do this in DxO as well.
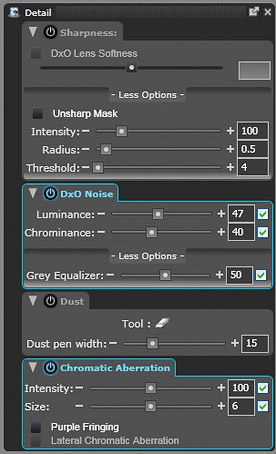
Finally, the chromatic aberration sliders let you remove chromatic aberration that would not be otherwise removed through the lens profiles. This is useful if you are using a lens for which there is no profile (such as a lens made by a company other than your camera manufacturer) or if there is more chromatic aberration than the profile can remove. In practice I rarely use this tool, but if necessary it is available. Notice that you can also remove purple fringing and more. To do a good job with this tool you will have to look at your photograph at 100% magnification, navigate to the area where color fringing is present, and adjust the sliders until the fringing is gone.
I – The My Palette Palette

The My Palette palette allows you to drag and drop aliases of your favorite palettes and sub palettes. It is different from a Preset. While a preset is a compilation of adjustments made in several palettes, the My Palette favorites are aliases –copies if you prefer – of specific palettes or sub palettes. You are not saving the settings as much as you are saving the palette itself.
Saving a palette or sub-palette to the My Palette area is easy. Let’s say you want to save the Vibrancy sub-palette. To do that you open the color palette, then you open the vibrancy sub-palette, you adjust the vibrancy as you like it to be, and finally you drag the vibrancy sub palette to the My Palette area. Now this palette is saved in the My Palette area and can be recalled at any time.
One of the main differences between Presets and My Palette is that if you re-adjust the Vibrancy setting that you just dragged to the My Palette area, the Vibrancy slider in the Color palette will move at the same time. That’s because favorites in my palette are aliases of the regular palettes and sub palettes. You are not saving a setting. Rather, you are saving the sub palette so that you can find and open it faster than if you had to go through all the palettes to find it. All you have to do once it is saved is open My Palette and you will see all of your previously saved palettes in it.
________________________________________________________________
7 -The Process Area
Two things take place in the process area. First, your images are being processed and converted. This is an automatic process that takes place when you click on the Start Processing button at the top center of the screen. The status of the images being processed is then shown beneath that button, on the right side of the screen. Two progress bars start moving: the first one shows you how many of the total images have been processed, and the second shows you how far each image is from being fully processed.
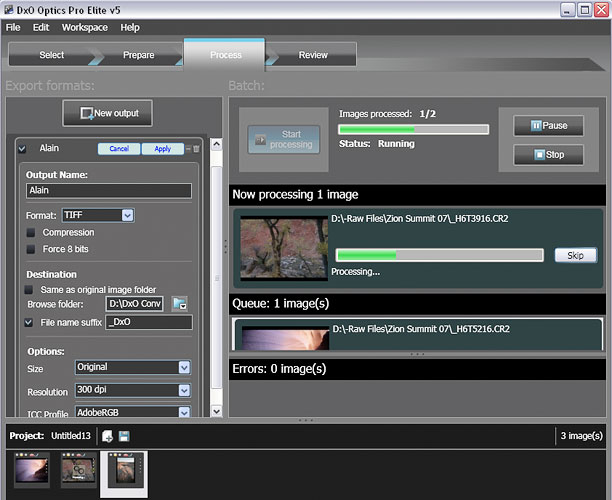
Before you click on the Start Processing button you need to set the proper parameters for your conversion. This is the second thing that you can do in the Process area. These adjustments are made on the left side of the screen, in the area located under the “New output” button.
On the screen shot above you can see the parameters that I use for my conversions. These are very straightforward. I output the images in Tiff format without any compression, in 16 bit, at the original size (no up or down resing) at 300 dpi and in ProPhoto RGB. I use ProPhoto RGB because it is one of the largest color spaces. I use a large color space to prevent any possible clipping of the image data. The fact that the color space is larger than the image color data does not cause any loss of image quality as long as the image is kept in 16 bit mode.
For this reason I keep my images in 16 bits until I send them to the printer. At that time I let the printer and paper profile do the conversion from 16 bits to 8 bits (no printer prints in 16 bits right now). At that time damage to the image data is prevented since the conversion is made into the printer color space while the image data itself is left in 16 bits for further use.
________________________________________________________________
8 – The Review Area

The last area is the review area. I have to say that I rarely use this area, preferring to look at my images in Photoshop. However, in case opening both DxO 5 and Photoshop requires too much processing power or memory, it is possible to see how your conversions look in DxO. You can zoom in and out of the image with a slider to see the details of areas that you are particularly interested in. If you are not satisfied with the conversion you can go back to the prepare area, change the settings, then convert the image a second time.
________________________________________________________________
9 – Conclusion
DxO 5 features significant improvements and new features compared to previous versions. If you are already using DxO you will find that version 5 features new options and is easier to use. If you have not used DxO yet you can download a free trial version from DxO.com and evaluate the software.
To me, the new user interface alone is worth updating. Until DxO 5 I kept wondering where some of the options were. Now I find them all easily and my workflow is a lot quicker and more intuitive. I focus on image optimization instead of trying to remember where everything is.
The new features of DxO 5 are also a big improvement. The noise reduction tool is a welcome addition that provides better noise removal than was available so far. It is of high interest to me because when I shoot 35mm digital I like to shoot handheld (I currently photograph with both 4×5 film and 35mm digital). Often, I need a small aperture to have a large depth of field and often the light level is low because I work at sunrise and sunset or because I find myself in a slot canyon or in other semi-dark places. The image in the screenshots above for example was taken at ISO 1600. I don’t expect DxO to remove all the noise in the image, but I have to say that version 5 certainly gives me cleaner files with less noise in the shadows.
Shadows receive very little exposure and are therefore a critical part of the image when it comes to noise removal. Because they feature very little detail, the image data in a high ISO shadow area is usually mostly noise. Having a raw converter that can remove noise as best as can be done is a serious asset in this situation.
My recommendation is to give DxO 5 a try. The free trial version makes this easy. Raw conversion is a quickly evolving field, and with version 5 DxO is making a very significant contribution to this field.
Alain Briot
Arizona
March 2008
________________________________________________________________
Alain Briot is a full time fine art photographer, the author ofMastering Landscape Photography(Rocky Nook, 2007) and aDxO Image Master. Through his website, beautiful-landscape.com, Alain offers fine art prints, workshops, DVD tutorials and more.
You can learn more about Alain’s work on his website atwww.beautiful-landscape.com You can also subscribe to Alain’s Newsletter and receive over 25 free essays in PDF format when you subscribe. Alain welcomes your comments or questions on this and on his other essays. His email address is[email protected].
________________________________________________________________
DxO 5 Tutorial Follow Up
By Alain Briot
I received a large number of emails following the publication of my tutorial essay on DxO 5. A large number of these emails were complimentary, while an equally large number pointed to issues encountered when using DxO 5. Because of the number of issues that needed to be addressed I decided to post a follow up to my original essay in which I answer the questions I was asked over emails as well as on the Luminous-Landscape forum.
1-Windows XP 64
I received numerous emails from photographers using Windows XP 64 who are unable to use DXO 5 or who have significant problems with the current version. I was not aware of these problems until this essay was published on Luminous Landscape. I use DXO 5 on a Sony Vaio notebook under Windows XP Home Edition with 2GB of Ram and it runs fine. I did not try DxO 5 under Windows XP 64.
If you plan to use DXO 5 under Windows XP 64 you need to know that the problems that were reported to me range from the program not running at all, to not being able to install updates, to strange behavior of certain commands and more. I have contacted DXO with these issues and asked when a Win XP 64 update will be available. I have not received a response yet.
Window XP 64 is necessary in order to use 4GB of Ram, something that helps a lot with ram-hungry applications such as DxO 5. Given the seriousness of these problems a 64 bit upgrade is definitely necessary and I hope DXO will provide one soon.
For me, the slowness that DxO exhibits in regards to providing updates in a timely fashion has been a frustrating aspect of using DXO 5. Besides the Win XP 64 problems, there is also a significant delays until support for new cameras and lenses is provided, leading many photographers to turn to other raw converters in the meantime out of frustration and necessary. We are also still waiting to get the Mac version to be released. The Mac version was originally scheduled to be released in Fall 2007. It is now Spring 2008 and we are just starting beta testing.
2-Review or tutorial?
This essay is not meant to be a review. As the title implies (An Introduction and Tutorial) this essay is intended to be an introduction and a tutorial to DxO 5. It is also intended to offer an alternative to the manuals offered by DxO, manuals which, as a reader mentioned, are “dismal.” While I believe it can be useful to anyone, I intended the essay to be a tutorial for current or potential users of DxO 5.
3-Is your essay based on DXO manuals or on personal experience?
It is based on personal experience with DXO 5, from beta versions to version 5.02. I did not read the manuals for the aforementioned reason.
4-The same essay appears on the DXO website. Why?
Because I sent a copy of this essay to DXO so they could make comments on any inaccuracies and for possible use by them. In turn they decided to offer it on their website as a tutorial. Do note that this is a secondary use. The primary use was as an essay to be published on this site as well as made available to my students.
5-Did you receive financial compensation from DxO for writing this essay?
No. As a DxO Master I get a free copy of the software, that’s all. The fact that I am a DxO Master was indicated by Michael in his announcement as well as mentioned by myself in the essay.
6-Gamut clipping indicators
There is no gamut clipping indicators in DXO 5 as of late March 2008. In my essay I inaccurately mentioned that these were available. The reason for that is because when I wrote this essay I noticed the lack of gamut warning indicators. I mentioned it to DxO and was told that this function would be available in the next update (the one currently available). This did not happen and I forgot to revise the essay to that effect prior to publication. Note that the same error is on the downloadable PDF on the DxO site and that no one at DxO pointed out this mistake. Mea culpa and thank you to those who pointed out this error. As an aside I must say that the lack of clipping indicators is a serious shortcoming. Clipping indicators are crucial in determining the exact adjustment for exposure and highlight/shadow recovery and have become standard on just about every raw converter.
7-There is no undo function in DxO
I was not aware of this lack until the essay was published on Luminous-landscape. Why? Simply because I do not use the Undo function in this application or in other raw converters for that matter. When I don’t like a particular effect I simply change the setting using the sliders or other commands rather than undoing what I just did. That is simply the way I work. However, we all have different needs and if you like to use the undo functions during raw conversion please know that this function is not available in the current version of DxO 5.
8- You’ve chosen not to adopt a non-destructive editing, database-driven tool like Lightroom or Aperture for your workflow. What led to that decision in your mind? Do you use only DxO 5 for your raw conversion needs or do you also use other raw converters?
First, all raw converters are non-destructive in the sense that none actually modifies the raw file. Some are advertised as “non destructive” while others are not, but the raw conversion process does not alter the original raw file, regardless of which raw converter is used. Whatever changes you make to the raw file are applied to a new converted image file while the original raw file in left intact.
This being said I actually use several raw converters, the main ones right now being Capture 1 Pro, Lightroom and DxO 5. I also use Raw Developer and Adobe Camera Raw (ACR) though not as often as the first 3. ACR uses the same raw conversion engine and adjustments as Lightroom but does not offer the same capabilities in regards to printing, web galleries, etc.
The reasons for using several raw converters are multiple. First, currently I use both a 1DsMk2 and a P45 digital back. DxO does not support the P45. So to convert P45 files I turn to Lightroom or Capture 1 Pro. Both do a great job but Capture 1 Pro allows me to use custom lens profiles to compensate for magenta –green color shifts that show up with certain lenses. It also rotates P45 previews automatically, which is nice.
In short, I use each converter for what it does best based on the specific needs of each image. I use Lightroom as a database and for its fantastic highlight and shadow recovery, DxO for lens correction, noise removal and color quality Capture one for its speed, conversion quality, noise removal and shadow recovery, Raw Developer for its fine detail and color quality, and so on. Often I will convert the same image in several raw converters, compare the result, and use the conversion I like best. In addition, I work with numerous students 1 on 1 and therefore encounter many different cameras and digital backs, often new models. Not all raw converters offer support for these cameras immediately, making it necessary to se a number of raw converters to guarantee that one of them will support the files we need to convert.
9-Can you batch process in DXO (apply the same settings to multiple files before processing?)
Apparently you cannot apply the same adjustments to multiple images. At least I couldn’t find a way to do so and no one I know of could find a way either. This is a serious shortcoming as I (and many users) regularly apply the same settings to multiple images, especially in regards to white balance.
10-Are the camera/lens based adjustments that DxO applies really that noticeable when viewed at the print sizes that most amateur photographers produce (e.g. up to 18×12)?
I personally think that, yes, the changes are noticeable at that size. However, there is an easy way to verify this for yourself and that is by downloading the trial version and making a side-by-side comparison with images converted both in DxO 5 and in your favorite other raw converter.
11-DxO updates issues
I find the slow updates speed on the Part of DxO particularly frustrating. We shouldn’t have to wait 6 months or more to get a Mac version. We shouldn’t have to wait the same amount of time for proper Windows XP 64 support. Similarly, we shouldn’t have to wait weeks or months for new cameras to be supported. Finally, we should get support for digital backs. After all, DxO does address an audience that wants the finest conversions, and this audience is most likely using digital backs and the latest cameras. While I do understand that the number of digital back users is small in comparison to DSLR users, I do believe that supporting digital backs should be included in DxO 5. I am not sure what causes these delays, but whatever the cause might be they are causing many users to become frustrated and stop using DxO.
12-In closing
In this follow up I tried to address all the issues that were brought up to me. However, if I forgot one of them, or if a new issue comes up, don’t hesitate to email me at[email protected]to report it. While I do not have the power of fixing these issues, I can report them to DxO and ask when a fix will be available. Again, thank you to all who wrote to express satisfaction with this tutorial or to report issues with DxO 5. I appreciate all your emails and feedback.
Alain Briot
April, 2008


Elevate Your Vision


Read this story and all the best stories on The Luminous Landscape
The author has made this story available to Luminous Landscape members only. Upgrade to get instant access to this story and other benefits available only to members.
Why choose us?
Luminous-Landscape is a membership site. Our website contains over 5300 articles on almost every topic, camera, lens and printer you can imagine. Our membership model is simple, just $2 a month ($24.00 USD a year). This $24 gains you access to a wealth of information including all our past and future video tutorials on such topics as Lightroom, Capture One, Printing, file management and dozens of interviews and travel videos.
- New Articles every few days
- All original content found nowhere else on the web
- No Pop Up Google Sense ads – Our advertisers are photo related
- Download/stream video to any device
- NEW videos monthly
- Top well-known photographer contributors
- Posts from industry leaders
- Speciality Photography Workshops
- Mobile device scalable
- Exclusive video interviews
- Special vendor offers for members
- Hands On Product reviews
- FREE – User Forum. One of the most read user forums on the internet
- Access to our community Buy and Sell pages; for members only.
You may also like


