


Handheld Panoramas – Easier Than You Think

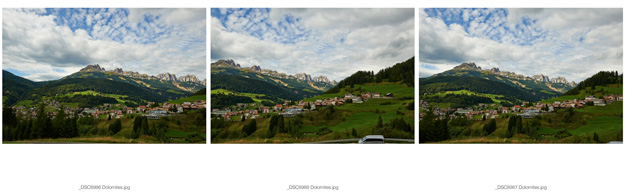
A Stitched Image In The Dolomites and The Three Originals
Panorama photography is nothing new and has been used for as long as there have been pictures. Back in the film days, special panoramic cameras were made. Some had large film areas and special lenses. Others had lenses that panned as film was transported across the frame. When successful, these images were widely admired as they could only be done with specialty cameras – this pretty much meant the regular photo enthusiast could not enjoy this type of photography.


Coronado Hotel, Top Stitched, Bottom with some corrections applied, Handheld – Fuji XT-1
Well, that has all changed with the advent of digital photography. Many smartphones and consumer pocket cameras have a panorama setting on them. Select it and just pan the camera—usually in the direction of a simple arrow—and in a few seconds you have a panorama shot.
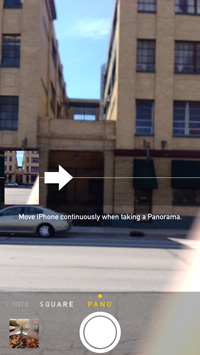

iPhone Screen Shot In Pano Mode and Resulting Image
Many DSLR and mirrorless cameras even have panorama settings. We’ll by-pass those and learn how to shoot panoramas with multiple exposures and then stitch them together in Photoshop.
Let’s get a few things out in the open before we get too deep into this. This article is about doing panos hand-held. There is a whole other practice of shooting panos with a tripod, finding the lens nodal point and leveling the camera. There are also a variety of photo stitching products available other than Photoshop. We will be covering that method of doing panoramas in another article in the not so distant future.
I am sharing this article today because many times on my workshops I discover there are attendees who have never shot a panorama image – because they thought it was too complicated. All too often I see people over-complicating things when it comes to photography. After a short demonstration, these same people are shooting stitched panoramas and discovering the fun and joy of making them. With a few simple basics, you can produce beautiful panos if you are standing on a beach, a mountainside, in front of a building or on a moving platform like a boat or Zodiac. The trick is to just do it – once you know the basics.
WHY
Photographers will shoot panos for three basic reasons. The first, is that you have a subject that will not fit a single frame or you actually need a wide aspect ratio shot. This could be a very wide subject or one that requires a wide field of view such as the image below.

Lava Field Falls in Iceland
The second reason to shoot panos is that you envision an image but need more pixels in order to enlarge it to a bigger size in the final print. In this case, it is not uncommon to shoot a few shots in vertical mode and then stitch them together. When combined, the file size will be bigger and will allow a larger size image to be made. This is very helpful if you are shooting with a 16mp camera such as the Olympus or Fuji micro four thirds cameras or smaller point-and-shoots.

This is a multi row stitch from an Olympus OMD E1, 45 images
Processed at 10 inch long edge – resulting in a 20×44 image size

Final cropped image – Amazing detail (trust me)
The third reason to shoot panos, is that even when shooting with a wide angle lens, you are unable to cover the whole picture. Thus a panorama allows you to shoot sections of a subject’s area and then combine them in software.
HOW
There are few basics for successful panos.
- You must use manual exposure
- Try to keep the camera level during exposures
- Pick a focal length that is not too wide. Try to use a ‘normal’ focal length if possible
- Keep the camera as close to your body’s center point and rotate on your feet
- Leave auto focus on
- If you shoot a scene with people, watch the people as you shoot.
- Avoid things that move within the image: cars
or people passing through.
- Take the shot (sequence) a couple of times. Before each set, stick your hand in front of the lens and shoot an exposure, that way you know where to find the start and end of each sequence.
Now let’s go into a bit of detail on each of the above
Most of us use some type of auto-exposure when taking photos, the most common being auto aperture. So, if I see a scene I’d like to shoot as a panorama, I shoot the scene in individual shots on the “A” setting and review my exposures. I watch my histogram & shutter speeds carefully to determine a good average exposure for the whole scene.
If my aperture was at f/8, I may see a few images at 125 th of a sec, and some at 250 th of a second. Essentially I look at the histograms and try to determine the correct exposure that will not clip shadows or highlights. In this example, let’s say I determine that 250 th at f/8 looks good (kind of an average).
I now set the camera to manual mode and dial in 250 th at f/8. With this manual setting, I shoot a few exposures of the scene to make sure there is nothing blown out in one direction or the other. Learn to read your histogram andmake surethere is no clipping. Now you have you proper exposure. After some practice, you’ll have enough experience to allow you to bypass these steps.
Select your focal length. If possible try to use a focal length that is in the normal lens range for the format you are using or longer. Although you can stitch wide-angle lens images, they tend to treat perspective differently and can give some interesting results.
In order to get greater coverage of the scene (especially in one row panos), turn your camera to the vertical or portrait position,
Now look at the scene through your viewfinder. Many cameras have level indicators in the viewfinder that are excellent for helping you keep the camera level between images. If your camera doesn’t have a level indicator, the trick is to pick out a level or straight feature in your viewfinder, perhaps something on the sides or even the center indicator or grid line. So say you are shooting a building, you might pick a set of window frames that are all in a line as a guide. As you rotate with your camera, make sure the camera’s horizontal reference point is on the same line as your chosen guide. You’ll get the hang of this after a while. If the camera has a level indicator – use it.
Now you are ready to take the exposures. Keep the camera’s vertical axis as close to center as possible. The easiest way is to tuck the camera into your face and looking through the viewfinder, lean back and arch your back just a bit so that the camera has an imaginary center line to your feet. Aim your feet to the left – assuming a left to right pano. Now rotate slowly on your heels to the right. Don’t take any images yet just make sure you have got what I callthe pano shuffledown. Once you have gone through the rotation, be sure you have that horizontal guide to use for leveling and that the subject fits into the viewfinder. It’s time to take the picture.

Leave auto focus on and shoot at a medium f-stop – my favorite when possible is f/8. Some will tell you to turn auto focus off but I advocate leaving it on. Often the objects at the left and right of the frame will be farther away then the center of the subject, thus if you let autofocus find a good spot on the subject, you’ll have everything in focus. This will be even more helpful when we discuss shooting multi-row panos below.
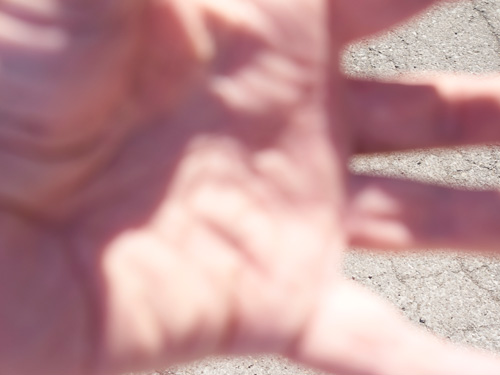
The Hand – Sequence Separator
You are now ready to shoot. Before starting, it is good practice to take a picture of your hand in front of the camera so you know the starting point of the series and then take your sequence of images. Take your time and let autofocus kick in and make sure your camera is level and lined up on your reference point in the viewfinder. Allow for at least 20% overlap of images. Continue shooting until you reach the end of the subject you want to cover. Watch what is in the frame – especially if there is anything moving. Wait until subjects clear the frame if possible. When the sequence is finished take another picture of your hand so you know where the end of the series is.
If you are taking shots that include people, you need to watch a few things. Let’s say you are shooting a building and there are people standing out front. As long as these people are just standing there you should be ok – so go ahead and shoot. However, you want to avoid movement – for instance a person on a bike or someone walking across the scene. As you rotate, they may advance and be in all your frames. Be careful and watch the scene and avoid this if possible.
All the above seems like a lot of steps but once you get the hang of it you’ll be doing it quickly and instinctively.
After some practice you’ll get good at this, plus it is fun to see what the results are. You can shoot from almost any platform. I have done panos from a Zodiac bobbing up and down to shooting from a moving ship.
When In Doubt – Shoot It

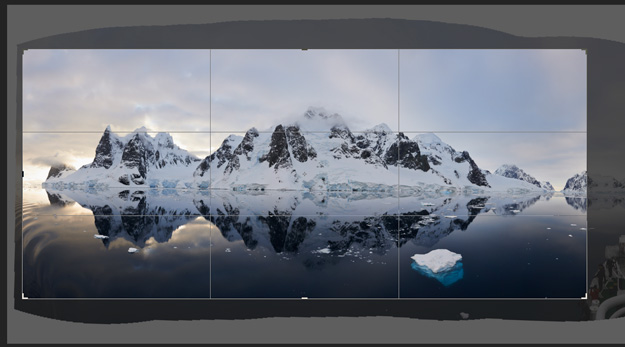
The 18 Images Used To Make The Lemaire Channel Panorama
If you see a scene don’t look at it and say it won’t work. At least take the “I’ll shoot it and see what happens” attitude. This past winter on one our Antarctica trips, we were traveling through the Lemaire channel. This is a spectacular place to shoot and I wanted to see if I could shoot a pano of one side almost 180 degrees showing both ends of the channel. The ship was cruising fairly fast so I got all set as outlined above and started at the left and quickly panned left to right. I did this twice before the ship’s angle no longer allowed me to see both ends. I surprised even myself seeing it work after stitching in Photoshop.
Making The Stitch
The procedure for making panos is really easy – or at least it gets that way after you have done it a few times. I’ll give you my typical workflow below.
First, I shoot all RAW, so I have to import my images into my RAW processor. It’s no secret I use Capture One, however Lightroom or any other software is fine as you’ll be doing the same things no matter what.
After my images are in Capture One, I use the rating part of the software to separate images. While 3, 4 and 5 stars are reserved for individual image edits, I use 1 and 2 stars for Panos and HDRs. So, as I look at my images and find a sequence of images that are from a pano shoot, I give them a 1 star rating. After the initial edits I sort by rating and filter for 1 star images. I now have all the panos from the particular shoot and everything else is tucked way. I select a group of images from the sequence and highlight one of the images.
On the selected image I adjust white balance, exposure, highlight and shadow recovery adjustments, clarity and curves, etc. I DO NOT CROP and I DO NOT DO LAYER ADJUSTMENTS. Once I am happy with this, I copy these settings to the clipboard and apply to all the other selected images. Now all the images have the same adjustments.
While the images are all selected, I process them out to either JPEG or Tiff files. Many times I’ll initially select jpeg, especially if they are large files and I want to check that the stitch will work. I sometimes do a trial stitch with an output of 10 inches on the long edge. Essentially these are smaller files and will be used as proof-of-concept images. This is helpful when you are working with multi-row stitches and upwards of 50 plus files. We’ll cover more of this below. If the stitch works as expected, then you can always reprocess the images and stitch at full size. Of course you may need a pot of coffee as you wait for the stitches to be processed in Photoshop. It tkes some time when stitching 20 Phase One IQ180 files!
The processed images are set to open in Photoshop. When the Process button is hit, the fun begins.
The image above is a contact sheet for the Lemaire Channel pano – all 18 of them.
Once all the images are in Photoshop selectFile > Automate > Photomerge. You’ll get a dialog box. Hit the buttonAdd Open Files. This will bring all the images you just processed into the Photomerge dialog. You make or may not want to check theGeometric Distortion Correction button. ClickOKto begin the process.

This is the add open files dialog box – Check the Geometric Distortion Button.
(sometimes I use this and sometimes not)
After a few minutes or longer – depending on the power of your machine – you’ll get a stitched image on your screen.

This is what it will look like after stitching. You may want to get an idea of how Photoshop managed to do this by clicking on the little eye next to each layer and see what elements of the original image were used to make the final. I find it fascinating how Photoshop decides what parts of a frame to use. It is kind of magic. it works pretty well most of the time even if you have moving water or other motion in the image.
Considering I shot this from a moving boat, it’s not bad. It’s not quite level so lets deal with that now. Before doing anything else I save this image with layers in case we need to come back to it. It will be a rather large file. Once saved, I flatten it. To do this selectLayer > FlattenImage. This will combine all the images on their layers to a single layer.

I now go toImage > Image Rotation > Arbitrary. Here I determine how much rotation and in which direction is needed. You can turn grid lines on to help with this.

Now it’s time to crop. Select the crop you want and apply – Save the image again and re-name it. This way you retain your original with layers if needed again. Sometimes depending on how you crop, the image may have gaps at the corners or top. This is whereContent Aware fill comes in. It’s one of Photoshop’s best features. Use it as needed.
Now it’s time to determine if any final adjustments are needed. I usually open the image using the NIK collection and specifically Viveza. This program allows me to make some last minute selective adjustments until I am satisfied. As a side note, an investment in the NIK plugs-ins is one of the best you can make. I highly recommend this set of filters. With this image, I evened out the sky, enhanced the sunrise a bit and did some selective adjustments to the overall denisty.

That’s essentially it. But there are few more things you can do. Let’s look at some more examples.
I was in the Dolomites shooting some magnificent mountains. As I stood on an overlook looking at the mountain seen below, it looked way too massive to shoot – even with a wide angle lens. So, I decided to shoot a multi-row stitched shot. For this grouping, rather than set the camera in the typical vertical arrangement I used horizontal orientation.

I shot 54 images for this shot. I made sure to leave a lot of excess on each side as well as top and bottom when shooting.
I followed the same procedure as above and ended up with the stitched picture seen below. This was shot with a Nikon D8000e and I enjoyed a cup of coffee while the stitching was going on in Photoshop. The new stitched image was huge and full of incredible detail.

This what I was presented with. Pretty cool just to think you could do something like this. Because I used auto-focus the foreground all the way back to the mountain is tack sharp.

I flattened and cropped the image and now wanted to fix the distortion caused by the curvature of the stitch. For this I selected the image using theMarquee tool. From there I went toEdit > Transform > Warp. By pulling on handles, selecting lines and so forth you can begin to make corrections to the image. This part takes some getting used to and you may have to try several variations. Once you have done it a few times you’ll know what handles to pull as well as what points to move around.
Once the curvature corrections were made, I saved the image. This time I used two Nik programs to make my final image. First I selected HDRefx and used the single image option selection. I made a selection from presets and then adjusted to my liking. Then I used Viveza for some final touch ups and saved the image.

This Is The Final Result, 54 images, Shot Handheld, Stitched In Photoshop
There are a number of different ways stitching can be accomplished. This is my way. I could have made the image a smart object before editing. I sometimes also use other programs like PTgui to do my stitching. But we will cover more of this and other methods in a subsequent article coming soon.
Sometimes no matter how hard you try, you end up with gaps or corners that need to be fixed. I use content aware fill much of the time to fix these gaps and I will show more in the next article on this.
For now, go out and try doing some handheld panos. The more you do, the better you get. Two of my best images hanging in my studio/gallery are panos. The detail is astounding and I love to watch people enjoy the images (44×72 inches). They stand back and look at the photo and slowly walk up to it until they are looking at blades of grass or leaves on a tree or other small details in the image. I coin thisimmersive imaging, as the view immerses the observer in the viewing experience.

A Nine Image Stitch Shot In Iceland With a Phase One IQ180

The Dolomites – 5 Image Stitch

Who Said Panos Had To Be Horizontal? They work in Vertical format too
Published May 2014


Elevate Your Vision


Read this story and all the best stories on The Luminous Landscape
The author has made this story available to Luminous Landscape members only. Upgrade to get instant access to this story and other benefits available only to members.
Why choose us?
Luminous-Landscape is a membership site. Our website contains over 5300 articles on almost every topic, camera, lens and printer you can imagine. Our membership model is simple, just $2 a month ($24.00 USD a year). This $24 gains you access to a wealth of information including all our past and future video tutorials on such topics as Lightroom, Capture One, Printing, file management and dozens of interviews and travel videos.
- New Articles every few days
- All original content found nowhere else on the web
- No Pop Up Google Sense ads – Our advertisers are photo related
- Download/stream video to any device
- NEW videos monthly
- Top well-known photographer contributors
- Posts from industry leaders
- Speciality Photography Workshops
- Mobile device scalable
- Exclusive video interviews
- Special vendor offers for members
- Hands On Product reviews
- FREE – User Forum. One of the most read user forums on the internet
- Access to our community Buy and Sell pages; for members only.
You may also like


