


Let’s Get Ripped — Again
This review is of ImagePrint 6.0 for Mac OSX, which started to ship in early June, 2004. At the same time support for the newEpson 4000printer was added. ImagePrint 6 for Windows XP will be available later in July.
Because my priorImagePrint 5.5review contained quite a bit of background information on RIPs in general I have used some of that material as background in this review as well.
What’s New?
This review is in two parts. This first section is for current users of Imageprint who want to know what changes they can expect if they decide to upgrade to ImagePrint 6. The second section below, beginning withHistory Lessonis a full stand-alone review of IP 6 for those who are either not familiar with what a RIP is, or with this specific product.
New Features
—Integrated Image Browser: There is now a file browser that can display all image types recognized by IP. But, it’s found under theViewmenu, rather thanFile. It seems a bit strange to me to have a two different file browsing windows, one for file names only and the other for file names and images, and to have them located in different places.
—Preserve Transparency Levels in PSD Files: Transparent files (such as a logo) can now be overlayed on opaque files within IP
—Undo/ Redo: As it says, but only by one step in each direction.
—Multipage Support: If you are laying out a multi-page document new pages will be automatically created and filled as needed.
—Nudge Images: Images in layouts can be moved in small increments with the arrow keys.
—Image Grouping: Groups of images can be moved and resized together.
—Movement Locking: When moving files on a page they can be constrained to left/right and up/down
—Rotate Templates:Templates can be rotated 90 degrees.
—New Layout Modes: Automatically layout images with pre-defined spacing and sizes, or create your own.
—Annotation: Annotations such as file name, date, etc can be added beneath images
—Colorized B&W: Grayscale images can be printed with coloured highlights
—Improved Tint Picker: greater control over tinting grayscale images
—Rebuild Layouts:old jobs can be reloaded from the spooler and reedited.
— Improved Installation: Installation and licensing now done in one window
—Improved Color Correction Tools: Applies to RBG and also CMYK images
—Print to TIFF: Create a fully colour managed printable version of your files.
— The PDF user manual is new and re-written
A History Lesson
Back before Windows (remember DOS?) every program had to have its own printer driver. Each piece of software that you owned had to know how to talk the printer directly, and had to be aware of the idiosyncrasies of each brand and model of printer. With Windows though, the operating system takes care of all the dirty work. Well, maybenot quiteall.
When dealing with graphics, such as photographic images, each printer manufacturer provides special software (a printer driver) that is able to deal with handling ink and layout management, and also the conversion of bitmapped images (Photoshopfiles, for example) into an invisible dithered pattern of dots on paper.Photoshopin its turn deals with image size, orientation, and talking to the printer driver, which in turn spools the image to disk prior to printing so that your computer and you are free to move on to other tasks more quickly. Add to this system-level colour management and printer profiles, and you can see that there is a long chain of software that weaves between the operating system, the printer driver, the application software, and various other ancillary programs. Whew! It’s amazing that all of this works together, and that high quality prints can be produced. (Those who end up pulling their hair out trying to get good prints often have run afoul of incompatibilities within this nasty thread of interlinked programs, where it’s often impossible to tell where the problem actually lies).
It’s therefore not surprising that more people have problems with printing than with any other aspect of image processing workflow in photography today. Let one setting in one program or aspect of the chain go awry and ugly prints result, and users start losing their hair and drinking heavily on the long road to finding a solution.
Is there an answer to this problem. Yes, there is, and it’s called a RIP.

Dawn on Lake Muskoka — May, 2004
Just Imagine
Now, imagine that instead of this complex and sometimes recalcitrant network of programs that carry your precious image from being bits on a disk to a print worthy of exhibition you could have just one program, written by one company, that did the whole thing — page layout, colour management, profiling integration, driving the printer, and spooling. Imagine simply drag-and-dropping an image into this program and having it able to produce superb prints without the voodoo that’s usually necessary. Imagine being able to say —I want 1 – 5X7" and 6 – 4X5" prints of the same shot, and please lay them out on a large piece of paper optimizing paper using.Imagine having dozens of extremely high quality printing profiles for almost every possible combination of ink and paper type, and when new ones come along being able to download them for free.
Sound like science fiction, or maybe a dream? Well it exists, and it’s called a RIP.
So, What’s a RIP?
RIP is an acronym standing forRasterImageProcessor. You may recall that a TV image is created when an electron gun scans back and forth 30 times a second, painting the image on the screen’s phosphors. This is called a raster scan. Why then is a super-integrated program for printing images called a RIP. Beats me. There’s obviously some historical connection, but it’s lost in the depths of computing history. (Oh, OK — if you think you really know the reason, go ahead a write. But it really isn’t that important).
Regardless of what it’s called, a RIP is simply a program that does everything needed to print your image, and it does it in a highly integrated manner. Or at least the latest RIP fromColorByte Softwaredoes. It’s calledImageprint 6, and it is available for Epson 1270, 1280,1290, 2100, 2200, 4000, 5000, 5500, 9000, 9500, 9600, 10000 and 10,600. Roland FJ Series and HP Designjet printers are also supported, as are Iris printers. Postscript as well as raster versions are available.
Prices for non-Postscript versions range from USD $495 for Epson’s smaller desktop printers like the 2200, to $895 for the new Epson 4000, and between $1,500 and $2,500 for the larger Epson wide-format printers.
Seems like a lot of money for a printer driver, and for some it will be. But, what a printer driver!
Plug in Your Dongle
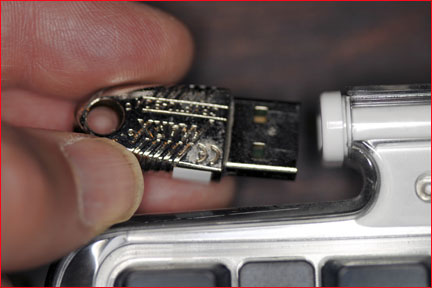
Fig. 1— Dongle key.
Shown here being plugged into the keyboard USB port on a Mac
Imageprint 6 is heavily copy protected. It requires that you download and enter a special numeric key once the software is installed on your computer, and that you also place a small hardware key (dongle) into an available USB port on your computer. The software will not operate without this key. Your should read the information on theColorByteweb site to be sure that you understand how the software will integrate into your hardware environment and workflow, and what the cost of upgrades may be down the line if you change printers.
Don’t be turned off by this though. Almost every high-end RIP on the market works in a similar fashion. Just be informed before you make your purchase, so that there are no surprises down the road.
If you are upgrading from an early version of ImagePrint, such as version 5.5, I strongly recommend that you uninstall it before installing version 6. I didn’t, and suffered through a frustrating day of installation problems until ColorByte’s excellent support staff helped me figure out what the problem was.
RIPn’ Right Along
Imageprint 6 runs on a Mac, and only under OS X. (A windows XP version will be available some time in July, 2004).
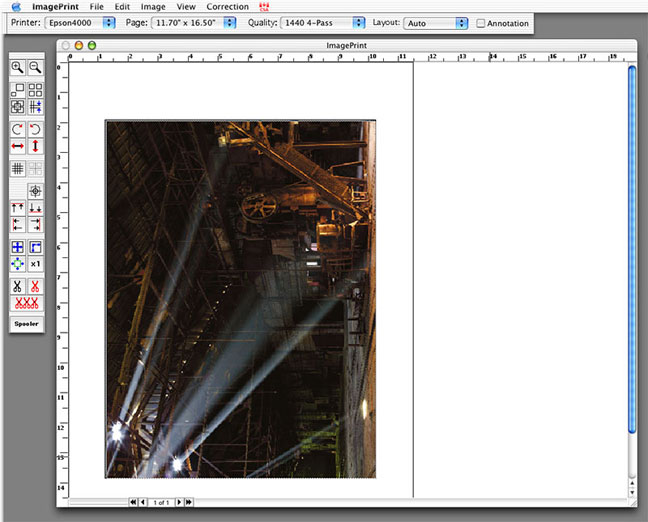
Fig. 2
Above in Fig. 2 is a screen shot showing the full working environment consisting of a layout screen, tool palette and printer control bar. The tool icons are mostly obvious in their functions. The first thing that one does is to bring a file to be printed into Imageprint. You can do this through the usualFile / Opencommand menus, by using the new graphical file browser or simply by dragging and dropping a file onto the program icon or open screen. Once there you can rotate it, enlarge or shrink it, duplicate or otherwise manipulate the image on the visual layout. Multiple images can be similarly loaded and oriented on the page.
If you look at Fig. 2 above you’ll see that the photograph is within a rectangular space on the left of the screen. This space is the relative paper size that you’ll be printing on. The space to the right of this is a holding space. Any images there are not printed, but can be held there for addition to the printing window at any time. (This is why you want a wide aspect ratio Mac Cinemadisplay!or a least a second monitor)
Colour Management
One of the great strengths of ImagePrint is that it is a highly colour managed environment. The first place to start is in setting it up so that your monitor profile is in the appropriate directory. (If you have not profiled your monitor, stop here. There’s no point in using a program like this unless your monitor has been properly profiled with a spider).
Profiles — We’ve got Profiles
The menu where you set your printer profile is the heart of ImagePrint’s ability to produce stunning prints. It will lead you to ahugeselection of profiles for your selected printer, as seen in a partial list below in Fig. 3. There are profiles for virtually every imaginable combination of paper and ink, including many third party papers. And if this isn’t enough, there are more added regularly to the ColorByte web site as they are produced.
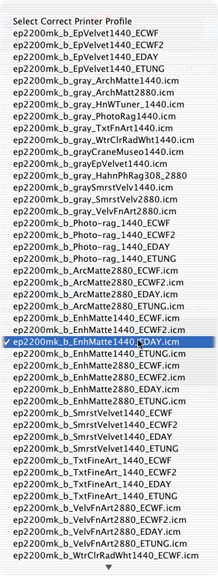
Fig. 3 Printer Profiles
It’s important to realize that these are not your everyday run-of-the-mill profiles. These are about as good as a profile can get, with rich open shadows and accurate colours. You could spend thousands of dollars having someone make this many high-end profiles for you, and at least hundreds making just a handful for the papers that you use most often. This is why ImagePrint, though the price starts at $500, is such a bargain for anyone who wants and needs to do their printing with accurate profiles, and who like to try many different papers.
I have produced profiles myself using aSpectrocamspectrophotometer and high-end profiling software. I have also had printing profiles made for me by others using similar and even higher-end systems. None have been as good as those provided by colorbyte for Imageprint.
Prior to the Epson 4000 the profiles provided with Imageprint were clearly superior to those from Epson. But now with the Epson 4000 their profiles appear to my eye to be comparable to those from Colorbyte. In either words, both are excellent. One can argue, as Colorbyte does, that their profiles are technically superior, but at the end of the day Epson’s look very good as well. Also, Epson’s profiles are just for their own inks and papers. Other than that you’re on your own and the costs would start adding up for every new paper that you need to support with a new profile.
As new papers come to market ColorByte puts profiles on their site for downloading (these only work with Imageprint) and I’ve been told that you can even ask ColorByte to create profiles for other papers if they don’t already exist.
The program can also use third party profiles (though why you’d want to, I’m not sure), but they don’t integrate with all of the features of the program. For example, if you are using an ImagePrint profile that is speced for 1400 PPI printing and you have the program set for another resolution the profile will automatically change this to prevent a mismatch. Nice!
Here’s the main point on profiles — profile quality isn’t the only reason to consider a RIP. For example, the 4000 ships with profiles for its own papers. But Imageprint provides profiles for all of these in versions fordaylight,tungsten illuminationandcool white flourescents. Colorbyte also makes available profiles for a large number of third-party papers. Add to this its superior B&W printing capability and layout strengths, and the fact that Epson is now catching up in profile quality should not factor too large in your planning if a RIP is what you need.
Monochrome Printing

Bent Birch — May, 2004. Algonquin Park
Canon 1ds with 70-300mm f/5.6 DO IS
Possibly the greatest benefit to some Imageprint users will be its ability to printabsolutely neutralmonochrome prints. Beautiful B&W prints with no metamerism. Quite amazing. There are a series of profiles available for most of the major papers that have the word "gray" in them. These are the profiles that allow you to make beautiful monochrome prints.
In my opinion ImagePrint is capable of creating the most neutral B&W prints that I’ve ever seen from an inkjet printer, including those that use special monochrome inks. Believe it or not these rival traditional chemical prints in their tonal range and richness. And if you want to achieve custom tonalities you can using a very sophisticated mixer whihc is provided for separate highlight and shadow toning.
Speak to Me
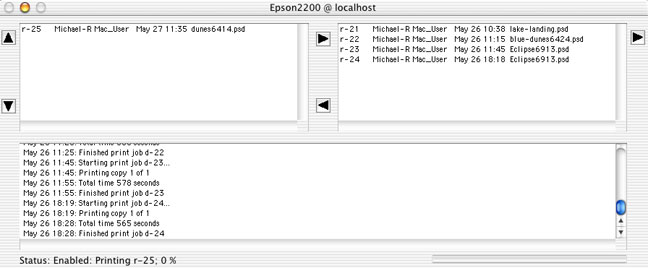
Fig. 6 SpoolFace
One of the only annoyances that I found with Imageprint is that it consists of two separate programs,ImagePrintitself and the spoolerSpoolFace. This is an issue, because once the file is sent to Spoolface, ImagePrint is unaware of what’s going on. To the newcomer this can be disconcerting and confusing because if the spooler or printer gets stalled or hung up (out of ink, for example) you have no way of knowing from the ImagePrint interface what’s going on. I therefore now make it a habit to have Spoolface open on my desktop so that I can see what it’s doing, and with IP 6 there is now a Spooler button at the bottom the toolbar to assist you in accessing it. The program also provides an audio signal when the job has been passed to the spooler to remind you to have a loot over there.
This stand alone print spooler is a powerful tool. It allows you to print multiple jobs and queue them up. If you think a later job should take priority you can drag it to the front of the queue so that it prints next. If you have ImagePrint running on multiple computers they can each send print jobs to the computer that has a dongle plugged into it and that is running SpoolFace, and you can then prioritize these as well. In a production environment, like a photographic studio, this is a very powerful tool.
My ongoing complaint with the spooler is that it can find itself in a state where the printer isn’t printing, and it isn’t immediately obvious what the problem might be. The first place to look at is under theQueuedrop-down to see if it saysDisableorEnable. It may very well find itself disabled because of a printer connection or status problem, and you won’t know why.
ImagePrint is unaware of the ink status of the printer, so you’ll need to keep an eye on the LCD display of a 4000, or the flashing lights on a 2200 to know when inks are running low.
Autoprint
Autoprint is a utility provided with IP 6 that will be of use to many photographers and studios. With it you simply drag images into a designatedHot Folderon your hard disk and then based on your preferred settings the program will automatically print your layouts. As each page is filled Autoprint automatically sends the files to the spooler for printing. This can provide a busy studio with huge productivity gains.
Conclusion
If you’ve read this far it’s because you’re likely interested in what a RIP can do for you. Though seemingly pricey, ImagePrint 6.0 is one of the most "affordable" high-end RIPs that I’ve seen, and if you own one of the current Epson desktop printers and desire high quality colour prints, tremendous printing versatility and the most neutral monochrome prints, then this could well be what you’ve been looking for. Fine art printers will want it for its image quality and layout control. B&W printers will want it for its unsurpassed monochrome prints and busy studios will want it for its productivity features. Many will simply take advantage of all of these. In a word — Imageprint 6 is strongly recommended.


Elevate Your Vision


Read this story and all the best stories on The Luminous Landscape
The author has made this story available to Luminous Landscape members only. Upgrade to get instant access to this story and other benefits available only to members.
Why choose us?
Luminous-Landscape is a membership site. Our website contains over 5300 articles on almost every topic, camera, lens and printer you can imagine. Our membership model is simple, just $2 a month ($24.00 USD a year). This $24 gains you access to a wealth of information including all our past and future video tutorials on such topics as Lightroom, Capture One, Printing, file management and dozens of interviews and travel videos.
- New Articles every few days
- All original content found nowhere else on the web
- No Pop Up Google Sense ads – Our advertisers are photo related
- Download/stream video to any device
- NEW videos monthly
- Top well-known photographer contributors
- Posts from industry leaders
- Speciality Photography Workshops
- Mobile device scalable
- Exclusive video interviews
- Special vendor offers for members
- Hands On Product reviews
- FREE – User Forum. One of the most read user forums on the internet
- Access to our community Buy and Sell pages; for members only.
You may also like


