Click Logo Above to Find Out About
The Luminous Landscape Lightroom V1.0 Hi-Res Download
Video Tutorial – With Michael Reichmann & Jeff Schewe
Regular readers know that I have been involved with Adobe Lightroom as an alpha and beta tester for some time. I have produced several video tutorials on the program, and this site saw a number of beta-related Lightroom articles during 2006.
Now, with the launch of Lightroom V1.0, together with video producer Chris Sanderson and Adobe Photoshop guru Jeff Schewe, I have producedan in-depth multi-hour video tutorial on Lightroom.
In addition, this page will feature, from time to time, miscellaneous tips on how to get the most from Lightroom. It is not intended as a regular column – simply a place for me to provide some insights about the program, its use, and related topics.
Needless to say, all of this is not because of any commercial relationship with Adobe, but simply because I found the concept, and then the execution of Lightroom, to offer the photographer (me, initially) a set of superbly designed tools for accomplishing the tasks needed when working with digital files.
__________________________________________________________
Current Workflow
One of the most common questions asked about V1.0 of Lightroom is – how does it integrate into my own current workflow? There are obviously different approaches to integrating Lightroom with other programs, especially Photoshop, but here’s what currently works best for me.
Firstly, one of Lightroom V1.0’s major drawbacks is its limited sharpening capability. My approach is to turn off sharpening in Develop, and if I use Lightroom for printing (which I frequently do, since it features a very powerful print layout capability) I turn of sharpening there as well. Instead, I usePhotokit Sharpener‘s Input and print sharpening from within Photoshop.
There have been some subtle rumours and hints that an enhanced sharpening capability will appear in a future version of Lightroom. As the politicians say – I can neither confirm nor deny those rumours, but I for one hope that this is the case sooner rather than later.
The other major failing for me at the moment is that soft proofing isn’t available in Lightroom’s Print module. Soft proofing isn’t always necessary, but it sure is nice to have, and when it is needed, there’s no way to do without it. But since a round trip to Photoshop is currently necessary for sharpening anyhow (and noise reduction sometimesas well), this is what I do.
Within Lightroom, once I have completed all global corrections to the raw file, as well as spotting, I useCMD / CTRL Eto export the file to Photoshop. In Photoshop, If the file needs it I first do noise reduction with theNoisewareplug-in. Otherwise, or next, I do aLocal Contrast Enhancement(most of the time), and thenInput SharpeningwithPhotokit Sharpener(always).
Unless I then need to do any work with Layers or Masks I’m pretty much done in Photoshop. I save the file back to Lightroom for general use, such as the web, and as a master archive file. But before exiting Photoshop I select my favourite paper type’s profile and soft proof the image. If it requires any adjustment I do these, size the image for printing, and then save to Lightroom again, but only after doing anOutput Sharpen. I name this file accordingly, such asGreat-Shot-18X22-matte.
Back in Lightroom I now have three files, or at least three versions of the file; the raw with my Lightroom corrections, the Photoshop processed version with sharpening, noise reduction and local contrast enhancement, and finally a print versions that’s been soft proofed, colour corrected for printing if needed, sized, and output sharpened for my anticipated final print.
I stack the files in Lightroom, but first save virtual copies to Lightroom "Collections" namedPhotoshopedandPrint Files. Since Collections are virtual and therefore take up no space, I can freely use them. The two new Photoshop files do of course take up additional disk space, but at under $1 / GB, it isn’t a big concern.
In future I can always access my edited raw file, my Photoshopped file, or my Print file either as part of the Stack, or from their Collections. When I want to make a print, I can do so from within Lightroom, and similarly when I want to task a file for use on the web, or some other output application I have a choice of which conversion to use.
Of course I’ll be very happy when Lightroom has proper sharpening, local contrast enhancement, and soft proofing included – at which point I won’t need to go into Photoshop as often. But in the meantime this is a somewhat time and disk space consuming routine, but still manageable, and offering all of the advantages of working in Lightroom.
When Lightroom also adds database merging, all will be right with the world.
__________________________________________________________
Bringing it all Back Home
Here’s the problem. You’ve just come back from a shoot. You created a separate Lightroom Library on your portable hard drive and worked on your files in the field. You’d love to now merge your shoot’s Library with the main one on your desktop hard drive, but you can’t. At least not until Adobe ships an update that includes library merging (probably in the second quarter of ’07). In fact, you may have several different shoots and libraries on a number of portable drives with edited files on them and now want to move the damn things to another drive, free up space, reuse the drives and move on. How to do it?
Managing multiple libraries has already been covered in the tutorial immediately below. But how about the ability to integrate the files from separate libraries into one new one while maintaining your edits and ranking? It’s possible a couple of different ways. Here then is how to do it.
The first way to do it is to export the files in your Library to DNG. Lightroom’s DNG exports contain most of the information about what you’ve done in Lightroom, including ranking, keywords, and all raw file adjustments. Just select All files, go toFile / Export Photos, and then select DNG. Once these have been created in a new directory on another hard drive, for example, just create a new Library on that drive and Import the DNG files from their current location. The only major thing that’s missing from the files will be the edit History list. An additional advantage of exporting DNG’s (as opposed to using XMP sidecars, as described immediately below) is that Virtual Copies are retained.
The second approach is to create XMP sidecar files. These are small text files that contain all of the metadata generated by Lightroom concerning your files. Select all files, and then from the Library Module go toMetadata / XMP / Export XMP to File. Just as with exported DNG files just about everything that you’ve done in Lightroom will be included in the XMP sidecar. If you now create a new Lightroom Library and Import the files from their previous or a new location, the XMP’s which now exist in the same directory will come along and will be loaded by Lightroom automatically.
While we have to wait for Lightroom V1.1 so that multiple libraries can be easily merged into one monster database either of these suggested approaches allows you to manage one large database and import files and almost all of their Lightroom-altered attributes into a single database now.
__________________________________________________________
__________________________________________________________
Managing Multiple Libraries
Lightroom V 1.0 has as its most visible difference from products that have come before, such as Photoshop, Camera Raw, and Bridge, that it is built around the concept of a database. Files are not browsed, but rather are cataloged and indexed in a variety of ways, so that they can subsequently be raw processed as well as printed, and turned into slide shows or web galleries.
The database approach also allows for highly flexible file organization, involving key-wording and the ability to group and categorize image files by an almost unlimited number of parameters. And because files only need to exist once, in one place, yet can be included invirtualform in numerous groupings and categories, a highly efficient means of storing and organizing ones thousands of proliferating files is now possible.
There is an Achilles heel to Lightroom V1.0 though. It is that there can only be one database in use by the program at any one time. This wouldn’t be a problem if separate databases could be merged. But they can’t – at least not in V1.0
But why would you want to do this? Simply because in addition to being a library for all of your image files, Lightroom as also a raw converter, image processor, and file sorter and organizer. This means that it is a tool that one will use in the field on a laptop as well as in the office or studio. So then, what do you do when you get back home? You can have a Lightroom Library on your laptop containing the images from your shoot in Hawaii last week, but how do you merge that Library with the one on your main system?
The answer is that you can’t. At least not yet. In a beta in late 2006 Adobe did have the ability to merge Libraries, but it was decided before the launch of V1.0 that the code and processing was not robust enough, and so the merging of libraries was removed, to be added in a future update to the program – likely V1.1. So, what to do?
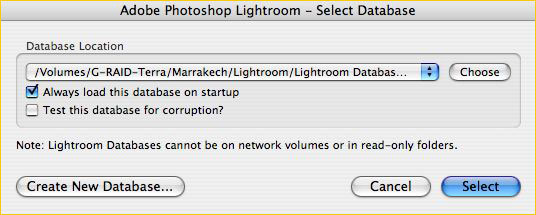
My approach is to treat this as a different way of working, with its own benefits. Though there can only be one database in use at a time, you can have as many separate Lightroom databases as one wishes. Preferences can be set in the program so that every time Lightroom is launched it will ask which Library to use. (Hold down Alt / Option during launch). Simply point to the Library that you wish, and that session with the program will use it.
What I therefore do is that every time I travel with my laptop I create a new Library, and place it in a master directory, called, for example,Hawaii. In that directory I also put all of my transferred raw files and test processed files. I work on the files in the field, and then when back home transfer the master directoryHawaii, which contains all of my files from that shoot, including that Lightroom Library, onto my permanent storage hard drive. When I need to work with those files I simply point Lightroom to theHawaiiLibrary in its new location.
The only trick needed when one transfers files from one drive to another is to inform Lightroom of the file’s new location. The first time you start to work with a file and the Library can’t find it, it will ask you to point to it. Do so, and the program will then automatically find all of the others in the same Library.
At some point in the future, maybe in V1.1, Lightroom will allow you to merge separate databases into one. When this happens all of the separate Libraries that you have created till then will be able to be consolidated. Indeed, you will still be able to keep them as separate entities as well as having them in one giant master database. The best of both worlds.
__________________________________________________________
"All my Selects have disappeared"
The first time this happened to me I couldn’t figure out for some time why my Selects weren’t visible. The concept ofSelectsisn’t new to Lightroom, though it may be to photographers who haven’t become used to working with a DAM (Digital Asset Management)application. In Lightroom you have the ability to tag images in a number of different ways. You can set any file as having one to five Stars, or tag it as being associated with any of five different "Colours". In addition, an image can be set as a "Pick" or a "Reject".
A wedding photographer might, for example, set all pictures containing the bride as "blue", any with the groom as "red", and so forth. Then they can also be ranked in terms of goodness on a scale of 1 to 5. It’s all up to you.
Lightroom also provides several means of sorting these Selects, and the one that can get you into trouble is the filter control at the lower right of the Library panel. Use is fairly intuitive. Just click on a Star or Colour and only images that have been tagged that way appear. But there’s more. Next to the stars there’s a selector for "and higher", "and lower", and "only".

These too are fairly intuitive, but are also the potential source of a "gottcha".
I frequently use "Only" to just show the shots that are of a certain ranking, such as 3 Star selects. When you then turn off the 3 Star ranking (just click on the third star), all of your shots will reappear, just as you expect they would.
But, do they? What you’ll find is thatallof your selects, whether 3 star, or any other ranking, have disappeared. Why? Because Lightroom has been told to display"only" those images that are unranked. In other words, not having a star ranking is of itself a form of ranking, and Lightroom is therefore obediently displaying all shots that are unranked. In other words, your ranked shots will have all disappeared, displaying only the unranked ones. This may be what you want, but more than likely it isn’t.
The solution is simple. Just click on the on / off toggle to the extreme right of the panel and all ranking will be disabled. Or, alternately, havegreater thanorless thanas your selection, rather than "only".
__________________________________________________________
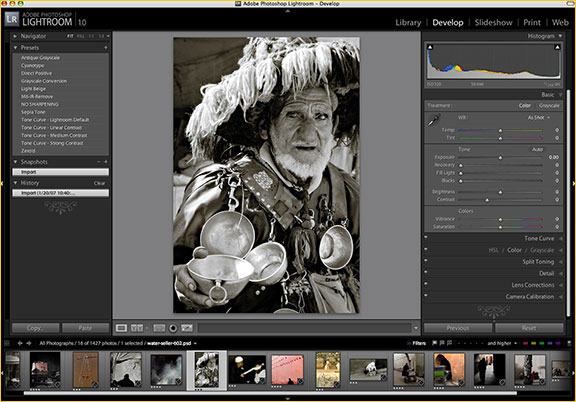
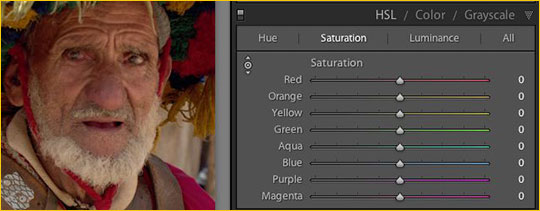
The Targeted Adjustment Tool
There are a number of tools and capabilities in V1.0 that were not seen in the public betas. One of these, which I regard as being among the most powerful tools in Lightroom, is what Adobe calls theTargeted Adjustment Tool, or TAT as I’ll call it from now on.
It is the small bulls eye on the upper left hand section of the Tone Curve, HSL and Grayscale menus. It can be seen below just to the left of the word Saturation, above the sliders.
Click on the above Illustration to play a free streaming Quicktime video tutorial
How it the TAT works is simple. Just click on it and then place the cursor anywhere in the image area which you wish to adjust. Depending on which tool you have selected,Tone Curve,HSLorGrayscale, what the TAT does is allow you to affect just the values of a similar hue, saturation or luminance to those under the cursor. This can be done by holding down the mouse button and dragging upwards or downwards, which acts similarly to moving a vertical slider (though none is visible). Or, the same thing can be accomplished with a greater degree of precision by using the up and down cursor keys.
This is actually easier to demonstrate than it is to explain, so immediately above is a brief streaming video which shows how this works. Give it a try. It’s a most powerful tool.
________________________________________________________________
Learn Lightroom From The Experts
Download The Hi-Res Luminous Landscape Lightroom V1.0 Tutorial
With Michael Reichmann and Jeff Schewe
Beginning Learning Lightroom in-Depth Now!
________________________________________________________________


Elevate Your Vision


Read this story and all the best stories on The Luminous Landscape
The author has made this story available to Luminous Landscape members only. Upgrade to get instant access to this story and other benefits available only to members.
Why choose us?
Luminous-Landscape is a membership site. Our website contains over 5300 articles on almost every topic, camera, lens and printer you can imagine. Our membership model is simple, just $2 a month ($24.00 USD a year). This $24 gains you access to a wealth of information including all our past and future video tutorials on such topics as Lightroom, Capture One, Printing, file management and dozens of interviews and travel videos.
- New Articles every few days
- All original content found nowhere else on the web
- No Pop Up Google Sense ads – Our advertisers are photo related
- Download/stream video to any device
- NEW videos monthly
- Top well-known photographer contributors
- Posts from industry leaders
- Speciality Photography Workshops
- Mobile device scalable
- Exclusive video interviews
- Special vendor offers for members
- Hands On Product reviews
- FREE – User Forum. One of the most read user forums on the internet
- Access to our community Buy and Sell pages; for members only.
You may also like