© 2004, Glenn E. Mitchell II, Ph.D.
The Light’s Right Studio
Have you ever wanted to make an adjustment to an image but limit the effect to just the highlights or the shadows in an image? Photoshop pros know they can press the Option-Command-~ sequence (Alt-Ctrl-~ for Windows users) and Photoshop will grab the highlights in an image and make them into a selection. Invert that selection, and the shadows are selected.
Photoshop uses a very broad definition of highlights: one that reaches well down into the middle tones. For a quick and dirty selection of the brighter portions of an image, Option-Command-~ is helpful. But, what if you need more precise control?
Figure 1.The Coliseum in Rome on a dreary day in March.
Ever take a photograph on a rainy, dreary day? Something like Figure 1 is typical. You end up with lots of contrast but not much information in the middle tones. The result is a flat, boring image.
One solution in this case is to use a tripod and bracket the shots. Take one photograph to hold the sky detail and another to emphasize the shadow detail. Then you can composite the shots later in Adobe Photoshop. That solution takes care of images with wide dynamic range, but there are other instances where we might want to adjust just the middle tones or just the quarter tones. What then?
Figure 2 shows the results of careful adjustments using a set of tone masks for the shadows, three-quarter tones, and middle tones. The image has a lot more “pop” than the raw image in Figure 1. It is a much more pleasing image.
Figure 2.An improved image after corrections with tone masks.
A brief glance at the histogram in Figure 3a reveals that the range of the shadows in the original image needs to be extended to add contrast. The shadows were underexposed. Sliding the tonal curve for the shadows to the left will add contrast. Image detail in the middle tones and quarter tones is almost non-existent in Figure 1, also. The three-quarter tones need to be pulled in the direction of the middle tones to brighten the image. A few of the sky highlights were clipped, so the highlights need to be protected to prevent further clipping as the image is adjusted. The histogram in Figure 3b shows the results of adjusting the image with tone masks that focus on these specific problems.
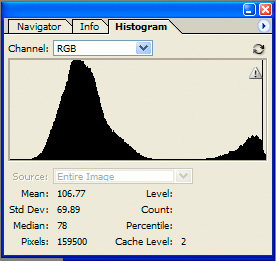
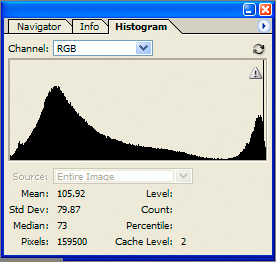
Figures 3a and 3b. The results of applying a series of adjustments using tone masks.
__________________________________________________________________________________________
Building Tone Masks
Each individual color in an image is a unique combination of hue, saturation, and brightness. Tone refers to the brightness component. Tone-based masks select portions of an image based on their relative brightness.
We use the Photoshop Levels and Curves dialogs to make tone adjustments to an image. Levels is a great tool for extending the dynamic range of an image. Curves is the tool of choice for making contrast changes in just one part of the image’s dynamic range.
Both Levels and Curves have their limits. The Photoshop Levels dialog affects the entire image. You cannot limit the effect to say the middle tones or the shadows or the highlights. Curves also have an impact throughout an image, although you can apply different magnitudes of change based on tone.
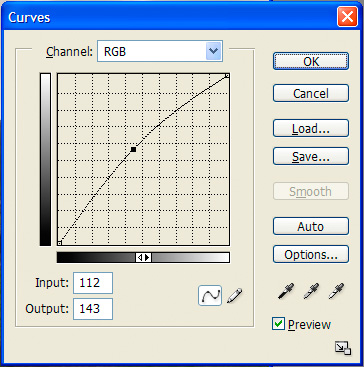

Figures 4a and 4b. Anchors can help, but it is difficult to make extreme changes and keep them limited to a narrow portion of the tonal range for an image.
Tone masks use Curves to generate the masks. Their effects can be limited to very narrow ranges of tone with near-surgical precision. This is much more difficult to accomplish with the Curves dialog alone. Adjusting just one point in the Curves dialog does not affect only those tones; it also affects adjacent tones. (See Figure 4a.) The more extreme the change, the stronger the effect on adjacent tones. Increased numbers of adjacent tones are also affected.
The typical solution is to add a set of anchor points, as in Figure 4b. This keeps the number of affected adjacent tones to a minimum. But there are limits to that solution, also. First, the Curves dialog only supports a small number of points. Second, because we are adjusting a curve, it is possible to get some twists and bends from extreme changes that can cause some of the adjacent tones to posterize or undergo other severe changes.
Tone-based masks allow you to not only apply differing amounts of adjustment along the tonal curve for an image, they allow you to determine whether any adjustment is applied at all. You can, for example, limit Hue/Saturation change to the middle tones or apply a different combination of hue, saturation, and lightness values to the shadows than the middle tones.
Making a tone mask starts with a channel that captures just the luminosity for the image. You have several options.
• One technique is to duplicate the current image and convert the duplicate to the L*a*b color model. One of the resulting channels is the “L” or “Lightness” channel. You can then duplicate the channel back to the original image. The duplicate file can then be deleted.
• Another technique is to duplicate the image and then use Image|Mode|Grayscale to make a monochrome image that averages the luminosity of the RGB values for each pixel. You can copy the “Gray” channel from the duplicate back to the original by dragging-and-dropping. The duplicate can then be deleted.
• A third technique is to create a temporary Hue/Saturation or Channel Mixer adjustment layer to convert the image to monochrome. (Image|Mode|Grayscale uses a mixture of 38% Red, 45% Green, and 17% Blue.) The Image|Calculations command can then be used to copy the “Gray” channel for this temporary layer to a new channel. With the luminosity data tucked away in a new alpha channel, the temporary Hue/Saturation or Channel Mixer adjustment layer can be deleted.
• You can also copy the HSB/HSL plug-in from the “Goodies” folder on your Photoshop CS CDs to the Adobe Photoshop Only plug-ins directory. With the plug-in properly installed, you can make a duplicate of the image and then select the HSB/HSL filter under Filter|Other. The Blue channel will be “Brightness” for HSB and “Lightness” for HSL. You can copy the channel back to the original image, renaming it as you copy it. The duplicate file can then be deleted.
Alt-Ctrl-Shift-~ on the PC (Option-Cmd-Shift-~ on the Mac) will select highlights. This creates a selection based on luminosity. You can go to the Channels palette and save the selection as an alpha channel.
If you plan to make more than one tone mask for an image, you should duplicate the new “Luminosity” channel. An Image|Adjust|Curves adjustment is used to isolate the specific tone ranges for each mask.
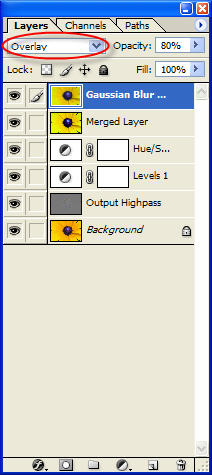
Figure 5.The new “Luminosity” channel, which will be used to construct tone masks.
Figure 6a shows one possible curve for isolating the middle tones in an image. The middle of the curve is pulled to 255 and the extreme right is dropped to 0. This has the effect of creating a grayscale channel where midtone gray is 100% selected. As the tones become progressively stronger or weaker, their selection is reduced until pure black and pure white are reached. They are not selected at all.
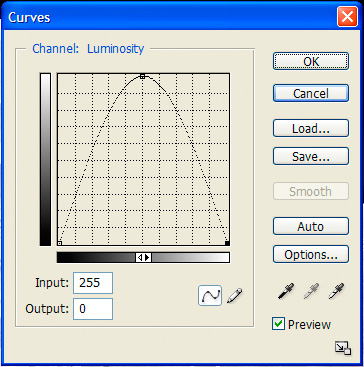
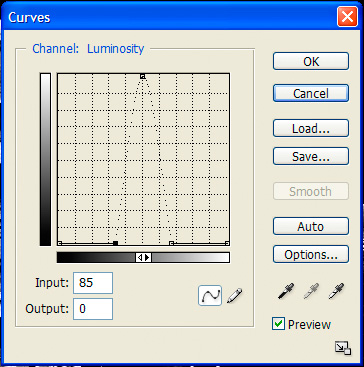
Figures 6a and 6b. Two different curves for masking middle tones in an image.
A second curve for isolating middle tones appears in Figure 6b. Two additional points are used to limit the selection of shadows and highlights. Only the middle tones will be selected, with those closest to 128 having the strongest selection.
Curves can also allow more abrupt transitions. Even a bar is possible by adding one more point at 255, notching out a narrow range with an immediate transition.
The broader curve in Figure 6a generates a mask with more transitional features. The gray tones in Figure 7 are areas of the image – predominantly three-quarter tones and quarter tones – that will be partially selected.
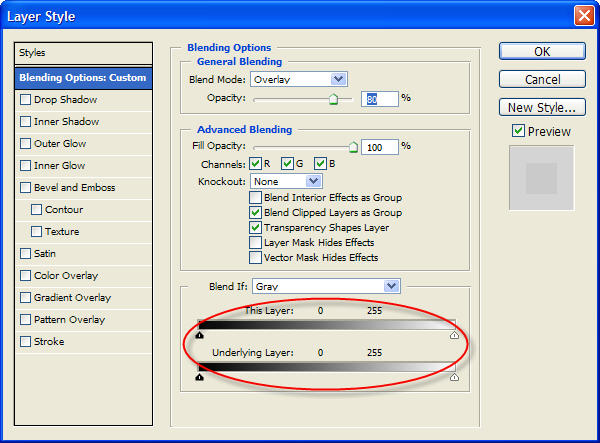
Figure 7.The middle tone mask generated by the Curves adjustment in Figure 6a.
The rule to remember for tone-based maps is, “White reveals, black conceals, and gray reveals and conceals somewhat.” As you adjust the “Luminosity” layer by applying a Curves adjustment, you can watch the effect on your new tone mask and adjust accordingly. In the tone mask in Figure 7, the sky is almost entirely masked out. The few dark gray tones will allow darker features in the sky to a tiny effect but overall the sky is protected from further clipping as we try to brighten the middle tones and quarter tones.
The narrower curve in Figure 6b generates a mask with greater contrast. The middle tones are much more isolated from the three-quarter tones and the quarter tones. Now the sky and the shadows are completely protected for adjustments to the middle tones.
Figure 8.The middle tone mask generated by the Curve adjustment in Figure 6b.
__________________________________________________________________________________________
A Practical Example
Salvaging the image of the Roman Coliseum required separate attention to various tone areas. The layers and channels palettes appear in Figures 9a and 9b.
If your preference is to work non-destructively, then you know that lots of layers means large files. In this case, the file went from a 5.5 MB Canon 10D RAW file to a 226.6 MB Photoshop .PSD master file. The RAM consumed by the file was a whopping 417 MB.
Nearly all of the overhead in this case is the three blend layers. For each blend layer, the “Background” layer was duplicated and a tone mask was applied.
The easiest way to apply a tone mask is to select the Channels palette and then ctrl-click (on a Mac, use cmd-click) on the channel with the mask. This will load the mask as a selection. You can then return to the Layers palette and select Layer | Add Layer Mask | Reveal Selection. If you instead add a new layer, the selection will become a layer mask.
The shadow layer used an overlay blend at 100% opacity, which deepened the shadows. The three-quarter tone layer used a soft light blend at 30% opacity to add contrast. The layer for the middle tones also used a soft light blend to enhance contrast, but the opacity was instead set to 75%.
The three blend layers improved the contrast but left the image rather dark. A gentle “S” curve brightened the entire image. The middle tone mask was used a second time to mask a separate curve adjustment to the middle tones. Again, the curve was a very gentle “S” curve to further brighten the middle tones.
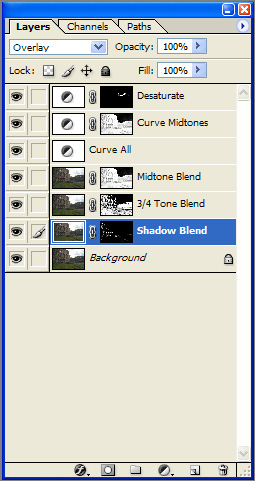
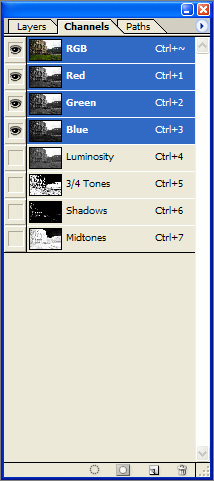
Figures 9a and 9b.Three different tone masks provide separate attention to the tone areas
that lie between the shadows and the middle tones.
The final layer was a Hue/Saturation adjustment layer. The mask in this case was not a tone mask. It was a contour mask that was painted white by hand with the Photoshop brush tool. The layer was used to desaturate some of the edges and finer branches of the trees in the background. Although it would not be evident in these small images, some pixels did not clip entirely, leaving occasional bronze halos. Using an adjustment layer to desaturate rather than the Photoshop sponge tool provides more flexibility, especially if changes are desired in the future.
__________________________________________________________________________________________
Conclusion
Tone-based masks allow you to separate elements of an image, using tones to target areas for change or isolating them from change. They are accomplished by first separating out the luminosity for the image into an alpha channel and then applying a curve to duplicates of the resulting alpha channel in order to confine the masks to specific ranges of tone. The resulting tonal masks can then be used as layer masks for more precise retouching of your digital images. Although the technique requires more effort than Photoshop Curves alone, it can be used to retouch images with difficult contrast or color correction problems. It is also a helpful technique for limiting effects to specific tonal areas, such as removing the effects of noise from shadow areas.
__________________________________________________________________________________________
Glenn E. Mitchell, II(who prefers to be called "Mitch") is an avid photographer and digital printmaker.
His information and gallery website can be seen atwww.thelightsright.com.
You’ll find other tutorials and helpful Photoshop resources there,
including a Photoshop CS action set for tone masks.
__________________________________________________________________________________________
Read this story and all the best stories on The Luminous Landscape
The author has made this story available to Luminous Landscape members only. Upgrade to get instant access to this story and other benefits available only to members.
Why choose us?
Luminous-Landscape is a membership site. Our website contains over 5300 articles on almost every topic, camera, lens and printer you can imagine. Our membership model is simple, just $2 a month ($24.00 USD a year). This $24 gains you access to a wealth of information including all our past and future video tutorials on such topics as Lightroom, Capture One, Printing, file management and dozens of interviews and travel videos.
- New Articles every few days
- All original content found nowhere else on the web
- No Pop Up Google Sense ads – Our advertisers are photo related
- Download/stream video to any device
- NEW videos monthly
- Top well-known photographer contributors
- Posts from industry leaders
- Speciality Photography Workshops
- Mobile device scalable
- Exclusive video interviews
- Special vendor offers for members
- Hands On Product reviews
- FREE – User Forum. One of the most read user forums on the internet
- Access to our community Buy and Sell pages; for members only.


